2016 MINI Hardtop 4 Door buttons
[x] Cancel search: buttonsPage 153 of 251

3. Press button.4."RDS"
HD Radio™ reception
Many stations broadcast both analog and digi‐
tal signals.
License conditions
HD Radio technology manufactured under li‐
cense from iBiquity Digital Corporation. U. S.
and Foreign Patents. HD Radio™ and the HD,
HD Radio, and “Arc” logos are proprietary
trademarks of iBiquity Digital Corp.
Activating/deactivating digital radio
reception
1. "Radio"2."FM" or "AM"3. Press button.4."HD Radio reception"
This symbol is displayed in the status line
when the audio signal is digital.
When setting a station with a digital signal, it
may take a few seconds before the station
plays in digital quality.
Information about HD Radio stations whose
station name ends with ...HD or with ...HD1:
In areas in which the station is not continuously
received in digital mode, the playback switches
between analog and digital reception. In this
case, switch off digital radio reception.
Information about HD Radio multicast stations
whose station name ends
with ...HD2, ...HD3, ...:
In areas in which the station is not continuously
received in digital mode, there may be inter‐
ruptions of the audible signal lasting several
seconds. This depends on the reception.
Displaying additional information
Some stations broadcast additional information
on the current track, such as the name of the
artist.1.Select the desired station.2. Press button.3."Station info"
Stored stations
General information
It is possible to store up to 40 stations.
SymbolMeaning1 ... 40Memory location.FMStations out of the FM waveband.AMStations out of the AM waveband.SATSatellite radio station.
Calling up a station
1. "Radio"2."Presets"3.Select the desired memory location.
Storing a station The station currently selected is stored.
1. "Radio"2."Presets"3."Store station ( )"4.Memory location to be selected.
The stations can also be stored on the Favorites
buttons, refer to page 153.
Programmable memory buttons The first eight locations in the station list corre‐
spond to the assignment of the Favorites keys.
Seite 153RadioENTERTAINMENT153
Online Edition for Part no. 01 40 2 963 307 - VI/15
Page 155 of 251

Selecting channelsYou can only listen to enabled channels.1. "Radio"2."Satellite radio"3.Select categories.4.Select the channel.
The selected channel is stored in the remote
control currently used.
Changing the channel Press button.
Storing a channel
1. "Radio"2."Satellite radio"3.Select the channel.4.Press the right button.5.Select the memory location.
The channels are stored for the remote control
currently used.
The channels can also be stored on the pro‐
grammable memory buttons.
Weather & Traffic jump Traffic and weather information for a selected
region is broadcast every few minutes.
Selecting a region
1. "Radio"2."Satellite radio"3. Press button.4."Set area:"5.Select region.
The region is stored in the remote control cur‐
rently used.
Activating/deactivating the jump
Reception must be guaranteed in order to acti‐
vate or deactivate.1. "Radio"2."Satellite radio"3. Press button.4."Weather & Traffic Jump"
Information for the selected region is broadcast
as soon as it is available.
Information
▷Reception may not be available in some sit‐
uations, such as under certain environmen‐
tal or topographic conditions.▷The signal may not be available in tunnels
or underground garages; next to tall build‐
ings; or near trees, mountains or powerful
sources of radio interference.Seite 155RadioENTERTAINMENT155
Online Edition for Part no. 01 40 2 963 307 - VI/15
Page 156 of 251

MultimediaExternal devices
The concept Various external devices can be connected to
the vehicle. Sound is played back through the
vehicle loudspeakers. The system can be oper‐
ated via the radio, depending on how the ex‐
ternal device is connected to the vehicle.SymbolMeaning AUX-IN port. USB audio interface.
Overview
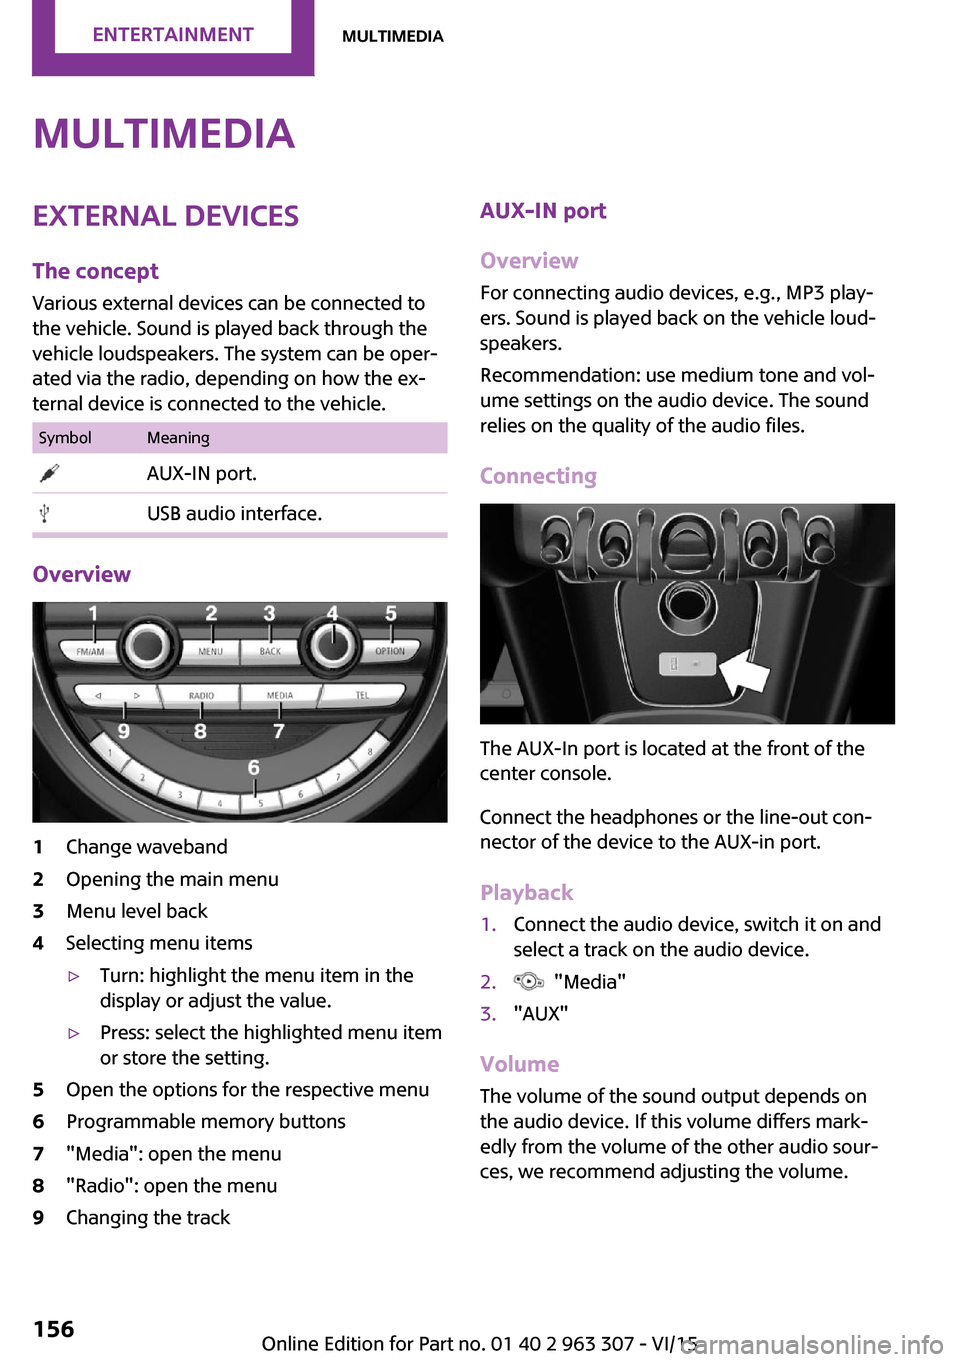
1Change waveband2Opening the main menu3Menu level back4Selecting menu items▷Turn: highlight the menu item in the
display or adjust the value.▷Press: select the highlighted menu item
or store the setting.5Open the options for the respective menu6Programmable memory buttons7"Media": open the menu8"Radio": open the menu9Changing the trackAUX-IN port
Overview
For connecting audio devices, e.g., MP3 play‐
ers. Sound is played back on the vehicle loud‐
speakers.
Recommendation: use medium tone and vol‐
ume settings on the audio device. The sound
relies on the quality of the audio files.
Connecting
The AUX-In port is located at the front of the
center console.
Connect the headphones or the line-out con‐
nector of the device to the AUX-in port.
Playback
1.Connect the audio device, switch it on and
select a track on the audio device.2. "Media"3."AUX"
Volume
The volume of the sound output depends on
the audio device. If this volume differs mark‐
edly from the volume of the other audio sour‐
ces, we recommend adjusting the volume.
Seite 156ENTERTAINMENTMultimedia156
Online Edition for Part no. 01 40 2 963 307 - VI/15
Page 159 of 251

Apple iPod/iPhone port
The USB port is located at the front of the cen‐
ter console.
Use a flexible adapter cable for connecting,
e.g., the original iPod/iPhone adapter cable.
The Apple iPod/iPhone menu structure is sup‐
ported by the USB audio interface.
Track search
Music tracks can searched in various ways.
▷Track from the current playlist.▷Via playlists stored in the iPod/iPhone.▷Via the categories saved for the music
tracks, e.g., type of music, artist, composer,
album, track.▷In the media audio books and podcasts.
Current playback
List of tracks that is currently being played. E. g.
the list of tracks that was found in the track
search or a playlist.
1. "Media"2."USB device"3."Current playback"4.Select the track at which the playback is to
begin.
Playback lists
1. "Media"2."USB device"3."Playlists"4.Select the playback list.5.Select the track at which the playback is to
begin.
Categories
1. "Media"2."USB device"3.Select the category.▷"Genres"▷"Artists"▷"Composers"▷"Albums"▷"Titles"▷"Audio books"▷"Podcasts"4.A-Z search to reduce the list to a beginning
letter to be entered.5.Select the track at which the playback is to
begin.
Changing the track
About the radio:
Press button.
Via the buttons on the steering wheel: Press button.
A reel is made to the previous/next track from
the currently played one.
Fast forward/reverse
About the radio:
Press and hold this button.
Via the buttons on the steering wheel:
Seite 159MultimediaENTERTAINMENT159
Online Edition for Part no. 01 40 2 963 307 - VI/15
Page 164 of 251

Bluetooth hands-free systemVehicle features and op‐
tions
This chapter describes all standard, country-
specific and optional features offered with the
series. It also describes features that are not
necessarily available in your car, e. g., due to
the selected options or country versions. This
also applies to safety-related functions and sys‐
tems. The respectively applicable country provi‐
sions must be observed when using the respec‐
tive features and systems.
The concept Mobile phones can be connected to the vehicle
via Bluetooth. After the mobile phones are
paired once, they are recognized automatically
when the ignition is switched on. As soon as
they are inside the vehicle they can be oper‐
ated via the radio and via the buttons on the
steering wheel.
Information WARNING
Operating the integrated information sys‐
tem and communication devices while driving
can distract from traffic. It is possible to lose
control of the vehicle. There is risk of an acci‐
dent. Only use the systems or devices when the
traffic situation allows. If necessary stop and
use the systems and devices while the vehicle is
stationary. ◀
Certain functions may need to be enabled by
the mobile phone provider or service provider.
At high temperatures, the charge functions of
the mobile phone can be limited under certain
circumstances, and some functions are no lon‐
ger executed.Do not operate a mobile phone that is con‐
nected to the vehicle on the mobile phone key‐
pad, as this may lead to a malfunction.
When the mobile phone is used via the vehicle,
refer to the operating manual of the mobile
phone.
Compatible mobile
phones
Accurate information about which mobile
phones are supported with a Bluetooth inter‐
face is available at www.mini.com/connectivity.
These compatible mobile phones, with a cer‐
tain software version, support the vehicle func‐
tions described below.
Malfunctions may occur with other mobile
phones or software versions.
Displaying the vehicle identification
number and software part number
The vehicle identification number and software
part number are needed to determine which
mobile phones are supported by the mobile
phone installation package. The software ver‐
sion of the mobile phone may also be required.1. "Telephone"2. Press button.3."Bluetooth® info"4."System information"
Pairing/unpairing the
mobile phone
Requirements
▷The mobile phone is compatible.Seite 164COMMUNICATIONBluetooth hands-free system164
Online Edition for Part no. 01 40 2 963 307 - VI/15
Page 246 of 251

J
Jacking points for the vehicle jack 210
Joystick, Steptronic transmis‐ sion 58
Jump-starting 214
K
Key/remote control 22
Keyless Go, see Comfort Ac‐ cess 28
Key Memory, see Personal Profile 24
Kickdown, Steptronic trans‐ mission 58
Knee airbag 82
L
Label on recommended tires 186
Lamp replacement 203
Lamp replacement, front 204
Lamp replacement, rear 206
Lamp replacement, side 209
Language, setting 72
Lashing eyes, securing cargo 140
LATCH child restraint sys‐ tem 47
Launch Control 61
Leather, care 221
LED bug light 204
LED headlights 204
LED ring, central instrument cluster 73
LEDs, light-emitting di‐ odes 203
License Texts and Certifica‐ tions 235
Light 76
Light-alloy wheels, care 222
Light-emitting diodes, LEDs 203 Lighter 125
Lighting 76
Lights and bulbs 203
Light switch 76
Load 140
Loading 139
Lock, door 26
Locking/unlocking via door lock 26
Locking/unlocking with re‐ mote control 24
Locking, automatic 30
Locking, settings 29
Lock, power window 33
Locks, doors, and windows 48
Low beams 76
Low beams, automatic, see High-beam Assistant 78
Lower back support, mechani‐ cal 37
Luggage rack, refer to Roof- mounted luggage rack 140
Lumbar support, mechani‐ cal 37
M
Maintenance 200
Maintenance require‐ ments 200
Maintenance, service require‐ ments 68
Maintenance system, MINI 200
Make-up mirror 125
Malfunction displays, see Check Control 63
Manual air distribu‐ tion 116, 119
Manual air flow 116, 119
Manual mode, transmis‐ sion 59
Manual operation, door lock 26
Manual operation, exterior mirrors 42 Manual operation, fuel filler
flap 174
Manual operation, Park Dis‐ tance Control PDC 110
Manual transmission 58
Manufacturer of the MINI 7
Marking, run-flat tires 187
Master key, see Remote con‐ trol 22
Maximum cooling 118
Maximum speed, display 69
Maximum speed, winter tires 187
Medical kit 214
Menu in instrument cluster 70
Messages, see Check Con‐ trol 63
Microfilter 117, 120
MID - program, driving dy‐ namics 99
MINI maintenance sys‐ tem 200
Minimum tread, tires 185
Mirrors 42
Mobile communication devi‐ ces in the vehicle 137
Mobile phone 164
Mobility System 188
Mode, GREEN Mode 143
Modifications, technical, refer to Own Safety 7
Moisture in headlight 204
Mounting of child restraint systems 46
Multifunction steering wheel, buttons 14
N
Neck restraints, front, see Head restraints 40
Neck restraints, rear, see Head restraints 41
New wheels and tires 186
Nylon rope for tow-starting/ towing 217 Seite 246REFERENCEEverything from A to Z246
Online Edition for Part no. 01 40 2 963 307 - VI/15