2016 MERCEDES-BENZ SPRINTER turn signal
[x] Cancel search: turn signalPage 149 of 290

Lane Keeping Assist does not keep your vehicle
in its lane.
The system may be impaired or may not function
if:
Rif the vehicle is incorrectly loaded
(Ypage 212)
Rthere is poor visibility, e.g. due to insufficient
illumination of the road, or due to snow, rain,
fog or spray
Rthere is glare, e.g. from oncoming traffic, the
sun or reflection from other vehicles (e.g. if
the road surface is wet)
Rthe windshield is dirty, fogged up, damaged or
covered, for instance by a sticker, in the vicin-
ity of the camera
Rno, or several, unclear lane markings are pres-
ent for one lane, e.g. in a construction area
Rthe lane markings are worn away, dark or cov-
ered up, e.g. by dirt or snow
Rthe distance to the vehicle in front is too small
and the lane markings thus cannot be detec-
ted
Rthe lane markings change quickly, e.g. lanes
branch off, cross one another or merge
Rthe road is narrow and winding
Rthere are highly variable shade conditions on
the road
A warning may be given if a front wheel passes
over a lane marking. In addition, a warning tone
sounds and the Ãindicator lamp in the
instrument cluster flashes red.
Activating/deactivating Lane Keeping
Assist
Lane Keeping Assist is automatically activated
when you start the engine.
XTo deactivate: press thejbutton in the
center console (Ypage 35).
On vehicles without steering wheel but-
tons:
OFF
flashes briefly in the display and the Ã
indicator lamp in the instrument cluster
flashes yellow and then lights up continu-
ously.
On vehicles with steering wheel buttons:
The Lane
Keep.AssistDeactivatedmes-
sage appears in the display and the Ã
indicator lamp in the instrument cluster
flashes yellow and then lights up continu-
ously. Lane Keeping Assist is deactivated.
XTo activate:
press thejbutton in the
center console again (Ypage 35).
On vehicles without steering wheel but-
tons:
on
flashes briefly in the display and the Ã
indicator lamp in the instrument cluster goes
out. If a lane marking is detected, the Ã
indicator lamp lights up green.
On vehicles with steering wheel buttons:
The Lane Keep. Assist Activated
mes-
sage appears in the display and the Ã
indicator lamp in the instrument cluster goes
out. If a lane marking is detected, the Ã
indicator lamp lights up green.
Lane Keeping Assist is activated.
A Lane Keeping Assist warning is suppressed if:
Ra driving safety system intervenes, such as
ABS, BAS or ESP®.
Ryou have set the turn signal and a lane change is detected. In this case, the warnings are
suppressed for a certain period of time.
Ryou accelerate hard, e.g. kickdown on vehi-
cles with an automatic transmission.
Ryou brake hard.
Ryou steer actively, e.g. swerve to avoid an
obstacle or change lane quickly.
Ryou cut the corner on a sharp bend.
In order that you are warned only when neces-
sary and in good time if you cross the lane mark-
ing, the system recognizes certain conditions
and warns you accordingly.
Lane Keeping Assist warns you earlier if:
Ryou approach the outer lane marking on a
bend.
Rthe road has very wide lanes, e.g. a freeway.
Rthe system recognizes solid lane markings.
Warnings are given later if:
Rthe road has narrow lanes.
Ryou cut the corner on a bend.
All-wheel drive
Important safety notes
!Never tow the vehicle with one axle raised.
This may damage the transfer case. Damage
of this sort is not covered by the Mercedes-
Benz Limited Warranty. All wheels must
Driving systems147
Driving and parking
Z
Page 178 of 290

Redialing
The on-board computer saves the last names or
numbers dialed in the redial memory.
Using the steering wheel buttons
XUse theVorU button to select the TELmenu.
The display shows the mobile phone opera-
tional readiness symbol.
XPress the6button.
The display shows the most recently dialed
numbers or names in the redial memory.
XPress the 9or: button to select the
desired name or number.
XTo start dialing: press the6button.
The on-board computer dials the correspond-
ing phone number.
When a connection is established, the name
of the other person and/or the call duration
appear in the display.
or
XTo exit the redial memory: press the~
button.
Display messages
Notes on display messages
Important safety notes
GWARNING
No information will be displayed if either the
instrument cluster or the display is inopera-
tive.
As a result, you will not be able to see warning
and indicator lamps or information about the
driving conditions, such as speed or outside
temperature. Driving characteristics may be
impaired. Adjust your driving style and vehicle
speed accordingly.
Contact a qualified specialist workshop
immediately.
GWARNING
If service work is not carried out correctly, the operating safety of your vehicle may be affec-
ted. This could cause you to lose control of
your vehicle and cause an accident. More-
over, the safety systems may no longer be
able to protect you or others as they are
designed to do.
Always have service work carried out at a
qualified specialist workshop.
iIf you turn the key to position 2in the igni-
tion, a display check is performed. All warning
and indicator lamps (except the turn signal
indicator lamps) and the display are activa-
ted. Before starting the journey, check that
the warning and indicator lamps are operating
correctly.
Vehicles without steering wheel but-
tons
Warnings, malfunctions or additional informa-
tion may also be shown in the display. The fol-
lowing tables show all the display messages. A
warning tone sounds with certain display mes-
sages.
Vehicles with steering wheel buttons
The on-board computer shows warnings, mal-
functions or additional information in the dis-
play. A warning tone sounds with certain display
messages. Display messages of a high priority
are shown in red.
Please respond in accordance with the display
messages and follow the additional notes in this Operator's Manual.
You can hide low-priority display messages by
pressing the V,U,9or: button
on the steering wheel or the 9reset button.
You cannot hide display messages of the highest
priority. These messages will continue to be
shown in the display until their cause has been
eliminated.
The on-board computer stores certain display
messages in the message memory
(
Ypage 176).
Message memory
The on-board computer only records and shows
malfunctions and warnings from certain sys-
tems. Therefore, make sure that your vehicle is
safe to use. You could otherwise cause an acci-
dent by driving an unsafe vehicle.
176Display messages
On-board computer and displays
Page 187 of 290

Lights
Display messagesPossible causes/consequences andMSolutions
b
Low beam left
The left-hand low beam is faulty3.
XHalogen headlamps:replace the bulb as soon as possible
(Ypage 87).
XBi-Xenon headlamps: consult a qualified specialist workshop as
soon as possible.
b
Low beam right
The right-hand low-beam headlamp is faulty3.
XHalogen headlamps: replace the bulb as soon as possible
(Ypage 87).
XBi-Xenon headlamps: consult a qualified specialist workshop as
soon as possible.
b
Cornering lt. left
The left-hand cornering light is faulty3.
XReplace the bulb as soon as possible (Ypage 87).
b
Cornering lt. right
The right-hand cornering light is faulty3.
XReplace the bulb as soon as possible (Ypage 87).
b
Lights on auto‐matic. Remove key
The automatic headlamp feature is active: the light switch is in the
à position and you have forgotten to remove the key.
XRemove the key from the ignition lock.
b
Turn signal left
The left-hand turn signal is faulty.
XChange the bulb as soon as possible in the front (Ypage 88) or rear
(Ypage 89) indicator lamp.
b
Turn signal right
The right-hand turn signal is faulty.
XChange the bulb as soon as possible in the front (Ypage 88) or rear
(Ypage 89) indicator lamp.
b
Brake lamp left
The left brake lamp is faulty3.
XReplace the bulb as soon as possible (Ypage 89).
b
Brake lamp right
The right brake lamp is faulty3.
XReplace the bulb as soon as possible (Ypage 89).
b
Third brake lamp
The high-mounted brake lamp is faulty3. This display message will only
appear if all LEDs have failed.
XConsult a qualified specialized workshop as soon as possible.
b
High beam left
The left high-beam headlamp is faulty3.
XReplace the bulb as soon as possible (Ypage 87).
3Depending on the equipment, the bulb-failure indicator may not befeatured for any lamps other than the turn
signals.
Display messages185
On-board computer and displays
Z
Page 188 of 290

Display messagesPossible causes/consequences andMSolutions
b
Highbea mright
The right high beam headlamp is fault y3.
XReplaceth ebulb as soo nas possibl e (Ypage 87).
b
Licenseplate lam p
Alicense plat elamp is fault y3.
XReplaceth ebulb as soo nas possibl e (Ypage 90).
b
Switch off lights
You haveforgotte nto switch off th elights when leaving th evehicle.
XTurn th eligh tswitch to $.
b
Foglampfront lef t
The left-han dfron tfog lamp is faulty.3
XHav eth ebulb replace das soo nas possibl eat aqualified specialist
workshop .
b
Foglampfront right
The right-hand fron tfog lamp is fault y3.
XHaveth ebulb replace das soo nas possibl eat aqualified specialist
workshop .
b
Rearfoglam p
The rear fog lamp is fault y3.
XReplaceth ebulb as soo nas possibl e (Ypage 89).
b
Parkinglam pfrontlef t
The fron tlef tparking lamp/standin glamp is fault y3.
XReplaceth ebulb as soo nas possibl e (Ypage 87).
b
Parkinglam pfrontright
The fron tright parking lamp/standin glamp is fault y3.
XReplaceth ebulb as soo nas possibl e (Ypage 87).
b
Reverselam p
Abackup lamp is fault y3.
XReplaceth ebulb as soo nas possibl e (Ypage 89).
b
Taillam plef t
The left-han dtai llamp is faulty.3
XReplac eth ebulb as soo nas possibl e (Ypage 89).
b
Taillam pright
The right-hand tai llamp is faulty.3
XReplac eth ebulb as soo nas possibl e (Ypage 89).
b
Marker lam p
Aperimete rlamp is faulty.3
XReplac eth ebulb as soo nas possibl e (Ypage 91).
3Dependin gon th eequipment, th ebulb-failure indicato rmay no tbe featured for any lamp sother than th etur n
signals.
186Display messages
On-board computer and displays
Page 205 of 290
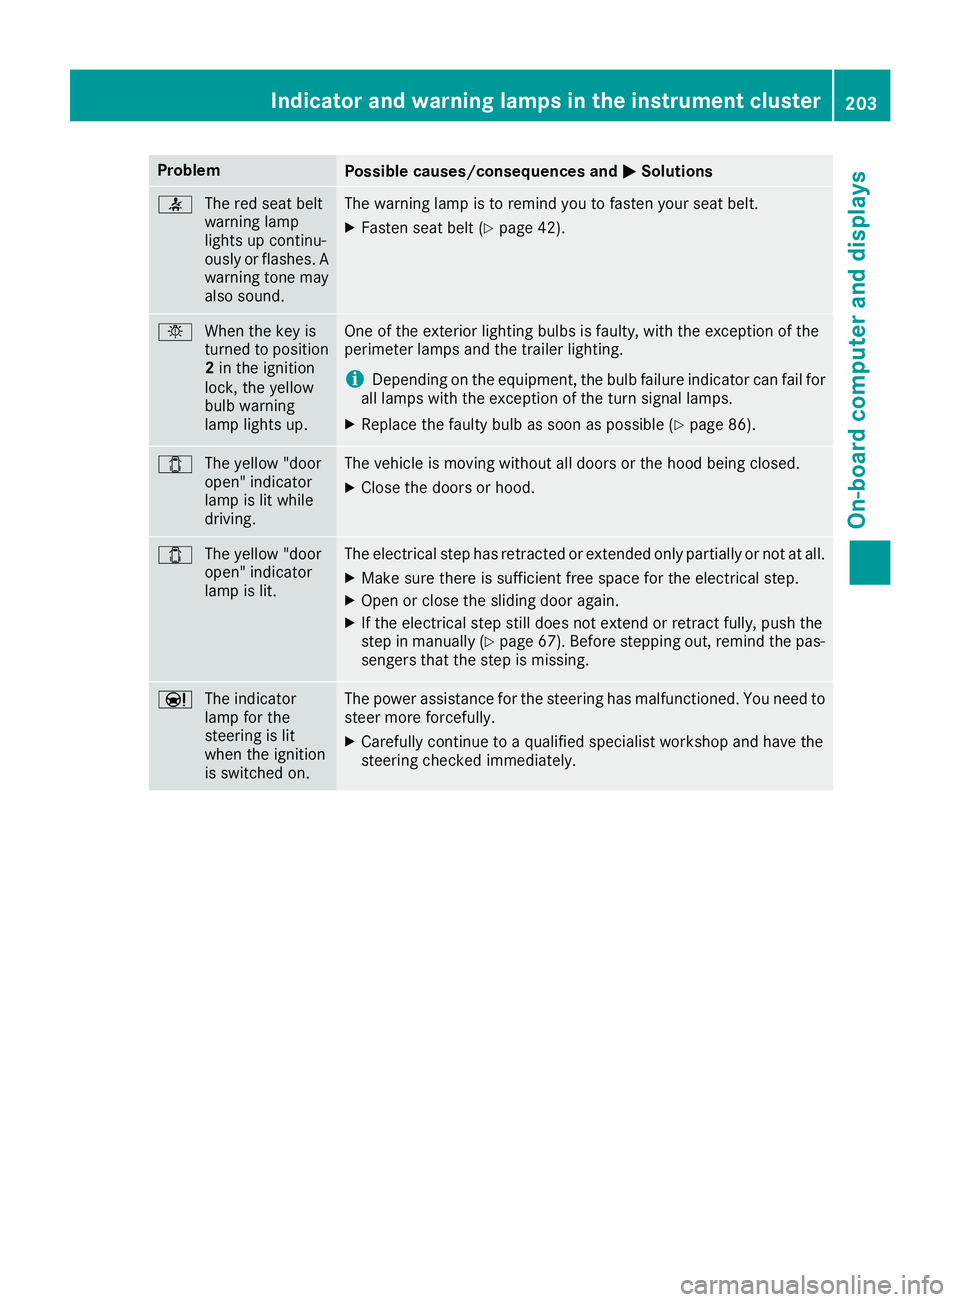
ProblemPossible causes/consequences andMSolutions
7
The red seat belt
warning lamp
lights up continu-
ously or flashes. A
warning tone may
also sound.The warning lamp is to remind you to fasten your seat belt.
XFasten seat belt (Ypage 42).
bWhen the key is
turned to position
2in the ignition
lock, the yellow
bulb warning
lamp lights up.One of the exterior lighting bulbs is faulty, with the exception of the
perimeter lamps and the trailer lighting.
iDepending on the equipment, the bulb failure indicator can fail for
all lamps with the exception of the turn signal lamps.
XReplace the faulty bulb as soon as possible (Ypage 86).
1 The yellow "door
open" indicator
lamp is lit while
driving.The vehicle is moving without all doors or the hood being closed.
XClose the doors or hood.
1The yellow "door
open" indicator
lamp is lit.The electrical step has retracted or extended only partially or not at all.
XMake sure there is sufficient free space for the electrical step.
XOpen or close the sliding door again.
XIf the electrical step still does not extend or retract fully, push the
step in manually (Ypage 67). Before stepping out, remind the pas-
sengers that the step is missing.
Ð The indicator
lamp for the
steering is lit
when the ignition
is switched on.The power assistance for the steering has malfunctioned. You need to
steer more forcefully.
XCarefully continue to a qualified specialist workshop and have the
steering checked immediately.
Indicator and warning lamps in the instrument cluster203
On-board computer and displays
Z
Page 238 of 290

!Do not fold the windshield wipers away from
the windshield unless the hood is closed. Oth-
erwise, you could damage the hood.
!Do not pull the wiper blade. Otherwise, the
wiper blade could be damaged.
!Do not clean wiper blades too often and do
not rub them too hard. Otherwise, the graph-
ite coating could be damaged. This could
cause wiper noise.
!Hold the wiper arm securely when folding
back. The windshield could be damaged if the
wiper arm smacks against it suddenly.
XTurn the key to position 0in the ignition lock
or remove it.
XFold the windshield wiper arms away from the
windshield until you feel them engage.
XCarefully clean the wiper blades with a damp
cloth.
XFold back the wiper arms before switching on
the ignition.
Cleaning the exterior lighting
!Only use cleaning agents or cleaning cloths
which are suitable for plastic light lenses.
Unsuitable cleaning agents or cleaning cloths
could scratch or damage the plastic light len- ses.
XClean the plastic covers of the exterior light-
ing with a damp sponge and a mild cleaning
agent, e.g. car shampoo for Sprinter vehicles,
or with cleaning cloths.
Cleaning the mirror turn signal
!Only use cleaning agents or cleaning cloths
that are suitable for plastic lenses. Unsuitable
cleaning agents or cleaning cloths could
scratch or damage the plastic lenses of the
mirror turn signals.
XClean the plastic lenses of the mirror turn sig-
nals in the exterior mirror housing using a wet
sponge and mild cleaning agent, e.g. car
shampoo or cleaning cloths.
Cleaning the sensors
!Do not use dry, coarse or hard cloths and do
not scrub. You will otherwise scratch or dam-
age the sensors. If you clean the sensors with a power washer
or steam cleaner, observe the information
provided by the manufacturer regarding the
distance to be maintained between the vehi-
cle and the nozzle of the power washer.
PARKTRONIC sensors (example: front bumper, left
side of vehicle)
XClean all sensors :in the front and rear
bumpers with water, shampoo and a soft
cloth.
Cleaning the rear view camera
!Do not use dry, coarse or hard cloths and do
not scrub. Otherwise, you will scratch or dam-
age the lens of the rear-view camera.
If you clean the vehicle with a high-pressure or
steam cleaner, maintain a distance of at least
1.650 cm from the rear-view camera. Do not
aim directly at the rear-view camera or at the
microphone opening on the underside of the
rear-view camera. You could otherwise dam-
age the rear-view camera.
Rear view camera in the middle of the roof above
the high-mounted brake lamp
:
Camera lens
;Microphone openings
236Care
Maintenance and care