2016 MERCEDES-BENZ SL ROADSTER lights
[x] Cancel search: lightsPage 182 of 333

Symbol
;appears. The vehicle height is
adjusted to the raised level.
Adjusting to normal level X
Make sure that the engine is running or that it
has been switched off by the ECO start/stop
function.
X If symbol ;
; is shown: press=or;
on the steering wheel to select the Assist. Assist.
menu.
X Press the 9or: button to select
Vehicle level
Vehicle level.
X Press the abutton.
The following message appears: :Vehicle Vehicle
level Lower with OK
level Lower with OK.
X Press the abutton.
Symbol ;is faded out. The vehicle is adjus-
ted to the normal level.
The "Raised level" setting is cancelled if you:
R drive faster than approximately 120 km/h.
R drive for approximately three minutes at a
speed over 80 km/h.
R or switch to the drive program while the vehi-
cle is in motion.
Suspension settings General notes
The electro-hydraulically controlled suspension
features improved driving dynamics, driving
safety and ride comfort. You can also choose
between a particularly sporty or a comfortable
tuning.
The suspension is continuously adjusted for
each wheel individually and depends on:
R the road surface condition, e.g. bumps
R the vehicle load
R the drive program selected Your selection remains stored even if you
remove the key from the ignition lock.
If the ignition is switched off for less than four
hours, the previously selected setting is activa-
ted when the engine is next started. If the igni-
tion is switched off for more than four hours, the
comfortable setting is activated when the
engine is next started.
Selecting the sporty setting The firmer setting of the suspension tuning in
sports mode ensures even better contact with
the road. Select this mode if you prefer a firmer
suspension setting.
X Make sure that the engine is running or that it
has been switched off by the ECO start/stop
function.
X If indicator lamp ;
; is not lit: press but-
ton :.
Indicator lamp ;lights up. The sports sus-
pension setting is selected.
The AMG Ride Control SPORT AMG Ride Control SPORT message
appears in the multifunction display.
Selecting the comfort setting In comfort mode, the driving characteristics of
your vehicle are more comfortable. Select this Driving systems
179Driving and parking Z
Page 185 of 333
From the:
R sixth segment onwards, you will hear an inter-
mittent warning tone for approximately two
seconds.
R seventh segment onwards, you will hear a
warning tone for approximately two seconds.
This indicates that you have now reached the minimum distance.
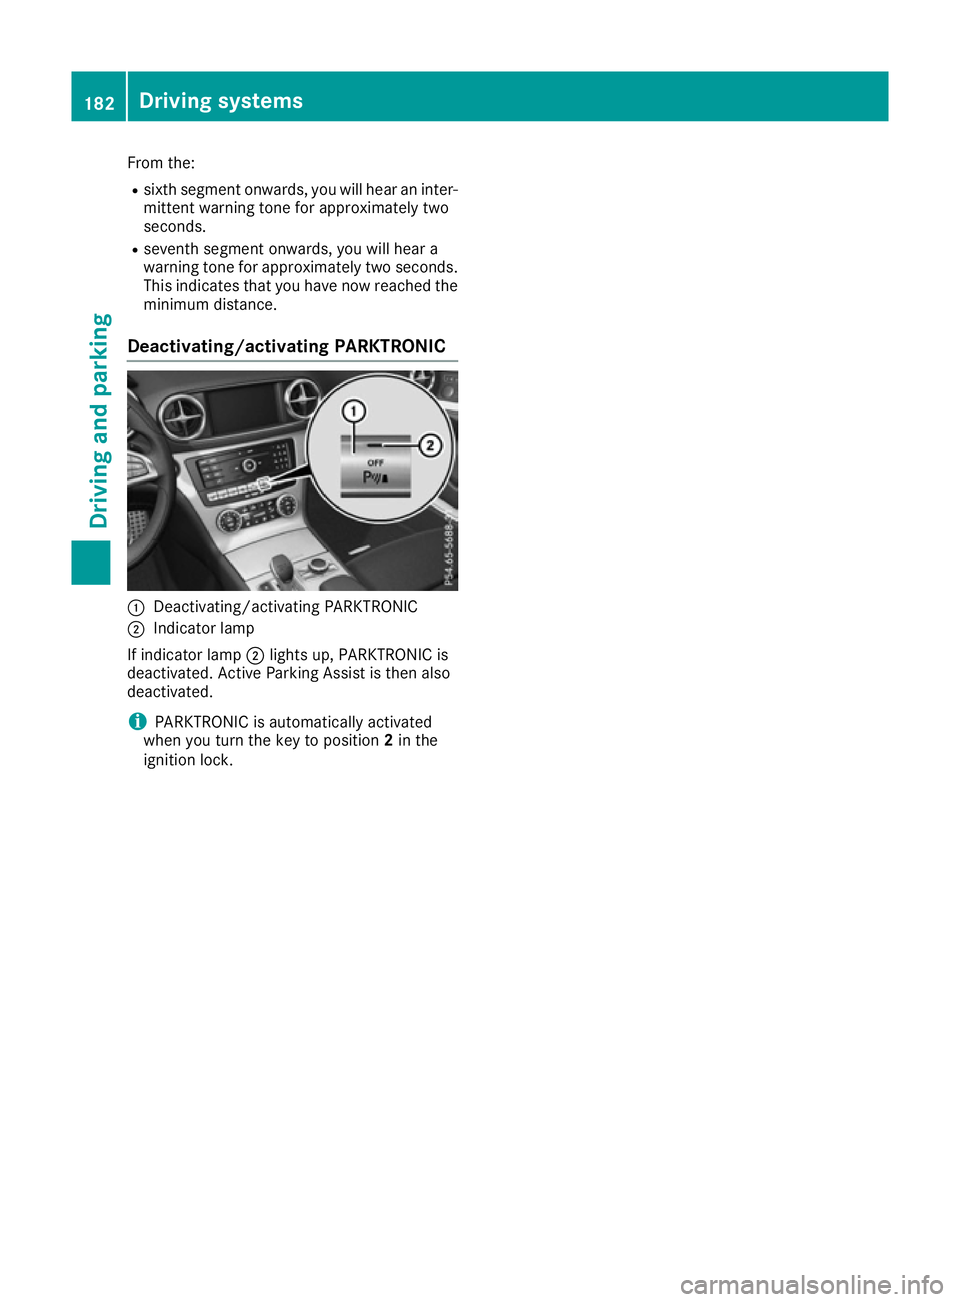
Deactivating/activating PARKTRONIC :
Deactivating/activating PARKTRONIC
; Indicator lamp
If indicator lamp ;lights up, PARKTRONIC is
deactivated. Active Parking Assist is then also
deactivated.
i PARKTRONIC is automatically activated
when you turn the key to position 2in the
ignition lock. 182
Driving systemsDriving and parking
Page 186 of 333
Problems with PARKTRONIC
Problem
Possible causes/consequences and
M
MSolutions Only the red segments in
the PARKTRONIC warn-
ing displays are lit. You
also hear a warning tone
for approximately two
seconds.
PARKTRONIC is deacti-
vated after approx-
imately five seconds,
and the indicator lamp in
the PARKTRONIC button
lights up. PARKTRONIC has malfunctioned and has switched off.
X If problems persist, have PARKTRONIC checked at a qualified spe-
cialist workshop. Only the red segments in
the PARKTRONIC warn-
ing displays are lit.
PARKTRONIC is deacti-
vated after approx-
imately five seconds. The PARKTRONIC sensors are dirty or there is interference.
X
Clean the PARKTRONIC sensors (Y page 285).
X Switch the ignition back on. The problem may be caused by an external source of radio or ultra-
sound waves.
X See if PARKTRONIC functions in a different location. Active Parking Assist
General notes Active Parking Assist is an electronic parking aid
with ultrasound. It measures the road on both
sides of the vehicle. A parking symbol indicates a suitable parking space. Active steering inter-
vention can assist you during manoeuvring and
parking. You may also use PARKTRONIC
(Y page 180).
Important safety notes Active Parking Assist is only an aid. It is not a
substitute for your attention to the immediate
surroundings. The responsibility for safe
manoeuvring and parking remains with you.
Make sure that no persons, animals or objects
are in the manoeuvring range.
When PARKTRONIC is deactivated, Active Park-
ing Assist is also unavailable. G
WARNING
While parking or pulling out of a parking
space, the vehicle swings out and can drive
onto areas of the oncoming lane. This could cause you to collide with other road users.
There is a risk of an accident.
Pay attention to other road users. Stop the
vehicle if necessary or cancel the Active Park-
ing Assist parking procedure.
! If unavoidable, you should drive over obsta-
cles such as kerbs slowly and not at a sharp
angle. Otherwise, you may damage the
wheels or tyres.
Active Parking Assist may also display spaces
not suitable for parking, e.g.: R parking or stopping restrictions
R in front of driveways or entrances and exits
R unsuitable surfaces
Parking tips:
R on narrow roads, drive as closely as possible
past the parking space
R parking spaces that are littered or overgrown
might be identified or measured incorrectly
R parking spaces that are partially occupied by
trailer drawbars might not be identified as
such or be measured incorrectly Driving systems
183Driving and parking Z
Page 189 of 333
parking position can no longer be achieved
from this position.
Exiting a parking space In order that Active Parking Assist can assist you
when exiting the parking space:
R the border of the parking space must be high
enough at the front and the rear. A kerb stone is too small, for example.
R the border of the parking space must not be
too wide, as the position of the vehicle must
not exceed an angle of 45° to the starting
position as it is manoeuvred into the parking
space.
R a manoeuvring distance of at least 1.0 mmust
be available.
Active Parking Assist can only assist you with
exiting a parking space if you have parked the
vehicle parallel to the direction of travel using
Active Parking Assist.
X Start the engine.
X Release the electric parking brake.
X Switch on the turn signal in the direction you
will drive out of the parking space.
X Shift the transmission to position Dor R.
The Start Park Assist? Yes: OK No: Start Park Assist? Yes: OK No:
message appears in the multifunction display
%.
X To cancel the procedure: press the%
button on the multifunction steering wheel or
pull away.
or X To exit a parking space using Active Park-
ing Assist: press theabutton on the mul-
tifunction steering wheel.
The Park Assist active Accelerate
Park Assist active Accelerate
and brake Observe surroundings
and brake Observe surroundings mes-
sage appears in the multifunction display.
X Release the multifunction steering wheel.
X Pull away, being ready to brake at all times. Do
not exceed a maximum speed of approx-
imately 10 km/h when exiting a parking
space. Otherwise, Active Parking Assist will
be cancelled.
X Shift the transmission to position Dor Ras
required or according to the message while
the vehicle is stationary.
Active Parking Assist immediately steers in
the other direction. The Park Assist
Park Assist
active active Accelerate
Accelerate and
andbrake
brake Observe
Observe surroundings
surroundings
message appears in the mul-
tifunction display.
i You will achieve the best results by waiting
for the steering procedure to complete before
pulling away.
If you reverse after activation, the steering
wheel is moved to the straight-ahead posi-
tion.
X Drive forwards and reverse as prompted by
the PARKTRONIC warning displays, several
times if necessary.
Once you have exited the parking space com-
pletely, the steering wheel is moved to the
straight-ahead position. You hear a tone and the
Park
Park Assist Assist switched
switched off
offmessage appears
in the multifunction display. You will then have
to steer and merge into traffic on your own.
PARKTRONIC is still available. You can take over the steering before the vehicle has exited the
parking space completely. This is useful, for
example, when you recognise that it is already
possible to pull out of the parking space.
Cancelling Active Parking Assist You can cancel Active Parking Assist at any
time.
X Stop the movement of the multifunction
steering wheel or steer yourself.
Active Parking Assist will be cancelled at
once. The Park Assist cancelled Park Assist cancelled mes-
sage appears in the multifunction display.
or
X Press the PARKTRONIC button on the centre
console (Y page 182).
PARKTRONIC is switched off and Active Park-
ing Assist is immediately cancelled. The
Park Assist cancelled Park Assist cancelled message appears
in the multifunction display.
Active Parking Assist is cancelled automatically
if:
R parking using Active Parking Assist is no lon-
ger possible
R you are driving faster than 10 km/h
R a wheel spins and ESP ®
intervenes or fails.
The ÷ ESP®
warning lamp lights up in the
instrument cluster.
A warning tone sounds. The parking symbol
goes out and the Park Assist cancelled Park Assist cancelled
message appears in the multifunction display. 186
Driving systemsDriving and pa
rking
Page 197 of 333
Monitoring range
G
WARNING
Active Blind Spot Assist does not detect all
traffic situations and road users. There is a
risk of an accident.
Always make sure that there is sufficient dis-
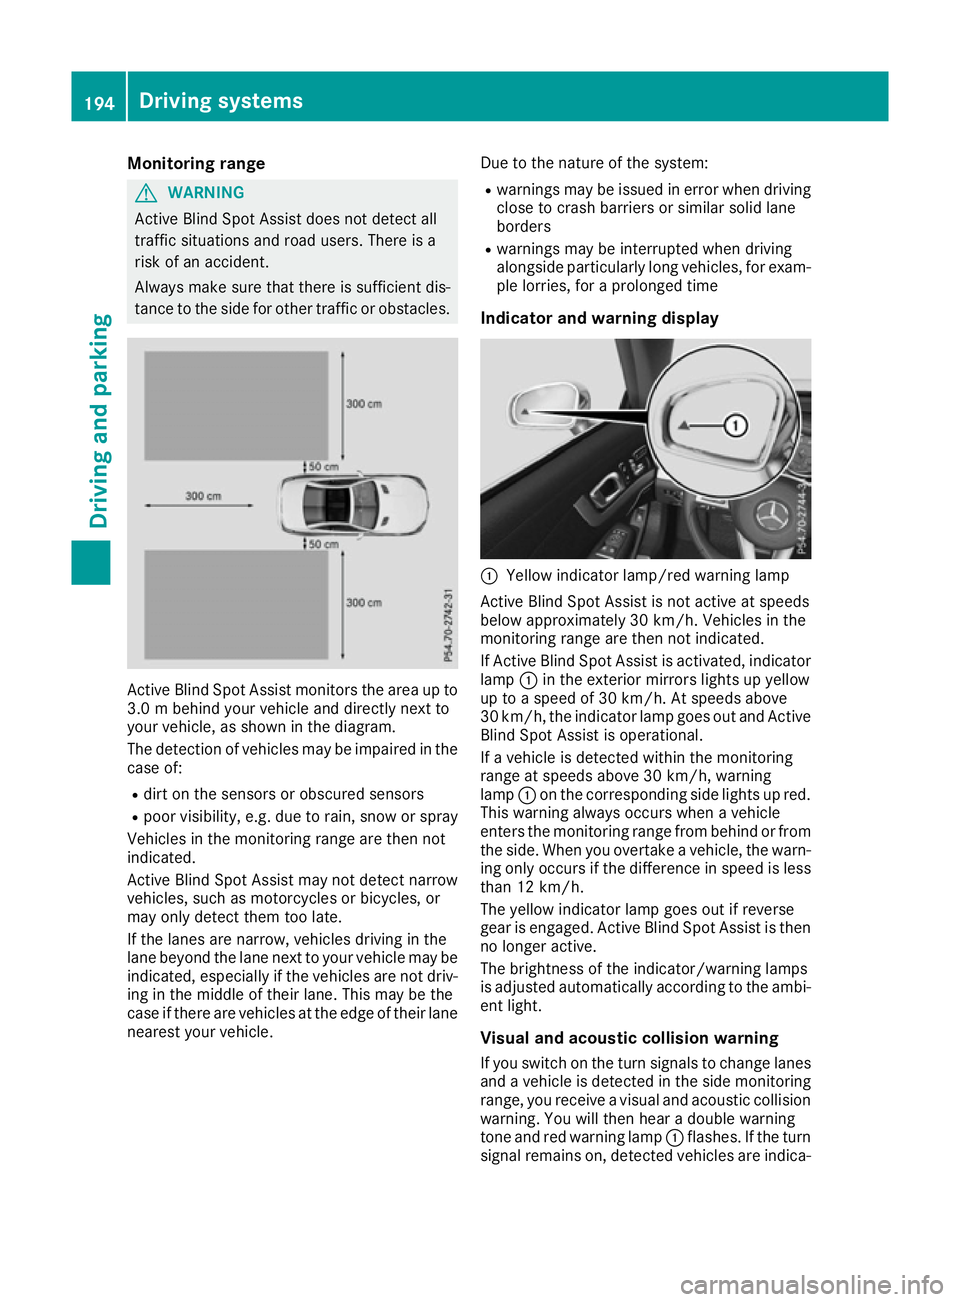
tance to the side for other traffic or obstacles. Active Blind Spot Assist monitors the area up to
3.0 m behind your vehicle and directly next to
your vehicle, as shown in the diagram.
The detection of vehicles may be impaired in the case of:
R dirt on the sensors or obscured sensors
R poor visibility, e.g. due to rain, snow or spray
Vehicles in the monitoring range are then not
indicated.
Active Blind Spot Assist may not detect narrow
vehicles, such as motorcycles or bicycles, or
may only detect them too late.
If the lanes are narrow, vehicles driving in the
lane beyond the lane next to your vehicle may be
indicated, especially if the vehicles are not driv-
ing in the middle of their lane. This may be the
case if there are vehicles at the edge of their lane nearest your vehicle. Due to the nature of the system:
R warnings may be issued in error when driving
close to crash barriers or similar solid lane
borders
R warnings may be interrupted when driving
alongside particularly long vehicles, for exam-
ple lorries, for a prolonged time
Indicator and warning display :
Yellow indicator lamp/red warning lamp
Active Blind Spot Assist is not active at speeds
below approximately 30 km/h. Vehicles in the
monitoring range are then not indicated.
If Active Blind Spot Assist is activated, indicator
lamp :in the exterior mirrors lights up yellow
up to a speed of 30 km/h. At speeds above
30 km/h, the indicator lamp goes out and Active Blind Spot Assist is operational.
If a vehicle is detected within the monitoring
range at speeds above 30 km/h, warning
lamp :on the corresponding side lights up red.
This warning always occurs when a vehicle
enters the monitoring range from behind or from
the side. When you overtake a vehicle, the warn-
ing only occurs if the difference in speed is less
than 12 km/h.
The yellow indicator lamp goes out if reverse
gear is engaged. Active Blind Spot Assist is then no longer active.
The brightness of the indicator/warning lamps
is adjusted automatically according to the ambi-
ent light.
Visual and acoustic collision warning
If you switch on the turn signals to change lanes
and a vehicle is detected in the side monitoring range, you receive a visual and acoustic collision
warning. You will then hear a double warning
tone and red warning lamp :flashes. If the turn
signal remains on, detected vehicles are indica- 194
Driving systemsDriving and parking
Page 212 of 333
Instrument cluster
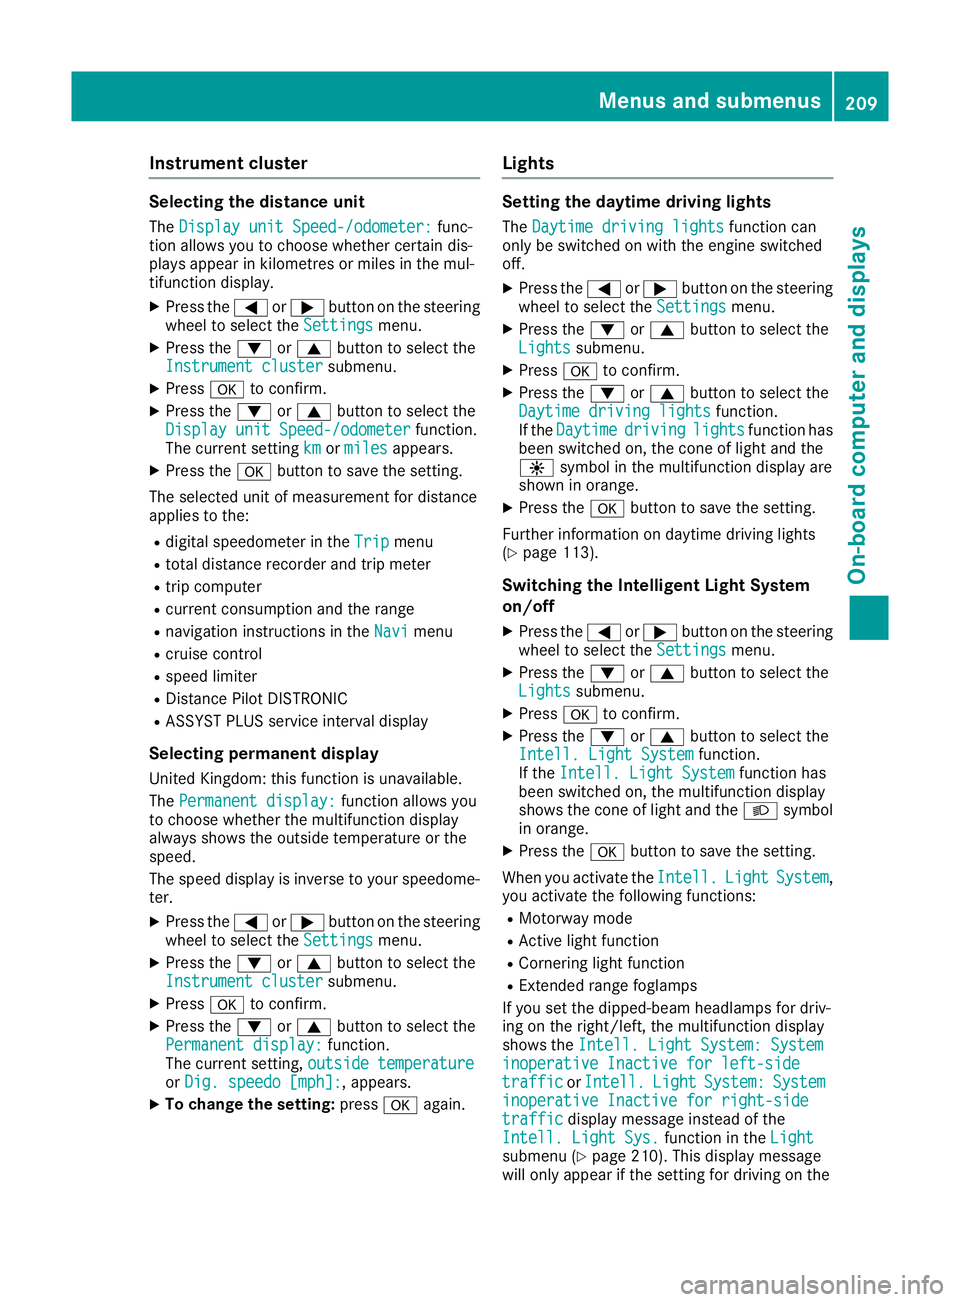
Selecting the distance unit
The Display unit Speed-/odometer:
Display unit Speed-/odometer: func-
tion allows you to choose whether certain dis-
plays appear in kilometres or miles in the mul-
tifunction display.
X Press the =or; button on the steering
wheel to select the Settings Settingsmenu.
X Press the :or9 button to select the
Instrument cluster
Instrument cluster submenu.
X Press ato confirm.
X Press the :or9 button to select the
Display unit Speed-/odometer
Display unit Speed-/odometer function.
The current setting km
km ormiles
miles appears.
X Press the abutton to save the setting.
The selected unit of measurement for distance
applies to the: R digital speedometer in the Trip Tripmenu
R total distance recorder and trip meter
R trip computer
R current consumption and the range
R navigation instructions in the Navi
Navimenu
R cruise control
R speed limiter
R Distance Pilot DISTRONIC
R ASSYST PLUS service interval display
Selecting permanent display United Kingdom: this function is unavailable.
The Permanent display:
Permanent display: function allows you
to choose whether the multifunction display
always shows the outside temperature or the
speed.
The speed display is inverse to your speedome-
ter.
X Press the =or; button on the steering
wheel to select the Settings Settingsmenu.
X Press the :or9 button to select the
Instrument cluster
Instrument cluster submenu.
X Press ato confirm.
X Press the :or9 button to select the
Permanent display:
Permanent display: function.
The current setting, outside temperature
outside temperature
or Dig. speedo [mph]:
Dig. speedo [mph]: , appears.
X To change the setting: pressaagain. Lights Setting the daytime driving lights
The Daytime driving lights
Daytime driving lights function can
only be switched on with the engine switched
off.
X Press the =or; button on the steering
wheel to select the Settings Settingsmenu.
X Press the :or9 button to select the
Lights
Lights submenu.
X Press ato confirm.
X Press the :or9 button to select the
Daytime driving lights
Daytime driving lights function.
If the Daytime
Daytime driving
drivinglights
lightsfunction has
been switched on, the cone of light and the
W symbol in the multifunction display are
shown in orange.
X Press the abutton to save the setting.
Further information on daytime driving lights
(Y page 113).
Switching the Intelligent Light System
on/off
X Press the =or; button on the steering
wheel to select the Settings Settingsmenu.
X Press the :or9 button to select the
Lights
Lights submenu.
X Press ato confirm.
X Press the :or9 button to select the
Intell. Light System
Intell. Light System function.
If the Intell. Light System
Intell. Light System function has
been switched on, the multifunction display
shows the cone of light and the Lsymbol
in orange.
X Press the abutton to save the setting.
When you activate the Intell.
Intell. Light LightSystem
System ,
you activate the following functions:
R Motorway mode
R Active light function
R Cornering light function
R Extended range foglamps
If you set the dipped-beam headlamps for driv-
ing on the right/left, the multifunction display
shows the Intell. Light System: System
Intell. Light System: System
inoperative Inactive for left-side inoperative Inactive for left-side
traffic traffic orIntell.
Intell. Light
LightSystem:
System: System
System
inoperative Inactive for right-side
inoperative Inactive for right-side
traffic
traffic display message instead of the
Intell. Light Sys.
Intell. Light Sys. function in theLight
Light
submenu (Y page 210). This display message
will only appear if the setting for driving on the Menus and submenus
209On-board computer and displays Z
Page 213 of 333
left/right is set opposite to your vehicle's coun-
try version.
Further information on the Intelligent Light Sys-
tem (Y page 115).
Setting the dipped-beam headlamps for
driving on the left/right
You can use this function to switch between
symmetrical and asymmetrical dipped beam
(Y page 113).
X Press the =or; button on the steering
wheel to select the Settings
Settings menu.
X Press the :or9 button to select the
Lights
Lights submenu.
X Press ato confirm.
X Press the :or9 button to select the
Dipped beams Setting for:
Dipped beams Setting for: function.
The current setting Right-side traffic
Right-side traffic or
Left-side traffic Left-side traffic appears.
X Press the abutton to save the setting.
If you change the setting, conversion does not take place until the next time the vehicle is
stationary.
If you set the dipped-beam headlamps for driv-
ing on the right/left, then motorway mode and
the extended range foglamps are unavailable.
These are only deactivated if the setting for driv-
ing on the left/right is set opposite to your vehi-
cle's country version.
A qualified specialist workshop can set the
dipped-beam headlamps for driving on the left/ right.
Setting the brightness of the ambient
lighting
X Press the =or; button on the steering
wheel to select the Settings
Settings menu.
X Press the :or9 button to select the
Lights
Lights submenu.
X Press ato confirm.
X Press the :or9 button to select the
Amb. light +/- Amb. light +/- function.
The current setting appears.
X Press ato confirm.
X Press the :or9 button to adjust the
brightness to any level from Off
OfftoLevel 5
Level 5
(bright).
X Press the aor% button to save the
setting. Setting the ambient lighting colour
X Press the =or; button on the steering
wheel to select the Settings
Settings menu.
X Press the :or9 button to select the
Lights
Lights submenu.
X Press ato confirm.
X Press the :or9 button to select the
Amb. light col.
Amb. light col. function.
X Press ato confirm.
X Press the :or9 button to set the col-
our to SOLAR
SOLAR, SOLAR orange
SOLAR orange orSOLAR red
SOLAR red.
X Press the aor% button to save the
setting.
Activating/deactivating the surround
lighting and exterior lighting delayed
switch-off
X Press the =or; button on the steering
wheel to select the Settings Settingsmenu.
X Press the :or9 button to select the
Lights
Lights submenu.
X Press ato confirm.
X Press :or9 to select the Surround
Surround
lighting
lighting function.
If the Surround
Surround lighting
lightingfunction is activa-
ted, the multifunction display shows the light
cone and the area around the vehicle in
orange.
X Press the abutton to save the setting.
Deactivating delayed switch-off of the exterior
lighting temporarily: X Before leaving the vehicle, turn the key to
position 0in the ignition lock.
X Turn the key to position 2in the ignition lock.
The exterior lighting delayed switch-off is
deactivated.
Delayed switch-off of the exterior lighting is
reactivated the next time you start the engine.
If you have activated the Surround lighting Surround lighting
function and you turn the light switch to Ã,
the following functions are activated when it is
dark:
R surround lighting: the exterior lighting
remains lit for 40 seconds after unlocking
with the key. If you start the engine, the sur-
round lighting is switched off and automatic
headlamp mode is activated (Y page 113).
R exterior lighting delayed switch-off: the
exterior lighting remains lit for 60 seconds
after the engine is switched off. If you close all 210
Menus and submenusOn-board computer and displays
Page 214 of 333
the doors and the boot lid, the exterior lighting
goes off after 15 second s.
Depending on your vehicle's equipment, when
the surround lighting and delayed switch-off
exterior lighting are on, the following light up:
R side lamps
R dipped-beam headlamps
R daytime driving lights
R surround lighting in the exterior mirrors
Activating/deactivating the interior light- ing delayed switch-off
If you activate the Lighting Lightingdelayed
delayedsw.-off
sw.-off
function, the interior lighting remains on for
20 seconds after you remove the key from the
ignition lock.
X Press the =or; button on the steering
wheel to select the Settings
Settingsmenu.
X Press the :or9 button to select the
Lights
Lights submenu.
X Press ato confirm.
X Press the :or9 button to select the
Lighting delayed sw.-off
Lighting delayed sw.-off function.
When the Lighting
Lighting delayed
delayedsw.-off
sw.-offfunc-
tion is activated, the vehicle interior is dis-
played in orange in the multifunction display.
X Press the abutton to save the setting.
Vehicle Setting the permanent speed limiter
X Press the =or; button on the steering
wheel to select the Settings
Settings menu.
X Press the :or9 button to select the
Vehicle Vehicle submenu.
X Press ato confirm.
X Press :or9 to select the Limit
Limit
speed (winter tyres):
speed (winter tyres): function.
The current setting appears.
X Press ato confirm.
X Press the :or9 button to adjust the
permanent speed limiter in increments of ten
(160 km/h 160 km/h to240 km/h
240 km/h). The Off
Offsetting
switches the permanent speed limiter off.
X Press the abutton to store the entry.
Further information on the permanent speed
limiter (Y page 172). Activating/deactivating the automatic
locking feature
If you activate the Automatic door locks Automatic door locks
function, the vehicle is centrally locked above a
speed of approximately 15 km/h.
X Press the =or; button on the steering
wheel to select the Settings Settingsmenu.
X Press the :or9 button to select the
Vehicle
Vehicle submenu.
X Press ato confirm.
X Press the :or9 button to select the
Automatic door locks
Automatic door locks function.
When the Automatic
Automatic door
doorlocks
locks function is
activated, the multifunction display shows the
left-hand vehicle door in orange.
X Press the abutton to save the setting.
Further information on the automatic locking
feature (Y page 84).
Activating/deactivating the acoustic
locking confirmation
If you switch on the Acoustic
Acoustic Lock Lockfunction, an
acoustic signal sounds when you lock the vehi-
cle.
X Press the =or; button on the steering
wheel to select the Settings
Settings menu.
X Press the :or9 button to select the
Vehicle Vehicle submenu.
X Press ato confirm.
X Press the :or9 button to select the
Acoustic Lock
Acoustic Lock function.
If the Acoustic Lock
Acoustic Lock function is activated,
the & symbol in the multifunction display
lights up orange.
X Press the abutton to save the setting.
Comfort Activating/deactivating the EASY-
ENTRY/EXIT feature
G
WARNING
When the EASY-ENTRY/EXIT feature adjusts
the steering wheel, you and other vehicle
occupants – particularly children – could
become trapped. There is a risk of injury.
While the EASY-ENTRY/EXIT feature is mak-
ing adjustments, make sure that no one has Menus and submenus
211On-board computer and displays
Z