2016 MERCEDES-BENZ SL ROADSTER keyless
[x] Cancel search: keylessPage 155 of 333
Do not get into the vehicle again during the refu-
elling process. Otherwise, electrostatic charge
could build up again.
! Do not use diesel to refuel vehicles with a
petrol engine. Do not switch on the ignition if you accidentally refuel with the wrong fuel.
Otherwise, the fuel will enter the fuel system.
Even small amounts of the wrong fuel can
result in damage to the fuel system and the
engine. Notify a qualified specialist workshop
and have the fuel tank and fuel lines drained
completely.
! Overfilling the fuel tank could damage the
fuel system.
! Take care not to spill any fuel on painted
surfaces. You could otherwise damage the
paintwork.
! Use a filter when adding fuel from a fuel can.
The fuel lines and/or the fuel injection system could otherwise be blocked by particles fromthe fuel can.
If you overfill the fuel tank, some fuel may spray
out when you remove the fuel pump nozzle.
Further information on fuel and fuel quality
(Y page 322). Refuelling
General notes The fuel filler flap is unlocked or locked auto-
matically when you unlock or lock the vehicle
with the key or using KEYLESS-GO.
The position of the
8fuel filler cap is dis-
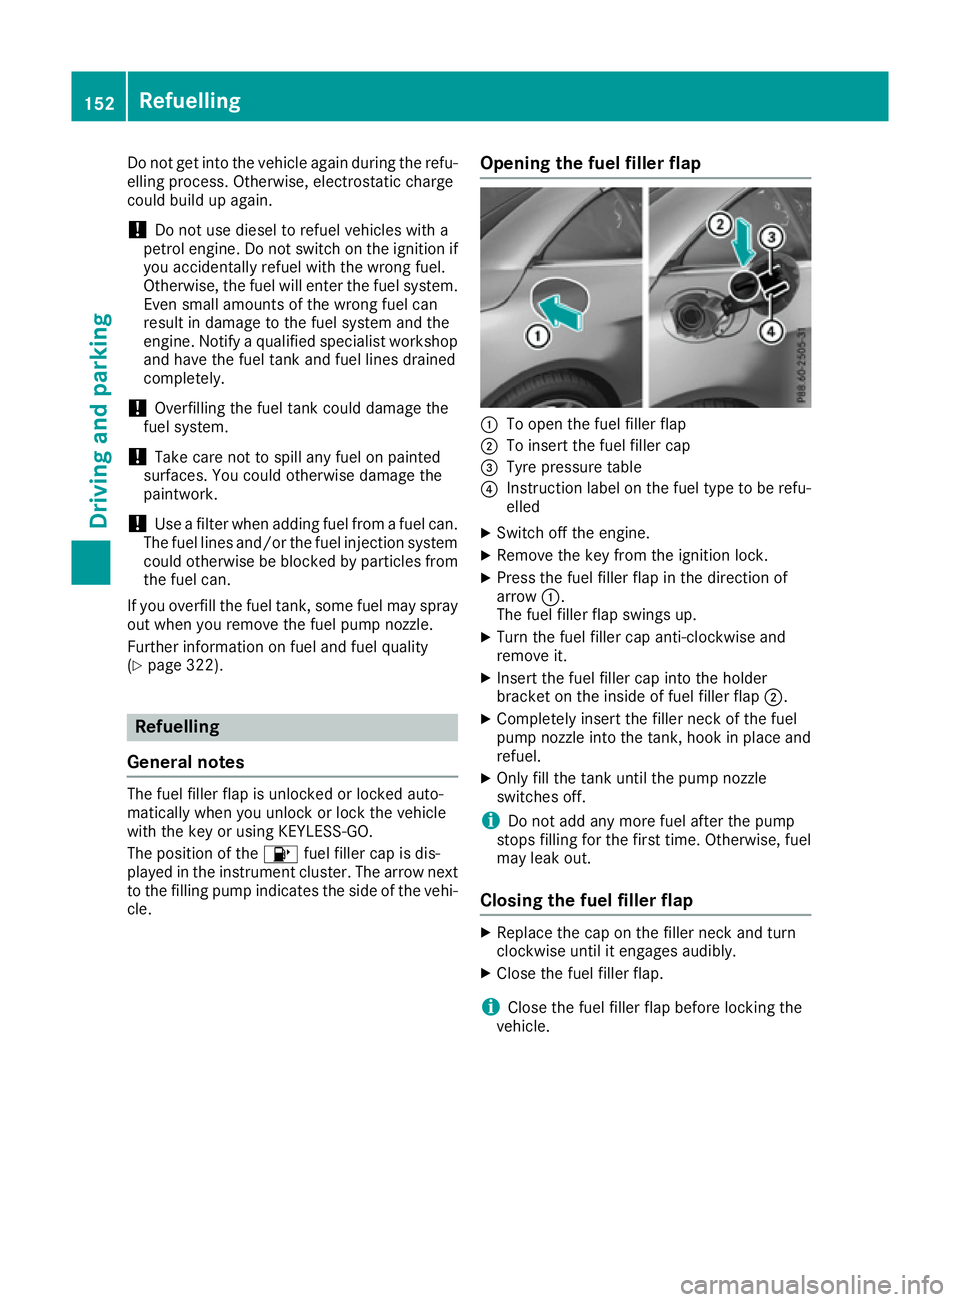
played in the instrument cluster. The arrow next to the filling pump indicates the side of the vehi- cle. Opening the fuel filler flap :
To open the fuel filler flap
; To insert the fuel filler cap
= Tyre pressure table
? Instruction label on the fuel type to be refu-
elled
X Switch off the engine.
X Remove the key from the ignition lock.
X Press the fuel filler flap in the direction of
arrow :.
The fuel filler flap swings up.
X Turn the fuel filler cap anti-clockwise and
remove it.
X Insert the fuel filler cap into the holder
bracket on the inside of fuel filler flap ;.
X Completely insert the filler neck of the fuel
pump nozzle into the tank, hook in place and
refuel.
X Only fill the tank until the pump nozzle
switches off.
i Do not add any more fuel after the pump
stops filling for the first time. Otherwise, fuel
may leak out.
Closing the fuel filler flap X
Replace the cap on the filler neck and turn
clockwise until it engages audibly.
X Close the fuel filler flap.
i Close the fuel filler flap before locking the
vehicle. 152
RefuellingDriving an
d parking
Page 157 of 333
cle from rolling away by applying the parking
brake.
X Apply the electric parking brake.
X Shift the transmission to position P
(Y page 142).
X With the key: turn the key to position 0in the
ignition lock and remove it.
The immobiliser is activated.
X With KEYLESS-GO: press the Start/Stop
button (Y page 132).
The engine stops and all the indicator lamps in the instrument cluster go out.
When the driver's door is closed, this corre-
sponds to key position 1. When the driver's
door is open, this corresponds to key position
0 (Y page 132).
The engine can be switched off while the vehicle is in motion by pressing and holding the Start/
Stop button for about three seconds. This func-
tion operates independently of the ECO start/
stop automatic engine switch-off function. Electric parking brake
General notes G
WARNING
If you leave children unattended in the vehi-
cle, they may be able to set the vehicle in
motion if, for example, they:
R release the parking brake
R shift the automatic transmission out of park
position P
R start the engine
In addition, they may operate vehicle equip-
ment and become trapped. There is a risk of
an accident and injury.
When leaving the vehicle, always take the key
with you and lock the vehicle. Never leave
children unattended in the vehicle. The function of the electric parking brake is
dependent on the on-board voltage. If the on-
board voltage is low or if there is a malfunction
in the system, it may not be possible to apply the
released parking brake.
X If this is the case, only park the vehicle on
level ground and secure it to prevent it from
rolling away.
X Shift the automatic transmission to position
P.
It may not be possible to release an applied
parking brake if the on-board voltage is low or if there is a malfunction in the system. Contact a
qualified specialist workshop.
The electric parking brake carries out a function
check at regular intervals when the engine is
switched off. Noises that occur are normal.
Applying or releasing manually X
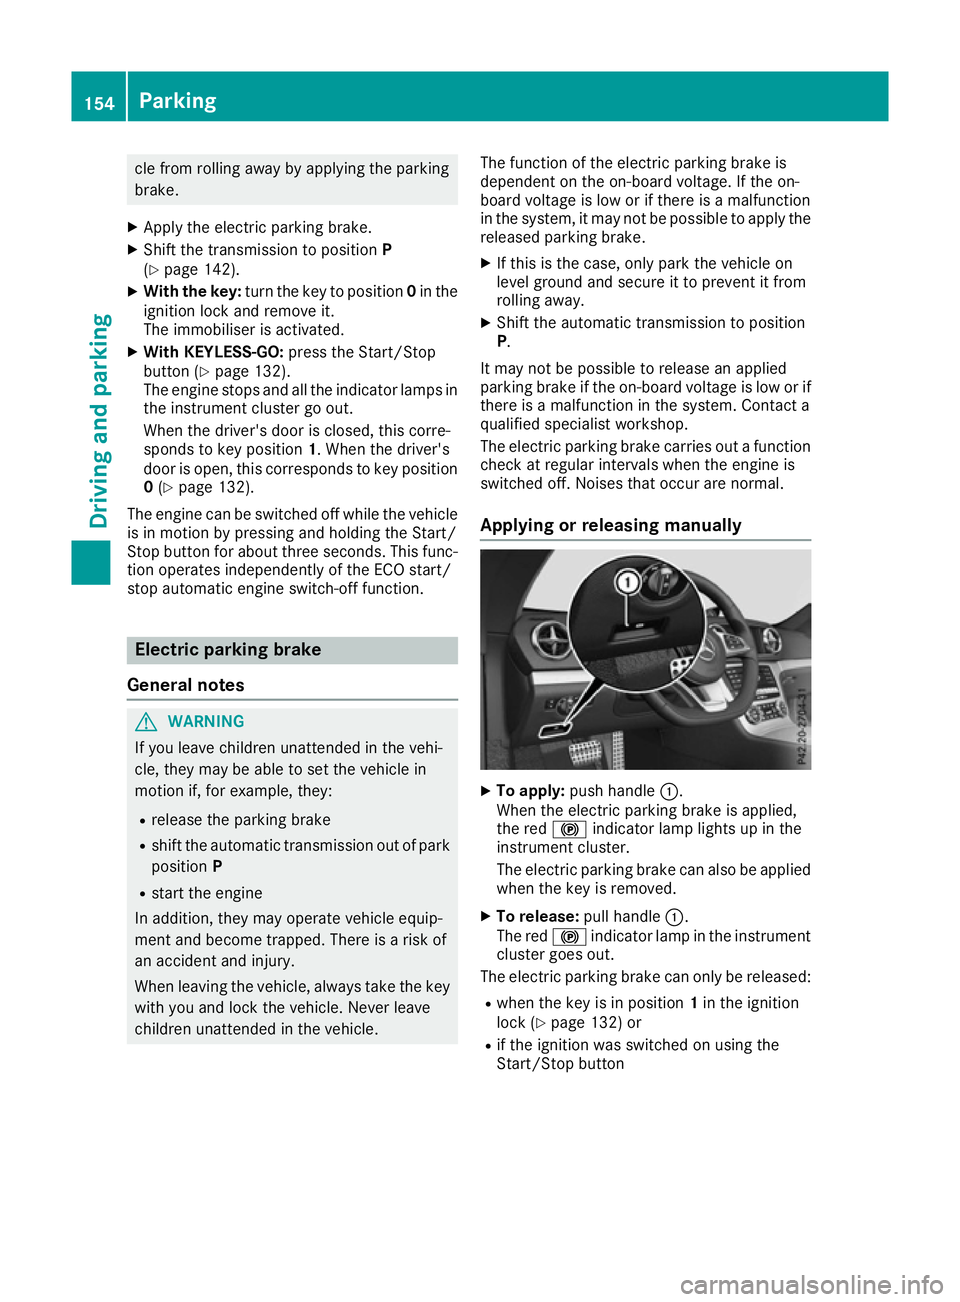
To apply: push handle :.
When the electric parking brake is applied,
the red !indicator lamp lights up in the
instrument cluster.
The electric parking brake can also be applied when the key is removed.
X To release: pull handle:.
The red !indicator lamp in the instrument
cluster goes out.
The electric parking brake can only be released:
R when the key is in position 1in the ignition
lock (Y page 132) or
R if the ignition was switched on using the
Start/Stop button 154
ParkingDriving and parking
Page 222 of 333
Display messages
Possible causes/consequences and
M
MSolutions T!
÷
inoperative inoperative See
SeeOwn‐
Own‐
er's Manual
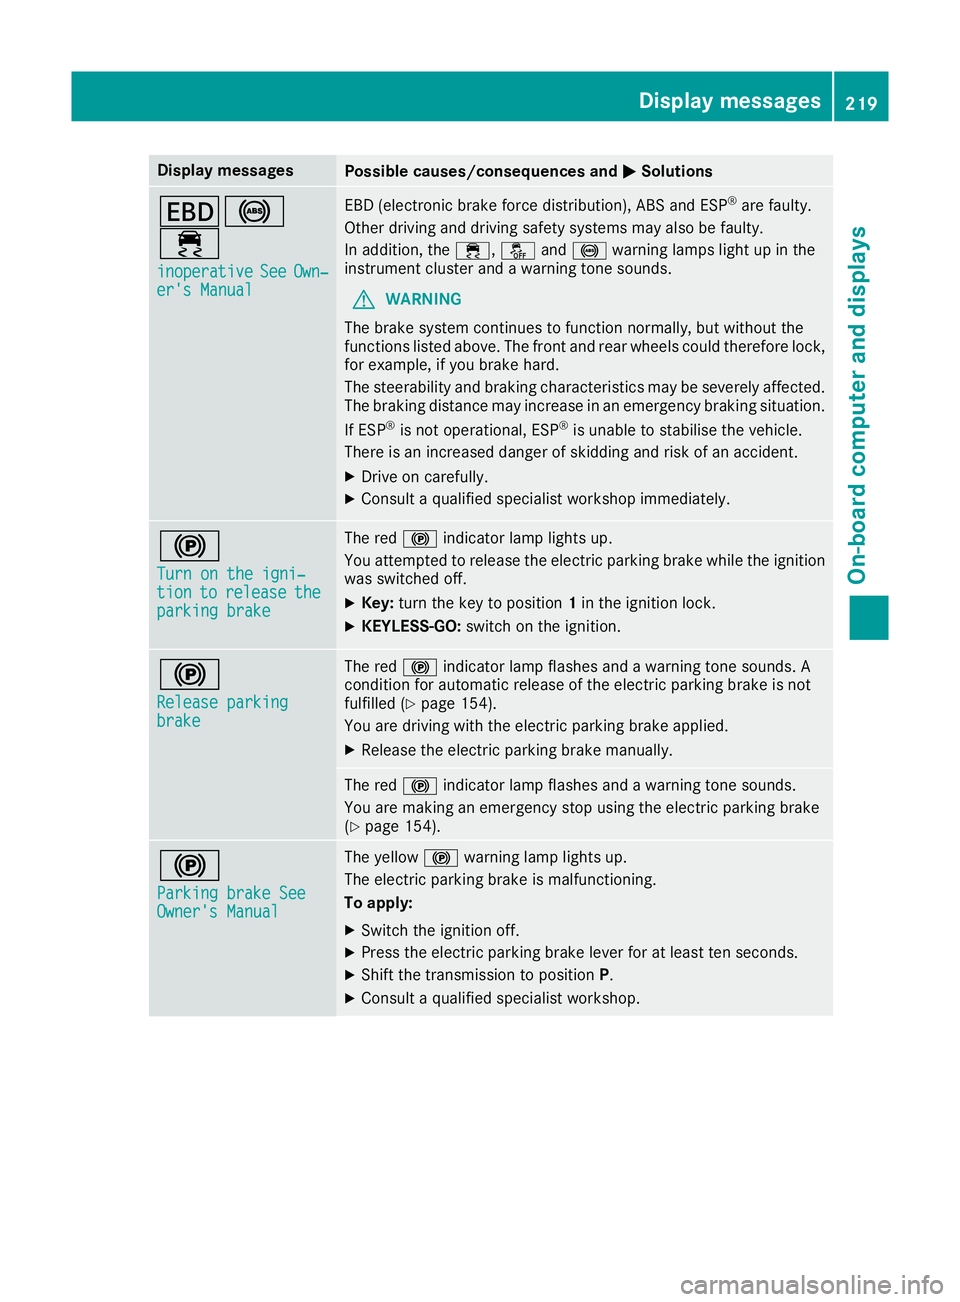
er's Manual EBD (electronic brake force distribution), ABS and ESP
®
are faulty.
Other driving and driving safety systems may also be faulty.
In addition, the ÷,åand! warning lamps light up in the
instrument cluster and a warning tone sounds.
G WARNING
The brake system continues to function normally, but without the
functions listed above. The front and rear wheels could therefore lock, for example, if you brake hard.
The steerability and braking characteristics may be severely affected.The braking distance may increase in an emergency braking situation.
If ESP ®
is not operational, ESP ®
is unable to stabilise the vehicle.
There is an increased danger of skidding and risk of an accident.
X Drive on carefully.
X Consult a qualified specialist workshop immediately. !
Turn on the igni‐ Turn on the igni‐
tion tion
to
torelease
release the
the
parking brake
parking brake The red
!indicator lamp lights up.
You attempted to release the electric parking brake while the ignition
was switched off.
X Key: turn the key to position 1in the ignition lock.
X KEYLESS-GO: switch on the ignition. !
Release parking Release parking
brake brake The red
!indicator lamp flashes and a warning tone sounds. A
condition for automatic release of the electric parking brake is not
fulfilled (Y page 154).
You are driving with the electric parking brake applied.
X Release the electric parking brake manually. The red
!indicator lamp flashes and a warning tone sounds.
You are making an emergency stop using the electric parking brake
(Y page 154). !
Parking brake See Parking brake See
Owner's Manual Owner's Manual The yellow
!warning lamp lights up.
The electric parking brake is malfunctioning.
To apply:
X Switch the ignition off.
X Press the electric parking brake lever for at least ten seconds.
X Shift the transmission to position P.
X Consult a qualified specialist workshop. Display
messages
219On-board computer and displays Z
Page 246 of 333
Key
Display messages
Possible causes/consequences and
M
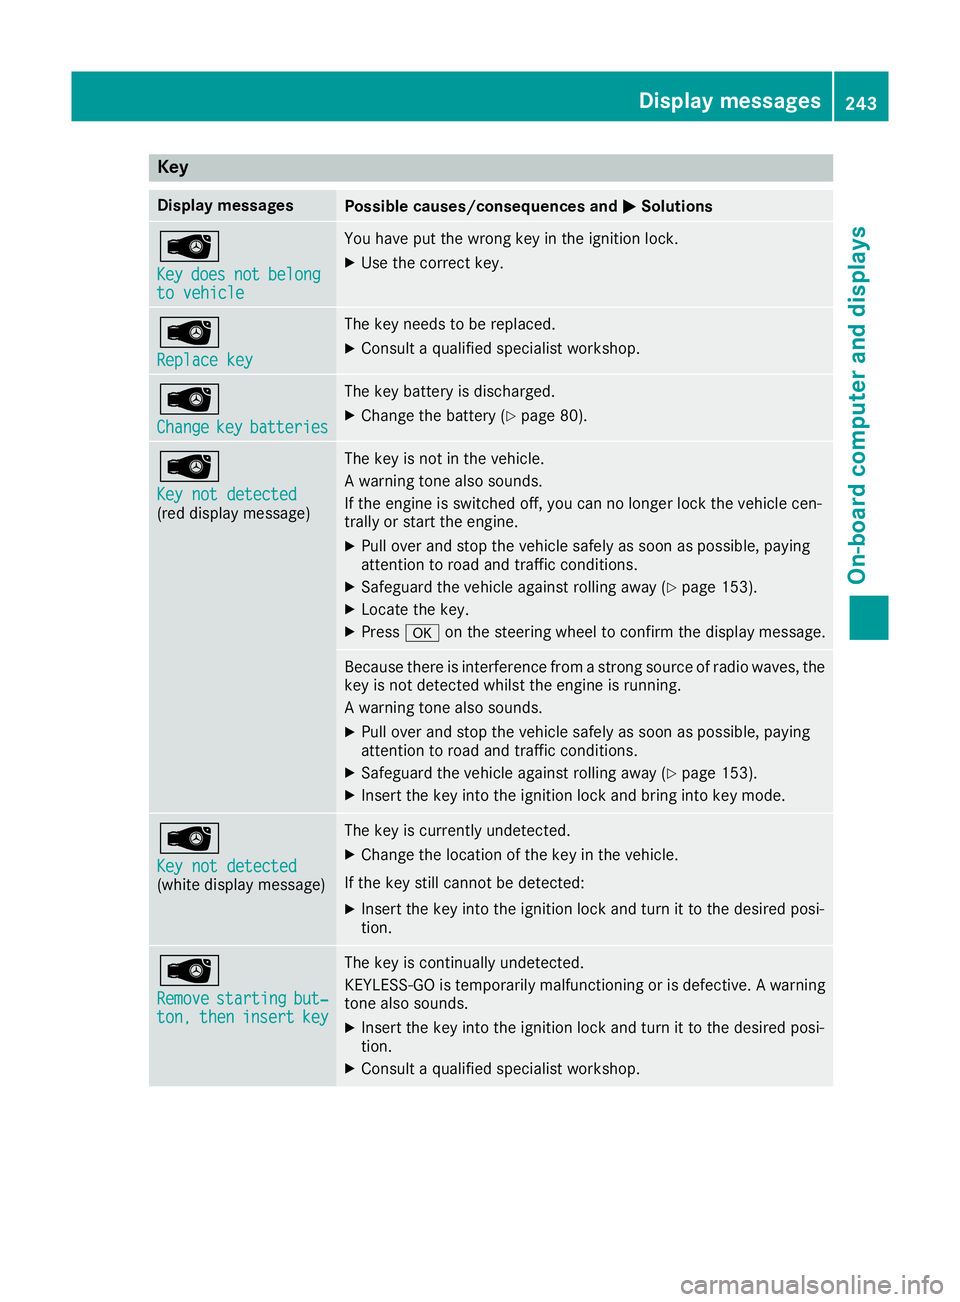
MSolutions Â
Key Key
does
does not
notbelong
belong
to vehicle
to vehicle You have put the wrong key in the ignition lock.
X Use the correct key. Â
Replace key Replace key The key needs to be replaced.
X Consult a qualified specialist workshop. Â
Change Change
key
keybatteries
batteries The key battery is discharged.
X Change the battery (Y page 80).Â
Key not detected Key not detected
(red display message) The key is not in the vehicle.
A warning tone also sounds.
If the engine is switched off, you can no longer lock the vehicle cen-
trally or start the engine.
X Pull over and stop the vehicle safely as soon as possible, paying
attention to road and traffic conditions.
X Safeguard the vehicle against rolling away (Y page 153).
X Locate the key.
X Press aon the steering wheel to confirm the display message. Because there is interference from a strong source of radio waves, the
key is not detected whilst the engine is running.
A warning tone also sounds.
X Pull over and stop the vehicle safely as soon as possible, paying
attention to road and traffic conditions.
X Safeguard the vehicle against rolling away (Y page 153).
X Insert the key into the ignition lock and bring into key mode. Â
Key not detected Key not detected
(white display message) The key is currently undetected.
X Change the location of the key in the vehicle.
If the key still cannot be detected:
X Insert the key into the ignition lock and turn it to the desired posi-
tion. Â
Remove Remove
starting
starting but‐
but‐
ton,
ton, then
theninsert
insert key
key The key is continually undetected.
KEYLESS-GO is temporarily malfunctioning or is defective. A warning
tone also sounds.
X Insert the key into the ignition lock and turn it to the desired posi-
tion.
X Consult a qualified specialist workshop. Display
messages
243On-board computer and displays Z
Page 267 of 333
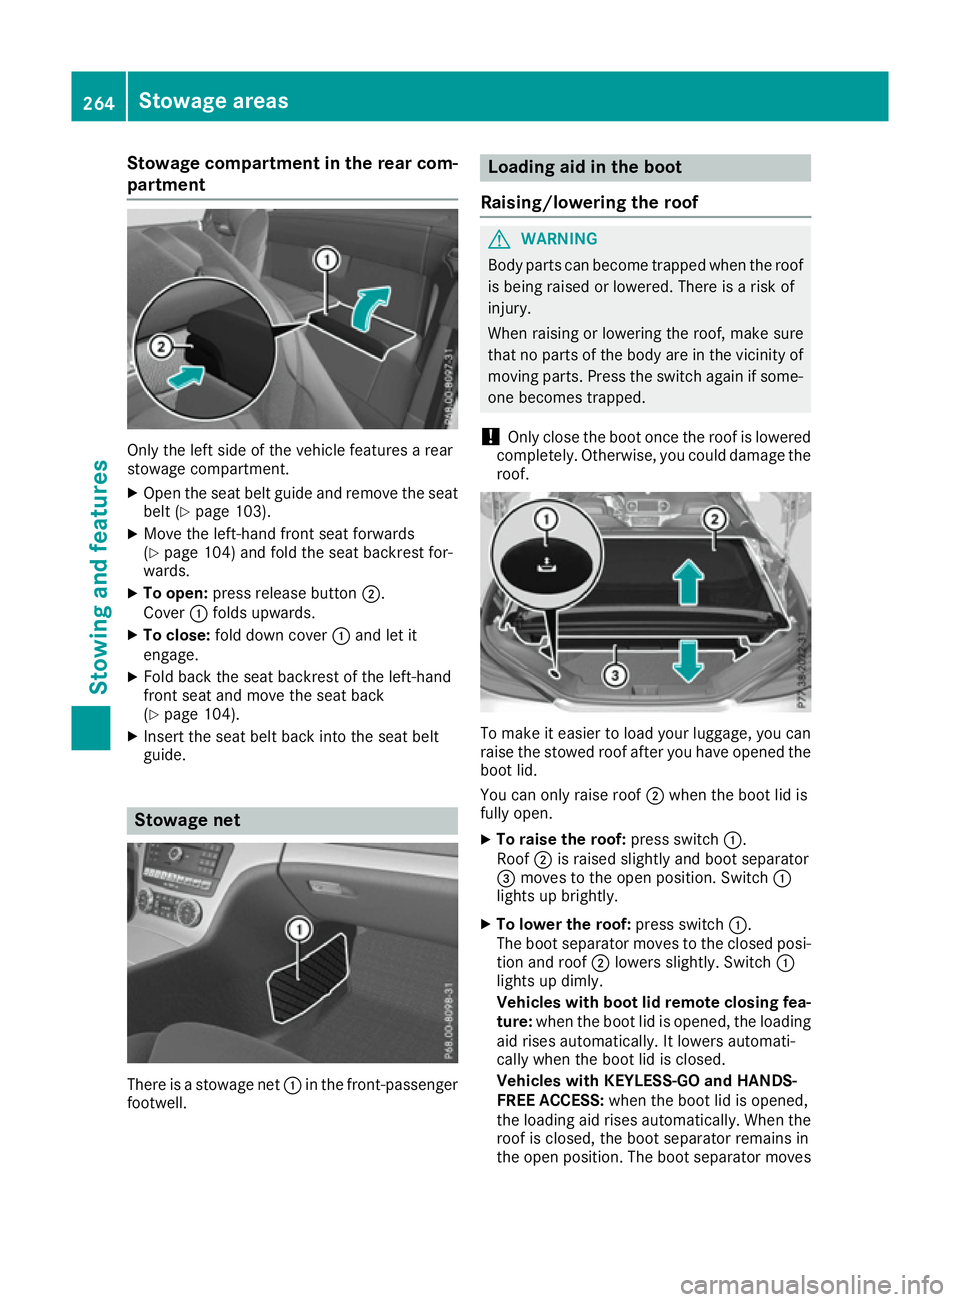
Stowage compartment in the rear com-
partment Only the left side of the vehicle features a rear
stowage compartment.
X Open the seat belt guide and remove the seat
belt (Y page 103).
X Move the left-hand front seat forwards
(Y page 104) and fold the seat backrest for-
wards.
X To open: press release button ;.
Cover :folds upwards.
X To close: fold down cover :and let it
engage.
X Fold back the seat backrest of the left-hand
front seat and move the seat back
(Y page 104).
X Insert the seat belt back into the seat belt
guide. Stowage net
There is a stowage net
:in the front-passenger
footwell. Loading aid in the boot
Raising/lowering the roof G
WARNING
Body parts can become trapped when the roof is being raised or lowered. There is a risk of
injury.
When raising or lowering the roof, make sure
that no parts of the body are in the vicinity of moving parts. Press the switch again if some-
one becomes trapped.
! Only close the boot once the roof is lowered
completely. Otherwise, you could damage the roof. To make it easier to load your luggage, you can
raise the stowed roof after you have opened the boot lid.
You can only raise roof ;when the boot lid is
fully open.
X To raise the roof: press switch:.
Roof ;is raised slightly and boot separator
= moves to the open position. Switch :
lights up brightly.
X To lower the roof: press switch:.
The boot separator moves to the closed posi- tion and roof ;lowers slightly. Switch :
lights up dimly.
Vehicles with boot lid remote closing fea-
ture: when the boot lid is opened, the loading
aid rises automatically. It lowers automati-
cally when the boot lid is closed.
Vehicles with KEYLESS-GO and HANDS-
FREE ACCESS: when the boot lid is opened,
the loading aid rises automatically. When the
roof is closed, the boot separator remains in
the open position. The boot separator moves 264
Stowage areasStowing and features
Page 282 of 333
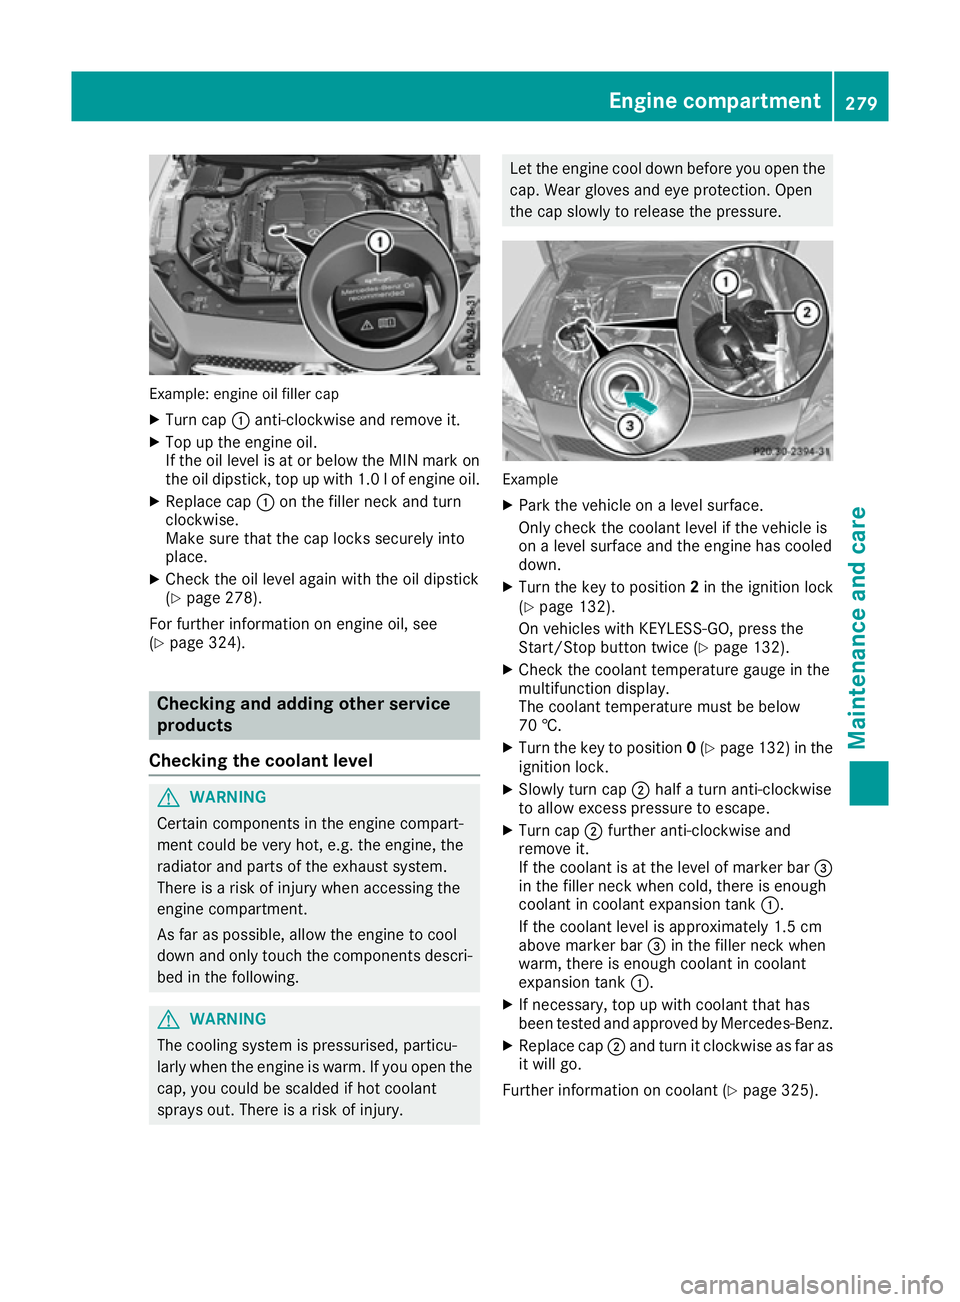
Example: engine oil filler cap
X Turn cap :anti-clockwise and remove it.
X Top up the engine oil.
If the oil level is at or below the MIN mark on
the oil dipstick, top up with 1.0 lof engine oil.
X Replace cap :on the filler neck and turn
clockwise.
Make sure that the cap locks securely into
place.
X Check the oil level again with the oil dipstick
(Y page 278).
For further information on engine oil, see
(Y page 324). Checking and adding other service
products
Checking the coolant level G
WARNING
Certain components in the engine compart-
ment could be very hot, e.g. the engine, the
radiator and parts of the exhaust system.
There is a risk of injury when accessing the
engine compartment.
As far as possible, allow the engine to cool
down and only touch the components descri- bed in the following. G
WARNING
The cooling system is pressurised, particu-
larly when the engine is warm. If you open the cap, you could be scalded if hot coolant
sprays out. There is a risk of injury. Let the engine cool down before you open the
cap. Wear gloves and eye protection. Open
the cap slowly to release the pressure. Example
X Park the vehicle on a level surface.
Only check the coolant level if the vehicle is
on a level surface and the engine has cooled
down.
X Turn the key to position 2in the ignition lock
(Y page 132).
On vehicles with KEYLESS-GO, press the
Start/Stop button twice (Y page 132).
X Check the coolant temperature gauge in the
multifunction display.
The coolant temperature must be below
70 †.
X Turn the key to position 0(Y page 132) in the
ignition lock.
X Slowly turn cap ;half a turn anti-clockwise
to allow excess pressure to escape.
X Turn cap ;further anti-clockwise and
remove it.
If the coolant is at the level of marker bar =
in the filler neck when cold, there is enough
coolant in coolant expansion tank :.
If the coolant level is approximately 1.5 cm
above marker bar =in the filler neck when
warm, there is enough coolant in coolant
expansion tank :.
X If necessary, top up with coolant that has
been tested and approved by Mercedes-Benz.
X Replace cap ;and turn it clockwise as far as
it will go.
Further information on coolant (Y page 325). Engine compartment
279Maintenance and care Z
Page 285 of 333
You could otherwise scratch or damage the
surfaces and protective film.
! Do not park up the vehicle for an extended
period straight after cleaning it, particularly
after having cleaned the wheels with wheel
cleaner. Wheel cleaners could cause
increased corrosion of the brake discs and
brake pads/linings. For this reason, you
should drive for a few minutes after cleaning. Braking heats the brake discs and the brake
pads/linings, thus drying them. The vehicle
can then be parked up.
Regular care of your vehicle is a condition for
retaining quality in the long term.
Use care products and cleaning agents recom-
mended and approved by Mercedes-Benz. Washing the vehicle and cleaning the
paintwork
Automatic car wash G
WARNING
Braking efficiency is reduced after the vehicle has been washed. There is a risk of an acci-
dent.
After washing the vehicle, brake carefully
while paying attention to the traffic conditions in order to restore full braking efficiency.
! When DISTRONIC PLUS or the HOLD func-
tion is activated, the vehicle brakes automat- ically in certain situations.
To avoid damage to the vehicle, deactivate
DISTRONIC PLUS and the HOLD function in
the following or similar situations:
R when towing away
R in a car wash
! It is preferable to use car washes with
adjustable high-pressure pre-cleaning that
corresponds to the specification for the Cab-
riolet programme. In car washes that use high
water pressures, there is a risk that a small
amount of water may leak into the vehicle. !
Vehicles with HANDS-FREE ACCESS: if a
key with KEYLESS-GO is within the detection
range of the KEYLESS-GO antenna, the fol-
lowing situations could lead to the uninten-
tional opening of the boot lid:
R using a car wash
R using a high-pressure cleaner
Make sure that the key is at least 2 m away
from the vehicle.
! Make sure that the automatic transmission
is in position Nwhen washing your vehicle in
a tow-through car wash. Other transmission
positions may lead to damage to the vehicle.
! Make sure that:
R the side windows and the roof are com-
pletely closed
R the climate control blower is switched off
R the windscreen wiper switch is at position
0
The vehicle could otherwise be damaged.
You can wash the vehicle in an automatic car
wash from the very start.
Wash off excess dirt before cleaning the vehicle
in an automatic car wash.
After using an automatic car wash, wipe wax off the windscreen and the wiper blades. This will
prevent smears and reduce wiping noises
caused by residue on the windscreen.
Washing by hand In some countries, washing by hand is only
allowed at specially equipped washing bays.
Observe the legal requirements for each indi-
vidual country.
X Do not use hot water and do not wash the
vehicle in direct sunlight.
X Use a soft sponge to clean.
X Use a mild cleaning agent, such as a car
shampoo approved by Mercedes-Benz.
X Thoroughly hose down the vehicle with a gen-
tle jet of water.
X Do not point the water jet directly towards the
air inlet.
X Use plenty of water and rinse out the sponge
frequently. 282
CareMaintenance and care
Page 286 of 333
X
Rinse the vehicle with clean water and dry
thoroughly with a chamois.
X Do not let the cleaning agent dry on the paint-
work.
When using the vehicle in winter, remove all
traces of road salt deposits carefully and as
soon as possible.
High-pressure cleaning equipment G
WARNING
The water jet of circular-jet nozzles (dirt grind- ers) can cause damage not visible from the
outside to tyres or chassis components. Com-
ponents damaged in this way can unexpect-
edly fail. There is a risk of an accident.
Do not use high-pressure cleaners with circu-
lar-jet nozzles to clean the vehicle. Have dam- aged tyres or chassis components replaced
immediately.
! Always maintain a distance of at least 30 cm
between the vehicle and the high-pressure
cleaner nozzle. Information about the correct
distance is available from the equipment
manufacturer.
Move the high-pressure cleaner nozzle
around when cleaning your vehicle.
Do not aim directly at any of the following:
R tyres
R door gaps, roof gaps, joints etc.
R soft top (Designo vario-roof)
R electrical components
R battery
R plug connectors
R lights
R seals
R trim elements
R ventilation slots
Damage to seals or electrical components
can lead to leaks or failures.
! Vehicles with HANDS-FREE ACCESS: if a
key with KEYLESS-GO is within the detection
range of the KEYLESS-GO antenna, the fol-
lowing situations could lead to the uninten-
tional opening of the boot lid:
R using a car wash
R using a high-pressure cleaner Make sure that the key is at least 2 m away
from the vehicle.
! Mille Miglia special model: parts of your
vehicle are covered with a decorative foil.
Maintain a distance of at least 70 cm between
the foil-wrapped parts of the vehicle and the
nozzle of the high pressure cleaner.
Information about the correct distance is
available from the equipment manufacturer.
Move the high-pressure cleaner nozzle
around when cleaning your vehicle.
Cleaning the paintwork !
Do not affix:
R stickers
R films
R magnetic plates or similar items
to painted surfaces. You could otherwise
damage the paintwork.
Scratches, corrosive deposits, areas affected by
corrosion and damage caused by inadequate
care cannot always be completely repaired. In
such cases, visit a qualified specialist workshop.
X Remove impurities immediately, where pos-
sible, whilst avoiding rubbing too hard.
X Soak insect remains with insect remover and
rinse off the treated areas afterwards.
X Soak bird droppings with water and rinse off
the treated areas afterwards.
X Remove coolant, brake fluid, tree resins, oils,
fuels and greases by rubbing gently with a
cloth soaked in petroleum ether or lighter
fluid.
X Use tar remover to remove tar stains.
X Use silicone remover to remove wax.
Care and treatment of matt paintwork !
Never polish the vehicle or the light alloy
wheels. Polishing makes the paintwork shiny.
! The following may cause the paint to
become shiny and thus reduce the matt
effect:
R vigorous rubbing with unsuitable materials
R frequent use of car washes
R washing the vehicle in direct sunlight
! Never use paint cleaner, buffing or polishing
products, or gloss preserver, e.g. wax. These Care
283Maintenance and care Z