2016 MERCEDES-BENZ SL ROADSTER tyre pressure
[x] Cancel search: tyre pressurePage 211 of 333
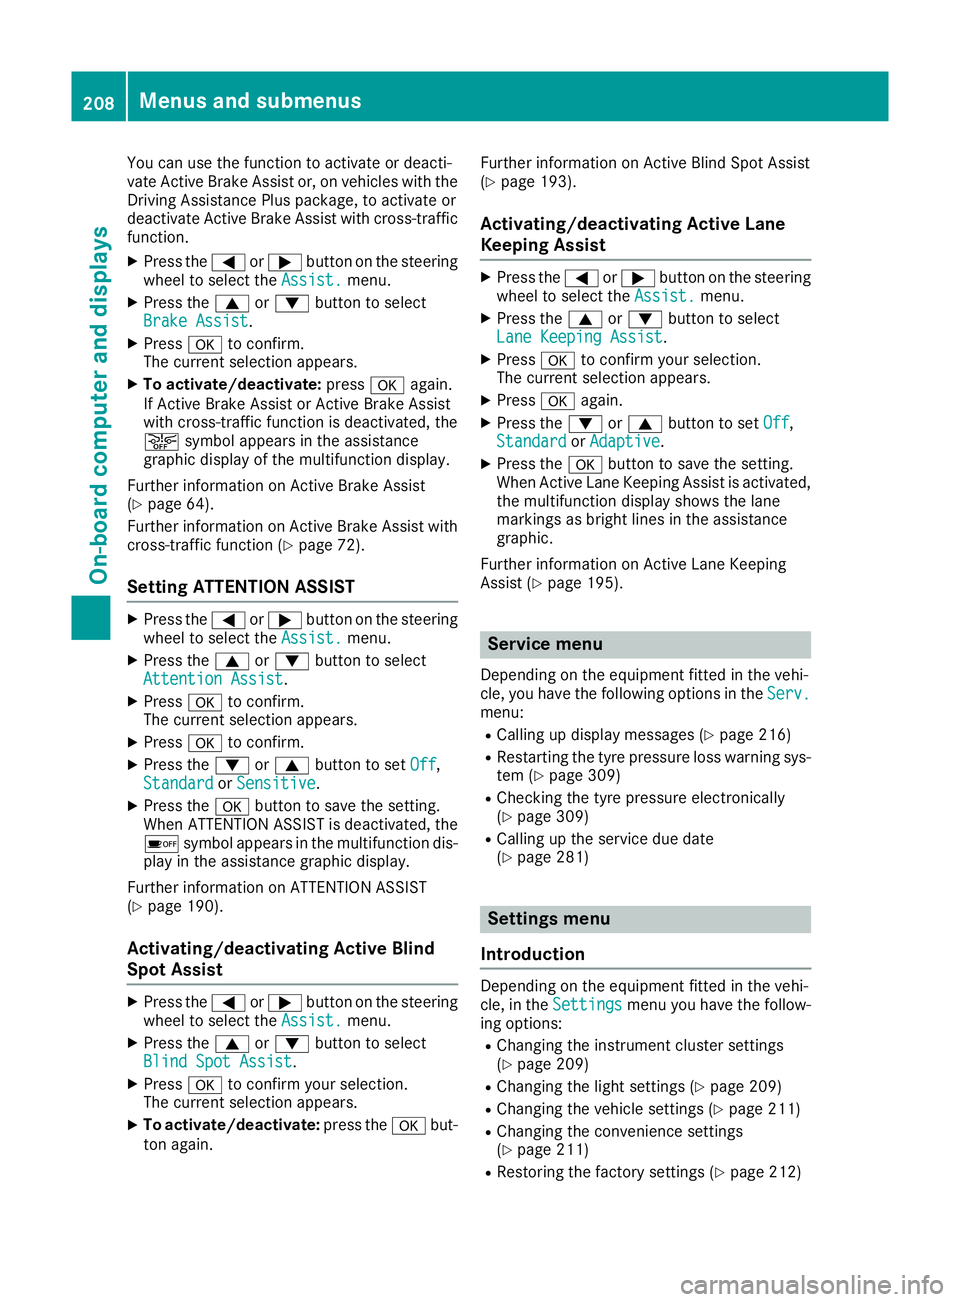
You can use the function to activate or deacti-
vate Active Brake Assist or, on vehicles with the
Driving Assistance Plus package, to activate or
deactivate Active Brake Assist with cross-traffic
function.
X Press the =or; button on the steering
wheel to select the Assist.
Assist. menu.
X Press the 9or: button to select
Brake Assist
Brake Assist.
X Press ato confirm.
The current selection appears.
X To activate/deactivate: pressaagain.
If Active Brake Assist or Active Brake Assist
with cross-traffic function is deactivated, the
æ symbol appears in the assistance
graphic display of the multifunction display.
Further information on Active Brake Assist
(Y page 64).
Further information on Active Brake Assist with
cross-traffic function (Y page 72).
Setting ATTENTION ASSIST X
Press the =or; button on the steering
wheel to select the Assist.
Assist. menu.
X Press the 9or: button to select
Attention Assist
Attention Assist.
X Press ato confirm.
The current selection appears.
X Press ato confirm.
X Press the :or9 button to set Off Off,
Standard
Standard orSensitive
Sensitive.
X Press the abutton to save the setting.
When ATTENTION ASSIST is deactivated, the
é symbol appears in the multifunction dis-
play in the assistance graphic display.
Further information on ATTENTION ASSIST
(Y page 190).
Activating/deactivating Active Blind
Spot Assist X
Press the =or; button on the steering
wheel to select the Assist.
Assist. menu.
X Press the 9or: button to select
Blind Spot Assist
Blind Spot Assist.
X Press ato confirm your selection.
The current selection appears.
X To activate/deactivate: press theabut-
ton again. Further information on Active Blind Spot Assist
(Y
page 193).
Activating/deactivating Active Lane
Keeping Assist X
Press the =or; button on the steering
wheel to select the Assist. Assist.menu.
X Press the 9or: button to select
Lane Keeping Assist
Lane Keeping Assist.
X Press ato confirm your selection.
The current selection appears.
X Press aagain.
X Press the :or9 button to set Off
Off,
Standard
Standard orAdaptive
Adaptive .
X Press the abutton to save the setting.
When Active Lane Keeping Assist is activated,
the multifunction display shows the lane
markings as bright lines in the assistance
graphic.
Further information on Active Lane Keeping
Assist (Y page 195). Service menu
Depending on the equipment fitted in the vehi-
cle, you have the following options in the Serv. Serv.
menu:
R Calling up display messages (Y page 216)
R Restarting the tyre pressure loss warning sys-
tem (Y page 309)
R Checking the tyre pressure electronically
(Y page 309)
R Calling up the service due date
(Y page 281) Settings menu
Introduction Depending on the equipment fitted in the vehi-
cle, in the
Settings Settings menu you have the follow-
ing options:
R Changing the instrument cluster settings
(Y page 209)
R Changing the light settings (Y page 209)
R Changing the vehicle settings (Y page 211)
R Changing the convenience settings
(Y page 211)
R Restoring the factory settings (Y page 212)208
Menus and submenusOn-board computer and displays
Page 240 of 333
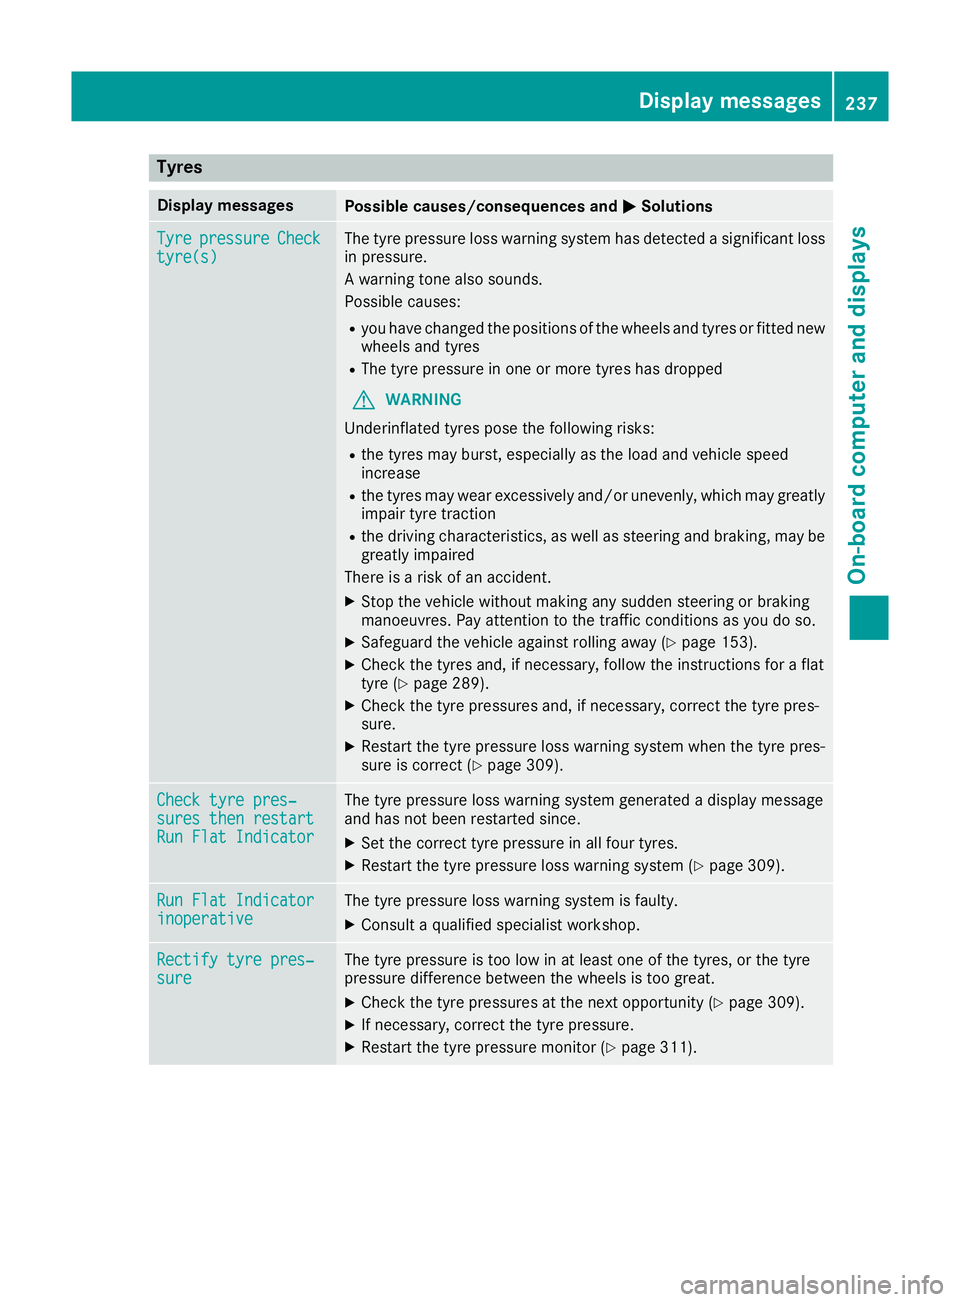
Tyres
Display messages
Possible causes/consequences and
M
MSolutions Tyre
Tyre
pressure
pressure Check
Check
tyre(s)
tyre(s) The tyre pressure loss warning system has detected a significant loss
in pressure.
A warning tone also sounds.
Possible causes:
R you have changed the positions of the wheels and tyres or fitted new
wheels and tyres
R The tyre pressure in one or more tyres has dropped
G WARNING
Underinflated tyres pose the following risks:
R the tyres may burst, especially as the load and vehicle speed
increase
R the tyres may wear excessively and/or unevenly, which may greatly
impair tyre traction
R the driving characteristics, as well as steering and braking, may be
greatly impaired
There is a risk of an accident.
X Stop the vehicle without making any sudden steering or braking
manoeuvres. Pay attention to the traffic conditions as you do so.
X Safeguard the vehicle against rolling away (Y page 153).
X Check the tyres and, if necessary, follow the instructions for a flat
tyre (Y page 289).
X Check the tyre pressures and, if necessary, correct the tyre pres-
sure.
X Restart the tyre pressure loss warning system when the tyre pres-
sure is correct (Y page 309). Check tyre pres‐ Check tyre pres‐
sures then restart sures then restart
Run Flat Indicator Run Flat Indicator The tyre pressure loss warning system generated a display message
and has not been restarted since.
X Set the correct tyre pressure in all four tyres.
X Restart the tyre pressure loss warning system (Y page 309).Run Flat Indicator Run Flat Indicator
inoperative inoperative The tyre pressure loss warning system is faulty.
X Consult a qualified specialist workshop. Rectify tyre pres‐
Rectify tyre pres‐
sure sure The tyre pressure is too low in at least one of the tyres, or the tyre
pressure difference between the wheels is too great.
X Check the tyre pressures at the next opportunity (Y page 309).
X If necessary, correct the tyre pressure.
X Restart the tyre pressure monitor (Y page 311). Display
messages
237On-board computer and displays Z
Page 241 of 333
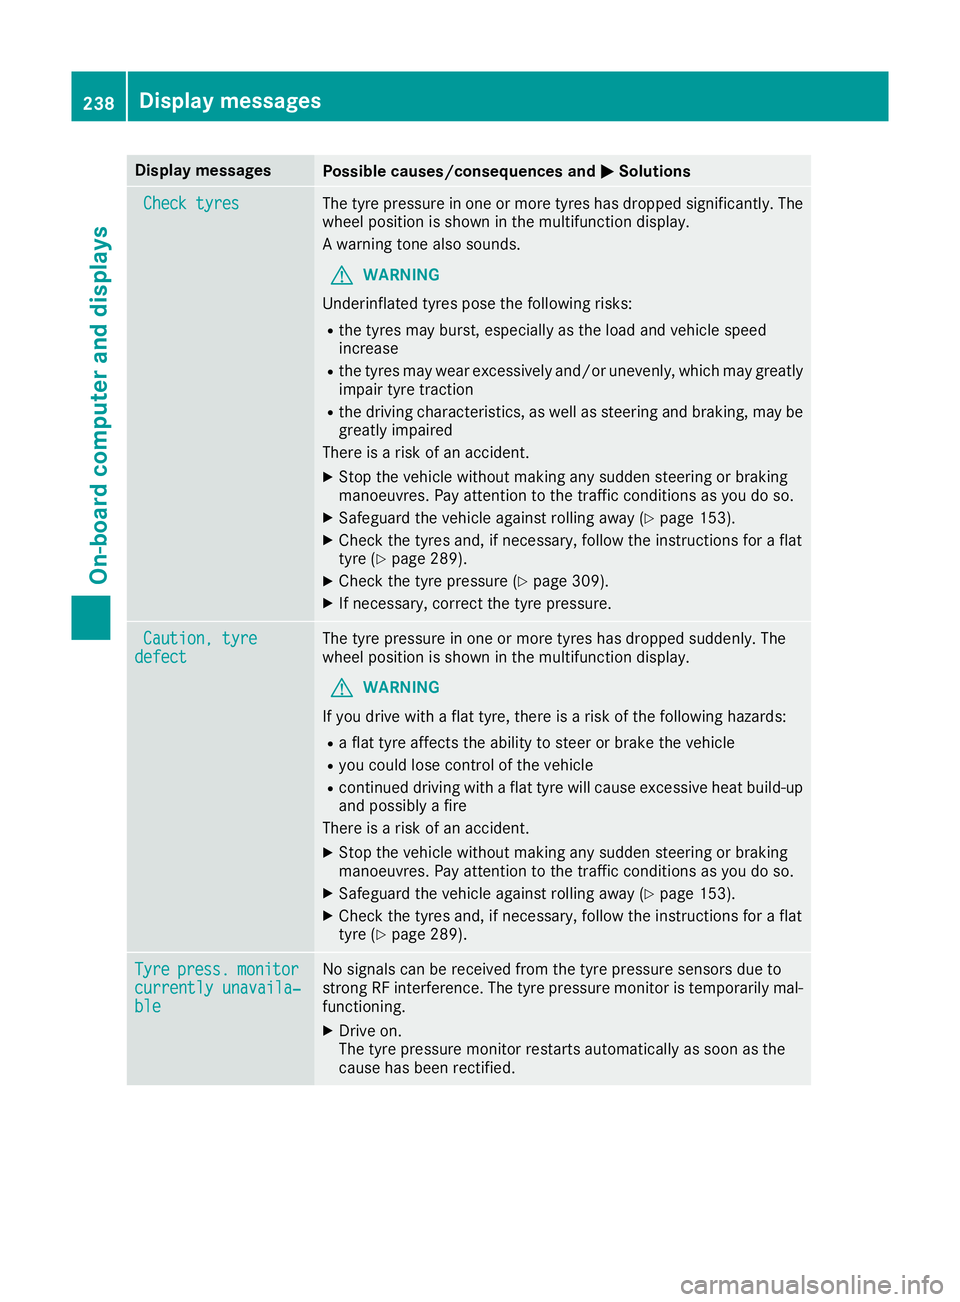
Display messages
Possible causes/consequences and
M
MSolutions Check tyres
Check tyres The tyre pressure in one or more tyres has dropped significantly. The
wheel position is shown in the multifunction display.
A warning tone also sounds.
G WARNING
Underinflated tyres pose the following risks:
R the tyres may burst, especially as the load and vehicle speed
increase
R the tyres may wear excessively and/or unevenly, which may greatly
impair tyre traction
R the driving characteristics, as well as steering and braking, may be
greatly impaired
There is a risk of an accident.
X Stop the vehicle without making any sudden steering or braking
manoeuvres. Pay attention to the traffic conditions as you do so.
X Safeguard the vehicle against rolling away (Y page 153).
X Check the tyres and, if necessary, follow the instructions for a flat
tyre (Y page 289).
X Check the tyre pressure (Y page 309).
X If necessary, correct the tyre pressure. Caution, tyre Caution, tyre
defect
defect The tyre pressure in one or more tyres has dropped suddenly. The
wheel position is shown in the multifunction display.
G WARNING
If you drive with a flat tyre, there is a risk of the following hazards: R a flat tyre affects the ability to steer or brake the vehicle
R you could lose control of the vehicle
R continued driving with a flat tyre will cause excessive heat build-up
and possibly a fire
There is a risk of an accident.
X Stop the vehicle without making any sudden steering or braking
manoeuvres. Pay attention to the traffic conditions as you do so.
X Safeguard the vehicle against rolling away (Y page 153).
X Check the tyres and, if necessary, follow the instructions for a flat
tyre (Y page 289). Tyre Tyre
press.
press. monitor
monitor
currently unavaila‐
currently unavaila‐
ble ble No signals can be received from the tyre pressure sensors due to
strong RF interference. The tyre pressure monitor is temporarily mal-
functioning.
X Drive on.
The tyre pressure monitor restarts automatically as soon as the
cause has been rectified. 238
Display
messagesOn-board computer and displays
Page 242 of 333
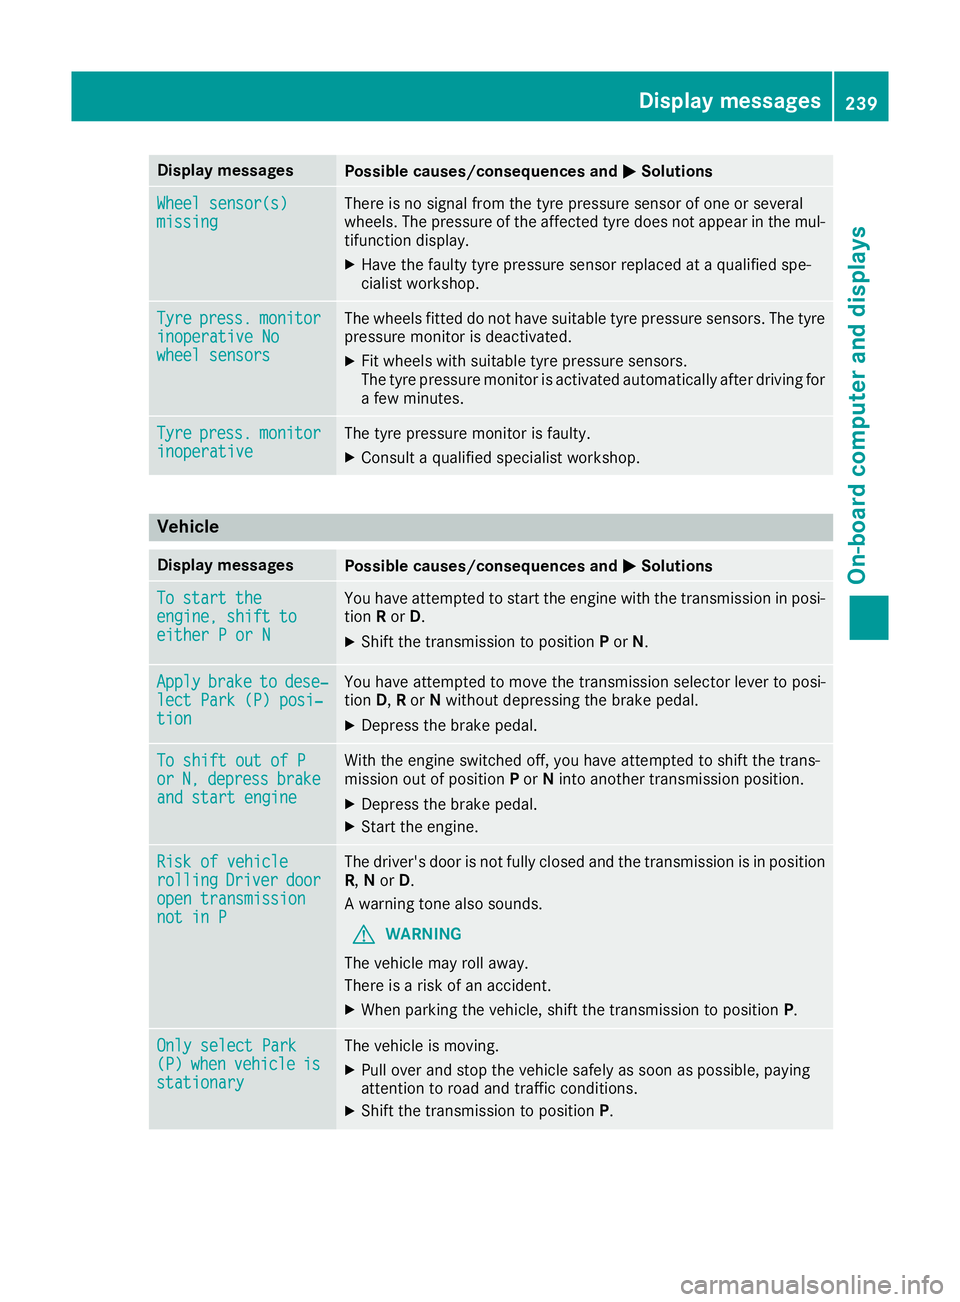
Display messages
Possible causes/consequences and
M
MSolutions Wheel sensor(s)
Wheel sensor(s)
missing missing There is no signal from the tyre pressure sensor of one or several
wheels. The pressure of the affected tyre does not appear in the mul-
tifunction display.
X Have the faulty tyre pressure sensor replaced at a qualified spe-
cialist workshop. Tyre Tyre
press.
press. monitor
monitor
inoperative No
inoperative No
wheel sensors wheel sensors The wheels fitted do not have suitable tyre pressure sensors. The tyre
pressure monitor is deactivated.
X Fit wheels with suitable tyre pressure sensors.
The tyre pressure monitor is activated automatically after driving for
a few minutes. Tyre Tyre
press.
press. monitor
monitor
inoperative
inoperative The tyre pressure monitor is faulty.
X Consult a qualified specialist workshop. Vehicle
Display messages
Possible causes/consequences and
M
MSolutions To start the
To start the
engine, shift to engine, shift to
either P or N either P or N You have attempted to start the engine with the transmission in posi-
tion Ror D.
X Shift the transmission to position Por N. Apply
Apply
brake
braketo
todese‐
dese‐
lect Park (P) posi‐
lect Park (P) posi‐
tion tion You have attempted to move the transmission selector lever to posi-
tion
D,Ror Nwithout depressing the brake pedal.
X Depress the brake pedal. To shift out of P To shift out of P
or or
N,
N,depress
depress brake
brake
and start engine
and start engine With the engine switched off, you have attempted to shift the trans-
mission out of position Por Ninto another transmission position.
X Depress the brake pedal.
X Start the engine. Risk of vehicle
Risk of vehicle
rolling rolling
Driver
Driverdoor
door
open transmission
open transmission
not in P not in P The driver's door is not fully closed and the transmission is in position
R, Nor D.
A warning tone also sounds.
G WARNING
The vehicle may roll away.
There is a risk of an accident.
X When parking the vehicle, shift the transmission to position P.Only select Park Only select Park
(P) (P)
when
when vehicle
vehicle is
is
stationary
stationary The vehicle is moving.
X
Pull over and stop the vehicle safely as soon as possible, paying
attention to road and traffic conditions.
X Shift the transmission to position P. Display
messages
239On-board computer and displays Z
Page 255 of 333
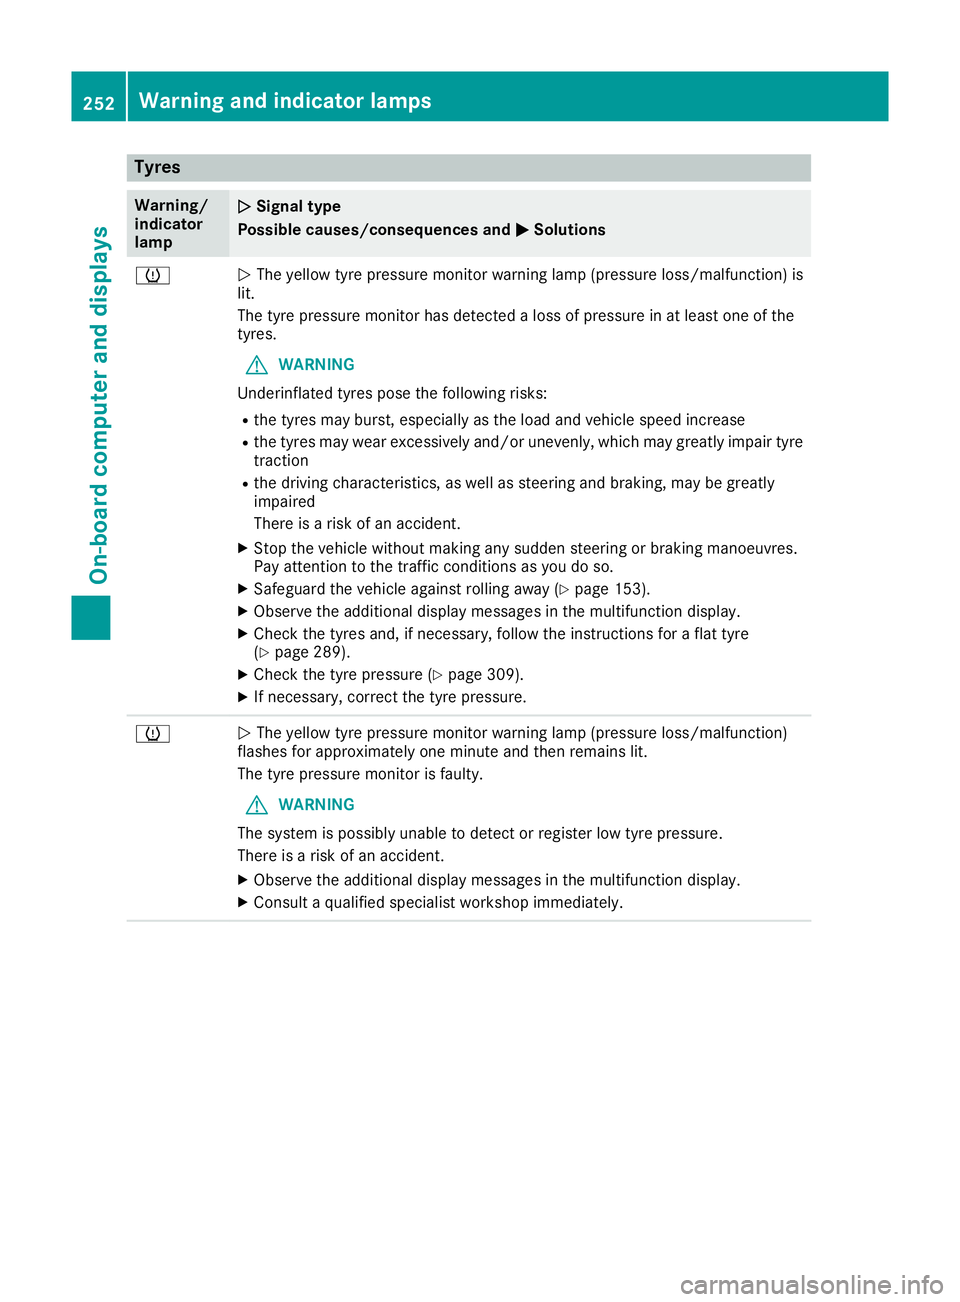
Tyres
Warning/
indicator
lamp
N N
Signal type
Possible causes/consequences and M
MSolutions h
N
The yellow tyre pressure monitor warning lamp (pressure loss/malfunction) is
lit.
The tyre pressure monitor has detected a loss of pressure in at least one of the
tyres.
G WARNING
Underinflated tyres pose the following risks:
R the tyres may burst, especially as the load and vehicle speed increase
R the tyres may wear excessively and/or unevenly, which may greatly impair tyre
traction
R the driving characteristics, as well as steering and braking, may be greatly
impaired
There is a risk of an accident.
X Stop the vehicle without making any sudden steering or braking manoeuvres.
Pay attention to the traffic conditions as you do so.
X Safeguard the vehicle against rolling away (Y page 153).
X Observe the additional display messages in the multifunction display.
X Check the tyres and, if necessary, follow the instructions for a flat tyre
(Y page 289).
X Check the tyre pressure (Y page 309).
X If necessary, correct the tyre pressure. h
N
The yellow tyre pressure monitor warning lamp (pressure loss/malfunction)
flashes for approximately one minute and then remains lit.
The tyre pressure monitor is faulty.
G WARNING
The system is possibly unable to detect or register low tyre pressure.
There is a risk of an accident.
X Observe the additional display messages in the multifunction display.
X Consult a qualified specialist workshop immediately. 252
Warning and indicator lampsOn-board computer and displays
Page 286 of 333
X
Rinse the vehicle with clean water and dry
thoroughly with a chamois.
X Do not let the cleaning agent dry on the paint-
work.
When using the vehicle in winter, remove all
traces of road salt deposits carefully and as
soon as possible.
High-pressure cleaning equipment G
WARNING
The water jet of circular-jet nozzles (dirt grind- ers) can cause damage not visible from the
outside to tyres or chassis components. Com-
ponents damaged in this way can unexpect-
edly fail. There is a risk of an accident.
Do not use high-pressure cleaners with circu-
lar-jet nozzles to clean the vehicle. Have dam- aged tyres or chassis components replaced
immediately.
! Always maintain a distance of at least 30 cm
between the vehicle and the high-pressure
cleaner nozzle. Information about the correct
distance is available from the equipment
manufacturer.
Move the high-pressure cleaner nozzle
around when cleaning your vehicle.
Do not aim directly at any of the following:
R tyres
R door gaps, roof gaps, joints etc.
R soft top (Designo vario-roof)
R electrical components
R battery
R plug connectors
R lights
R seals
R trim elements
R ventilation slots
Damage to seals or electrical components
can lead to leaks or failures.
! Vehicles with HANDS-FREE ACCESS: if a
key with KEYLESS-GO is within the detection
range of the KEYLESS-GO antenna, the fol-
lowing situations could lead to the uninten-
tional opening of the boot lid:
R using a car wash
R using a high-pressure cleaner Make sure that the key is at least 2 m away
from the vehicle.
! Mille Miglia special model: parts of your
vehicle are covered with a decorative foil.
Maintain a distance of at least 70 cm between
the foil-wrapped parts of the vehicle and the
nozzle of the high pressure cleaner.
Information about the correct distance is
available from the equipment manufacturer.
Move the high-pressure cleaner nozzle
around when cleaning your vehicle.
Cleaning the paintwork !
Do not affix:
R stickers
R films
R magnetic plates or similar items
to painted surfaces. You could otherwise
damage the paintwork.
Scratches, corrosive deposits, areas affected by
corrosion and damage caused by inadequate
care cannot always be completely repaired. In
such cases, visit a qualified specialist workshop.
X Remove impurities immediately, where pos-
sible, whilst avoiding rubbing too hard.
X Soak insect remains with insect remover and
rinse off the treated areas afterwards.
X Soak bird droppings with water and rinse off
the treated areas afterwards.
X Remove coolant, brake fluid, tree resins, oils,
fuels and greases by rubbing gently with a
cloth soaked in petroleum ether or lighter
fluid.
X Use tar remover to remove tar stains.
X Use silicone remover to remove wax.
Care and treatment of matt paintwork !
Never polish the vehicle or the light alloy
wheels. Polishing makes the paintwork shiny.
! The following may cause the paint to
become shiny and thus reduce the matt
effect:
R vigorous rubbing with unsuitable materials
R frequent use of car washes
R washing the vehicle in direct sunlight
! Never use paint cleaner, buffing or polishing
products, or gloss preserver, e.g. wax. These Care
283Maintenance and care Z
Page 287 of 333
products are only suitable for high-gloss sur-
faces. Their use on vehicles with matt paint-
work leads to considerable surface damage
(shiny, spotted areas).
Always have paintwork repairs carried out at a
qualified specialist workshop.
! Do not use wash programs with a hot wax
treatment under any circumstances.
Observe these notes if your vehicle has a clear
matt finish. This will help you to avoid damage to
the paintwork due to incorrect treatment.
These notes also apply to light-alloy wheels with a clear matt finish.
i The vehicle should preferably be washed by
hand using a soft sponge, car shampoo and
plenty of water.
i Use only insect remover and car shampoo
from the range of recommended and
approved Mercedes-Benz care products. Cleaning vehicle parts
Cleaning the wheels G
WARNING
The water jet of circular-jet nozzles (dirt grind- ers) can cause damage not visible from the
outside to tyres or chassis components. Com-
ponents damaged in this way can unexpect-
edly fail. There is a risk of an accident.
Do not use high-pressure cleaners with circu-
lar-jet nozzles to clean the vehicle. Have dam- aged tyres or chassis components replaced
immediately.
! Do not use acidic wheel cleaning products
to remove brake dust. This could damage
wheel bolts and brake components.
! Do not park up your vehicle for a long period
of time immediately after cleaning, particu-
larly after cleaning the wheel rim with wheel
cleaner. Wheel cleaner may lead to increased corrosion of the brake discs and pads. You
should therefore drive for a few minutes after
cleaning. By heating up the brakes, the brake
discs and pads dry. The vehicle can then be
parked up for a long period of time. Cleaning the windows G
WARNING
If the windscreen wipers are set in motion
when cleaning the windscreen or wiper
blades, you could become trapped. There is a danger of injury.
Always switch off the windscreen wipers and
the ignition before cleaning the windscreen orwiper blades.
! Only fold the windscreen wipers away from
the windscreen when vertical. Otherwise, you
will damage the bonnet.
! Do not use dry cloths, abrasive cleaning
agents, solvents or solvent-based cleaning
agents to clean the inside of the windows/
windscreen. Do not touch the inside of the
windows/windscreen with hard items such
as an ice scraper or a ring. Otherwise, the
windows/windscreen could be damaged.
! Clean the water drainage channels of the
windscreen and the rear window at regular
intervals. Deposits such as leaves, petals and
pollen may under certain circumstances pre-
vent water from draining away. This can lead
to corrosion damage and damage to elec-
tronic components.
X Clean the inside and outside of the windows
with a damp cloth and a cleaning agent that is
recommended and approved by Mercedes-
Benz.
Cleaning the wiper blades G
WARNING
If the windscreen wipers are set in motion
when cleaning the windscreen or wiper
blades, you could become trapped. There is a danger of injury.
Always switch off the windscreen wipers and
the ignition before cleaning the windscreen orwiper blades.
! Do not pull on the wiper blade. Otherwise,
the wiper blade could be damaged.
! Do not clean wiper blades too often and do
not rub them too hard. Otherwise, the graph- 284
CareMaintenance and care
Page 292 of 333
Flat tyre
Preparing the vehicle
Your vehicle may be equipped with: R tyres with run-flat characteristics
(MOExtended tyres) (Y page 289)
Vehicle preparation is not necessary on vehi- cles with MOExtended tyres.
R a TIREFIT kit (Y page 288)
R an emergency spare wheel (certain countries
only) (Y page 318)
Vehicles with MOExtended tyres are not equip-
ped with a TIREFIT kit at the factory. It is there-
fore recommended that you additionally equip
your vehicle with a TIREFIT kit if you fit tyres that do not feature run-flat characteristics, e.g. win-
ter tyres. A TIREFIT kit can be obtained from a
qualified specialist workshop.
Information on changing and fitting a wheel
(Y page 312).
X Stop the vehicle as far away as possible from
traffic on solid, non-slippery and level ground.
X Switch on the hazard warning lamps.
X Safeguard the vehicle against rolling away
(Y page 153).
X If possible, bring the front wheels into the
straight-ahead position.
X Switch off the engine.
X Vehicles without KEYLESS-GO: remove the
key from the ignition lock.
X Vehicles with KEYLESS-GO: open the driv-
er's door.
The on-board electronics now have status 0.
This is the same as the key having been
removed.
X Vehicles with KEYLESS-GO: remove the
Start/Stop button from the ignition lock
(Y page 132).
X Make sure that the passengers are not endan-
gered as they do so. Make sure that no one is
near the danger area while a wheel is being
changed. Anyone who is not directly assisting in the wheel change should, for example,
stand behind the barrier.
X Get out of the vehicle. Pay attention to traffic
conditions when doing so.
X Close the driver's door.
X Place the warning triangle at a suitable dis-
tance (Y page 287). Observe legal require-
ments. MOExtended tyres (tyres with run-flat
characteristics)
General notes With MOExtended tyres (tyres with run-flat char-
acteristics), you can continue to drive your vehi- cle even if there is a total loss of pressure in one
or more tyres. The affected tyre must not show
any clearly visible damage.
You can recognise MOExtended tyres by the
MOExtended marking which appears on the tyre wall. You will find this marking next to the tyre
size designation, the load-bearing capacity and
the speed index.
MOExtended tyres may only be used in conjunc-tion with an activated tyre pressure loss warning
system or tyre pressure monitor.
If a pressure loss warning message appears in the multifunction display:
R observe the instructions in the display mes-
sages (Y page 237)
R check the tyre for damage
R if driving on, observe the following notes
The driving distance possible in run-flat mode is
approximately 80 km when the vehicle is parti-
ally laden and approximately 30 km when the
vehicle is fully laden.
In addition to the vehicle load, the driving dis-
tance possible depends upon:
R vehicle speed
R road condition
R outside temperature
The driving distance possible in run-flat mode
may be reduced by extreme driving conditions/
manoeuvres, or it can be increased through a
moderate style of driving.
The driving distance possible in run-flat mode is counted from the moment the tyre pressure loss
warning appears in the multifunction display.
You must not exceed a maximum speed of
80 km/h.
When replacing one or all tyres, observe the fol-
lowing specifications for your vehicle's tyres:
R size
R type and
R the "MOExtended" mark
If a tyre has gone flat and cannot be replaced
with an MOExtended tyre, a standard tyre may
be used as a temporary measure. Make sure Flat tyre
289Breakdown assistance Z