2016 MERCEDES-BENZ SL-CLASS ROADSTER USB port
[x] Cancel search: USB portPage 454 of 614
attained with up-to-date Gracenote®music
recognition technology. Information about
new versions can be obtained from an author-
ized Mercedes-Benz Center.
You can have your music recognition soft-
ware updated there with a DVD, or you can
update it yourself.
iThe Gracenote Media Database is upda-
ted in conjunction with the navigation sys-
tem's digital map (
Ypage 377).
Displaying the track and album
XPress the zbutton.
The current track and album are displayed
in a window.
Displaying metadata (MP3 mode)
COMAND can also display the album name
and artist (metadata) during playback if this
information has been entered into the sys-
tem.
For all media that contain MP3 data (e.g. MP3
CD, SD memory card, MUSIC REGISTER), you
can determine whether:
Rthe metadata contained in the tags of the
encoded music data should be displayed
Rthe file and directory names should be dis-
played during playback
XTo display the album and artist name:
select MP3
orUSBin the basic display by
sliding VÆand turning cVdthe COMAND
controller and press Wto confirm.
XSelect Display track informationand
press Wto confirm.
Selecting an active partition (USB mass
storage devices only)
You can select this function for USB mass
storage devices when the storage device is
partitioned. Up to 5 partitions (primary or log-
ical, FAT, FAT32 and NTFS) are supported.
XSelect MP3in the basic display by sliding
VÆ and turning cVdthe COMAND con-
troller and press Wto confirm.
XSelect Select active partitionand
press Wto confirm.
Playback options
XTo select options: switch on audio CD or
MP3 mode (
Ypage 448).
XSelect CDorMP3mode by sliding VÆand
turning cVdthe COMAND controller and
then pressing Wto confirm.
The options list appears. The #dot indi-
cates the option selected.
XSelect an option by turning cVdand press
W to confirm.
The option is switched on. For all options
except Normal track sequence
, you will
see a corresponding display in the display/
selection window.
The following options are available to you:
RNormal track sequence
The tracks are played in the normal order
(e.g. track 1, 2, 3, etc.).
In MP3 mode, the track order is determined
by the order in which the tracks are written
to the MP3 data carrier when it is created.
Alphabetical order is the most common.
Once all the tracks in a folder have been
played, the tracks in the next folder are
played.
RRandom media
All the tracks on the medium are played in
random order (e.g. track 3, 8, 5 etc.).
RRandom track list(MP3 mode only)
You will hear the tracks in the current play-
list or currently active folder (including all
subfolders) in random order.
iThe Normal track sequenceoption is
automatically selected when you change
the disc you are currently listening to or
when you select a different medium. If an
option is selected, it remains selected after
COMAND is switched on or off.
452Audio
COMAND
Page 455 of 614
Notes on MP3 mode
General notes
Depending on the volume and format of the
MP3 data, the length of time required for
reading the data may increase.
Permissible data carriers
RCD-R and CD-RW
RDVD-R and DVD-RW
RDVD+R and DVD+RW
RSD memory card
RUSB storage device
Permissible file systems
RISO 9660/Joliet standard for CDs
RUDF for video DVDs
RFAT16, FAT32 and NTFS for SD memory
card and USB storage media
Multisession CDs
For multisession CDs, the content of the first
session determines how COMAND will proc-
ess the CD. COMAND plays only one session
and gives priority to the audio CD session.
If possible, use COMAND to play only CDs
that have been written in one session.
File structure of a data carrier
When you create a disc with compressed
music files, the tracks can be organized in
folders. A folder may also contain subfolders.
The disc may contain no more than eight
directory levels. Files beyond the eighth level
will not be recognized by the system.
iCOMAND loads up to 15,000 tracks from
an SD memory card or USB storage
medium.
Track and file names
When you create a disc with compressed
music files, you can assign names to the
tracks and fo
lders.
COMAND uses these names accordingly for
the display. Folders that contain data other
than MP3 or WMA tracks are not displayed by
COMAND. If MP3 or WMA files are stored in the root
directory itself, the root directory will also be
treated as a folder. COMAND will then show
the name of the root directory as the folder
name.
You should observe the following when
assigning track names:
Rtrack names must have at least one char-
acter.
Rtrack names must have the extension
"mp3" or "wma".
Rthere must be a dot between the track
name and the extension.
Example of a correct track name:
"Track1.mp3".
Permissible formats
COMAND supports the following formats:
RMPEG1 Audio Layer 3 (MP3)
RMicrosoft Windows Media Audio V8 and V9
(WMA) without copy protection
Microsoft Windows Media Audio V2, V7, V8
and V9 (WMA)
Radditional music files in AAC format with
the file extensions .aac, .mp4, .m4a
and .m4b, but not copy-protected iTunes
music files with the extension .m4p.
iIf, in addition to MP3 files, there are other
music files in these audio formats stored on
the disc, the loading process may require a
l
onger time before the first track is played.
iThe MP3 audio encoding method is under
license from Fraunhofer IIS (Institut Integ-
rierte Schaltungen – Institute for Integrated
Circuits) and Thomson.
Permissible bit and sampling rates
COMAND supports MP3files of the following
types:
Rfixed and variable bit rates from 32 kbit/s
to 320 kbit/s
Rsampling rates of 8 kHz to 48 kHz
Audio453
COMAND
Z
Page 460 of 614
?Graphic time and track display
APosition of the medium in the media list
and name of the medium, followed by the
current playback option (no display for
Normal Track Sequence
)
BArtist
CMUSIC REGISTER menu bar
Switching on using the DISC button
XPress the hbutton repeatedly until the
MUSIC REGISTER is switched on.
By pressing the hbutton repeatedly, you
can switch modes in the following order:
RCD/MP3 (disc)
RMemory card mode
RMUSIC REGISTER
RUSB storage device
RMedia Interface or audio AUX mode
RBluetooth®audio mode
If music files are available, playback begins at
the point last listened to.
If there are no music files, you will see a mes-
sage to this effect.
XConfirm the message by pressing Wand
store the music data (
Ypage 458).
Switching modes via the audio menu
XSelect Audioin the main function bar by
sliding ZVand turning cVdthe COMAND
controller and press Wto confirm.
If MUSIC REGISTER was the last mode
selected, it is now switched on.
If another audio source is switched on, you
can now switch on the MUSIC REGISTER in
the audio menu.
XSelect Audioby sliding ZVand turning
cVd the COMAND controller and press W
to confirm.
The audio menu appears.
XSelect Music Registerand press Wto
confirm. Switching on with the number buttons
XMake sure that neither radio nor disc is
activated.
XPress the
mnumber key.
The MUSIC REGISTER is switched on.
Importing music files
Introduction
You can import music files from a CD in the
following file formats:
RMP3
RWMA
RAAC (with file extensions .m4p, .m4a, .m4b and .aac)
XSwitch on CD mode (Ypage 448).
XWith an audio CD inserted, select RECin the
basic CD display by sliding VÆand turning
cVd the COMAND controller and press W
to confirm.
iCD information such as album name, disc
name, artist and track is provided by the
Gracenote Media Database (
Ypage 450).
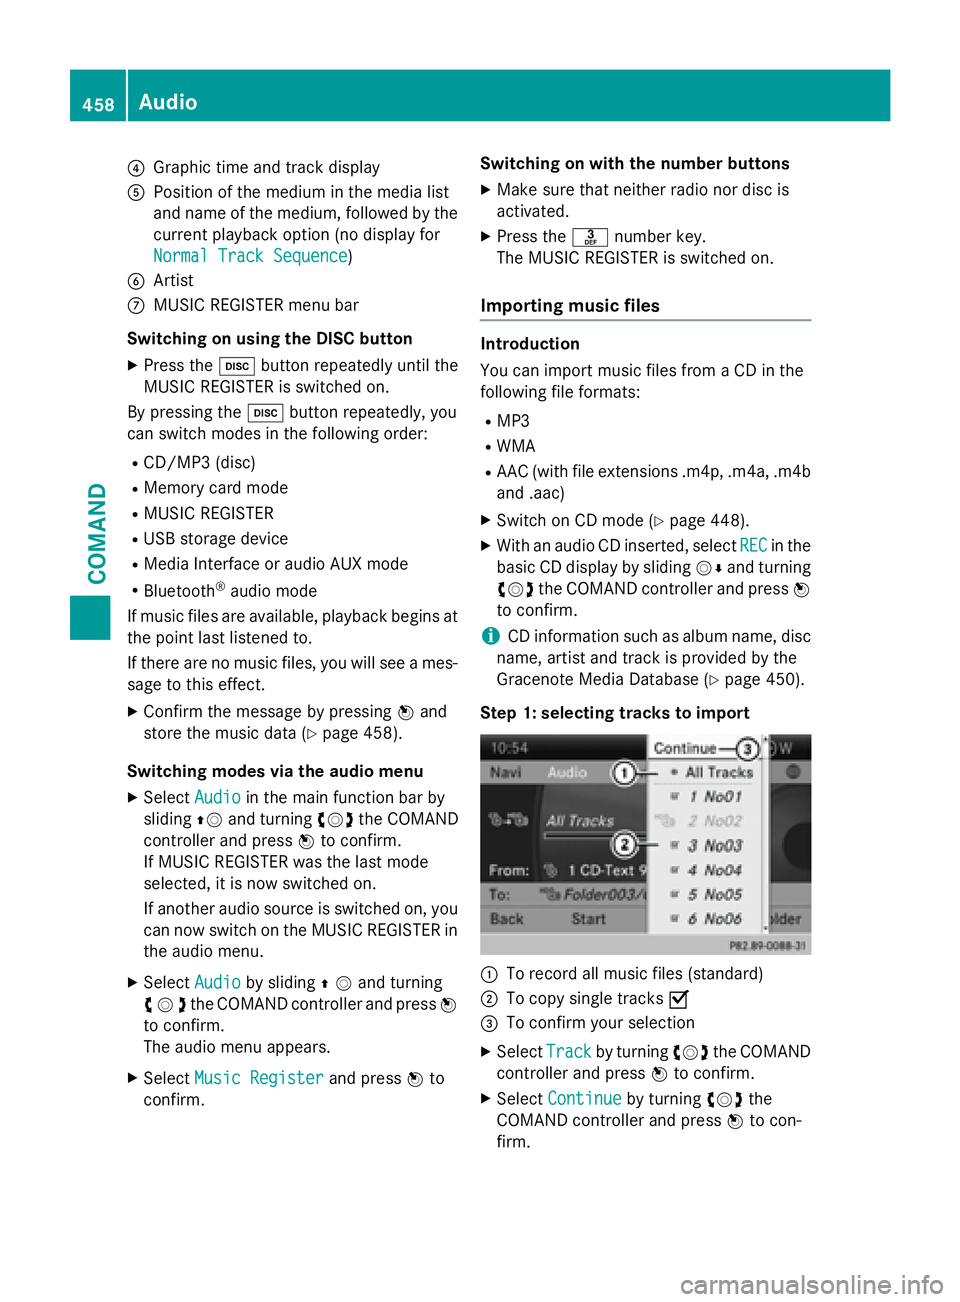
Step 1: selecting tracks to import
:To record all music files (standard)
;To copy single tracks O
=To confirm your selection
XSelectTrackby turning cVdthe COMAND
controller and press Wto confirm.
XSelect Continueby turning cVdthe
COMAND controller and press Wto con-
firm.
458Audio
COMAND
Page 467 of 614
Switching to Bluetooth®audio mode
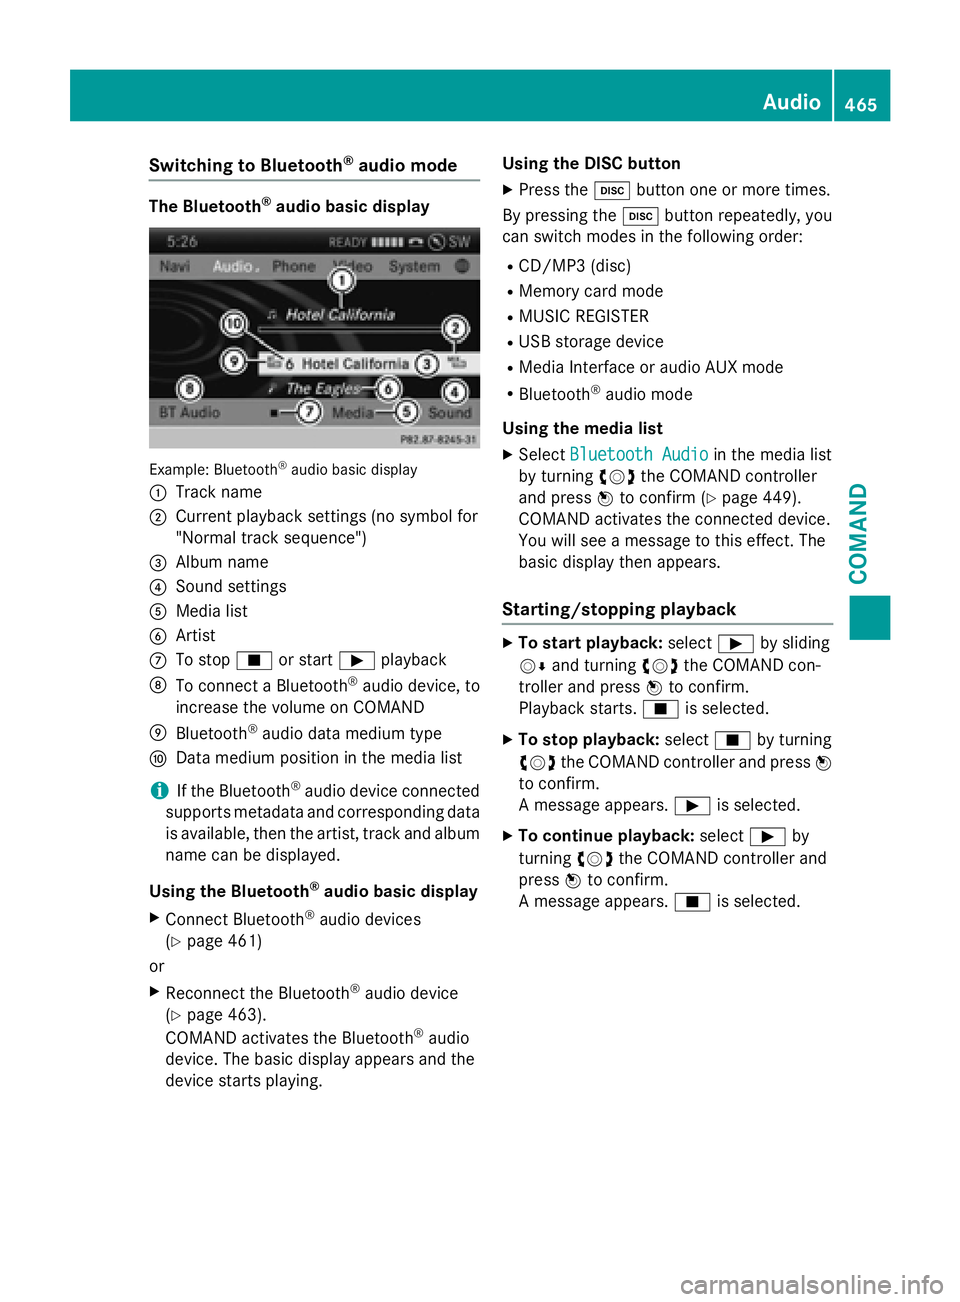
The Bluetooth®audio basic display
Example: Bluetooth®audio basic display
:
Track name
;Current playback settings (no symbol for
"Normal track sequence")
=Album name
?Sound settings
AMedia list
BArtist
CTo stop Éor start Ìplayback
DTo connect a Bluetooth®audio device, to
increase the volume on COMAND
EBluetooth®audio data medium type
FData medium position in the media list
iIf the Bluetooth®audio device connected
supports metadata and corresponding data
is available, then the artist, track and album
name can be displayed.
Using the Bluetooth
®audio basic display
XConnect Bluetooth®audio devices
(
Ypage 461)
or
XReconnect the Bluetooth®audio device
(
Ypage 463).
COMAND activates the Bluetooth®audio
device. The basic display appears and the
device starts playing. Using the DISC button
XPress the
hbutton one or more times.
By pressing the hbutton repeatedly, you
can switch modes in the following order:
RCD/MP3 (disc)
RMemory card mode
RMUSIC REGISTER
RUSB storage device
RMedia Interface or audio AUX mode
RBluetooth®audio mode
Using the media list
XSelect Bluetooth Audioin the media list
by turning cVdthe COMAND controller
and press Wto confirm (
Ypage 449).
COMAND activates the connected device.
You will see a message to this effect. The
basic display then appears.
Starting/stopping playback
XTo start playback: selectÌby sliding
VÆ and turning cVdthe COMAND con-
troller and press Wto confirm.
Playback starts. Éis selected.
XTo stop playback: selectÉby turning
cVd the COMAND controller and press W
to confirm.
A message appears. Ìis selected.
XTo continue playback: selectÌby
turning cVdthe COMAND controller and
press Wto confirm.
A message appears. Éis selected.
Audio465
COMAND
Z
Page 469 of 614

Increasing the volume on COMAND
XSelect BTAudioby sliding VÆand turning
cVd the COMAND controller and press W
to confirm.
XSe lect Volumeand press Wto confirm.
A menu appears. The #dot indicates the
current setting.
XSe lect StandardorBoostand press Wto
confirm.
In formation about sound settings
(
Ypage 298)
You willfind further information inthe "Audio
AUX mode" section (
Ypage 473)
Operation with the Media Interface
Connection options
Overview
You willfind the connection sockets in the
center console stowage compartment.
Device-specific adapter cables are required
to connect external devices to the Media
In terface. Country-specific versions are sup-
plied wit h the Media Interface (
Ypage 467).
You can connect the following data carriers to
COMAND via the Media Interface:
RiPod®
RiPhone®
Rcertain MP3 players
iSt ore ind ividual parts ina safe place.
Only use genuine Mercedes-Benz connec-
tion cables.
iiPod®and iPhone®are registered trade-
marks of Ap ple Inc., Cupertino, California,
USA.
iMP3 players that support MTP ( Med ia
T ransfer Protoco l)can beused.
This allows the MP3 player to beeasily con-
nected to the Media Interface and removed
after use. Aud iodata isplayed without
problem.
On some MP3 players, you have to act ivate
the relevant function; see the MP3 player
operating instructions.
Supported devices
For details and a listof supported devices,
vis itht tp://www.mbusa- mobile.com . Or
call the Mercedes-Benz Customer Assistance
Center at 1-800-FOR-MERCedes
(1-800-367-6372 )(for the USA) or Customer
Relations at 1-800-387-0100 (for Canada).
Connecting an external device
Do not leave external devices in the vehicle.
They may malfunction in extreme tempera-
tures; see the operating instructions for the
respective device. Examples of extreme tem-
peratures are direct sunlight or very low out-
side temperatures. Mercedes-Benz USA, LLC
accepts no liability for damage to external
devices.
iNever connect more than one device at a
time. You will otherwise not be able to play back from the external device.
USB hubs (devices with several USB con-
nections) are not supported.
Audio467
COMAND
Z
Page 470 of 614

:Four-pin socket for ⅛ inch stereo jack,
e.g. for MP3 players (audio and video)
;iPod®plug for connecting an iPod®
=USB socket for connecting an MP3 player
?Example of device: iPod®
XConnect the external device with suitable
socket:,;or=.
COMAND activates the device, a display
appears (when connecting an iPod
®plug or
USB socket).
If you remove a device, the No
DeviceCon‐
nectedmessage appears.
iA connected iPod®or MP3 player should
not be simultaneously operated via the
Media Interface and the remote control
(e.g. Bluetooth
®remote control) or directly
via the device itself. This may cause unfore- seen technical difficulties.
Applications (Apps) that are activated on
the connected device may lead to malfunc-
tions.
iConnecting a fully discharged iPod®or
MP3 player can result in an extended initi-
alization period.
Malfunction messages appear while the
device is being activated if:
Rthe connected device is not supported
( External Device Unavailable
mes-
sage).
Rthe connected device consumes too much
power.
Rthe Media Interface connection is faulty.
Ra mass storage device (e.g. a USB memory
stick or USB hard drive) is connected to the
Media Interface.
In this case the Please connect the
device to the other USB portmes-
sage appears.
iThe separate USB connection ensures
quick access and expanded media content options.
iConsult an authorized Mercedes-Benz
Center if you have further questions.
Disconnecting an iPod
®
XPress the release catch on iPod®plug ;
and pull the iPod®cable from the iPod®,
see the separate cable kit instructions.
Switching to Media Interface mode
General notes
In extreme cases, starting up individual func-
tions can take up to several minutes – this
depends on the external device and its con-
tent (e.g. video podcasts).
Only use the original software to save files on
iPods
®or MP3 players. Otherwise, some or all
functions may not be available.
Switching on automatically
XConnect an external device (Ypage 467).
COMAND activates the device (if connec-
ted via the iPod
®connector or USB socket).
The basic display then appears.
Switching on using the DISC button
The external device is connected to the Media Interface.
XPress the hbutton one or more times.
By pressing the DISC button repeatedly, you
can switch modes in the following order:
RCD/MP3 (disc)
RMemory card mode
RMUSIC REGISTER
468Audio
COMAND
Page 475 of 614
Dataformats
MP3 and WMA are supported as dat aformats
wit hfixed and variable bit rates (up to
32 0kbits/s).
Specia lconsiderations when using MP 3
player s
Up to eigh tdirectory levels wit hup to 1,000
track sper directory are supported.
Do no tuse US Bextension leads or adapters .
The ycan impair functionality.
iDRM (Digital Rights Management) protec-
te dfiles are no tsupported by th eMedia
Interface .
Audio AUX mode
Note son audi oAUX mode
External audio source smay hav edifferen t
volumes ,whic hcan mean that system mes -
sage ssuc has traffic announcements and
navigation system announcements are muc h
louder. If necessary, deactivat eth esystem
message sor adjust their volume manually.
You can connec tan external audio source
(AUX) to COMAND .
Dependin gon th evehicl emodel series, th e
connection is made usin g ajackin th estow-
age compartmen tin th ecenter console or a
US Bpor t (
Ypage 447).
If COMAND is equipped wit hth eMedia Inter-
face, external audio source sare connecte d
usin gth ecable set provided. An AU Xsocke t
is no tprovided. The connection sfo rth e
Media Interface are locate din th estowage
compartmen tin th ecenter console.
iYou will fin dfurther information onlin eat
http://www.mbusa-mobile.co m.Or cal l
th eMercedes-Ben zCustome rAssistance
Cente rat 1-800-FOR-MERCedes
(1-800-367-6372 ) (for the USA) or Cus-
tomer Relations at 1-800-387-0100 (for
Canada).
Switching to audio AUX mode
Switching on using the DISC button
The external device is connected to the audio
AUX input.
XPress the hbutton one or more times.
By pressing the function button repeatedly,
you can change the operating mode in the
following order:
RCD/MP3 (disc)
RMemory card mode
RMUSIC REGISTER
RUSB storage device
RMedia Interface or audio AUX mode
RBluetooth®audio mode
Switching modes via the audio menu
When you connect an external audio source,
audio AUX is not selected automatically.
XSelect Audioin the main function bar by
sliding ZVand turning cVdthe COMAND
controller and press Wto confirm.
If AUX mode was the last mode selected, it
will now be active.
If another audio source is switched on, you
can now switch to audio AUX mode in the
audio menu.
XSelect AudiousingZVand press Wto
confirm.
The audio menu appears.
XSelect Auxby turning cVdand press Wto
confirm.
The audio AUX menu appears. The medium
in the external audio source is played if the
source is connected and playback selec-
ted.
Audio473
COMAND
Z
Page 483 of 614
XSelectVideoand press Wto confirm.
XSelect Auxand press Wto confirm.
The AUX video menu appears. You will hear
and see the content of the external video
source if it is connected and switched to
playback.
Showing/hiding the menu
XTo show: in video AUX mode, press Wthe
COMAND controller.
XTo hide: slideZVthe COMAND controller
and confirm Full Screen
by pressingW.
Volume and sound settings
Information on:
RVolume settings (Ypage 297)
RSound settings (Ypage 298)
iA device which is connected as an exter-
nal video source may seem quieter or
louder in the vehicle, or the usual maximum
volume cannot be achieved. On some devi-
ces, it is possible to adjust the volume sep-
arately. In this case, start at a medium vol-
ume and increase it gradually. This enables
you to determine whether the system is
able to play the sound at high volume with-
out distorting it.
Increasing the volume on COMAND
XShow the video AUX menu (Ypage 481).
XSelect Volumeby turning cVdthe
COMAND controller and press Wto con-
firm.
A menu appears. The #dot indicates the
current setting.
XSelect StandardorBoostand press Wto
confirm.
Standard
: the volume of the external video
source is adjusted to a standard value.
Boost
: the volume of the external video
source is raised by approximately 10 dB.
Picture viewer
Introduction
If there are pictures on the active data
medium, you can look at them. You can dis-
play pictures with a resolution of up to 20
megapixels.
Data mediumSupported picture
formats
CD/DVD with pic-
ture filesbmp, jpeg, jpg, png
USB devices (sticks,
hard drives)
SD memory cardbmp, jpeg, jpg, png
Calling up a category list
XSelect a data medium with pictures (e.g. a
memory card):
Rin the Audio menu (Ypage 437)
Rin the media list (Ypage 449)
XSelect Searchin the basic display by slid-
ing VÆ and turning cVdthe COMAND
controller and press Wto confirm.
The category list appears (
Ypage 454).
Displaying pictures
XSelect (Ypage 454) Photosin the category
list by turning cVdthe COMAND controller
and press Wto confirm.
A folder directory appears.
XSelect a folder with photos and press Wto
confirm.
The folder displays the existing picture files (example).
Video481
COMAND
Z