2016 MERCEDES-BENZ SL-CLASS ROADSTER check oil
[x] Cancel search: check oilPage 260 of 614
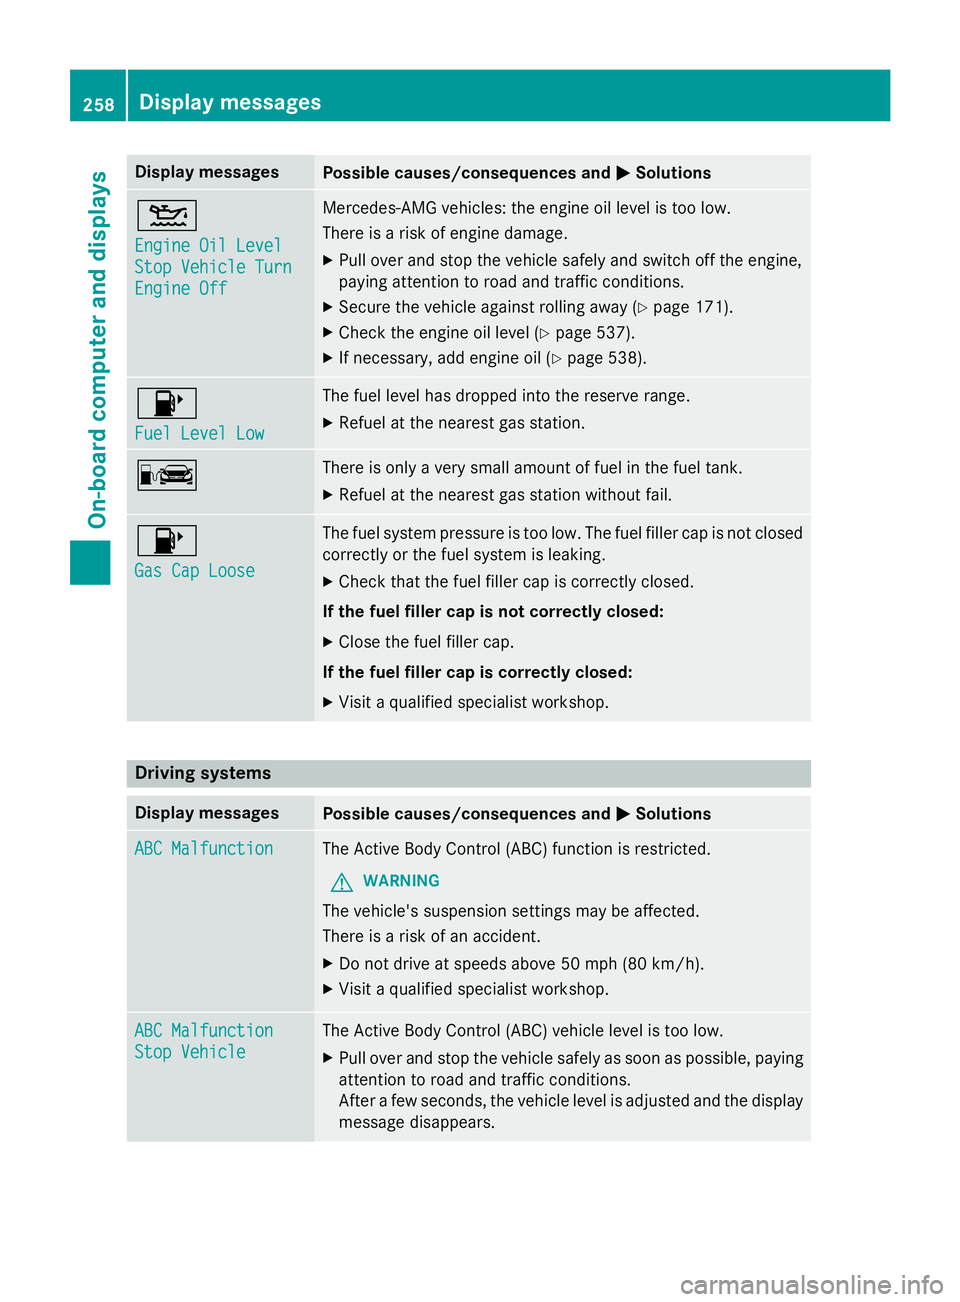
Display messagesPossible causes/consequences andMSolutions
4
Engine Oil Level
StopVehicl eTur n
Engine Off
Mercedes-AMG vehicles: th eengin eoil level is to olow.
There is aris kof engin edamage.
XPull ove rand stop th evehicl esafely and switch of fth eengine,
payin gattention to roa dand traffic conditions.
XSecur eth evehicl eagainst rollin gaway (Ypage 171).
XCheckth eengin eoil level (Ypage 537).
XIf necessary, add engin eoil (Ypage 538).
8
Fue lLevel Low
The fuel level has dropped into th ereserv erange.
XRefuel at th eneares tgas station .
CThere is only aver ysmall amount of fue lin th efuel tank.
XRefuel at th eneares tgas station without fail .
8
Gas Cap Loose
The fuel system pressur eis to olow. The fuel filler cap is no tclosed
correctl yor th efue lsystem is leaking.
XChec kthat th efuel filler cap is correctl yclosed .
If th efuel filler cap is not correctl yclosed :
XCloseth efuel filler cap .
If th efuel filler cap is correctl yclosed :
XVisitaqualified specialist workshop .
Driving systems
Display messagesPossible causes/consequences and MSolutions
ABC MalfunctionThe Active Body Control (ABC) function is restricted.
GWARNING
The vehicle's suspensio nsetting smay be affected.
There is aris kof an accident.
XDo no tdrive at speeds abov e50 mph (80 km/h).
XVisit aqualified specialist workshop .
ABC Malfunction
StopVehicl e
The Active Body Control (ABC) vehicl elevel is to olow.
XPull ove rand stop th evehicl esafely as soo nas possible, payin g
attention to roa dand traffic conditions.
Afte r afew seconds, th evehicl elevel is adjusted and th edisplay
message disappears.
258Display messages
On-board computer and displays
Page 539 of 614
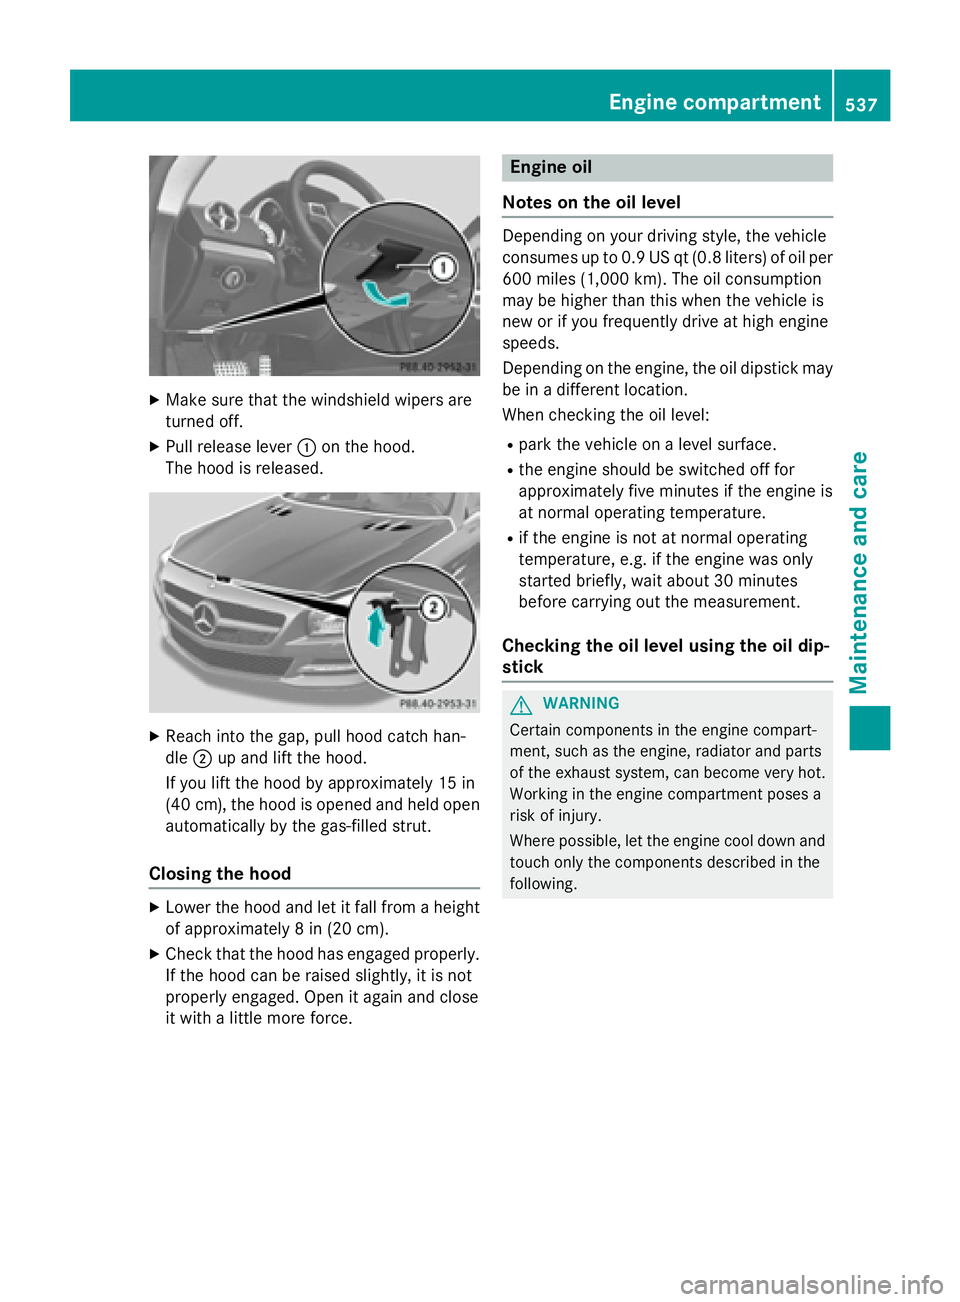
XMake sure that the windshield wipers are
turned off.
XPull release lever:on the hood.
The hood is released.
XReach into the gap, pull hood catch han-
dle ;up and lift the hood.
If you lift the hood by approximately 15 in
(40 cm), the hood is opened and held open automatically by the gas-filled strut.
Closing the hood
XLower the hood and let it fall from a height
of approximately 8 in (20 cm).
XCheck that the hood has engaged properly.
If the hood can be raised slightly, it is not
properly engaged. Open it again and close
it with a little more force.
Engine oil
Notes on the oil level
Depending on your driving style, the vehicle
consumes up to 0.9 US qt (0.8 liters) of oil per
600 miles (1,000 km). The oil consumption
may be higher than this when the vehicle is
new or if you frequently drive at high engine
speeds.
Depending on the engine, the oil dipstick may
be in a different location.
When checking the oil level:
Rpark the vehicle on a level surface.
Rthe engine should be switched off for
approximately five minutes if the engine is
at normal operating temperature.
Rif the engine is not at normal operating
temperature, e.g. if the engine was only
started briefly, wait about 30 minutes
before carrying out the measurement.
Checking the oil level using the oil dip-
stick
GWARNING
Certain components in the engine compart-
ment, such as the engine, radiator and parts
of the exhaust system, can become very hot.
Working in the engine compartment poses a
risk of injury.
Where possible, let the engine cool down and touch only the components described in the
following.
Engine compartment537
Maintenance and care
Z
Page 541 of 614
XReplacecap :on th efiller neck and tur n
clockwise .
Ensur ethat th ecap locks into plac e
securely.
XChec kth eoil level again wit hth eoil dip-
stick (
Ypage 537).
Further information on engin eoil
(
Ypage 605).
Checking and addin gother service
products
Checking coolant level
GWARNIN G
Certain component sin th eengin ecompart-
ment, suc has th eengine, radiato rand part s
of th eexhaust system, can become ver yhot .
Working in th eengin ecompartmen tposes a
ris kof injury.
Where possible, let th eengin ecool down and
touch only th ecomponent sdescribed in th e
following.
GWARNIN G
The engin ecoolin gsystem is pressurized, par-
ticularly when th eengin eis warm .Whe n
openin gth ecap ,you could be scalded by hot
coolan tsprayin gout .There is aris kof injury.
Let th eengin ecool down before openin gth e
cap .Wear eye and han dprotection when
openin gth ecap .Ope nth ecap slowly half a
tur nto allow pressur eto escape.
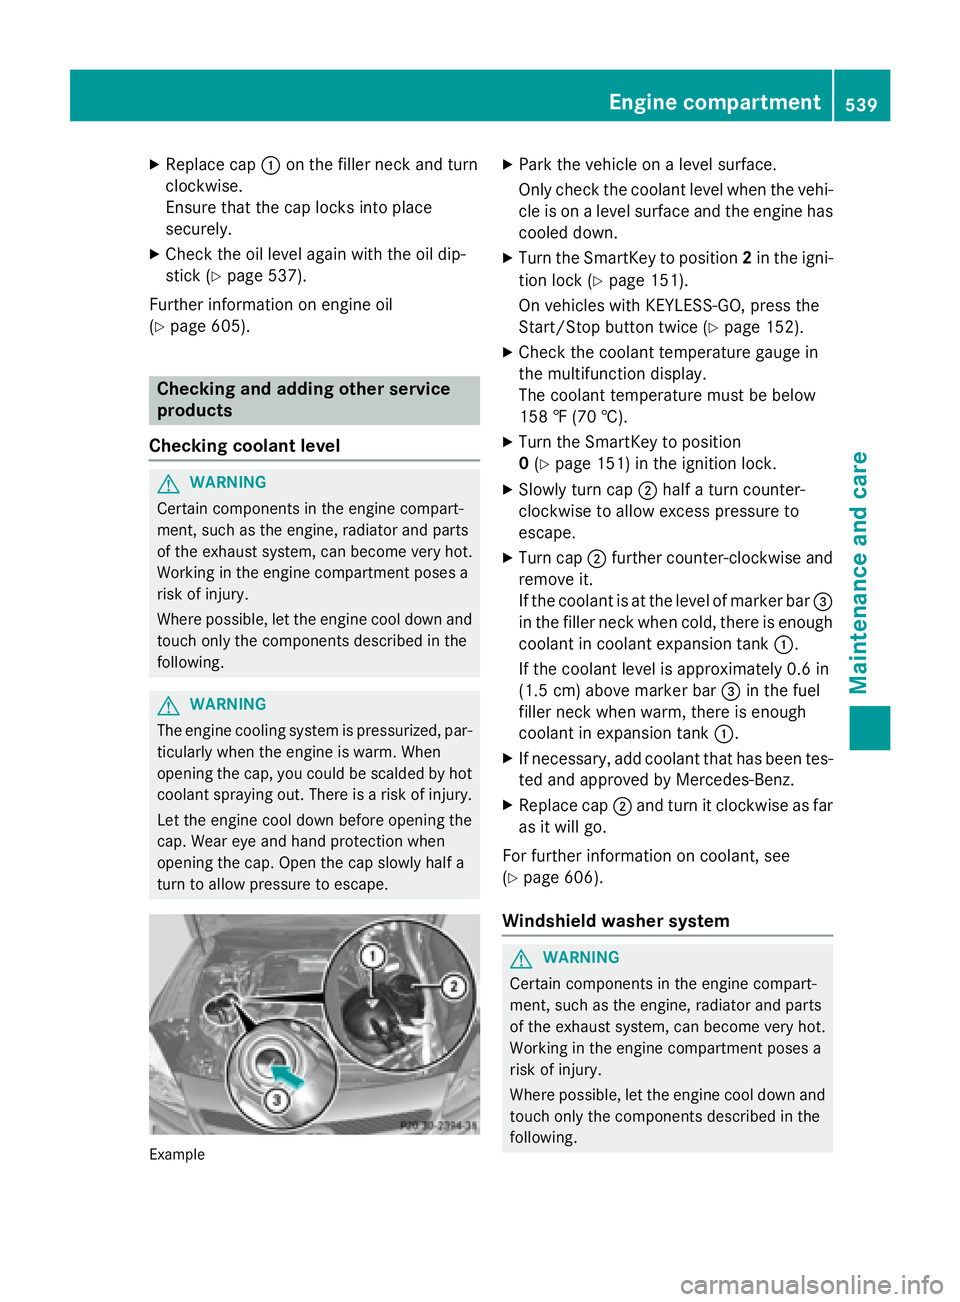
Exampl e
XPark thevehicl eon alevel surface.
Only chec kth ecoolan tlevel when th evehi-
cle is on alevel surfac eand th eengin ehas
cooled down .
XTurn theSmartKey to position 2in th eigni-
tion loc k (
Ypage 151).
On vehicles wit hKEYLESS-GO ,press th e
Start/Sto pbutto ntwice (
Ypage 152).
XCheckth ecoolan ttemperature gauge in
th emultifunction display.
The coolan ttemperature mus tbe belo w
15 8 ‡ (70 †).
XTurn th eSmartKey to position
0 (
Ypage 151) in th eignition lock.
XSlowly tur ncap ;half atur ncounter-
clockwise to allow excess pressur eto
escape.
XTurn cap ;further counter-clockwise and
remove it .
If th ecoolan tis at th elevel of marke rbar =
in th efiller neck when cold, there is enough
coolan tin coolan texpansion tan k:.
If th ecoolan tlevel is approximately 0. 6in
(1.5 cm ) above marker bar =in the fuel
filler neck when warm, there is enough
coolant in expansion tank :.
XIf necessary, add coolant that has been tes-
ted and approved by Mercedes-Benz.
XReplace cap;and turn it clockwise as far
as it will go.
For further information on coolant, see
(
Ypage 606).
Windshield washer system
GWARNING
Certain components in the engine compart-
ment, such as the engine, radiator and parts
of the exhaust system, can become very hot.
Working in the engine compartment poses a
risk of injury.
Where possible, let the engine cool downand
touch only the components describe d in the
foll owin g.
Engine compartment539
Maintenance and care
Z
Page 543 of 614
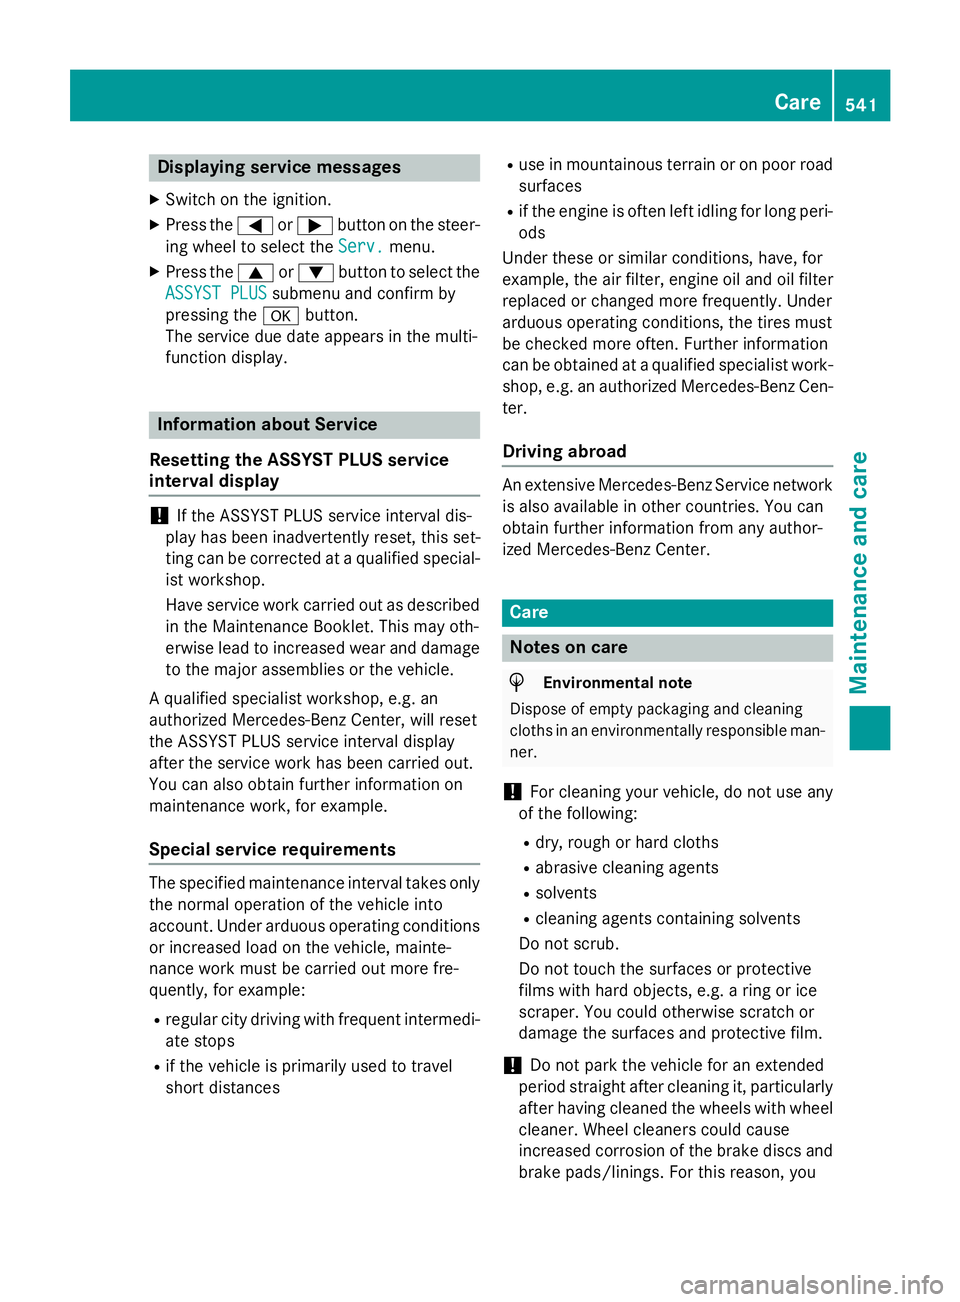
Displaying service messages
XSwitchon th eignition .
XPress th e= or; buttonon th esteer -
in g whee lto selec tth eServ.
menu.
XPress th e9 or: buttonto selec tth e
ASSYST PLU S
submenuand confirm by
pressing th ea button.
The servic edue dat eappears in th emulti-
function display.
Information about Service
Resetting th eASSYS TPLUS service
interva ldisplay
!If th eASSYST PLU Sservic einterval dis -
play has been inadvertentl yreset ,this set -
ting can be correcte dat aqualified special-
ist workshop .
Hav eservic ewor kcarrie dout as described
in th eMaintenance Booklet .Thi smay oth-
erwise lead to increase dwear and damage
to th emajor assemblies or th evehicle.
A qualified specialis tworkshop ,e.g. an
authorized Mercedes-Ben zCenter, will reset
th eASSYST PLU Sservic einterval display
after th eservic ewor khas been carrie dout .
You can also obtain further information on
maintenance work, fo rexample.
Specia lservice requirement s
The specifiedmaintenance interval take sonly
th enormal operation of th evehicle into
account. Under arduous operatin gcondition s
or increase dload on th evehicle, mainte -
nance wor kmus tbe carrie dout more fre-
quently, fo rexample:
Rregular city drivin gwit hfrequent intermedi-
at estops
Rif th evehicle is primarily used to trave l
short distances
Ruse in mountainous terrain or on poo rroad
surfaces
Rif th eengin eis ofte nlef tidlin gfo rlon gperi-
ods
Under these or similar conditions, have, fo r
example, th eair filter, engin eoil and oil filte r
replaced or changed more frequently. Under
arduous operatin gconditions, th etires mus t
be checke dmore often. Further information
can be obtained at aqualified specialist work-
shop, e.g. an authorized Mercedes-Ben zCen -
ter.
Drivin gabroad
An extensive Mercedes-Ben zServic enetwor k
is also available in other countries. You can
obtain further information from any author -
ized Mercedes-Ben zCenter.
Car e
Note son car e
HEnvironmental not e
Dispose of empty packagin gand cleanin g
cloths in an environmentally responsible man -
ner.
!Fo rcleanin gyour vehicle, do no tuse any
of th efollowing :
Rdry, rough or har dcloths
Rabrasiv ecleanin gagents
Rsolvents
Rcleanin gagents containin gsolvents
Do no tscrub .
Do no ttouch th esurfaces or protective
films wit hhar dobjects ,e.g. arin gor ic e
scraper. You could otherwise scratch or
damage th esurfaces and protective film.
!Do no tpar kth evehicle fo ran extended
period straight after cleanin git,particularly
after havin gcleaned th ewheels wit hwhee l
cleaner. Wheel cleaners could caus e
increase dcorrosion of th ebrake discs and
brake pads/linings. Fo rthis reason ,you
Care541
Maintenance and care
Z
Page 556 of 614
attained a pressure of at least 180 kPa
(1.8 bar/26 psi).
If a tire pressure of 180 kP a(1.8 bar/26 psi)
has been attained after five minutes:
(
Ypage 554).
If a tire pressure of 180 kPa (1.8 bar/26 psi)
has not been attained after five minutes:
(
Ypage 554).
iIf tire sealant leaks out, allow it to dry. It
can then be removed like a layer of film.
If your clothes are soiled with tire sealant,
have them cleaned with perchloroethylene
at a dry cleaner as soon as possible.
Tire pressure not reached
If a pressure of 180 kPa (1.8 bar/26 psi) has
not been attained after five minutes:
XSwitch off the tire inflation compressor.
XUnscrew the filler hose from the valve of
the faulty tire.
XVery slowly drive forwards or reverse
approximately 30 ft (10 m).
XPump up the tire again.
After a maximum of five minutes the tire
pressure must be at least 180 kPa (1.8 bar/ 26 psi).
GWARNING
If the required tire pressure is not reached
after the specified time, the tire is too badly
damaged. The tire sealant cannot repair the
tire in this instance. Damaged tires and a tire
pressure that is too low can significantly
impair the vehicle's braking and driving char-
acteristics. There is a risk of accident.
Do not continue driving. Contact a qualified
specialist workshop.
Tire pressure reached
GWARNING
A tire temporarily sealed with tire sealant
impairs the driving characteristics and is not
suitable for higher speeds. There is a risk of
accident.
You should therefore adapt your driving style
accordingly and drive carefully. Do not exceed the specified maximum speed with a tire that
has been repaired using tire sealant.
The maximum speed for a tire sealed with tire
sealant is 50 mph (80 km/h). The upper part of the TIREFIT sticker must be affixed to the
instrument cluster in the driver's field of
vision.
!Residue from the tire sealant may come
out of the filler hose after use. This could
cause stains.
Therefore, place the filler hose in the plastic bag which contained the TIREFIT kit.
HEnvironmental note
Have the used tire sealant bottle disposed of
professionally, e.g. at a qualified specialist
workshop.
If a tire pressure of 180 kPa (1.8 bar/26 psi)
has been achieved after a maximum period of ten minutes:
XSwitch off the tire inflation compressor.
XUnscrew the filler hose from the valve of
the faulty tire.
XStow the tire sealant bottle and the tire
inflation compressor.
XPull away immediately.
XStop after driving for approximately ten
minutes and check the tire pressure with
the tire inflation compressor.
The tire pressure must now be at least
130 kPa (1.3 bar/19 psi).
GWARNING
If the required tire pressure is not reached
after driving for a short period, the tire is too
badly damaged. The tire sealant cannot repair
the tire in this instance. Damaged tires and a
tire pressure that is too low can significantly
impair the vehicle's braking and driving char-
acteristics. There is a risk of accident.
554Flat tire
Breakdown assistance
Page 591 of 614
Tire-mounting tools should not be used
near the valve. This could damage the elec-
tronic components.
Only have tires changed at a qualified spe-
cialist workshop.
Always pay attention to the instructions and
safety notes when changing a wheel
(
Ypage 589).
The wear patterns on the front and rear tires
differ, depending on the operating conditions.
Rotate the wheels before a clear wear pattern
has formed on the tires. Front tires typically
wear more on the shoulders and the rear tires
in the center.
On vehicles that have the same size front and
rear wheels, you can rotate the wheels
according to the intervals in the tire manu-
facturer's warranty book in your vehicle docu-
ments. If no warranty book is available, the
tires should be rotated every 3,000 to
6,000 miles (5,000 to 10,000 km). Depending on tire wear, this may be required earlier. Do
not change the direction of wheel rotation.
Clean the contact surfaces of the wheel and
the brake disc thoroughly every time a wheel
is rotated. Check the tire pressure and, if nec-
essary, restart the tire pressure loss warning
system.
Direction of rotation
Tires with a specified direction of rotation
have additional benefits, e.g. if there is a risk
of hydroplaning. These advantages can only
be gained if the tires are installed correspond-
ing to the direction of rotation.
An arrow on the sidewall of the tire indicates
its correct direction of rotation.
Storing wheels
Store wheels that are not being used in a cool,
dry and preferably dark place. Protect the
tires from oil, grease, gasoline and diesel.
Mounting a wheel
Preparing the vehicle
XStop the vehicle on solid, non-slippery and
level ground.
XUnload the vehicle. The jack can only be
used when the vehicle is unladen.
XApply the electric parking brake manually.
XBring the front wheels into the straight-
ahead position.
XShift the transmission to position P.
XSwitch off the engine.
XVehicles without KEYLESS-GO:remove
the SmartKey from the ignition lock.
XVehicles with KEYLESS-GO: open the
driver's door.
The on-board electronics now have status
0. This is the same as the SmartKey having
been removed.
XVehicles with KEYLESS-GO: remove the
Start/Stop button from the ignition lock
(
Ypage 152).
XIf included in the vehicle equipment,
remove the tire-change tool kit from the
vehicle.
XSafeguard the vehicle against rolling away.
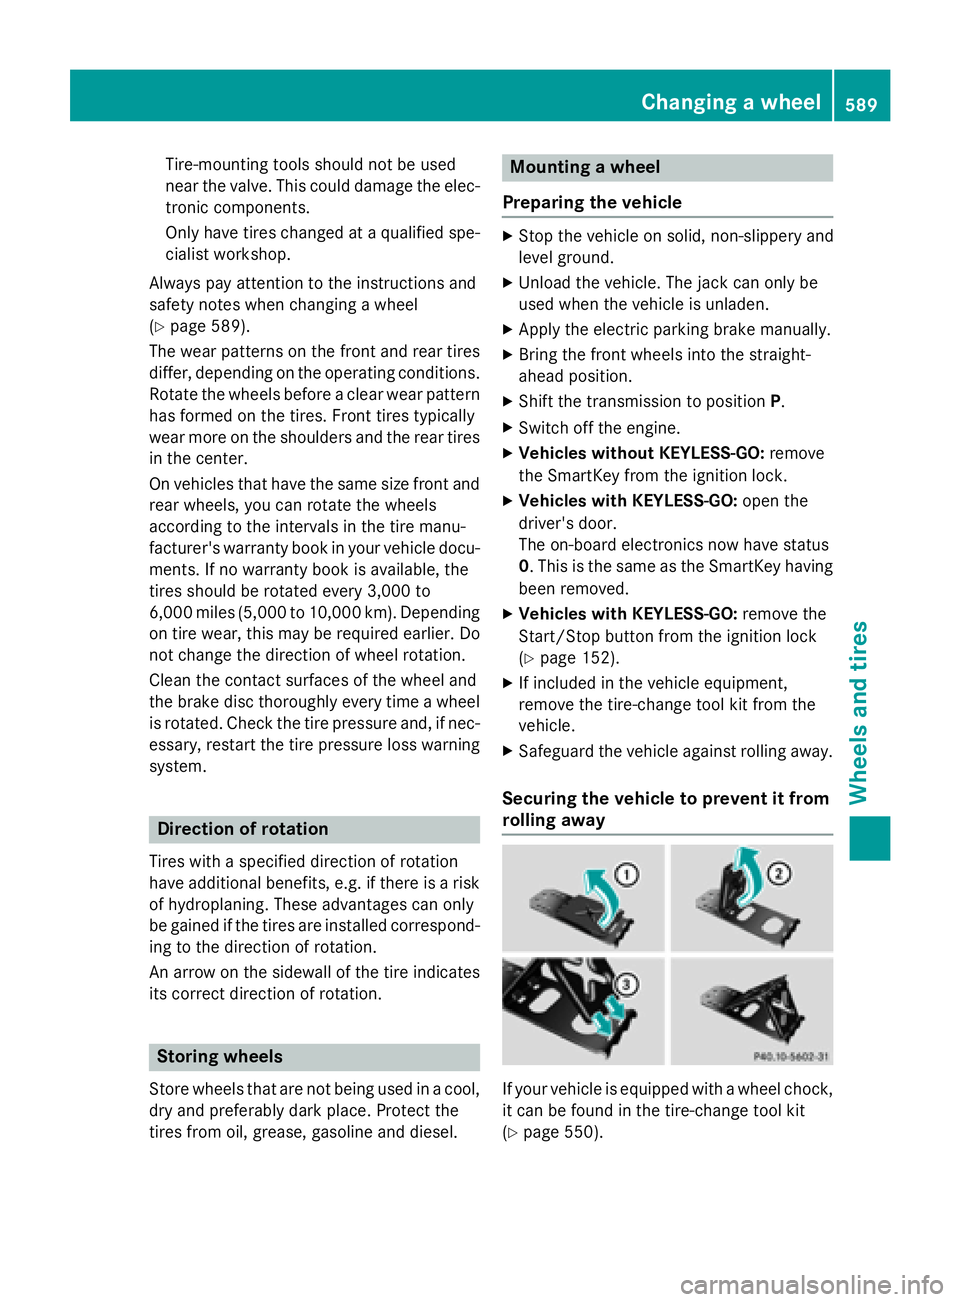
Securing the vehicle to prevent it from
rolling away
If your vehicle is equipped with a wheel chock,
it can be found in the tire-change tool kit
(
Ypage 550).
Changing a wheel589
Wheels and tires
Z