2016 MERCEDES-BENZ S-COUPE oil level
[x] Cancel search: oil levelPage 329 of 410
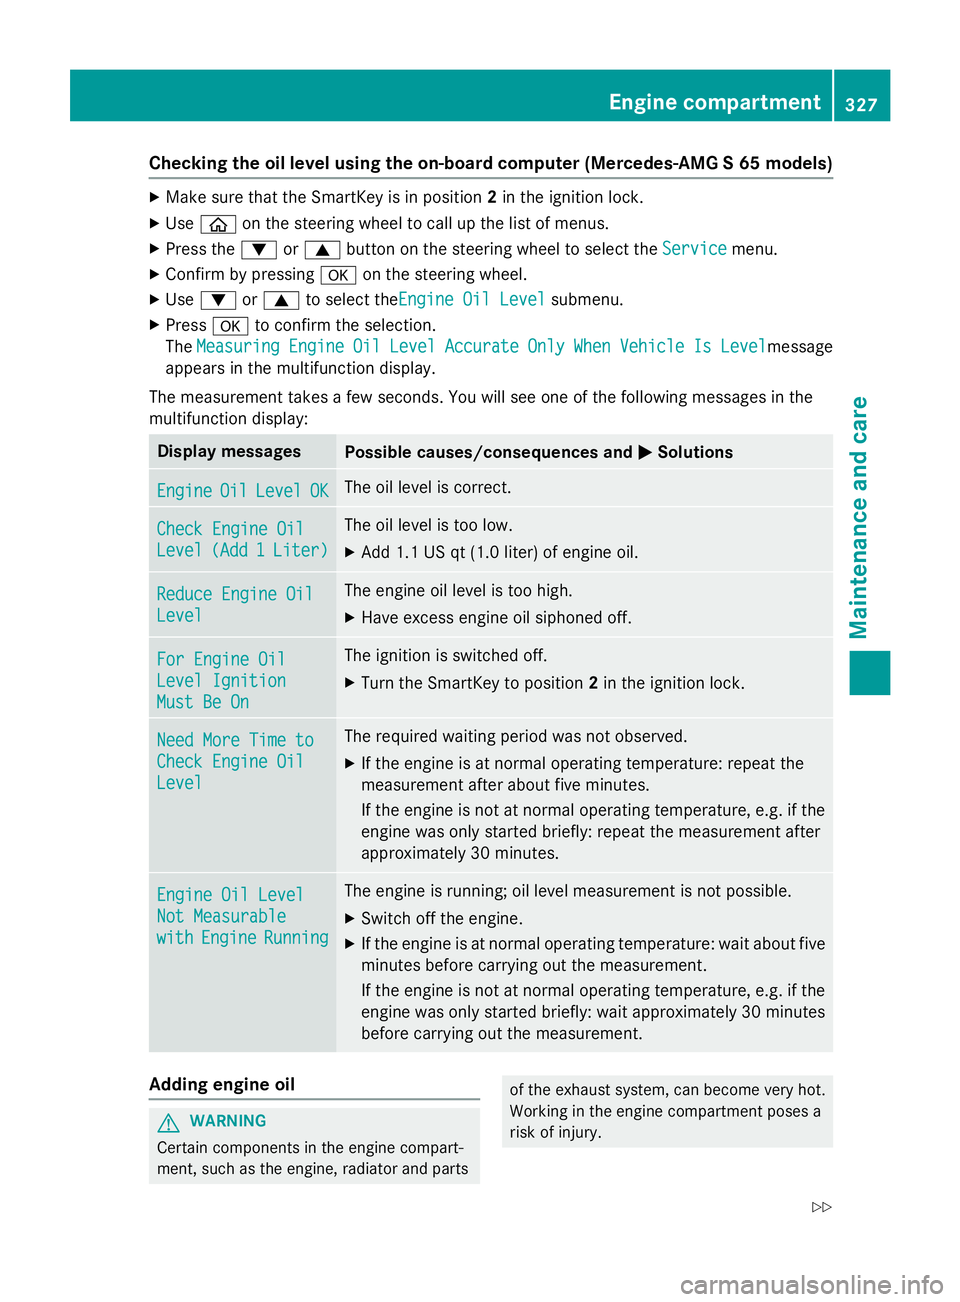
Checking the oil level using the on-board computer (Mercedes-AMG S 65 models)
XMake sure that the SmartKey is in position2in the ignition lock.
XUse ò on the steering wheel to call up the list of menus.
XPress the :or9 button on the steering wheel to select the Servicemenu.
XConfirm by pressingaon the steering wheel.
XUse: or9 to select theEngine Oil Levelsubmenu.
XPress ato confirm the selection.
The Measuring
EngineOilLevelAccurateOnlyWhenVehicleIsLevelmessage
appears in the multifunction display.
The measurement takes a few seconds. You will see one of the following messages in the
multifunction display:
Display messagesPossible causes/consequences and MSolutions
EngineOilLevelOKThe oil level is correct.
Check Engine Oil
Level(Add1Liter)
The oil level is too low.
XAdd 1.1 US qt (1.0 liter) of engine oil.
Reduce Engine Oil
Level
The engine oil level is too high.
XHave excess engine oil siphoned off.
For Engine Oil
Level Ignition
Must Be On
The ignition is switched off.
XTurn the SmartKey to position2in the ignition lock.
Need More Time to
Check Engine Oil
Level
The required waiting period was not observed.
XIf the engine is at normal operating temperature: repeat the
measurement after about five minutes.
If the engine is not at normal operating temperature, e.g. if the
engine was only started briefly: repeat the measurement after
approximately 30 minutes.
Engine Oil Level
Not Measurable
withEngineRunning
The engine is running; oil level measurement is not possible.
XSwitch off the engine.
XIf the engine is at normal operating temperature: wait about five
minutes before carrying out the measurement.
If the engine is not at normal operating temperature, e.g. if the
engine was only started briefly: wait approximately 30 minutes
before carrying out the measurement.
Adding engine oil
GWARNING
Certain components in the engine compart-
ment, such as the engine, radiator and parts
of the exhaust system, can become very hot.
Working in the engine compartment poses a
risk of injury.
Engine compartment327
Maintenance and care
Z
Page 330 of 410
Where possible, let the engine cool down andtouch only the components described in the
following.
GWARNING
If engine oil comes into contact with hot com- ponents in the engine compartment, it may
ignite. There is a risk of fire and injury.
Make sure that engine oil is not spilled next to
the filler neck. Let the engine cool down and
thoroughly clean the engine oil off the com-
ponents before starting the engine.
HEnvironmental note
When adding oil, take care not to spill any. If
oil enters the soil or waterways, it is harmful to
the environment.
!Only use engine oils and oil filters that
have been approved for vehicles with a ser-
vice system. You can obtain a list of the
engine oils and oil filters tested and
approved in accordance with the
Mercedes-Benz Specifications for Service
Products at any Mercedes-Benz Service
center.
Damage to the engine or exhaust system is
caused by the following:
Rusing engine oils and oil filters that have
not been specifically approved for the
service system
Rreplacing engine oil and oil filters after
the interval for replacement specified by the service system has been exceeded
Rusing engine oil additives.
!Do not add too much oil. adding too much
engine oil can result in damage to the
engine or to the catalytic converter. Have
excess engine oil siphoned off.
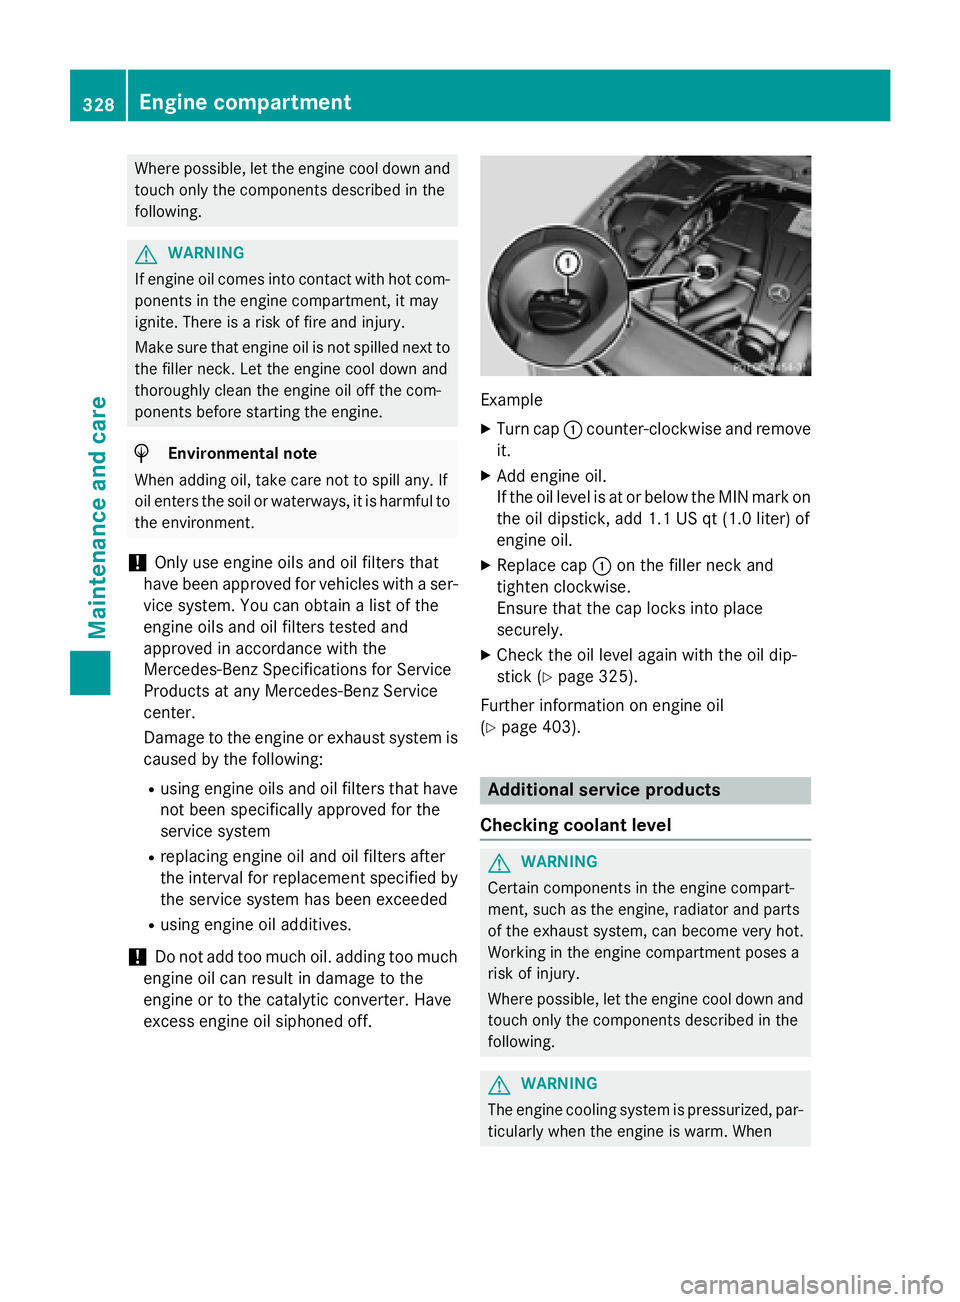
Example
XTurn cap :counter-clockwise and remove
it.
XAdd engine oil.
If the oil level is at or below the MIN mark on
the oil dipstick, add 1.1 US qt (1.0 liter) of
engine oil.
XReplace cap :on the filler neck and
tighten clockwise.
Ensure that the cap locks into place
securely.
XCheck the oil level again with the oil dip-
stick (
Ypage 325).
Further information on engine oil
(
Ypage 403).
Additional service products
Checking coolant level
GWARNING
Certain components in the engine compart-
ment, such as the engine, radiator and parts
of the exhaust system, can become very hot.
Working in the engine compartment poses a
risk of injury.
Where possible, let the engine cool down and touch only the components described in the
following.
GWARNING
The engine cooling system is pressurized, par-
ticularly when the engine is warm. When
328Engine compartment
Maintenance and care
Page 332 of 410
XAdd the premixed washer fluid.
XTo close:press cap :onto the filler neck
until it engages.
If the washer fluid level drops below the rec-
ommended minimum of 1 liter, a message
appears in the multifunction display prompt-
ing you to add washer fluid (
Ypage 283).
Further information on windshield washer
fluid/antifreeze (
Ypage 405).
ASSYST PLUS
Service message
The ASSYST PLUS service interval display
informs you of the next service due date.
Information on the type of service and service
intervals (see the separate Maintenance
Booklet).
You can obtain further information from an
authorized Mercedes-Benz Center or at
http://www.mbusa.com (USA only).
iThe ASSYST PLUS service interval display
does not show any information on the
engine oil level. Observe the notes on the
engine oil level (
Ypage 325).
The multifunction display shows a service
message for several seconds, e.g.:
RService A in .. Days
RService A Due
RService A Exceeded by .. Days
Depending on the operating conditions of the
vehicle, the remaining time or distance until
the next service due date is displayed.
The letter A
orB, possibly in connection with a
number or another letter, indicates the type
of service. A
stands for a minor service and B
for a major service.
You can obtain further information from an
authorized Mercedes-Benz Center.
The ASSYST PLUS service interval display
does not take into account any periods of
time during which the battery is disconnec-
ted. Maintaining the time-dependent service
schedule:
XNote down the service due date displayed
in the multifunction display before discon-
necting the battery.
or
XAfter reconnecting the battery, subtract
the battery disconnection periods from the service date shown on the display.
Hiding a service message
XPress the aor% button on the steer-
ing wheel.
Displaying service messages
XSwitch the ignition on.
XUse ò on the steering wheel to call up
the list of menus.
XPress the 9or: button on the steer-
ing wheel to select the Service
menu and
press ato confirm.
XPress the 9or: button on the steer-
ing wheel to select the ASSYST PLUS
sub-
menu and press ato confirm.
The service due date appears in the multi-
function display.
Information about Service
Resetting the ASSYST PLUS service
interval display
!If the ASSYST PLUS service interval dis-
play has been inadvertently reset, this set-
ting can be corrected at a qualified special-
ist workshop.
Have service work carried out as described in the Maintenance Booklet. This may oth-
erwise lead to increased wear and damage
to the major assemblies or the vehicle.
A qualified specialist workshop, e.g. an
authorized Mercedes-Benz Center, will reset
330ASSYST PLUS
Maintenance and care
Page 384 of 410
GVWR (Gross Vehicle Weight Rating)
The GVWR is the maximum permissible gross
weight of a fully loaded vehicle (the weight of
the vehicle including all accessories, occu-
pants, fuel, luggage and the drawbar nose-
weight, if applicable). The gross vehicle
weight rating is specified on the vehicle iden-
tification plate on the B-pillar on the driver's
side.
Maximum loaded vehicle weight
The maximum weight is the sum of:
Rthe curb weight of the vehicle
Rthe weight of the accessories
Rthe load limit
Rthe weight of the factory installed optional
equipment
Kilopascal (kPa)
Metric unit for tire pressure. 6.9 kPa corre-
sponds to 1 psi. Another unit for tire pressure is bar. 100 kilopascals (kPa) are the equiva-
lent of 1 bar.
Load index
In addition to the load-bearing index, the load
index may also be imprinted on the sidewall of
the tire. This specifies the load-bearing capa-
city more precisely.
Curb weight
The weight of a vehicle with standard equip-
ment including the maximum capacity of fuel,
oil and coolant. It also includes the air-condi-
tioning system and optional equipment if
these are installed in the vehicle, but does not
include passengers or luggage.
Maximum load rating
The maximum load rating is the maximum
permissible weight in kilograms or lbs for
which a tire is approved.
Maximum permissible tire pressure
Maximum permissible tire pressure for one
tire. Maximum load on one tire
Maximum load on one tire. This is calculated
by dividing the maximum axle load of one axle
by two.
PSI (pounds per square inch)
A standard unit of measure for tire pressure.
Aspect ratio
Relationship between tire height and tire
width in percent.
Tire pressure
This is pressure inside the tire applying an
outward force to each square inch of the
tire's
su
rface. The tire pressure is specified in
pounds per square inch (psi), in kilopascal
(kPa) or in bar. The tire pressure should only
be corrected when the tires are cold.
Cold tire pressure
The tires are cold:
Rif the vehicle has been parked without
direct sunlight on the tires for at least three
hours and
Rif the vehicle has not been driven further
than 1 mile (1.6 km)
Tread
The part of the tire that comes into contact
with the road.
Bead
The tire bead ensures that the tire sits
securely on the wheel. There are several steel
wires in the bead to prevent the tire from
coming loose from the wheel rim.
Sidewall
The part of the tire between the tread and the
bead.
Weight of optional extras
The combined weight of those optional extras that weigh more than the replaced standard
parts and more than 5 lbs (2.3 kg). These
optional extras, such as high-performance
brakes, level control, a roof rack or a high-
382All about wheels and tires
Wheels and tires
Page 386 of 410
Direction of rotation
Tires with aspecifie ddirection of rotation
hav eadditional benefits, e.g. if there is aris k
of hydroplaning .These advantages can only
be gained if th etires are installed correspond-
in g to th edirection of rotation .
An arrow on th esidewall of th etire indicates
it s correc tdirection of rotation .
Storing wheels
Storewheels that are no tbein gused in acool,
dry and preferably dar kplace. Protec tth e
tires from oil, grease ,gasolin eand diesel.
Mounting awheel
Preparing th evehicle
XStop th evehicle on solid, non-slipper yand
level ground.
XApply th eelectric parking brake manually.
XBrin gth efron twheels into th estraight -
ahead position .
XShift thetransmissio nto position P.
XMakesur ethat "normal" level is selecte d
fo rAIRMATIC (
Ypage 197).
XSwitchof fth eengine.
XOpe nth edriver's door.
The on-boar delectronic sno whav estatus
0. Thi sis th esam eas th eSmartKey havin g
been removed.
XRemov eStart/Sto pbutto nfrom ignition
loc k (
Ypage 151).
or ,if th eSmartKey is inserte din th eignition
lock:
XRemov eth eSmartKey from th eignition
lock.
XMak esur ethat th eengin ecanno tbe star-
te dvia your smartphone (
Ypage 154).
XIf included in thevehicle equipment,
remov eth etire-chang etool ki tfrom th e
vehicle.
XSafeguar dth evehicle against rollin gaway.
Securing th evehicle to preven tit from
rollin gawa y
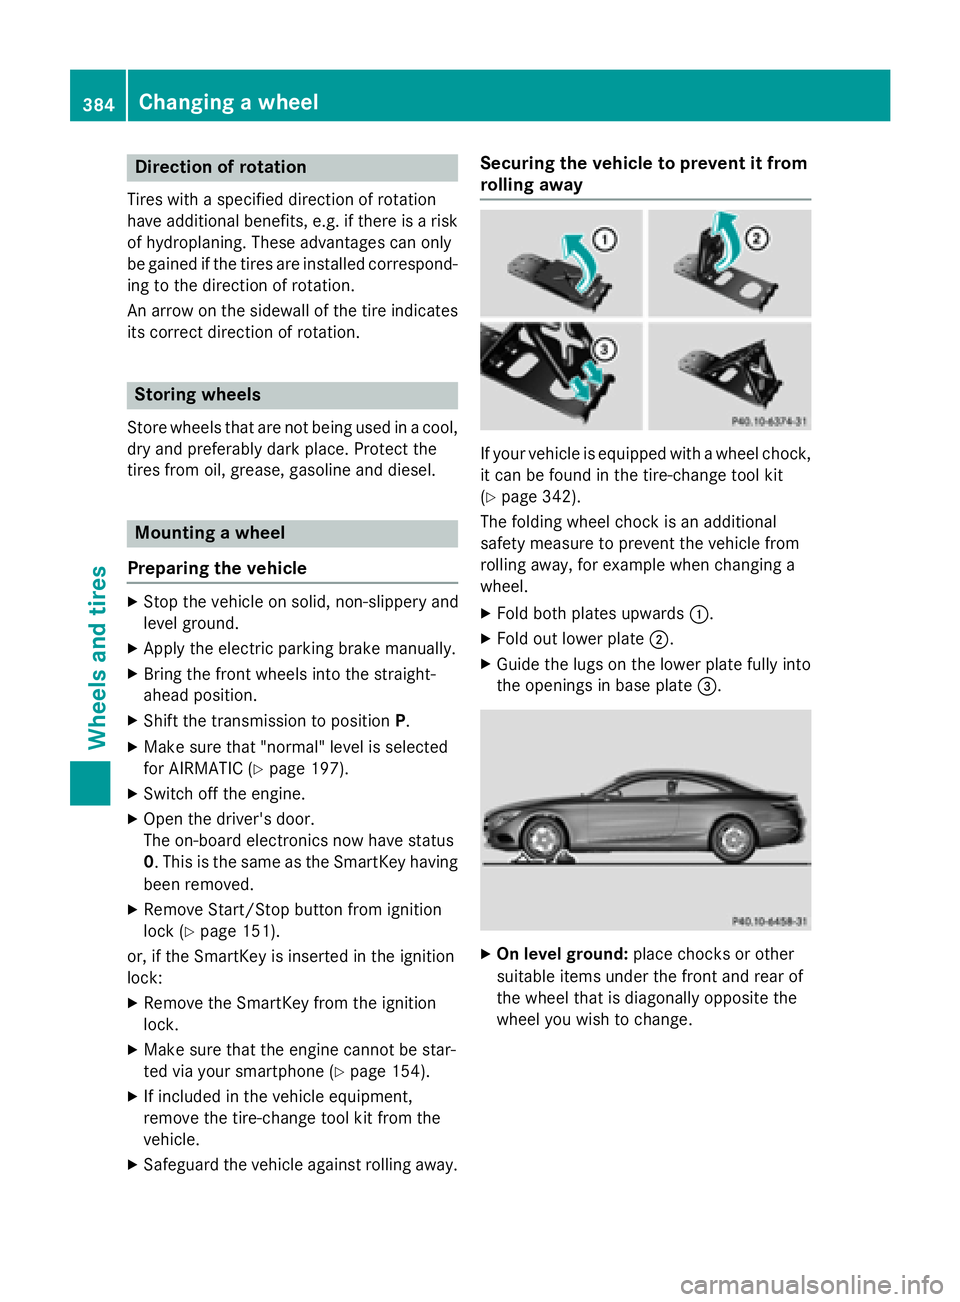
If your vehicle is equipped wit h awhee lchock,
it can be found in th etire-chang etool ki t
(
Ypage 342).
The foldin gwhee lchoc kis an additional
safet ymeasur eto preven tth evehicle from
rollin gaway, fo rexample when changin g a
wheel.
XFold bot hplates upwards :.
XFold out lowerplat e;.
XGuide th elugs on th elowe rplat efull yinto
th eopening sin base plat e=.
XOn leve lground: placechocks or other
suitable items under th efron tand rea rof
th ewhee lthat is diagonally opposite th e
whee lyou wish to change.
384Changing a wheel
Wheels and tires
Page 389 of 410
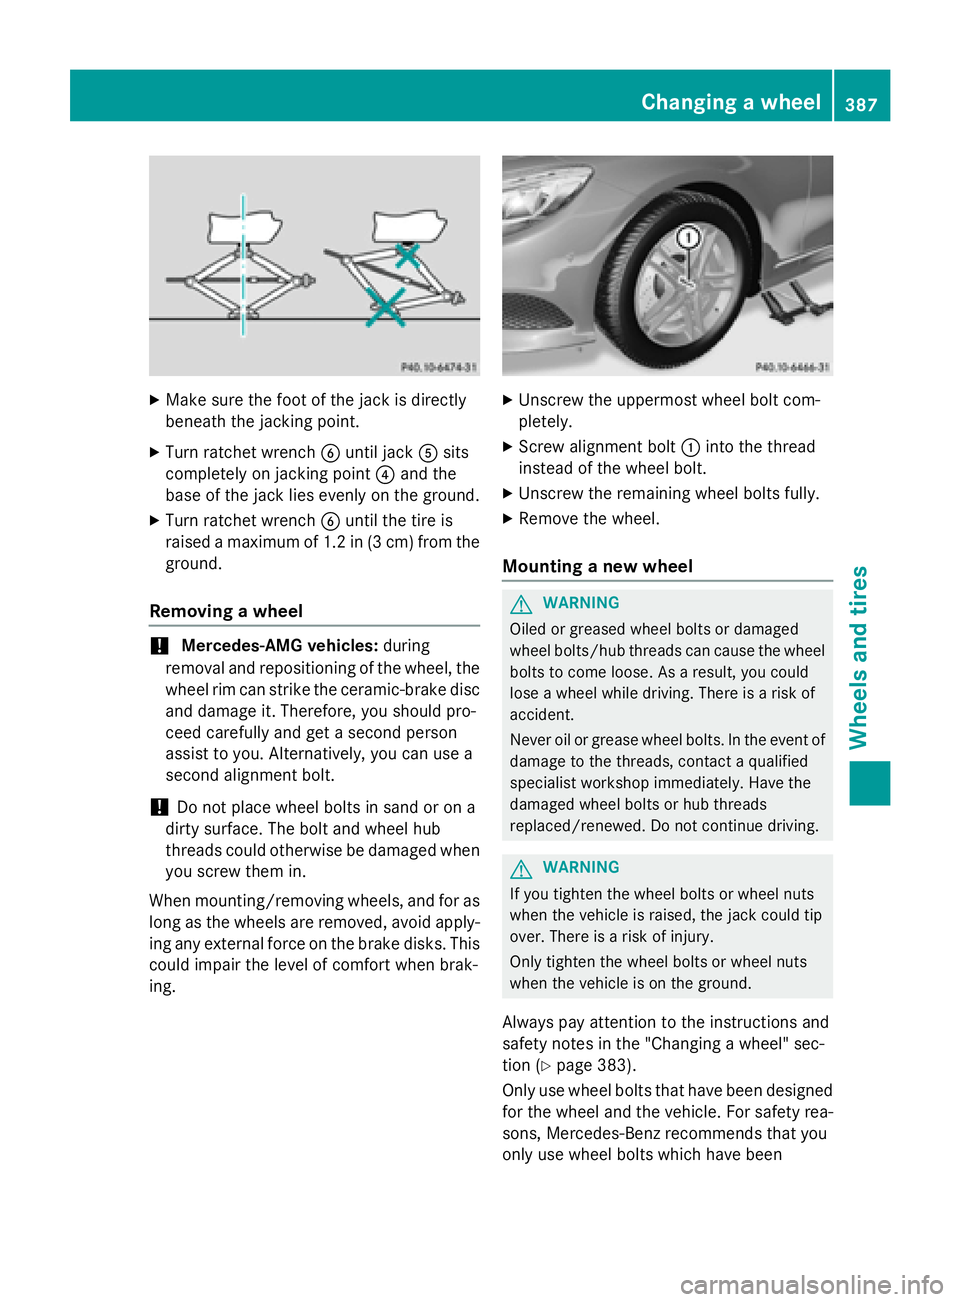
XMake sure the foot of the jack is directly
beneath the jacking point.
XTurn ratchet wrenchBuntil jack Asits
completely on jacking point ?and the
base of the jack lies evenly on the ground.
XTurn ratchet wrench Buntil the tire is
raised a maximum of 1.2 in (3 cm) from the ground.
Removing a wheel
!Mercedes-AMG vehicles: during
removal and repositioning of the wheel, the
wheel rim can strike the ceramic-brake disc
and damage it. Therefore, you should pro-
ceed carefully and get a second person
assist to you. Alternatively, you can use a
second alignment bolt.
!Do not place wheel bolts in sand or on a
dirty surface. The bolt and wheel hub
threads could otherwise be damaged when
you screw them in.
When mounting/removing wheels, and for as
long as the wheels are removed, avoid apply-
ing any external force on the brake disks. This
could impair the level of comfort when brak-
ing.
XUnscrew the uppermost wheel bolt com-
pletely.
XScrew alignment bolt :into the thread
instead of the wheel bolt.
XUnscrew the remaining wheel bolts fully.
XRemove the wheel.
Mounting a new wheel
GWARNING
Oiled or greased wheel bolts or damaged
wheel bolts/hub threads can cause the wheel bolts to come loose. As a result, you could
lose a wheel while driving. There is a risk of
accident.
Never oil or grease wheel bolts. In the event of
damage to the threads, contact a qualified
specialist workshop immediately. Have the
damaged wheel bolts or hub threads
replaced/renewed. Do not continue driving.
GWARNING
If you tighten the wheel bolts or wheel nuts
when the vehicle is raised, the jack could tip
over. There is a risk of injury.
Only tighten the wheel bolts or wheel nuts
when the vehicle is on the ground.
Always pay attention to the instructions and
safety notes in the "Changing a wheel" sec-
tion (
Ypage 383).
Only use wheel bolts that have been designed for the wheel and the vehicle. For safety rea-
sons, Mercedes-Benz recommends that you
only use wheel bolts which have been
Changing a wheel387
Wheels and tires
Z
Page 407 of 410
Filling capacities
ModelCapacity
S63 AMG 4MATIC8.2 US qt(7.8 l)
S65 AMG11.3 US qt(10.7 l)
All other models12.8 US qt(12.1 l)
Windshield washer system
Important safety notes
GWARNIN G
Windshield washe rconcentrate could ignit eif
it comes int ocontact wit hhot engin ecompo -
nent sor th eexhaust system. Ther eis aris kof
fir eand injury.
Mak esure that no windshield washe rcon-
centrate is spilled next to th efiller neck .
!Do not add distilled or de-ionized water to
the washer fluid container. Otherwise, the
level sensor may bedamaged.
!Only MB SummerFit and MB WinterF it
washer fluid should bemixed together. The
spray nozzles may otherwise become
bloc ked.
At temperatures above freezing:
XFill the washer fluid reservoir with a mixture
of water and windshield washer fluid, e.g.
MB SummerFit.
Add 1 part MB SummerFit to 100 parts water.
At temperatures below freezing:
XFill the washer fluid reservoir with a mixture
of water and washer fluid, e.g. MB Winter-
Fit.
For the correct mixing rat iorefer to the
information on the antifreeze reservoir.
iAdd windshield washer fluid, e.g. MB
SummerFit or MB WinterFit, to the washer
fluid all year roun d.
Climate control system refrigerant
Important safety notes
The climate control system of your vehicle is
filled with refrigerant R‑ 134a.
The instruction label regarding the refrigerant
type used can befound on the radiator cross
member.
!Only the refrigerant R‑ 134a and the PAG
oil approved byMercedes-Benz may be
used. The approved PAG oil may not be
mixed with any other PAG oil that isnot
approved for R-134a refrigerant. Other-
wise, the climate control system may be
damaged.
Se rvice work, such as to pping up refrigerant
or replacing components, may only be carried
out byaqualif ied specialist workshop.All
applic able regulations must beadhered to,
SA E standard J639 inc luded.
Always have work on the climate control sys-
tem carried out at a qualified specialist work-
shop.
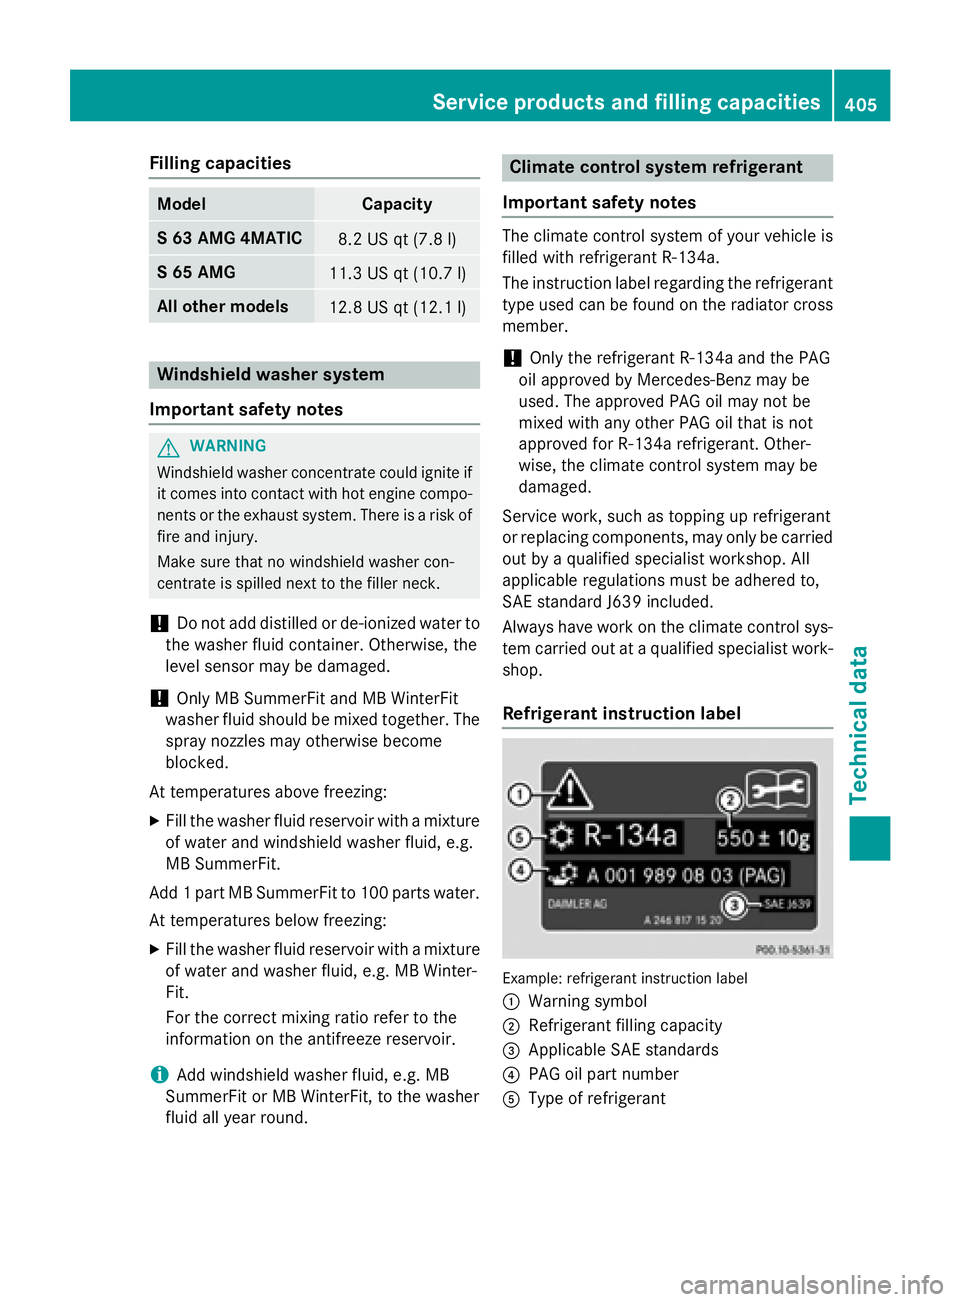
Refrigerant instruction label
Example: refrigeran tinstruction label
:
Warning symbol
;Refrigerant filling capacity
=Ap plic able SAE standards
?PAG oil part number
AType of refrigerant
Service products and filling capacities405
Technical data
Z