2016 MERCEDES-BENZ S-COUPE navigation
[x] Cancel search: navigationPage 248 of 410
Activating/deactivating Active Blind Spot
Assist
XPress theòbutton on the steering
wheel to open the menu list.
XPress :or9 on the steering wheel
to select the Settings
menu.
XConfirmbypressing aon the steering
wheel.
XUse : or9 to select the DriveAs‐
sistsubmenu.
XPressato confirm your selection.
XPress the :or9 button to select
Blind Spot Assist
.
XPress ato confirm.
The current selection appears.
XTo activate/deactivate: press thea
button again.
When Active BlindSpo t Assist isactivated,
whit e radar waves propagating backwards
appear next to the vehicle inthe Assis‐
tance Graphic.
For further information about Acti ve Blind
Spo t Assist, see (
Ypage 222).
Setting ATTENTION ASSIST
XPress the òbutton on the steering
wheel to open the menu list.
XPress :or9 on the steering wheel
to select the Settings
menu.
XConfirmbypressing aon the steering
wheel.
XUse : or9 to select the DriveAs‐
sistsubmenu.
XPressato confirm your selection.
XPress :or9 to select ATTENTION
ASSIST.
XPressato confirm your selection.
XPress :or9 to select Off,Stand‐
ardor Sensitive.
XPress the abutton to confirm the selec-
tion.
When ATTENTION AS SISTis deactivated, the
é symbol appears in the Assistance
Graphicmenuinthe multifunction display. For further information about ATTENTION
AS
SIST , see (
Ypage 215).
Acti vating/deactivating Active Lane
Keeping Assist
XPress the òbutton on the steering
wheel to open the menu list.
XPress :or9 on the steering wheel
to select the Settings
menu.
XConfirmbypressing aon the steering
wheel.
XUse : or9 to select the DriveAs‐
sistsubmenu.
XPressato confirm your selection.
XPress the :or9 button to select
Lane Keeping Assist
.
XPress ato confirm.
The current selection, Standard
orAdap‐
tive, appears.
XTo change the setting: pressaagain.
For further information about Acti veLane
Keeping Assist, see (
Ypage 225).
Head-up display submenu
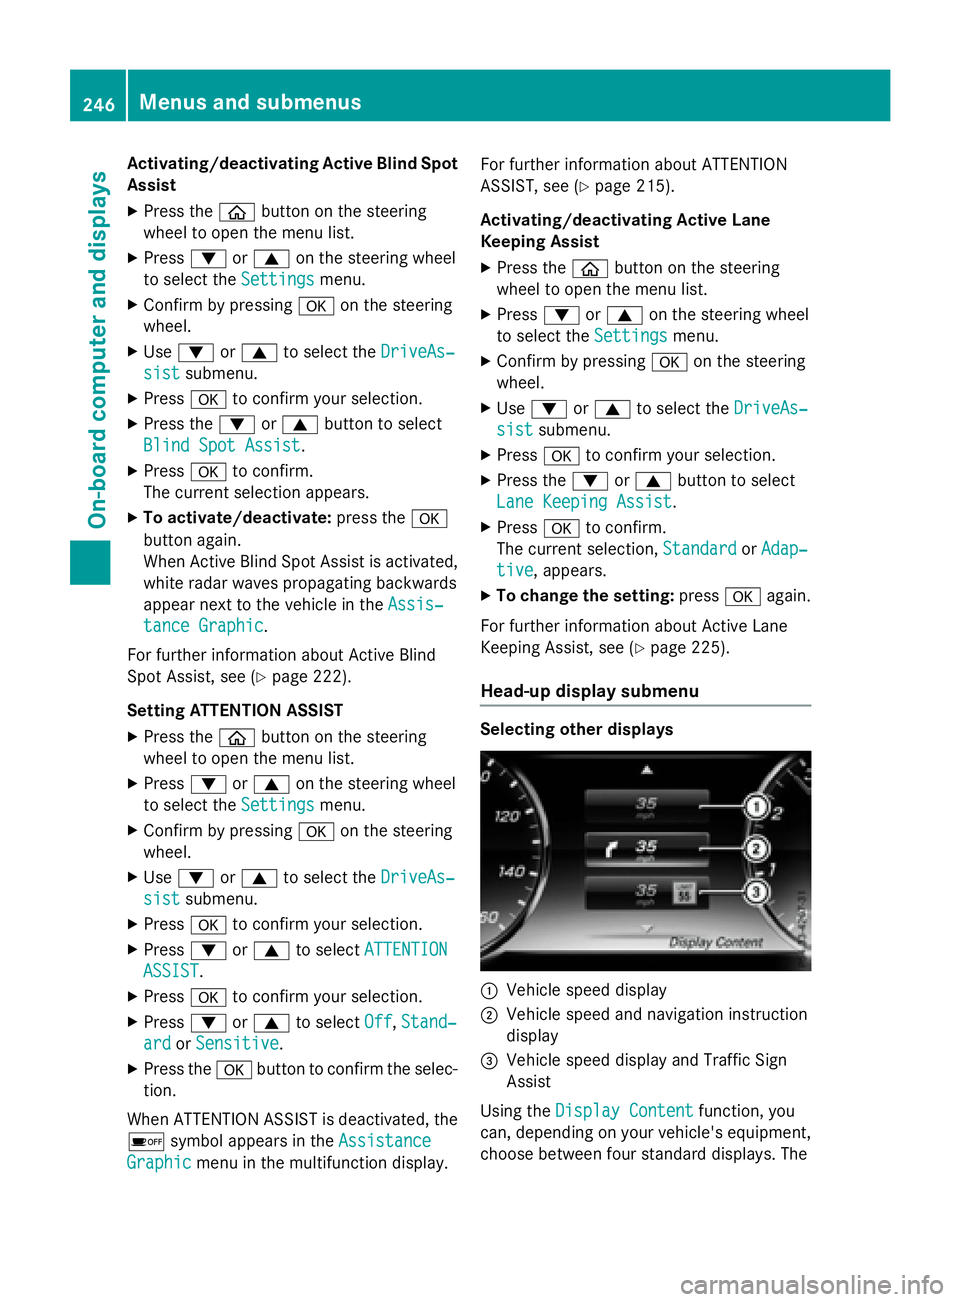
Selecting other displays
:Vehicle speeddisplay
;Vehicle speed and navigation instruction
display
=Vehicle speeddisplay and Traffic Sign
Assist
Using the Display Content
function, you
can, depe nding on your vehicle's equipment,
choose between four standard displays. The
246Menus and submenus
On-board computer and displays
Page 249 of 410
selected contents then appear in the head-up
display.
In Mercedes-AMG vehicles, you can also
choose between two AMG displays. If you
select an AMG display, the head-up display
shows AMG-specific contents.
XPress the òbutton on the steering
wheel to open the menu list.
XPress :or9 on the steering wheel
to select the Settings
menu.
XConfirm by pressing aon the steering
wheel.
XPress :or9 to select the Head-up
Displaysubmenu.
XPressato confirm.
XPress :or9 to select Display
Content.
XPressato confirm.
A graphic selection list appears.
XPress :or9 to select the desired
display.
XPress the abutton to confirm the selec-
tion.
Further information on navigation can be
found on COMAND (see the separate operat-
ing instructions).
For further information about Traffic Sign
Assist, see (
Ypage 217).
Setting the position
You can adjust the position of the head-up
display on the windshield. You can compen-
sate for height differences if the seat posi-
tions are changed, for example.
XSwitch on the head-up display
(
Ypage 233).
XPress the òbutton on the steering
wheel to open the menu list.
XPress the :or9 button on the steer-
ing wheel to select the Settings
menu.
XConfirm by pressingaon the steering
wheel.
XPress :or9 to select the Head-up
Displaysubmenu.
XPressato confirm.
XPress the :or9 button to select the
Position
function.
XPress the abutton to save the setting.
XPress :or9 to adjust the position
to a level from Level +5
toLevel -5.
XPress the aor% button to save the
setting.
Using the Memory function, you can save and
call up the set position of the head-up display
as a single memory preset (
Ypage 120).
Setting the brightness
The brightness of the head-up display is auto-
matically adjusted to the surrounding ambi-
ent light. You can also individually adjust the
brightness of the head-up display.
XSwitch on the head-up display
(
Ypage 233).
XPress òon the steering wheel to open
the menu list.
XPress the :or9 button on the steer-
ing wheel to select the Settings
menu.
XConfirm by pressingaon the steering
wheel.
XUse : or9 to select the Head-up
Displaysubmenu.
XPressato confirm.
XPress the :or9 button to select the
Brightness
function.
XPress the abutton to save the setting.
XPress :or9 to adjust the bright-
ness to a level from Level +5
(bright) to
Level -5
(dark).
XPress the aor% button to save the
setting.
Light submenu
Switching the spotlight function on/off
XPress òon the steering wheel to open
the menu list.
XPress :or9 on the steering wheel
to select the Settings
menu.
Menus and submenus247
On-board computer and displays
Z
Page 250 of 410

XConfirmbypressing aon the steering
wheel.
XPress :or9 to select the Lights
submenu.
XPressato confirm.
XPress the :or9 button to select the
Spotlight
function.
XPress the abutton to save the setting.
When the spotlight function isactivated,
the assistance graphic shows the pedes-
trian symbol.
Further information on the spotlight function
(
Ypage 221).
Switching the daytime running lamps on/
off
This function isnot availab le inCanada.
XPress the òbutton on the steering
wheel to open the menu list.
XPress :or9 on the steering wheel
to select the Settings
menu.
XConfirmbypressing aon the steering
wheel.
XPress :or9 to select the Lights
submenu.
XPressato confirm.
XPress :or9 to select the Daytime
Running Lightsfunction.
If the Daytime Running Lights
function
has been switched on, the cone of light and
the W symbol in the multifunction dis-
play are shown in whit e.
XPress theabutton to save the setting.
Further information on daytime running
lamps Daytime Running Lights
(Ypage 124).
Instrument cluster submenu
Selecting the distance unit
TheDisplay
UnitSpeed-/Odometerfunc-
tion allows you to choose whether certain
disp lays appear inkilometers or miles inthe
multifunction display.
XPress the òbutton on the steering
wheel to open the menu list.
XPress the :or9 button on the steer-
ing wheel to select the Settings
menu.
XConfirmbypressing aon the steering
wheel.
XPress :or9 to select the Instru‐
ment Clustersubmenu.
XPressato confirm.
XPress the :or9 button to select the
Display Unit Speed-/Odometer
func-
tion.
The current setting km
orMilesappears.
XPress the abutton to save the setting.
The selected unit of measurement for dis-
tance applies to:
Rspeedometer
Rdigital speedometer inthe Tripmenu
Radditional speedometer inthe status area
of the multifunction display.
The unit inthe additional speedometer is
displayed inversely to the selected dis-
tance unit.
Rodometer and tr ipodometer
Rthe tr ipcomputer
Rthe current consumption and the range
Rnavigation instructions inthe Navimenu
Rcruise control
RSPEEDTRONIC
RDIST RONIC PLUS
RDIST RONIC PLUS withSt eering Assist and
St op&Go Pilot
RASSYST PLUS service interval display
Switching the additional speedometer
on/off
The Additional Speedometer [km/h]
function allows you to choose whether the
status area inthe multifunction display shows
the speed digitally. The unit inthe additional
speedometer isalways inverse to the speed-
ometer unit.
248Menus and submenus
On-board computer and displays
Page 290 of 410
Warning/
indicator
lampNSignal type
Possible causes/consequences and M
Solutions
!NThe yellow ABS warning lamp is lit while the engine is running.
ABS (Anti-lock Braking System) is deactivated due to a malfunction. Therefore
BAS (Brake Assist), BAS PLUS with Cross-Traffic Assist, COLLISION PREVEN-
TION ASSIST PLUS, ESP
®(Electronic Stability Program), PRE‑SAFE®,
PRE‑SAFE®PLUS, PRE‑SAFE®Brake, the HOLD function, Hill Start Assist,
Crosswind Assist, STEER CONTROL, Active Lane Keeping Assist and Active
Blind Spot Assist are also deactivated.
ATTENTION ASSIST is deactivated.
GWARNING
The brake system continues to function normally, but without the functions
listed above. The wheels could therefore lock if you brake hard, for example.
The steerability and braking characteristics may be severely affected. The
braking distance in an emergency braking situation can increase.
If ESP
®is not operational, ESP®is unable to stabilize the vehicle.
There is an increased risk of skidding and an accident.
XObserve the additional display messages in the multifunction display.
XDrive on carefully.
XVisit a qualified specialist workshop.
If the ABS control unit is faulty, there is also a possibility that other systems,
such as the navigation system or the automatic transmission, will not be
available.
288Warning and indicator lamps in the instrument cluster
On-board computer and displays
Page 314 of 410
If a mobile phone network and GPS reception
are available, the system transfers data to the
Mercedes-Benz Customer Assistance Center,
for example:
Rcurrent location of the vehicle
Rvehicle identification number
The COMAND display indicates that a call is
active. During the call, you can change to the
navigation menu by pressing the NAVI button
on COMAND, for example.
Voice output is not available in this case.
A voice connection is established between
the Mercedes-Benz Customer Assistance
Center and the vehicle occupants.
From the remote malfunction diagnosis, the
Mercedes-Benz Customer Assistance Center
can ascertain the nature of the problem
(
Ypage 315).
The Mercedes-Benz Customer Assistance
Center either sends a qualified Mercedes-
Benz technician or makes arrangements for
your vehicle to be transported to the nearest
authorized Mercedes-Benz Center.
You may be charged for services such as
repair work and/or towing.
You can find more information in the separate
mbrace manual.
The system has not been able to initiate a
Roadside Assistance call, if:
Rthe indicator lamp for Roadside Assistance
call button Fis flashing continuously.
Rno voice connection to the Mercedes-Benz
Customer Assistance Center was estab-
lished.
This can occur if the relevant mobile phone
network is not available, for example.
The Call Failed
message appears in the
multifunction display.
XTo end a call: press the~button on the
multifunction steering wheel.
or
XPress the corresponding COMAND button
for ending a phone call.
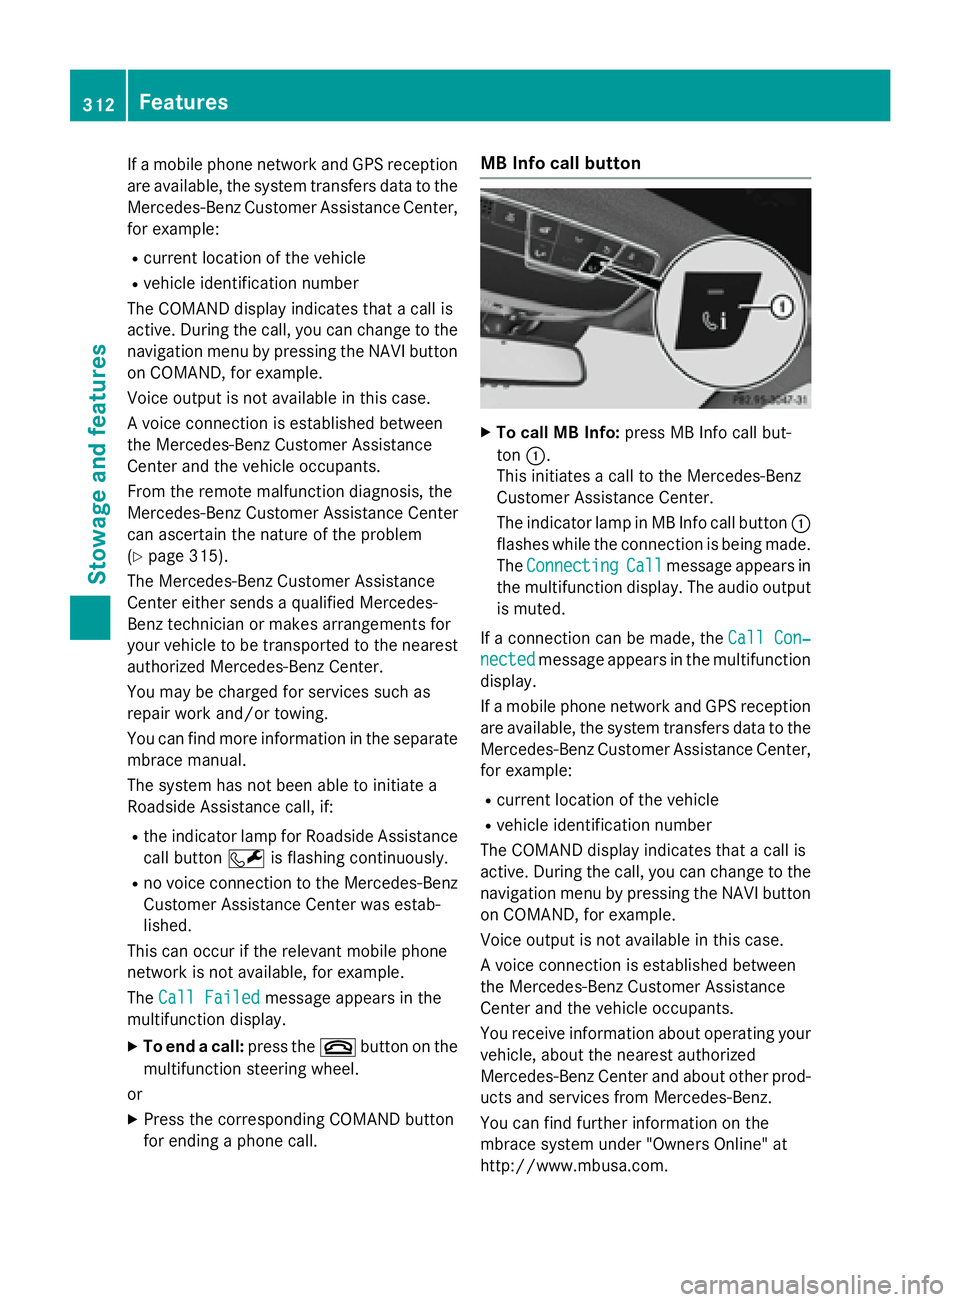
MB Info call button
XTo call MB Info: press MB Info call but-
ton :.
This initiates a call to the Mercedes-Benz
Customer Assistance Center.
The indicator lamp in MB Info call button :
flashes while the connection is being made.
The Connecting
Callmessage appears in
the multifunction display. The audio output
is muted.
If a connection can be made, the Call Con‐
nectedmessage appears in the multifunction
display.
If a mobile phone network and GPS reception
are available, the system transfers data to the
Mercedes-Benz Customer Assistance Center,
for example:
Rcurrent location of the vehicle
Rvehicle identification number
The COMAND display indicates that a call is
active. During the call, you can change to the
navigation menu by pressing the NAVI button
on COMAND, for example.
Voice output is not available in this case.
A voice connection is established between
the Mercedes-Benz Customer Assistance
Center and the vehicle occupants.
You receive information about operating your
vehicle, about the nearest authorized
Mercedes-Benz Center and about other prod-
ucts and services from Mercedes-Benz.
You can find further information on the
mbrace system under "Owners Online" at
http://www.mbusa.com.
312Features
Stowage and features
Page 315 of 410
The system has not been able to initiate an
MB Info call, if:
Rthe indicator lamp in MB Info call button
ïis flashing continuously.
Rno voice connection to the Mercedes-Benz
Customer Assistance Center was estab-
lished.
This can occur if the relevant mobile phone
network is not available, for example.
The Call Failed
message appears in the
multifunction display.
XTo end a call: press the~button on the
multifunction steering wheel.
or
XPress the corresponding COMAND button
for ending a phone call.
Call priority
When service calls are active, e.g. Roadside
Assistance or MB Info calls, an emergency
call can still be initiated. In this case, an emer-
gency call will take priority and override all
other active calls.
The indicator lamp of the respective button
flashes until the call is ended.
An emergency call can only be terminated by the Mercedes-Benz Customer Assistance
Center.
All other calls can be ended by pressing:
Rthe ~ button on the multifunction steer-
ing wheel
Rthe corresponding button in COMAND to
end the voice call
When a call is initiated, the audio system is
muted.
The mobile phone is no longer connected to
COMAND.
However, if you want to use your mobile
phone, do so only when the vehicle is station-
ary and in a safe location.
Downloading destinations
Downloading destinations
Downloading destinations gives you access
to a database with over 15 million points of
interest (POIs). These can be downloaded on
the navigation system in your vehicle. If you
know the destination, the address can be
downloaded. Alternatively, you can obtain the
location of Points of Interest (POIs)/impor-
tant destinations in the vicinity.
Furthermore, you can download routes with
up to four way points.
You are prompted to confirm route guidance
to the address entered.
XSelect Yesby turning 3or sliding 1
the controller and confirm with 7.
The system calculates the route and sub-
sequently starts the route guidance with
the address entered.
If you select No
the address can be stored in
the address book.
The destination download function is availa-
ble if:
Rthe vehicle is equipped with a navigation
system.
Rthe relevant mobile phone network is avail- able and data transfer is possible.
Route Assistance
This service is part of the mbrace PLUS Pack-
age and cannot be purchased separately.
You can use the route assistance function
even if the vehicle is not equipped with a nav-
igation system.
Within the framework of this service, you
receive a professional and reliable form of
navigation support without having to leave
your vehicle.
The customer service representative finds a
suitable route depending on your vehicle's
current position and the desired destination.
You will then be guided live through the cur-
rent route section.
Features313
Stowage and features
Z
Page 316 of 410
Search & Send
General notes
To use "Search & Send", your vehicle must be
equipped with mbrace and a navigation sys-
tem. Additionally, an mbrace service sub-
scription must be completed.
"Search & Send" is a destination entry ser-
vice. A destination address which is found on
Google Maps
®can be transferred via mbrace
directly to your vehicle's navigation system.
Specifying and sending the destination
address
XGo to the website http://
maps.google.com and enter a destination
address into the entry field.
XTo send the destination address to the
e-mail address of your mbrace account:
click on the corresponding button on the
website.
Example:
If you select 'Send to vehicle' and then
'Mercedes-Benz', the destination address
will be sent to your vehicle.
XWhen the "Send" dialog window appears:
Enter the e-mail address you specified
when setting up your mbrace account into
the corresponding field.
XClick "Send".
Information on specific commands such as
"Address entry" or "Send" can be found on the
website.
Calling up a transmitted destination
address
XTurn the SmartKey to position 2in the igni-
tion lock (
Ypage 151).
The transmitted destination address is loa-
ded into the vehicle's navigation system. A display message appears, asking
whether navigation should be started.
XSelectYesby turning
3or sliding 1
the controller and confirm with 7.
The system calculates the route and sub-
sequently starts the route guidance with
the address entered.
If you select No
the address can be stored in
the address book.
If you have sent more than one destination
address, each individual destination must
be confirmed separately.
Destination addresses are loaded in the same
order as the order in which they were sent.
If you own multiple Mercedes-Benz vehicles
with mbrace and activated mbrace accounts:
If multiple vehicles are registered under the
same e-mail address, the destination will be
sent to all the vehicles.
Vehicle remote opening
You can use the vehicle remote opening if you
have unintentionally locked your vehicle and
a replacement SmartKey is not available.
The vehicle can be opened by the Mercedes-
Benz Customer Assistance Center.
The vehicle can be immediately opened
remotely within four days of the ignition being turned off. After this time, the remote unlock-
ing may be delayed by 15 to 60 minutes. After
30 days, the vehicle can no longer be opened
remotely.
The vehicle remote unlocking feature is avail-
able if the relevant mobile phone network is
available and a data connection is possible.
XContact the following service hotlines:
Mercedes-Benz Customer Assistance Cen-
ter at 1-800-FOR-MERCedes
(1-800-367-6372) or 1-866-990-9007
You will be asked for your password.
XReturn to your vehicle at the time agreed
upon with the Mercedes-Benz Customer
Assistance Center.
314Features
Stowage and features
Page 318 of 410
XPress theYesbutton to confirm the mes-
sage.
XWhen the Vehicle Diagnostics
Please Start Ignitionmessage
appears: turn the SmartKey to position 2in
the ignition lock (
Ypage 151).
XIf the Please follow the instruc‐
tions received by phone and move
your vehicle to a safe position.
message appears: please follow the
instructions received by phone and move
your vehicle to a safe position.
The message in the display disappears.
The vehicle operating state check begins.
During this procedure, you will see the
Vehicle
DiagnosticsActivemessage.
If you select Cancel
, the Vehicle Health
Check is canceled completely.
When the check is complete, the Sending
vehicle diagnostics data. (Voice
connection may be interrupted dur‐
ingdatatransfer)message appears. The
vehicle data can now be sent.
XPress the OKbutton to confirm the mes-
sage.
The voice connection with the Customer
Assistance Center is terminated.
The Vehicle Diagnostics: Transfer‐
ring Data...message appears.
The vehicle data is sent to the Customer
Assistance Center.
Depending on what the customer service rep-
resentative agreed with you, the voice con-
nection is re-established after the transfer is
complete. If necessary, you will be contacted
at a later time by another means, e.g. by e-
mail or phone.
Another function of the Vehicle Health Check
is the transfer of service data to the Customer
Assistance Center. If a service is due, the dis-
play shows a message to this effect together
with information about any special offers at
your workshop.
This information can also be called up under
"Owners Online" at http://www.mbusa.com. Information on the data stored in the vehicle
(
Ypage 28).
Information on Roadside Assistance
(
Ypage 24).
Downloading routes
Downloading routes allows you to transfer
and save predefined routes in the navigation
system.
A route can be prepared and sent by either a
customer service representative or under
"Owners Online" at http://www.mbusa.com.
Each route can include up to four way points.
Once a route has been received by the navi-
gation system, you will see the The
to "Previous Destinations". Would
youliketostartnavigation?message
on the COMAND display.
The route is saved.
XTo start route guidance: selectYes.
An overview of the route is shown in the
display.
If you select No
the saved route can be
called up later in the navigation menu.
XSelect Start.
Route guidance starts.
Downloaded and saved routes can be called
up again.
You can find further information in the sepa-
rate COMAND/Audio 20 operating instruc-
tions.
Speed alert
You can define the upper speed limit, which
must not be exceeded by the vehicle.
If this selected speed is exceeded by the vehi-
cle, a message will be sent to the Customer
Assistance Center. The Customer Assistance Center then forwards this information to you.
You can select the way in which you receive
this information beforehand. Possible options
include text message, e-mail or an automated
call.
316Features
Stowage and features