2016 MERCEDES-BENZ S-COUPE check engine light
[x] Cancel search: check engine lightPage 85 of 410
SmartKey functions
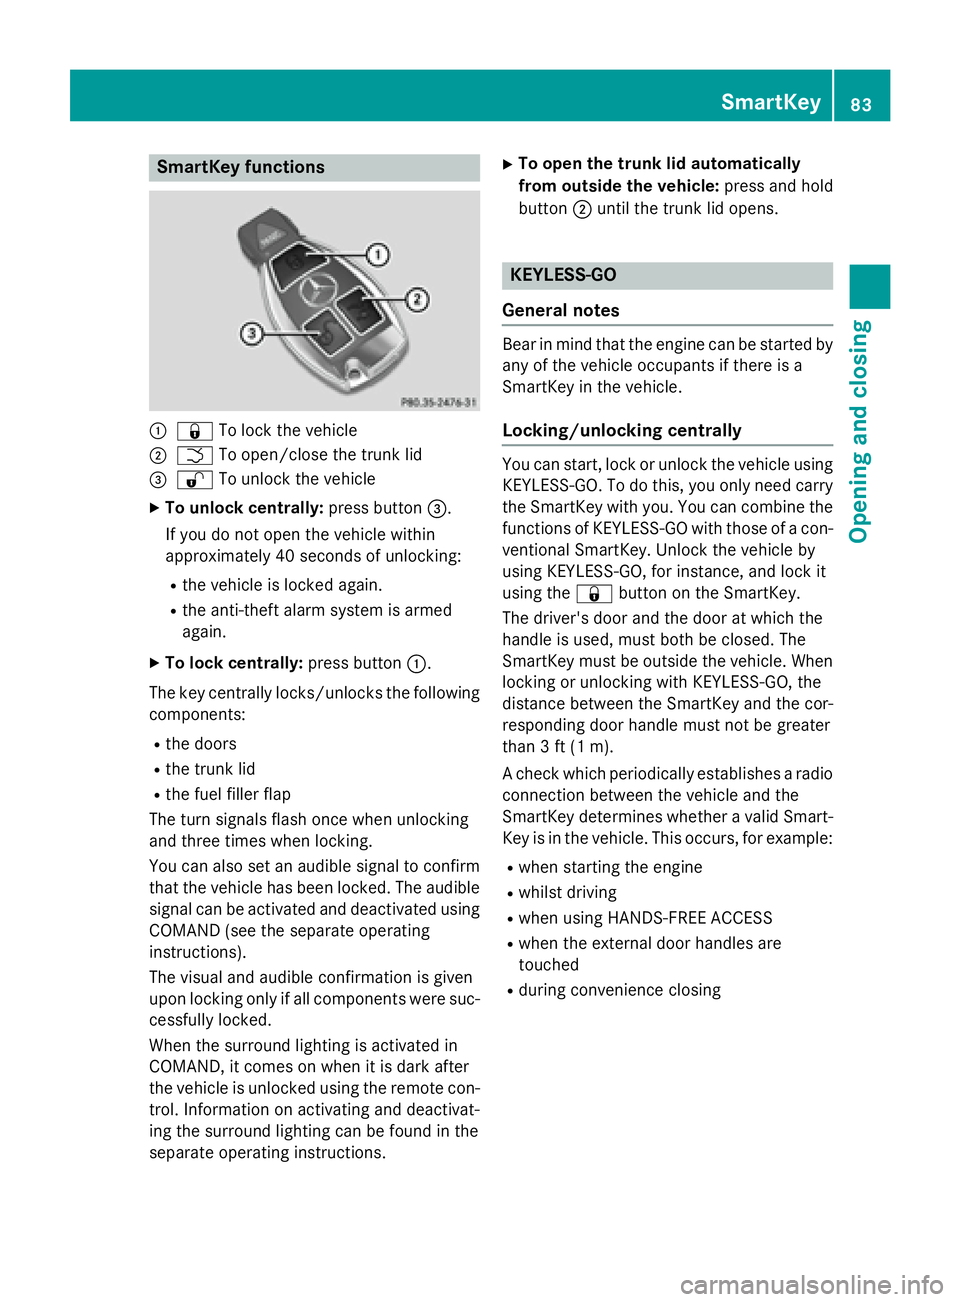
:&To lock the vehicle
;FTo open/close the trunk lid
=%To unlock the vehicle
XTo unlock centrally: press button=.
If you do not open the vehicle within
approximately 40 seconds of unlocking:
Rthe vehicle is locked again.
Rthe anti-theft alarm system is armed
again.
XTo lock centrally: press button:.
The key centrally locks/unlocks the following
components:
Rthe doors
Rthe trunk lid
Rthe fuel filler flap
The turn signals flash once when unlocking
and three times when locking.
You can also set an audible signal to confirm
that the vehicle has been locked. The audible
signal can be activated and deactivated using COMAND (see the separate operating
instructions).
The visual and audible confirmation is given
upon locking only if all components were suc-
cessfully locked.
When the surround lighting is activated in
COMAND, it comes on when it is dark after
the vehicle is unlocked using the remote con-
trol. Information on activating and deactivat-
ing the surround lighting can be found in the
separate operating instructions.
XTo open the trunk lid automatically
from outside the vehicle: press and hold
button ;until the trunk lid opens.
KEYLESS-GO
General notes
Bear in mind that the engine can be started by
any of the vehicle occupants if there is a
SmartKey in the vehicle.
Locking/unlocking centrally
You can start, lock or unlock the vehicle using KEYLESS-GO. To do this, you only need carry
the SmartKey with you. You can combine the
functions of KEYLESS-GO with those of a con-ventional SmartKey. Unlock the vehicle by
using KEYLESS-GO, for instance, and lock it
using the &button on the SmartKey.
The driver's door and the door at which the
handle is used, must both be closed. The
SmartKey must be outside the vehicle. When
locking or unlocking with KEYLESS-GO, the
distance between the SmartKey and the cor-
responding door handle must not be greater
than 3 ft (1 m).
A check which periodically establishes a radio
connection between the vehicle and the
SmartKey determines whether a valid Smart-
Key is in the vehicle. This occurs, for example:
Rwhen starting the engine
Rwhilst driving
Rwhen using HANDS-FREE ACCESS
Rwhen the external door handles are
touched
Rduring convenience closing
SmartKey83
Opening and closing
Z
Page 86 of 410
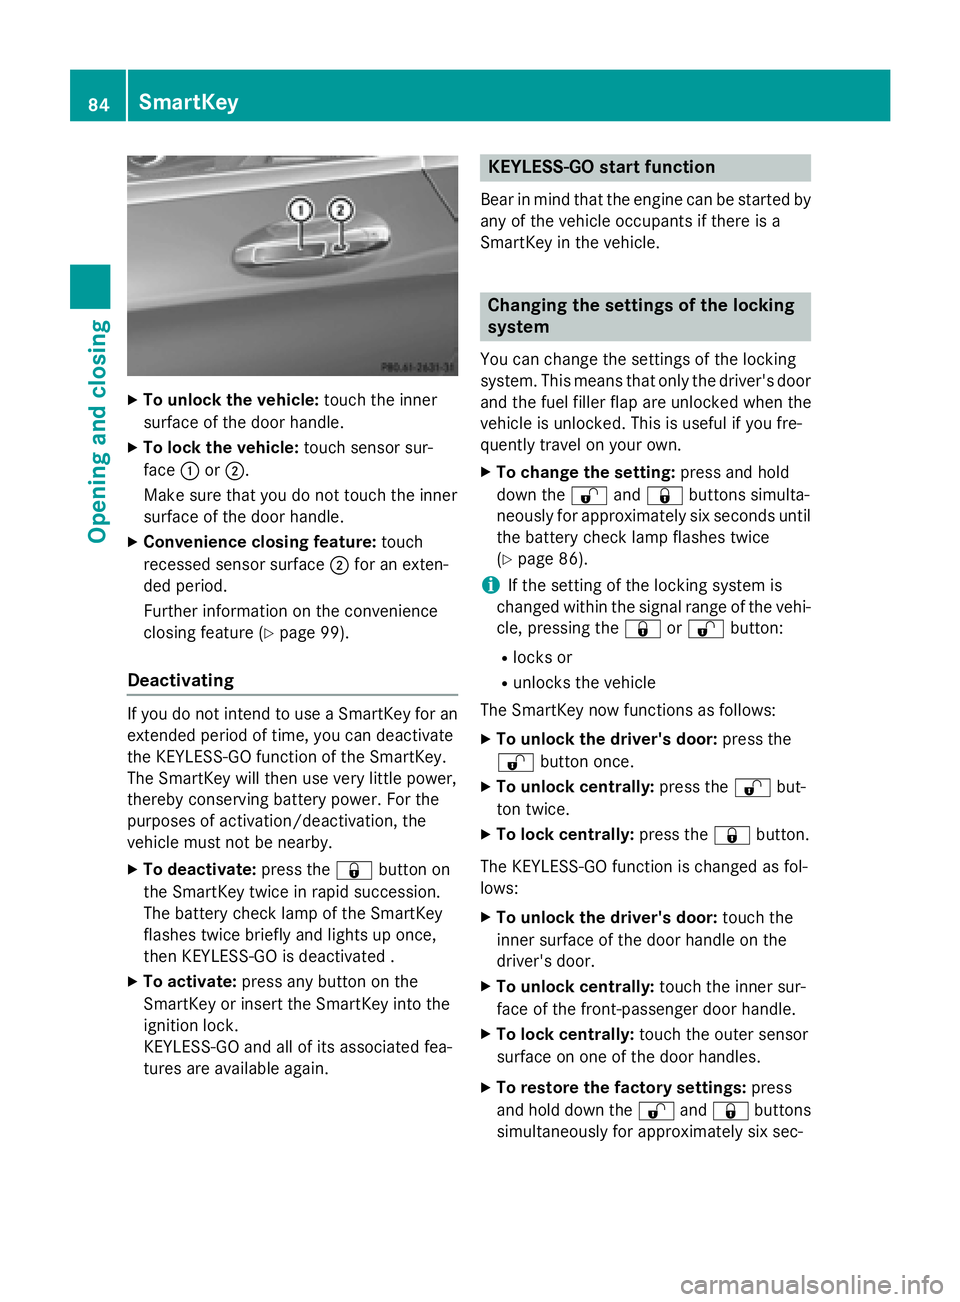
XTo unlock the vehicle:touch the inner
surface of the door handle.
XTo lock the vehicle: touch sensor sur-
face :or;.
Make sure that you do not touch the inner
surface of the door handle.
XConvenience closing feature: touch
recessed sensor surface ;for an exten-
ded period.
Further information on the convenience
closing feature (
Ypage 99).
Deactivating
If you do not intend to use a SmartKey for an
extended period of time, you can deactivate
the KEYLESS-GO function of the SmartKey.
The SmartKey will then use very little power,
thereby conserving battery power. For the
purposes of activation/deactivation, the
vehicle must not be nearby.
XTo deactivate: press the&button on
the SmartKey twice in rapid succession.
The battery check lamp of the SmartKey
flashes twice briefly and lights up once,
then KEYLESS-GO is deactivated .
XTo activate: press any button on the
SmartKey or insert the SmartKey into the
ignition lock.
KEYLESS-GO and all of its associated fea-
tures are available again.
KEYLESS-GO start function
Bear in mind that the engine can be started by
any of the vehicle occupants if there is a
SmartKey in the vehicle.
Changing the settings of the locking
system
You can change the settings of the locking
system. This means that only the driver's door
and the fuel filler flap are unlocked when the
vehicle is unlocked. This is useful if you fre-
quently travel on your own.
XTo change the setting: press and hold
down the %and& buttons simulta-
neously for approximately six seconds until
the battery check lamp flashes twice
(
Ypage 86).
iIf the setting of the locking system is
changed within the signal range of the vehi-
cle, pressing the &or% button:
Rlocks or
Runlocks the vehicle
The SmartKey now functions as follows:
XTo unlock the driver's door: press the
% button once.
XTo unlock centrally: press the%but-
ton twice.
XTo lock centrally: press the&button.
The KEYLESS-GO function is changed as fol-
lows:
XTo unlock the driver's door: touch the
inner surface of the door handle on the
driver's door.
XTo unlock centrally: touch the inner sur-
face of the front-passenger door handle.
XTo lock centrally: touch the outer sensor
surface on one of the door handles.
XTo restore the factory settings: press
and hold down the %and& buttons
simultaneously for app
roximately six sec-
84SmartKey
Opening and closing
Page 90 of 410

ProblemPossible causes/consequences andMSolutions
The engine cannot be
started using the
SmartKey.The on-board voltage is too low.
XSwitch off non-essential consumers, e.g. seat heating or interior
lighting, and try to start the engine again.
If this does not work:
XCheck the starter battery and charge it if necessary
(
Ypage 349).
or
XJump-start the vehicle (Ypage 351).
or
XConsult a qualified specialist workshop.
The engine cannot be
started using the Start/
Stop button. The
SmartKey is in the vehi-
cle.The vehicle is locked.
XUnlock the vehicle and try to start the vehicle again.
The SmartKey battery is discharged or nearly discharged.
XCheck the SmartKey battery (Ypage 86) and replace it if nec-
essary (
Ypage 86).
If this does not work:
XStart your vehicle with the SmartKey in the ignition lock.
There is interference from a powerful source of radio waves.
XStart your vehicle with the SmartKey in the ignition lock.
You have lost a Smart-
Key.XHave the SmartKey deactivated at a qualified specialist work-
shop.
XReport the loss immediately to the vehicle insurers.
XIf necessary, have the locks changed as well.
You have lost the
mechanical key.XReport the loss immediately to the vehicle insurers.
XIf necessary, have the locks changed as well.
88SmartKey
Opening and closing
Page 108 of 410
Useful information
i
This Operator's Manual describes all
models and all standard and optional equip-
ment of your vehicle available at the time of
publication of the Operator's Manual.
Country-specific differences are possible.
Please note that your vehicle may not be
equipped with all features described. This
also applies to safety-related systems and
functions.
iRead the information on qualified special-
ist workshops (
Ypage 26).
Correct driver's seat position
GWARNING
You could lose control of your vehicle if you do the following while driving:
Radjust the driver's seat, head restraint,
steering wheel or mirrors
Rfasten the seat belt
There is a risk of an accident.
Adjust the driver's seat, head restraint, steer-
ing wheel and mirror and fasten your seat belt before starting the engine.
XObserve the safety guidelines on seat
adjustment (
Ypage 107).
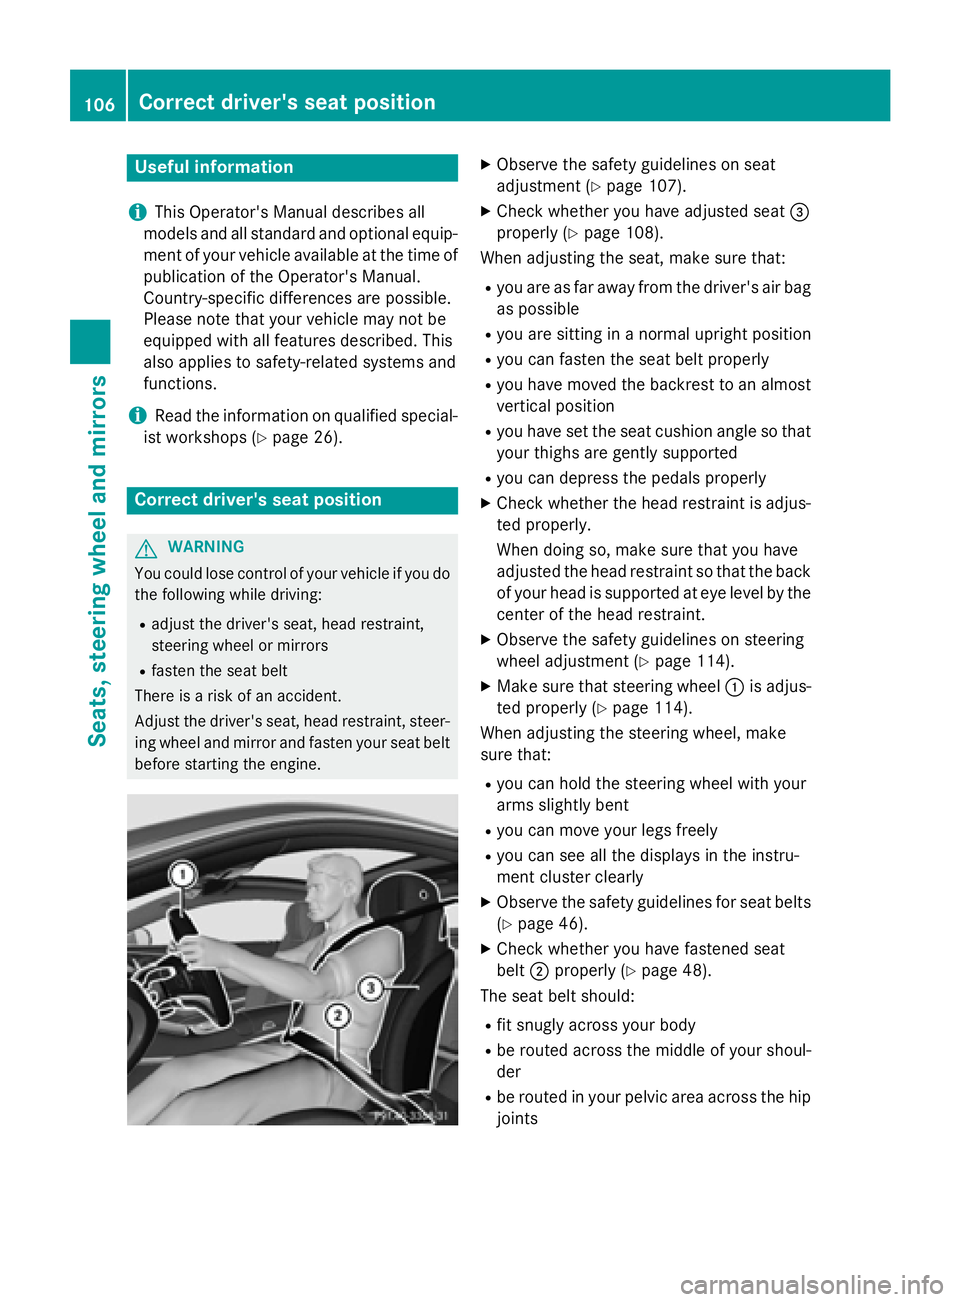
XCheck whether you have adjusted seat =
properly (
Ypage 108).
When adjusting the seat, make sure that:
Ryou are as far away from the driver's air bag
as possible
Ryou are sitting in a normal upright position
Ryou can fasten the seat belt properly
Ryou have moved the backrest to an almost
vertical position
Ryou have set the seat cushion angle so that
your thighs are gently supported
Ryou can depress the pedals properly
XCheck whether the head restraint is adjus-
ted properly.
When doing so, make sure that you have
adjusted the head restraint so that the back
of your head is supported at eye level by the
center of the head restraint.
XObserve the safety guidelines on steering
wheel adjustment (
Ypage 114).
XMake sure that steering wheel :is adjus-
ted properly (
Ypage 114).
When adjusting the steering wheel, make
sure that:
Ryou can hold the steering wheel with your
arms slightly bent
Ryou can move your legs freely
Ryou can see all the displays in the instru-
ment cluster clearly
XObserve the safety guidelines for seat belts
(
Ypage 46).
XCheck whether you have fastened seat
belt ;properly (
Ypage 48).
The seat belt should:
Rfit snugly across your body
Rbe routed across the middle of your shoul-
der
Rbe routed in your pelvic area across the hip
joints
106Correct driver's seat position
Seats, steering wheel and mirrors
Page 135 of 410
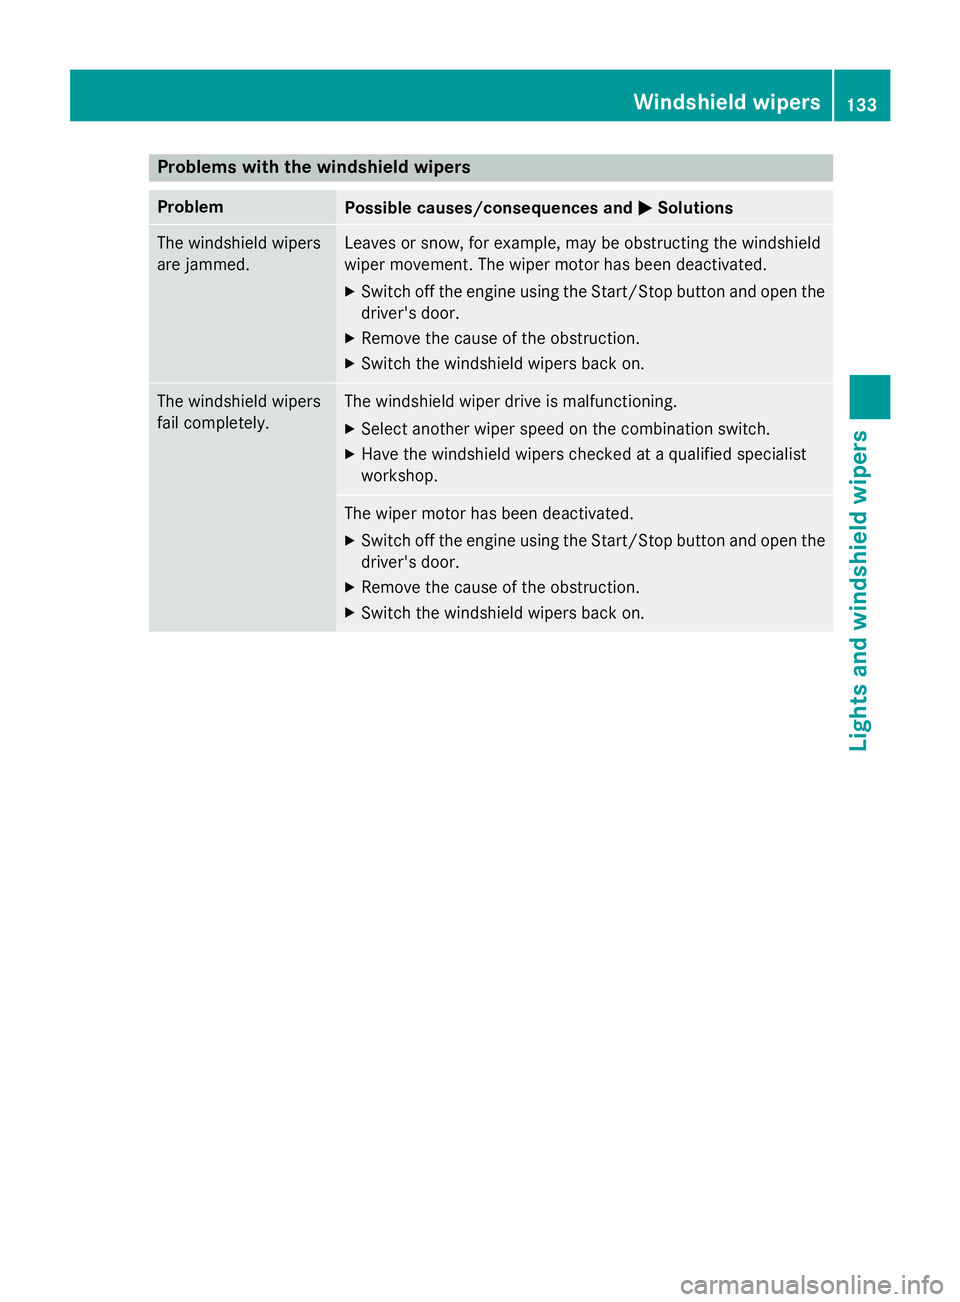
Problems with the windshield wipers
ProblemPossible causes/consequences andMSolutions
The windshield wipers
are jammed.Leaves or snow, for example, may be obstructing the windshield
wiper movement. The wiper motor has been deactivated.
XSwitch off the engine using the Start/Stop button and open the
driver's door.
XRemove the cause of the obstruction.
XSwitch the windshield wipers back on.
The windshield wipers
fail completely.The windshield wiper drive is malfunctioning.
XSelect another wiper speed on the combination switch.
XHave the windshield wipers checked at a qualified specialist
workshop.
The wiper motor has been deactivated.
XSwitch off the engine using the Start/Stop button and open the
driver's door.
XRemove the cause of the obstruction.
XSwitch the windshield wipers back on.
Windshield wipers133
Lights and windshield wipers
Z
Page 154 of 410
the case if you are not depressing the brake
pedal.
If you depress the brake pedal and press the
Start/Stop button, the engine starts immedi-
ately.
A check which periodically establishes a radio
connection between the vehicle and the
SmartKey determines whether a valid Smart-
Key is in the vehicle. This occurs, for example,when starting the engine.
To start the vehicle without actively using the
SmartKey:
Rthe Start/Stop button must be inserted in
the ignition lock.
Rthe SmartKey must be in the vehicle.
Rthe vehicle must not be locked with the
SmartKey or KEYLESS-GO (
Ypage 83).
Do not keep the SmartKey:
Rwith electronic devices, e.g. a mobile
phone or another SmartKey.
Rwith metallic objects, e.g. coins or metal
foil.
Rinside metallic objects, e.g. a metal case.
This can affect the functionality of the Smart-
Key.
If you lock the vehicle with the SmartKey's
remote control or with KEYLESS-GO, after a
short time:
Ryou will not be able to switch on the ignition
with the Start/Stop button.
Ryou will not be able to start the engine with
the Start/Stop button until the vehicle is
unlocked again.
If you lock the vehicle centrally using the but-
ton on the front doo
r (Ypage 89), you can
continue to start the engine with the Start/
Stop button.
The engine can be switched off while the vehi-
cle is in motion by pressing and holding the
Start/Stop button for three seconds. This
function operates independently of the ECO
start/stop automatic engine switch-off func-
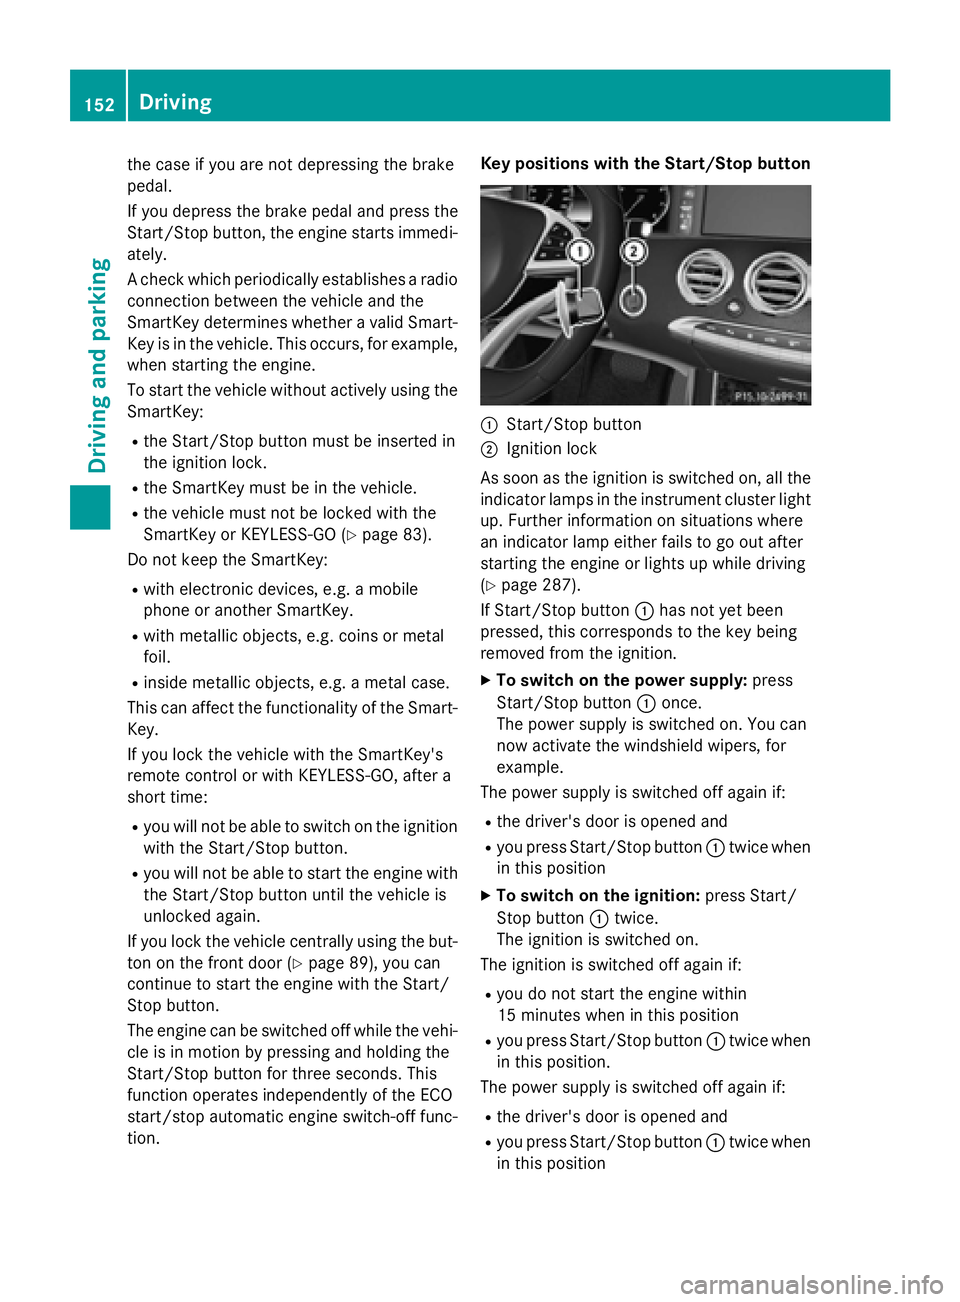
tion. Key positions with the Start/Stop button
:Start/Stop button
;Ignition lock
As soon as the ignition is switched on, all the
indicator lamps in the instrument cluster light
up. Further information on situations where
an indicator lamp either fails to go out after
starting the engine or lights up while driving
(
Ypage 287).
If Start/Stop button :has not yet been
pressed, this corresponds to the key being
removed from the ignition.
XTo switch on the power supply: press
Start/Stop button :once.
The power supply is switched on. You can
now activate the windshield wipers, for
example.
The power supply is switched off again if:
Rthe driver's door is opened and
Ryou press Start/Stop button :twice when
in this position
XTo switch on the ignition: press Start/
Stop button :twice.
The ignition is switched on.
The ignition is switched off again if:
Ryou do not start the engine within
15 minutes when inthis position
Ryou press Start/Stop button :twice when
in this position.
The power supply is switched off again if:
Rthe driver's door is opened and
Ryou press Start/Stop button :twice when
in this position
152Driving
Dr iving an d parking
Page 160 of 410
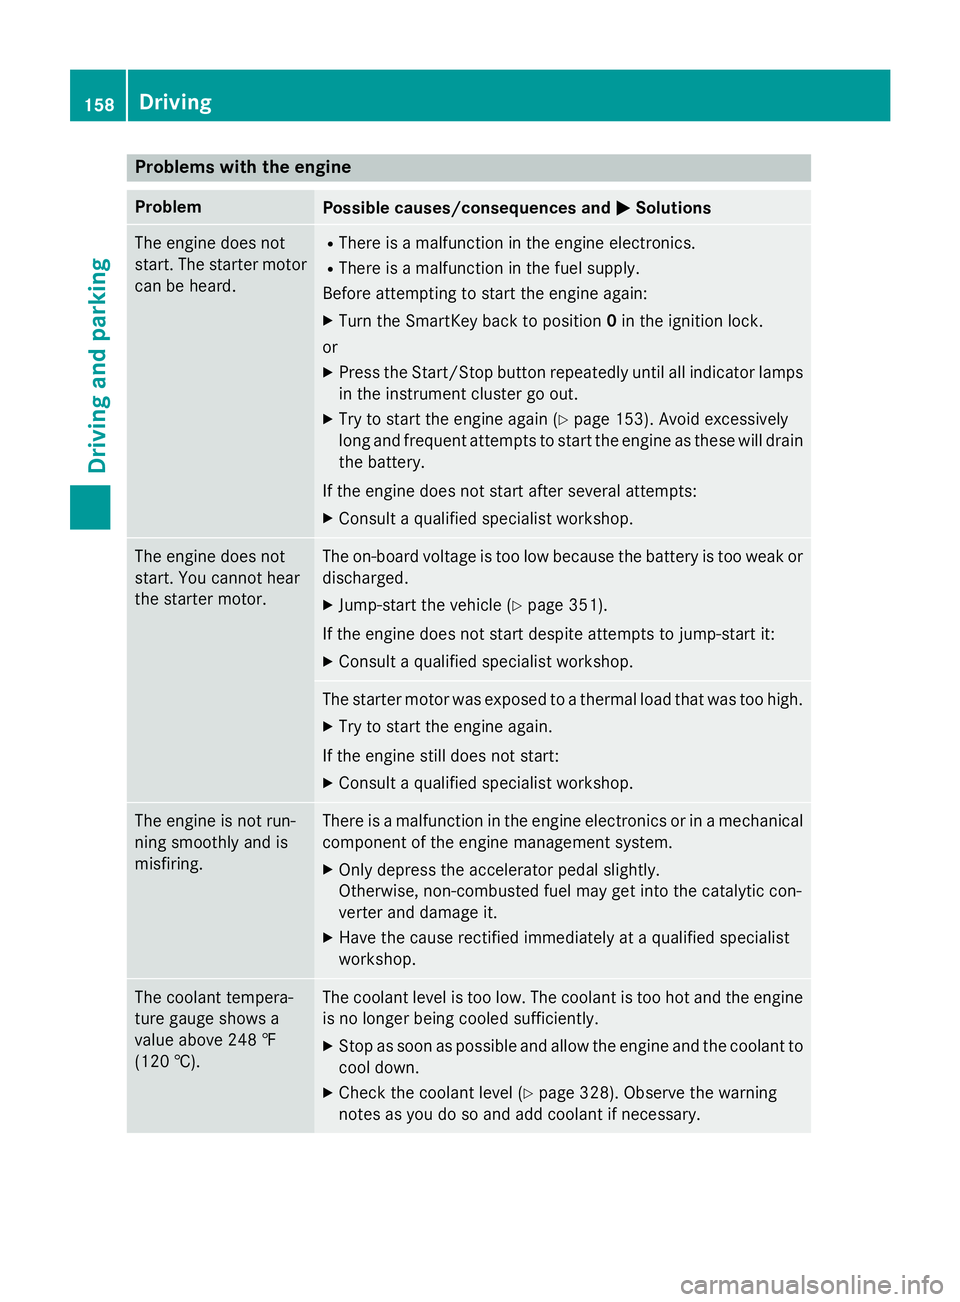
Problems with the engine
ProblemPossible causes/consequences andMSolutions
The engine does not
start. The starter motor
can be heard.RThere is a malfunction in the engine electronics.
RThere is a malfunction in the fuel supply.
Before attempting to start the engine again:
XTurn the SmartKey back to position 0in the ignition lock.
or
XPress the Start/Stop button repeatedly until all indicator lamps in the instrument cluster go out.
XTry to start the engine again (Ypage 153). Avoid excessively
long and frequent attempts to start the engine as these will drain
the battery.
If the engine does not start after several attempts:
XConsult a qualified specialist workshop.
The engine does not
start. You cannot hear
the starter motor.The on-board voltage is too low because the battery is too weak or
discharged.
XJump-start the vehicle (Ypage 351).
If the engine does not start despite attempts to jump-start it:
XConsult a qualified specialist workshop.
The starter motor was exposed to a thermal load that was too high.
XTry to start the engine again.
If the engine still does not start:
XConsult a qualified specialist workshop.
The engine is not run-
ning smoothly and is
misfiring.There is a malfunction in the engine electronics or in a mechanical
component of the engine management system.
XOnly depress the accelerator pedal slightly.
Otherwise, non-combusted fuel may get into the catalytic con-
verter and damage it.
XHave the cause rectified immediately at a qualified specialist
workshop.
The coolant tempera-
ture gauge shows a
value above 248 ‡
(120 †).The coolant level is too low. The coolant is too hot and the engine
is no longer being cooled sufficiently.
XStop as soon as possible and allow the engine and the coolant to
cool down.
XCheck the coolant level (Ypage 328). Observe the warning
notes as you do so and add coolant if necessary.
158Driving
Driving and parking
Page 171 of 410
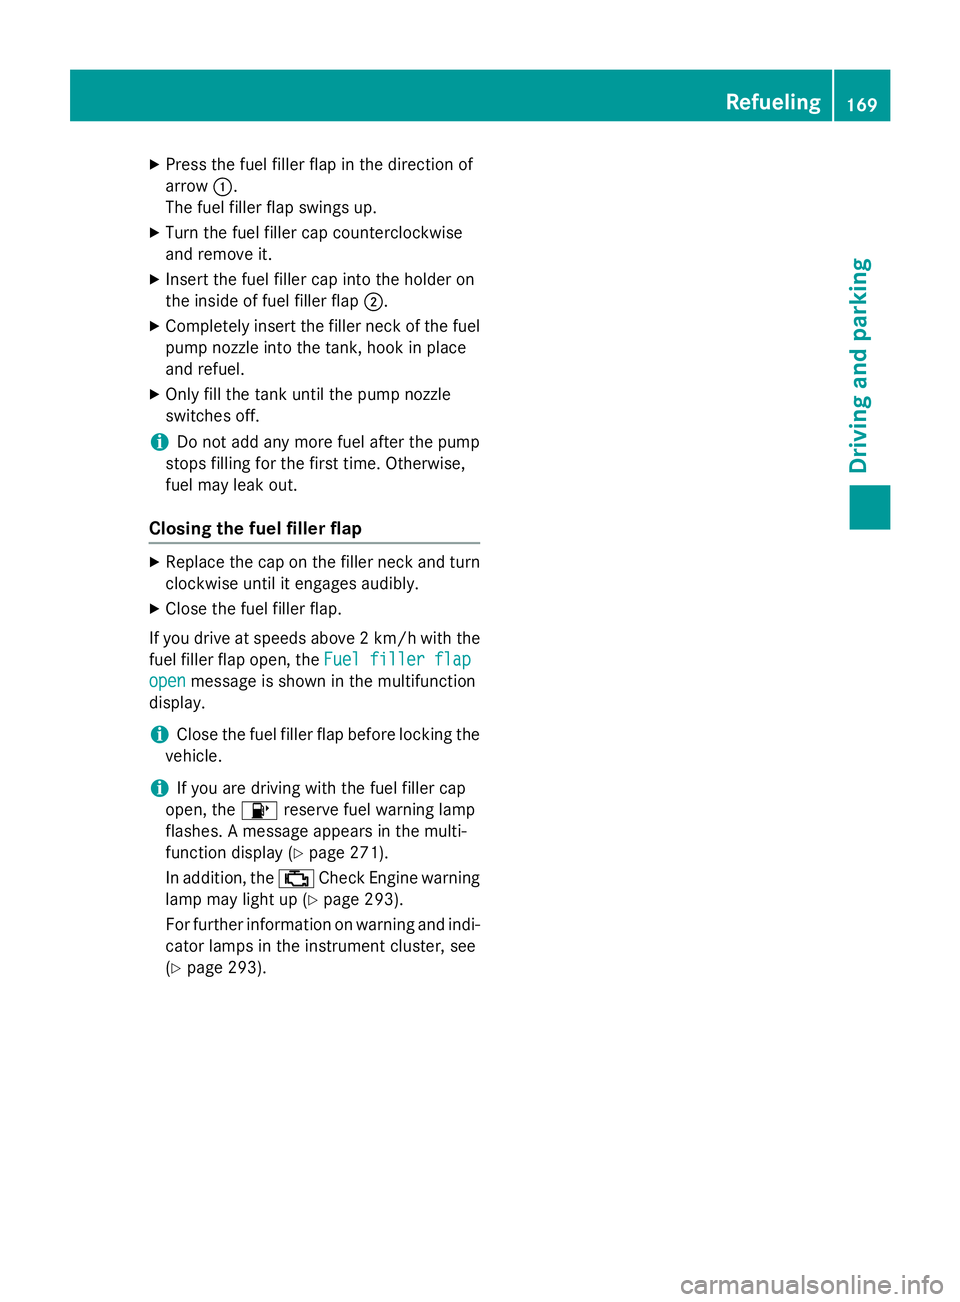
XPress the fuel filler flap in the direction of
arrow:.
The fuel filler flap swings up.
XTurn the fuel filler cap counterclockwise
and remove it.
XInsert the fuel filler cap into the holder on
the inside of fuel filler flap ;.
XCompletely insert the filler neck of the fuel
pump nozzle into the tank, hook in place
and refuel.
XOnly fill the tank until the pump nozzle
switches off.
iDo not add any more fuel after the pump
stops filling for the first time. Otherwise,
fuel may leak out.
Closing the fuel filler flap
XReplace the cap on the filler neck and turn
clockwise until it engages audibly.
XClose the fuel filler flap.
If you drive at speeds above 2 km/ hwith the
fuel filler flap open, the Fuel
fillerflap
openmessage is shown in the multifunction
display.
iClose the fuel filler flap before locking the
vehicle.
iIf you are driving with the fuel filler cap
open, the 8reserve fuel warning lamp
flashes. A message appears in the multi-
function display (
Ypage 271).
In addition, the ;Check Engine warning
lamp may light up (
Ypage 293).
For further information on warning and indi-
cator lamps in the instrument cluster, see
(
Ypage 293).
Refueling169
Driving and parking
Z