2016 MERCEDES-BENZ S-COUPE ignition
[x] Cancel search: ignitionPage 358 of 410
tion switch, the hazard warning lamp starts
flashing again.
Towing the vehicle with the rear axle
raised
Only vehicles without 4MATIC can be
towed with the rear axle raised.
!The ignition must be switched off if you
are towing the vehicle with the rear axle
raised. Intervention by ESP
®could other-
wise damage the brake system.
!Vehicles with 4MATIC must not be towed
with either the front or the rear axle raised,
as doing so will damage the transmission.
!Vehicles with automatic transmission
must not be towed with the rear axle raised.
The vehicle/trailer combination may oth-
erwise swerve or even roll over.
Transporting the vehicle
!
You may only secure the vehicle by the
wheels, not by parts of the vehicle such as axle or steering components. Otherwise,
the vehicle could be damaged.
The towing eye can be used to pull the vehicle
onto a trailer or transporter for transporting
purposes.
XTurn the SmartKey to position 2in the igni-
tion lock.
XShift the automatic transmission to posi-
tion N.
As soon as the vehicle has been loaded:
XPrevent the vehicle from rolling away by
applying the electric parking brake.
XShift the automatic transmission to posi-
tion P.
XTurn the SmartKey to position 0in the igni-
tion lock and remove it.
XSecure the vehicle.
Notes on 4MATIC vehicles
!
Vehicles with 4MATIC must not be towed
with either the front or the rear axle raised,
as doing so will damage the transmission.
Vehicles with 4MATIC may either be towed
away with both axles on the ground or be loa- ded up and transported.
If the vehicle's transmission, front, or rear
axle is damaged, have the vehicle transported
on a truck or trailer.
In the event of damage to the electrical
system: if the battery is defective, the auto-
matic transmission will be locked in position
P . To shift the automatic transmission to posi-
tion N, you must provide power to the vehi-
cle's electrical system in the same way as
when jump-starting (
Ypage 351).
Have the vehicle transported on a transporter
or trailer.
Tow-starting (emergency engine
starting)
!
Vehicles with automatic transmission
must not be tow-started. You could other-
wise damage the automatic transmission.
iInformation on "Jump-starting"
(
Ypage 351).
Fuses
Important safety notes
GWARNING
If you manipulate or bridge a faulty fuse or if
you replace it with a fuse with a higher amper- age, the electric cables could be overloaded.
This could result in a fire. There is a risk of an
accident and injury.
Always replace faulty fuses with the specified
new fuses having the correct amperage.
Blown fuses must be replaced with fuses of
the same rating, which you can recognize by
356Fuses
Breakdown assistance
Page 359 of 410
the color and value. The fuse ratings are listed
in the fuse allocation chart.
The fuse allocation chart is on the fuse box in
the trunk (
Ypage 358).
If a newly inserted fuse also blows, have the
cause traced and rectified at a qualified spe-
cialist workshop, e.g. an authorized
Mercedes-Benz Center.
!Only use fuses that have been approved
for Mercedes-Benz vehicles and which
have the correct fuse rating for the system
concerned. Otherwise, components or sys-
tems could be damaged.
The fuses in your vehicle serve to close down
faulty circuits. If a fuse blows, all the compo-
nents on the circuit and their functions stop
operating.
Before changing a fuse
XSecure the vehicle against rolling away
(
Ypage 170).
XSwitch off all electrical consumers.
XMake sure that the ignition is switched off
(
Ypage 151).
or
XWhen using the SmartKey, turn the Smart-
Key to position 0in the ignition lock and
remove it (
Ypage 151).
All indicator lamps in the instrument cluster
must be off.
The fuses are located in various fuse boxes:
RFuse box on the driver's side of the dash-
board
RFuse box in the front-passenger footwell
RFuse box in the engine compartment on the left-hand side of the vehicle, when viewed
in the direction of travel
RFuse box in the trunk on the right-hand side
of the vehicle, when viewed in the direction
of travel
Dashboard fuse box
!
Do not use a pointed object such as a
screwdriver to open the cover in the dash-
board. You could damage the dashboard or
the cover.
!Make sure that no moisture can enter the
fuse box when the cover is open.
!When closing the cover, make sure that it
is lying correctly on the fuse box. Moisture
seeping in or dirt could otherwise impair
the operation of the fuses.
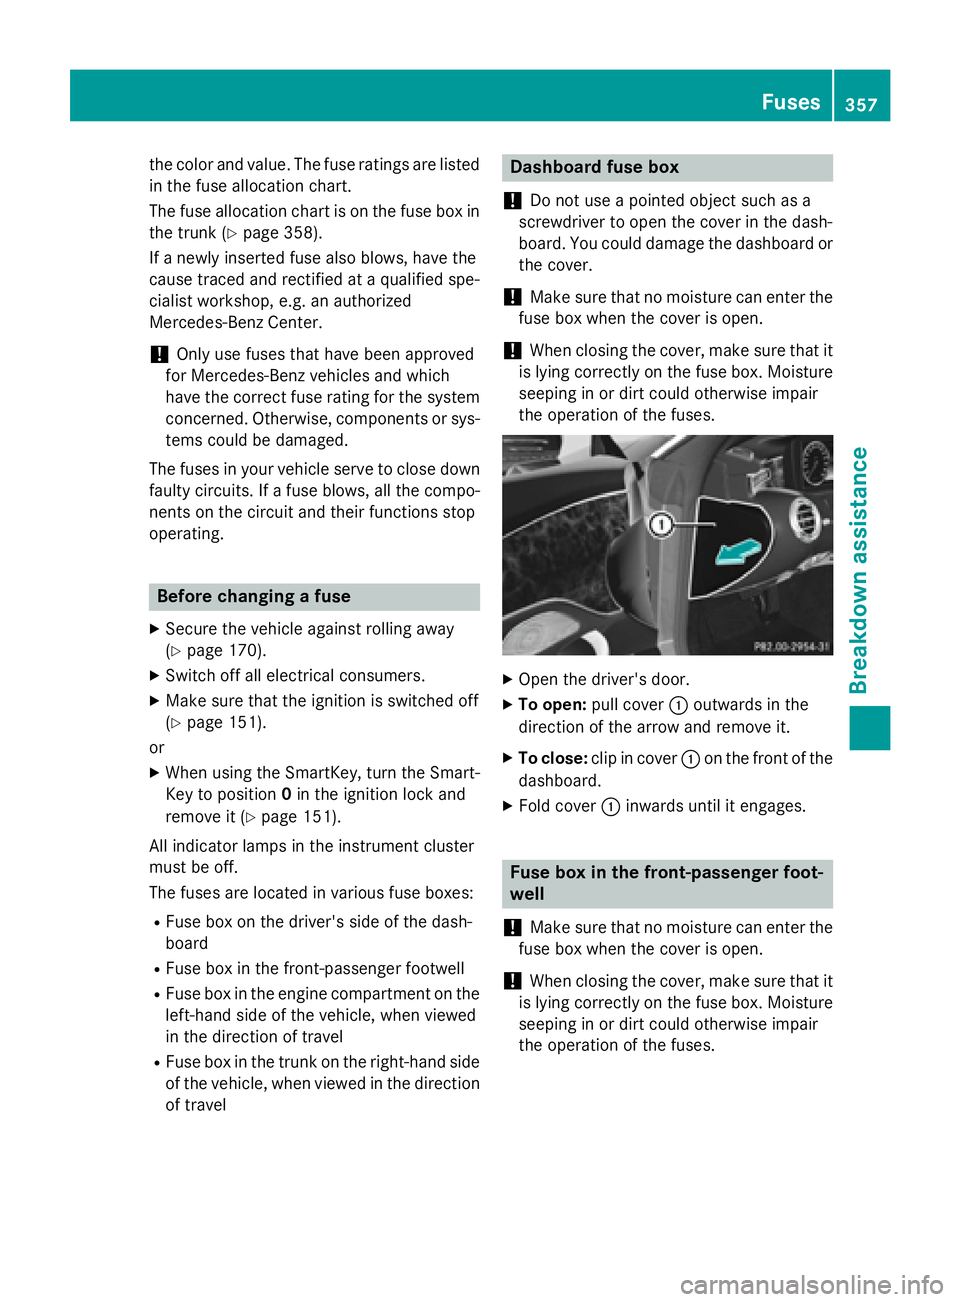
XOpen the driver's door.
XTo open: pull cover :outwards in the
direction of the arrow and remove it.
XTo close: clip in cover :on the front of the
dashboard.
XFold cover :inwards until it engages.
Fuse box in the front-passenger foot-
well
!
Make sure that no moisture can enter the
fuse box when the cover is open.
!When closing the cover, make sure that it
is lying correctly on the fuse box. Moisture
seeping in or dirt could otherwise impair
the operation of the fuses.
Fuses357
Breakdown assistance
Z
Page 360 of 410
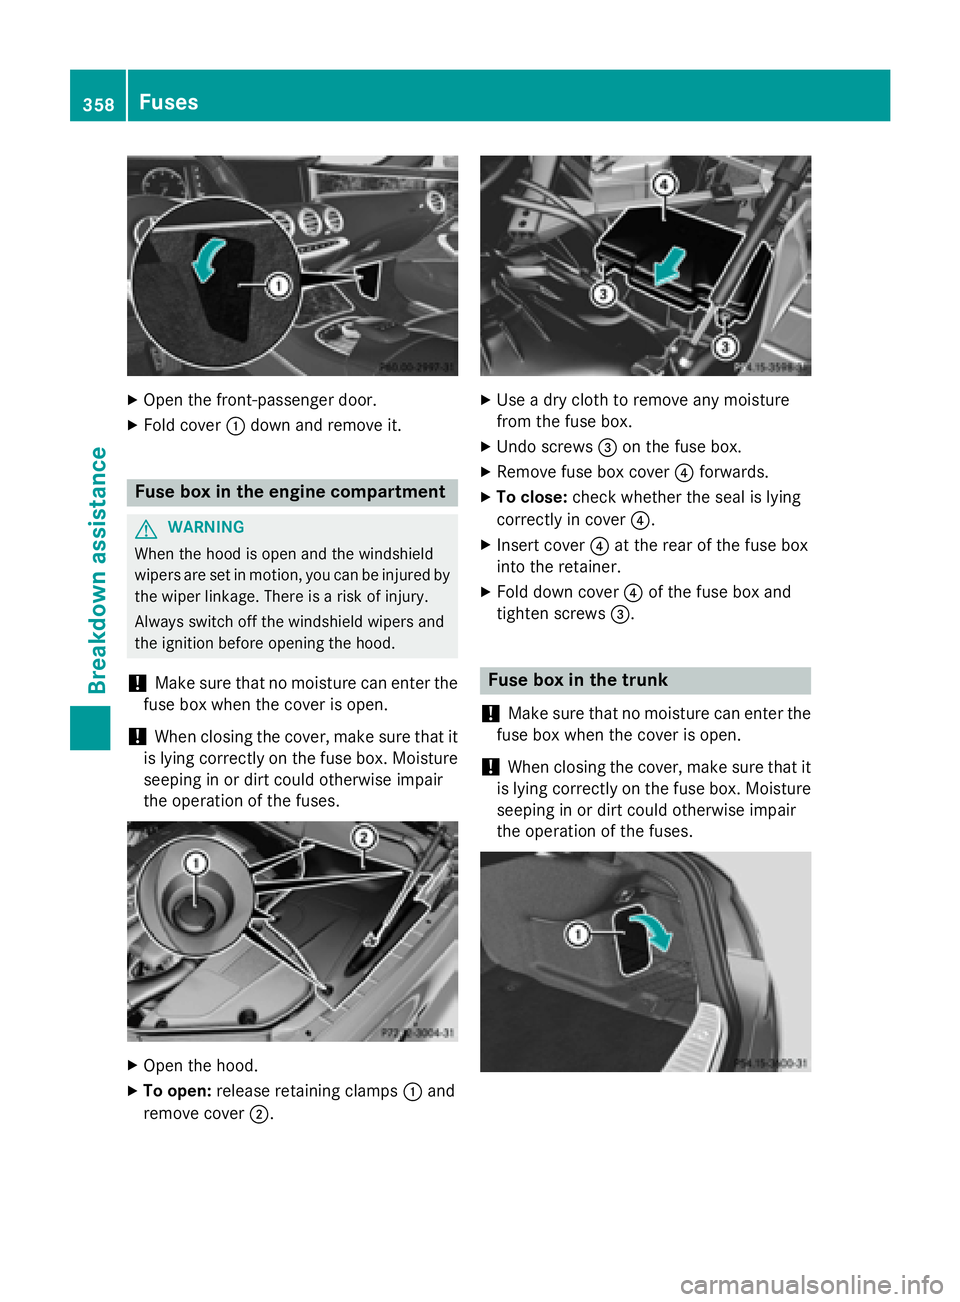
XOpen the front-passenger door.
XFold cover:down and remove it.
Fuse box in the engine compartment
GWARNING
When the hood is open and the windshield
wipers are set in motion, you can be injured by
the wiper linkage. There is a risk of injury.
Always switch off the windshield wipers and
the ignition before opening the hood.
!Make sure that no moisture can enter the
fuse box when the cover is open.
!When closing the cover, make sure that it
is lying correctly on the fuse box. Moisture
seeping in or dirt could otherwise impair
the operation of the fuses.
XOpen the hood.
XTo open: release retaining clamps :and
remove cover ;.
XUse a dry cloth to remove any moisture
from the fuse box.
XUndo screws=on the fuse box.
XRemove fuse box cover ?forwards.
XTo close: check whether the seal is lying
correctly in cover ?.
XInsert cover?at the rear of the fuse box
into the retainer.
XFold down cover ?of the fuse box and
tighten screws =.
Fuse box in the trunk
!
Make sure that no moisture can enter the
fuse box when the cover is open.
!When closing the cover, make sure that it
is lying correctly on the fuse box. Moisture
seeping in or dirt could otherwise impair
the operation of the fuses.
358Fuses
Breakdown assistance
Page 372 of 410
minated, the system may not be able to detect
or signal low tire pressure as intended.
TPMS malfunctions may occur for a variety of
reasons, including the installation of incom-
patible replacement or alternate tires or
wheels on the vehicle that prevent the TPMS
from functioning properly. Always check the
TPMS malfunction telltale after replacing one
or more tires or wheels on your vehicle to
ensure that the replacement or alternate Tires
and wheels allow the TPMS to continue to
function properly.
It is the driver's responsibility to set the tire
pressure to that recommended for cold tires
which is suitable for the operating situation
(
Ypage 365). Note that the correct tire pres-
sure for the current operating situation must
first be taught-in to the tire pressure monitor.
If there is a substantial loss of pressure, the
warning threshold for the warning message is
aligned to the reference values taught-in.
Restart the tire pressure monitor after adjust-
ing the pressure of the cold tires
(
Ypage 371). The current pressures are
saved as new reference values. As a result, a
warning message will appear if the tire pres-
sure drops significantly.
The tire pressure monitor does not warn you
of an incorrectly set tire pressure. Observe
the notes on the recommended tire pressure
(
Ypage 365).
The tire pressure monitor is not able to warn
you of a sudden loss of pressure, e.g. if the
tire is penetrated by a foreign object. In the
event of a sudden loss of pressure, bring the
vehicle to a halt by braking carefully. Avoid
abrupt steering maneuvers.
The tire pressure monitor has a yellow warn-
ing lamp in the instrument cluster for indicat-
ing pressure loss or a malfunction. Whether
the warning lamp flashes or lights up indi-
cates whether a tire pressure is too low or the
tire pressure monitor is ma
lfunctioning:
Rif the warning lamp is lit continuously, the
tire pressure on one or more tires is signif- icantly too low. The tire pressure monitor is
not malfunctioning.
Rif the warning lamp flashes for around a
minute and then remains lit constantly, the
tire pressure monitor is malfunctioning.
In addition to the warning lamp, a message
appears in the multifunction display. Observe
the information on display messages
(
Ypage 279).
It may take up to ten minutes for a malfunc-
tion of the tire pressure monitor to be indica-
ted. A malfunction will be indicated by the tire
pressure warning lamp flashing for approx-
imately one minute and then remaining lit.
When the malfunction has been rectified, the
tire pressure warning lamp goes out after a
few minutes of driving.
The tire pressure values indicated by the on-
board computer may differ from those meas-
ured at a gas station with a pressure gage.
The tire pressures shown by the on-board
computer refer to those measured at sea
level. At high altitudes, the tire pressure val-
ues indicated by a pressure gage are higher
than those shown by the on-board computer.
In this case, do not reduce the tire pressures.
The operation of the tire pressure monitor can be affected by interference from radio trans-
mitting equipment (e.g. radio headphones,
two-way radios) that may be being operated
in or near the vehicle.
Checking the tire pressure electroni-
cally
XMake sure that the SmartKey is in position
2 in the ignition lock (
Ypage 151).
XUse ò on the steering wheel to call up
the list of menus.
XPress 9or: on the steering wheel
to select the Service
menu.
XPress theabutton.
370Tire pressure
Wheels and tires
Page 373 of 410
XPress9or: to select Tire Pres‐
sure.
XPress the abutton.
The current tire pressure of each tire is
shown in the multifunction display.
If the vehicle was parked for longer than
20 minutes, the Tire pressure will be
displayed after driving a few
minutesmessage appears.
After a teach-in process, the tire pressure
monitor automatically detects new wheels or
new sensors. As long as a clear allocation of
the tire pressure value to the individual
wheels is not possible, the Tire Pressure
Monitor Activemessage is shown instead
of the tire pressure display. The tire pressures are already being monitored.
Tire pressure monitor warning mes-
sages
If the tire pressure monitor detects a pressureloss in one or more tires, a warning message
is shown in the multifunction display and the
yellow tire pressure monitor warning lamp
comes on.
RIf the Please Correct Tire Pressure
message appears in the multifunction dis-
play, the tire pressure in at least one tire is
too low and must be corrected at the next
opportunity.
RIf theCheckTiresmessage appears in the
multifunction display, the tire pressure in
one or more tires has dropped significantly
and the tires must be checked.
RIf the Warning Tire Malfunctionmes-
sage appears in the multifunction display,
the tire pressure in one or more tires has
dropped suddenly and the tires must be
checked.
Observe the instructions and safety notes in
the display messages in the "Tires" section
(
Ypage 279).
If the wheel positions on the vehicle are rota-
ted, the tire pressures may be displayed for
the wrong positions for a short time. This is rectified after a few minutes of driving, and
the tire pressures are displayed for the cor-
rect positions.
Restarting the tire pressure monitor
When you restart the tire pressure monitor, all
existing warning messages are deleted and
the warning lamps go out. The monitor uses
the currently set tire pressures as the refer-
ence values for monitoring. In most cases, the
tire pressure monitor will automatically
detect the new reference values after you
have changed the tire pressure. However, you
can also define reference values manually as
described here. The tire pressure monitor
then monitors the new tire pressure values.
XSet the tire pressure to the value recom-
mended for the corresponding driving sit-
uation on the Tire and Loading Information
placard on the driver's side
B-pillar (
Ypage 365).
Additional tire pressure values for different
loads can also be found on the tire pressure
table on the inside of the fuel filler flap
(
Ypage 365).
XMake sure that the tire pressure is correct
on all four wheels.
XMake sure that the SmartKey is in position
2 in the ignition lock.
XUse ò on the steering wheel to call up
the list of menus.
XPress 9or: on the steering wheel
to select the Service
menu.
XPress theabutton.
XPress 9or: to select Tire Pres‐
sure.
XPress the abutton.
The current tire pressure for each wheel or
the Tire
pressurewillbedisplayed
afterdrivingafewminutesmessage
Tire pressure371
Wheels and tires
Z
Page 386 of 410
Direction of rotation
Tires with aspecifie ddirection of rotation
hav eadditional benefits, e.g. if there is aris k
of hydroplaning .These advantages can only
be gained if th etires are installed correspond-
in g to th edirection of rotation .
An arrow on th esidewall of th etire indicates
it s correc tdirection of rotation .
Storing wheels
Storewheels that are no tbein gused in acool,
dry and preferably dar kplace. Protec tth e
tires from oil, grease ,gasolin eand diesel.
Mounting awheel
Preparing th evehicle
XStop th evehicle on solid, non-slipper yand
level ground.
XApply th eelectric parking brake manually.
XBrin gth efron twheels into th estraight -
ahead position .
XShift thetransmissio nto position P.
XMakesur ethat "normal" level is selecte d
fo rAIRMATIC (
Ypage 197).
XSwitchof fth eengine.
XOpe nth edriver's door.
The on-boar delectronic sno whav estatus
0. Thi sis th esam eas th eSmartKey havin g
been removed.
XRemov eStart/Sto pbutto nfrom ignition
loc k (
Ypage 151).
or ,if th eSmartKey is inserte din th eignition
lock:
XRemov eth eSmartKey from th eignition
lock.
XMak esur ethat th eengin ecanno tbe star-
te dvia your smartphone (
Ypage 154).
XIf included in thevehicle equipment,
remov eth etire-chang etool ki tfrom th e
vehicle.
XSafeguar dth evehicle against rollin gaway.
Securing th evehicle to preven tit from
rollin gawa y
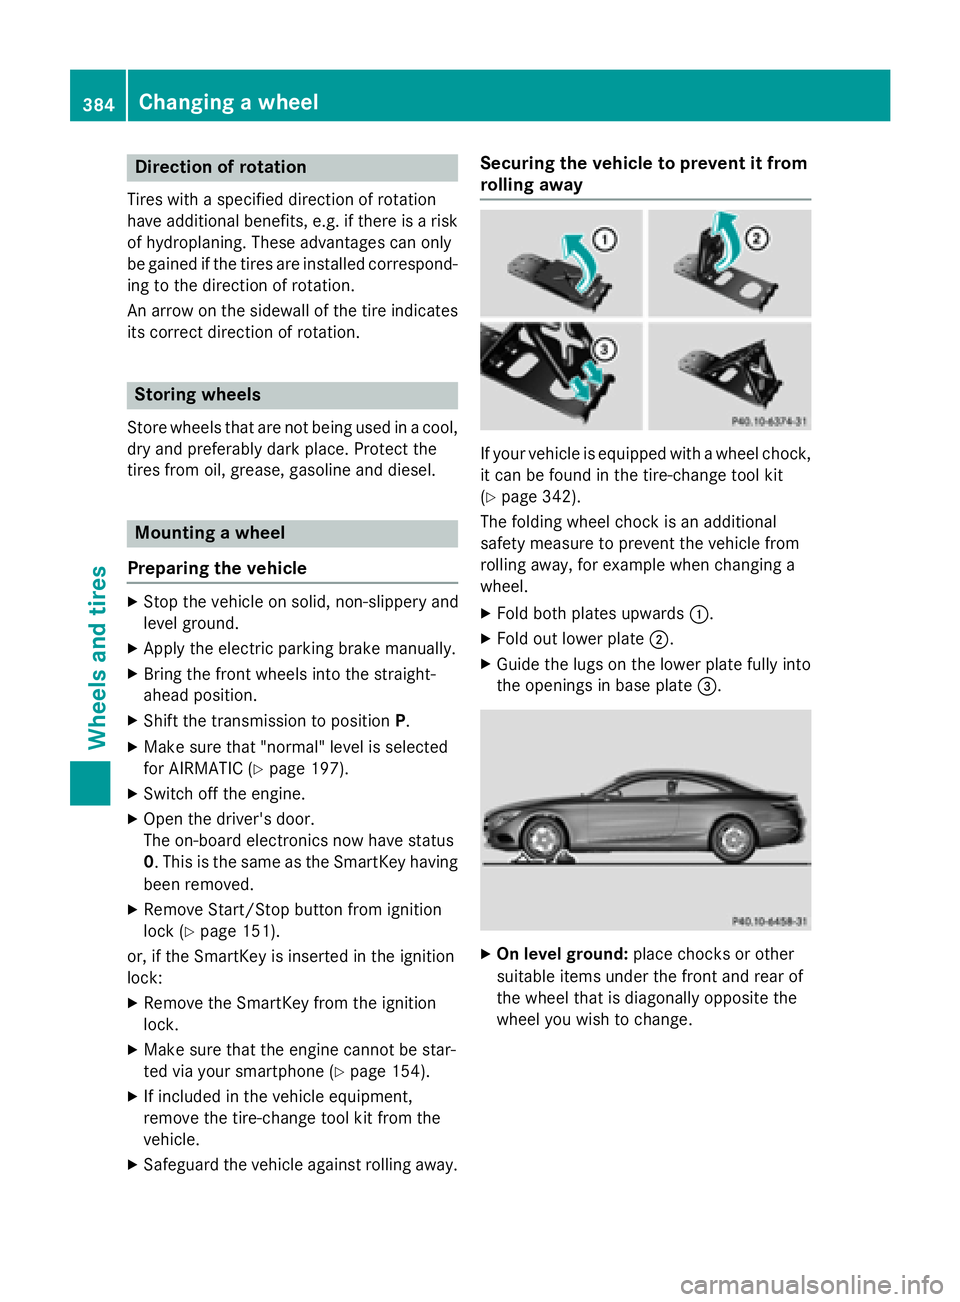
If your vehicle is equipped wit h awhee lchock,
it can be found in th etire-chang etool ki t
(
Ypage 342).
The foldin gwhee lchoc kis an additional
safet ymeasur eto preven tth evehicle from
rollin gaway, fo rexample when changin g a
wheel.
XFold bot hplates upwards :.
XFold out lowerplat e;.
XGuide th elugs on th elowe rplat efull yinto
th eopening sin base plat e=.
XOn leve lground: placechocks or other
suitable items under th efron tand rea rof
th ewhee lthat is diagonally opposite th e
whee lyou wish to change.
384Changing a wheel
Wheels and tires