2016 MERCEDES-BENZ S-COUPE glove box
[x] Cancel search: glove boxPage 6 of 410
1, 2, 3 ...
4ETS (Electronic Traction System)see ETS/4ETS (Electronic Trac-
tion System)
4MATIC (permanent four-wheel
drive) .................................................. 199
12 V socket
see Sockets
360° camera
Cleaning ........................................ .336
Function/notes .............................2 11
A
ABS (Anti-lock Braking System)
Display message ............................ 252
Function/notes ................................ 68
Important safety notes .................... 68
Warning lamp ................................. 288
Accident
Automatic measures after an acci-
dent ................................................. 62
Activating/deactivating cooling
with air dehumidification ................. 138
Activating/deactivating Night
View Assist Plus
With spotlight function ................... 221
Active Blind Spot Assist
Activating/deactivating (on-
board computer) ............................ 246
Display message ............................ 274
Function/information .................... 222
Active Body Control (ABC)
Display message ............................ 273
Function/notes ............................. 194
Active Lane Keeping Assist
Activating/deactivating (on-
board computer) ............................ 246
Display message ............................ 274
Function/information .................... 225
Active multicontour seat .................. 111
Active Parking Assist
Detecting parking spaces .............. 203
Display message ............................ 275
Exiting a parking space .................. 205
Function/notes ............................. 202
Important safety notes .................. 202 Parking .......................................... 204
ADAPTIVE BRAKE ................................. 75
Adaptive Brake Assist
Function/notes ................................ 72
Adaptive Damping System (ADS) ..... 198
Adaptive Highbeam Assist Plus
Display message ............................ 268
Function/notes ............................. 127
Switching on/off ........................... 128
Additional speedometer ................... 248
Additives (engine oil) ........................ 403
Air bags
Deployment ..................................... 59
Display message ............................ 264
Front air bag (driver, front
passenger) ....................................... 52
Important safety notes .................... 50
Introduction ..................................... 50
Knee bag .......................................... 52
Occupant Classification System
(OCS) ............................................... 53
PASSENGER AIR BAG indica tor
l
amps ............................................... 45
Side impact air bag .......................... 52
Window curtain air bag .................... 53
Air vents
Glove box ....................................... 147
Important safety notes .................. 146
Rear ............................................... 147
Setting ........................................... 146
Setting the center air vents ........... 146
Setting the side air vents ............... 147
Air-conditioning system
see Climate control
AIRMATIC
Display message ............................ 272
Function/notes ............................. 197
Alarm
ATA (Anti-Theft Alarm system) ......... 78
Switching off (ATA) .......................... 78
Switching the function on/off
(ATA) ................................................ 78
Alarm system
see ATA (Anti-Theft Alarm system)
Anti-lock braking system
see ABS (Anti-lock Braking System)
Anti-Theft Alarm system
see ATA (Anti-Theft Alarm system)
4Index
Page 13 of 410
G
Garage door openerClearing the memory .....................3 20
General notes ................................ 317
Important safety notes .................. 317
Opening/closing the garage door .. 320
Programming (button in the rear-
view mirror) ................................... 318
Synchronizing the rolling code ....... 318
Gasoline ............................................. 401
Gear indicator (on-board com-
puter, Mercedes-AMG vehicles) ....... 249
Genuine parts ...................................... 22
Glove box ...........................................3 01
H
Handbrake
see Parking brake
HANDS-FREE ACCESS .......................... 94
Hazard warning lamps ......................126
Head bags
Display message ............................ 262
Head restraints
Adjusting ....................................... 109
Adjusting (manually) ......................1 09
Adjusting (rear) .............................. 110
Head-up display
Adjusting the brightness ................ 247
Displays and operating .................. 233
Function/notes .............................2 33
Important safety notes .................. 233
Selecting displays .......................... 246
Setting the position ....................... 247
Storing settings (memory func-
tion) ............................................... 121
Headlamps
Fogging up ..................................... 129
see Automatic headlamp mode
Heating
see Climate control
High beam flasher .............................1 26
High-beam headlamps
Adaptive Highbeam Assist PLUS .... 127
Display message ............................ 266
Switching on/off ........................... 126
Hill start assist .................................. 155 HOLD function
Activating ....................................... 193
Activation conditions ..................... 193
Deactivating ................................... 193
Display message ............................ 276
Function/notes .............................1 92
General notes ................................ 192
Hood
Closing ...........................................3 25
Display message ............................ 282
Important safety notes .................. 324
Opening ......................................... 324
Horn ...................................................... 32
HUD
see Head-up display
Hydroplaning ..................................... 178I
Ignition lock
see Key positions
Immobilizer .......................................... 78
Indicator and warning lamps
COLLISION PREVENTION ASSIST
PLUS .............................................. 296
Indicator lamps
see Warning and indicator lamps
Indicators
see Turn signals
Instrument cluster
Overview .......................................... 33
Warning and indicator lamps ........... 34
Instrument cluster lighting .............. 230
Interior lighting
Control ...........................................1 29
Emergency lighting ........................ 130
Overview ........................................ 129
Reading lamp ................................. 129
J
Jack
Using ............................................. 385
Jump starting (engine) ......................351
K
Key positions
SmartKey ....................................... 151
Index11
Page 20 of 410

Button overview ............................... 35
Buttons (on-board computer) ......... 231
Cleaning .........................................338
EASY ENTRY/EXIT feature ............. 116
Important safety notes .................. 114
Paddle shifters ............................... 163
Steering wheel heating .................. 115
Storing settings (memory func-
tion) ............................................... 121
Steering wheel heating
Problem (malfunction) ................... 116
Switching on/off ........................... 115
Steering wheel paddle shifters ........163
Stop&Go Pilot
see DISTRONIC PLUS
Stowage areas ................................... 300
Stowage compartments
Armrest (under) .............................3 02
Center console .............................. 301
Center console in rear compart-
ment .............................................. 302
Cup holders ................................... 304
Door ............................................... 302
Eyeglasses compartment ...............3 01
Glove box ....................................... 301
Important safety information ......... 300
Rear ............................................... 302
Rear seat backrest ......................... 302
Stowage net ................................... 303
see Stowage areas
Stowage net ....................................... 303
Stowage space
Parcel net retainers ....................... 303
Securing a load .............................. 303
Stowage well beneath the trunk
floor .................................................... 303
Summer tires
In winter ........................................ 364
Sun visor ............................................ 305
Suspension tuning
Active Body Control ABC ...............1 95
AIRMATIC ...................................... 198
SETUP (on-board computer) .......... 250
Switching air-recirculation mode
on/off ................................................. 143T
Tachometer ........................................ 230
Tail lamps
Display message ............................ 266
see Lights
Tank content
Fuel gauge ....................................... 33
Technical data
Capacities ...................................... 400
Information ....................................3 98
Tires/wheels ................................. 388
Vehicle data ................................... 406
Telephone
Accepting a call (multifunction
steering wheel) .............................. 242
Display message ............................ 283
Introduction ................................... 241
Menu (on-board computer) ............ 241
Number from the phone book ........2 42
Redialing ........................................ 243
Rejecting/ending a call ................. 242
Temperature
Coolant .......................................... 231
Engine oil (on-board computer,
Mercedes-AMG vehicles) ...............2 49
Outside temperature ......................2 31
Setting (climate control) ................ 140
Transmission oil (on-board com-
puter, Mercedes-AMG vehicles) ..... 249
Tire pressure
Calling up (on-board computer) ..... 369
Checking manually ........................ 368
Display message ............................ 279
Maximum ....................................... 368
Not reached (TIREFIT) .................... 346
Notes ............................................. 367
Reached (TIREFIT) .......................... 346
Recommended ............................... 365
Tire pressure monitor
Checking the tire pressure elec-
tronically ........................................ 370
Function/notes .............................3 69
General notes ................................ 369
Important safety notes .................. 369
Radio type approval for the tire
pressure monitor ........................... 372
Restarting ...................................... 371
18Index
Page 54 of 410
GWARNING
Sensors to control the air bags are located in
the doors. Modifications or work not per-
formed correctly to the doors or door panel-
ing, as well as damaged doors, can lead to the
function of the sensors being impaired. The air
bags might therefore not function properly
anymore. Consequently, the air bags cannot
protect vehicle occupants as they are
designed to do. There is an increased risk of
injury.
Never modify the doors or parts of the doors.
Always have work on the doors or door pan-
eling carried out at a qualified specialist work-
shop.
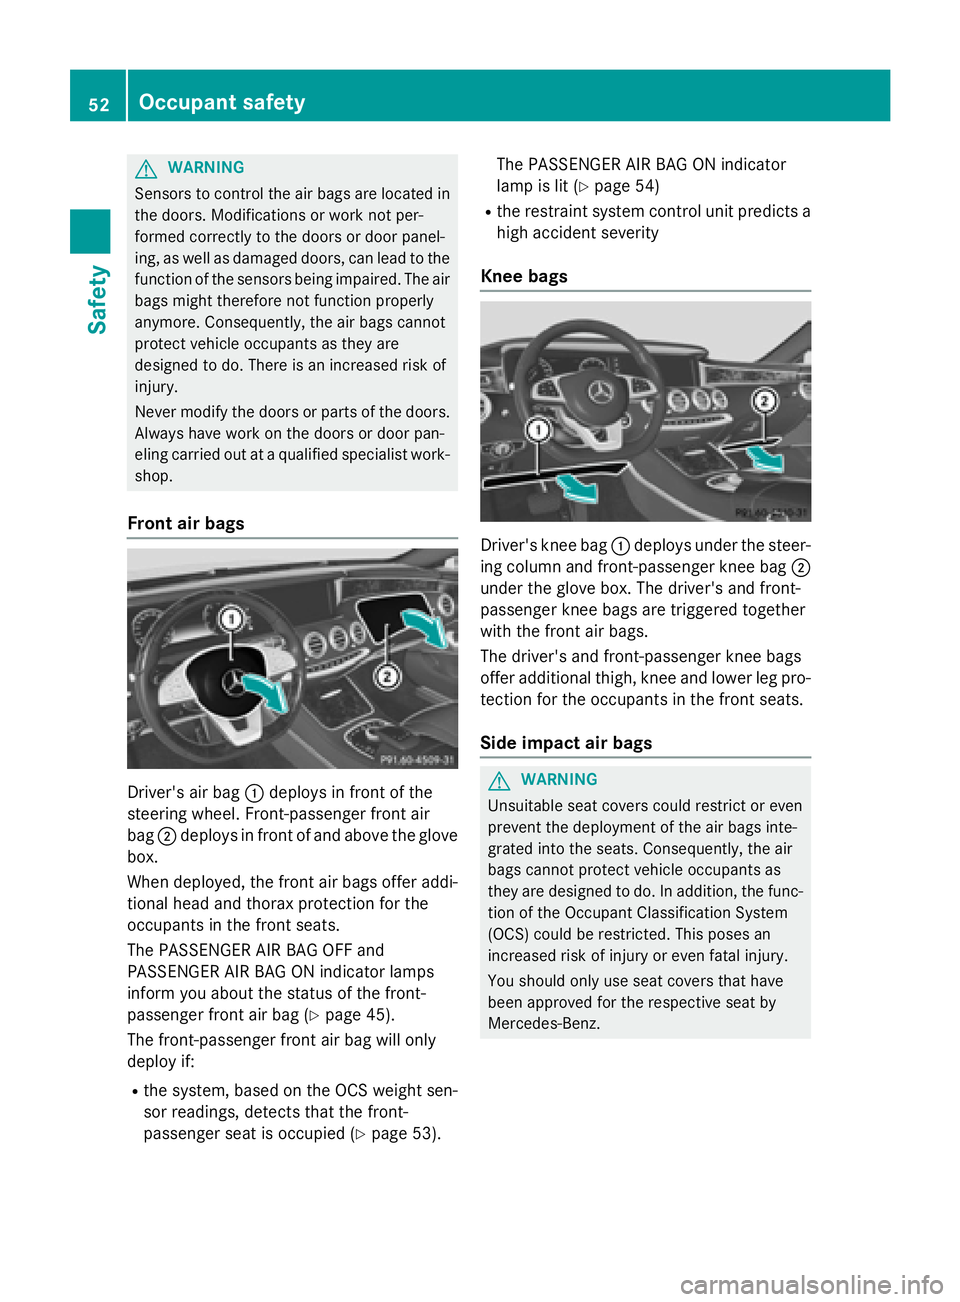
Front air bags
Driver's air bag :deploys in front of the
steering wheel. Front-passenger front air
bag ;deploys in front of and above the glove
box.
When deployed, the front air bags offer addi-
tional head and thorax protection for the
occupants in the front seats.
The PASSENGER AIR BAG OFF and
PASSENGER AIR BAG ON indicator lamps
inform you about the status of the front-
passenger front air bag (
Ypage 45).
The front-passenger front air bag will only
deploy if:
Rthe system, based on the OCS weight sen-
sor readings, detects that the front-
passenger seat is occupied (
Ypage 53). The PASSENGER AIR BAG ON indicator
lamp is lit (
Ypage 54)
Rthe restraint system control unit predicts a
high accident severity
Knee bags
Driver's knee bag :deploys under the steer-
ing column and front-passenger knee bag ;
under the glove box. The driver's and front-
passenger knee bags are triggered together
with the front air bags.
The driver's and front-passenger knee bags
offer additional thigh, knee and lower leg pro-
tection for the occupants in the front seats.
Side impact air bags
GWARNING
Unsuitable seat covers could restrict or even
prevent the deployment of the air bags inte-
grated into the seats. Consequently, the air
bags cannot protect vehicle occupants as
they are designed to do. In addition, the func- tion of the Occupant Classification System
(OCS) could be restricted. This poses an
increased risk of injury or even fatal injury.
You should only use seat covers that have
been approved for the respective seat by
Mercedes-Benz.
52Occupant safety
Safety
Page 98 of 410
Opening and closing
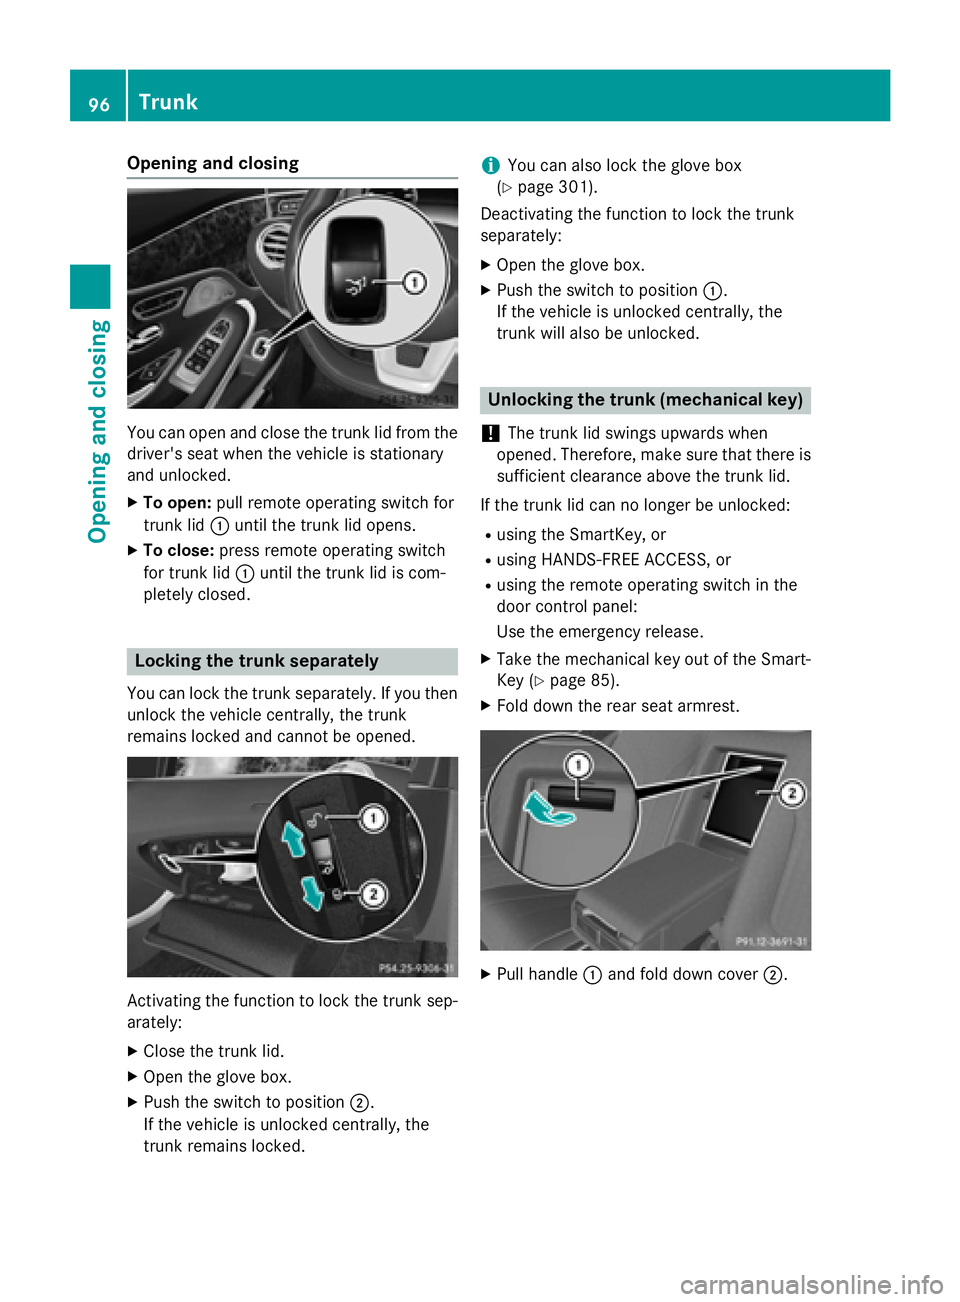
You can open and close the trunk lid from the
driver's seat when the vehicle is stationary
and unlocked.
XTo open:pull remote operating switch for
trunk lid :until the trunk lid opens.
XTo close: press remote operating switch
for trunk lid :until the trunk lid is com-
pletely closed.
Locking the trunk separately
You can lock the trunk separately. If you then
unlock the vehicle centrally, the trunk
remains locked and cannot be opened.
Activating the function to lock the trunk sep-
arately:
XClose the trunk lid.
XOpen the glove box.
XPush the switch to position ;.
If the vehicle is unlocked centrally, the
trunk remains locked.
iYou can also lock the glove box
(
Ypage 301).
Deactivating the function to lock the trunk
separately:
XOpen the glove box.
XPush the switch to position :.
If the vehicle is unlocked centrally, the
trunk will also be unlocked.
Unlocking the trunk (mechanical key)
!
The trunk lid swings upwards when
opened. Therefore, make sure that there is
sufficient clearance above the trunk lid.
If the trunk lid can no longer be unlocked:
Rusing the SmartKey, or
Rusing HANDS-FREE ACCESS, or
Rusing the remote operating switch in the
door control panel:
Use the emergency release.
XTake the mechanical key out of the Smart-
Key (
Ypage 85).
XFold down the rear seat armrest.
XPull handle :and fold down cover ;.
96Trunk
Opening and closing
Page 146 of 410
If you activate the residual heat function at
high temperatures, only the ventilation will be
activated. The blower runs at medium speed.
XTo deactivate:press theÁrocker
switch up or down.
The indicator lamp in the Árocker
switch goes out.
Residual heat is deactivated automatically:
Rafter approximately 30 minutes
Rwhen the ignition is switched on
Rif the battery voltage drops
Perfume atomizer
Operating the perfume atomizer
GWARNING
If children open the perfume vial, they could
drink the perfume or it could come into con-
tact with their eyes. There is a risk of injury. Do not leave children unsupervised in the vehicle.
If the perfume liquid has been drunk, consult
a doctor. If perfume comes into contact with
your eyes or skin, rinse the eyes with clean
water. If you continue to experience difficul-
ties, consult a doctor.
HEnvironmental note
Full perfume vials must not
be disposed of with house-
hold rubbish. They must be
collected separately and
recycled to protect the envi-
ronment.
Dispose of full perfume vials
in an environmentally
responsible manner and
take them to a special wastecollection point.
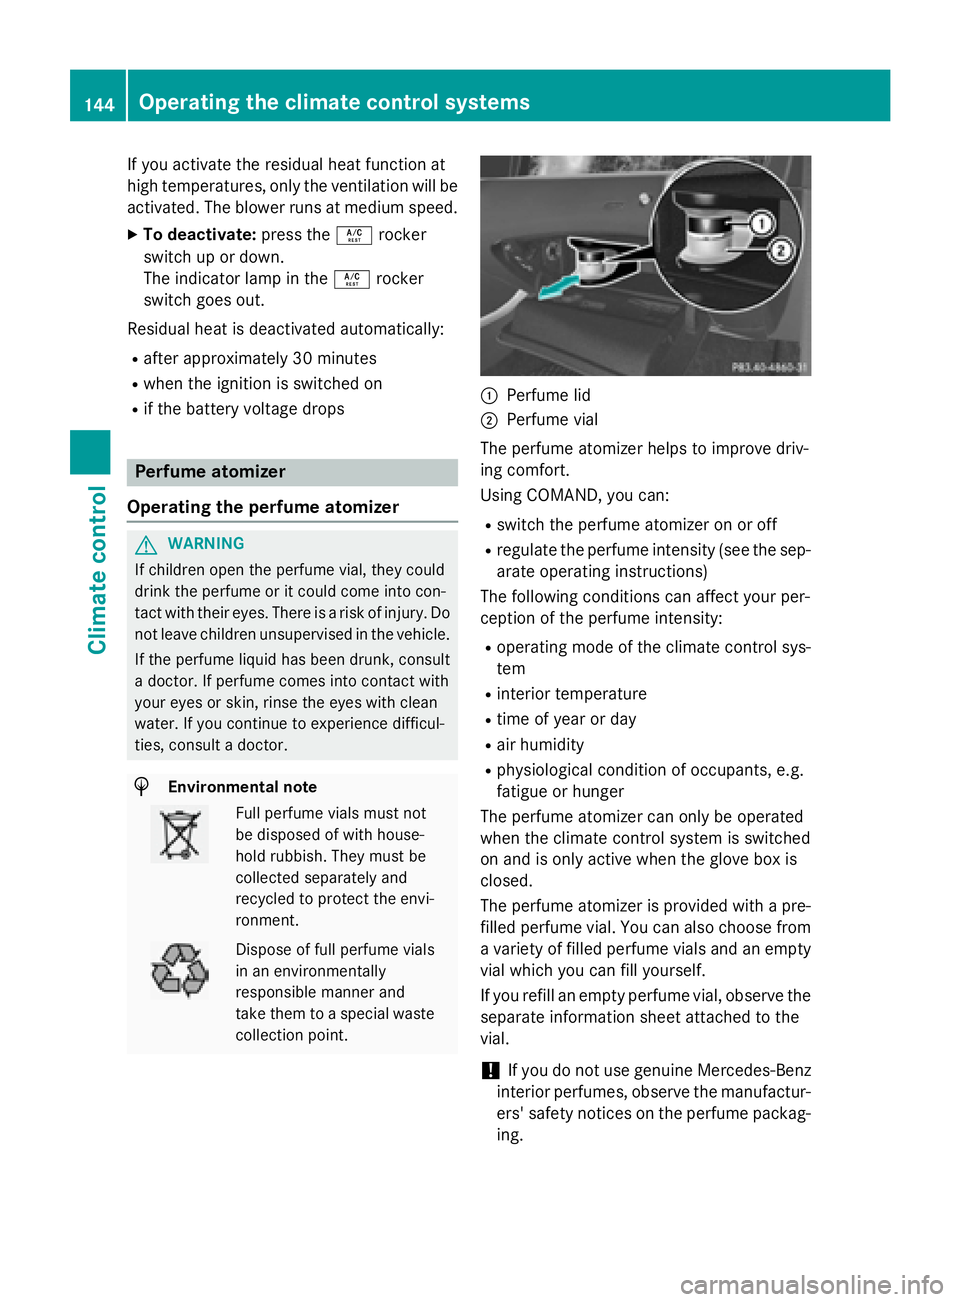
:Perfume lid
;Perfume vial
The perfume atomizer helps to improve driv-
ing comfort.
Using COMAND, you can:
Rswitch the perfume atomizer on or off
Rregulate the perfume intensity (see the sep- arate operating instructions)
The following conditions can affect your per-
ception of the perfume intensity:
Roperating mode of the climate control sys-
tem
Rinterior temperature
Rtime of year or day
Rair humidity
Rphysiological condition of occupants, e.g.
fatigue or hunger
The perfume atomizer can only be operated
when the climate control system is switched
on and is only active when the glove box is
closed.
The perfume atomizer is provided with a pre-
filled perfume vial. You can also choose from
a variety of filled perfume vials and an empty
vial which you can fill yourself.
If you refill an empty perfume vial, observe the
separate information sheet attached to the
vial.
!If you do not use genuine Mercedes-Benz
interior perfumes, observe the manufactur-
ers' safety notices on the perfume packag-
ing.
144Operating the climate control systems
Climate control
Page 147 of 410
Do not refill the pre-filled perfume vial when it
is empty. Dispose of the used vial after use.
XTo insert the perfume vial:open the glove
box (
Ypage 301).
XSlide the perfume vial into the holder as far as it will go.
XTo remove the perfume vial: pull out the
perfume vial.
XTo refill the perfume vial: unscrew the lid
of the empty perfume vial to refill it your-
self.
XRefill the vial with a maximum of 15 ml of
the desired liquid perfume.
XScrew the lid back on to the vial.
!Only refill the vial when you are outside
the vehicle. Otherwise, liquid perfume
could drip into the interior and contaminate
it.
Always refill the empty refillable vial with the
same perfume. Otherwise, you might not ach-
ieve optimum results from the perfume atom-
izer.
Operating the climate control systems145
Climate control
Z
Page 149 of 410
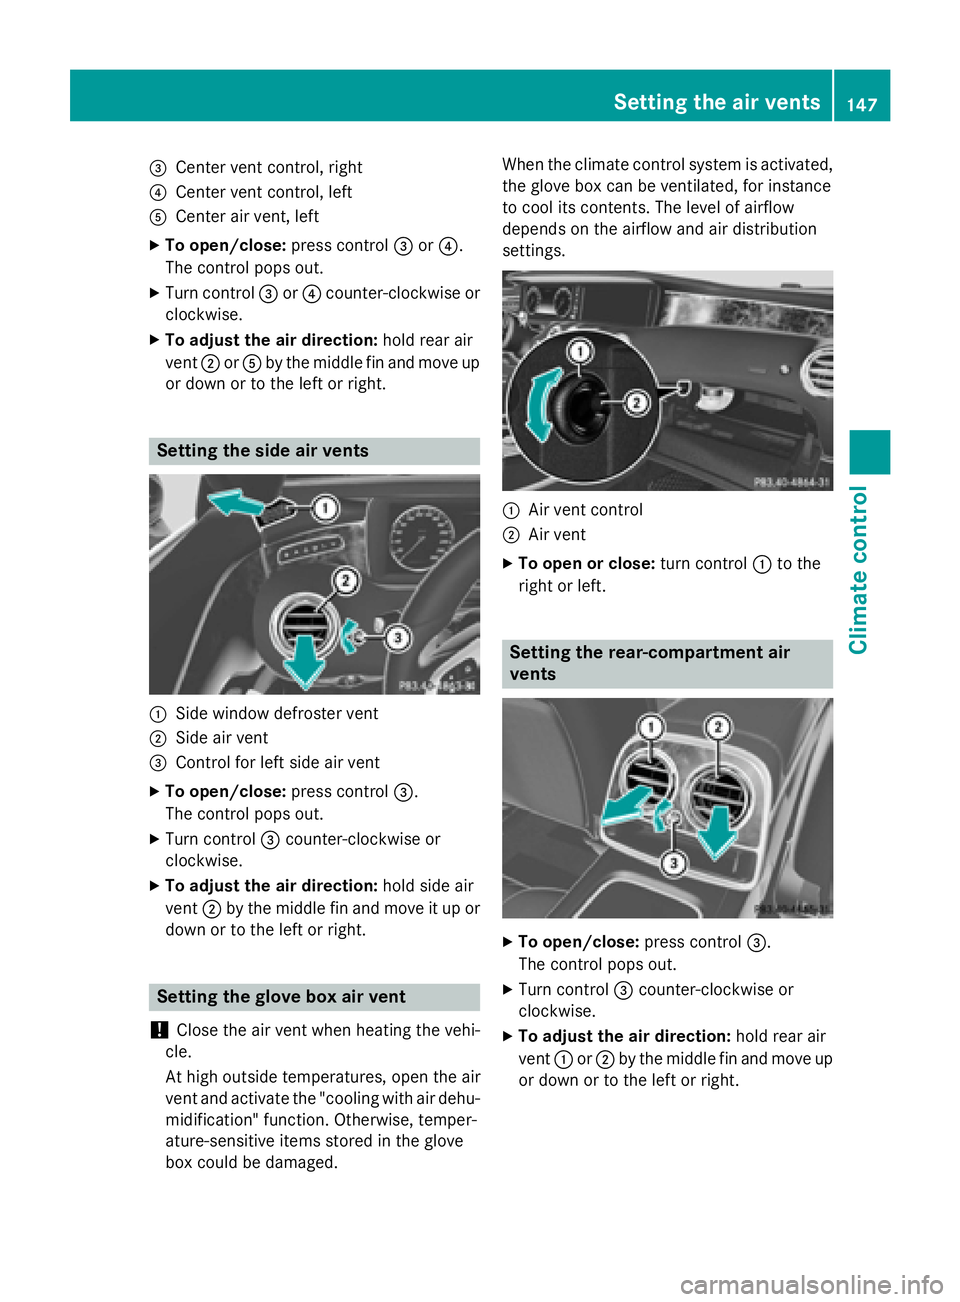
=Center vent control, right
?Center vent control, left
ACenter air vent, left
XTo open/close:press control=or?.
The control pops out.
XTurn control =or? counter-clockwise or
clockwise.
XTo ad just the air direction: hold rear air
vent ;orA by the midd lefin and move up
or down or to the left or right.
Setting the side air vents
:Sidewin dow defroster vent
;Side air vent
=Control for left side air vent
XTo open/close: press control=.
The control pops out.
XTurn control =counter-clockwise or
clockwise.
XTo ad just the air direction: holdsideair
vent ;bythe midd lefin and move it up or
down or to the left or right.
Setting the glove box air vent
!
Close the air vent when heating the veh i-
cle.
At high outside temperatures, open the air
vent and activate the "cooling with air dehu- midi fication" function. Otherwise, temper-
ature-sensitive items stored inthe glove
box could bedamaged. When the climate control system
isactivated,
the glove box can beventilated, for instance
to cool its contents. The level of airflow
depends on the airflow and air distribution
settings.
:Air vent control
;Air vent
XTo open orclose: turn control :to the
right or left.
Setting the rear-compartment air
vents
XTo open/close: press control=.
The control pops out.
XTurn control =counter-clock wiseor
clockwise.
XTo ad just the air direction: hold rear air
vent :or; bythe midd lefin and move up
or down or to the left or right.
Setting the air vents147
Climate control
Z