2016 MERCEDES-BENZ S-Class SEDAN start
[x] Cancel search: startPage 138 of 438

For this reason, you should always switch off
the windshield wipers in dry weather.
1$Windshield wiper off
2ÄIntermittent wipe, low (rain sensor set
to low sensitivity)
3Å Intermittent wipe, high (rain sensor
set to high sensitivity)
4° Continuous wipe, slow
5¯Continuous wipe, fast
BíSingle wipe/î to wipe the wind-
shield using washer fluid
XSwitch on the power supply with the Start/
Stop button or the SmartKey (Ypage 162).
XTurn the combination switch to the corre-
sponding position.
In the ÄorÅ position, the appropriate
wiping frequency is set automatically according
to the intensity of the rain. In the Åposition,
the rain sensor is more sensitive than in
the Ä position, causing the windshield wip-
ers to wipe more frequently.
Vehicles with MAGIC VISION CONTROL: the
washer fluid is fed through the wiper blades and
when wiping with washer fluid îthe washer
fluid is emitted directly from the blades.
Vehicles with MAGIC VISION CONTROL: if you
push and hold the combination switch beyond
the point of resistance in the direction of arrow
B, the manual wash program is activated. If you briefly push and hold the combination switch
beyond the point of resistance in the direction of
arrow B, the automatic wash program is acti-
vated.
If the wiper blades are worn, the windshield will
no longer be wiped properly. This could prevent
you from observing the traffic conditions.
Replacing the wiper blades
Important safety notes
GWARNING
If the windshield wipers begin to move while
you are changing the wiper blades, you could be trapped by the wiper arm. There is a risk of
injury.
Always switch off the windshield wipers and
ignition before changing the wiper blades.
!To avoid damaging the wiper blades, make
sure that you touch only the wiper arm of the
wiper.
!Never open the hood if a windshield wiper
arm has been folded away from the wind-
shield.
Hold the windshield wiper arm firmly when
you change the wiper blade. If you release the
windshield wiper arm without a wiper blade
and it falls onto the windshield, the windshield
may be damaged by the force of the impact.
Mercedes-Benz recommends that you have
the wiper blades changed at a qualified spe-
cialist workshop.
!Always position the windshield wiper arms
vertically before folding them away from the
windshield. By doing so, you will avoid dam-
age to the hood.
Replacing the wiper blades (standard
windshield wipers)
Moving the wiper arms to a vertical posi-
tion
On vehicles without KEYLESS-GO:
XTurn the SmartKey to position 0in the ignition
lock (Ypage 162).
XSet the windshield wiper to the °position.
XTurn the SmartKey to position 1in the ignition
lock (Ypage 162).
XAs soon as the wiper arms are vertical to the
hood, turn the SmartKey to position 0in the
ignition lock (
Ypage 162).
XRemove the SmartKey.
XFold the wiper arms away from the windshield
until you feel them snap into place.
136Windshield wipers
Lights and windshield wipers
Page 139 of 438
On vehicles with KEYLESS-GO:
XSwitch off the engine.
XRemove your foot from the brake pedal.
XSet the windshield wipers to position°.
XPress the Start/Stop button repeatedly until
the windshield wiper starts.
XWhen the wiper arms have reached the verti-
cal position, press the Start/Stop button
repeatedly until the windshield wipers stop.
XFold the wiper arms away from the windshield
until you feel them snap into place.
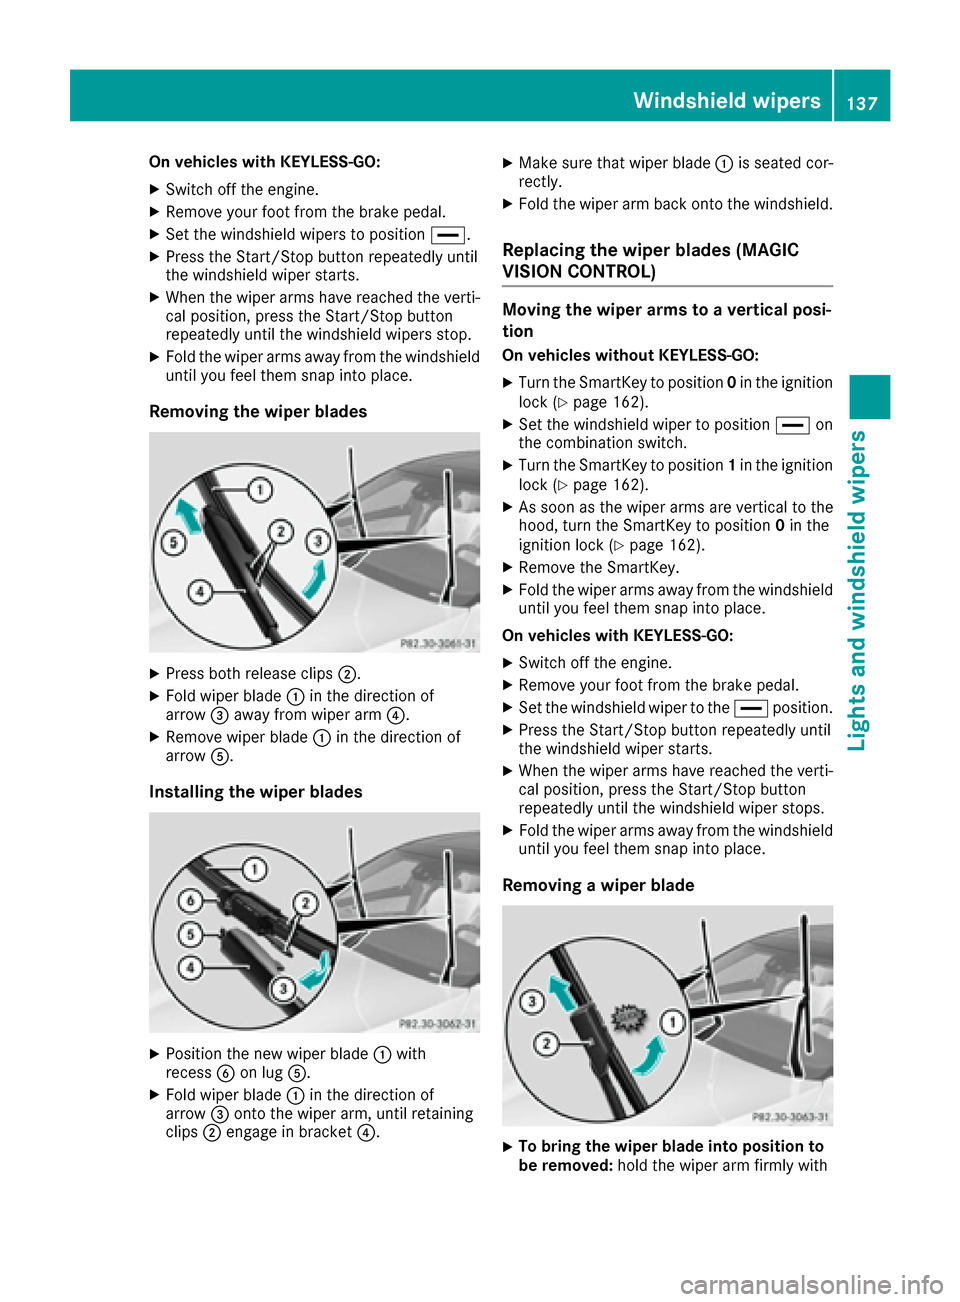
Removing the wiper blades
XPress both release clips ;.
XFold wiper blade:in the direction of
arrow =away from wiper arm ?.
XRemove wiper blade:in the direction of
arrow A.
Installing the wiper blades
XPosition the new wiper blade :with
recess Bon lug A.
XFold wiper blade :in the direction of
arrow =onto the wiper arm, until retaining
clips ;engage in bracket ?.
XMake sure that wiper blade :is seated cor-
rectly.
XFold the wiper arm back onto the windshield.
Replacing the wiper blades (MAGIC
VISION CONTROL)
Moving the wiper arms to a vertical posi-
tion
On vehicles without KEYLESS-GO:
XTurn the SmartKey to position 0in the ignition
lock (Ypage 162).
XSet the windshield wiper to position °on
the combination switch.
XTurn the SmartKey to position 1in the ignition
lock (Ypage 162).
XAs soon as the wiper arms are vertical to the
hood, turn the SmartKey to position 0in the
ignition lock (
Ypage 162).
XRemove the SmartKey.
XFold the wiper arms away from the windshield
until you feel them snap into place.
On vehicles with KEYLESS-GO:
XSwitch off the engine.
XRemove your foot from the brake pedal.
XSet the windshield wiper to the °position.
XPress the Start/Stop button repeatedly until
the windshield wiper starts.
XWhen the wiper arms have reached the verti-
cal position, press the Start/Stop button
repeatedly until the windshield wiper stops.
XFold the wiper arms away from the windshield
until you feel them snap into place.
Removing a wiper blade
XTo bring the wiper blade into position to
be removed: hold the wiper arm firmly with
Windshield wipers137
Lights and windshield wipers
Z
Page 141 of 438
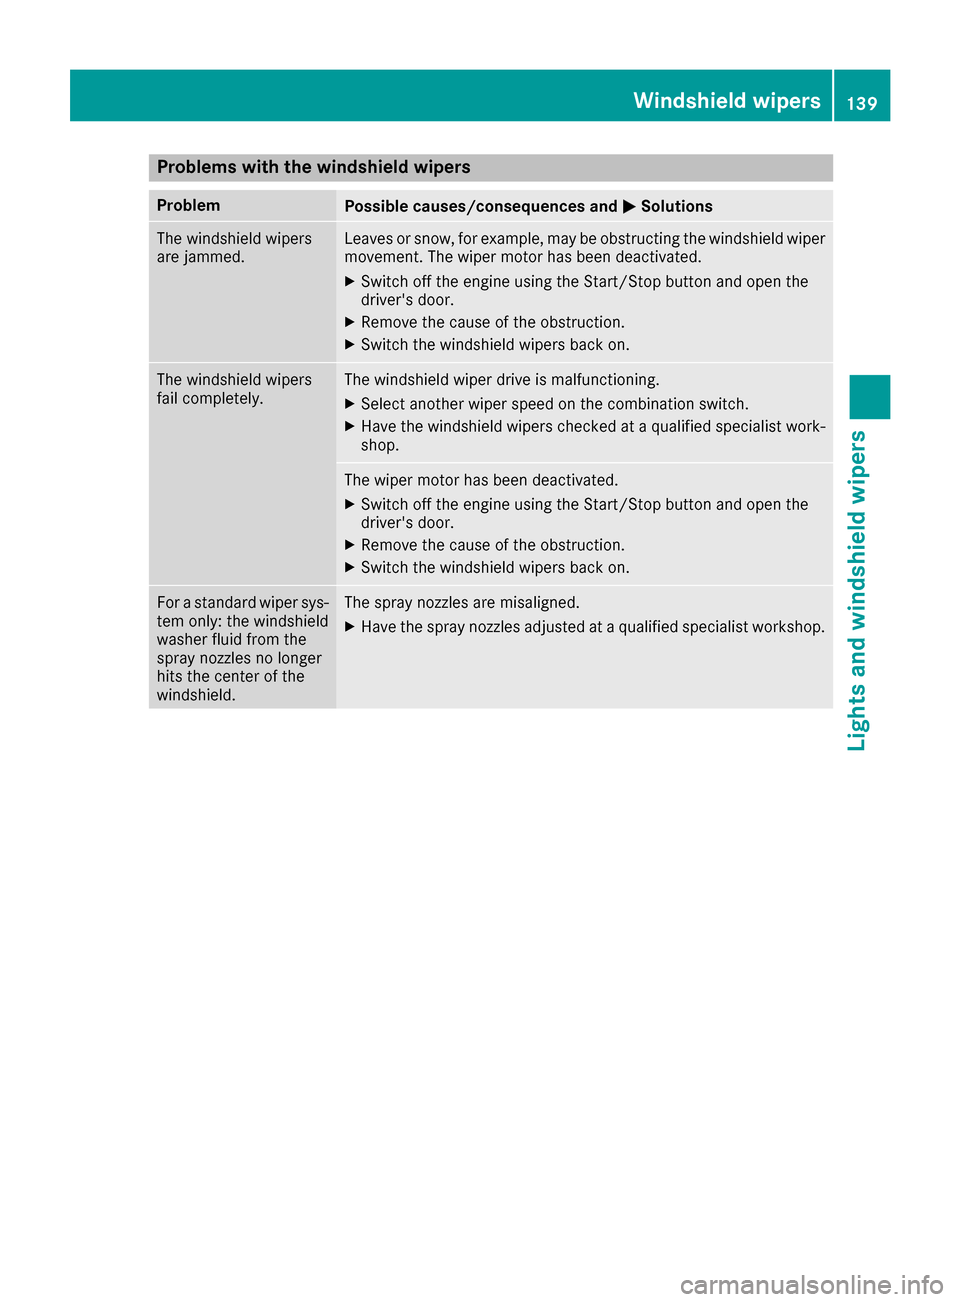
Problems with the windshield wipers
ProblemPossible causes/consequences andMSolutions
The windshield wipers
are jammed.Leaves or snow, for example, may be obstructing the windshield wiper
movement. The wiper motor has been deactivated.
XSwitch off the engine using the Start/Stop button and open the
driver's door.
XRemove the cause of the obstruction.
XSwitch the windshield wipers back on.
The windshield wipers
fail completely.The windshield wiper drive is malfunctioning.
XSelect another wiper speed on the combination switch.
XHave the windshield wipers checked at a qualified specialist work-
shop.
The wiper motor has been deactivated.
XSwitch off the engine using the Start/Stop button and open the
driver's door.
XRemove the cause of the obstruction.
XSwitch the windshield wipers back on.
For a standard wiper sys-
tem only: the windshield
washer fluid from the
spray nozzles no longer
hits the center of the
windshield.The spray nozzles are misaligned.
XHave the spray nozzles adjusted at a qualified specialist workshop.
Windshield wipers139
Lights and windshield wipers
Z
Page 142 of 438
Useful information
i
This Operator's Manual describes all models
and all standard and optional equipment of
your vehicle available at the time of publica-
tion of the Operator's Manual. Country-spe-
cific differences are possible. Please note
that your vehicle may not be equipped with all
features described. This also applies to
safety-related systems and functions.
iRead the information on qualified specialist
workshops (Ypage 28).
Overview of climate control systems
General notes
Observe the settings recommended on the fol-
lowing pages. The windows could otherwise fog
up.
To prevent the windows from fogging up:
Rswitch off climate control only briefly
Rswitch on air-recirculation mode only briefly
Rswitch on the cooling with air dehumidifica-
tion function
Rswitch on the defrost windshield function
briefly, if required
Climate control regulates the temperature and
air humidity in the vehicle interior. The air filter
cleans the air, thus improving the interior cli-
mate.
For vehicles with a combustion engine, the
"Cooling with air dehumidification" function is
only available when the engine is running. For
hybrid vehicles, the "Cooling with air dehumidi-
fication" function is also available via the elec-
tric refrigerant compressor when the engine is
not running. Optimum climate control is only
achieved with the side windows and roof closed.
If you start the engine using your smartphone,
the last selected climate control setting is reac-
tivated (
Ypage 164).
The residual heat function can only be activated
or deactivated with the ignition switched off
(
Ypage 152).
iVentilate the vehicle for a brief period during
warm weather, e.g. using the convenience
opening feature (
Ypage 95). This will speed
up the cooling process and the desired inte- rior temperature will be reached more
quickly.
iThe integrated filter filters out most parti-
cles of dust and soot and completely filters
out pollen. It also reduces gaseous pollutants
and odors. A clogged filter reduces the
amount of air supplied to the vehicle interior.
For this reason, you should always observe
the interval for replacing the filter, which is
specified in the Maintenance Booklet. As it
depends on environmental conditions, e.g.
heavy air pollution, the interval may be
shorter than stated in the Maintenance Book- let.
iIt is possible that the blower may be activa-
ted automatically 60 minutes after the Smart-
Key has been removed depending on various
factors, e.g. the outside temperature. The
vehicle is then ventilated for 30 minutes to dry
the climate control system.
140Overview of climate control systems
Climate control
Page 147 of 438
Notes on using automatic climate
control
Climate control system
Below, you can find a number of notes and rec-
ommendations to help you use climate control
optimally.
RActivate climate control using the Ã
rocker switch. The indicator lamp in the Ã
rocker switch lights up.
RSet the temperature to 72 ‡ (22 †).
ROnly use the "Windshield defrosting" function
briefly until the windshield is clear again.
ROnly use air-recirculation mode briefly, e.g. if
there are unpleasant outside odors or when in
a tunnel. The windows could otherwise fog up, since no fresh air is drawn into the vehicle in
air-recirculation mode.
RUse the residual heat function if you want to
heat or ventilate the vehicle interior when the
ignition is switched off. The residual heat
function can only be activated or deactivated
with the ignition switched off. The residual
heat function is switched off when the ignition
is switched on.
If you are controlling the rear-compartment cli-
mate control using the front control panel, note
the following:
RIf you set rear-compartment climate control
using the front control panel, the Ysym-
bol appears in the rear-compartment control
panel display.
RIf the rear-compartment climate control is set
using the front control panel, it cannot be set
at the same time using the rear control panel. After completing the settings for the rear-
compartment climate control using the front
control panel, wait five seconds. You will then
be able to control the rear climate control
using the rear control panel.
RAfter selecting the rear compartment set-
tings, the front climate control can be con-
trolled automatically again via the multimedia
system after five seconds.
Alternatively, you can select "Cancel rear
compartment" in the multimedia system air-
conditioning function bar.
ECO start/stop function
During automatic engine switch-off, the climate
control system only operates at a reduced capa-
city. If you require the full climate control output,
you can switch off the ECO start/stop function
by pressing the ECO button (
Ypage 167).
Operating the climate control sys-
tems
Activating/deactivating climate con-
trol
General notes
When the climate control is switched off, the air
supply and air circulation are also switched off.
The windows could fog up. Therefore, switch off
climate control only briefly
Switch on climate control primarily using the
à rocker switch (
Ypage 147).
Activating/deactivating front climate
control using the front control panel
XTurn the SmartKey to position 2in the ignition
lock (Ypage 162).
XTo activate: press thetor! rocker
switch up or down.
The climate control menu opens.
XActivate climate control via the air-condition-
ing setting bar in the multimedia system (see
the separate operating instructions).
XTo deactivate: press thetor!
rocker switch up or down.
The climate control menu opens.
XActivate climate control via the air-condition-
ing setting bar in the multimedia system (see
the separate operating instructions).
Activating/deactivating rear-compart-
ment climate control using the front
control panel
Observe the notes on controlling the rear-com-
partment climate control using the front control
panel (
Ypage 145).
Operating the climate control systems145
Climate control
Page 151 of 438
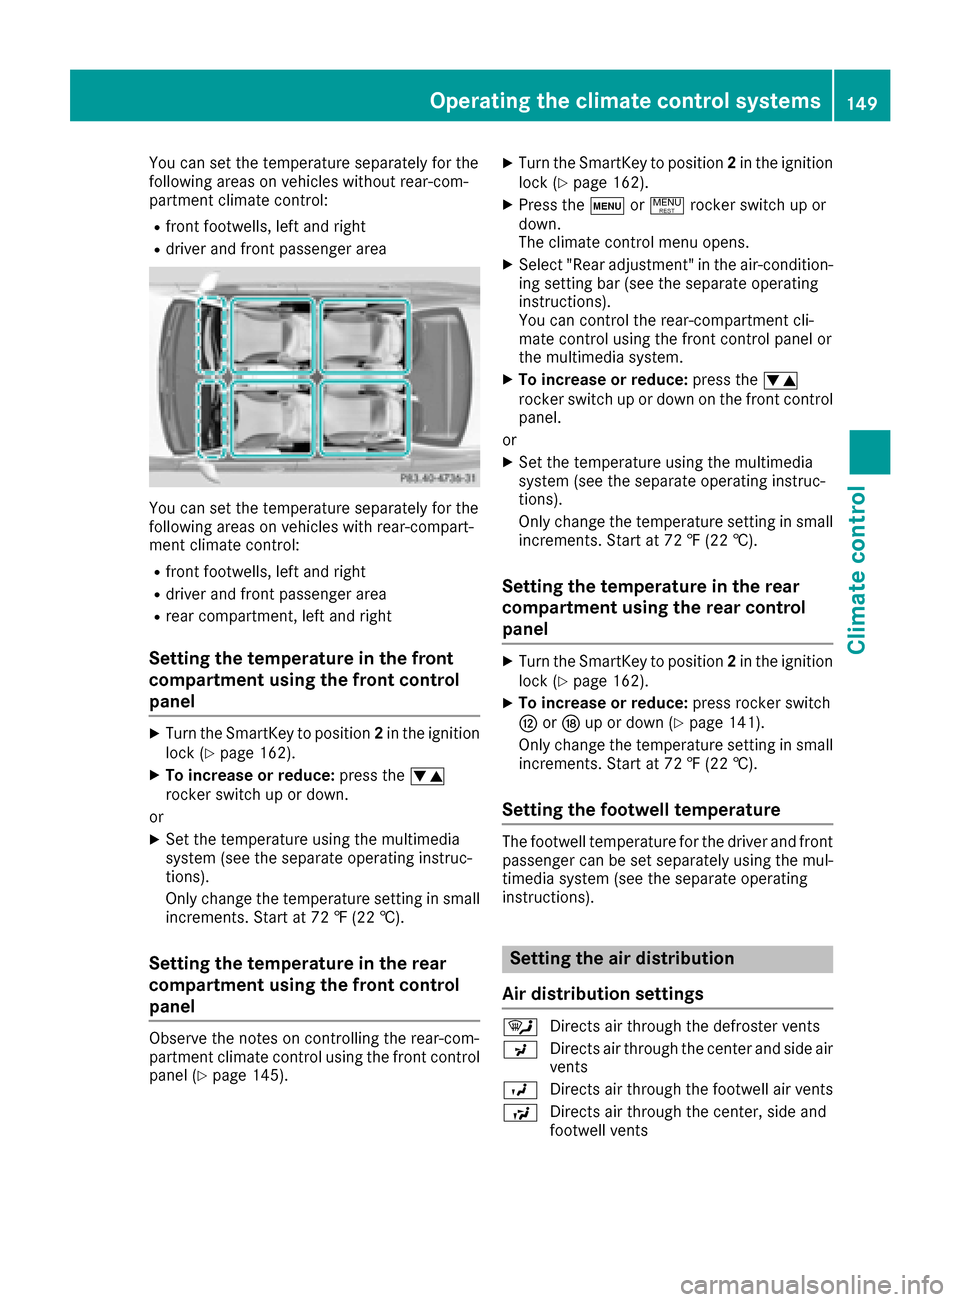
You can set the temperature separately for the
following areas on vehicles without rear-com-
partment climate control:
Rfront footwells, left and right
Rdriver and front passenger area
You can set the temperature separately for the
following areas on vehicles with rear-compart-
ment climate control:
Rfront footwells, left and right
Rdriver and front passenger area
Rrear compartment, left and right
Setting the temperature in the front
compartment using the front control
panel
XTurn the SmartKey to position2in the ignition
lock (Ypage 162).
XTo increase or reduce: press thew
rocker switch up or down.
or
XSet the temperature using the multimedia
system (see the separate operating instruc-
tions).
Only change the temperature setting in small
increments. Start at 72 ‡ (22 †).
Setting the temperature in the rear
compartment using the front control
panel
Observe the notes on controlling the rear-com-
partment climate control using the front control
panel (
Ypage 145).
XTurn the SmartKey to position 2in the ignition
lock (Ypage 162).
XPress the tor! rocker switch up or
down.
The climate control menu opens.
XSelect "Rear adjustment" in the air-condition-
ing setting bar (see the separate operating
instructions).
You can control the rear-compartment cli-
mate control using the front control panel or
the multimedia system.
XTo increase or reduce: press thew
rocker switch up or down on the front control
panel.
or
XSet the temperature using the multimedia
system (see the separate operating instruc-
tions).
Only change the temperature setting in small
increments. Start at 72 ‡ (22 †).
Setting the temperature in the rear
compartment using the rear control
panel
XTurn the SmartKey to position 2in the ignition
lock (Ypage 162).
XTo increase or reduce: press rocker switch
H orN up or down (Ypage 141).
Only change the temperature setting in small increments. Start at 72 ‡ (22 †).
Setting the footwell temperature
The footwell temperature for the driver and front
passenger can be set separately using the mul-
timedia system (see the separate operating
instructions).
Setting the air distribution
Air distribution settings
¯ Directs air through the defroster vents
P Directs air through the center and side air
vents
O Directs air through the footwell air vents
S Directs air through the center, side and
footwell vents
Operating the climate control systems149
Climate control
Page 158 of 438

XTo activate pre-entry climate control via
SmartKey:unlock the vehicle with the Smart-
Key or KEYLESS-GO.
The climate control functions are activated
for up to 5 minutes for pre-heating and pre-
cooling.
To deactivate "Pre-entry climate control via SmartKey": "Pre-entry climate control via
SmartKey" switches off automatically when the
engine is started.
The following functions remain active after the
engine is started:
RSeat heating (heating)
RSeat ventilation (ventilation)
RArmrest heating
RPerfume atomizer
RIonization
An activated "Pre-entry climate control via
SmartKey" function can be deactivated using
the rocker switch (
Ypage 158).
156Operating the climate control systems
Climate control
Page 159 of 438
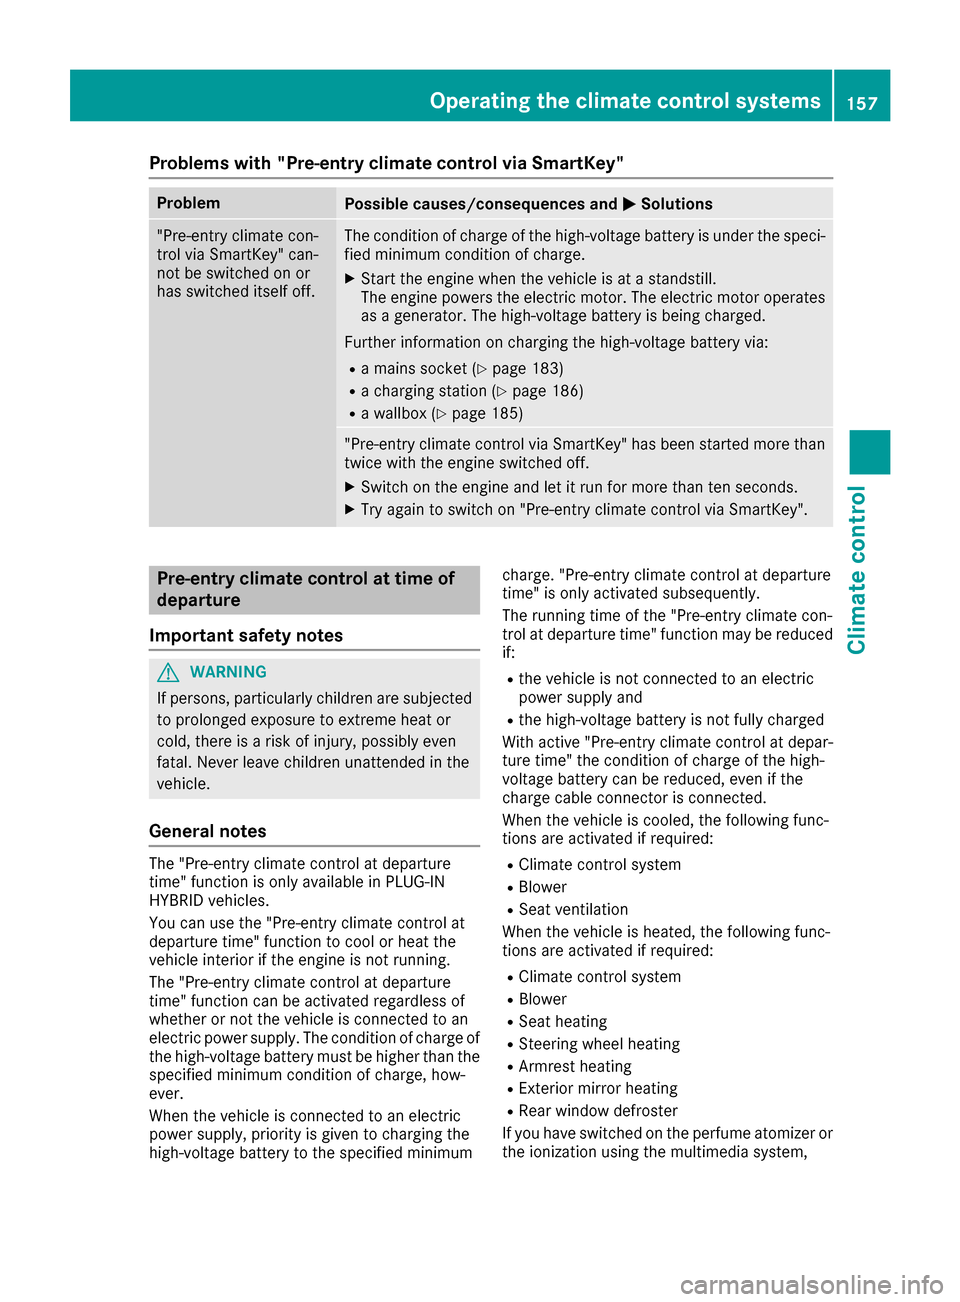
Problems with "Pre-entry climate control via SmartKey"
ProblemPossible causes/consequences andMSolutions
"Pre-entry climate con-
trol via SmartKey" can-
not be switched on or
has switched itself off.The condition of charge of the high-voltage battery is under the speci-
fied minimum condition of charge.
XStart the engine when the vehicle is at a standstill.
The engine powers the electric motor. The electric motor operates
as a generator. The high-voltage battery is being charged.
Further information on charging the high-voltage battery via:
Ra mains socket (Ypage 183)
Ra charging station (Ypage 186)
Ra wallbox (Ypage 185)
"Pre-entry climate control via SmartKey" has been started more than
twice with the engine switched off.
XSwitch on the engine and let it run for more than ten seconds.
XTry again to switch on "Pre-entry climate control via SmartKey".
Pre-entry climate control at time of
departure
Important safety notes
GWARNING
If persons, particularly children are subjected to prolonged exposure to extreme heat or
cold, there is a risk of injury, possibly even
fatal. Never leave children unattended in the
vehicle.
General notes
The "Pre-entry climate control at departure
time" function is only available in PLUG-IN
HYBRID vehicles.
You can use the "Pre-entry climate control at
departure time" function to cool or heat the
vehicle interior if the engine is not running.
The "Pre-entry climate control at departure
time" function can be activated regardless of
whether or not the vehicle is connected to an
electric power supply. The condition of charge of
the high-voltage battery must be higher than the
specified minimum condition of charge, how-
ever.
When the vehicle is connected to an electric
power supply, priority is given to charging the
high-voltage battery to the specified minimum charge. "Pre-entry climate control at departure
time" is only activated subsequently.
The running time of the "Pre-entry climate con-
trol at departure time" function may be reduced
if:
Rthe vehicle is not connected to an electric
power supply and
Rthe high-voltage battery is not fully charged
With active "Pre-entry climate control at depar-
ture time" the condition of charge of the high-
voltage battery can be reduced, even if the
charge cable connector is connected.
When the vehicle is cooled, the following func-
tions are activated if required:
RClimate control system
RBlower
RSeat ventilation
When the vehicle is heated, the following func-
tions are activated if required:
RClimate control system
RBlower
RSeat heating
RSteering wheel heating
RArmrest heating
RExterior mirror heating
RRear window defroster
If you have switched on the perfume atomizer or the ionization using the multimedia system,
Operating the climate control systems157
Climate control
Z