2016 MERCEDES-BENZ S-Class SEDAN seat memory
[x] Cancel search: seat memoryPage 128 of 438
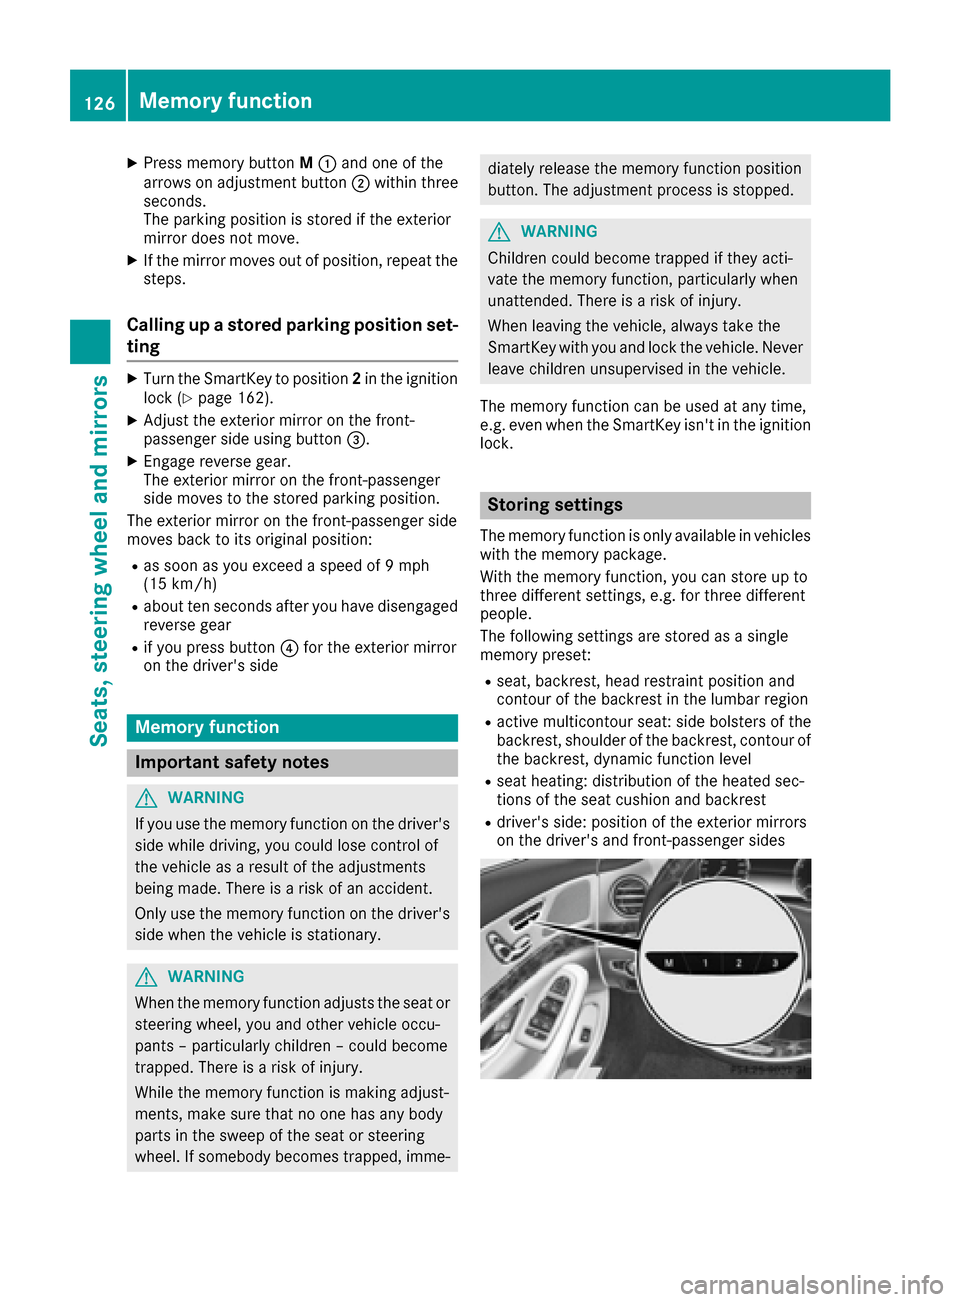
XPress memory buttonM: and one of the
arrows on adjustment button ;within three
seconds.
The parking position is stored if the exterior
mirror does not move.
XIf the mirror moves out of position, repeat the
steps.
Calling up a stored parking position set-
ting
XTurn the SmartKey to position 2in the ignition
lock (Ypage 162).
XAdjust the exterior mirror on the front-
passenger side using button =.
XEngage reverse gear.
The exterior mirror on the front-passenger
side moves to the stored parking position.
The exterior mirror on the front-passenger side
moves back to its original position:
Ras soon as you exceed a speed of 9 mph
(15 km/h)
Rabout ten seconds after you have disengaged
reverse gear
Rif you press button ?for the exterior mirror
on the driver's side
Memory function
Important safety notes
GWARNING
If you use the memory function on the driver's side while driving, you could lose control of
the vehicle as a result of the adjustments
being made. There is a risk of an accident.
Only use the memory function on the driver's
side when the vehicle is stationary.
GWARNING
When the memory function adjusts the seat or steering wheel, you and other vehicle occu-
pants – particularly children – could become
trapped. There is a risk of injury.
While the memory function is making adjust-
ments, make sure that no one has any body
parts in the sweep of the seat or steering
wheel. If somebody becomes trapped, imme-
diately release the memory function position
button. The adjustment process is stopped.
GWARNING
Children could become trapped if they acti-
vate the memory function, particularly when
unattended. There is a risk of injury.
When leaving the vehicle, always take the
SmartKey with you and lock the vehicle. Never
leave children unsupervised in the vehicle.
The memory function can be used at any time,
e.g. even when the SmartKey isn't in the ignition
lock.
Storing settings
The memory function is only available in vehicles
with the memory package.
With the memory function, you can store up to
three different settings, e.g. for three different
people.
The following settings are stored as a single
memory preset:
Rseat, backrest, head restraint position and
contour of the backrest in the lumbar region
Ractive multicontour seat: side bolsters of the
backrest, shoulder of the backrest, contour of
the backrest, dynamic function level
Rseat heating: distribution of the heated sec-
tions of the seat cushion and backrest
Rdriver's side: position of the exterior mirrors
on the driver's and front-passenger sides
126Memory function
Seats, steering wheel and mirrors
Page 129 of 438
XAdjust the seat accordingly (Ypage 106).
XOn the driver's side, adjust the steering wheel
(Ypage 120) and the exterior mirrors
(Ypage 123).
XPress memory button Mand one of the stor-
age position buttons 1,2 or 3within three
seconds.
The settings are stored in the selected preset
position. A tone sounds when the settings
have been completed.
Calling up a stored setting
XPress and hold the relevant storage position
button 1,2 or 3until the:
RSeat
RSteering wheel
RExterior mirrors
are in the stored position.
iIf you release the storage position button,
the seat, steering wheel and mirror setting
functions stop immediately. The multicontour
seat setting or the 4-way lumbar support is
still carried out.
Memory function in the rear compart-
ment
Important safety notes
GWARNING
When the memory function adjusts the seat or steering wheel, you and other vehicle occu-
pants – particularly children – could become
trapped. There is a risk of injury.
While the memory function is making adjust-
ments, make sure that no one has any body
parts in the sweep of the seat or steering
wheel. If somebody becomes trapped, imme-
diately release the memory function position
button. The adjustment process is stopped.
GWARNING
Children could become trapped if they acti-
vate the memory function, particularly when
unattended. There is a risk of injury.
When leaving the vehicle, always take the
SmartKey with you and lock the vehicle. Never
leave children unsupervised in the vehicle.
General notes
The settings for the rear seat and the front-
passenger seat can be stored using the rear-
compartment memory function.
RIf the indicator lamp in the vbutton is not
lit, store the rear seat settings.
RIf the indicator lamp in the vbutton lights
up, store the front-passenger seat and rear
seat settings. Both the front-passenger and
rear seat are taken into account with this set-
ting. Depending on the equipment in the vehi-
cle, two or three memory positions can be
stored for the front-passenger and rear seats.
Storing settings
General notes
With the memory function in the rear, you can
store up to three different settings, e.g. for three
different people.
The following settings are stored as a single
memory preset:
Rposition of the seat, backrest and head
restraint
Rmulticontour seat: the seat cushions of the
backrest as well as the contour of the back-
rest in the lumbar and shoulder regions
Rseat heating: distribution of the heated sec-
tions of the seat cushion and backrest if the
indicator lamp in the vbutton is not lit
The following settings are stored to a memory
position, if the indicator lamp in the vbutton
lights up:
Rposition of the footrest for the front-
passenger seat, if available
Rposition of the screen, if available
Memory function in the rear compartment127
Seats, steering wheel and mirrors
Z
Page 130 of 438
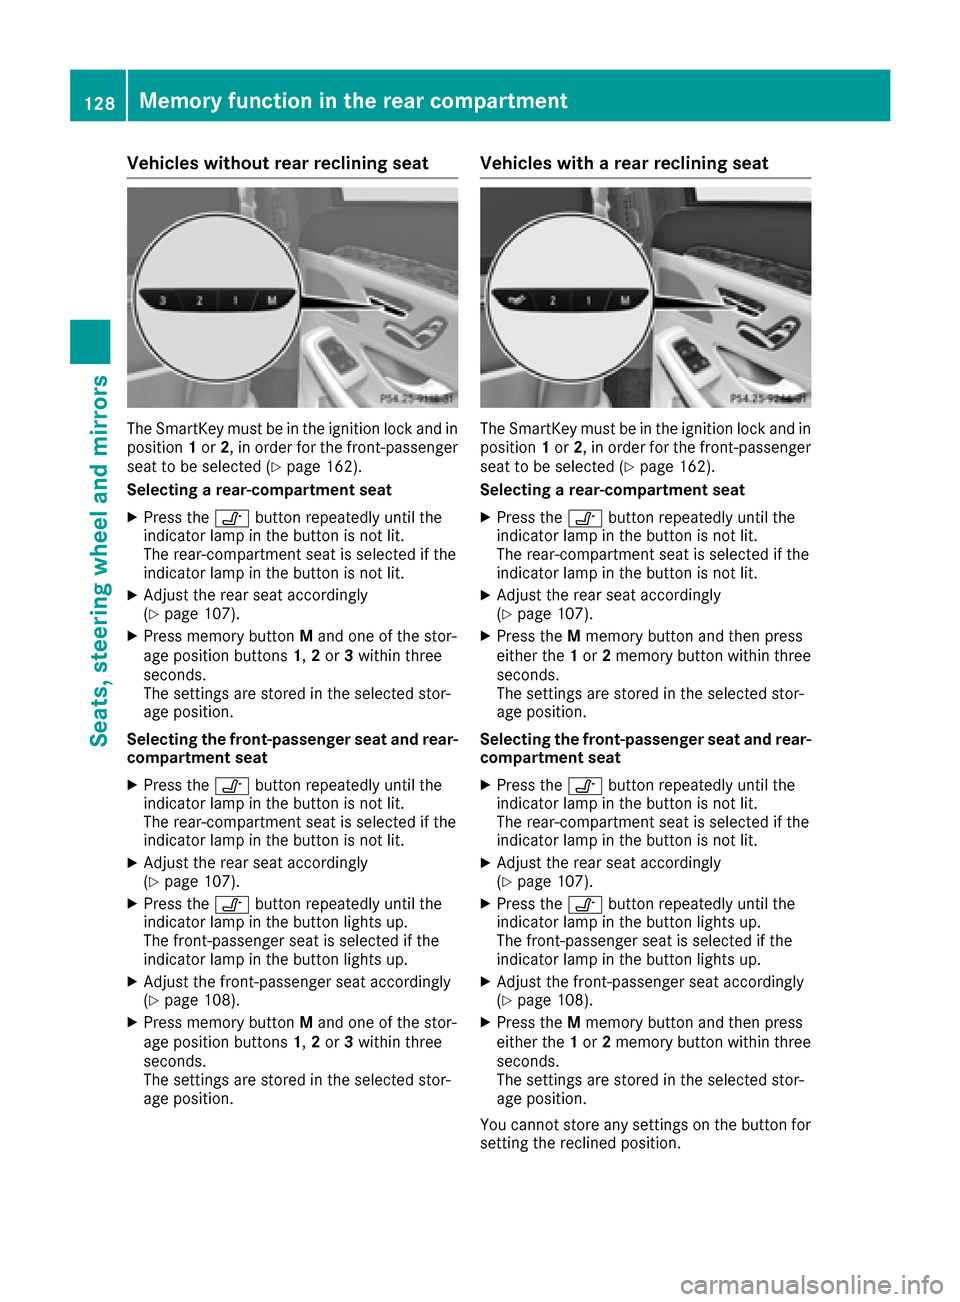
Vehicles without rear reclining seat
The SmartKey must be in the ignition lock and in
position1or 2, in order for the front-passenger
seat to be selected (
Ypage 162).
Selecting a rear-compartment seat
XPress the vbutton repeatedly until the
indicator lamp in the button is not lit.
The rear-compartment seat is selected if the
indicator lamp in the button is not lit.
XAdjust the rear seat accordingly
(Ypage 107).
XPress memory button Mand one of the stor-
age position buttons 1,2 or 3within three
seconds.
The settings are stored in the selected stor-
age position.
Selecting the front-passenger seat and rear-
compartment seat
XPress the vbutton repeatedly until the
indicator lamp in the button is not lit.
The rear-compartment seat is selected if the
indicator lamp in the button is not lit.
XAdjust the rear seat accordingly
(Ypage 107).
XPress the vbutton repeatedly until the
indicator lamp in the button lights up.
The front-passenger seat is selected if the
indicator lamp in the button lights up.
XAdjust the front-passenger seat accordingly
(Ypage 108).
XPress memory button Mand one of the stor-
age position buttons 1,2 or 3within three
seconds.
The settings are stored in the selected stor-
age position.
Vehicles with a rear reclining seat
The SmartKey must be in the ignition lock and in
position 1or 2, in order for the front-passenger
seat to be selected (
Ypage 162).
Selecting a rear-compartment seat
XPress the vbutton repeatedly until the
indicator lamp in the button is not lit.
The rear-compartment seat is selected if the
indicator lamp in the button is not lit.
XAdjust the rear seat accordingly
(Ypage 107).
XPress the Mmemory button and then press
either the 1or 2memory button within three
seconds.
The settings are stored in the selected stor-
age position.
Selecting the front-passenger seat and rear-
compartment seat
XPress the vbutton repeatedly until the
indicator lamp in the button is not lit.
The rear-compartment seat is selected if the
indicator lamp in the button is not lit.
XAdjust the rear seat accordingly
(Ypage 107).
XPress the vbutton repeatedly until the
indicator lamp in the button lights up.
The front-passenger seat is selected if the
indicator lamp in the button lights up.
XAdjust the front-passenger seat accordingly
(Ypage 108).
XPress the Mmemory button and then press
either the 1or 2memory button within three
seconds.
The settings are stored in the selected stor-
age position.
You cannot store any settings on the button for
se
tting the reclined position.
128Memory function in the rear compartment
Seats, steering wheel and mirrors
Page 131 of 438
Calling up a stored setting
General notes
The memory positions in the area for the chauf-
feur mode can only be set when the conditions
for the chauffeur mode are fulfilled
(
Ypage 111).
Vehicles without rear reclining seat
The SmartKey must be in the ignition lock and in
position 1or 2, in order for the front-passenger
seat to be selected (
Ypage 162).
XTo call up the stored rear seat setting:
press the vbutton repeatedly until the
indicator lamp in the button is not lit.
XTo call up the stored front-passenger seat
and rear seat settings: press thevbut-
ton repeatedly until the indicator lamp in the
button lights up.
XPress and hold the relevant storage position
button 1,2or 3until the rear seat or the front-
passenger seat are in the stored position.
iSeat adjustment is interrupted as soon as
you release the storage position button. The
adjustment of the multicontour seat is still
carried out.
Vehicles with a rear reclining seat
The SmartKey must be in the ignition lock and in
position 1or 2, in order for the front-passenger
seat to be selected (
Ypage 162).
XTo call up the stored rear seat setting:
press the vbutton repeatedly until the
indicator lamp in the button is not lit.
XTo call up the stored front-passenger seat
and rear seat settings: press thevbut-
ton repeatedly until the indicator lamp in the
button lights up.
XPress and hold the relevant storage position
button 1or 2until the rear seat or the front-
passenger seat is in the stored position.
iSeat adjustment is interrupted as soon as
you release the storage position button. The
adjustment of the multicontour seat is still
carried out.
Memory function in the rear compartment129
Seats, steering wheel and mirrors
Z
Page 275 of 438

condition of charge of the high-voltage bat-
tery for the departure time set.
Further information on charging the high-volt-
age battery (PLUG-IN HYBRID vehicles)
(
Ypage 181).
Head-up display submenu
Selecting other displays
:Vehicle speed display
;Vehicle speed and navigation instruction
display
=Vehicle speed display and Traffic Sign Assist
Using the Display Content
function, you can
choose from up to four display options depend-
ing on the vehicle's equipment. The selected
contents appear in the head-up display.
In Mercedes-AMG vehicles, you can also choose
between two AMG displays. If you select an
AMG display, the head-up display shows AMG-
specific contents.
XPress the òbutton on the steering wheel
to open the menu list.
XPress :or9 on the steering wheel to
select the Settingsmenu.
XConfirm by pressing aon the steering
wheel.
XPress :or9 to select the Head-upDisplaysubmenu.
XPressato confirm.
XPress :or9 to select Display Con‐tent.
XPressato confirm.
A graphic selection list appears.
XPress :or9 to select the desired dis-
play.
XPress the abutton to confirm the selec-
tion. For further information about the traffic sign
displays, see Traffic Sign Assist (
Ypage 229).
Further information on navigation displays can
be found in the multimedia system; see the sep-
arate operating instructions.
Setting the position
You can adjust the position of the head-up dis-
play on the windshield. You can compensate for
height differences if the seat positions are
changed, for example.
XSwitch on the head-up display (Ypage 259).
XPress the òbutton on the steering wheel
to open the menu list.
XPress the :or9 button on the steering
wheel to select the Settingsmenu.
XConfirm by pressing aon the steering
wheel.
XPress :or9 to select the Head-upDisplaysubmenu.
XPressato confirm.
XPress :or9 to select the Positionfunction.
XPress theabutton to save the setting.
XPress :or9 to adjust the position to a
level from Level+5(up) toLevel-5(down).
XPress the aor% button to save the
setting.
Using the Memory function, you can save and
call up the set position of the head-up display as
a single memory preset (
Ypage 126).
Setting the brightness
The brightness of the head-up display is auto-
matically adjusted to the surrounding ambient
light. You can also individually adjust the bright-
ness of the head-up display.
XSwitch on the head-up display (Ypage 259).
XPress òon the steering wheel to open the
menu list.
XPress the :or9 button on the steering
wheel to select the Settingsmenu.
XConfirm by pressing aon the steering
wheel.
XUse : or9 to select the Head-upDisplaysubmenu.
XPressato confirm.
XPress :or9 to select the Brightnessfunction.
XPress theabutton to save the setting.
Menus and submenus273
On-board computer and displays
Z
Page 352 of 438
operate in the frequency range of 280 to
433 MHz.
RReplace the batteries in garage door remote
controlA. This increases the likelihood that
garage door remote control Awill transmit a
strong and precise signal to the integrated
garage door opener.
RWhen programming, hold remote control A
at varying distances and angles from the but-
ton which you are programming. Try various
angles at a distance between 2and 12 inches
(5to 30 cm) or at the same angle but at varying
distances.
RIf another remote control is available for the
same garage door drive, repeat the same pro-
gramming steps with this remote control.
Before performing these steps, make sure
that new batteries have been installed in
garage door drive remote control A.
RNote that some remote controls only transmit
for a limited amount of time (the indicator
lamp on the remote control goes out). Press
buttonBon remote control Aagain before
transmission ends.
RAlign the antenna cable of the garage door
opener unit. This can improve signal recep-
tion/transmission.
Opening/closing the garage door
After it has been programmed, the integrated
garage door opener performs the function of the
garage door system remote control. Please also
read the operating instructions for the garage
door system.
XTurn the SmartKey to position 2in the ignition
lock (Ypage 162).
XPress button ;,=or? which you have
programmed to operate the garage door.
Garage door system with a fixed code: indi-
cator lamp :lights up green.
Garage door system with a rolling code: indi-
cator lamp :flashes green.
The transmitter will transmit a signal as long
as the button is pressed. The transmission is
halted after a maximum of ten seconds and
indicator lamp :lights up yellow.
XPress button ;,=or? again if necessary.
Clearing the memory
Make sure that you clear the memory of the
integrated garage door opener before selling the
vehicle.
XTurn the SmartKey to position 2in the ignition
lock (Ypage 162).
XPress and hold buttons ;and ?.
The indicator lamp initially lights up yellow
and then green.
XRelease buttons ;and ?.
The memory of the integrated garage door
opener in the rear-view mirror is cleared.
Floormats
GWARNING
Objects in the driver's footwell can restrict the pedal travel or obstruct a depressed pedal.
The operating and road safety of the vehicle is
jeopardized. There is a risk of an accident.
Make sure that all objects in the vehicle are
stowed correctly, and that they cannot enter
the driver's footwell. Install the floormats
securely and as specified in order to ensure
sufficient clearance for the pedals. Do not use
loose floormats and do not place floormats on
top of one another.
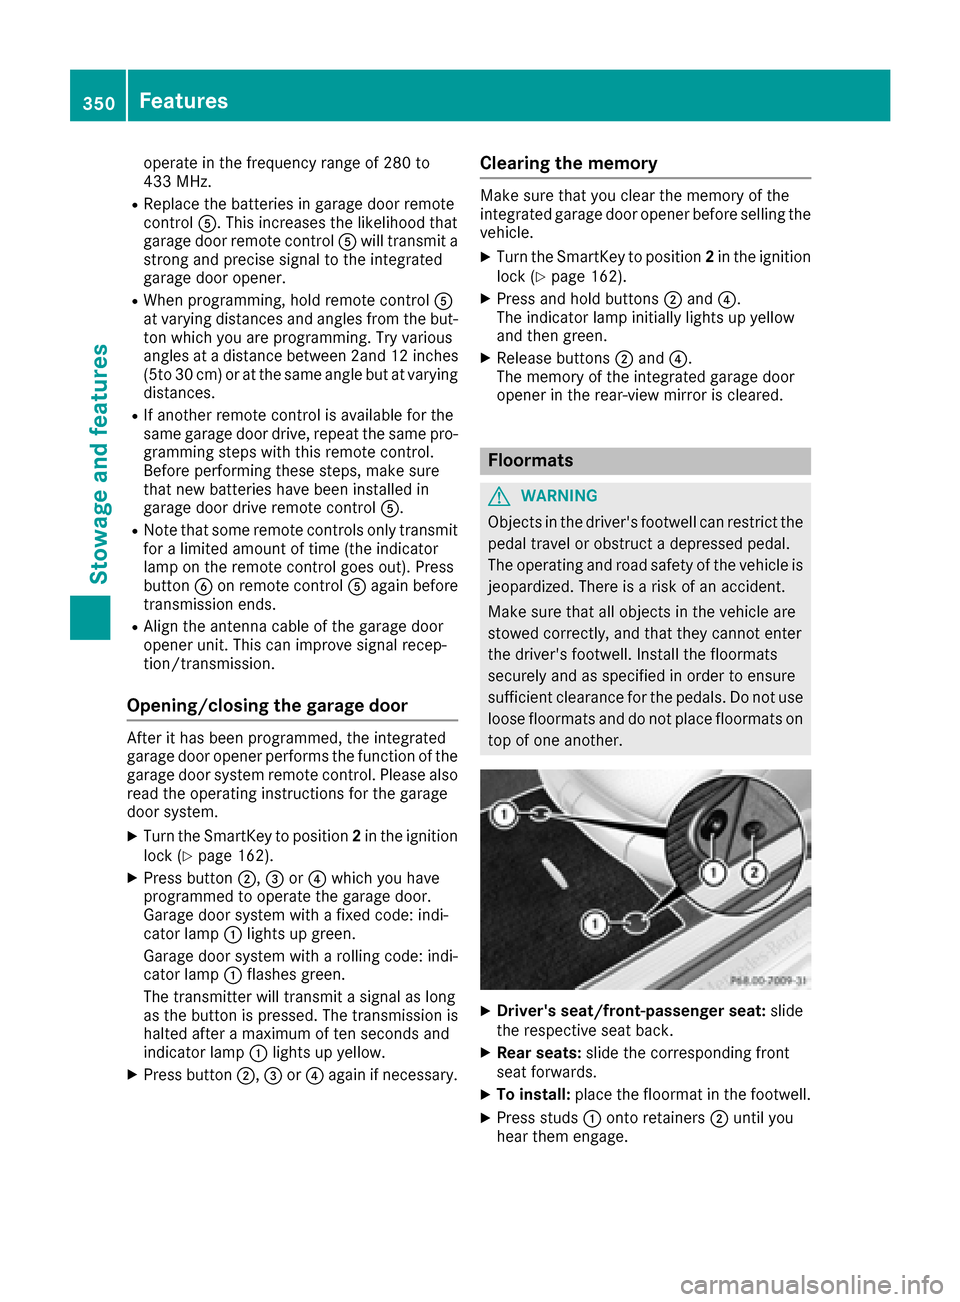
XDriver's seat/front-passenger seat: slide
the respective seat back.
XRear seats: slide the corresponding front
seat forwards.
XTo install: place the floormat in the footwell.
XPress studs :onto retainers ;until you
hear them engage.
350Features
Stowage and features