2016 MERCEDES-BENZ S-Class SEDAN heating
[x] Cancel search: heatingPage 154 of 438
Problems with the rear window defroster
ProblemPossible causes/consequences andMSolutions
The rear window
defroster has deactiva-
ted prematurely or can-
not be activated.The battery has not been sufficiently charged.
XSwitch off any consumers that are not required, e.g. reading lamps,
interior lighting or the seat heating.
When the battery is sufficiently charged, the rear window defroster
can be activated again.
Switching air-recirculation mode
on/off
General notes
You can also temporarily deactivate the flow of
fresh air manually if unpleasant odors are enter-
ing the vehicle from outside. The air already
inside the vehicle will then be recirculated.
If you switch on air-recirculation mode, the win-
dows can fog up more quickly, in particular at
low temperatures. Only use air-recirculation
mode briefly to prevent the windows from fog-
ging up.
Activating/deactivating
XTurn the SmartKey to position 2in the ignition
lock (Ypage 162).
XTo activate: press thegrocker switch up
or down.
The indicator lamp in the grocker switch
lights up.
Air-recirculation mode switches on automati-
cally:
Rat high outside temperatures
Rat high levels of pollution
Rin a tunnel
The indicator lamp in the grocker switch is
not lit when automatic air-recirculation mode is
activated. Outside air is added after about
30 minutes.
XTo deactivate: press thegrocker switch
up or down.
The indicator lamp in the grocker switch
goes out. Air-recirculation mode deactivates automati-
cally:
Rafter approximately five minutes at outside
temperatures below approximately 41 ‡
(5 †)
Rafter approximately five minutes if cooling
with air dehumidification is deactivated
Rafter approximately 30 minutes at outside
temperatures above approximately 41 ‡
(5 †) if the "Cooling with air dehumidifica-
tion" function is activated
Switching the residual heat on or off
General notes
Vehicles with rear-compartment climate
control: once the engine is switched off, it is
possible to make use of the residual heat of the
engine to continue heating or ventilating the
rear and front compartment of the vehicle for
approximately 15 minutes. If the "Residual heat"
function is set for only the front or only the rear compartment, it is possible to continue heating
or ventilating for approximately 30 minutes.
Vehicles without rear-compartment climate
control: once the engine is switched off, it is
possible to make use of the residual heat of the
engine to continue heating or ventilating the
front compartment of the vehicle for approx-
imately 30 minutes.
The heating or ventilation time depends on the
temperature that has been set.
152Operating the climate control systems
Climate control
Page 157 of 438
Problems with the perfume atomizer
ProblemPossible causes/consequences andMSolutions
The vehicle interior is not
perfumed although the
perfume atomizer is acti-
vated.The perfume vial has not been pushed into the holder as far as it will
go.
XSlide the perfume vial into the holder as far as it will go.
The perfume vial is not filled sufficiently.
XPre-filled vials:dispose of the empty vial.
XUse a new pre-filled vial.
XRefillable vials: fill the perfume vial with a maximum of 0.5 fl. oz.
(15 ml) of the same perfume.
The perfume atomizer is faulty.
XHave the perfume atomizer checked at a qualified specialist work-
shop.
Ionization
You can use the "Ionization" function to purify
the air in the vehicle interior and attain an
improved interior climate.
The ionization of the interior air is odorless and
cannot be perceived directly in the vehicle inte-
rior.
You can switch ionization on or off using the
multimedia system (see the separate operating
instructions).
Ionization can only be switched on if the front
climate control system is activated. The side air
vent on the driver's side must be open.
Pre-entry climate control via Smart-
Key
General notes
The "Pre-entry climate control via SmartKey"
function is only available in PLUG-IN HYBRID
vehicles.
Before getting in, the driver's seat area or the
whole interior can be briefly warmed or ventila-
ted in advance with the air from the air vents
being pre-cooled.
The high-voltage battery must be sufficiently
charged before "Pre-entry climate control via
SmartKey" can be activated. When the vehicle is pre-cooled, the following
functions are activated if required:
RClimate control system
RBlower
RSeat ventilation
When the vehicle is pre-heated, the following
functions are activated if required:
RClimate control system
RBlower
RSeat heating
RSteering wheel heating
RExterior mirror heating
RRear window defroster
If you have activated the following functions
using the multimedia system, they are activated
together with the "Pre-entry climate control via
SmartKey" function:
RArmrest heating
RPerfume atomizer
RIonization
Activating the perfume atomizer or ionization
(see separate operating instructions).
Activating or deactivating "Pre-entry
climate control via SmartKey"
Before "Pre-entry climate control via SmartKey"
can be activated, you must activate the function
via the multimedia system (see separate oper-
ating instructions).
Operating the climate control systems155
Climate control
Z
Page 158 of 438

XTo activate pre-entry climate control via
SmartKey:unlock the vehicle with the Smart-
Key or KEYLESS-GO.
The climate control functions are activated
for up to 5 minutes for pre-heating and pre-
cooling.
To deactivate "Pre-entry climate control via SmartKey": "Pre-entry climate control via
SmartKey" switches off automatically when the
engine is started.
The following functions remain active after the
engine is started:
RSeat heating (heating)
RSeat ventilation (ventilation)
RArmrest heating
RPerfume atomizer
RIonization
An activated "Pre-entry climate control via
SmartKey" function can be deactivated using
the rocker switch (
Ypage 158).
156Operating the climate control systems
Climate control
Page 159 of 438
Problems with "Pre-entry climate control via SmartKey"
ProblemPossible causes/consequences andMSolutions
"Pre-entry climate con-
trol via SmartKey" can-
not be switched on or
has switched itself off.The condition of charge of the high-voltage battery is under the speci-
fied minimum condition of charge.
XStart the engine when the vehicle is at a standstill.
The engine powers the electric motor. The electric motor operates
as a generator. The high-voltage battery is being charged.
Further information on charging the high-voltage battery via:
Ra mains socket (Ypage 183)
Ra charging station (Ypage 186)
Ra wallbox (Ypage 185)
"Pre-entry climate control via SmartKey" has been started more than
twice with the engine switched off.
XSwitch on the engine and let it run for more than ten seconds.
XTry again to switch on "Pre-entry climate control via SmartKey".
Pre-entry climate control at time of
departure
Important safety notes
GWARNING
If persons, particularly children are subjected to prolonged exposure to extreme heat or
cold, there is a risk of injury, possibly even
fatal. Never leave children unattended in the
vehicle.
General notes
The "Pre-entry climate control at departure
time" function is only available in PLUG-IN
HYBRID vehicles.
You can use the "Pre-entry climate control at
departure time" function to cool or heat the
vehicle interior if the engine is not running.
The "Pre-entry climate control at departure
time" function can be activated regardless of
whether or not the vehicle is connected to an
electric power supply. The condition of charge of
the high-voltage battery must be higher than the
specified minimum condition of charge, how-
ever.
When the vehicle is connected to an electric
power supply, priority is given to charging the
high-voltage battery to the specified minimum charge. "Pre-entry climate control at departure
time" is only activated subsequently.
The running time of the "Pre-entry climate con-
trol at departure time" function may be reduced
if:
Rthe vehicle is not connected to an electric
power supply and
Rthe high-voltage battery is not fully charged
With active "Pre-entry climate control at depar-
ture time" the condition of charge of the high-
voltage battery can be reduced, even if the
charge cable connector is connected.
When the vehicle is cooled, the following func-
tions are activated if required:
RClimate control system
RBlower
RSeat ventilation
When the vehicle is heated, the following func-
tions are activated if required:
RClimate control system
RBlower
RSeat heating
RSteering wheel heating
RArmrest heating
RExterior mirror heating
RRear window defroster
If you have switched on the perfume atomizer or the ionization using the multimedia system,
Operating the climate control systems157
Climate control
Z
Page 160 of 438
these will be activated together with the "Pre-
entry climate control at departure time".
Activating the perfume atomizer or ionization
(see separate operating instructions).
Setting the departure time
You can set the departure time using the on-
board computer or via the My Mercedes Electric
– Vehicle Homepage. The activation of the "Pre-
entry climate control at departure time" func-
tion can be linked to this departure time. Your
vehicle will then be cooled or heated until the
desired temperature is reached in time for the
set departure time. "Pre-entry climate control at departure time" will be activated a maximum of
55 minutes before departure. If the departure is
delayed, the vehicle will be heated or cooled for
another five minutes.
XTo set the departure time: set the departure
time using the on-board computer
(
Ypage 272). Set the departure time via the
My Mercedes Electric – Vehicle Homepage
(
Ypage 189).
XTo activate or deactivate "Pre-entry cli-
mate control at departure time": activate
or deactivate "Pre-entry climate control at
departure time" via the multimedia system
(see the separate operating instructions).
Activate or deactivate "Pre-entry climate con-
trol at departure time" via the My Mercedes
Electric – Vehicle Homepage (
Ypage 189).
When activating the "Pre-entry climate control
at departure time" function: you can sele ct
w
hether only the driver's area or the whole vehi-
cle interior should be heated or cooled.
The "Pre-entry climate control at departure
time" function switches off automatically when
the vehicle is started. The following functions
remain active:
RSeat heating
RSeat ventilation
RArmrest heating
RSteering wheel heating
RPerfume atomizer
RIonization
Switching off "Pre-entry climate control at
departure time": the activated "Pre-entry cli-
mate control at departure time" can be switched
off using the rocker switch (
Ypage 158).
Activating or deactivating "Immediate
pre-entry climate control" using the
rocker switch
You can activate "Immediate pre-entry climate
control" even if the vehicle interior is already at
the desired temperature. This means that the
vehicle interior continues to be cooled or
heated, e.g. if the journey is interrupted for up to 50 minutes, and the interior temperature is kept
constant.
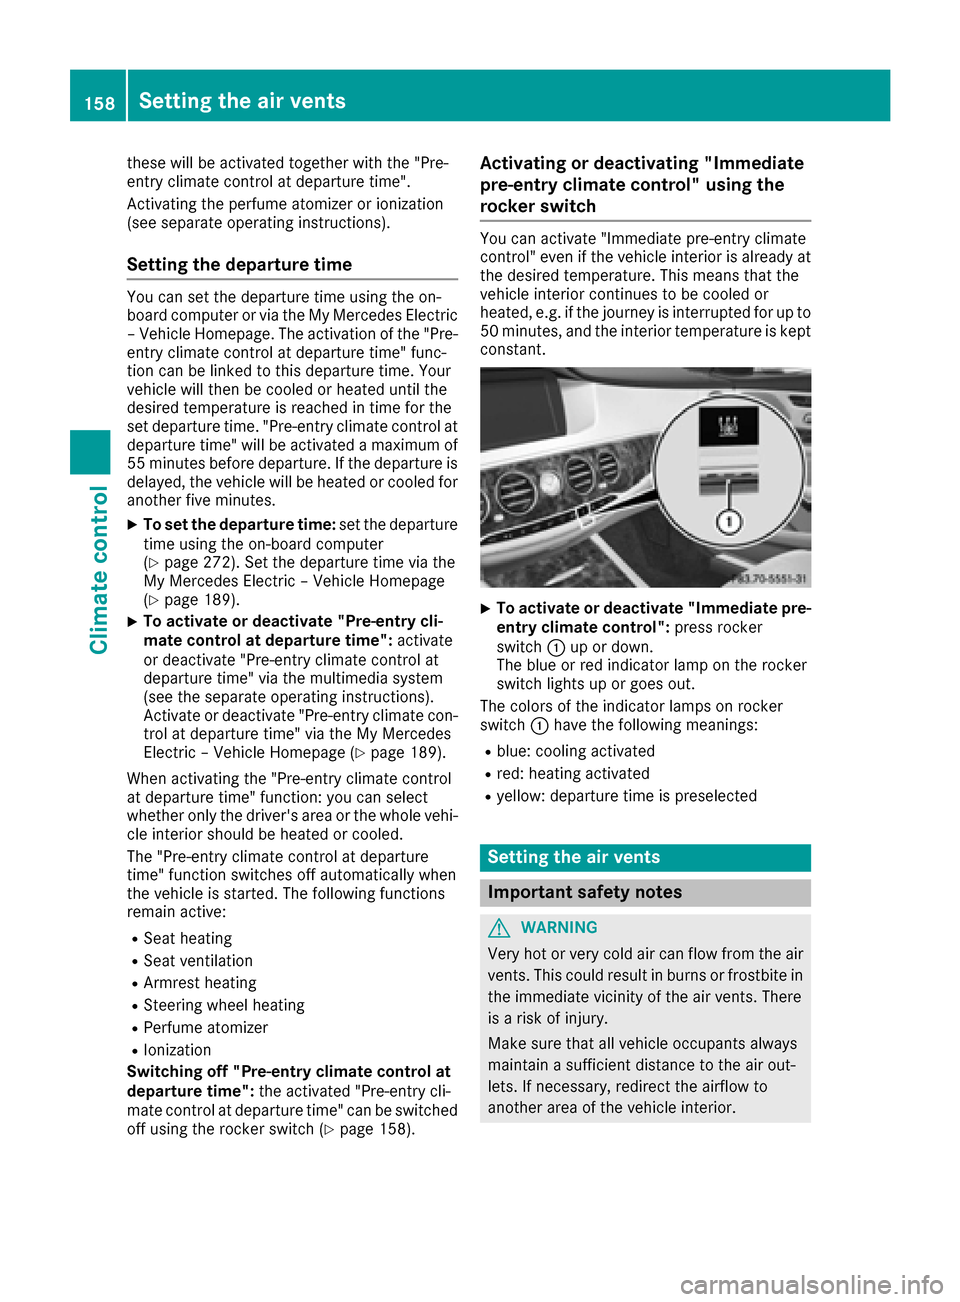
XTo activate or deactivate "Immediate pre-
entry climate control": press rocker
switch :up or down.
The blue or red indicator lamp on the rocker
switch lights up or goes out.
The colors of the indicator lamps on rocker
switch :have the following meanings:
Rblue: cooling activated
Rred: heating activated
Ryellow: departure time is preselected
Setting the air vents
Important safety notes
GWARNING
Very hot or very cold air can flow from the air
vents. This could result in burns or frostbite in
the immediate vicinity of the air vents. There
is a risk of injury.
Make sure that all vehicle occupants always
maintain a sufficient distance to the air out-
lets. If necessary, redirect the airflow to
another area of the vehicle interior.
158Setting the air vents
Climate control
Page 161 of 438
In order to ensure the direct flow of fresh air
through the air vents into the vehicle interior,
please observe the following notes:
Rkeep the air inlet between the windshield and
the hood free of blockages, such as ice, snow
or leaves.
Rnever cover the air vents or air intake grilles in
the vehicle interior.
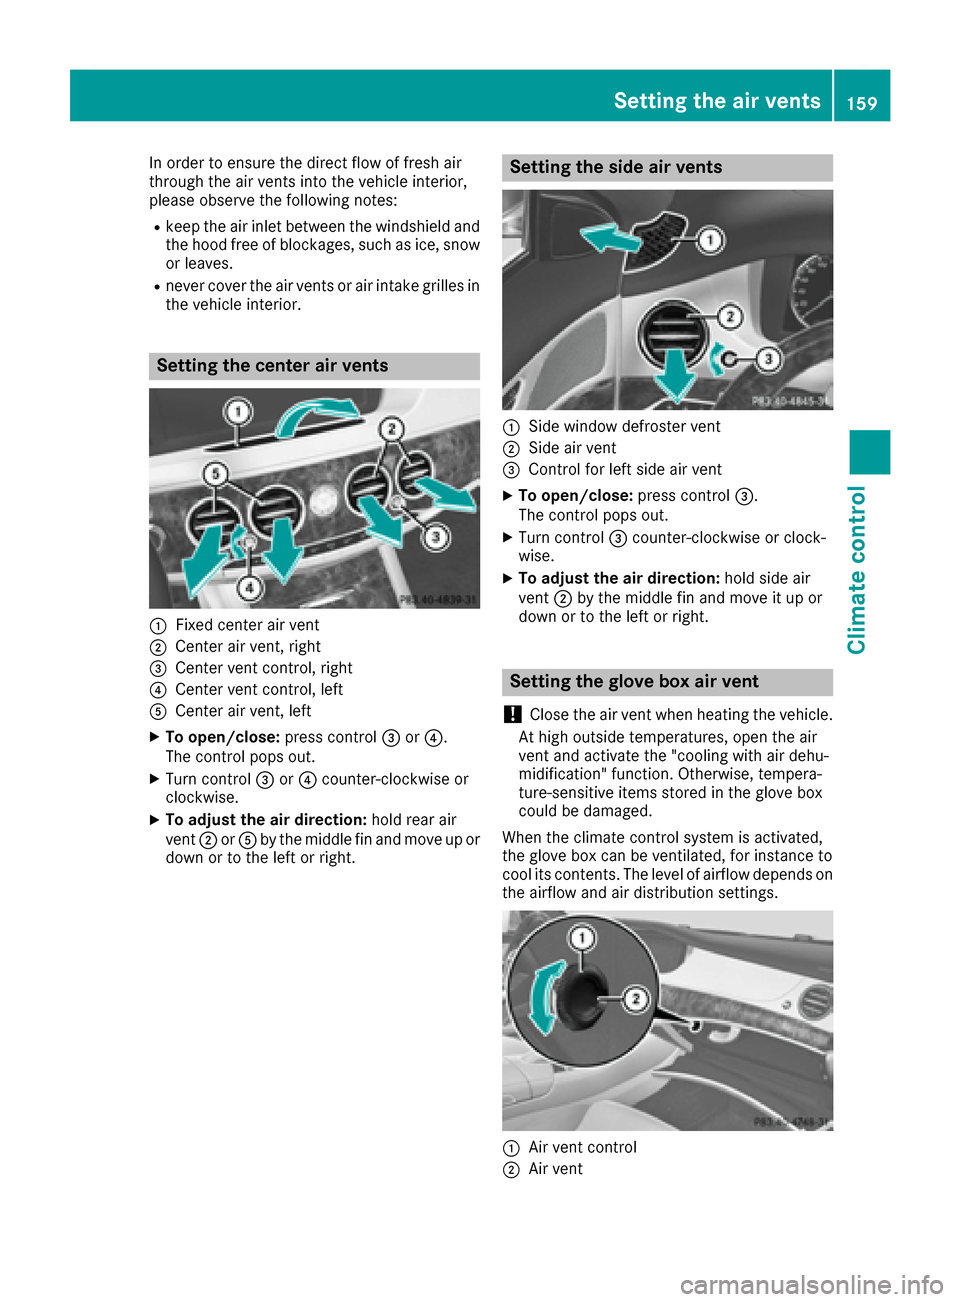
Setting the center air vents
:Fixed center air vent
;Center air vent, right
=Center vent control, right
?Center vent control, left
ACenter air vent, left
XTo open/close: press control=or?.
The control pops out.
XTurn control =or? counter-clockwise or
clockwise.
XTo adjust the air direction: hold rear air
vent ;orA by the middle fin and move up or
down or to the left or right.
Setting the side air vents
:Side window defroster vent
;Side air vent
=Control for left side air vent
XTo open/close: press control=.
The control pops out.
XTurn control =counter-clockwise or clock-
wise.
XTo adjust the air direction: hold side air
vent ;by the middle fin and move it up or
down or to the left or right.
Setting the glove box air vent
!
Close the air vent when heating the vehicle.
At high outside temperatures, open the air
vent and activate the "cooling with air dehu-
midification" function. Otherwise, tempera-
ture-sensitive items stored in the glove box
could be damaged.
When the climate control system is activated,
the glove box can be ventilated, for instance to
cool its contents. The level of airflow depends on
the airflow and air distribution settings.
:Air vent control
;Air vent
Setting the air vents159
Climate control
Z
Page 179 of 438
Problems with the transmission
ProblemPossible causes/consequences andMSolutions
The transmission has
problems shifting gear.The transmission is losing oil.
XHave the transmission checked at a qualified specialist workshop
immediately.
The acceleration ability
is deteriorating.
The transmission no lon-
ger changes gear.The transmission is in emergency mode.
7G-TRONIC:it is only possible to shift into secondgear and reverse
gear.
9G-TRONIC: it is only partly possible to engage the gears or the trans-
mission is in position N.
XStop the vehicle.
XShift the transmission to position P.
XSwitch off the engine.
XWait at least ten seconds before restarting the engine.
XShift the transmission to positionDor R.
7G-TRONIC: IfD is selected, the transmission shifts into second
gear, if Ris selected, the transmission shifts into reverse gear.
XHave the transmission checked at a qualified specialist workshop
immediately.
Problems with PLUG-IN HYBRID operation (Ypage 254).
Transfer case
This section is only valid for vehicles with 4-
wheel drive (4MATIC). Power is always trans-
mitted to both axles.
!Performance tests may only be carried out
on a 2-axle dynamometer. The brake system
or transfer case could otherwise be damaged. Contact a qualified specialist workshop for a
performance test.
!Since ESP®engages automatically, the igni-
tion must be switched off (the SmartKey or
Start/Stop button must be in position 0or 1)
if:
Rthe electric parking brake is being tested
on a brake dynamometer
Rthe vehicle is being towed with only one
axle raised (not permitted for vehicles with
4MATIC).
The brake system could otherwise be dam-
aged.
!Vehicles with 4MATIC must not be towed
with either the front or the rear axle raised, as doing so will damage the transmission.
Refueling
Important safety notes
GWARNING
Fuel is highly flammable. If you handle fuel
incorrectly, there is a risk of fire and explo-
sion.
You must avoid fire, open flames, creating
sparks and smoking. Switch off the engine
and, if applicable, the auxiliary heating before refueling.
GWARNING
Fuel is poisonous and hazardous to health.
There is a risk of injury.
You must make sure that fuel does not come into contact with your skin, eyes or clothing
Refueling177
Driving and parking
Z
Page 186 of 438
Setting the maximum charge current
GWARNING
If the charge current draw via a mains socket
is too high during the charging process, the
external electrical system may overheat.
There is a risk of fire.
Before beginning the charging process, check
the maximum permissible charge current
locally. Consult a qualified expert to do so
where necessary.
If necessary, adjust your vehicle's settings.
!An excessive charge current can blow a fuse
or lead to overheating of the external power
supply. Check whether the external power
supply is compatible with the set charge cur-
rent. If necessary, lower the set charge cur-
rent or use another power socket.
Before starting the charging process at a power
socket, check the maximum permissible charge current for the relevant power socket or the
building.
You can set the maximum permissible charge
current:
Ron the controls of the charging cable
Rin the on-board computer menu
(Ypage 272).
The lower value of the two charge current set-
tings – on the charge cable controls and in the
on-board computer – determines the maximum
charge current. If you cannot set the precise
maximum permitted charge current, select the
next lowest available value.
Only set the maximum permitted charge current in the on-board computer menu if:
Rit is not possible to set the charge current on
the charging cable
Rthe precise maximum permitted charge cur-
rent can only be set via the on-board com-
puter
How to set the maximum permissible charge
current on the charging cable, is described as
follows.
XTo adjust the setting: press button?
repeatedly until the desired setting is selec-
ted in display =.
RTwo LEDs are flashing: minimum setting
RAll LEDs are flashing: maximum setting If, after the charging process, the charging cable
is:
Rleft connected to the power socket, the cur-
rently selected values will be used for the next
charging process.
Rremoved from the power socket, the values
will be reset to the minimum setting for the
next charging process. You may then need to
reset the values of the maximum charge cur-
rent.
iIf the vehicle requires more time than usual
when charging, check the maximum charge
current settings using the controls on the
charging cable or in the on-board comput
er's
menu.
Indicator lamp on the vehicle socket
When the indicator lamp on the vehicle socket
lights up, this means the following:
Indicator
lamp
Flashes
orangeThe connection between the
vehicle and the current
source is being established
before charging begins.
Flashes
greenThe high-voltage battery is
being charged.
Flashes redA malfunction has occurred
while charging.
The indicator lamp goes out
after approximately
90 seconds.
Lights up
orangeA charging break for the high-
voltage battery is taking
place.
The indicator lamp goes out
after approximately
90 seconds.
Lights up
greenThe high-voltage battery is
fully charged.
The indicator lamp goes out
after approximately
90 seconds.
iIf the indicator lamp is off, lock or unlock the
vehicle. The indicator lamp then displays the
current status of the charging process again.
184Charging the high-voltage battery (PLUG-IN HYBRID vehicles)
Driving and parking