2016 MERCEDES-BENZ S-Class SEDAN consumption
[x] Cancel search: consumptionPage 255 of 438
Automa tic engine start
The automatically switched-off internal combus -
tio nengin estart sautomatically in certai nsitua-
tions ,if:
Rth epower demand from th edriver via th e
accelerato rpedal is greate rthan th eelectric
motor alon ecan provide
Rth edriver switches to driv eprogram Sor M
Rthecondition of charge of th ehigh-voltage
battery has reached th elower limit
Rth esettings of th eautomatic climat econtrol
require it, e.g. at external temperatures abov e
30 †
Overru nmod e
In overrun mode, th ecombustio nengin eis
switched off and is disconnected from th edriv e
train. The electric motor:
Rgenerates low thrust ,whic hcorrespond sto
th eoverrun mod eof an active combustio n
engin e
Rfunction sas agenerator and produce sth e
necessary energ yfor th eauxiliary consumer s
and charge sth ehigh-voltage battery
Ove rrun mod eis possible in th efollowin gspee d
range:
Rin driv eprogram Ebelow 81 mph (13 0km/h)
Rin driv eprogram E+below 11 2mph
(18 0km/h)
In driv eprogram E+,after th eaccelerato rpedal
has been released th ecoasting characteristic s
of th evehicl eare adapted to th etraffic condi-
tions .Further information about th ehaptic
accelerato r
p
edal (Ypage 251).
Route-based operating strategy
Forth eroute-based operating strategy, th esys-
te m factors in information about th eexpecte d
rout ewhen rout eguidance is active.
The information on th erout eis provide dby th e
multimedia system and includes th efollowing:
Rroad categories
Rspee dlimitation s
Rdataon downhill gradients The use of electric energ
yis automatically opti-
mally distributed from th ebeginnin gto th een d
of th ejourney, usin ginformation about th e
route. The distribution is pre-emptive and takes
int oconsideration :
Rthesections of th ejourney ahead
Rth eenerg yconsumption on th ewhole rout e
The condition of charge of th ehigh-voltage bat -
tery is thus systematically controlled. In addi-
tion, th econtrol function takes int oaccoun t
that:
Rth efuel saving sthroug hth euse of electrical
energ ycan vary, depending on th erout e(e.g.
urban ,interurban or highway)
Rth euse of electrical energ yis held available in
particular for electric operation (e.g. urban
routes)
The vehicl ethus automatically select sth eopti-
mum driving mod efor th erespectiv esectio nof
th eroute.
The route-based operating strategy is available
under th efollowin gconditions:
Rdriv eprogram E+is selected
RHYBRID driving mod eis selected
Ractive rout eguidance is activated
Rsuitable map dat ais available
When th eroute-based operating strategy is
bein gused, th earea in fron tof th evehicl eis
shown as green in th emultifunction display.
Parking
XApply th eelectric parking brake.
The red !indicator lamp in th einstrumen t
cluste rlight sup.
XUse th eDIRECT SELECT leve rto shif tth e
automatic transmission to P.
XSwitch theignition off .
The READY indicator in th einstrumen tcluste r
goes out .
Further information on parking and switching off
th einternal combustio nengin e (
Ypage 190).
PLUG‑ IN HYBRID operation253
Driving and parking
Z
Page 263 of 438
Setting options
You can adjust the following settings in the
head-up display submenu:
Radjust the position of the head-up display on
the windshield (Ypage 273)
Radjust the brightness of the displays in the
head-up display (Ypage 273)
Rselect displays in the head-up display
(Ypage 273).
Using the Display Content
function, you
can, depending on your vehicle's equipment,
choose between four standard displays. The
selected contents then appear in the head-up
display.
In Mercedes-AMG vehicles, you can also
choose between two AMG displays. If you
select an AMG display, the head-up display
shows AMG-specific contents.
If you select a display with traffic signs, detec- ted traffic signs from Traffic Sign Assist
appear in the head-up display.
Menus and submenus
Menu overview
Press the òbutton on the steering wheel to
open the menu list.
Operating the on-board computer (
Ypage 257).
Depending on the vehicle equipment, you can
select the following menu:
RTripmenu (Ypage 261)
RNavimenu (navigation instructions)
(Ypage 263)
RRadiomenu (Ypage 265)
RMediamenu (Ypage 265)
RTelephonemenu (Ypage 267)
RAssistance Graphicmenu (Ypage 268)
RServicemenu (Ypage 269)
RSettingsmenu (Ypage 269)
RAMGmenu (Mercedes-AMG vehicles)
(Ypage 275)
Trip menu
Standard display
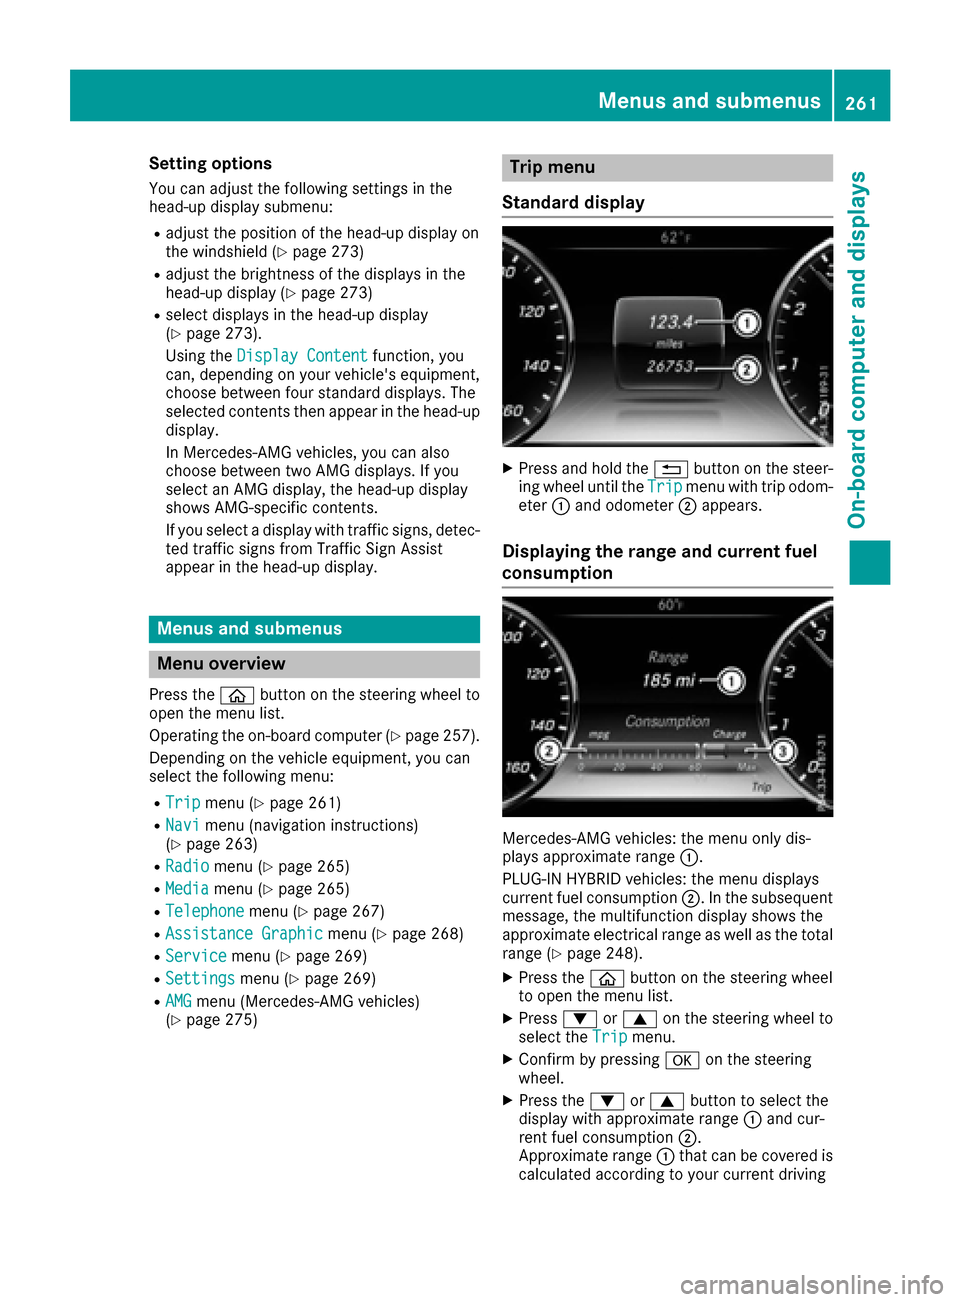
XPress and hold the %button on the steer-
ing wheel until the Tripmenu with trip odom-
eter :and odometer ;appears.
Displaying the range and current fuel
consumption
Mercedes-AMG vehicles: the menu only dis-
plays approximate range :.
PLUG-IN HYBRID vehicles: the menu displays
current fuel consumption ;. In the subsequent
message, the multifunction display shows the
approximate electrical range as well as the total
range (
Ypage 248).
XPress the òbutton on the steering wheel
to open the menu list.
XPress :or9 on the steering wheel to
select the Tripmenu.
XConfirm by pressing aon the steering
wheel.
XPress the :or9 button to select the
display with approximate range :and cur-
rent fuel consumption ;.
Approximate range :that can be covered is
calculated according to your current driving
Menus and submenus261
On-board computer and displays
Z
Page 264 of 438
style and the amount of fuel in the tank. If
there is only a small amount of fuel left in the
fuel tank, a vehicle being refueledC
appears instead of approximate range :.
Recuperation display =shows you if energy
has been recuperated from the kinetic energy in overrun mode and saved in the battery.
Recuperation display =depends on the
engine installed and is therefore not available
in all vehicles.
ECO display
The ECO display is not available in Mercedes-
AMG vehicles.
XPress the òbutton on the steering wheel
to open the menu list.
XPress :or9 on the steering wheel to
select the Tripmenu.
XConfirm by pressing aon the steering
wheel.
XPress the :or9 button to select ECODisplay.
If the ignition remains switched off for longer
than four hours, the ECO display will be auto-
matically reset.
For more information on the ECO display, see
(
Ypage 193).
Trip computer "From Start" or "From
Reset"
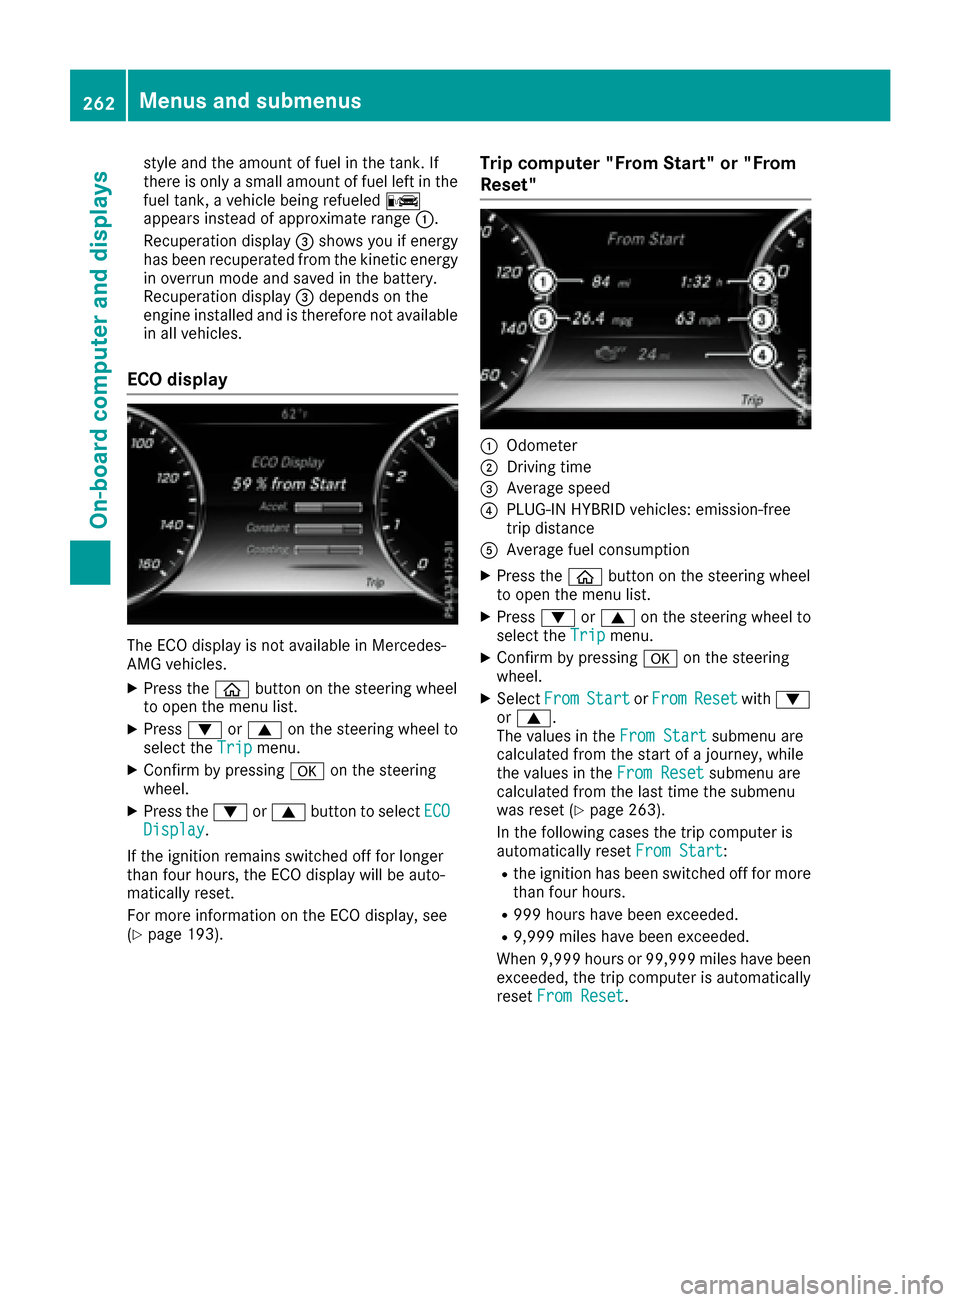
:Odometer
;Driving time
=Average speed
?PLUG-IN HYBRID vehicles: emission-free
trip distance
AAverage fuel consumption
XPress the òbutton on the steering wheel
to open the menu list.
XPress :or9 on the steering wheel to
select the Tripmenu.
XConfirm by pressing aon the steering
wheel.
XSelect FromStartorFromResetwith :
or 9.
The values in the From Start
submenu are
calculated from the start of a journey, while
the values in the From Reset
submenu are
calculated from the last time the submenu
was reset (
Ypage 263).
In the following cases the trip computer is
automatically reset From Start
:
Rthe ignition has been switched off for more
than four hours.
R999 hours have been exceeded.
R9,999 miles have been exceeded.
When 9,999 hours or 99,999 miles have been
exceeded, the trip computer is automatically
reset From Reset
.
262Menus and submenus
On-board computer and displays
Page 276 of 438

XPress:or9 to adjust the brightness
to a level from Level+5(bright) toLevel-5(dark).
XPress theaor% button to save the
setting.
Light submenu
Switching the spotlight function on/off
XPress òon the steering wheel to open the
menu list.
XPress :or9 on the steering wheel to
select the Settingsmenu.
XConfirm by pressing aon the steering
wheel.
XPress :or9 to select the Lightssubmenu.
XPressato confirm.
XPress the :or9 button to select the
Spotlightfunction.
XPress the abutton to save the setting.
When the spotlight function is activated, the
assistance graphic shows the pedestrian
symbol.
Further information on the spotlight function
(
Ypage 232).
Switching the daytime running lamps on/
off
This function is not available in Canada.
XPress the òbutton on the steering wheel
to open the menu list.
XPress :or9 on the steering wheel to
select the Settingsmenu.
XConfirm by pressing aon the steering
wheel.
XUse : or9 to select the Lightssub-
menu.
XPress ato confirm.
XUsing :or9, select the DaytimeRunning Lightsfunction.
If the DaytimeRunningLightsfunction has
been switched on, the cone of light and the
W symbol are shown in white in the multi-
function display.
XPress the abutton to save the setting.
Further information on daytime running lamps
Daytime Running Lights
(Ypage 130).
Instrument cluster submenu
Selecting the distance unit
The DisplayUnitSpeed-/Odometerfunction
allows you to choose whether certain displays
appear in kilometers or miles in the multifunc-
tion display.
XPress the òbutton on the steering wheel
to open the menu list.
XPress the :or9 button on the steering
wheel to select the Settingsmenu.
XConfirm by pressing aon the steering
wheel.
XPress :or9 to select the Instru‐ment Clustersubmenu.
XPressato confirm.
XPress the :or9 button to select the
Display Unit Speed-/Odometerfunction.
The current setting kmorMilesappears.
XPress the abutton to save the setting.
The selected unit of measurement for distance
applies to:
Rspeedometer
Rdigital speedometer in the Tripmenu
Radditional speedometer in the status area on
the multifunction display
The unit in the additional speedometer is dis- played inversely to the selected distance unit.
Rthe odometer and trip odometer
Rthe trip computer
Rthe current consumption and the range
Rnavigation instructions in the Navimenu
Rcruise control
RSPEEDTRONIC
RDISTRONIC PLUS
RDISTRONIC PLUS with Steering Assist and
Stop&Go Pilot
RASSYST PLUS service interval display
Switching the additional speedometer
on/off
TheAdditional Speedometer [km/h]func-
tion allows you to choose whether the status
area in the multifunction display shows the
speed digitally. The unit in the additional speed-
ometer is always inverse to the speedometer
unit.
274Menus and submenus
On-board computer and displays
Page 355 of 438
!Make sure that the windshield wipers are
not folded away from the windshield. You
could otherwise damage the windshield wip-
ers or the hood.
XMake sure that the windshield wipers are
turned off.
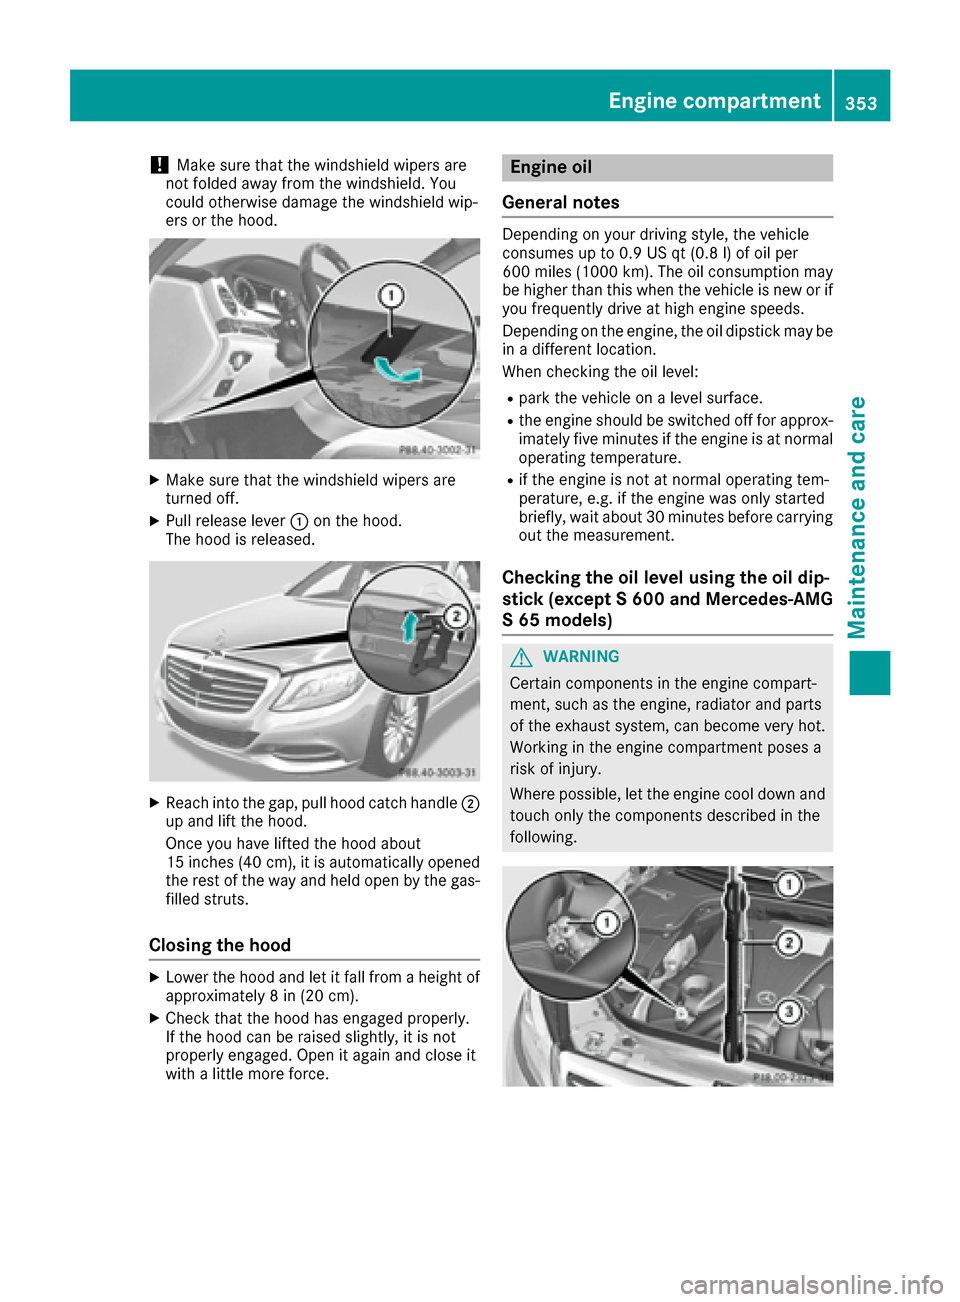
XPull release lever :on the hood.
The hood is released.
XReach into the gap, pull hood catch handle ;
up and lift the hood.
Once you have lifted the hood about
15 inches (40 cm), it is automatically opened
the rest of the way and held open by the gas-
filled struts.
Closing the hood
XLower the hood and let it fall from a height of
approximately 8 in (20 cm).
XCheck that the hood has engaged properly.
If the hood can be raised slightly, it is not
properly engaged. Open it again and close it
with a little more force.
Engine oil
General notes
Depending on your driving style, the vehicle
consumes up to 0.9 US qt (0.8 l) of oil per
600 miles (1000 km). The oil consumption may
be higher than this when the vehicle is new or if
you frequently drive at high engine speeds.
Depending on the engine, the oil dipstick may be
in a different location.
When checking the oil level:
Rpark the vehicle on a level surface.
Rthe engine should be switched off for approx-
imately five minutes if the engine is at normal
operating temperature.
Rif the engine is not at normal operating tem-
perature, e.g. if the engine was only started
briefly, wait about 30 minutes before carrying
out the measurement.
Checking the oil level using the oil dip-
stick (except S 600 and Mercedes-AMG
S 65 models)
GWARNING
Certain components in the engine compart-
ment, such as the engine, radiator and parts
of the exhaust system, can become very hot.
Working in the engine compartment poses a
risk of injury.
Where possible, let the engine cool down and touch only the components described in the
following.
Engine compartment353
Maintenance and care
Z
Page 391 of 438
Important notes on tire pressure
GWARNING
If th etire pressur edrops repeatedly, th e
wheel, valv eor tire may be damaged. Tir e
pressur ethat is to olow may result in atire
blow-out .Ther eis aris kof an accident.
RChec kth etire for foreign objects .
RCheckwhether th ewhee lis losing air or th e
valv eis leaking .
If you are unable to rectify th edamage, con-
tac t a qualified specialist workshop.
GWARNIN G
If you fit unsuitable accessories onto tire
valves, th etire valves may be overloaded and
malfunction ,whic hcan caus etire pressur e
loss .Due to their design ,retrofitte dtire pres-
sur emonitors keep th etire valv eopen .This
can also result in tire pressur eloss .Ther eis a
ris kof an accident.
Only screw th estandard valv ecap or other
valv ecap sapprove dby Mercedes-Ben zfor
your vehicl eonto th etire valve.
Use asuitable pressur egauge to chec kth etire
pressure. The outer appearanc eof atire does
no tpermit any reliable conclusio nabout th etire
pressure. On vehicles equipped wit hth eelec -
tronic tire pressur emonitor, th etire pressur e
can be checke din th eon-board computer.
The tire temperature and pressur eincreas e
when th evehicl eis in motion .This is dependen t
on th edriving spee dand th eload.
Therefore, you should only correc ttire pres-
sures when th etires are cold.
The tires are cold:
Rif th evehicl ehas been parked wit hth etires
out of direct sunligh tfor at least three hour s
and
Rif th evehicl ehas no tbeen driven further than
1 mile (1. 6km)
The tire temperature changes depending on th e
outside temperature, th evehicl espee dand th e
tire l
oad. If th etire temperature changes by
18 ‡(10 †), th etire pressur echanges by
approximately 10 kP a(0. 1bar/1.5 psi) .Tak e
this int oaccoun twhen checkin gth epressur eof
warm tires .Only correc tth etire pressur eif it is to
olow for th ecurren toperating conditions. If
you chec kth etire pressur ewhen th etires are
warm ,th eresulting value will be higher than if
th etires were cold. This is normal. Do no t
reduce th etire pressur eto th evalue specifie d
for cold tires .The tire pressur ewould otherwise
be to olow.
Observ eth erecommended tire pressures for
cold tires :
Ron theTir eand Loading Information placard
on th eB-pillar on th edriver' sside
Rin th etire pressur etable on th efuel filler flap
(Ypage 189)
Underinflated or overinflated tires
Underinflated tires
GWARNIN G
Tires wit hpressur ethat is to olow can over-
heat and burs tas aconsequence .In addition ,
they also suffer from excessiv eand/o rirreg-
ular wear ,whic hcan severely impair th ebrak -
ing properties and th edriving characteristics .
Ther eis aris kof an accident.
Avoid tire pressures that are to olow in all th e
tires ,includin gth espar ewheel.
Underinflated tires may:
Roverheat, leadin gto tire defects
Radversely affec thandlin g
Rwear excessively and/o runevenly
Rhav ean adverse effec ton fuel consumption
Overinflated tires
GWARNIN G
Tires wit hexcessively high pressur ecan burs t
because they are damaged mor eeasil yby
road debris, pothole setc. In addition ,they
also suffer from irregular wear ,whic hcan
severely impair th ebraking properties and th e
driving characteristics .Ther eis aris kof an
accident.
Avoid tire pressures that are to ohigh in all th e
tires ,includin gth espar ewheel.
Tire pressure389
Wheels and tires
Z
Page 412 of 438

XTighten the wheel bolts evenly in a crosswisepattern in the sequence indicated (: toA).
The tightening torque must be 110 lb-ft
(150 Nm).
XTurn the jack back to its initial position.
XStow the jack and the rest of the vehicle tools
in the trunk again.
XMercedes-AMG vehicles and vehicles
with AMG equipment: insert the cover into
the outer sill.
XCheck the tire pressure of the newly mounted
wheel and adjust it if necessary.
Observe the recommended tire pressure
(
Ypage 387).
iVehicles with a tire pressure control system:
all mounted wheels must be equipped with
functioning tire pressure control sensors.
Wheel and tire combinations
General notes
!
For safety reasons, Mercedes-Benz recom-
mends that you only use tires and wheels
which have been approved by Mercedes-Benz
specifically for your vehicle.
These tires have been specially adapted for
use with the control systems, such as ABS or
ESP
®, and are marked as follows:
RMO = Mercedes-Benz Original
RMOE = Mercedes-Benz Original Extended
(tires featuring run-flat characteristics)
RMO1 = Mercedes-Benz Original (only cer-
tain AMG tires)
Mercedes-Benz Original Extended tires may
only be used on wheels that have been spe-
cifically approved by Mercedes-Benz.
Only use tires, wheels or accessories tested
and approved by Mercedes-Benz. Certain
characteristics, e.g. handling, vehicle noise
emissions or fuel consumption, may other-
wise be adversely affected. In addition, when
driving with a load, tire dimension variations
could cause the tires to come into contact
with the bodywork and axle components. This
could result in damage to the tires or the vehi- cle.
Mercedes-Benz accepts no liability for dam-
age resulting from the use of tires, wheels or accessories other than those tested and
approved.
Information on tires, wheels and approved
combinations can be obtained from any quali-
fied specialist workshop.
!Retreaded tires are neither tested nor rec-
ommended by Mercedes-Benz, since previ-
ous damage cannot always be detected on
retreaded tires. As a result, Mercedes-Benz
cannot guarantee vehicle safety if retreaded
tires are mounted. Do not mount used tires if
you have no information about their previous
usage.
Overview of abbreviations used in the following
tire tables:
RBA: both axles
RFA: front axle
RRA: rear axle
The recommended pressures for various oper-
ating conditions can be found:
Ron the Tire and Loading Information placard
on the B-pillar on the driver's side
Rin the tire pressure table in the fuel filler flap
Observe the notes on recommended tire pres-
sures under various operating conditions
(
Ypage 387).
Check tire pressures regularly, and only when
the tires are cold. Comply with the maintenance
recommendations of the tire manufacturer in
the vehicle document wallet.
Notes on the vehicle equipment – always equip
the vehicle with:
Rwith tires of the same size on a given axle (left
and right)
Rthe same type of tires at a given time (summer
tires, winter tires, MOExtended tires)
Exception: it is permissible to install a differ-
ent type or make in the event of a flat tire.
Observe the "MOExtended tires (tires with
run-flat characteristics" section (
Ypage 368).
Vehicles equipped with MOExtended tires are
not equipped with a TIREFIT kit at the factory. It
is therefore recommended that you additionally
equip your vehicle with a TIREFIT kit if you mount
tires that do not feature run-flat properties, e.g.
winter tires. A TIREFIT kit may be obtained from a qualified specialist workshop.
iNot all wheel and tire combinations are
available at the factory for all countries.
410Wheel and tire combinations
Wheels and tires
Page 431 of 438
RM30 (gasoline with 30% methanol)
RM85 (gasoline with 85% methanol)
RM100 (100% methanol)
RGasoline with metalliferous additives
RDiesel
Do not mix such fuels with the fuel recom-
mended for your vehicle.
!To ensure the longevity and full perform-
ance of the engine, only premium-grade
unleaded gasoline must be used.
If standard unleaded gasoline is unavailable
and you have to refuel with unleaded gasoline
of a lower grade, observe the following pre-
cautions:
ROnly fill the fuel tank to half full with regular
unleaded gasoline and fill the rest with pre-
mium-grade unleaded gasoline as soon as
possible.
RDo not drive at the maximum speed.
RAvoid sudden acceleration and engine
speeds over 3,000 rpm.
You will usually find information about the fuel
grade on the pump. If you cannot find the label
on the pump, ask the staff for assistance.
iFor further information, consult a qualified
specialist workshop or visit
http://www.mbusa.com (USA only).
As a temporary measure, if the recommended
fuel is not available, you may also use regular
unleaded gasoline with an octane rating of
87 AKI/91 RON. This may reduce engine per-
formance and increase fuel consumption. Avoid
driving at full throttle and sudden acceleration.
Never refuel using fuel with a lower AKI.
Information on refueling .
Additives
!Operating the engine with fuel additives
added later can lead to engine failure. Do not
mix fuel additives with fuel. This does not
include additives for the removal and preven-
tion of residue buildup. gasoline must only be
mixed with additives recommended by
Mercedes-Benz. Comply with the instructions
for use on the product label. More information
about recommended additives can be
obtained from any authorized Mercedes-Benz
Center.
Mercedes-Benz recommends that you use bran- ded fuels that have additives. The quality of the fuel available in some coun-
tries may not be sufficient. Residue could build
up in the injection system as a result. In such
cases, and in consultation with an authorized
Mercedes-Benz Center, the gasoline may be
mixed with the cleaning additive recommended
by Mercedes-Benz. You must observe the notes
and mixing ratios specified on the container.
Engine oil
General notes
!Never use engine oil or an oil filter of a spec-
ification other than is necessary to fulfill the
prescribed service intervals. Do not change
the engine oil or oil filter in order to achieve
longer replacement intervals than those pre-
scribed. You could otherwise cause engine
damage or damage to the exhaust gas after-
treatment.
Follow the instructions in the service interval
display regarding the oil change. Otherwise,
you may damage the engine and the exhaust
gas aftertreatment.
When handling engine oil, observe the important
safety notes on service products (
Ypage 427).
The engine oils are matched to the performance
of Mercedes-Benz engines and service intervals.
You should therefore only use engine oils and oil
filters that are approved for vehicles with main- tenance systems.
For a list of approved engine oils and oil filters,
consult an authorized Mercedes-Benz Center.
Or visit the website
http://bevo.mercedes-benz.com.
The table shows which engine oils have been
approved for your vehicle.
Service products and filling capacities429
Technical data
Z