2016 MERCEDES-BENZ S-Class SEDAN brake light
[x] Cancel search: brake lightPage 87 of 438
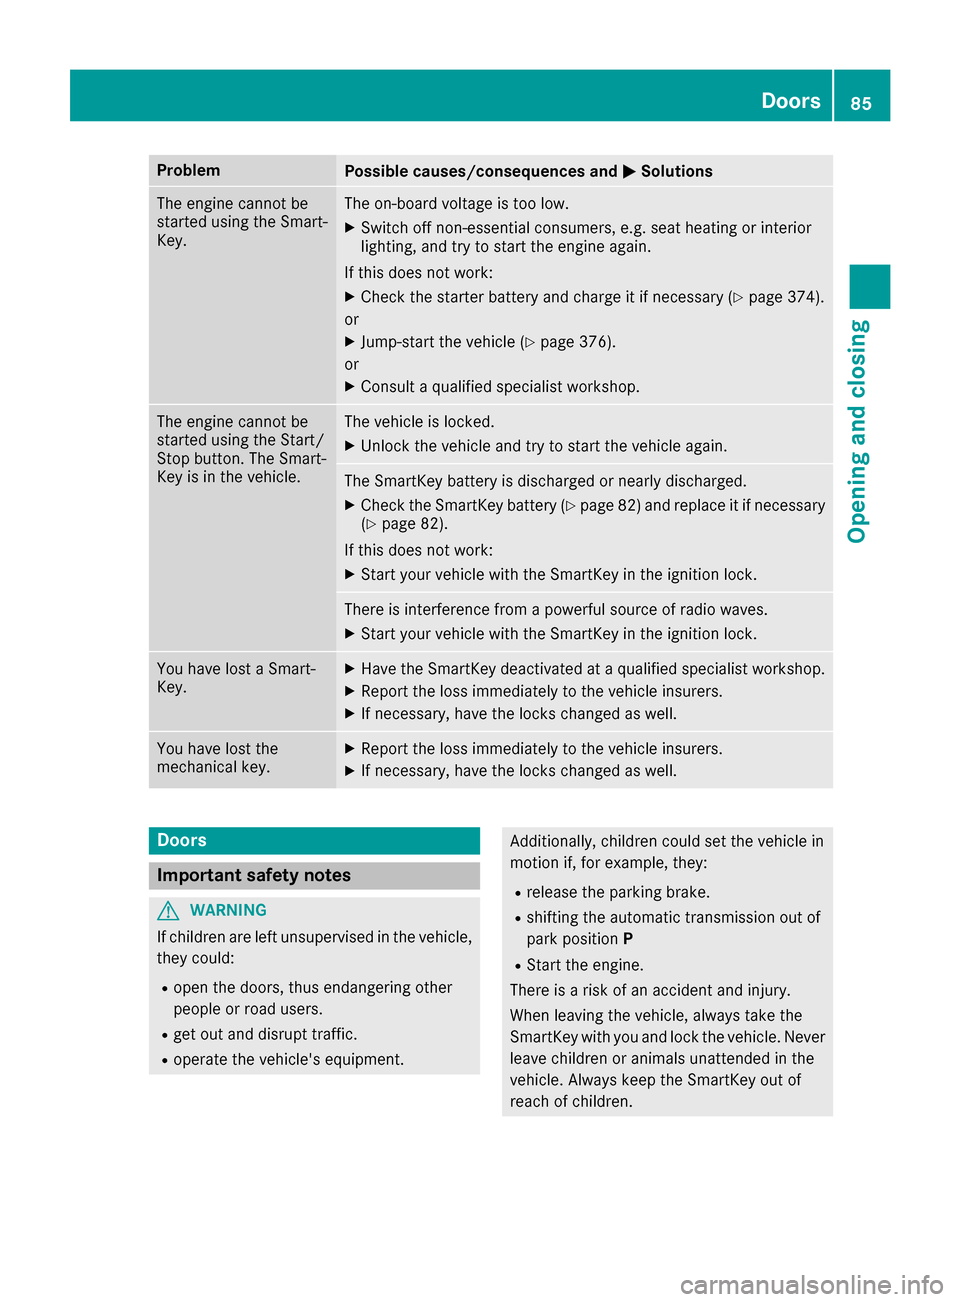
ProblemPossible causes/consequences andMSolutions
The engine cannot be
started using the Smart-
Key.The on-board voltage is too low.
XSwitch off non-essential consumers, e.g. seat heating or interior
lighting, and try to start the engine again.
If this does not work:
XCheck the starter battery and charge it if necessary (Ypage 374).
or
XJump-start the vehicle (Ypage 376).
or
XConsult a qualified specialist workshop.
The engine cannot be
started using the Start/
Stop button. The Smart-
Key is in the vehicle.The vehicle is locked.
XUnlock the vehicle and try to start the vehicle again.
The SmartKey battery is discharged or nearly discharged.
XCheck the SmartKey battery (Ypage 82) and replace it if necessary
(Ypage 82).
If this does not work:
XStart your vehicle with the SmartKey in the ignition lock.
There is interference from a powerful source of radio waves.
XStart your vehicle with the SmartKey in the ignition lock.
You have lost a Smart-
Key.XHave the SmartKey deactivated at a qualified specialist workshop.
XReport the loss immediately to the vehicle insurers.
XIf necessary, have the locks changed as well.
You have lost the
mechanical key.XReport the loss immediately to the vehicle insurers.
XIf necessary, have the locks changed as well.
Doors
Important safety notes
GWARNING
If children are left unsupervised in the vehicle,
they could:
Ropen the doors, thus endangering other
people or road users.
Rget out and disrupt traffic.
Roperate the vehicle's equipment.
Additionally, children could set the vehicle in
motion if, for example, they:
Rrelease the parking brake.
Rshifting the automatic transmission out of
park position P
RStart the engine.
There is a risk of an accident and injury.
When leaving the vehicle, always take the
SmartKey with you and lock the vehicle. Never
leave children or animals unattended in the
vehicle. Always keep the SmartKey out of
reach of children.
Doors85
Opening and closing
Z
Page 134 of 438

High-beam headlamps
XTo activate manually:turn the SmartKey in
the ignition lock to position 2or start the
engine.
XVehicles without Adaptive Highbeam Assist
Plus: turn the light switch to position Lor
Ã.
XVehicles with Adaptive Highbeam Assist Plus:
turn the light switch to the Lposition.
XPress the combination switch beyond the
pressure point in the direction of arrow :.
In the Ãposition, the high-beam head-
lamps are only switched on when it is dark and
the engine is running.
The blue Kindicator lamp in the instru-
ment cluster lights up when the high-beam
headlamps are switched on.
XTo switch off: move the combination switch
back to its normal position.
The blue Kindicator lamp in the instru-
ment cluster goes out.
Vehicles with Adaptive Highbeam Assist
Plus: if Adaptive Highbeam Assist Plus is acti-
vated, it automatically controls activation and
deactivation of the high-beam headlamps
(
Ypage 133).
High-beam flasher
XTo switch on: turn the SmartKey in the igni-
tion lock to position 1or 2, or start the engine.
XPull the combination switch in the direction of
arrow =.
Hazard warning lamps
XTo switch on the hazard warning lamps:
press button :.
All turn signals flash. If you now switch on a
turn signal using the combination switch, only
the turn signal lamp on the corresponding
side of the vehicle will flash.
XTo switch off the hazard warning lamps:
press button :.
The hazard warning lamps automatically switch
on if:
Ran air bag is deployed or
Rthe vehicle decelerates rapidly from a speed
of above 45 mph (70 km/h) and comes to a
standstill
The hazard warning lamps switch off automati-
cally if the vehicle reaches a speed of above
6 mph (10 km/h) again after a full brake appli-
cation.
The hazard warning lamps still operate if the
ignition is switched off.
Cornering light function
The cornering light function improves the illu-
mination of the road over a wide angle in the
direction you are turning, enabling better visi-
bility in tight bends, for example. It can only be
activated when the low-beam headlamps are
switched on.
Active:
Rif you are driving at speeds below 25 mph
(40 km/h) and switch on the turn signal or
turn the steering wheel
Rif you are driving at speeds between 25 mph
(40 km/h) and 45 mph (70 km/h) and turn
the steering wheel
The cornering lamp may remain lit for a short
time, but is automatically switched off after no
more than three minutes.
132Exterior lighting
Lights and windshield wipers
Page 139 of 438
On vehicles with KEYLESS-GO:
XSwitch off the engine.
XRemove your foot from the brake pedal.
XSet the windshield wipers to position°.
XPress the Start/Stop button repeatedly until
the windshield wiper starts.
XWhen the wiper arms have reached the verti-
cal position, press the Start/Stop button
repeatedly until the windshield wipers stop.
XFold the wiper arms away from the windshield
until you feel them snap into place.
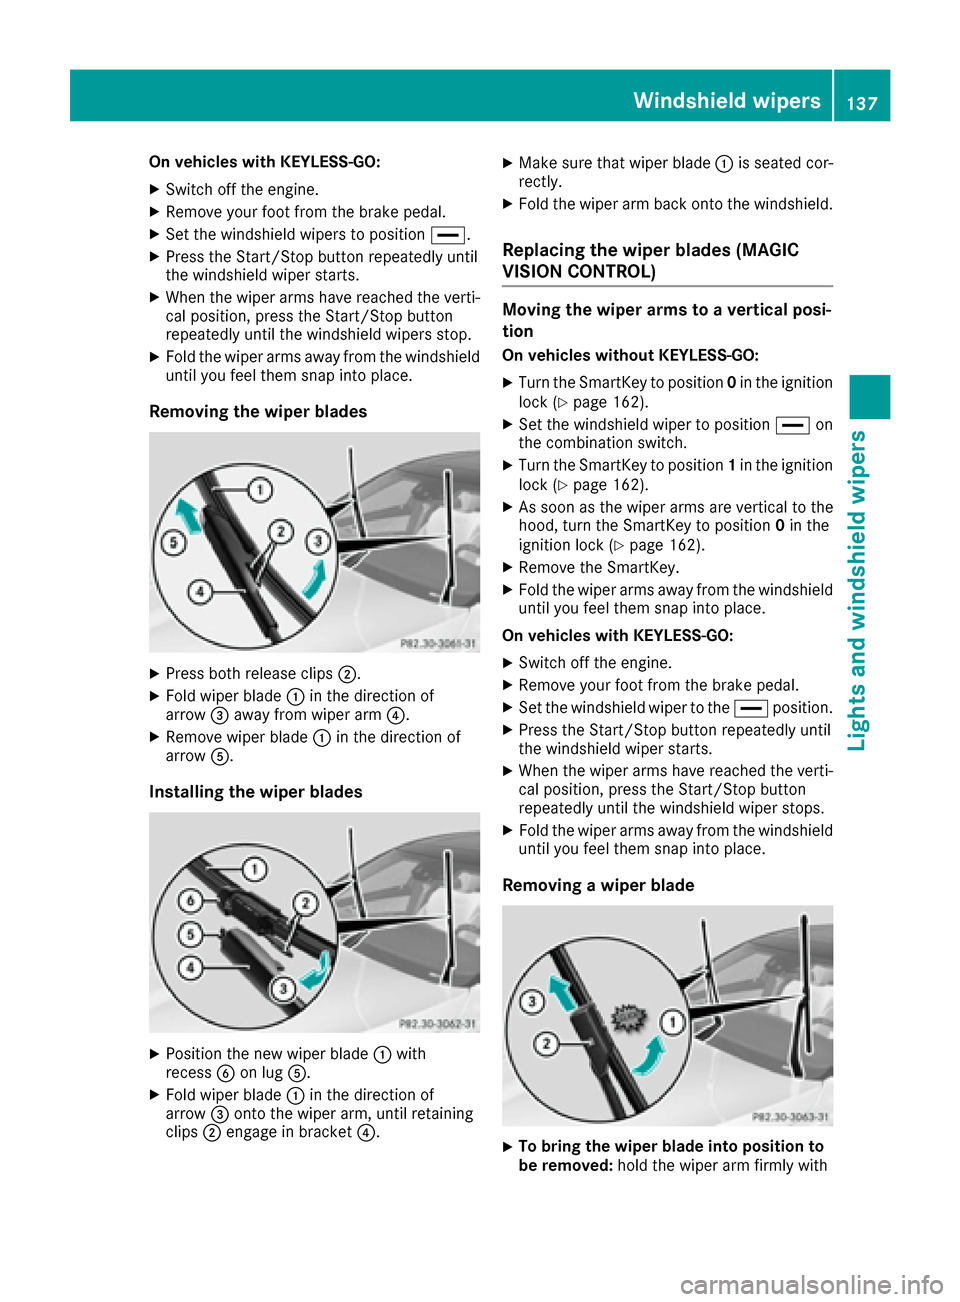
Removing the wiper blades
XPress both release clips ;.
XFold wiper blade:in the direction of
arrow =away from wiper arm ?.
XRemove wiper blade:in the direction of
arrow A.
Installing the wiper blades
XPosition the new wiper blade :with
recess Bon lug A.
XFold wiper blade :in the direction of
arrow =onto the wiper arm, until retaining
clips ;engage in bracket ?.
XMake sure that wiper blade :is seated cor-
rectly.
XFold the wiper arm back onto the windshield.
Replacing the wiper blades (MAGIC
VISION CONTROL)
Moving the wiper arms to a vertical posi-
tion
On vehicles without KEYLESS-GO:
XTurn the SmartKey to position 0in the ignition
lock (Ypage 162).
XSet the windshield wiper to position °on
the combination switch.
XTurn the SmartKey to position 1in the ignition
lock (Ypage 162).
XAs soon as the wiper arms are vertical to the
hood, turn the SmartKey to position 0in the
ignition lock (
Ypage 162).
XRemove the SmartKey.
XFold the wiper arms away from the windshield
until you feel them snap into place.
On vehicles with KEYLESS-GO:
XSwitch off the engine.
XRemove your foot from the brake pedal.
XSet the windshield wiper to the °position.
XPress the Start/Stop button repeatedly until
the windshield wiper starts.
XWhen the wiper arms have reached the verti-
cal position, press the Start/Stop button
repeatedly until the windshield wiper stops.
XFold the wiper arms away from the windshield
until you feel them snap into place.
Removing a wiper blade
XTo bring the wiper blade into position to
be removed: hold the wiper arm firmly with
Windshield wipers137
Lights and windshield wipers
Z
Page 169 of 438
then not necessary to continue applying the
brakes during the automatic stop phase. When
you depress the accelerator pedal, the engine
starts automatically and the braking effect of
the HOLD function is deactivated.
All vehicles (except Mercedes-AMG vehi-
cles):automatic engine switch-off can take
place a maximum of four times in a row (initial
stop, then three subsequent stops).
Mercedes-AMG vehicles: the number of con-
secutive automatic engine switch-offs is unlimi-
ted.
Automatic engine start
The engine starts automatically if:
Ryou switch off the ECO start/stop function by pressing the ECO button
Ryou switch to drive program Sor M
Rin transmission position Dor Nthe brake
pedal is released and the HOLD function is not
active
Ryou depress the accelerator pedal
Ryou engage reverse gear R
Ryou move the transmission out of position P
Ryou unfasten your seat belt or open the driv-
er's door
Rthe vehicle starts to roll
Rthe brake system requires this
Rthe temperature in the vehicle interior devi-
ates from the set range
Rthe system detects moisture on the wind-
shield when the air-conditioning system is
switched on
Rthe battery's condition of charge is too low
Shifting the transmission to position Pdoes not
start the engine.
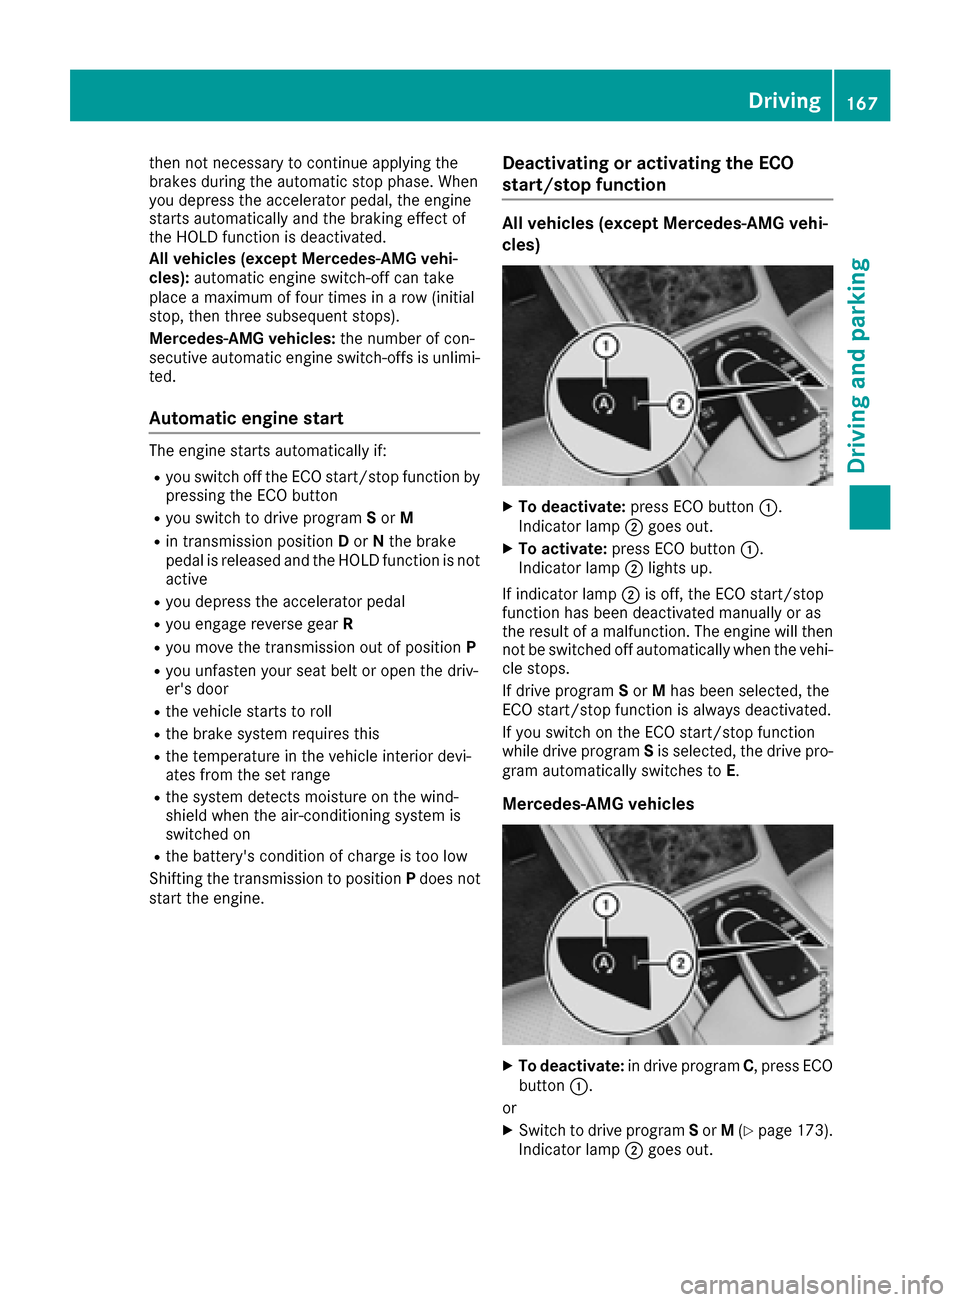
Deactivating or activating the ECO
start/stop function
All vehicles (except Mercedes-AMG vehi-
cles)
XTo deactivate: press ECO button :.
Indicator lamp ;goes out.
XTo activate: press ECO button :.
Indicator lamp ;lights up.
If indicator lamp ;is off, the ECO start/stop
function has been deactivated manually or as
the result of a malfunction. The engine will then
not be switched off automatically when the vehi- cle stops.
If drive program Sor Mhas been selected, the
ECO start/stop function is always deactivated.
If you switch on the ECO start/stop function
while drive program Sis selected, the drive pro-
gram automatically switches to E.
Mercedes-AMG vehicles
XTo deactivate: in drive program C, press ECO
button :.
or
XSwitch to drive program Sor M(Ypage 173).
Indicator lamp ;goes out.
Driving167
Driving an d parking
Z
Page 193 of 438
When leaving the vehicle, always take the
SmartKey with you and lock the vehicle. Never
leave children unsupervised in the vehicle.
The function of the electric parking brake is
dependent on the on-board voltage. If the on-
board voltage is low or there is a malfunction in
the system, it may not be possible to apply the
released parking brake.
XIf this is the case, only park the vehicle on
level ground and secure it to prevent it rolling
away.
XShift the automatic transmission to position
P.
It may not be possible to release an applied
parking brake if the on-board voltage is low or
there is a malfunction in the system. Contact a
qualified specialist workshop.
The electric parking brake performs a function
test at regular intervals while the engine is
switched off. The sounds that can be heard while
this is occurring are normal.
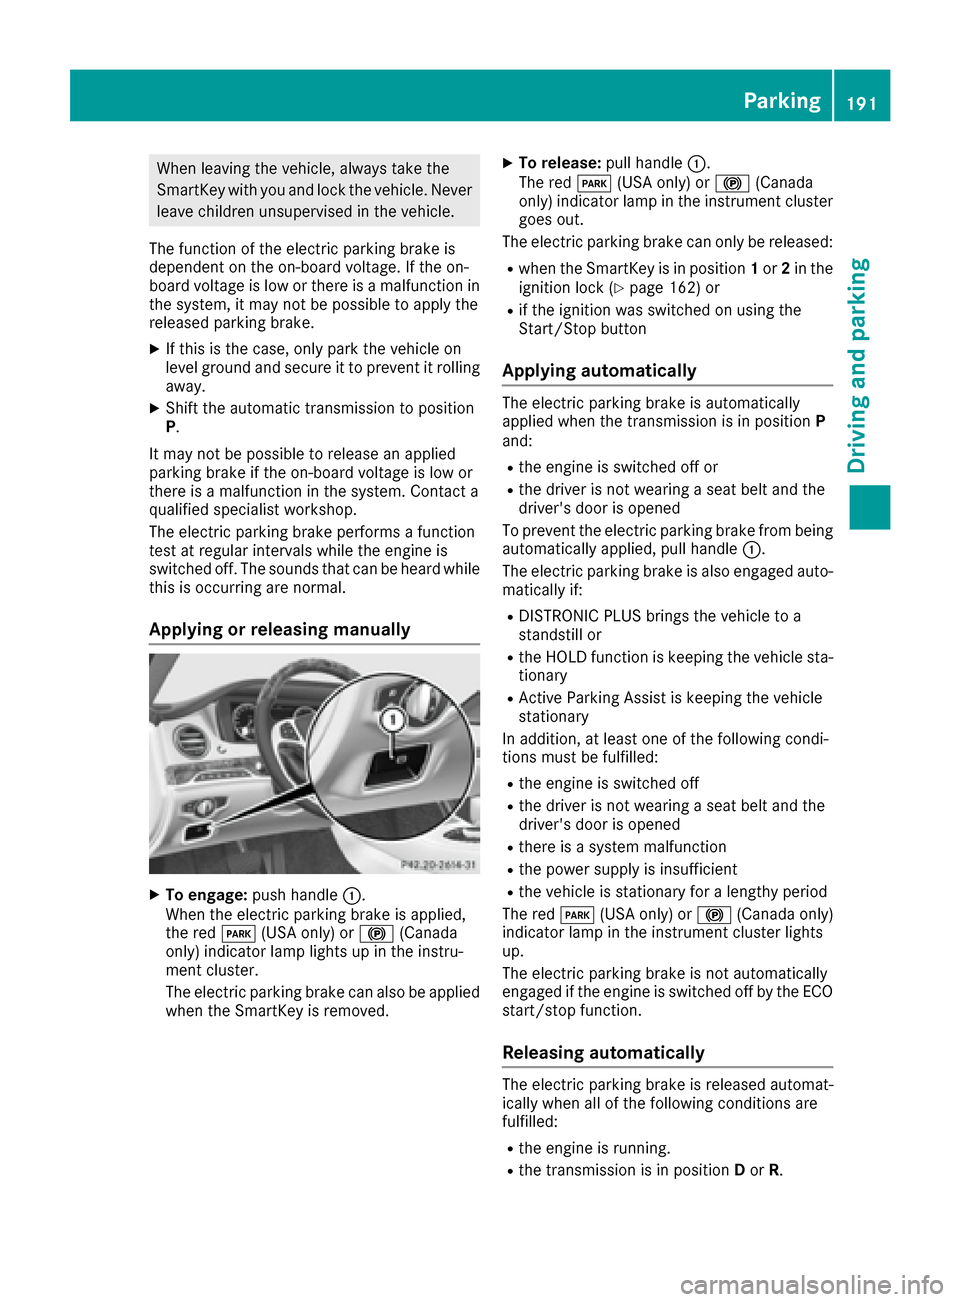
Applying or releasing manually
XTo engage: push handle :.
When the electric parking brake is applied,
the red F(USA only) or !(Canada
only) indicator lamp lights up in the instru-
ment cluster.
The electric parking brake can also be applied
when the SmartKey is removed.
XTo release: pull handle:.
The red F(USA only) or !(Canada
only) indicator lamp in the instrument cluster
goes out.
The electric parking brake can only be released:
Rwhen the SmartKey is in position 1or 2in the
ignition lock (Ypage 162) or
Rif the ignition was switched on using the
Start/Stop button
Applying automatically
The electric parking brake is automatically
applied when the transmission is in position P
and:
Rthe engine is switched off or
Rthe driver is not wearing a seat belt and the
driver's door is opened
To prevent the electric parking brake from being
automatically applied, pull handle :.
The electric parking brake is also engaged auto- matically if:
RDISTRONIC PLUS brings the vehicle to a
standstill or
Rthe HOLD function is keeping the vehicle sta-
tionary
RActive Parking Assist is keeping the vehicle
stationary
In addition, at least one of the following condi-
tions must be fulfilled:
Rthe engine is switched off
Rthe driver is not wearing a seat belt and the
driver's door is opened
Rthere is a system malfunction
Rthe power supply is insufficient
Rthe vehicle is stationary for a lengthy period
The red F(USA only) or !(Canada only)
indicator lamp in the instrument cluster lights
up.
The electric parking brake is not automatically
engaged if the engine is switched off by the ECO
start/stop function.
Releasing automatically
The electric parking brake is released automat-
ically when all of the following conditions are
fulfilled:
Rthe engine is running.
Rthe transmission is in position Dor R.
Parking191
Driving and parking
Z
Page 196 of 438
RAccel.(evaluation of all acceleration pro-
cesses)
-The bar fills up: moderate acceleration,
especially at higher speeds
-The bar empties: sporty acceleration
RConstant(assessment of driving behavior at
all times)
-The bar fills up: constant speed and avoid-
ance of unnecessary acceleration and
deceleration
-The bar empties: fluctuations in speed
RCoasting(assessment of all deceleration
processes)
-The bar fills up: anticipatory driving, keep-
ing your distance and early release of the
accelerator. The vehicle can coast without
use of the brakes.
-The bar empties: frequent braking
An economical driving style specially requires
driving at moderate engine speeds.
To achieve a higher value in the categories
Accel.
and Constant,
Robserve the gearshift recommendations.
Rdrive in drive program E
On long journeys at a constant speed, e.g. on the
highway, only the bar for Constant
will change.
The ECO display summarizes the driving char-
acteristics from the start of the journey to its
completion. For this reason, the bars change
dynamically at the beginning of the journey. On
longer journeys, there are fewer changes. For
more dynamic changes, carry out a manual
reset.
For further information on the ECO display, see
(
Ypage 262).
Brakes
Important safety notes
GWARNING
If you shift down on a slippery road surface in an attempt to increase the engine's braking
effect, the drive wheels could lose their grip.
There is an increased danger of skidding and
accidents.
Do not shift down for additional engine brak-
ing on a slippery road surface.
Downhill gradients
!On long and steep gradients, you must
reduce the load on the brakes by shifting to a
lower gear in good time. This allows you to
take advantage of the engine's braking effect.
This helps you to avoid overheating the
brakes and wearing them out excessively.
When you take advantage of engine braking, a
drive wheel may not turn for some time, e.g.
on a slippery road surface. This could cause
damage to the drive train. This type of damage
is not covered by the Mercedes-Benz war-
ranty.
Heavy and light loads
GWARNING
If you rest your foot on the brake pedal while
driving, the braking system can overheat. This increases the stopping distance and can even
cause the braking system to fail. There is a
risk of an accident.
Never use the brake pedal as a footrest. Never
depress the brake pedal and the accelerator
pedal at the same time.
!Depressing the brake pedal constantly
results in excessive and premature wear to
the brake pads.
If the brakes have been subjected to a heavy
load, do not stop the vehicle immediately. Drive
on for a short while. This allows the airflow to
cool the brakes more quickly.
Wet roads
If you have driven for a long time in heavy rain
without braking, there may be a delayed reac-
tion from the brakes when braking for the first
time. This may also occur after the vehicle has
been washed or driven through deep water.
You have to depress the brake pedal more
firmly. Maintain a greater distance from the
vehicle in front.
After driving on a wet road or having the vehicle
washed, brake firmly while paying attention to
the traffic conditions. This will warm up the
brake discs, thereby drying them more quickly
and protecting them against corrosion.
194Driving tips
Driving and parking
Page 197 of 438
Limited braking performance on salt-
treated roads
If you drive on salted roads, a layer of salt resi-
due may form on the brake discs and brake
pads. This can result in a significantly longer
braking distance.
RIn order to prevent any salt build-up, apply the
brakes occasionally while paying attention to the traffic conditions.
RCarefully depress the brake pedal and the
beginning and end of a journey.
RMaintain a greater distance to the vehicle
ahead.
Servicing the brakes
!The brake fluid level may be too low, if:
Rif the red brake warning lamp lights up in
the instrument cluster and
Ryou hear a warning tone while the engine is
running
Observe additional warning messages in the
multifunction display.
The brake fluid level may be too low due to
brake pad wear or leaking brake lines.
Have the brake system checked immediately.
Consult a qualified specialist workshop to
arrange this.
!Vehicles with 4MATIC: function or per-
formance tests may only be carried out on a 2-
axle dynamometer. If you wish to operate the
vehicle on such a dynamometer, please con-
sult a qualified specialist workshop in
advance. You could otherwise damage the
drive train or the brake system.
!Vehicles with 4MATIC: the ESP®system
operates automatically. The engine and the
ignition must therefore be switched off (the
SmartKey must be in position 0or 1in the
ignition lock or the Start/Stop button must be
in position 0or 1) if the electric parking brake
is tested on a brake dynamometer.
Braking triggered automatically by ESP
®may
cause severe damage to the brake system.
!Vehicles without 4MATIC: the ESP®sys-
tem operates automatically. The engine and
the ignition must therefore be switched off
(the SmartKey must be in position 0or 1in the
ignition lock or the Start/Stop button must be
in position 0or 1) if:
Rthe electric parking brake is tested using a
brake dynamometer.
Rthe vehicle is towed with one axle raised.
Braking triggered automatically by ESP®may
cause severe damage to the brake system.
All checks and maintenance work on the brake
system must be carried out at a qualified spe-
cialist workshop.
Have brake pads installed and brake fluid
replaced at a qualified specialist workshop.
If the brake system has only been subject to
moderate loads, you should test the functional-
ity of your brakes at regular intervals.
Information on BAS (Brake Assist) (
Ypage 69)
and BAS PLUS (Brake Assist PLUS) (Ypage 69).
For safety reasons, Mercedes-Benz recom-
mends only installing the following brake disks
and brake pads/linings:
Rbrake disks that have been approved by
Mercedes-Benz
Rbrake pads/linings that have been approved
by Mercedes-Benz or that are of an equivalent
standard of quality
Other brake disks or brake pads/linings can
compromise the safety of your vehicle.
Always replace all brake disks and brake pads/
linings on an axle at the same time. Always
install new brake pads/linings when replacing
brake disks.
The vehicle is equipped with lightweight brake
disks to which the wheel assembly with rim and
threaded connection is matched.
The use of brake disks other than those
approved by Mercedes-Benz can change the
track width and is subject to approval, if appli-
cable.
Shoc
k-type loads when handling the brake
discs, such as when changing wheels, can lead
to a reduction in comfort when driving with light-
weight brake discs. Avoid shock-type loads on
the lightweight brake disks, particularly on the
brake plate.
Mercedes-Benz recommends that you only use
brake fluid that has been specially approved for
your vehicle by Mercedes-Benz, or which corre-
Driving tips195
Driving and parking
Z
Page 200 of 438
When you activate cruise control, the stored
speed is shown in the multifunction display for
five seconds. In the speedometer, the segments
between the stored speed and the maximum
speed light up.
Storing and maintaining the current
speed
You can store the current speed if you are driv-
ing faster than 20 mph (30 km/h).
XAccelerate the vehicle to the desired speed.
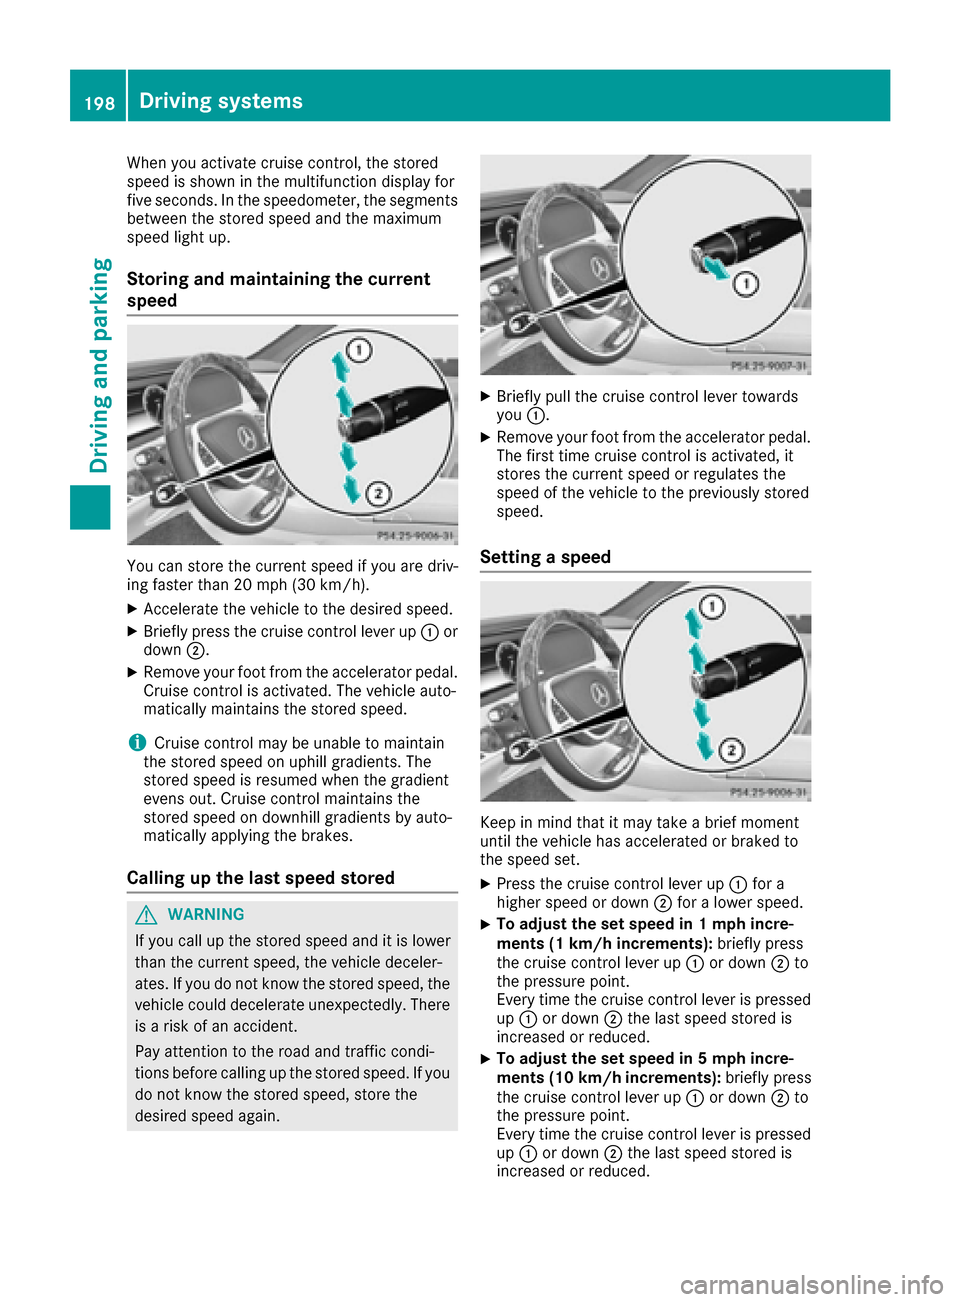
XBriefly press the cruise control lever up :or
down ;.
XRemove your foot from the accelerator pedal.
Cruise control is activated. The vehicle auto-
matically maintains the stored speed.
iCruise control may be unable to maintain
the stored speed on uphill gradients. The
stored speed is resumed when the gradient
evens out. Cruise control maintains the
stored speed on downhill gradients by auto-
matically applying the brakes.
Calling up the last speed stored
GWARNING
If you call up the stored speed and it is lower
than the current speed, the vehicle deceler-
ates. If you do not know the stored speed, the vehicle could decelerate unexpectedly. There
is a risk of an accident.
Pay attention to the road and traffic condi-
tions before calling up the stored speed. If you
do not know the stored speed, store the
desired speed again.
XBriefly pull the cruise control lever towards
you :.
XRemove your foot from the accelerator pedal.
The first time cruise control is activated, it
stores the current speed or regulates the
speed of the vehicle to the previously stored
speed.
Setting a speed
Keep in mind that it may take a brief moment
until the vehicle has accelerated or braked to
the speed set.
XPress the cruise control lever up :for a
higher speed or down ;for a lower speed.
XTo adjust the set speed in 1 mph incre-
ments (1 km/h increments): briefly press
the cruise control lever up :or down ;to
the pressure point.
Every time the cruise control lever is pressed
up : or down ;the last speed stored is
increased or reduced.
XTo adjust the set speed in 5 mph incre-
ments (10 km/h increments): briefly press
the cruise control lever up :or down ;to
the pressure point.
Every time the cruise control lever is pressed up : or down ;the last speed stored is
increased or reduced.
198Driving systems
Driving and parking