2016 MERCEDES-BENZ S-Class SEDAN Pre heating
[x] Cancel search: Pre heatingPage 161 of 438
In order to ensure the direct flow of fresh air
through the air vents into the vehicle interior,
please observe the following notes:
Rkeep the air inlet between the windshield and
the hood free of blockages, such as ice, snow
or leaves.
Rnever cover the air vents or air intake grilles in
the vehicle interior.
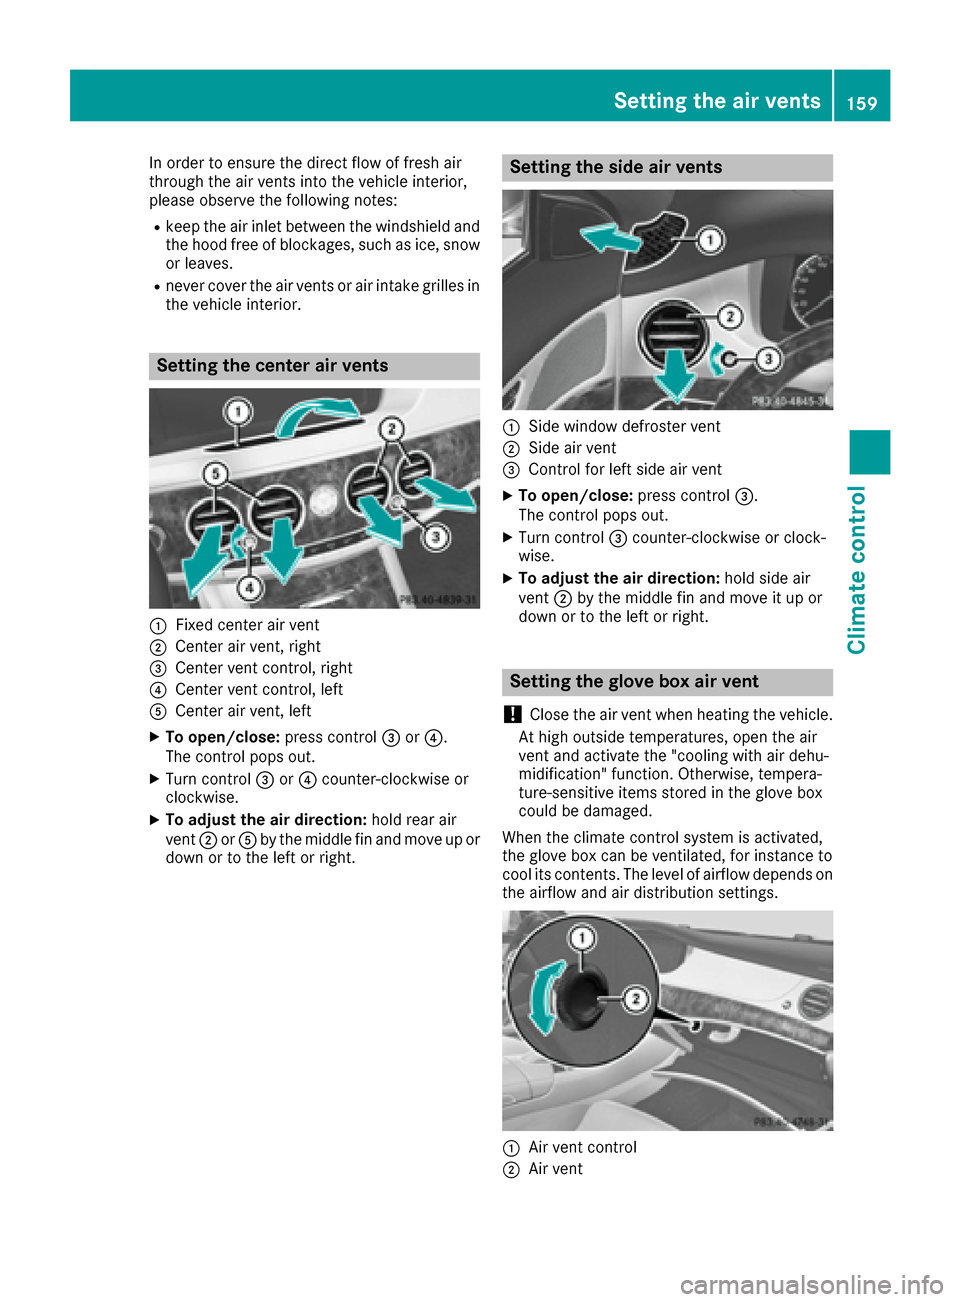
Setting the center air vents
:Fixed center air vent
;Center air vent, right
=Center vent control, right
?Center vent control, left
ACenter air vent, left
XTo open/close: press control=or?.
The control pops out.
XTurn control =or? counter-clockwise or
clockwise.
XTo adjust the air direction: hold rear air
vent ;orA by the middle fin and move up or
down or to the left or right.
Setting the side air vents
:Side window defroster vent
;Side air vent
=Control for left side air vent
XTo open/close: press control=.
The control pops out.
XTurn control =counter-clockwise or clock-
wise.
XTo adjust the air direction: hold side air
vent ;by the middle fin and move it up or
down or to the left or right.
Setting the glove box air vent
!
Close the air vent when heating the vehicle.
At high outside temperatures, open the air
vent and activate the "cooling with air dehu-
midification" function. Otherwise, tempera-
ture-sensitive items stored in the glove box
could be damaged.
When the climate control system is activated,
the glove box can be ventilated, for instance to
cool its contents. The level of airflow depends on
the airflow and air distribution settings.
:Air vent control
;Air vent
Setting the air vents159
Climate control
Z
Page 186 of 438
Setting the maximum charge current
GWARNING
If the charge current draw via a mains socket
is too high during the charging process, the
external electrical system may overheat.
There is a risk of fire.
Before beginning the charging process, check
the maximum permissible charge current
locally. Consult a qualified expert to do so
where necessary.
If necessary, adjust your vehicle's settings.
!An excessive charge current can blow a fuse
or lead to overheating of the external power
supply. Check whether the external power
supply is compatible with the set charge cur-
rent. If necessary, lower the set charge cur-
rent or use another power socket.
Before starting the charging process at a power
socket, check the maximum permissible charge current for the relevant power socket or the
building.
You can set the maximum permissible charge
current:
Ron the controls of the charging cable
Rin the on-board computer menu
(Ypage 272).
The lower value of the two charge current set-
tings – on the charge cable controls and in the
on-board computer – determines the maximum
charge current. If you cannot set the precise
maximum permitted charge current, select the
next lowest available value.
Only set the maximum permitted charge current in the on-board computer menu if:
Rit is not possible to set the charge current on
the charging cable
Rthe precise maximum permitted charge cur-
rent can only be set via the on-board com-
puter
How to set the maximum permissible charge
current on the charging cable, is described as
follows.
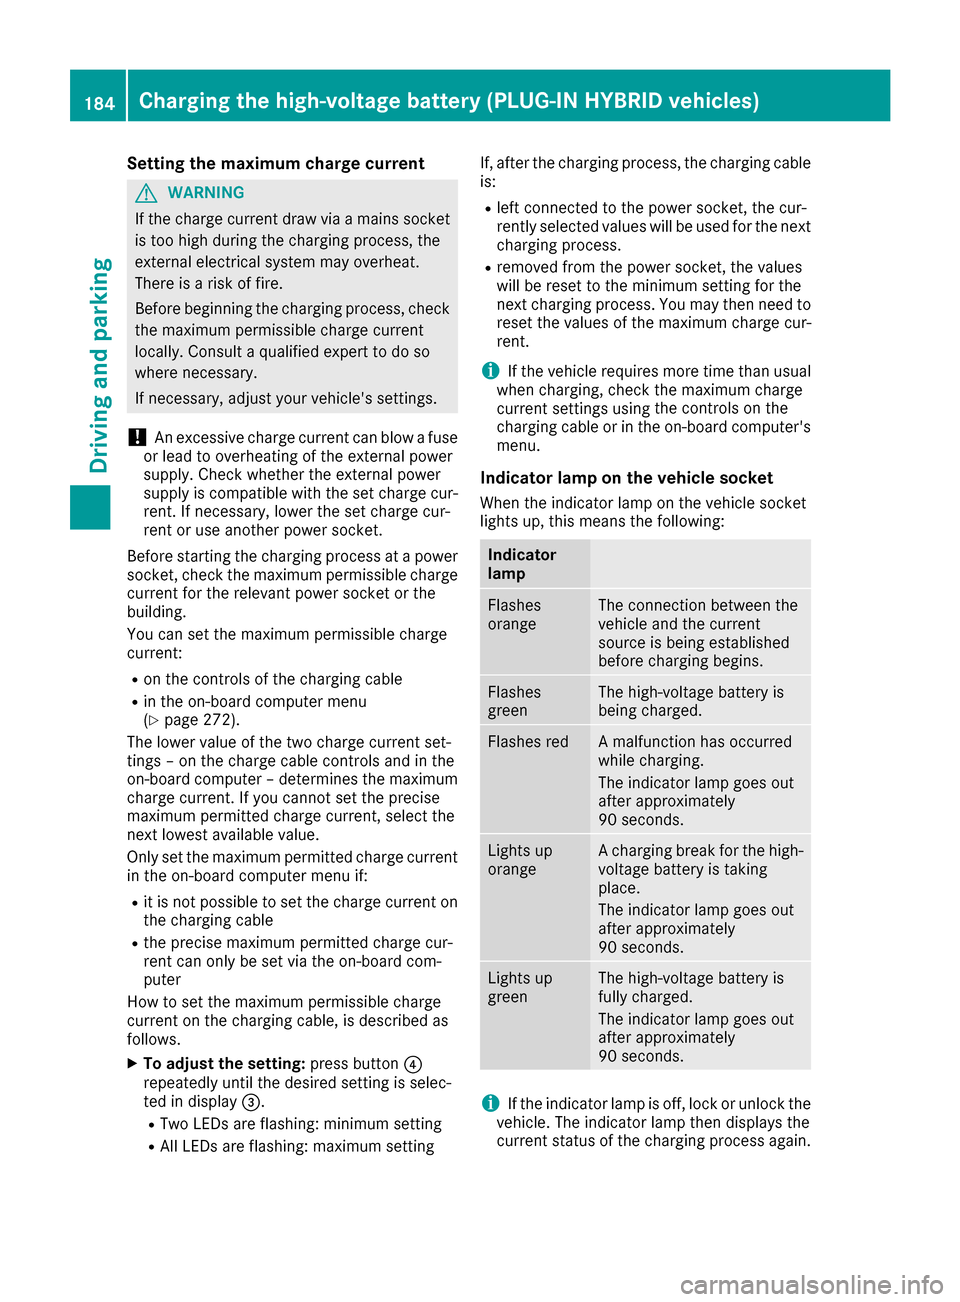
XTo adjust the setting: press button?
repeatedly until the desired setting is selec-
ted in display =.
RTwo LEDs are flashing: minimum setting
RAll LEDs are flashing: maximum setting If, after the charging process, the charging cable
is:
Rleft connected to the power socket, the cur-
rently selected values will be used for the next
charging process.
Rremoved from the power socket, the values
will be reset to the minimum setting for the
next charging process. You may then need to
reset the values of the maximum charge cur-
rent.
iIf the vehicle requires more time than usual
when charging, check the maximum charge
current settings using the controls on the
charging cable or in the on-board comput
er's
menu.
Indicator lamp on the vehicle socket
When the indicator lamp on the vehicle socket
lights up, this means the following:
Indicator
lamp
Flashes
orangeThe connection between the
vehicle and the current
source is being established
before charging begins.
Flashes
greenThe high-voltage battery is
being charged.
Flashes redA malfunction has occurred
while charging.
The indicator lamp goes out
after approximately
90 seconds.
Lights up
orangeA charging break for the high-
voltage battery is taking
place.
The indicator lamp goes out
after approximately
90 seconds.
Lights up
greenThe high-voltage battery is
fully charged.
The indicator lamp goes out
after approximately
90 seconds.
iIf the indicator lamp is off, lock or unlock the
vehicle. The indicator lamp then displays the
current status of the charging process again.
184Charging the high-voltage battery (PLUG-IN HYBRID vehicles)
Driving and parking
Page 196 of 438
RAccel.(evaluation of all acceleration pro-
cesses)
-The bar fills up: moderate acceleration,
especially at higher speeds
-The bar empties: sporty acceleration
RConstant(assessment of driving behavior at
all times)
-The bar fills up: constant speed and avoid-
ance of unnecessary acceleration and
deceleration
-The bar empties: fluctuations in speed
RCoasting(assessment of all deceleration
processes)
-The bar fills up: anticipatory driving, keep-
ing your distance and early release of the
accelerator. The vehicle can coast without
use of the brakes.
-The bar empties: frequent braking
An economical driving style specially requires
driving at moderate engine speeds.
To achieve a higher value in the categories
Accel.
and Constant,
Robserve the gearshift recommendations.
Rdrive in drive program E
On long journeys at a constant speed, e.g. on the
highway, only the bar for Constant
will change.
The ECO display summarizes the driving char-
acteristics from the start of the journey to its
completion. For this reason, the bars change
dynamically at the beginning of the journey. On
longer journeys, there are fewer changes. For
more dynamic changes, carry out a manual
reset.
For further information on the ECO display, see
(
Ypage 262).
Brakes
Important safety notes
GWARNING
If you shift down on a slippery road surface in an attempt to increase the engine's braking
effect, the drive wheels could lose their grip.
There is an increased danger of skidding and
accidents.
Do not shift down for additional engine brak-
ing on a slippery road surface.
Downhill gradients
!On long and steep gradients, you must
reduce the load on the brakes by shifting to a
lower gear in good time. This allows you to
take advantage of the engine's braking effect.
This helps you to avoid overheating the
brakes and wearing them out excessively.
When you take advantage of engine braking, a
drive wheel may not turn for some time, e.g.
on a slippery road surface. This could cause
damage to the drive train. This type of damage
is not covered by the Mercedes-Benz war-
ranty.
Heavy and light loads
GWARNING
If you rest your foot on the brake pedal while
driving, the braking system can overheat. This increases the stopping distance and can even
cause the braking system to fail. There is a
risk of an accident.
Never use the brake pedal as a footrest. Never
depress the brake pedal and the accelerator
pedal at the same time.
!Depressing the brake pedal constantly
results in excessive and premature wear to
the brake pads.
If the brakes have been subjected to a heavy
load, do not stop the vehicle immediately. Drive
on for a short while. This allows the airflow to
cool the brakes more quickly.
Wet roads
If you have driven for a long time in heavy rain
without braking, there may be a delayed reac-
tion from the brakes when braking for the first
time. This may also occur after the vehicle has
been washed or driven through deep water.
You have to depress the brake pedal more
firmly. Maintain a greater distance from the
vehicle in front.
After driving on a wet road or having the vehicle
washed, brake firmly while paying attention to
the traffic conditions. This will warm up the
brake discs, thereby drying them more quickly
and protecting them against corrosion.
194Driving tips
Driving and parking
Page 199 of 438
Drive particularly carefully on slippery road sur-
faces. Avoid sudden acceleration, steering and
braking maneuvers. Do not use the cruise con-
trol or DISTRONIC PLUS.
If the vehicle threatens to skid or cannot be
stopped when moving at low speed:
XShift the transmission to positionN.
The outside temperature indicator is not
designed to serve as an ice-warning device and is therefore unsuitable for that purpose.
Changes in the outside temperature are dis-
played after a short delay.
Indicated temperatures just above the freezing
point do not guarantee that the road surface is
free of ice. The road may still be icy, especially in
wooded areas or on bridges.
You should pay special attention to road condi-
tions when temperatures are around freezing
point.
For more information on driving with snow
chains, see (
Ypage 386).
For more information on driving with summer
tires, see (
Ypage 386).
Observe the notes in the "Winter operation" sec-
tion (
Ypage 386).
Driving systems
Mercedes-Benz Intelligent Drive
Mercedes-Benz Intelligent Drive stands for inno-
vative driver assistance and safety systems
which enhance comfort and support the driver in
critical situations. With these intelligent co-ordi- nated systems Mercedes-Benz has set a mile-
stone on the path towards autonomous driving.
Mercedes-Benz Intelligent Drive embraces all
elements of active and passive safety in one well
thought out system – for the safety of the vehi-
cle occupants and that of other road users.
Further information on driving safety systems
(
Ypage 68).
Cruise control
General notes
Cruise control maintains a constant road speed
for you. It brakes automatically in order to avoid
exceeding the set speed. Change into a lower
gear in good time on long and steep downhill gradients. This is especially important if the
vehicle is laden. By doing so, you will make use
of the braking effect of the engine. This relieves
the load on the brake system and prevents the
brakes from overheating and wearing too
quickly.
You can use cruise control if you want to drive at
a steady speed for a prolonged period of time.
You can store any road speed above 20 mph
(30 km/h).
Important safety notes
If you fail to adapt your driving style, cruise con-
trol can neither reduce the risk of an accident
nor override the laws of physics. Cruise control
cannot take into account the road, traffic and
weather conditions. Cruise control is only an
aid. You are responsible for the distance to the
vehicle in front, for vehicle speed, for braking in
good time and for staying in your lane.
Do not use cruise control:
Rin road and traffic conditions which do not
allow you to maintain a constant speed, e.g. in
heavy traffic or on winding roads
Ron slippery road surfaces. Braking or accel-
erating could cause the drive wheels to lose
traction and the vehicle could then skid
Rwhen there is poor visibility, e.g. due to fog,
heavy rain or snow
If there is a change of drivers, advise the new
driver of the speed stored.
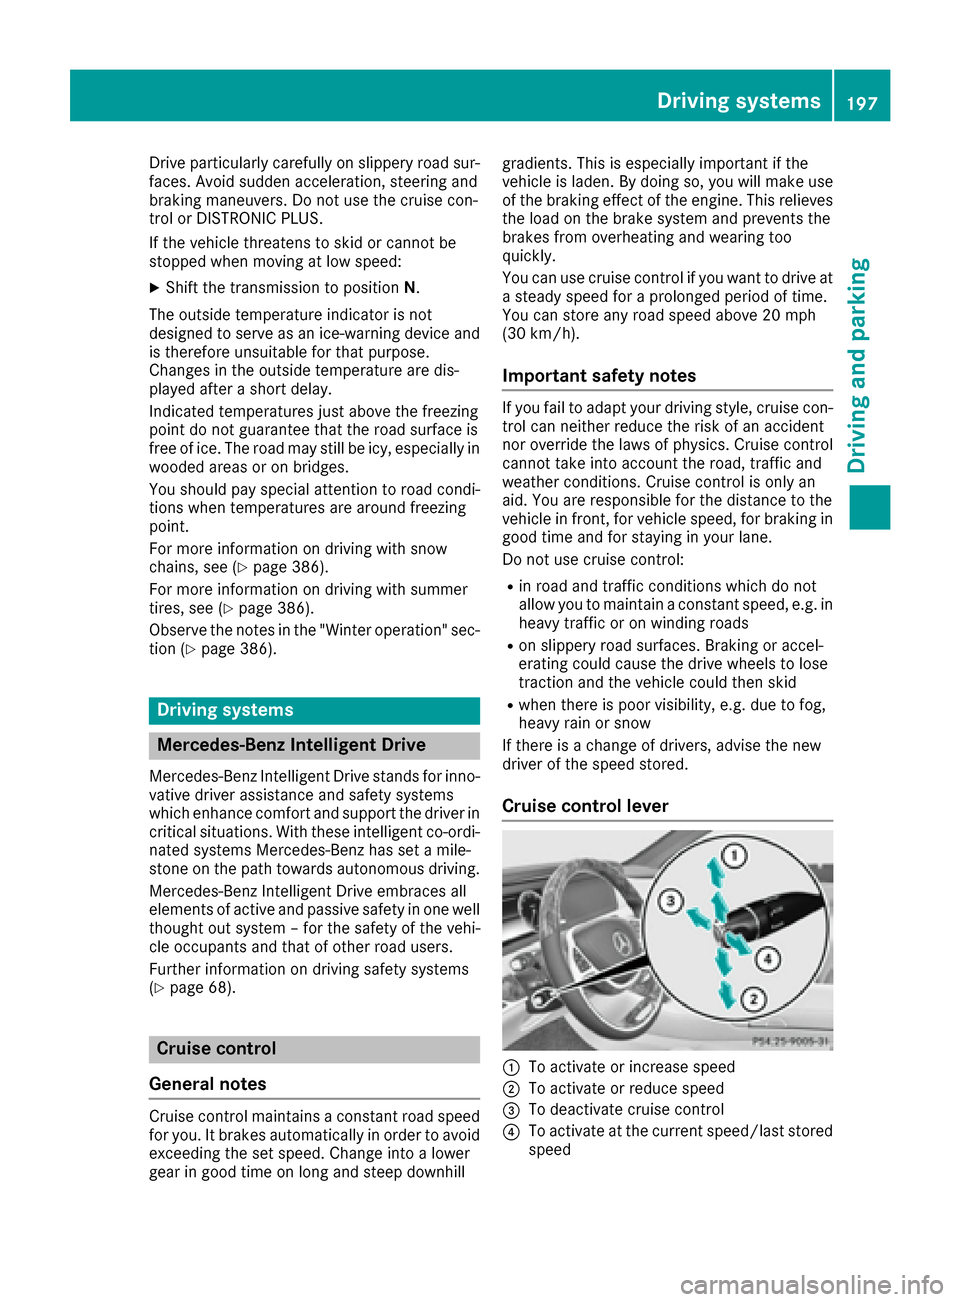
Cruise control lever
:To activate or increase speed
;To activate or reduce speed
=To deactivate cruise control
?To activate at the current speed/last stored
speed
Driving system s197
Driving an d parking
Z
Page 201 of 438

iCruise controlisnot deactivated ifyou
depr ess the accelerator pedal. Ifyou acceler-
ate to overtake, cruise control adjusts the
veh icle's speed to the last speed stored after
you have finished overtaking.
Deactivating cruise control
There are several ways to deactivate cruise con-
trol:
XBriefly press cruise the control lever for-
wards :.
or
XBrake.
Cruise control isautomatically deactivated if:
Ryou engage the electr icparking brake
Ryou are driving at less than 20 mph (30 km/h)
RESP®intervenes or you deactivate ESP®
Ryou shift the transmission to position Nwhile
driv ing
If cruise control isdeactivate d,you willhear a
warning tone. You willsee the Cruise Con‐
trol Offmessage inthe multifunction display
for approximate lyfive seconds.
iWhen you switch off the engine, the last
speed stored iscleared.
DISTRONIC PLUS
General notes
DI ST RONIC PLUS regulates the speed and auto-
matically helps you maintain the distance to the
veh icle detected infront. Vehicle s are detected
wit h the aid of the radar sensor system.
DI ST RONIC PLUS brakes automatically so that
the set speed is not excee ded.Change into a lower gear in good time on long
and steep
downhillgradients. This isespecially
important ifthe vehicle is laden. By doing so, you
will make use of the braking effect of the engine.
This relieves the load on the brake system and
prevents the brakes from overheating and wear-
ing too quickly.
If DI ST RONIC PLUS detects that there isa risk of
a collision, you will bewarned visually and
acoustically. DI STRONIC PLUS cannot prevent a
collision without your intervention. An intermit-
tent warning tone will then sound and the dis-
tance warning lamp willlight up in the instru-
ment cluster. Brake immediately inorder to
increase the distance to the vehicle in front or
take evasive action provided it issafe to doso.
DISTRONIC PLUS operates inrange between
0 mph (0 km/ h)and 120 mph (200km/ h).
Do not use DISTRONIC PLUS while driving on
roads with steep gradients.
As DISTRONIC PLUS transmits radar waves, it
can resemble the radar de tectors o
f the respon-
sible authorities. You can refer to the relevant
chapter in the Operator's Manual if questions
are asked about this.
iUSA only: This device has been approved by
the FCC as a "Vehicular Radar System". The
radar sensor is intended for use in an auto-
motive radar system only. Removal, tamper-
ing, or altering of the device will void any war-
ranties, and is not permitted by the FCC. Do
not tamper with, alter, or use in any non-
approved way.
Any unauthorized modification to this device
could void the user's authority to operate the
equipment.
iCanada only: This device complies with
RSS-210 of Industry Canada. Operation is
subject to the following two conditions:
1. This device may not cause harmful inter-
ference, and
2. This device must accept any interference
received, including interference that may
cause undesired operation of the device.
Removal, tampering, or altering of the device
will void any warranties, and is not permitted.
Do not tamper with, alter, or use in any non-
approved way.
Any unauthorized modification to this device
could void the user's authority to operate the equipment.
Driving system s199
Driving an d parking
Z
Page 299 of 438
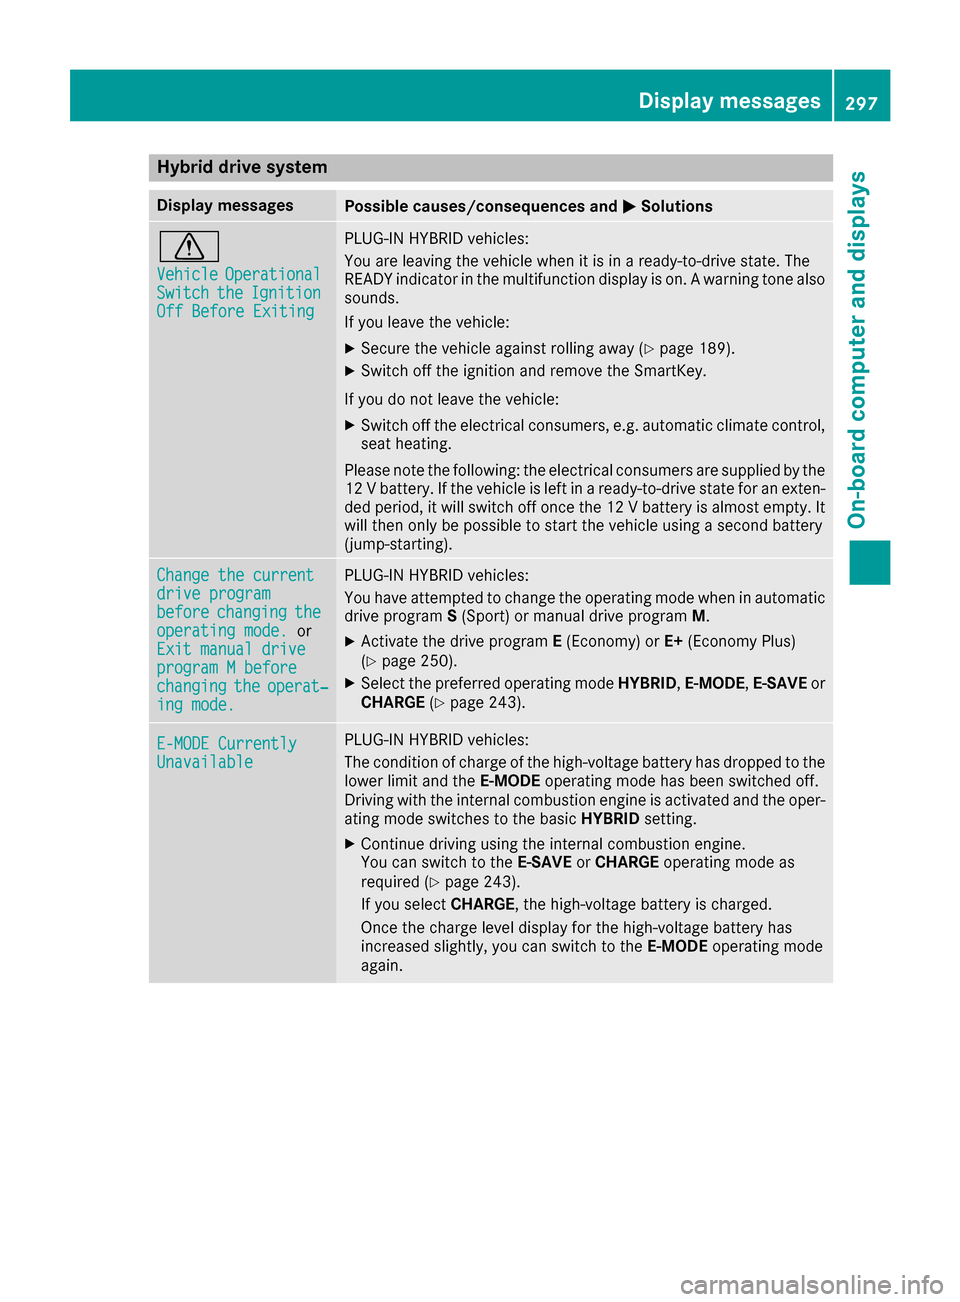
Hybrid drive system
Display messagesPossible causes/consequences andMSolutions
d
VehicleOperationalSwitchtheIgnitionOff Before Exiting
PLUG-IN HYBRID vehicles:
You are leaving the vehicle when it is in a ready-to-drive state. The
READY indicator in the multifunction display is on. A warning tone also
sounds.
If you leave the vehicle:
XSecure the vehicle against rolling away (Ypage 189).
XSwitch off the ignition and remove the SmartKey.
If you do not leave the vehicle:
XSwitch off the electrical consumers, e.g. automatic climate control,
seat heating.
Please note the following: the electrical consumers are supplied by the 12 V battery. If the vehicle is left in a ready-to-drive state for an exten-
ded period, it will switch off once the 12 V battery is almost empty. It
will then only be possible to start the vehicle using a second battery
(jump-starting).
Change the currentdrive programbeforechangingtheoperating mode.or
Exit manual drive
program M beforechangingtheoperat‐ing mode.
PLUG-IN HYBRID vehicles:
You have attempted to change the operating mode when in automatic
drive program S(Sport) or manual drive program M.
XActivate the drive programE(Economy) or E+(Economy Plus)
(Ypage 250).
XSelect the preferred operating mode HYBRID,E-MODE,E-SAVE or
CHARGE (Ypage 243).
E-MODE CurrentlyUnavailable
PLUG-IN HYBRID vehicles:
The condition of charge of the high-voltage battery has dropped to the
lower limit and the E-MODEoperating mode has been switched off.
Driving with the internal combustion engine is activated and the oper-
ating mode switches to the basic HYBRIDsetting.
XContinue driving using the internal combustion engine.
You can switch to the E-SAVEorCHARGE operating mode as
required (
Ypage 243).
If you select CHARGE, the high-voltage battery is charged.
Once the charge level display for the high-voltage battery has
increased slightly, you can switch to the E-MODEoperating mode
again.
Display messages297
On-board computer and displays
Z
Page 335 of 438
XTo switch on the heating function:press
and hold button ;until the red indicator
lamp on the button lights up.
XTo switch off the function: press and hold
button ;until the indicator lamp on the but-
ton goes out.
The rubber mat can be removed for cleaning.
Clean with clear, lukewarm water only.
Do not use hard or sharp objects to clean the
cup holder. Use only a soft cloth to clean it.
Sun visors
Overview
GWARNING
If the mirror cover of the vanity mirror is folded
up when the vehicle is in motion, you could be
blinded by incident light. There is a risk of an
accident.
Always keep the mirror cover folded down
while driving.
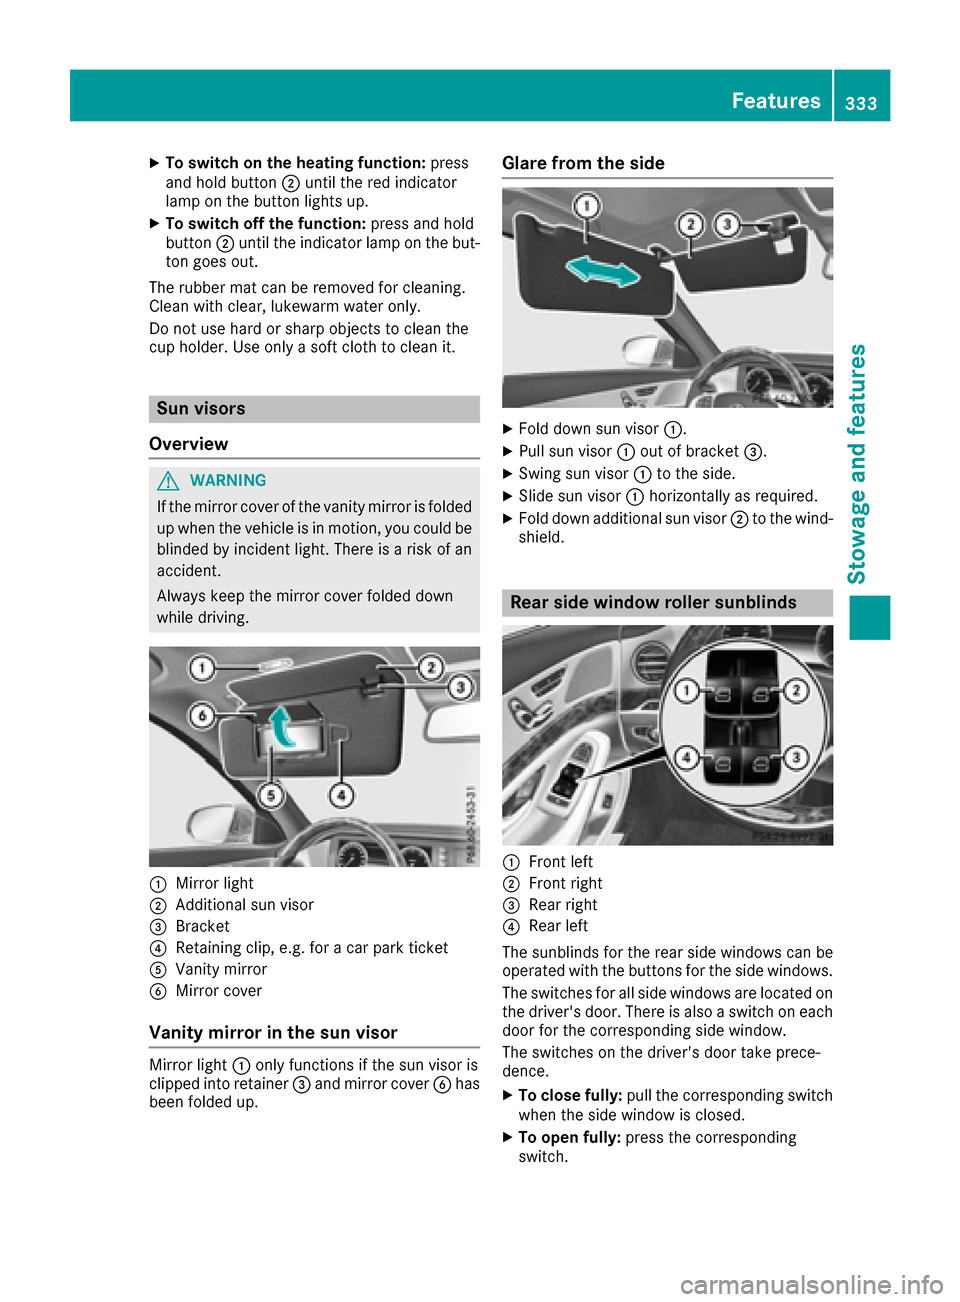
:Mirror light
;Additional sun visor
=Bracket
?Retaining clip, e.g. for a car park ticket
AVanity mirror
BMirror cover
Vanity mirror in the sun visor
Mirror light :only functions if the sun visor is
clipped into retainer =and mirror cover Bhas
been folded up.
Glare from the side
XFold down sun visor :.
XPull sun visor:out of bracket =.
XSwing sun visor :to the side.
XSlide sun visor :horizontally as required.
XFold down additional sun visor ;to the wind-
shield.
Rear side window roller sunblinds
:Front left
;Front right
=Rear right
?Rear left
The sunblinds for the rear side windows can be
operated with the buttons for the side windows.
The switches for all side windows are located on
the driver's door. There is also a switch on each
door for the corresponding side window.
The switches on the driver's door take prece-
dence.
XTo close fully: pull the corresponding switch
when the side window is closed.
XTo open fully: press the corresponding
switch.
Features333
Stowag ean d features
Z
Page 337 of 438
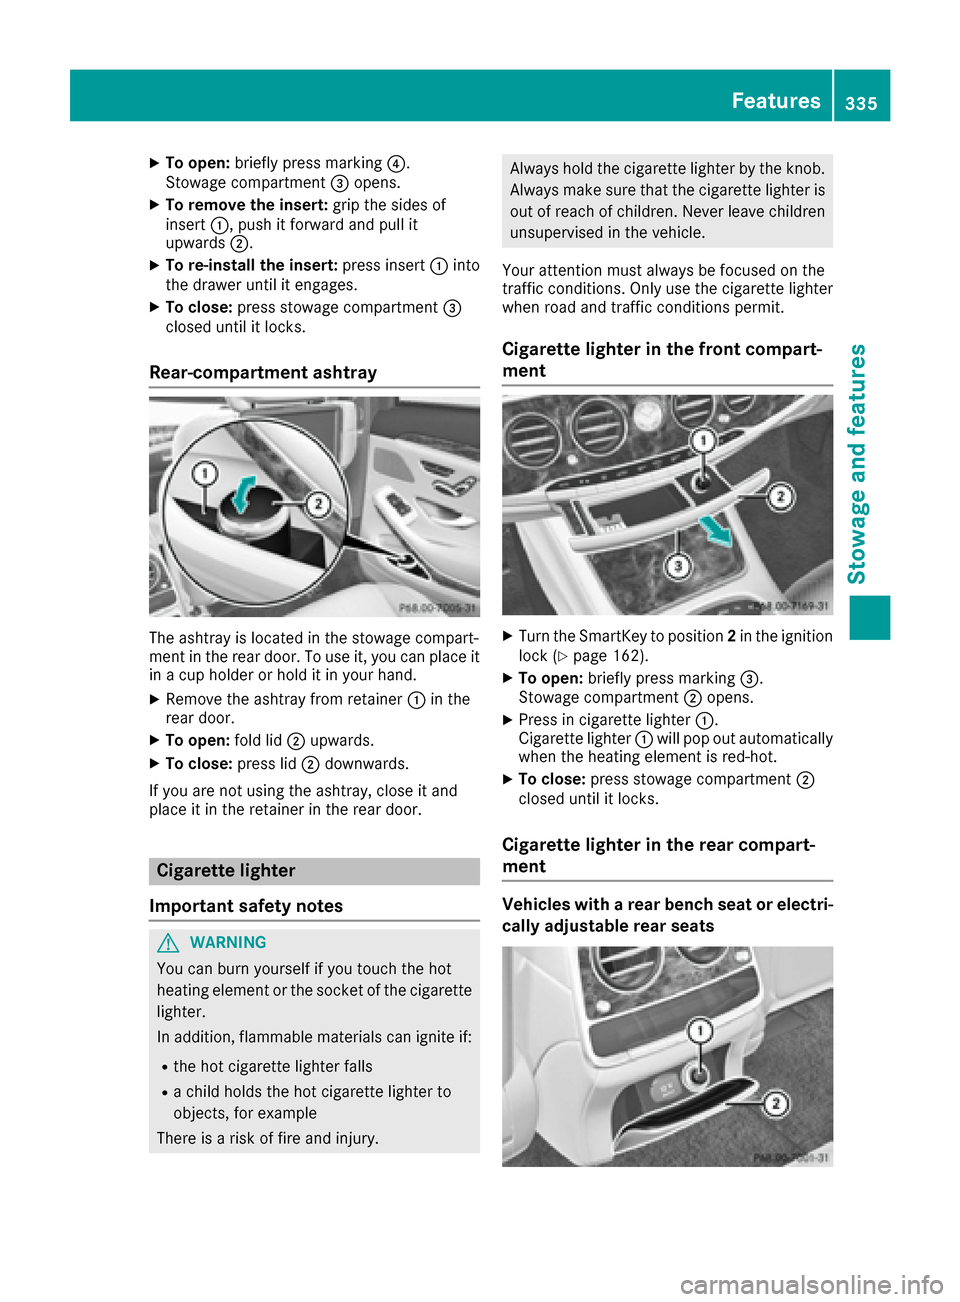
XTo open:briefly press marking ?.
Stowage compartment =opens.
XTo remove the insert: grip the sides of
insert :, push it forward and pull it
upwards ;.
XTo re-install the insert: press insert:into
the drawer until it engages.
XTo close: press stowage compartment =
closed until it locks.
Rear-compartment ashtray
The ashtray is located in the stowage compart-
ment in the rear door. To use it, you can place it
in a cup holder or hold it in your hand.
XRemove the ashtray from retainer :in the
rear door.
XTo open: fold lid;upwards.
XTo close: press lid;downwards.
If you are not using the ashtray, close it and
place it in the retainer in the rear door.
Cigarette lighter
Important safety notes
GWARNING
You can burn yourself if you touch the hot
heating element or the socket of the cigarette lighter.
In addition, flammable materials can ignite if:
Rthe hot cigarette lighter falls
Ra child holds the hot cigarette lighter to
objects, for example
There is a risk of fire and injury.
Always hold the cigarette lighter by the knob. Always make sure that the cigarette lighter is
out of reach of children. Never leave children
unsupervised in the vehicle.
Your attention must always be focused on the
traffic conditions. Only use the cigarette lighter
when road and traffic conditions permit.
Cigarette lighter in the front compart-
ment
XTurn the SmartKey to position 2in the ignition
lock (Ypage 162).
XTo open: briefly press marking =.
Stowage compartment ;opens.
XPress in cigarette lighter :.
Cigarette lighter :will pop out automatically
when the heating element is red-hot.
XTo close: press stowage compartment ;
closed until it locks.
Cigarette lighter in the rear compart-
ment
Vehicles with a rear bench seat or electri-
cally adjustable rear seats
Features335
Stowag ean d features
Z