2016 MERCEDES-BENZ S-Class SEDAN lane assist
[x] Cancel search: lane assistPage 206 of 438
Setting a specified minimum distance
You can set the specified minimum distance for
DISTRONIC PLUS by varying the time span
between one and two seconds. With this func-
tion, you can set the minimum distance that
DISTRONIC PLUS keeps to the vehicle in front,
dependent on vehicle speed. You can see this
distance in the multifunction display
(
Ypage 204).
iMake sure that you maintain the minimum
distance to the vehicle in front as required by
law. Adjust the distance to the vehicle in front
if necessary.
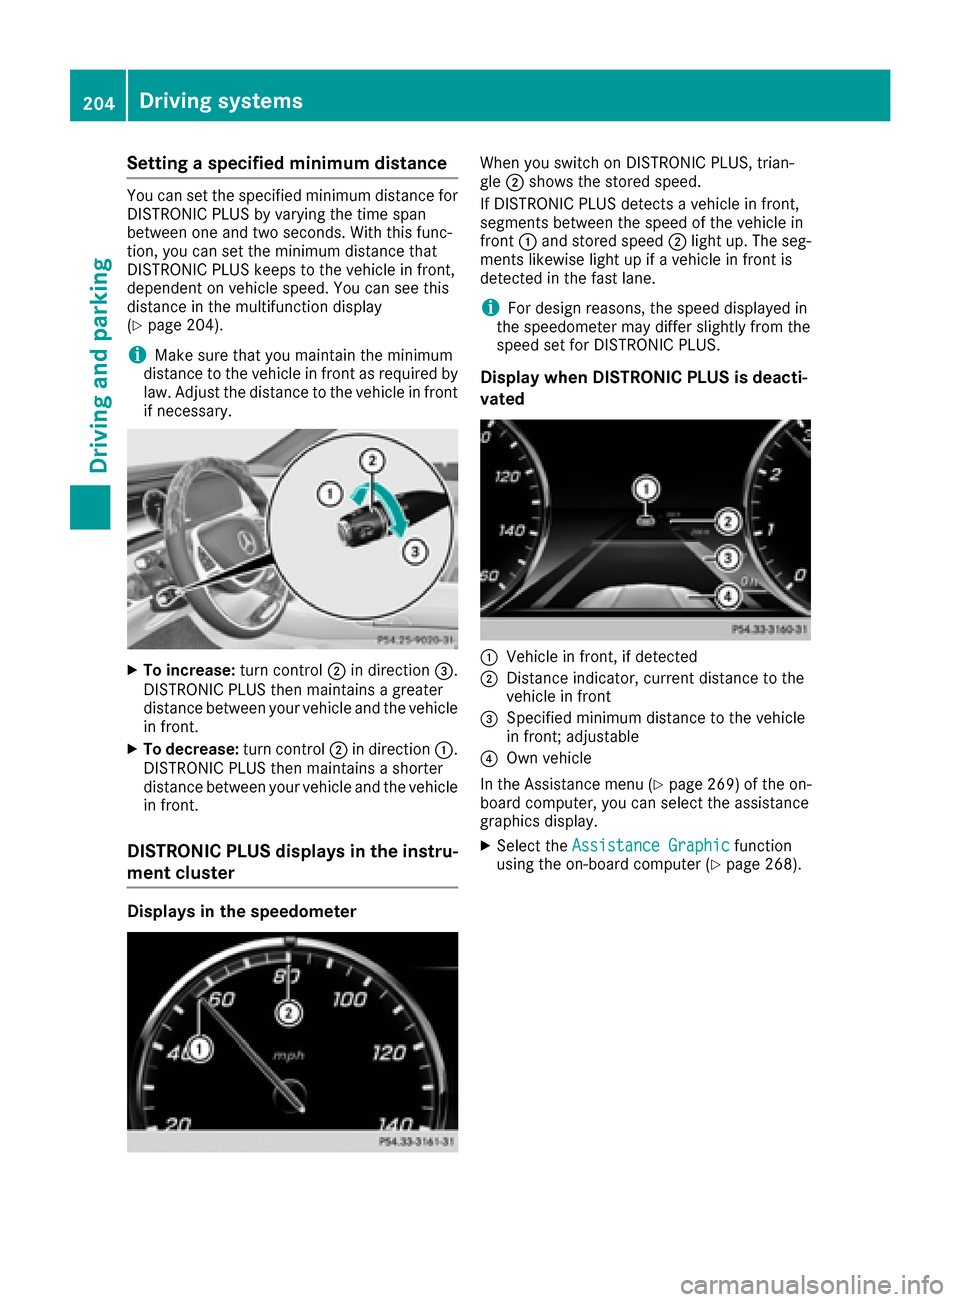
XTo increase: turn control;in direction =.
DISTRONIC PLUS then maintains a greater
distance between your vehicle and the vehicle
in front.
XTo decrease: turn control;in direction :.
DISTRONIC PLUS then maintains a shorter
distance between your vehicle and the vehicle
in front.
DISTRONIC PLUS displays in the instru-
ment cluster
Displays in the speedometer
When you switch on DISTRONIC PLUS, trian-
gle ;shows the stored speed.
If DISTRONIC PLUS detects a vehicle in front,
segments between the speed of the vehicle in
front :and stored speed ;light up. The seg-
ments likewise light up if a vehicle in front is
detected in the fast lane.
iFor design reasons, the speed displayed in
the speedometer may differ slightly from the
speed set for DISTRONIC PLUS.
Display when DISTRONIC PLUS is deacti-
vated
:Vehicle in front, if detected
;Distance indicator, current distance to the
vehicle in front
=Specified minimum distance to the vehicle
in front; adjustable
?Own vehicle
In the Assistance menu (
Ypage 269) of the on-
board computer, you can select the assistance
graphics display.
XSelect the Assistance Graphicfunction
using the on-board computer (Ypage 268).
204Driving systems
Driving and parking
Page 207 of 438
Display when DISTRONIC PLUS is activa-
te d
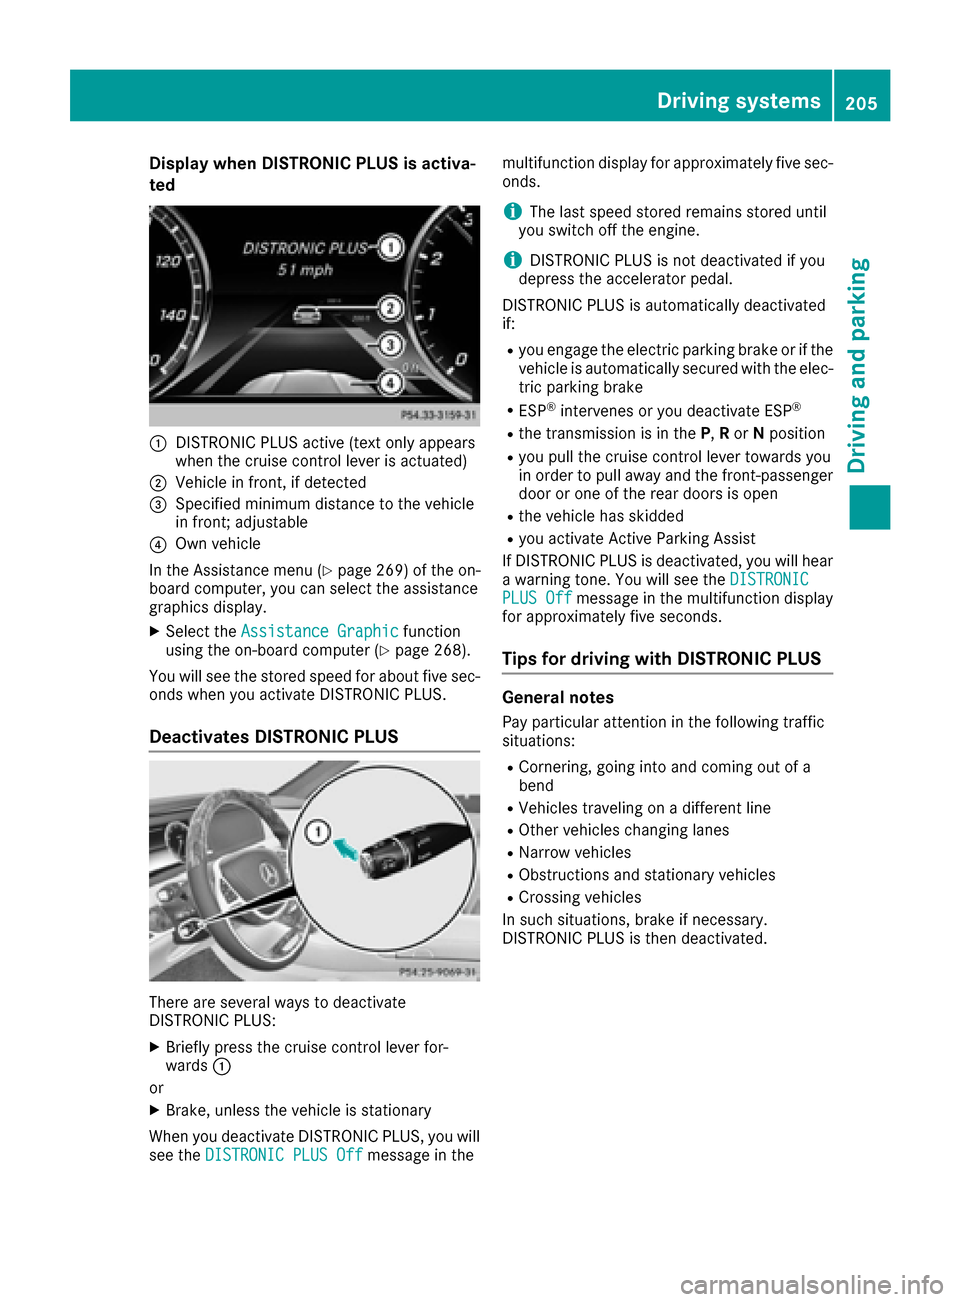
:DISTRONIC PLU Sactive (tex tonly appears
when th ecruise control lever is actuated)
;Vehicl ein front, if detecte d
=Specified minimum distanc eto th evehicl e
in front; adjustable
?Own vehicl e
In th eAssistance men u (
Ypage 269) of theon -
boar dcomputer, you can select th eassistanc e
graphic sdisplay.
XSelec tth eAssistanc eGraphi cfunction
usin gth eon-boar dcomputer (Ypage 268).
You will see th estore dspeed fo rabout fiv esec -
onds when you activat eDISTRONIC PLUS.
Deactivate sDISTRONIC PLUS
There are severa lways to deactivat e
DISTRONIC PLUS:
XBriefly press th ecruise control lever for-
ward s:
or
XBrake ,unless th evehicl eis stationary
Whe nyou deactivat eDISTRONIC PLUS, you will
see th eDISTRONIC PLU SOff
message in th emultifunction display fo
rapproximately fiv esec -
onds.
iThe last speed store dremain sstore duntil
you switch of fth eengine.
iDISTRONIC PLU Sis no tdeactivated if you
depress th eaccelerato rpedal.
DISTRONIC PLU Sis automatically deactivated
if:
Ryou engage th eelectric parkin gbrak eor if th e
vehicl eis automatically secured wit hth eelec -
tric parkin gbrak e
RESP®intervenes or you deactivat eES P®
Rthetransmissio nis in th eP, Ror Nposition
Ryou pull th ecruise control lever toward syou
in order to pull away and th efront-passenger
doo ror on eof th erea rdoors is ope n
Rthevehicl ehas skidde d
Ryou activat eActive Parking Assis t
If DISTRONIC PLU Sis deactivated, you will hear
a warnin gtone .You will see th eDISTRONIC
PLU SOffmessage in th emultifunction display
fo rapproximately fiv eseconds.
Tips for drivin gwit hDISTRONIC PLUS
General notes
Pay particular attention in th efollowing traffic
situations:
RCornering, goin ginto and comin gout of a
ben d
RVehicles travelin gon adifferen tlin e
ROther vehicles changin glanes
RNarrow vehicles
RObstruction sand stationary vehicles
RCrossing vehicles
In suc hsituations, brak eif necessary.
DISTRONIC PLU Sis then deactivated.
Driving systems20 5
Driving an d parking
Z
Page 209 of 438
DISTRONIC PLUS at traffic lights with crossing
traffic, for example, could cause your vehicle to
pull away unintentionally.
DISTRONIC PLUS with Steering Assist
and Stop&Go Pilot
General notes
DISTRONIC PLUS with Steering Assist and
Stop&Go Pilot aids you in keeping the vehicle in
the center of the driving lane by means of mod-
erate steering interventions at speeds of
0 - 125 mph (0 - 200 km/h).
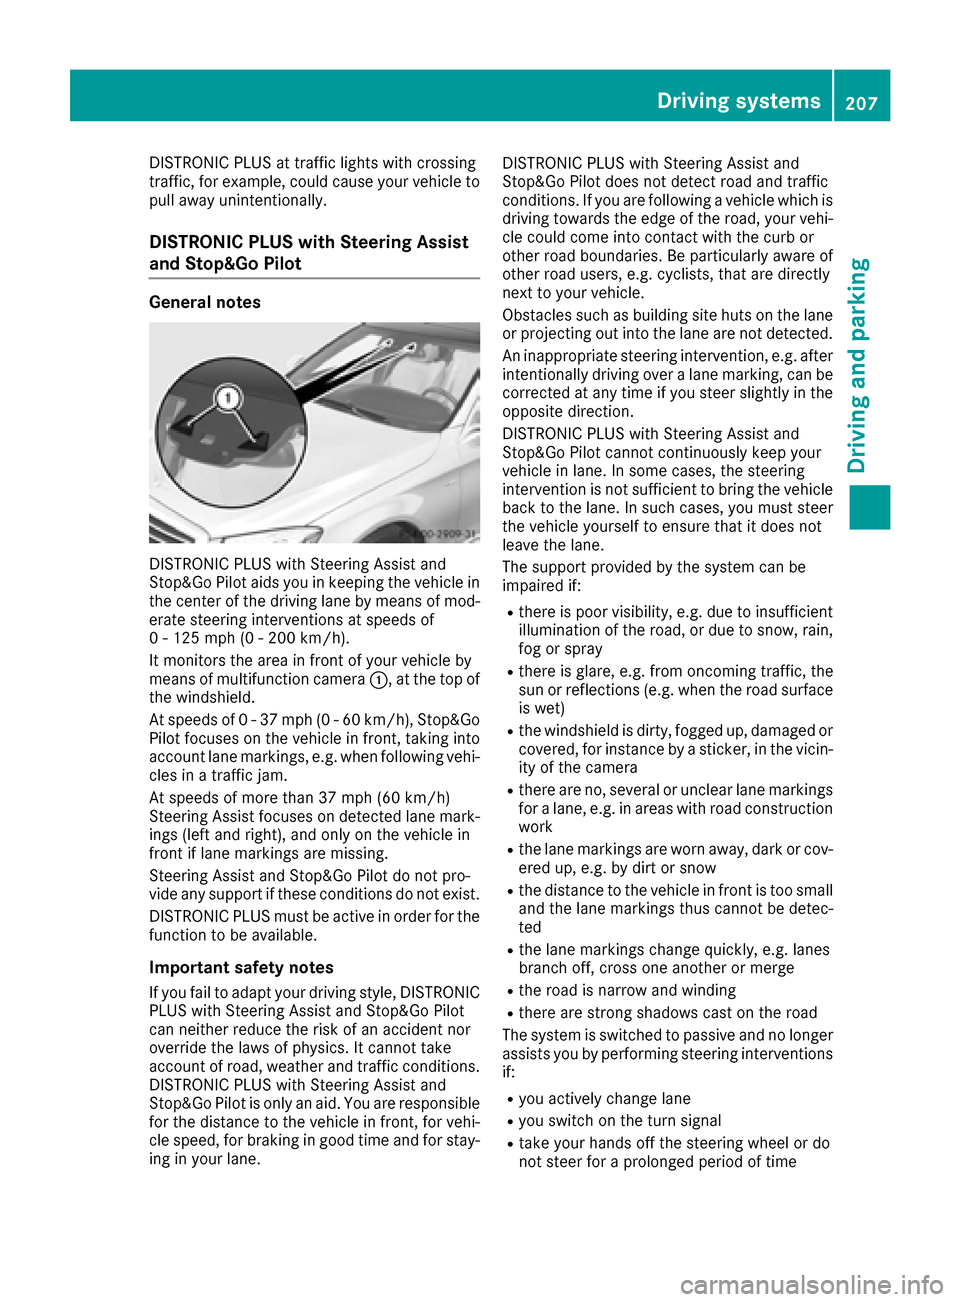
It monitors the area in front of your vehicle by
means of multifunction camera:, at the top of
the windshield.
At speeds of 0 - 37 mph (0 - 60 km/h), Stop&Go Pilot focuses on the vehicle in front, taking into
account lane markings, e.g. when following vehi-
cles in a traffic jam.
At speeds of more than 37 mph (60 km/h)
Steering Assist focuses on detected lane mark-
ings (left and right), and only on the vehicle in
front if lane markings are missing.
Steering Assist and Stop&Go Pilot do not pro-
vide any support if these conditions do not exist.
DISTRONIC PLUS must be active in order for the
function to be available.
Important safety notes
If you fail to adapt your driving style, DISTRONIC
PLUS with Steering Assist and Stop&Go Pilot
can neither reduce the risk of an accident nor
override the laws of physics. It cannot take
account of road, weather and traffic conditions.
DISTRONIC PLUS with Steering Assist and
Stop&Go Pilot is only an aid. You are responsi ble
fo
r the distance to the vehicle in front, for vehi-
cle speed, for braking in good time and for stay-
ing in your lane. DISTRONIC PLUS with Steering Assist and
Stop&Go Pilot does not detect road and traffic
conditions. If you are following a vehicle which is
driving towards the edge of the road, your vehi-
cle could come into contact with the curb or
other road boundaries. Be particularly aware of
other road users, e.g. cyclists, that are directly
next to your vehicle.
Obstacles such as building site huts on the lane
or projecting out into the lane are not detected.
An inappropriate steering intervention, e.g. after
intentionally driving over a lane marking, can be
corrected at any time if you steer slightly in theopposite direction.
DISTRONIC PLUS with Steering Assist and
Stop&Go Pilot cannot continuously keep your
vehicle in lane. In some cases, the steering
intervention is not sufficient to bring the vehicle
back to the lane. In such cases, you must steer the vehicle yourself to ensure that it does not
leave the lane.
The support provided by the system can be
impaired if:
Rthere is poor visibility, e.g. due to insufficient
illumination of the road, or due to snow, rain,
fog or spray
Rthere is glare, e.g. from oncoming traffic, the
sun or reflections (e.g. when the road surface
is wet)
Rthe windshield is dirty, fogged up, damaged or
covered, for instance by a sticker, in the vicin-
ity of the camera
Rthere are no, several or unclear lane markings
for a lane, e.g. in areas with road construction
work
Rthe lane markings are worn away, dark or cov-
ered up, e.g. by dirt or snow
Rthe distance to the vehicle in front is too small
and the lane markings thus cannot be detec-
ted
Rthe lane markings change quickly, e.g. lanes
branch off, cross one another or merge
Rthe road is narrow and winding
Rthere are strong shadows cast on the road
The system is switched to passive and no longer
assists you by performing steering interventions
if:
Ryou actively change lane
Ryou switch on the turn signal
Rtake your hands off the steering wheel or do
not steer for a prolonged period of time
Driving system s207
Driving an d parking
Z
Page 210 of 438
iSteering Assist and Stop&Go Pilot are acti-
vated again automatically after a lane change
is completed.
Steering Assist and Stop&Go Pilot do not pro-
vide any support:
Ron very sharp corners
Rwhen a loss of tire pressure or a defective tire
has been detected and displayed
Pay attention also to the important safety notes
for DISTRONIC PLUS (
Ypage 200).
The steering interventions are carried out with a
limited steering moment. The system requires
the driver to keep his hands on the steering
wheel and to steer himself.
If you do not steer yourself or if you take your
hands off the steering wheel for a prolonged
period of time, the system will first alert you with
a visual warning. A steering wheel symbol
appears in the multifunction display. If you have
still not started to steer and have not taken hold
of the steering wheel after five seconds at the
latest, a warning tone also sounds to remind you
to take control of the vehicle. Steering Assist
and Stop&Go Pilot are switched to passive.
DISTRONIC PLUS remains active.
Activating Steering Assist and Stop&Go
Pilot
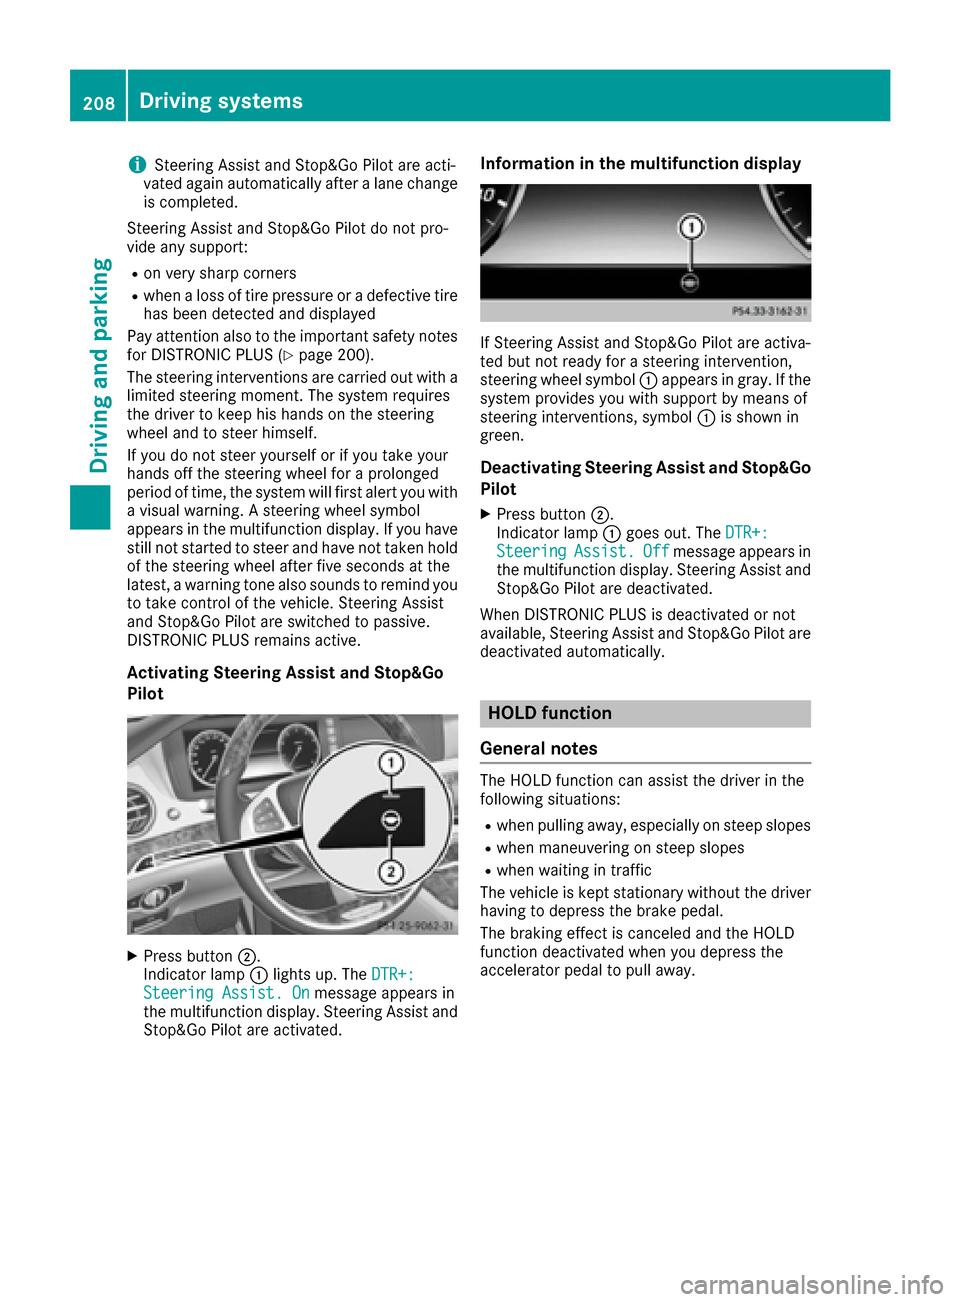
XPress button ;.
Indicator lamp :lights up. The DTR+:
Steering Assist. Onmessage appears in
the multifunction display. Steering Assist and
Stop&Go Pilot are activated.
Information in the multifunction display
If Steering Assist and Stop&Go Pilot are activa-
ted but not ready for a steering intervention,
steering wheel symbol :appears in gray. If the
system provides you with support by means of
steering interventions, symbol :is shown in
green.
Deactivating Steering Assist and Stop&Go
Pilot
XPress button ;.
Indicator lamp :goes out. The DTR+:
SteeringAssist.Offmessage appears in
the multifunction display. Steering Assist and
Stop&Go Pilot are deactivated.
When DISTRONIC PLUS is deactivated or not
available, Steering Assist and Stop&Go Pilot are deactivated automatically.
HOLD function
General notes
The HOLD function can assist the driver in the
following situations:
Rwhen pulling away, especially on steep slopes
Rwhen maneuvering on steep slopes
Rwhen waiting in traffic
The vehicle is kept stationary without the driver having to depress the brake pedal.
The braking effect is canceled and the HOLD
function deactivated when you depress the
accelerator pedal to pull away.
208Driving systems
Driving and parking
Page 218 of 438

Problems with PARKTRONIC
ProblemPossible causes/consequences andMSolutions
Only the red segments in
the PARKTRONIC warn-
ing displays are lit. You
also hear a warning tone
for approximately two
seconds.
PARKTRONIC is then
deactivated and the indi-
cator lamp on the
PARKTRONIC button
lights up.PARKTRONIC has malfunctioned and has switched off.
XIf problems persist, have PARKTRONIC checked at a qualified spe-
cialist workshop.
Only the red segments in
the PARKTRONIC warn-
ing displays are lit.
PARKTRONIC is then
deactivated.The PARKTRONIC sensors are dirty or there is interference.
XClean the PARKTRONIC sensors (Ypage 362).
XSwitch the ignition back on.
The problem may be caused by an external source of radio or ultra-
sound waves.
XSee if PARKTRONIC functions in a different location.
Active Parking Assist
General notes
Active Parking Assist is an electronic parking aid
with ultrasound. It measures the road on both
sides of the vehicle. A parking symbol indicates a suitable parking space. Active steering inter-
vention and brake application can assist you
during parking and when exiting a parking
space. You may also use PARKTRONIC
(
Ypage 214).
Important safety notes
Active Parking Assist is merely an aid. It is not a
replacement for your attention to your immedi-
ate surroundings. You are always responsible
for safe maneuvering, parking and exiting a
parking space. Make sure that no persons, ani-
mals or objects are in the maneuvering range.
When PARKTRONIC is switched off, Active Park-
ing Assist is also unavailable.
GWARNING
While parking or pulling out of a parking
space, the vehicle swings out and can drive
onto areas of the oncoming lane. This could
result in a collision with another road user.
There is a risk of an accident.
Pay attention to other road users. Stop the
vehicle if necessary or cancel the Active Park- ing Assist parking procedure.
!If unavoidable, you should drive over obsta-
cles such as curbs slowly and not at a sharp
angle. Otherwise, you may damage the
wheels or tires.
Active Parking Assist may possibly indicate
parking spaces which are not suitable for park-
ing, for example:
Rwhere parking or stopping is prohibited
Rin front of driveways or entrances and exits
Ron unsuitable surfaces
Parking tips:
ROn narrow roads, drive as close to the parking
space as possible.
RParking spaces that are littered or overgrown
might be identified or measured incorrectly.
RParking spaces that are partially occupied by
trailer drawbars might not be identified as
such or be measured incorrectly.
216Driving systems
Driving and parking
Page 223 of 438

The flap closes again when:
Ryou have finished the maneuvering process
Ryou switch off the engine
Ryou open the trunk
Observe the notes on cleaning (
Ypage 363).
For technical reasons, the flap may remain
open briefly after the rear view camera has
been deactivated.
Activating/deactivating the rear view
camera
XTo activate: make sure that the SmartKey is
in position 2in the ignition lock.
XMake sure that the Activation by R gearfunction is selected in the multimedia system
(see the separate operating instructions).
XEngage reverse gear.
The rear view camera flap opens. The multi-
media system shows the area behind the vehi-
cle with guide lines.
The image from the rear view camera is avail-
able throughout the maneuvering process.
To deactivate: the rear view camera deacti-
vates if you shift the transmission to Por after
driving forwards a short distance.
Displays in the multimedia system
The rear view camera may show a distorted view
of obstacles, show them incorrectly or not at all.
The rear view camera does not show objects in
the following positions:
Rvery close to the rear bumper
Runder the rear bumper
Rin the area immediately above the handle in
the trunk lid
!Objects not at ground level may appear to
be further away than they actually are, e.g.:
Rthe bumper of a parked vehicle
Rthe drawbar of a trailer
Rthe ball coupling of a trailer tow hitch
Rthe rear section of an HGV
Ra slanted post
Use the guidelines only for orientation.
Approach objects no further than the bottom-
most guideline.
:Yellow guide line at a distance of approx-
imately 13 ft (4.0 m) from the rear of the
vehicle
;White guide line without turning the steering
wheel, vehicle width including the exterior
mirrors (static)
=Yellow guide line for the vehicle width
including the exterior mirrors, for current
steering wheel angle (dynamic)
?Yellow lane marking tires at current steering
wheel angle (dynamic)
AYellow guide line at a distance of approx-
imately 3 ft (1.0 m) from the rear of the vehi-
cle
BVehicle center axle (marker assistance)
CBumper
DRed guide line at a distance of approximately
12 in (0.30 m) from the rear of the vehicle
The guide lines are shown when the transmis-
sion is in position R.
The distance specifications only apply to
objects that are at ground level.
Driving systems221
Driving and parking
Z
Page 228 of 438
see the top view of the vehicle and the image
from the rear view camera.
Selecting the split-screen and full
screen displays
Switching between split screen views:
XTo switch to the line with the vehicle icons:
slide5the controller.
XTo select a vehicle icon: turn the controller.
Switching to full screen mode:
X180° ViewTurn and press the controller.
iThe 180° option is only available in the fol-
lowing views:
RTop view with picture from the rear view
camera
RTop view with picture from the front camera
Displays in the multimedia system
Important safety notes
The camera system may show a distorted view
of obstacles, show them incorrectly or not at all.
Obstacles are not shown by the system in the
following locations:
Runder the front and rear bumpers
Rvery close to the front and rear bumpers
Rin close range above the handle on the trunk
lid
Rvery close to the exterior mirrors
Rin the transitional areas between the various
cameras in the virtual top view
!Objects not at ground level may appear to
be further away than they actually are, e.g.:
Rthe bumper of a parked vehicle
Rthe drawbar of a trailer
Rthe ball coupling of a trailer tow hitch
Rthe rear section of an HGV
Ra slanted post
Use the guidelines only for orientation.
Approach objects no further than the bottom-
most guideline.
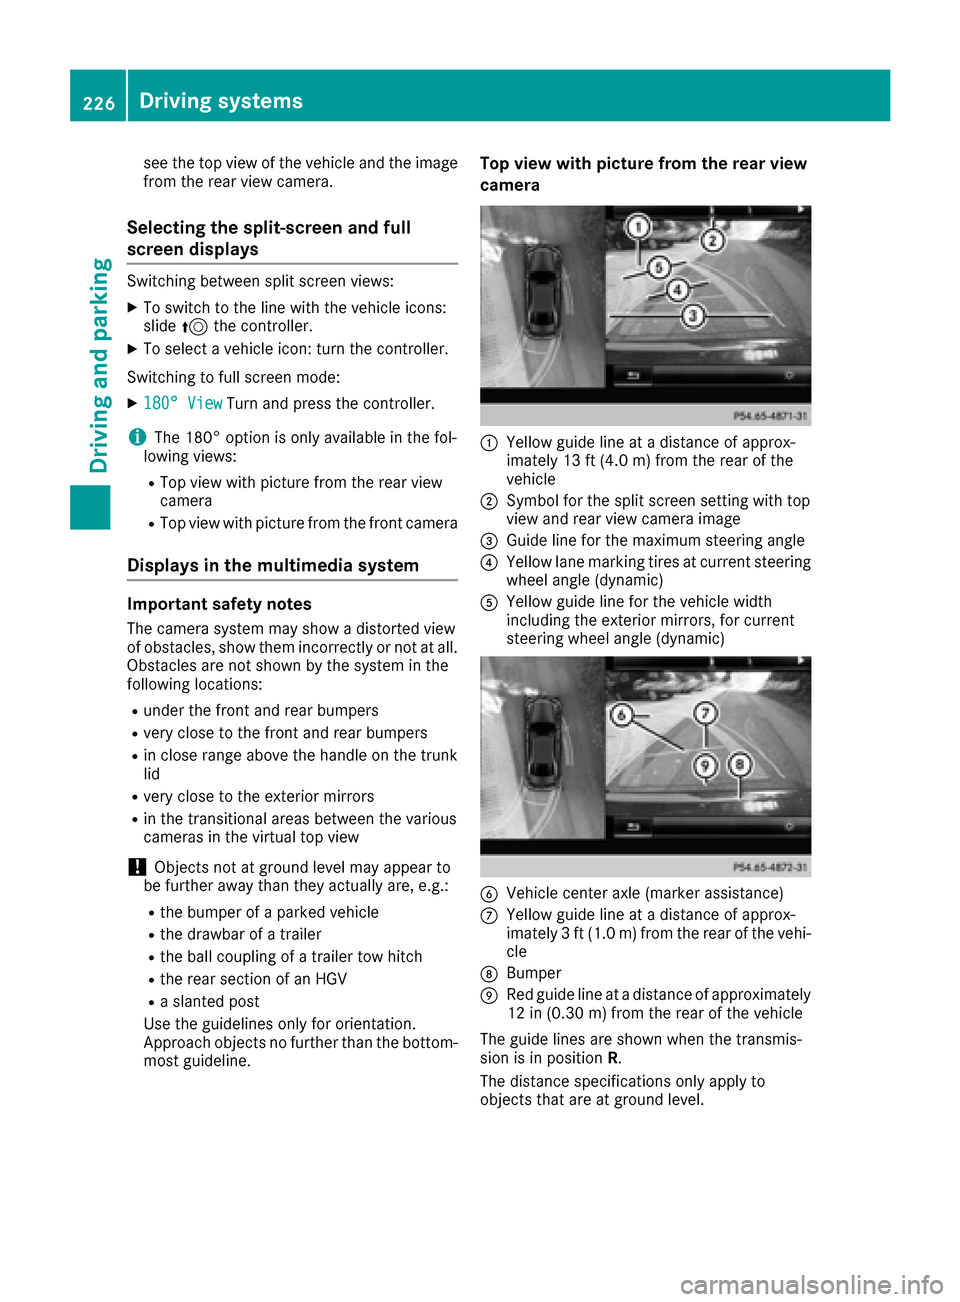
Top view with picture from the rear view
camera
:Yellow guide line at a distance of approx-
imately 13 ft (4.0 m) from the rear of the
vehicle
;Symbol for the split screen setting with top
view and rear view camera image
=Guide line for the maximum steering angle
?Yellow lane marking tires at current steering
wheel angle (dynamic)
AYellow guide line for the vehicle width
including the exterior mirrors, for current
steering wheel angle (dynamic)
BVehicle center axle (marker assistance)
CYellow guide line at a distance of approx-
imately 3 ft (1.0 m) from the rear of the vehi-
cle
DBumper
ERed guide line at a distance of approximately
12 in (0.30 m) from the rear of the vehicle
The guide lines are shown when the transmis-
sion is in position R.
The distance specifications only apply to
objects that are at ground level.
226Driving systems
Driving and parking
Page 229 of 438
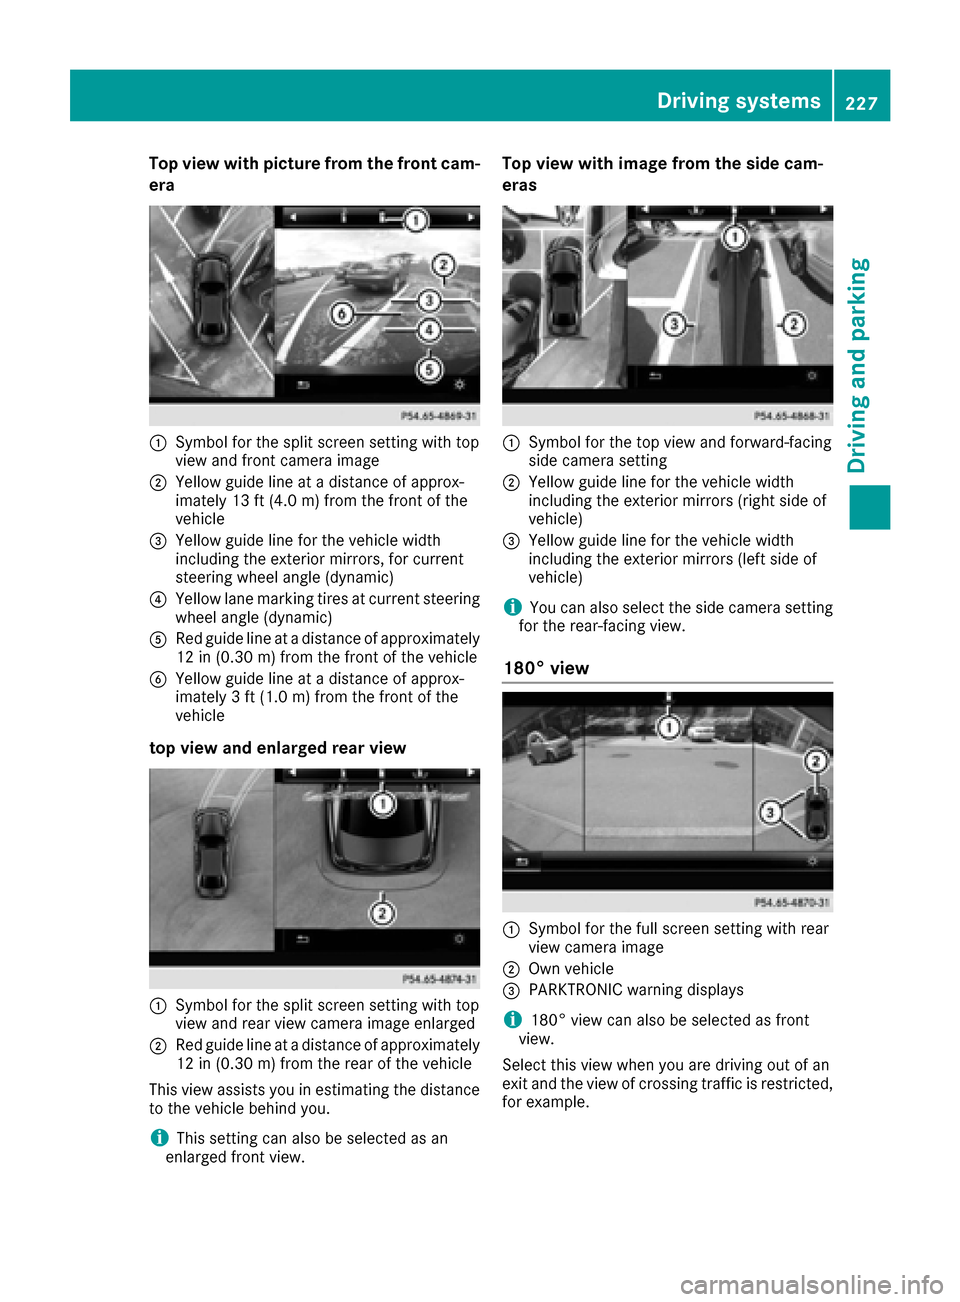
Top view with picture from the front cam-
era
:Symbol for the split screen setting with top
view and front camera image
;Yellow guide line at a distance of approx-
imately 13 ft (4.0m) fromthe front of the
vehicle
=Yellow guide line for the vehicle width
including the exterior mirrors, for current
steering wheel angle (dynamic)
?Yellow lane marking tires at current steering
wheel angle (dynamic)
ARed guide line at a distance of approximately
12 in (0.30 m) fromthe front of the vehicle
BYellow guide line at a distance of approx-
imately 3 ft (1.0 m) fromthe front of the
vehicle
top view and enlarged rear view
:Symbol for the split screen setting with top
view and rear view camera image enlarged
;Red guide line at a distance of approximately
12 in (0.30 m)from the rear of the vehicle
This view assists you in estimating the distance
to the vehicle behind you.
iThis setting can also be selected as an
enlarged front view.
Top view with image from the side cam-
eras
:Symbol for the top view and forward-facing
side camera setting
;Yellow guide line for the vehicle width
including the exterior mirrors (right side of
vehicle)
=Yellow guide line for the vehicle width
including the exterior mirrors (left side of
vehicle)
iYou can also select the side camera setting
for the rear-facing view.
180° view
:Symbol for the full screen setting with rear
view camera image
;Own vehicle
=PARKTRONIC warning displays
i180° view can also be selected as front
view.
Select this view when you are driving out of an
exit and the view of crossing traffic is restricted,
for example.
Driving systems227
Driving and parking
Z