2016 MERCEDES-BENZ GLS SUV seats
[x] Cancel search: seatsPage 321 of 397
Extending and retracting the luggage
compartment cover X
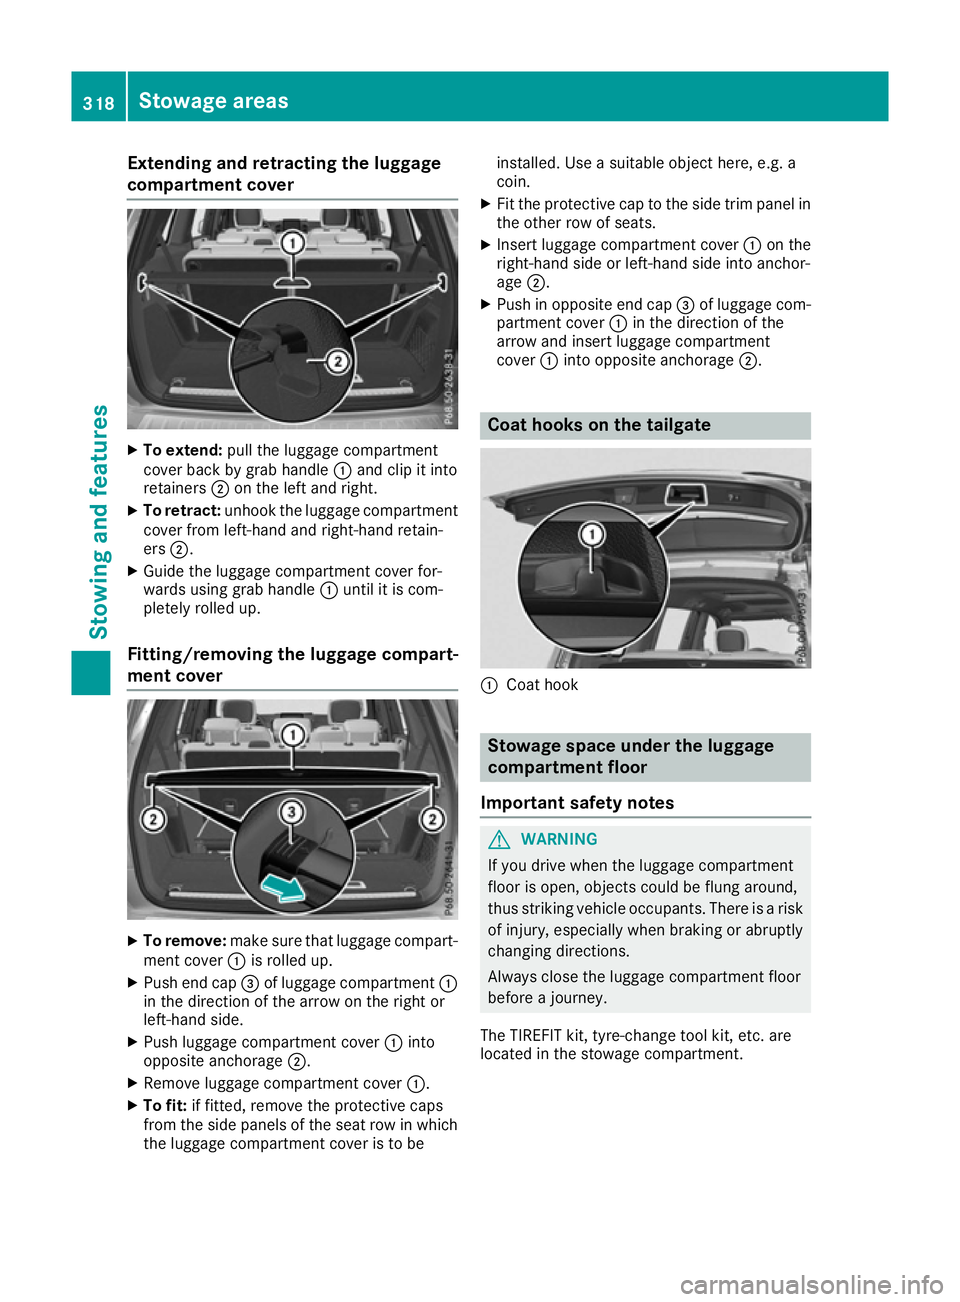
To extend: pull the luggage compartment
cover back by grab handle :and clip it into
retainers ;on the left and right.
X To retract: unhook the luggage compartment
cover from left-hand and right-hand retain-
ers ;.
X Guide the luggage compartment cover for-
wards using grab handle :until it is com-
pletely rolled up.
Fitting/removing the luggage compart-
ment cover X
To remove: make sure that luggage compart-
ment cover :is rolled up.
X Push end cap =of luggage compartment :
in the direction of the arrow on the right or
left-hand side.
X Push luggage compartment cover :into
opposite anchorage ;.
X Remove luggage compartment cover :.
X To fit: if fitted, remove the protective caps
from the side panels of the seat row in which
the luggage compartment cover is to be installed. Use a suitable object here, e.g. a
coin.
X Fit the protective cap to the side trim panel in
the other row of seats.
X Insert luggage compartment cover :on the
right-hand side or left-hand side into anchor-
age ;.
X Push in opposite end cap =of luggage com-
partment cover :in the direction of the
arrow and insert luggage compartment
cover :into opposite anchorage ;. Coat hooks on the tailgate
:
Coat hook Stowage space under the luggage
compartment floor
Important safety notes G
WARNING
If you drive when the luggage compartment
floor is open, objects could be flung around,
thus striking vehicle occupants. There is a risk of injury, especially when braking or abruptly
changing directions.
Always close the luggage compartment floor
before a journey.
The TIREFIT kit, tyre-change tool kit, etc. are
located in the stowage compartment. 318
Stowage areasStowing and features
Page 324 of 397
X
To open: slide cover ;to its foremost posi-
tion.
X To close: pull cover ;back as far as it will go.
You can remove the rubber mat of the cup
holder to clean it. Wash it with clean, lukewarm water only.
Temperature-controlled cup holder in
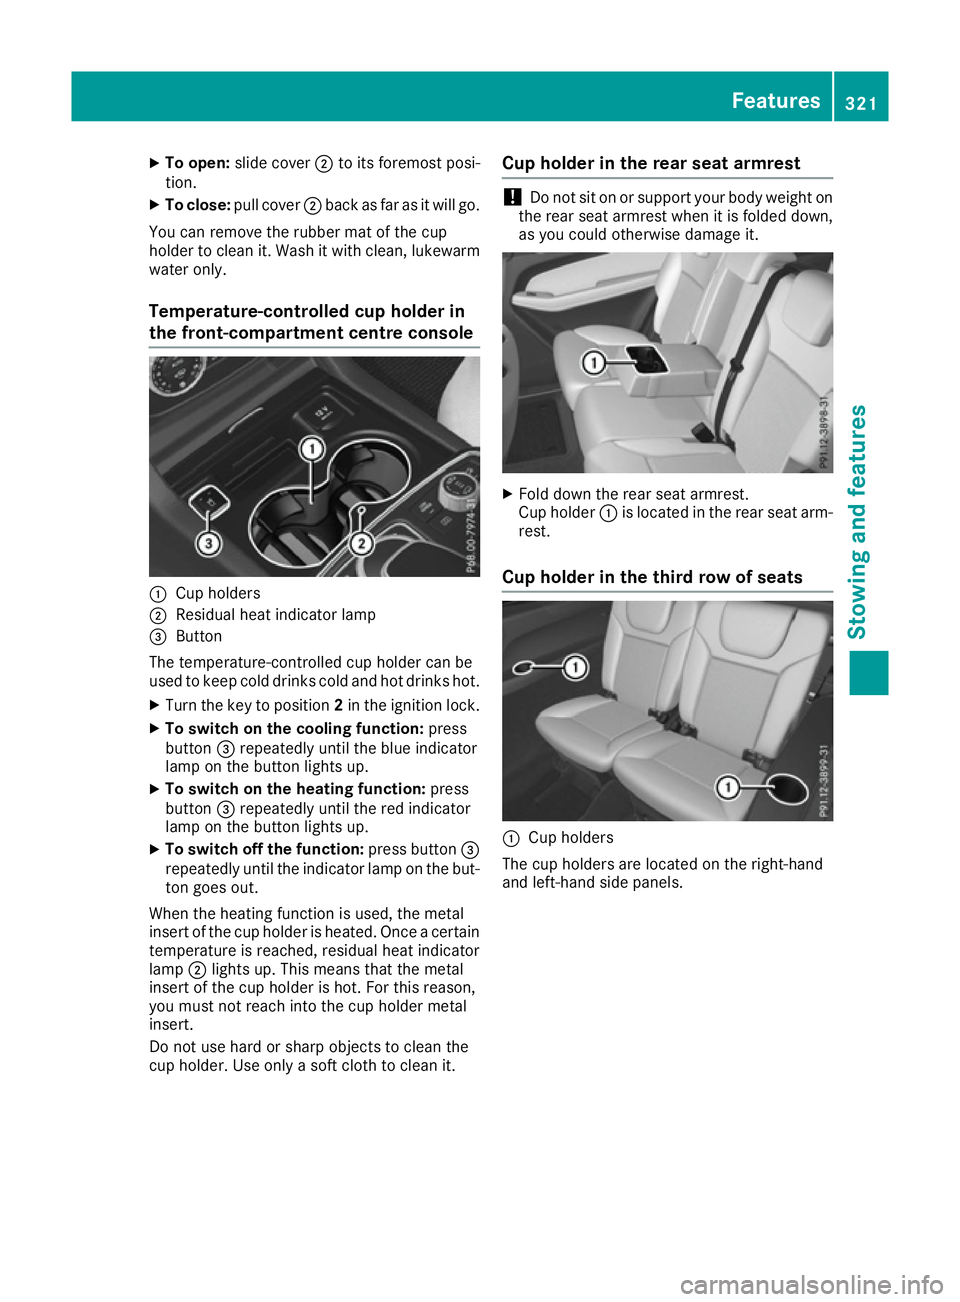
the front-compartment centre console :
Cup holders
; Residual heat indicator lamp
= Button
The temperature-controlled cup holder can be
used to keep cold drinks cold and hot drinks hot.
X Turn the key to position 2in the ignition lock.
X To switch on the cooling function: press
button =repeatedly until the blue indicator
lamp on the button lights up.
X To switch on the heating function: press
button =repeatedly until the red indicator
lamp on the button lights up.
X To switch off the function: press button=
repeatedly until the indicator lamp on the but-
ton goes out.
When the heating function is used, the metal
insert of the cup holder is heated. Once a certain temperature is reached, residual heat indicator
lamp ;lights up. This means that the metal
insert of the cup holder is hot. For this reason,
you must not reach into the cup holder metal
insert.
Do not use hard or sharp objects to clean the
cup holder. Use only a soft cloth to clean it. Cup holder in the rear seat armrest !
Do not sit on or support your body weight on
the rear seat armrest when it is folded down,
as you could otherwise damage it. X
Fold down the rear seat armrest.
Cup holder :is located in the rear seat arm-
rest.
Cup holder in the third row of seats :
Cup holders
The cup holders are located on the right-hand
and left-hand side panels. Features
321Stowing an d features Z
Page 326 of 397
Ashtray
Front ashtray !
The holder under the ashtray is not heat
resistant. Before placing lit cigarettes in the
ashtray, make sure that the ashtray is prop-
erly engaged. Otherwise, the holder could be
damaged. X
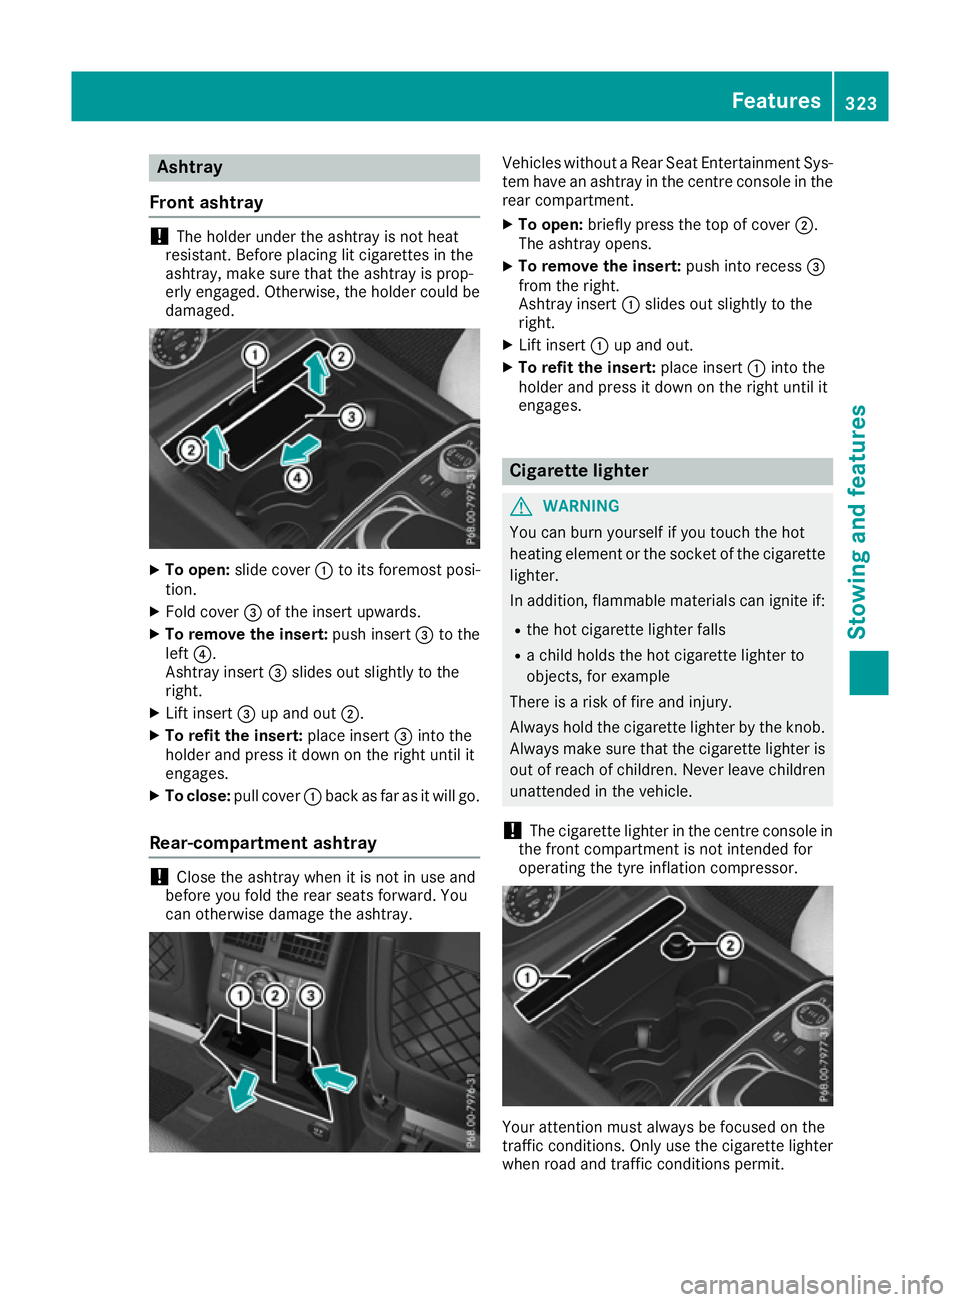
To open: slide cover :to its foremost posi-
tion.
X Fold cover =of the insert upwards.
X To remove the insert: push insert=to the
left ?.
Ashtray insert =slides out slightly to the
right.
X Lift insert =up and out ;.
X To refit the insert: place insert=into the
holder and press it down on the right until it
engages.
X To close: pull cover :back as far as it will go.
Rear-compartment ashtray !
Close the ashtray when it is not in use and
before you fold the rear seats forward. You
can otherwise damage the ashtray. Vehicles without a Rear Seat Entertainment Sys-
tem have an ashtray in the centre console in the rear compartment.
X To open: briefly press the top of cover ;.
The ashtray opens.
X To remove the insert: push into recess=
from the right.
Ashtray insert :slides out slightly to the
right.
X Lift insert :up and out.
X To refit the insert: place insert:into the
holder and press it down on the right until it
engages. Cigarette lighter
G
WARNING
You can burn yourself if you touch the hot
heating element or the socket of the cigarette lighter.
In addition, flammable materials can ignite if:
R the hot cigarette lighter falls
R a child holds the hot cigarette lighter to
objects, for example
There is a risk of fire and injury.
Always hold the cigarette lighter by the knob.
Always make sure that the cigarette lighter is
out of reach of children. Never leave children unattended in the vehicle.
! The cigarette lighter in the centre console in
the front compartment is not intended for
operating the tyre inflation compressor. Your attention must always be focused on the
traffic conditions. Only use the cigarette lighter
when road and traffic conditions permit. Features
323Stowing and featu res Z
Page 334 of 397
Australia
Country Radio type approval num-
ber
Frequency range (MHz)
AU (Aus-
tralia) 28 June 2005
MHz: 27, 30, 40, 433, 868
NZ (New Zea-
land) 20 March 06
MHz: 27, 30, 40, 433
Floormats
G
WARNING
Objects in the driver's footwell may restrict
the clearance around the pedals or block a
depressed pedal. This jeopardises the oper-
ating and road safety of the vehicle. There is a risk of an accident.
Stow all objects securely in the vehicle so that
they do not get into the driver's footwell.
Always fit the floormats securely and as pre-
scribed in order to ensure that there is always sufficient room for the pedals. Do not use
loose floormats and do not place several floor-mats on top of one another. X
Driver's and front-passenger seat: slide
the corresponding seat backwards.
X Rear seats: slide the corresponding front
seat forwards.
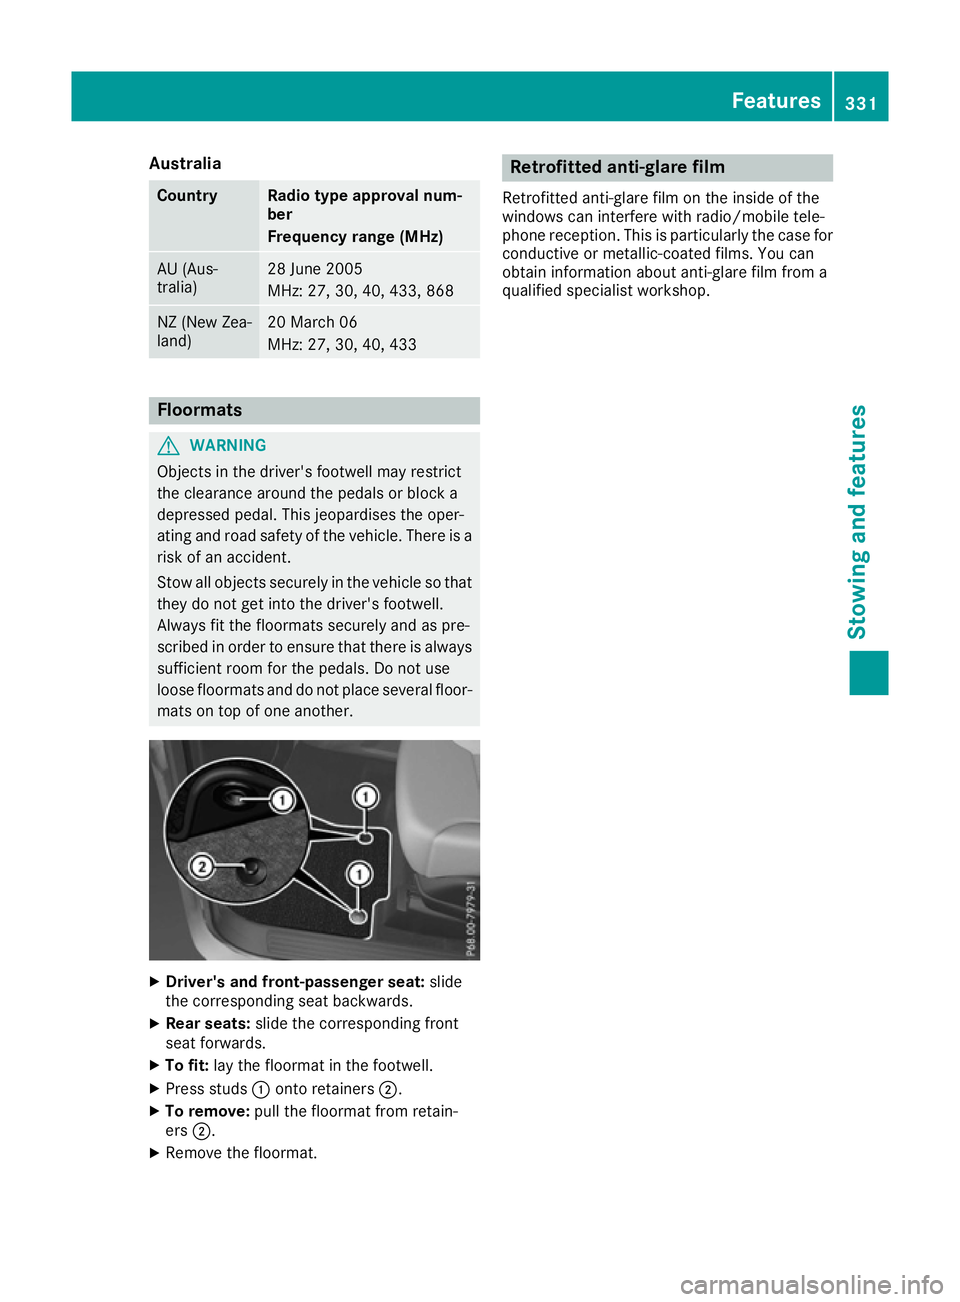
X To fit: lay the floormat in the footwell.
X Press studs :onto retainers ;.
X To remove: pull the floormat from retain-
ers ;.
X Remove the floormat. Retrofitted anti-glare film
Retrofitted anti-glare film on the inside of the
windows can interfere with radio/mobile tele-
phone reception. This is particularly the case for conductive or metallic-coated films. You can
obtain information about anti-glare film from a
qualified specialist workshop. Features
331Stowing and featu res Z
Page 368 of 397
sure monitors keep the tyre valve open. This
can also result in tyre pressure loss. There is a risk of accident.
Only screw standard valve caps or valve caps
specifically provided by Mercedes-Benz for
your vehicle onto the tyre valve. G
WARNING
If the tyre pressure drops repeatedly, the
wheel, valve or tyre may be damaged. Tyre
pressure that is too low may result in a tyre
blow-out. There is a risk of accident. R Check the tyre for foreign objects.
R Check whether the wheel is losing air or the
valve is leaking.
If you are unable to rectify the damage, con-
tact a qualified specialist workshop. H
Environmental note
Check the tyre pressure regularly, at least
every 14 days.
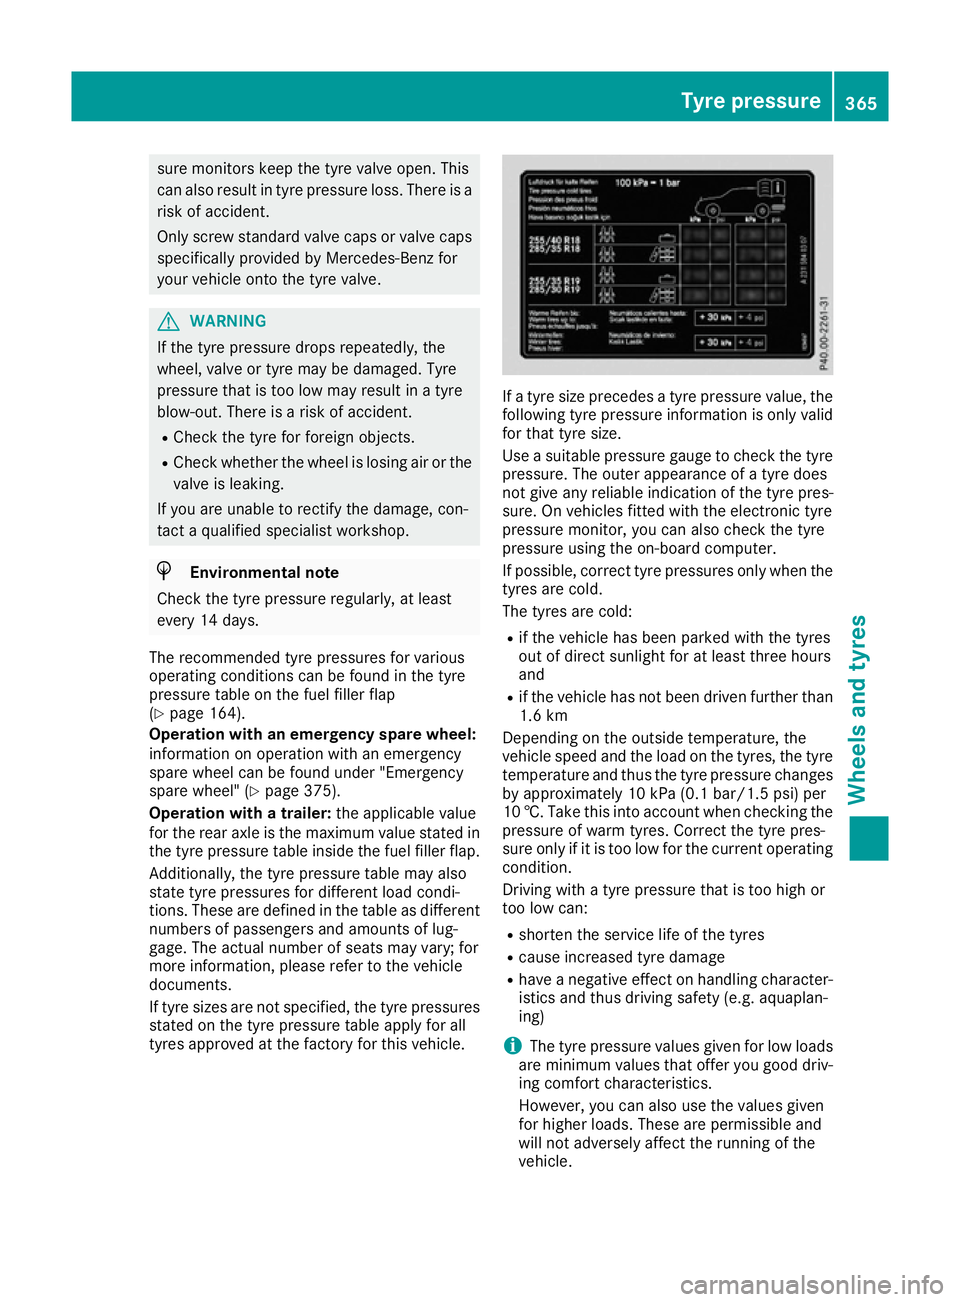
The recommended tyre pressures for various
operating conditions can be found in the tyre
pressure table on the fuel filler flap
(Y page 164).
Operation with an emergency spare wheel:
information on operation with an emergency
spare wheel can be found under "Emergency
spare wheel" (Y page 375).
Operation with a trailer: the applicable value
for the rear axle is the maximum value stated in the tyre pressure table inside the fuel filler flap.
Additionally, the tyre pressure table may also
state tyre pressures for different load condi-
tions. These are defined in the table as different numbers of passengers and amounts of lug-
gage. The actual number of seats may vary; for
more information, please refer to the vehicle
documents.
If tyre sizes are not specified, the tyre pressures
stated on the tyre pressure table apply for all
tyres approved at the factory for this vehicle. If a tyre size precedes a tyre pressure value, the
following tyre pressure information is only valid
for that tyre size.
Use a suitable pressure gauge to check the tyre
pressure. The outer appearance of a tyre does
not give any reliable indication of the tyre pres-
sure. On vehicles fitted with the electronic tyre
pressure monitor, you can also check the tyre
pressure using the on-board computer.
If possible, correct tyre pressures only when the
tyres are cold.
The tyres are cold:
R if the vehicle has been parked with the tyres
out of direct sunlight for at least three hours
and
R if the vehicle has not been driven further than
1.6 km
Depending on the outside temperature, the
vehicle speed and the load on the tyres, the tyre temperature and thus the tyre pressure changes by approximately 10 kPa (0.1 bar/1.5 psi) per
10 †. Take this into account when checking the
pressure of warm tyres. Correct the tyre pres-
sure only if it is too low for the current operating
condition.
Driving with a tyre pressure that is too high or
too low can:
R shorten the service life of the tyres
R cause increased tyre damage
R have a negative effect on handling character-
istics and thus driving safety (e.g. aquaplan-
ing)
i The tyre pressure values given for low loads
are minimum values that offer you good driv- ing comfort characteristics.
However, you can also use the values given
for higher loads. These are permissible and
will not adversely affect the running of the
vehicle. Tyre pressure
365Wheels and tyres Z