2016 MERCEDES-BENZ GLS SUV fuel
[x] Cancel search: fuelPage 29 of 397

Environmental protection
General notes
H
Environmental note
Daimler's declared policy is one of compre-
hensive environmental protection.
Our objectives are to use the natural resour-
ces which form the basis of our existence on
this planet sparingly and in a manner which
takes the requirements of both nature and
humanity into consideration.
You too can help to protect the environment
by operating your vehicle in an environmen-
tally-responsible manner.
Fuel consumption and the rate of engine,
transmission, brake and tyre wear depend on
the following factors:
R operating conditions of your vehicle
R your personal driving style
You can influence both factors. Therefore,
please bear the following in mind:
Operating conditions:
R avoid short trips, as these increase fuel
consumption.
R observe the correct tyre pressure.
R do not carry any unnecessary weight in the
vehicle.
R remove the roof rack once you no longer
need it.
R a regularly serviced vehicle will contribute
to environmental protection. You should
therefore adhere to the service intervals.
R all maintenance work should be carried out
at a qualified specialist workshop.
Personal driving style:
R do not depress the accelerator pedal when
starting the engine.
R do not warm up the engine when the vehicle
is stationary.
R drive carefully and maintain a safe distance
from the vehicle in front.
R avoid frequent, sudden acceleration and
braking. R
change gear in good time and use each gear
only up to Ôof its maximum engine speed.
R switch off the engine in stationary traffic.
R monitor the vehicle's fuel consumption. Returning an end-of-life vehicle
EU countries only:
Mercedes-Benz will take back your end-of-life
vehicle for environmentally-friendly disposal in
accordance with the European Union (EU) End-
Of-Life Vehicles Directive.
A network of vehicle take-back points and dis-
mantlers has been established for you to return
your vehicle. You can leave it at any of these
points free of charge. This makes an important
contribution to closing the recycling circle and
conserving resources.
For further information about the recycling and
disposal of end-of-life vehicles, and the take-
back conditions, please visit the national
Mercedes-Benz website for your country. Genuine Mercedes-Benz parts
H
Environmental note
Daimler AG also supplies reconditioned
assemblies and parts which are of the same
quality as new parts. For these, the same war-
ranty applies as for new parts.
! Airbags and seat belt tensioners, as well as
control units and sensors for these restraint
systems, may be installed in the following
areas of your vehicle:
R doors
R door pillars
R door sills
R seats
R dashboard
R instrument cluster
R centre console
Do not install accessories such as audio sys-
tems in these areas. Do not carry out repairs
or welding. You could impair the operating
efficiency of the restraint systems. 26
Introduction
Page 34 of 397
It is advisable to register your vehicle with a
Mercedes-Benz Service Centre.
Inform Mercedes-Benz as soon as possible
about any change in address or vehicle owner-
ship. You can do this at a Mercedes-Benz Ser-
vice Centre, for example. Correct use
If you remove any warning stickers, you or oth-
ers could fail to recognise certain dangers.
Leave warning stickers in position.
Observe the following information when driving your vehicle:
R the safety notes in this manual
R the vehicle technical data
R traffic rules and regulations
R laws and safety standards pertaining to motor
vehicles Implied warranty
! Follow the instructions in this manual about
the proper operation of your vehicle as well as
about possible vehicle damage. Damage to
your vehicle that arises from culpable contra- ventions against these instructions are not
covered either by Mercedes-Benz implied
warranty or by the New or Used-Vehicle War-
ranty. QR code for rescue card
The QR code is secured in the fuel filler flap and
on the opposite side on the B-pillar. In the event
of an accident, rescue services can use the QR
code to quickly find the appropriate rescue card for your vehicle. The current rescue card con-
tains, in a compact form, the most important
information about your vehicle, e.g. the routing
of the electric cables.
You can find more information under http://
portal.aftersales.i.daimler.com/public/
content/asportal/en/communication/
informationen_fuer/QRCode.html. Data stored in the vehicle
Many of the electronic components in your vehi-
cle can store data.
These data memories temporarily or perma-
nently store technical information about:
R the vehicle's operating state
R events
R faults
In general, this technical information docu-
ments the state of a component, a module, a
system or the surroundings.
This includes, for example:
R operating conditions of system components,
e.g. fluid levels
R status messages concerning the vehicle and
its individual components, e.g. number of
wheel revolutions/speed, deceleration in
movement, lateral acceleration, accelerator
pedal position
R malfunctions and defects in important system
components, e.g. lights, brakes
R vehicle reactions and operating conditions in
special driving situations, e.g. airbag deploy-
ment, intervention of stability control sys-
tems
R ambient conditions, e.g. outside temperature
These data are of an exclusively technical nature
and can be used to:
R assist in detecting and rectifying faults and
defects
R analyse vehicle functions, e.g. after an acci-
dent
R optimise vehicle functions
The data cannot be used to trace the vehicle's
movements.
When your vehicle is serviced, technical infor-
mation can be read from the event data memory
and fault data memory.
Services include, for example:
R repair services
R service processes
R warranty events
R quality assurance
The information is read out by employees of the service network (including the manufacturer)
using special diagnostic testers. You can obtain more information there, if required. Introduction
31 Z
Page 38 of 397
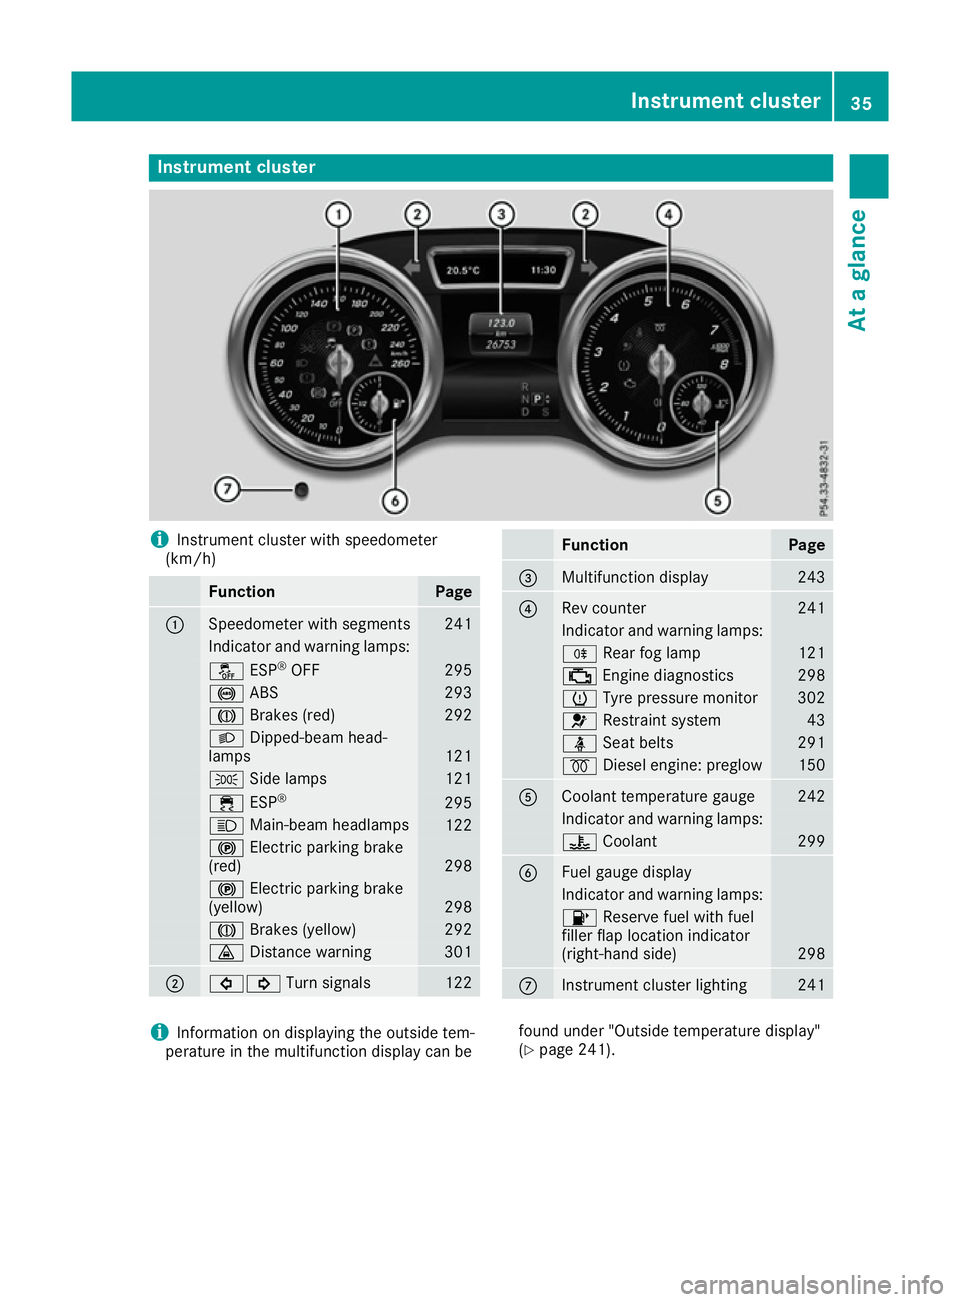
Instrument cluster
i
Instrument cluster with speedometer
(km/h) Function Page
:
Speedometer with segments 241
Indicator and warning lamps:
å
ESP®
OFF 295
!
ABS 293
J
Brakes (red) 292
L
Dipped-beam head-
lamps 121
T
Side lamps 121
÷
ESP® 295
K
Main-beam headlamps 122
!
Electric parking brake
(red) 298
!
Electric parking brake
(yellow) 298
J
Brakes (yellow) 292
·
Distance warning 301
;
#!
Turn signals 122 Function Page
=
Multifunction display 243
?
Rev counter 241
Indicator and warning lamps:
R
Rear fog lamp 121
;
Engine diagnostics 298
h
Tyre pressure monitor 302
6
Restraint system 43
ü
Seat belts 291
%
Diesel engine: preglow 150
A
Coolant temperature gauge 242
Indicator and warning lamps:
?
Coolant 299
B
Fuel gauge display
Indicator and warning lamps:
8
Reserve fuel with fuel
filler flap location indicator
(right-hand side) 298
C
Instrument cluster lighting 241
i
Information on displaying the outside tem-
perature in the multifunction display can be found under "Outside temperature display"
(Y
page 241). Instrument cluster
35At a glance
Page 60 of 397

uations, PRE-SAFE
®
PLUS takes pre-emptive
measures to protect the vehicle occupants.
Important safety notes The intervention of PRE-SAFE
®
PLUS cannot
prevent an imminent collision.
The driver is not warned before the intervention
of PRE-SAFE ®
PLUS.
PRE-SAFE ®
PLUS does not intervene:
R if the vehicle is reversing
R when the vehicle is towing a trailer and there
is a risk of a rear-end collision
When driving, or when parking or exiting a park-
ing space with assistance from Parking Pilot,
PRE-SAFE ®
PLUS will not apply the brakes.
Function PRE-SAFE
®
PLUS intervenes in certain situa-
tions if the radar sensor system detects an
imminent head-on or rear-end collision.
PRE-SAFE ®
PLUS takes the following measures
depending on the hazardous situation detected:
R if the radar sensor system detects that a
head-on collision is imminent, the seat belts
are pre-tensioned
R if the radar sensor system detects that a rear-
end collision is imminent:
- the rear hazard warning lamps are activa-
ted and flash at a higher frequency
- the brake pressure is increased if the driver
applies the brakes when the vehicle is sta- tionary
- the seat belts are pre-tensioned
The PRE-SAFE ®
PLUS braking application is can-
celled:
R if the accelerator pedal is depressed when a
gear is engaged
R if the risk of a collision passes or is no longer
detected
R if Distance Pilot DISTRONIC indicates an
intention to pull away
If the hazardous situation passes without result- ing in an accident, the original settings are
restored. Automatic measures after an acci-
dent
Immediately after an accident, the following
measures may be implemented, depending on
the type and severity of the impact:
R the hazard warning lamps are activated
R the emergency lighting is activated
R the vehicle doors are unlocked
R the front side windows are lowered
R vehicles with a memory function: the electri-
cally adjustable steering wheel is raised
R the engine is switched off and the fuel supply
is cut off
R vehicles with the Mercedes-Benz emergency
call system: automatic emergency call Children in the vehicle
Important safety notes
Accident statistics show that children secured
in the rear seats are safer than children secured in the front seats. For this reason, Mercedes-
Benz strongly advises that you fit a child
restraint system on a rear seat. Children are
generally better protected there.
If a child younger than twelve years old and
under 1.50 m in height is travelling in the vehi-
cle:
R always secure the child in a child restraint
system suitable for Mercedes-Benz vehicles.
The child restraint system must be appropri-
ate to the age, weight and size of the child.
R be sure to observe the instructions and safety
notes in this section in addition to the child
restraint system manufacturer's installation
instructions
R be sure to observe the instructions and safety
notes on the automatic front-passenger front
airbag deactivation system (Y page 50). Children in the vehicle
57Safety Z
Page 85 of 397

If you do not open the vehicle within approx-
imately 40 seconds of unlocking:
R the vehicle locks again
R protection against theft is reactivated
X To lock centrally: press the&button.
The key centrally locks and unlocks the follow-
ing components:
R the doors
R the tailgate
R the fuel filler flap
During unlocking, the turn signals flash once.
During locking, they flash three times.
You can also set an audible signal to confirm
that the vehicle has been locked. The audible
signal can be activated or deactivated using the on-board computer (Y page 253).
Only when all the components have been locked is the visual or audible locking confirmation
issued.
If activated in the multimedia system, the loca-
tor lighting also lights up in the dark (see sepa-
rate operating instructions).
X To open the tailgate automatically from
outside the vehicle:
press and hold theF
button until the tailgate opens.
Vehicles with KEYLESS-GO: X To close the tailgate automatically from
outside the vehicle: if the key is located in
the immediate vicinity of the vehicle, press
the F button on the key.
When the tailgate closes, you can then
release the button. KEYLESS-GO
General notes Bear in mind that the engine can be started by
any of the vehicle occupants if there is a KEY-
LESS-GO key in the vehicle (Y page 150).
Locking and unlocking centrally You can start, lock or unlock the vehicle using
KEYLESS-GO. To do this, you need to carry the
key with you. You can combine the KEYLESS-GO functions with the functions of a conventional
key. Unlock the vehicle by using KEYLESS-GO, for instance, and lock it using the
&button
on the key.
The driver's door and the door at which the han- dle is used must both be closed. The key must be
outside the vehicle. When locking or unlocking
with KEYLESS-GO, the distance between the key and the corresponding door handle must not be greater than 1 m.
KEYLESS-GO checks whether a valid key is in
the vehicle by periodically establishing a radio
connection between the vehicle and the key.
This happens:
R during engine start
R during driving
R when the external door handles are touched
R during convenience closing X
To unlock the vehicle: touch the inner sur-
face of the door handle.
X To lock the vehicle: touch sensor surface :
or ;.
Make sure that you do not touch the inner
surface of the door handle.
X Convenience closing feature: touch
recessed sensor surface ;for an extended
period.
Further information on the convenience closing
feature (Y page 95).
If you pull on the handle of the tailgate, only the luggage compartment of the vehicle is
unlocked.
Deactivating and activating If you do not intend to use a key for an extended
period of time, you can deactivate the KEYLESS-
GO function of the key. The key will then use very
little power, thereby conserving battery power.
For the purposes of activation or deactivation,
the vehicle does not have to be nearby. 82
KeyOpening and closing
Page 86 of 397
X
To deactivate: press the&button on the
key twice in rapid succession.
The battery check lamp of the key flashes
twice briefly and lights up once, then KEY-
LESS-GO is deactivated (Y page 84).
X To activate: press any button on the key.
or X Insert the key into the ignition lock.
KEYLESS-GO and all its associated features
are available again. KEYLESS-GO start function
General notes Bear in mind that the engine can be started by
any of the vehicle occupants if there is a key in
the vehicle (Y page 150). Changing the settings of the locking
system
You can change the settings of the locking sys-
tem. This means that only the driver's door and
the fuel filler flap are unlocked when the vehicle is unlocked. This is useful if you frequently travel
alone.
X To change the setting: press and hold down
the % and& buttons simultaneously
for about six seconds until the battery indica-
tor lamp flashes twice (Y page 84).
If the setting of the locking system is changed
within the signal range of the vehicle, pressing
the & or% button:
R locks or
R unlocks the vehicle
The key now functions as follows:
X To unlock: press the%button once.
X To unlock centrally: press the%button
twice.
X To lock centrally: press the&button. The KEYLESS-GO function is changed as fol-
lows:
X
To unlock the driver's door: touch the inner
surface of the door handle on the driver's
door.
X To unlock centrally: touch the inner surface
of the door handle on the front-passenger
door or the rear door.
X To lock centrally: touch the outer sensor
surface on one of the door handles
(Y page 82).
X To restore the factory settings: press and
hold down the %and& buttons simul-
taneously for approximately six seconds until the battery check lamp flashes twice
(Y page 84). Emergency key element
General notes If the vehicle can no longer be locked or
unlocked with the key or with KEYLESS-GO, use
the emergency key element.
If you use the emergency key element to unlock
and open the driver's door, the anti-theft alarm
system will be triggered. Switch off the alarm
(Y page 78).
If you unlock the vehicle using the emergency
key element, the fuel filler flap will not be
unlocked automatically.
X To unlock the fuel filler flap: insert the key
into the ignition lock.
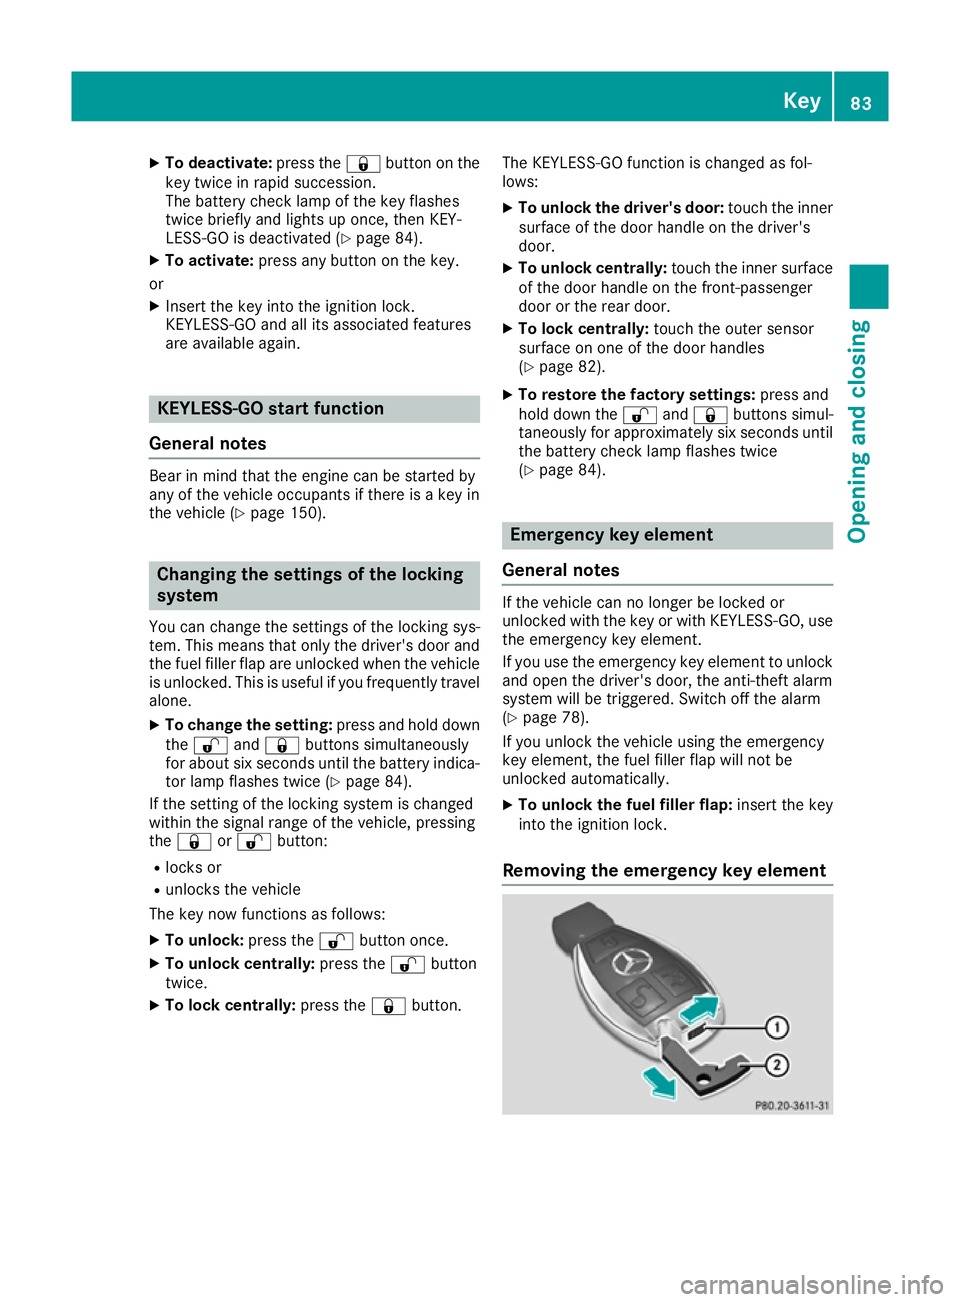
Removing the emergency key element Key
83Opening and closing Z
Page 91 of 397
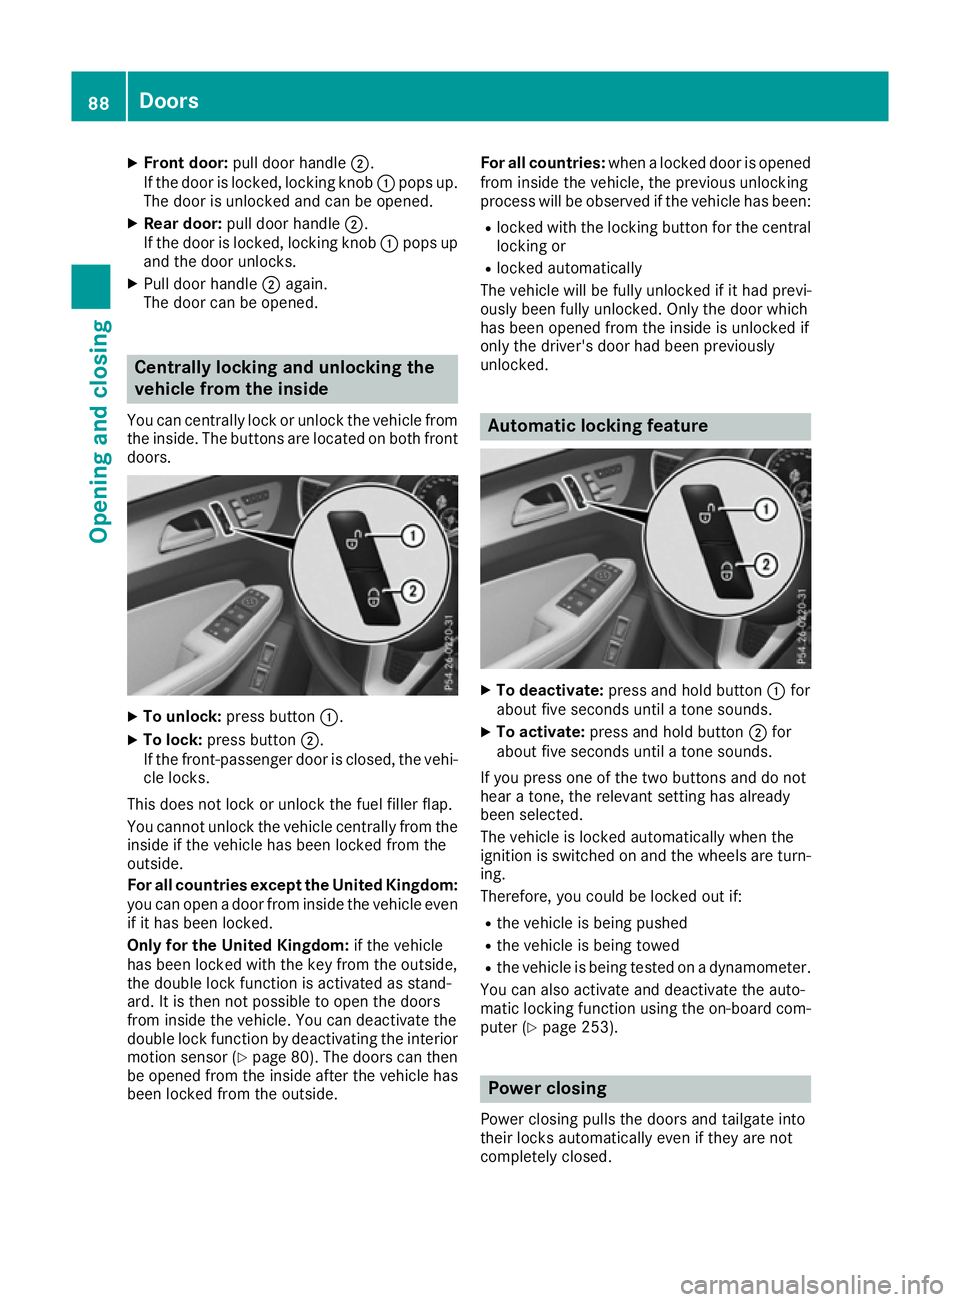
X
Front door: pull door handle ;.
If the door is locked, locking knob :pops up.
The door is unlocked and can be opened.
X Rear door: pull door handle ;.
If the door is locked, locking knob :pops up
and the door unlocks.
X Pull door handle ;again.
The door can be opened. Centrally locking and unlocking the
vehicle from the inside
You can centrally lock or unlock the vehicle from the inside. The buttons are located on both frontdoors. X
To unlock: press button :.
X To lock: press button ;.
If the front-passenger door is closed, the vehi-
cle locks.
This does not lock or unlock the fuel filler flap.
You cannot unlock the vehicle centrally from the
inside if the vehicle has been locked from the
outside.
For all countries except the United Kingdom:
you can open a door from inside the vehicle even if it has been locked.
Only for the United Kingdom: if the vehicle
has been locked with the key from the outside,
the double lock function is activated as stand-
ard. It is then not possible to open the doors
from inside the vehicle. You can deactivate the
double lock function by deactivating the interior motion sensor (Y page 80). The doors can then
be opened from the inside after the vehicle has
been locked from the outside. For all countries:
when a locked door is opened
from inside the vehicle, the previous unlocking
process will be observed if the vehicle has been:
R locked with the locking button for the central
locking or
R locked automatically
The vehicle will be fully unlocked if it had previ-
ously been fully unlocked. Only the door which
has been opened from the inside is unlocked if
only the driver's door had been previously
unlocked. Automatic locking feature
X
To deactivate: press and hold button :for
about five seconds until a tone sounds.
X To activate: press and hold button ;for
about five seconds until a tone sounds.
If you press one of the two buttons and do not
hear a tone, the relevant setting has already
been selected.
The vehicle is locked automatically when the
ignition is switched on and the wheels are turn-
ing.
Therefore, you could be locked out if:
R the vehicle is being pushed
R the vehicle is being towed
R the vehicle is being tested on a dynamometer.
You can also activate and deactivate the auto-
matic locking function using the on-board com- puter (Y page 253). Power closing
Power closing pulls the doors and tailgate into
their locks automatically even if they are not
completely closed. 88
DoorsOpening and closing
Page 92 of 397
X
To power close a door: push the door into
the lock up to the first detent position.
Power closing will pull the door fully closed.
X To power close the tailgate: lightly press
the tailgate downwards.
Power closing will pull the tailgate fully
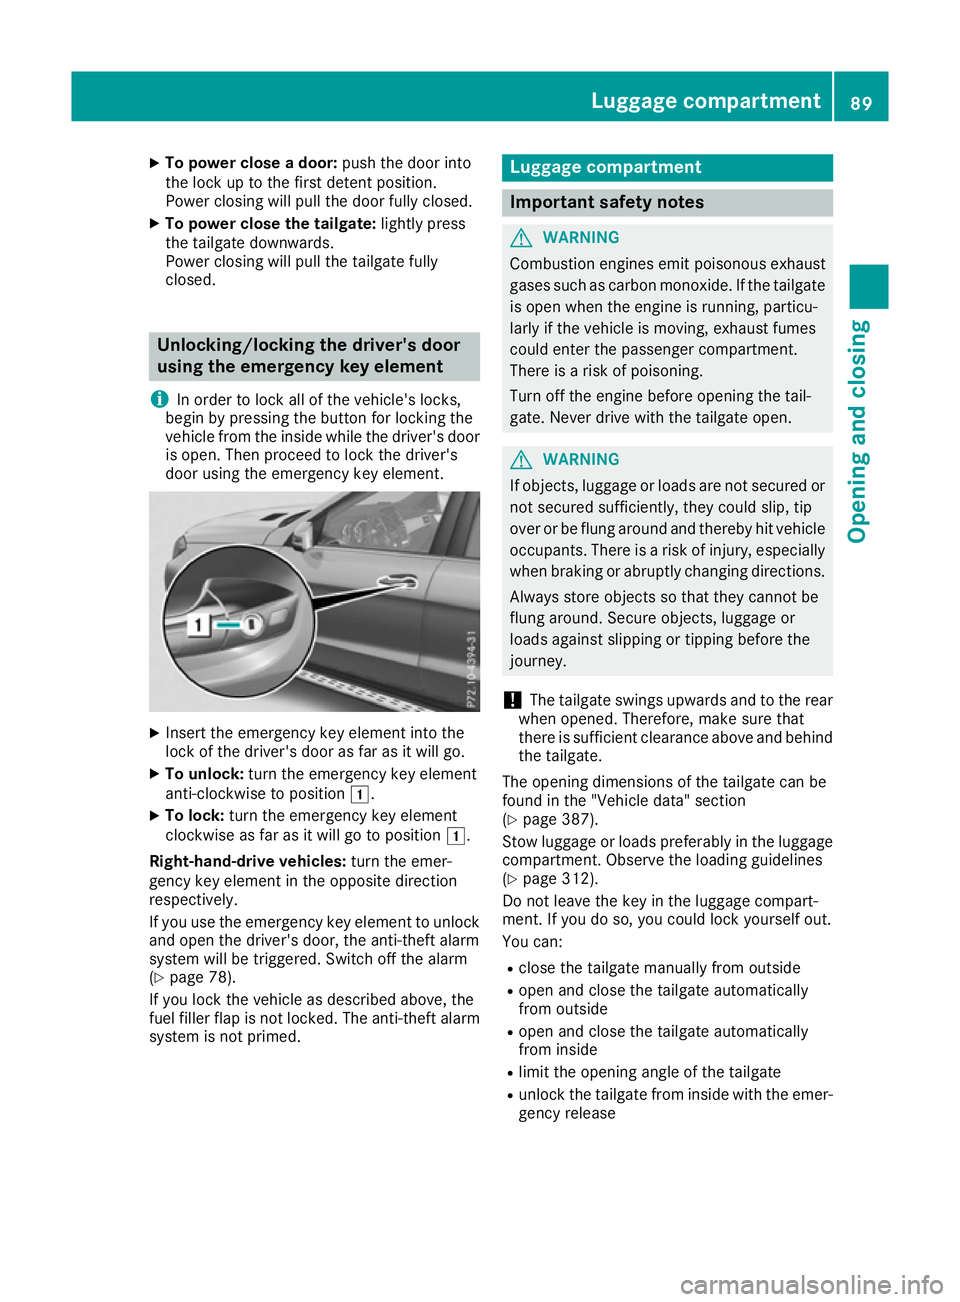
closed. Unlocking/locking the driver's door
using the emergency key element
i In order to lock all of the vehicle's locks,
begin by pressing the button for locking the
vehicle from the inside while the driver's door
is open. Then proceed to lock the driver's
door using the emergency key element. X
Insert the emergency key element into the
lock of the driver's door as far as it will go.
X To unlock: turn the emergency key element
anti-clockwise to position 1.
X To lock: turn the emergency key element
clockwise as far as it will go to position 1.
Right-hand-drive vehicles: turn the emer-
gency key element in the opposite direction
respectively.
If you use the emergency key element to unlock
and open the driver's door, the anti-theft alarm
system will be triggered. Switch off the alarm
(Y page 78).
If you lock the vehicle as described above, the
fuel filler flap is not locked. The anti-theft alarm
system is not primed. Luggage compartment
Important safety notes
G
WARNING
Combustion engines emit poisonous exhaust
gases such as carbon monoxide. If the tailgate is open when the engine is running, particu-
larly if the vehicle is moving, exhaust fumes
could enter the passenger compartment.
There is a risk of poisoning.
Turn off the engine before opening the tail-
gate. Never drive with the tailgate open. G
WARNING
If objects, luggage or loads are not secured or not secured sufficiently, they could slip, tip
over or be flung around and thereby hit vehicle
occupants. There is a risk of injury, especially when braking or abruptly changing directions.
Always store objects so that they cannot be
flung around. Secure objects, luggage or
loads against slipping or tipping before the
journey.
! The tailgate swings upwards and to the rear
when opened. Therefore, make sure that
there is sufficient clearance above and behind
the tailgate.
The opening dimensions of the tailgate can be
found in the "Vehicle data" section
(Y page 387).
Stow luggage or loads preferably in the luggage
compartment. Observe the loading guidelines
(Y page 312).
Do not leave the key in the luggage compart-
ment. If you do so, you could lock yourself out.
You can:
R close the tailgate manually from outside
R open and close the tailgate automatically
from outside
R open and close the tailgate automatically
from inside
R limit the opening angle of the tailgate
R unlock the tailgate from inside with the emer-
gency release Luggage compartment
89Opening and closing Z