2016 MERCEDES-BENZ GLS SUV emergency towing
[x] Cancel search: emergency towingPage 327 of 397

X
Turn the key to position 2in the ignition lock
(Y page 148).
X To open: slide cover :to its foremost posi-
tion.
X Press in cigarette lighter ;.
Cigarette lighter ;will pop out automatically
when the heating element is red-hot.
X To close: pull cover :back as far as it will go. 12 V sockets
General notes X
Turn the key to position 1in the ignition lock
(Y page 148).
With the exception of the socket in the front
centre console, all sockets can be used for
accessories with a maximum current draw of
240 W (20 A). The socket in the front centre
console can be used for accessories with a max-
imum current draw of 180 W (15 A). Accessories include such items as mobile phone chargers.
If you use the sockets for long periods when the engine is switched off, the battery may dis-
charge.
i An emergency cut-off ensures that the on-
board voltage does not drop too low. If the on-
board voltage is too low, the power to the
sockets is automatically cut. This ensures
that there is sufficient power to start the
engine.
Socket in the front centre console !
The socket is not intended for operating the
tyre inflation compressor.
X To open: slide the cover to its foremost posi-
tion.
X Lift up the cover of the socket.
X To close: pull the cover back as far as it will
go.
Socket in the rear-compartment centre
console On vehicles with the Rear Seat Entertainment
System, there are two sockets in the rear-com-
partment centre console.
X Lift up the cover of the socket. Socket in the luggage compartment
X
Lift up the cover of socket :. Mercedes-Benz emergency call sys-
tem
Information on these requirements can be found in the separate multimedia system operating
instructions. X
To open: press and hold cover :for at least
one second.
X To make an emergency call: press SOS but-
ton ;briefly.
The indicator lamp in SOS button ;flashes
until the emergency call is concluded.
X Wait for a voice connection to the Mercedes-
Benz emergency call centre.
X After the emergency call, close cover :.
You will see a message if:
R a connection to the Mercedes-Benz emer-
gency call centre cannot be made
R a call has not been automatically forwarded
to the public emergency call centre
In this case, dial the 112emergency number
on your mobile phone. 324
FeaturesStowing and features
Page 328 of 397
You can find more information on the Mercedes-
Benz emergency call system in the separate
multimedia system operating instructions. Mobile phone
Important safety notes G
WARNING
Operating mobile communications equip-
ment while driving distracts you from paying
attention to traffic conditions. This could also cause you to lose control of the vehicle. There
is a risk of an accident.
Use this device only when the vehicle is sta-
tionary.
You must observe the legal requirements for the country in which you are currently driving when
operating mobile communications equipment in the vehicle.
If it is permitted by law to operate communica-
tions equipment while the vehicle is in motion,
you may only do so if the traffic situation per-
mits. You may otherwise be distracted from the
traffic conditions, cause an accident and injure
yourself and others.
Excessive levels of electromagnetic radiation
may cause damage to your health and to the
health of others. The use of an exterior aerial
takes into consideration the scientific discus-
sion surrounding the possible health risk posed
by electromagnetic fields.
Mercedes-Benz recommends the use of an
approved exterior aerial. This ensures:
R optimal mobile phone reception quality in the
vehicle
R that mutual interference between the vehicle
electronics and mobile phones is minimised
An exterior aerial has the following advantages:
R it conducts the electromagnetic fields gener-
ated by a wireless device to the exterior
R the field strength in the vehicle interior is
lower than in a vehicle that does not have an
exterior aerial
Information on retrofitting two-way radios and
mobile phones (RF transmitters) (Y page 379).General notes There are various mobile phone brackets that
may be fitted in your vehicle; in some cases,
these are country-specific.
More information on suitable mobile phones,
mobile phone brackets and on connecting Blue-
tooth ®
-capable mobile phones with the multi-
media system can be obtained:
R at your Mercedes-Benz Service Centre
R on the Internet at http://www.mercedes-
benz.com/connect
The functions and services available when you
use the phone depend on your mobile phone
model and service provider.
Using a mobile phone To connect a mobile phone to the exterior aerial
and charge it, insert it into the mobile phone
bracket.
X Open the telephone compartment
(Y page 313).
X Place the mobile phone bracket into the pre-
installed fitting; see the separate installation
instructions for the mobile phone fitting.
X Insert the mobile phone into the mobile phone
bracket; see the separate installation instruc-
tions for the mobile phone fitting.
i The mobile phone can also be operated
without being in the bracket. However, the
charging function and aerial function are not
available.
In order to use Bluetooth ®
(SAP profile) on your
telephone module, you must first insert the tele-
phone module into the pre-installed fitting. This connects it to the exterior aerial. If you wish to
charge the mobile phone, then you must con-
nect it to a USB port.
Further information on the telephone module
with Bluetooth ®
(SAP profile) can be found in the
Digital Owner's Manual.
Operating the mobile phone You can operate the telephone using the
6
and ~ buttons on the multifunction steering
wheel. You can operate other mobile phone
functions via the on-board computer
(Y page 248).
When you remove the key from the ignition lock, the mobile phone is disconnected from the vehi- Features
325Stowing and features Z
Page 349 of 397
the vehicle. For more information on which tools
are required to perform a wheel change on your vehicle, consult a qualified specialist workshop.
Necessary tyre-changing tools may include, for
example:
R jack
R wheel chock
R wheel wrench
R ratchet ring spanner
R centring pin
i The jack weighs approximately 3.4 kg.
The maximum load-bearing capacity of the
jack can be found on the adhesive label on the
jack.
The jack is maintenance-free. If there is a
malfunction, please contact a qualified spe-
cialist workshop.
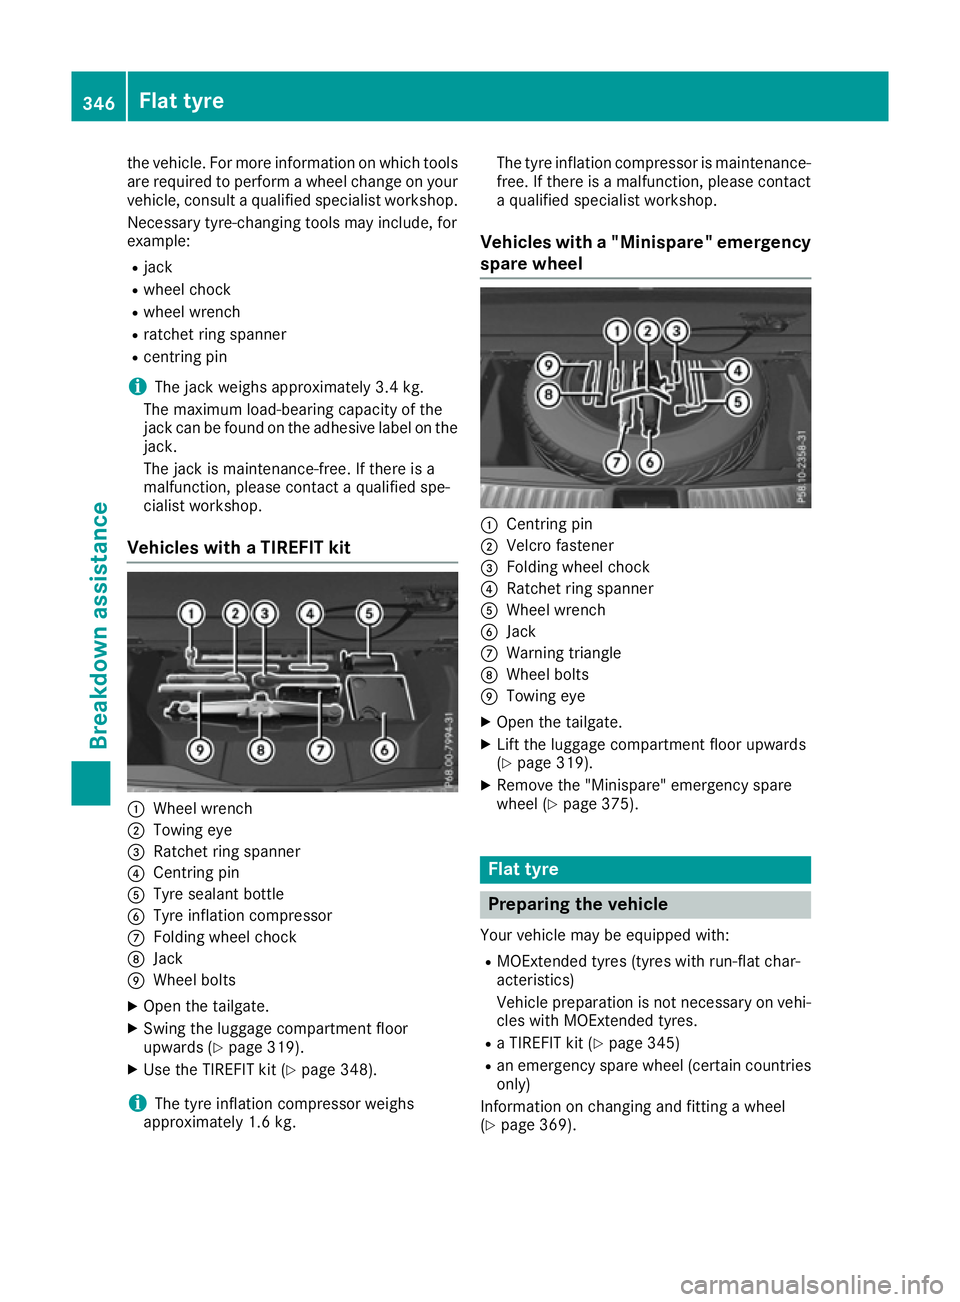
Vehicles with a TIREFIT kit :
Wheel wrench
; Towing eye
= Ratchet ring spanner
? Centring pin
A Tyre sealant bottle
B Tyre inflation compressor
C Folding wheel chock
D Jack
E Wheel bolts
X Open the tailgate.
X Swing the luggage compartment floor
upwards (Y page 319).
X Use the TIREFIT kit (Y page 348).
i The tyre inflation compressor weighs
approximately 1.6 kg. The tyre inflation compressor is maintenance-
free. If there is a malfunction, please contact a qualified specialist workshop.
Vehicles with a "Minispare" emergency
spare wheel :
Centring pin
; Velcro fastener
= Folding wheel chock
? Ratchet ring spanner
A Wheel wrench
B Jack
C Warning triangle
D Wheel bolts
E Towing eye
X Open the tailgate.
X Lift the luggage compartment floor upwards
(Y page 319).
X Remove the "Minispare" emergency spare
wheel (Y page 375). Flat tyre
Preparing the vehicle
Your vehicle may be equipped with: R MOExtended tyres (tyres with run-flat char-
acteristics)
Vehicle preparation is not necessary on vehi- cles with MOExtended tyres.
R a TIREFIT kit (Y page 345)
R an emergency spare wheel (certain countries
only)
Information on changing and fitting a wheel
(Y page 369). 346
Flat tyreBreakdown assistance
Page 378 of 397
Emergency spare wheel
Important safety notes
G
WARNING
The wheel/tyre dimensions and the tyre type of the spare wheel/emergency spare wheel
and the wheel to be replaced may differ. Fit-
ting a spare wheel/emergency spare wheel
may severely impair the driving characteris-
tics. There is a risk of accident.
To prevent hazardous situations:
R Adapt your driving style accordingly and
drive carefully.
R Never fit more than one spare wheel/emer-
gency spare wheel if the dimensions are
different to those of the wheel being
replaced.
R Only use a spare wheel/emergency spare
wheel briefly if the dimensions are different
to those of the wheel being replaced.
R Do not switch off ESP ®
.
R Have the spare wheel/emergency spare
wheel in question replaced at the nearest
qualified specialist workshop. Make sure
that the wheel/tyre dimensions and tyre
type are correct.
! Mercedes-AMG vehicles with
"Minispare" emergency spare wheel: only
use the "Minispare" emergency spare wheel
on the rear axle. If you fit the "Minispare"
emergency spare wheel to the front axle, the braking system could be damaged.
If a tyre on the front axle is damaged, an
undamaged wheel on the rear axle must be
replaced first with the "Minispare" emergency
spare wheel. The damaged wheel on the front
axle can then be replaced by the undamaged wheel from the rear axle.
You must observe the instruction label on the"Minispare" emergency spare wheel.
When using an emergency spare wheel or spare wheel of a different size, you must not exceed
the maximum speed of 80 km/h.
Snow chains must not be fitted to emergency
spare wheels. General notes
You can ask for information regarding permitted emergency spare wheels at a Mercedes-Benz
Service Centre.
Fitting the emergency spare wheel is described under "Fitting a wheel" (Y page 370).
You should check the pressure of all your tyres, including the emergency spare wheel, regularly
as well as prior to long trips, and correct the
pressure as necessary (Y page 364). The value
on the wheel is valid.
An emergency spare wheel may also be fitted
against the direction of rotation. Observe the
time restriction on use as well as the speed lim- itation specified on the emergency spare wheel.
Replace the tyres after six years at the latest,
regardless of wear. This also applies to the
emergency spare wheel.
If you are driving with the emergency spare
wheel fitted, the tyre pressure loss warning sys- tem or the tyre pressure monitor cannot func-
tion reliably. Restart the tyre pressure loss warn-
ing system or tyre pressure monitor only once
the defective wheel has been replaced with a
new wheel.
Vehicles with tyre pressure monitor: after an
emergency spare wheel has been fitted, the sys- tem may still display the tyre pressure of the
removed wheel for a few minutes. The value dis-
played for the position where the emergency
spare wheel is fitted is not the same as the cur- rent tyre pressure of the emergency spare
wheel. Removing/stowing the emergency
spare wheel
Vehicles with a "Minispare" emergency
spare wheel under the luggage com-
partment floor Observe the instructions and safety notes in the
"Fitting a wheel" section (Y page 370).
Example image: vehicle without lockable lug-
gage compartment floor. Emergency spare wheel
375Wheels and tyres Z
Page 379 of 397
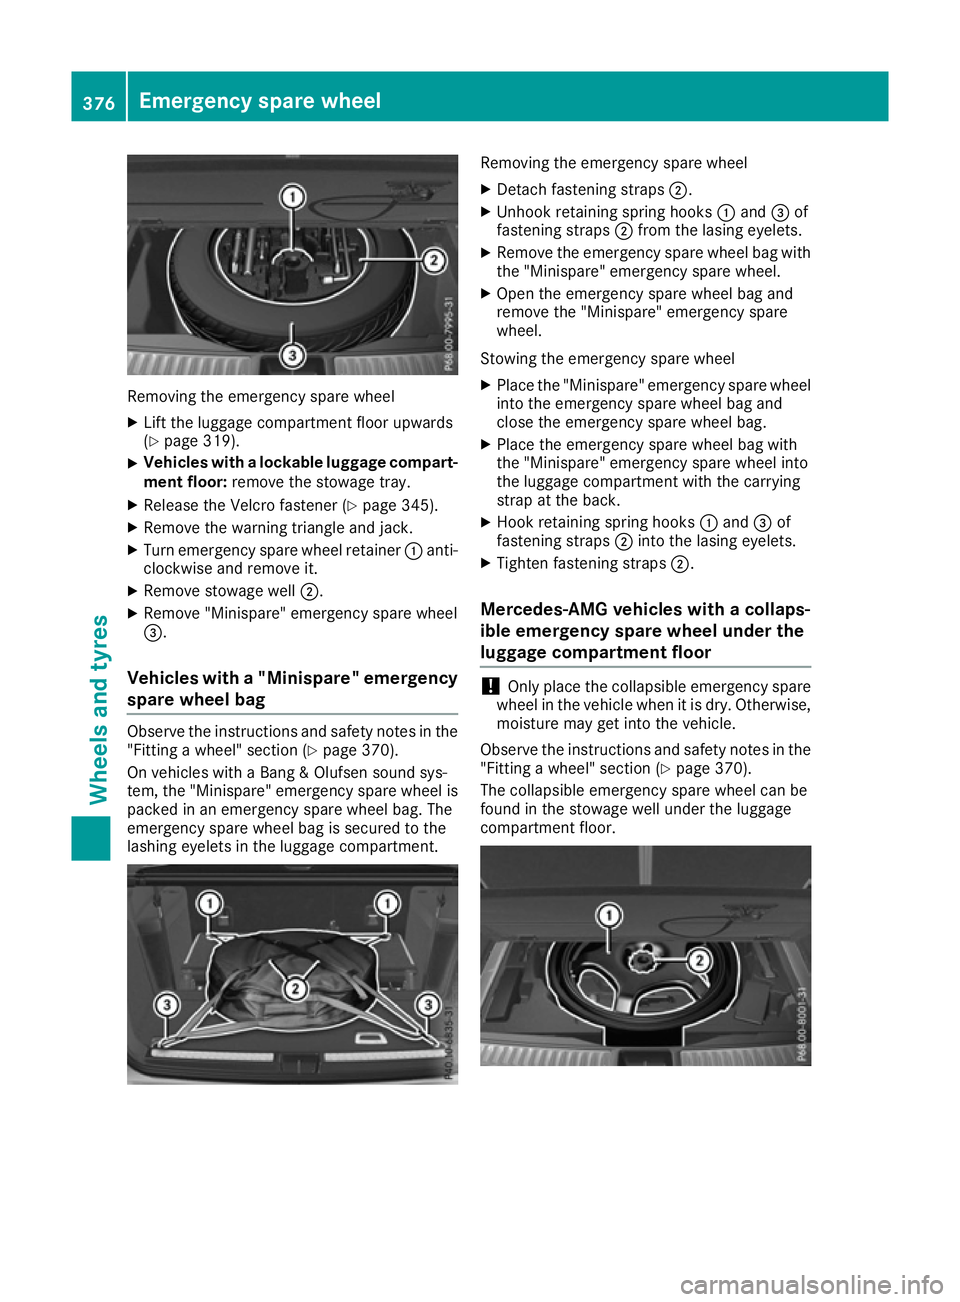
Removing the emergency spare wheel
X Lift the luggage compartment floor upwards
(Y page 319).
X Vehicles with a lockable luggage compart-
ment floor: remove the stowage tray.
X Release the Velcro fastener (Y page 345).
X Remove the warning triangle and jack.
X Turn emergency spare wheel retainer :anti-
clockwise and remove it.
X Remove stowage well ;.
X Remove "Minispare" emergency spare wheel
=.
Vehicles with a "Minispare" emergency spare wheel bag Observe the instructions and safety notes in the
"Fitting a wheel" section (Y page 370).
On vehicles with a Bang & Olufsen sound sys-
tem, the "Minispare" emergency spare wheel is
packed in an emergency spare wheel bag. The
emergency spare wheel bag is secured to the
lashing eyelets in the luggage compartment. Removing the emergency spare wheel
X Detach fastening straps ;.
X Unhook retaining spring hooks :and =of
fastening straps ;from the lasing eyelets.
X Remove the emergency spare wheel bag with
the "Minispare" emergency spare wheel.
X Open the emergency spare wheel bag and
remove the "Minispare" emergency spare
wheel.
Stowing the emergency spare wheel
X Place the "Minispare" emergency spare wheel
into the emergency spare wheel bag and
close the emergency spare wheel bag.
X Place the emergency spare wheel bag with
the "Minispare" emergency spare wheel into
the luggage compartment with the carrying
strap at the back.
X Hook retaining spring hooks :and =of
fastening straps ;into the lasing eyelets.
X Tighten fastening straps ;.
Mercedes-AMG vehicles with a collaps-
ible emergency spare wheel under the
luggage compartment floor !
Only place the collapsible emergency spare
wheel in the vehicle when it is dry. Otherwise,
moisture may get into the vehicle.
Observe the instructions and safety notes in the
"Fitting a wheel" section (Y page 370).
The collapsible emergency spare wheel can be
found in the stowage well under the luggage
compartment floor. 376
Emergency spare wheelWheels and ty
res
Page 380 of 397
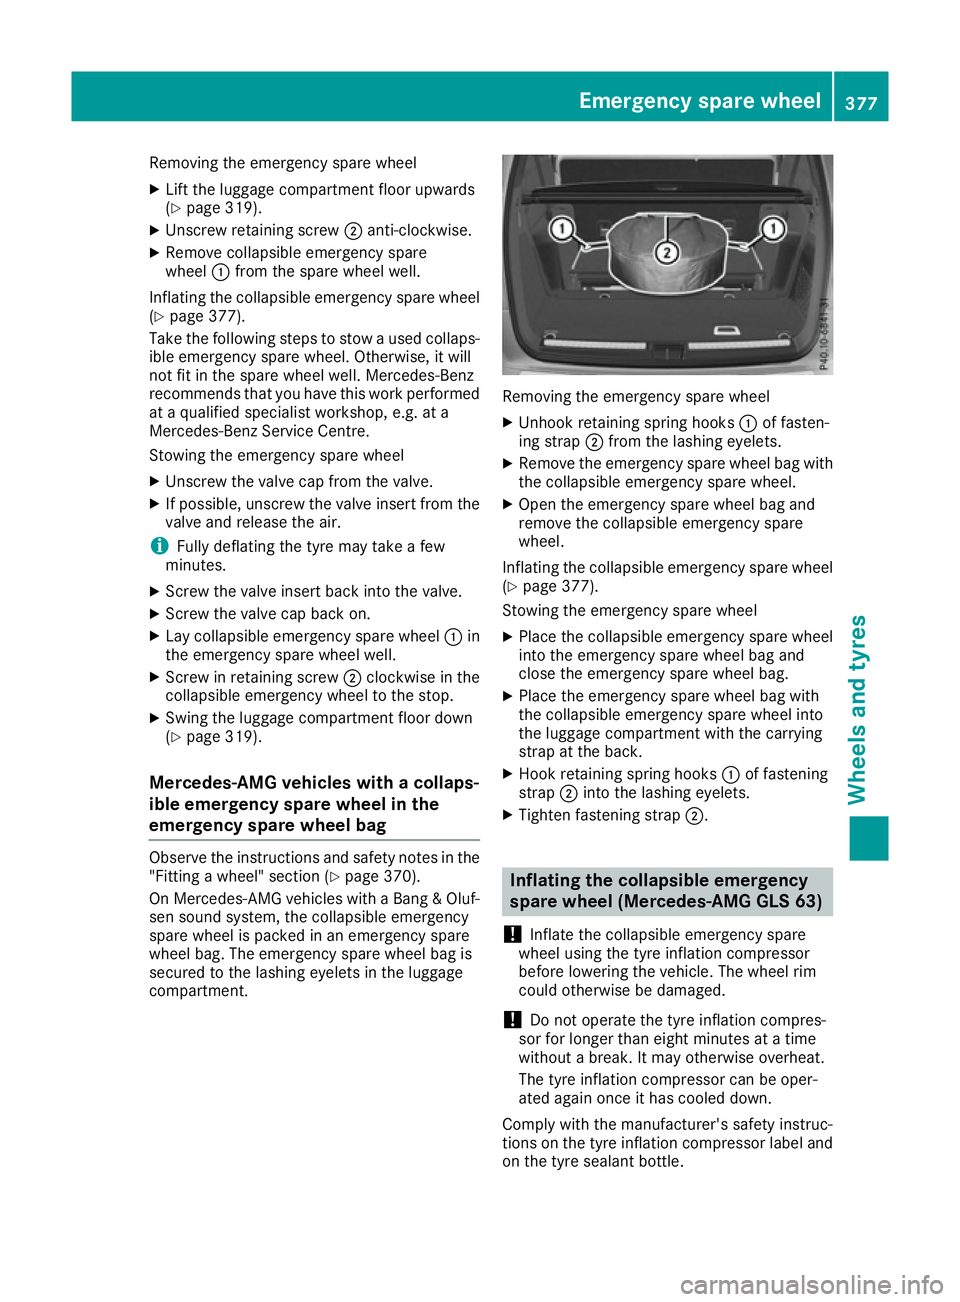
Removing the emergency spare wheel
X Lift the luggage compartment floor upwards
(Y page 319).
X Unscrew retaining screw ;anti-clockwise.
X Remove collapsible emergency spare
wheel :from the spare wheel well.
Inflating the collapsible emergency spare wheel (Y page 377).
Take the following steps to stow a used collaps-
ible emergency spare wheel. Otherwise, it will
not fit in the spare wheel well. Mercedes-Benz
recommends that you have this work performed
at a qualified specialist workshop, e.g. at a
Mercedes-Benz Service Centre.
Stowing the emergency spare wheel
X Unscrew the valve cap from the valve.
X If possible, unscrew the valve insert from the
valve and release the air.
i Fully deflating the tyre may take a few
minutes.
X Screw the valve insert back into the valve.
X Screw the valve cap back on.
X Lay collapsible emergency spare wheel :in
the emergency spare wheel well.
X Screw in retaining screw ;clockwise in the
collapsible emergency wheel to the stop.
X Swing the luggage compartment floor down
(Y page 319).
Mercedes-AMG vehicles with a collaps-
ible emergency spare wheel in the
emergency spare wheel bag Observe the instructions and safety notes in the
"Fitting a wheel" section (Y page 370).
On Mercedes-AMG vehicles with a Bang & Oluf-
sen sound system, the collapsible emergency
spare wheel is packed in an emergency spare
wheel bag. The emergency spare wheel bag is
secured to the lashing eyelets in the luggage
compartment. Removing the emergency spare wheel
X Unhook retaining spring hooks :of fasten-
ing strap ;from the lashing eyelets.
X Remove the emergency spare wheel bag with
the collapsible emergency spare wheel.
X Open the emergency spare wheel bag and
remove the collapsible emergency spare
wheel.
Inflating the collapsible emergency spare wheel (Y page 377).
Stowing the emergency spare wheel
X Place the collapsible emergency spare wheel
into the emergency spare wheel bag and
close the emergency spare wheel bag.
X Place the emergency spare wheel bag with
the collapsible emergency spare wheel into
the luggage compartment with the carrying
strap at the back.
X Hook retaining spring hooks :of fastening
strap ;into the lashing eyelets.
X Tighten fastening strap ;. Inflating the collapsible emergency
spare wheel (Mercedes-AMG GLS 63)
! Inflate the collapsible emergency spare
wheel using the tyre inflation compressor
before lowering the vehicle. The wheel rim
could otherwise be damaged.
! Do not operate the tyre inflation compres-
sor for longer than eight minutes at a time
without a break. It may otherwise overheat.
The tyre inflation compressor can be oper-
ated again once it has cooled down.
Comply with the manufacturer's safety instruc-
tions on the tyre inflation compressor label and
on the tyre sealant bottle. Emergency spare wheel
377Wheels and tyres Z