2016 MERCEDES-BENZ GLS SUV cooling
[x] Cancel search: coolingPage 142 of 397
Outside air is added after about 30 minutes.
X To deactivate: press thedbutton.
The indicator lamp in the dbutton goes
out.
i Air-recirculation mode is deactivated auto-
matically:
R after approximately five minutes at outside
temperatures below approximately 5 †
R after approximately five minutes if cooling
with air dehumidification is deactivated
R after approximately 30 minutes at outside
temperatures above approximately 5 † if
the "Cooling with air dehumidification"
function is activated Convenience opening/closing using
the air-recirculation button
G
WARNING
When the convenience closing feature is oper- ating, parts of the body could become trapped
in the closing area of the side window and the
sliding sunroof. There is a risk of injury.
Observe the complete closing procedure
when the convenience closing feature is oper-
ating. When closing make sure that no parts of the body are in the closing area. G
WARNING
During convenience opening parts of the body could be drawn in or become trapped
between the side window and window frame.
There is a risk of injury.
When opening, make sure that nobody is
touching the side window. If someone
becomes trapped, immediately press
the W switch in the door to stop the move-
ment of the side windows. To continue closing
the side window, pull on the Wswitch.
X Convenience closing feature: press and
hold the dbutton until the side windows
close.
Vehicles with sliding sunroof or pano-
rama sliding sunroof: the sliding sunroof or
panorama sliding sunroof closes simultane-
ously. The indicator lamp in the
dbutton lights
up. Air-recirculation mode is activated.
If parts of the body are in the closing area during
convenience closing, proceed as follows:
X Press the Wbutton to stop the side win-
dows.
The side windows stop.
X To then open the side windows, press the
W button again.
X Only vehicles with sliding sunroof or pan-
orama sliding sunroof: press the2
switch to stop the sliding sunroof or pano-
rama sliding sunroof.
The sliding sunroof or panorama sliding sun-
roof stops.
X To then open the sliding sunroof or panorama
sliding sunroof, pull back on the 2button.
i If the sliding sunroof is raised and closes,
press the 2switch, to stop the sliding
sunroof. Do not pull back on the 2switch
afterwards. The sliding sunroof closes before
it opens.
i Notes on the automatic reversing function
for:
R the side windows (Y page 93)
R the panorama sliding sunroof (Y page 97)
R the sliding sunroof (Y page 97)
X Convenience opening feature: press and
hold the dbutton until the side windows
open.
Vehicles with sliding sunroof or pano-
rama sliding sunroof: the sliding sunroof or
panorama sliding sunroof opens simultane-
ously.
The indicator lamp in the dbutton goes
out. Air-recirculation mode is deactivated.
i If you open the side windows or the sliding
sunroof or the panorama sliding sunroof man-
ually after closing them with the convenience closing feature, they will remain in this posi-
tion when opened using the convenience
opening feature. Operating the climate control system
139Climate control Z
Page 148 of 397
X
To open or close: turn thumbwheels=
and ?to the left or right. Adjusting the side air vents
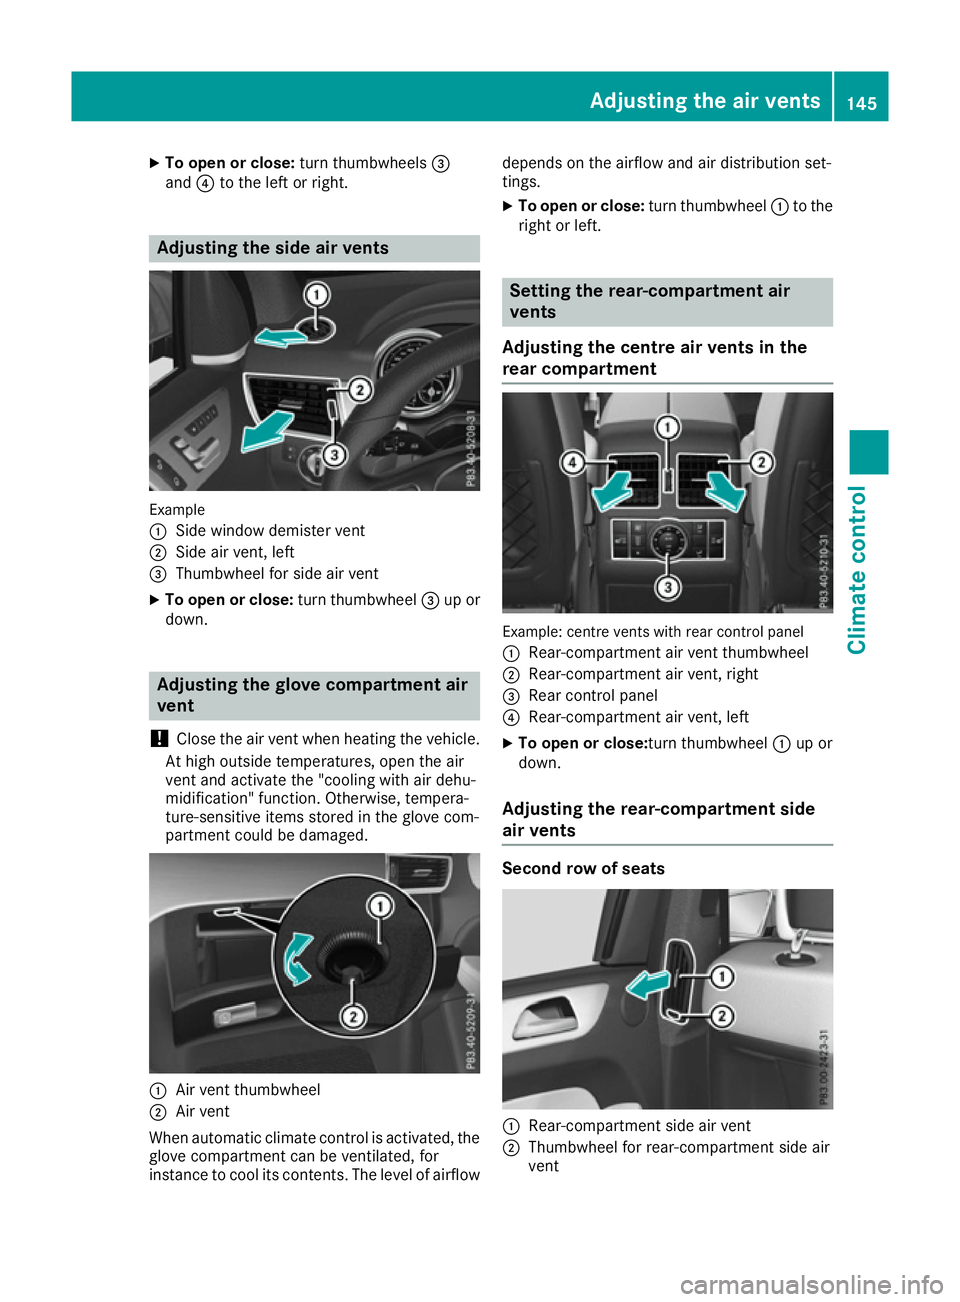
Example
:
Side window demister vent
; Side air vent, left
= Thumbwheel for side air vent
X To open or close: turn thumbwheel=up or
down. Adjusting the glove compartment air
vent
! Close the air vent when heating the vehicle.
At high outside temperatures, open the air
vent and activate the "cooling with air dehu-
midification" function. Otherwise, tempera-
ture-sensitive items stored in the glove com-
partment could be damaged. :
Air vent thumbwheel
; Air vent
When automatic climate control is activated, the
glove compartment can be ventilated, for
instance to cool its contents. The level of airflow depends on the airflow and air distribution set-
tings.
X To open or close: turn thumbwheel:to the
right or left. Setting the rear-compartment air
vents
Adjusting the centre air vents in the
rear compartment Example: centre vents with rear control panel
: Rear-compartment air vent thumbwheel
; Rear-compartment air vent, right
= Rear control panel
? Rear-compartment air vent, left
X To open or close: turn thumbwheel:up or
down.
Adjusting the rear-compartment side
air vents Second row of seats
:
Rear-compartment side air vent
; Thumbwheel for rear-compartment side air
vent Adjusting the air vents
145Climate control Z
Page 237 of 397
R
the permissible rear axle load of the towing
vehicle
R the maximum permissible gross vehicle
weight of both the towing vehicle and the
trailer
The applicable permissible values, which must
not be exceeded, can be found:
R in your vehicle documents
R on the identification plates of the trailer tow
hitch and the trailer
R on the vehicle identification plate
If the values differ, the lowest value applies.
You will find the values approved by the manu-
facturer on the vehicle identification plates and
those for the towing vehicle under "Technical
data" (Y page 390).
When towing a trailer, your vehicle's handling
characteristics will be different in comparison to
when driving without a trailer.
The vehicle/trailer combination:
R is heavier
R is restricted in its acceleration and gradient-
climbing capability
R has an increased braking distance
R is affected more by strong crosswinds
R demands more sensitive steering
R has a larger turning circle
This can impair the vehicle's handling charac-
teristics. Adapt your driving style accordingly.
Maintain a safe distance. Drive carefully.
When towing a trailer, always adjust your speed to the current road and weather conditions. Do
not exceed the maximum permissible speed for
your vehicle/trailer combination. Notes on towing a trailer
General notes !
If you have a trailer tow hitch retrofitted,
changes to the engine cooling system may be necessary, depending on the vehicle type.
If you have a trailer tow hitch retrofitted,
observe the anchorage points on the chassis.
Check the tyre pressures when towing a trailer.
You will find the values in the tyre pressure table in the vehicle fuel filler flap (Y page 364).Please note that when towing a trailer, the fol-
lowing driving systems have limited availability
or are not available at all.
R Parking Assist PARKTRONIC (Y page 201)
R Blind Spot Assist (Y page 219)
R Active Lane Keeping Assist (Y page 224)
R Parking Pilot (Y page 204)
On vehicles without level control, the height of
the ball coupling will alter according to the load
placed on the vehicle. If necessary, use a trailer
with a height-adjustable drawbar.
You will find permissible trailer loads under
"Technical data" (Y page 390).
Driving tips Observe the information on ESP
®
trailer stabili-
sation (Y page 74) and on pulling away with a
trailer (Y page 151).
Select the Comfortdrive program using the
DYNAMIC SELECT controller (Y page 155).
The maximum permissible speed for vehicle/
trailer combinations depends on the type of
trailer. Before beginning the journey, check the
trailer's documents to see what the maximum
permissible speed is for your trailer. Observe the legally prescribed maximum speed in the rele-
vant country.
For certain Mercedes-Benz vehicles, the maxi-
mum permissible rear axle load is increased
when towing a trailer. See the "Technical Data"
section to find out whether this applies to your
vehicle (Y page 390). If you utilise any of the
added maximum rear axle load when towing a
trailer, the vehicle/trailer combination may not
exceed a maximum speed of 100 km/h for rea-
sons concerning the operating permit. This also
applies in countries in which the permissible
maximum speed for vehicle/trailer combina-
tions is above 100 km/h.
When towing a trailer, your vehicle's handling
characteristics will be different to when driving
without a trailer and the vehicle will consume
more fuel.
Use the left-hand gearshift paddle to shift to a
lower gear on long and steep downhill gradients.
This also applies if you have activated cruise
control, the speed limiter or Distance Pilot
DISTRONIC.
This will use the braking effect of the engine, so
less braking will be required to maintain the
vehicle speed. This relieves the load on the 234
Towing a trailerDriving an
d parking
Page 274 of 397
Display messages
Possible causes/consequences and
M
MSolutions b
Switch on headlamps Switch on headlamps You are driving without dipped-beam headlamps.
X
Turn the light switch to the Lorà position. Adaptive Highbeam Adaptive Highbeam
Assist Plus cur‐ Assist Plus cur‐
rently unavailable rently unavailable
See Owner's Manual See Owner's Manual Adaptive Highbeam Assist Plus is deactivated and temporarily inop-
erative.
Possible causes:
R The windscreen is dirty in the camera's field of vision.
R Visibility is impaired due to heavy rain, snow or fog.
X Clean the windscreen.
If the system detects that the camera is fully operational again, the Adaptive Highbeam Assist Plus available again Adaptive Highbeam Assist Plus available again message is
displayed.
Adaptive Highbeam Assist Plus is operational again. Adaptive Highbeam Adaptive Highbeam
Assist Plus inoper‐ Assist Plus inoper‐
ative ative Adaptive Highbeam Assist Plus is faulty.
X Consult a qualified specialist workshop. Engine
Display messages
Possible causes/consequences and
M
MSolutions +
Top up coolant See Top up coolant See
Owner's Manual Owner's Manual The coolant level is too low.
! Avoid making long journeys with too little coolant in the engine
cooling system. The engine will otherwise be damaged.
X Top up the coolant, observing the warning notes before doing so
(Y page 335).
If you have to top up the coolant frequently: X Contact a qualified specialist workshop and have the engine cooling
system checked. ? The fan motor is faulty.
X If the coolant temperature is below 120 †, continue driving to the
nearest qualified specialist workshop.
X Avoid heavy loads on the engine as you do so, e.g. driving in moun-
tainous terrain and stop-start traffic. Display
messages
271On-board computer and displays Z
Page 276 of 397
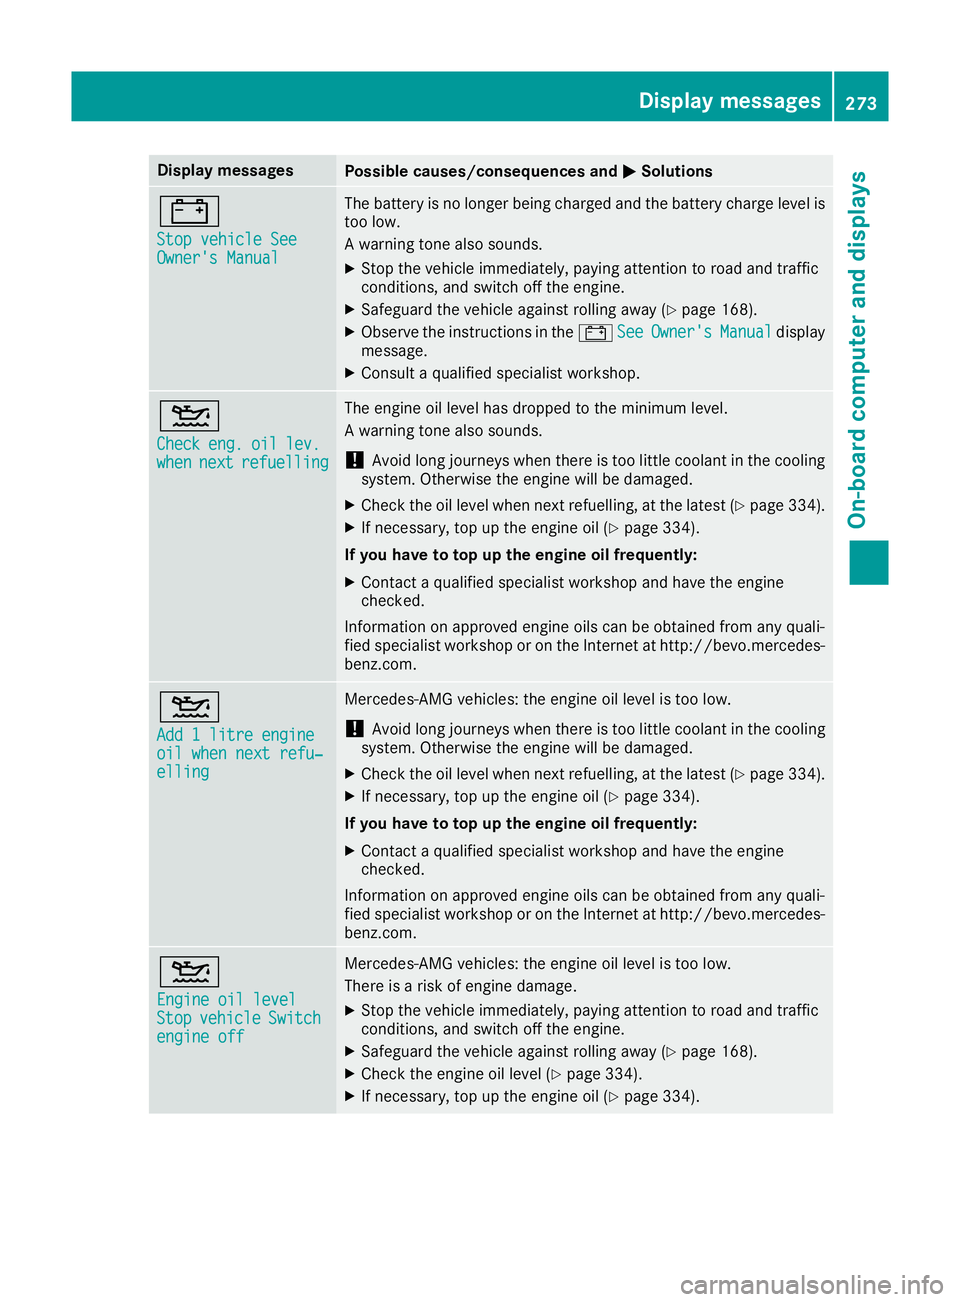
Display messages
Possible causes/consequences and
M
MSolutions #
Stop vehicle See Stop vehicle See
Owner's Manual Owner's Manual The battery is no longer being charged and the battery charge level is
too low.
A warning tone also sounds.
X Stop the vehicle immediately, paying attention to road and traffic
conditions, and switch off the engine.
X Safeguard the vehicle against rolling away (Y page 168).
X Observe the instructions in the #See SeeOwner's
Owner's Manual
Manualdisplay
message.
X Consult a qualified specialist workshop. 4
Check Check
eng.
eng.oil
oillev.
lev.
when
when next
nextrefuelling
refuelling The engine oil level has dropped to the minimum level.
A warning tone also sounds.
! Avoid long journeys when there is too little coolant in the cooling
system. Otherwise the engine will be damaged.
X Check the oil level when next refuelling, at the latest (Y page 334).
X If necessary, top up the engine oil (Y page 334).
If you have to top up the engine oil frequently:
X Contact a qualified specialist workshop and have the engine
checked.
Information on approved engine oils can be obtained from any quali-
fied specialist workshop or on the Internet at http://bevo.mercedes-
benz.co m. 4
Add 1 litre engine Add 1 litre engine
oil when next refu‐ oil when next refu‐
elling elling Mercedes-AMG vehicles: the engine oil level is too low.
! Avoid long journeys when there is too little coolant in the cooling
system. Otherwise the engine will be damaged.
X Check the oil level when next refuelling, at the latest (Y page 334).
X If necessary, top up the engine oil (Y page 334).
If you have to top up the engine oil frequently:
X Contact a qualified specialist workshop and have the engine
checked.
Information on approved engine oils can be obtained from any quali-
fied specialist workshop or on the Internet at http://bevo.mercedes-
benz.com. 4
Engine oil level Engine oil level
Stop Stop
vehicle
vehicle Switch
Switch
engine off
engine off Mercedes-AMG vehicles: the engine oil level is too low.
There is a risk of engine damage.
X Stop the vehicle immediately, paying attention to road and traffic
conditions, and switch off the engine.
X Safeguard the vehicle against rolling away (Y page 168).
X Check the engine oil level (Y page 334).
X If necessary, top up the engine oil (Y page 334). Display messages
273On-board computer and displays Z
Page 280 of 397
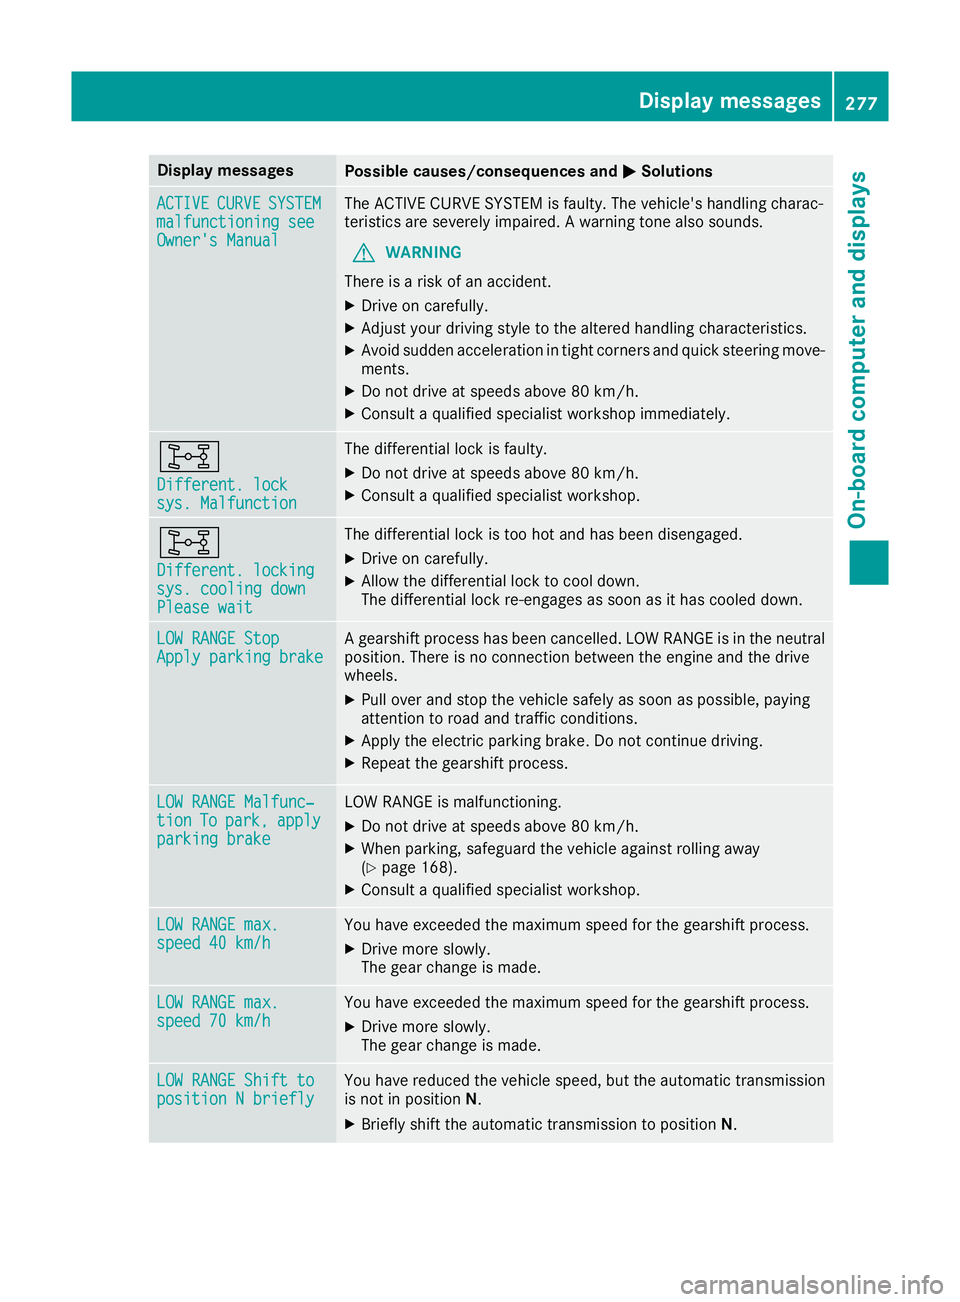
Display messages
Possible causes/consequences and
M
MSolutions ACTIVE
ACTIVE
CURVE
CURVESYSTEM
SYSTEM
malfunctioning see
malfunctioning see
Owner's Manual Owner's Manual The ACTIVE CURVE SYSTEM is faulty. The vehicle's handling charac-
teristics are severely impaired. A warning tone also sounds.
G WARNING
There is a risk of an accident.
X Drive on carefully.
X Adjust your driving style to the altered handling characteristics.
X Avoid sudden acceleration in tight corners and quick steering move-
ments.
X Do not drive at speeds above 80 km/h.
X Consult a qualified specialist workshop immediately. 8
Different. lock Different. lock
sys. Malfunction sys. Malfunction The differential lock is faulty.
X Do not drive at speeds above 80 km/h.
X Consult a qualified specialist workshop. 8
Different. locking Different. locking
sys. cooling down sys. cooling down
Please wait Please wait The differential lock is too hot and has been disengaged.
X Drive on carefully.
X Allow the differential lock to cool down.
The differential lock re-engages as soon as it has cooled down. LOW RANGE Stop LOW RANGE Stop
Apply parking brake Apply parking brake A gearshift process has been cancelled. LOW RANGE is in the neutral
position. There is no connection between the engine and the drive
wheels.
X Pull over and stop the vehicle safely as soon as possible, paying
attention to road and traffic conditions.
X Apply the electric parking brake. Do not continue driving.
X Repeat the gearshift process. LOW RANGE Malfunc‐
LOW RANGE Malfunc‐
tion tion
To
Topark,
park, apply
apply
parking brake
parking brake LOW RANGE is malfunctioning.
X Do not drive at speeds above 80 km/h.
X When parking, safeguard the vehicle against rolling away
(Y page 168).
X Consult a qualified specialist workshop. LOW RANGE max. LOW RANGE max.
speed 40 km/h speed 40 km/h You have exceeded the maximum speed for the gearshift process.
X Drive more slowly.
The gear change is made. LOW RANGE max. LOW RANGE max.
speed 70 km/h speed 70 km/h You have exceeded the maximum speed for the gearshift process.
X Drive more slowly.
The gear change is made. LOW RANGE Shift to LOW RANGE Shift to
position N briefly position N briefly You have reduced the vehicle speed, but the automatic transmission
is not in position N.
X Briefly shift the automatic transmission to position N. Display
messages
277On-board computer and displays Z
Page 303 of 397
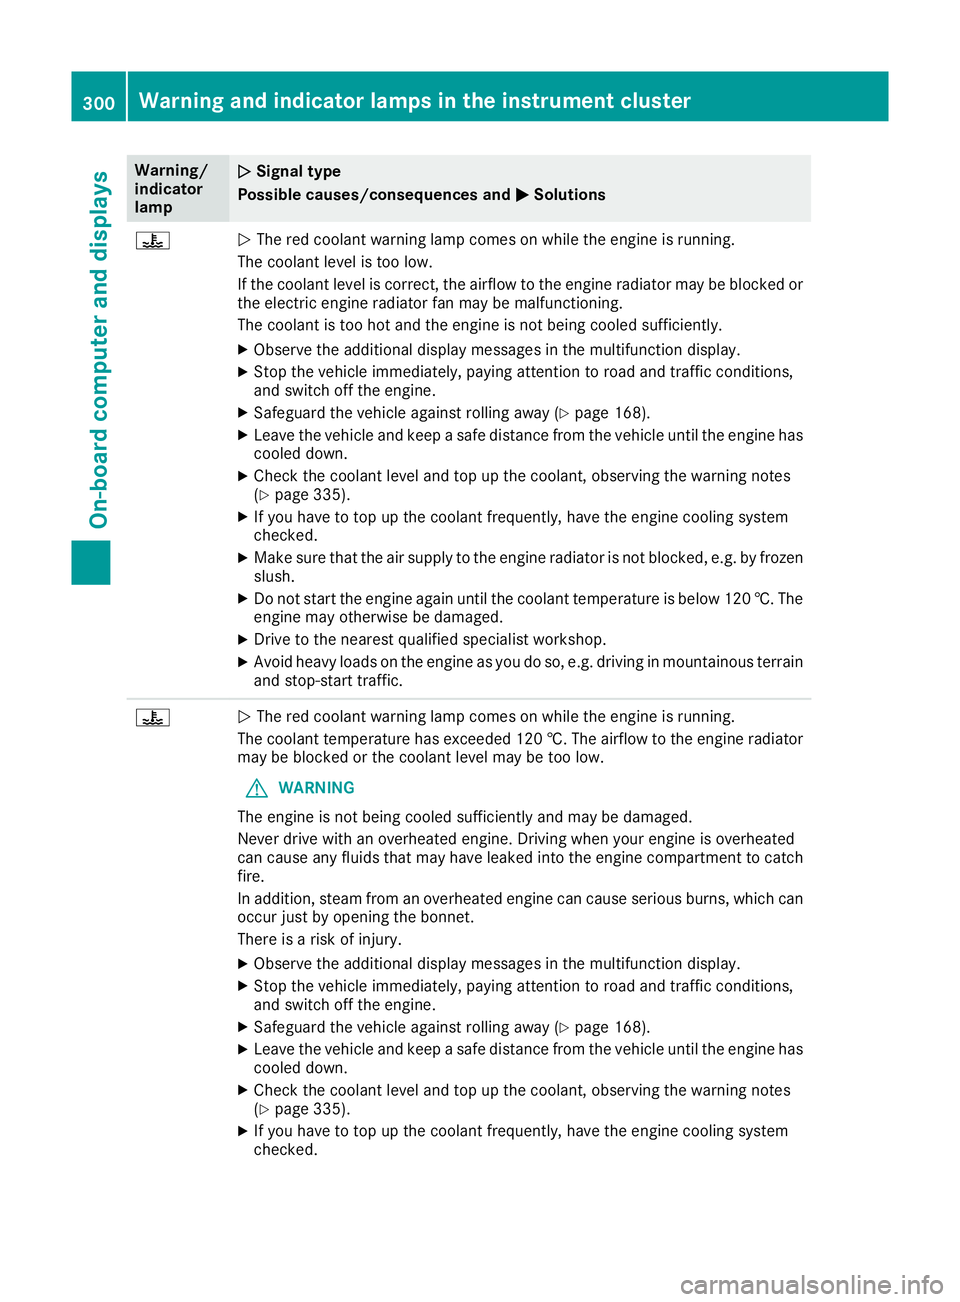
Warning/
indicator
lamp
N N
Signal type
Possible causes/consequences and M
M Solutions ?
N
The red coolant warning lamp comes on while the engine is running.
The coolant level is too low.
If the coolant level is correct, the airflow to the engine radiator may be blocked or the electric engine radiator fan may be malfunctioning.
The coolant is too hot and the engine is not being cooled sufficiently.
X Observe the additional display messages in the multifunction display.
X Stop the vehicle immediately, paying attention to road and traffic conditions,
and switch off the engine.
X Safeguard the vehicle against rolling away (Y page 168).
X Leave the vehicle and keep a safe distance from the vehicle until the engine has
cooled down.
X Check the coolant level and top up the coolant, observing the warning notes
(Y page 335).
X If you have to top up the coolant frequently, have the engine cooling system
checked.
X Make sure that the air supply to the engine radiator is not blocked, e.g. by frozen
slush.
X Do not start the engine again until the coolant temperature is below 120 †. The
engine may otherwise be damaged.
X Drive to the nearest qualified specialist workshop.
X Avoid heavy loads on the engine as you do so, e.g. driving in mountainous terrain
and stop-start traffic. ?
N
The red coolant warning lamp comes on while the engine is running.
The coolant temperature has exceeded 120 †. The airflow to the engine radiator may be blocked or the coolant level may be too low.
G WARNING
The engine is not being cooled sufficiently and may be damaged.
Never drive with an overheated engine. Driving when your engine is overheated
can cause any fluids that may have leaked into the engine compartment to catch fire.
In addition, steam from an overheated engine can cause serious burns, which can
occur just by opening the bonnet.
There is a risk of injury.
X Observe the additional display messages in the multifunction display.
X Stop the vehicle immediately, paying attention to road and traffic conditions,
and switch off the engine.
X Safeguard the vehicle against rolling away (Y page 168).
X Leave the vehicle and keep a safe distance from the vehicle until the engine has
cooled down.
X Check the coolant level and top up the coolant, observing the warning notes
(Y page 335).
X If you have to top up the coolant frequently, have the engine cooling system
checked. 300
Warning and indicator lamps in the instrument clusterOn-board computer and displays
Page 324 of 397
X
To open: slide cover ;to its foremost posi-
tion.
X To close: pull cover ;back as far as it will go.
You can remove the rubber mat of the cup
holder to clean it. Wash it with clean, lukewarm water only.
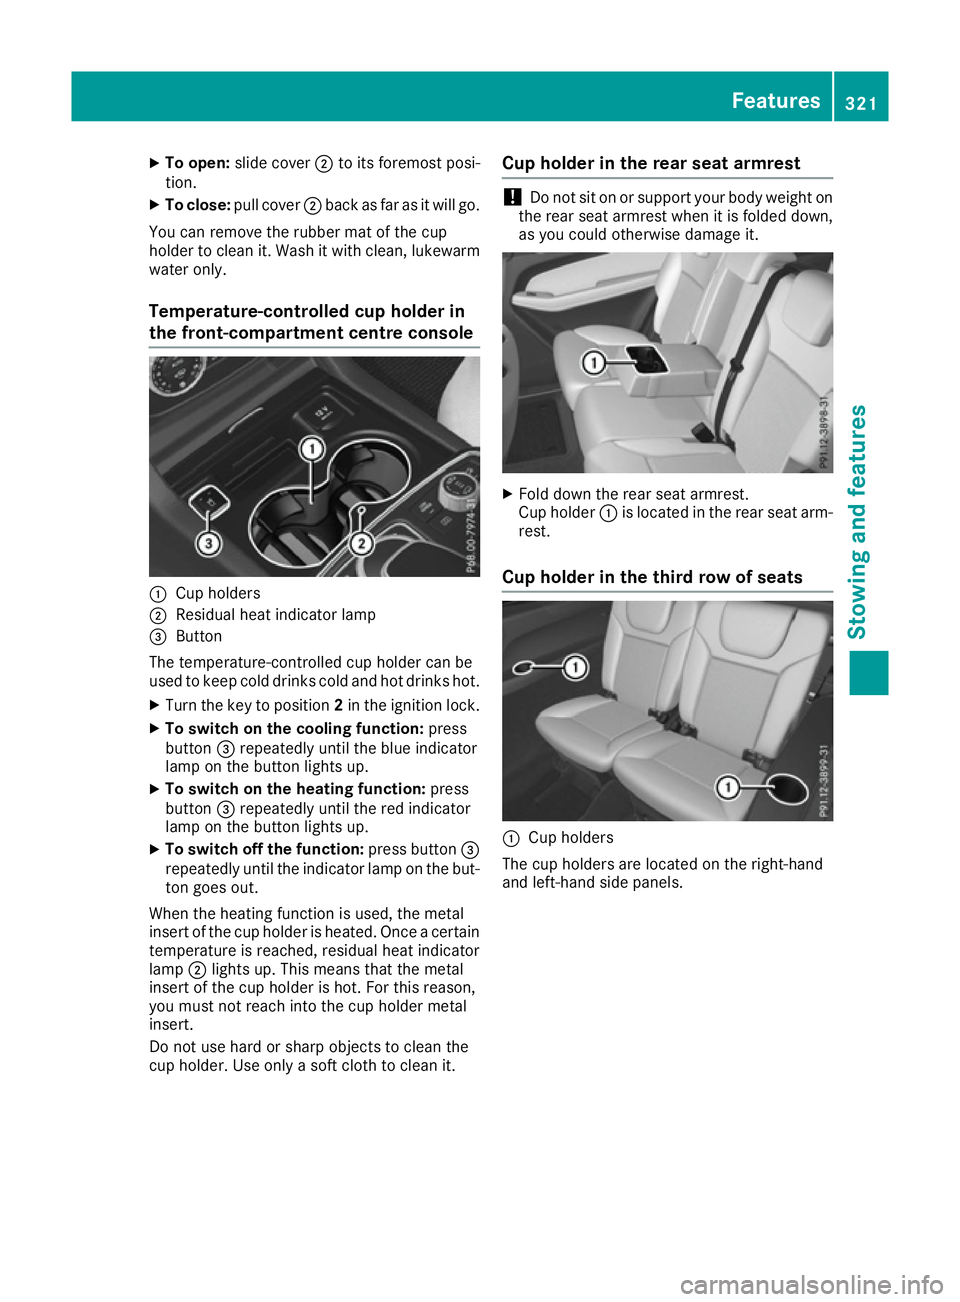
Temperature-controlled cup holder in
the front-compartment centre console :
Cup holders
; Residual heat indicator lamp
= Button
The temperature-controlled cup holder can be
used to keep cold drinks cold and hot drinks hot.
X Turn the key to position 2in the ignition lock.
X To switch on the cooling function: press
button =repeatedly until the blue indicator
lamp on the button lights up.
X To switch on the heating function: press
button =repeatedly until the red indicator
lamp on the button lights up.
X To switch off the function: press button=
repeatedly until the indicator lamp on the but-
ton goes out.
When the heating function is used, the metal
insert of the cup holder is heated. Once a certain temperature is reached, residual heat indicator
lamp ;lights up. This means that the metal
insert of the cup holder is hot. For this reason,
you must not reach into the cup holder metal
insert.
Do not use hard or sharp objects to clean the
cup holder. Use only a soft cloth to clean it. Cup holder in the rear seat armrest !
Do not sit on or support your body weight on
the rear seat armrest when it is folded down,
as you could otherwise damage it. X
Fold down the rear seat armrest.
Cup holder :is located in the rear seat arm-
rest.
Cup holder in the third row of seats :
Cup holders
The cup holders are located on the right-hand
and left-hand side panels. Features
321Stowing an d features Z