2016 MERCEDES-BENZ GLE warning lights
[x] Cancel search: warning lightsPage 149 of 450
Removing the Start/Stop button You can remove the Start/Stop button from the
ignition lock and start the vehicle as normal
using the SmartKey.
It is only possible to switch between KEYLESS-
GO mode and SmartKey operation when the
transmission is in position P .X
Remove Start/Stop button �C from ignition
lock �D .
You do not have to remove the Start/Stop but-
ton from the ignition lock when you leave the
vehicle. You should, however, always take the
SmartKey with you when leaving the vehicle. As
long as the SmartKey is in the vehicle: R
the vehicle can be started using the Start/
Stop button R
the electrically powered equipment can be
operated
Starting the engine
Important safety notes
G WARNING
If children are left unsupervised in the vehicle,
they could: R
open the doors, thus endangering other
people or road users. R
get out and disrupt traffic. R
operate the vehicle's equipment.
Additionally, children could set the vehicle in
motion if, for example, they: R
release the parking brake. R
shifting the automatic transmission out of
park position PR
Start the engine.
There is a risk of an accident and injury.
When leaving the vehicle, always take the
SmartKey with you and lock the vehicle. Never
leave children or animals unattended in the
vehicle. Always keep the SmartKey out of
reach of children. G WARNING
Combustion engines emit poisonous exhaust
gases such as carbon monoxide. Inhaling
these exhaust gases leads to poisoning. There
is a risk of fatal injury. Therefore never leave
the engine running in enclosed spaces with-
out sufficient ventilation.
G WARNING
Flammable materials introduced through
environmental influence or by animals can
ignite if in contact with the exhaust system or
parts of the engine that heat up. There is a risk
of fire.
Carry out regular checks to make sure that
there are no flammable foreign materials in
the engine compartment or in the exhaust
system.
! Do not depress the accelerator when start-
ing the engine.
General notes Vehicles with a gasoline engine: the catalytic
converter is preheated for up to 30 seconds
after a cold start. The sound of the engine may
change during this time.
Automatic transmission X
Shift the transmission to position P
( Y
page 155).
The transmission position display in the mul-
tifunction display shows P ( Y
page 154).
i You can start the engine in transmission
position P and N .
Starting procedure with the SmartKey X
To start a diesel engine : turn the SmartKey
to position 2 in the ignition lock ( Y
page 145).
The �\( preglow indicator lamp in the instru-
ment cluster lights up. X
Turn the SmartKey to position 3 in the ignition
lock and release it as soon as the engine is
running ( Y
page 145).Driving 147
Driving and parking Z
Page 186 of 450
helps avoid overheating and excessive wear
of the brakes.
When you take advantage of the engine brak-
ing effect, a drive wheel may not turn for some
time, e.g. on a slippery road surface. This
could cause damage to the drive train. This
type of damage is not covered by the
Mercedes-Benz warranty.
Do not depress the brake pedal continuously
while the vehicle is in motion, e.g. causing the
brakes to rub by constantly applying light pres-
sure to the pedal. This results in excessive and
premature wear to the brake pads.
Heavy and light loads
G WARNING
If you rest your foot on the brake pedal while
driving, the braking system can overheat. This
increases the stopping distance and can even
cause the braking system to fail. There is a
risk of an accident.
Never use the brake pedal as a footrest. Never
depress the brake pedal and the accelerator
pedal at the same time.
! Depressing the brake pedal constantly
results in excessive and premature wear to
the brake pads.
If the brakes have been subjected to a heavy
load, do not stop the vehicle immediately. Drive
on for a short while. This allows the airflow to
cool the brakes more quickly.
Wet roads If you have driven for a long time in heavy rain
without braking, there may be a delayed reac-
tion from the brakes when braking for the first
time. This may also occur after the vehicle has
been washed or driven through deep water.
You then have to depress the brake pedal more
firmly. Maintain a greater distance from the
vehicle in front.
After driving on a wet road or having the vehicle
washed, brake firmly while paying attention to
the traffic conditions. This will warm up the
brake discs, thereby drying them more quickly
and protecting them against corrosion. Limited braking performance on salt-
treated roads If you drive on salted roads, a layer of salt resi-
due may form on the brake discs and brake
pads. This can result in a significantly longer
braking distance. R
Brake occasionally to remove any possible
salt residue. Make sure that you do not
endanger other road users when doing so. R
Carefully depress the brake pedal and the
beginning and end of a journey. R
Maintain a greater distance to the vehicle
ahead.
Servicing the brakes
! The brake fluid level may be too low, if: R
if the red brake warning lamp lights up in
the instrument cluster and R
you hear a warning tone while the engine is
running
Observe additional warning messages in the
multifunction display.
The brake fluid level may be too low due to
brake pad wear or leaking brake lines.
Have the brake system checked immediately.
Consult a qualified specialist workshop to
arrange this.
! A function or performance test should only
be carried out on a 2-axle dynamometer. If
you wish to operate the vehicle on such a
dynamometer, please consult a qualified spe-
cialist workshop in advance. You could oth-
erwise damage the drive train or the brake
system.
! Because ESP ®
is an automatic system, the
engine and ignition must be switched off
(SmartKey in position 0 or 1 or Start/Stop
button in position 0 or 1 ) when the electric
parking brake is being tested on a brake dyna-
mometer (maximum 10 seconds).
Braking triggered automatically by ESP ®
may
seriously damage the brake system.
All checks and maintenance work on the brake
system must be carried out at a qualified spe-
cialist workshop.
Have brake pads installed and brake fluid
replaced at a qualified specialist workshop.
If the brake system has only been subject to
moderate loads, you should test the functional-184
Driving tips
Driving and parking
Page 190 of 450
Observe the following notes: R
Stop the vehicle before starting to drive along
an off-road route. If necessary, select the off-
road program ( Y
page 237) or shift to the
LOW RANGE off-road gear ( Y
page 239).R
Select a vehicle level that is suitable for the
terrain. To avoid damaging the vehicle, make
sure there is always sufficient ground clear-
ance. R
Check that items of luggage and loads are
stowed safely and are well secured
( Y
page 333).R
Always keep the engine running and in gear
when driving on a downhill gradient. Activate
DSR ( Y
page 236).R
Always keep the engine running and in gear
when driving on a slope. R
Adapt your speed to the terrain. The rougher,
steeper or more ruts on the terrain, the slower
your speed should be. R
Do not jump with the vehicle as this will inter-
rupt the vehicle's propulsion. R
Drive with extreme care on unfamiliar off-road
routes where visibility is poor. For safety rea-
sons, get out of the vehicle first and survey
the off-road route. R
Look out for obstacles, such as rocks, holes,
tree stumps and furrows. R
Always keep the doors, the tailgate, the side
windows and the sliding sunroof closed while
the vehicle is in motion. R
Do not shift the automatic transmission to
transmission position N .R
Observe the notes on off-road fording
( Y
page 185).
i Do not use the HOLD function when driving
off-road, on steep uphill or downhill gradients
or on slippery or loose surfaces. The HOLD
function cannot hold the vehicle on such sur-
faces.
Checklist before driving off-road
! If the engine oil warning lamp lights up while
the vehicle is in motion, stop the vehicle in a
safe place as soon as possible. Check the
engine oil level. The engine oil warning lamp
warning must not be ignored. Continuing the
journey while the symbol is displayed could
lead to engine damage. X
Engine oil level: check the engine oil level
and add oil if necessary.
When driving on steep gradients, the engine
oil level must be sufficiently high to ensure a
correct oil supply in the vehicle. X
DEF tank (BlueTEC vehicles): check the
level and add if necessary ( Y
page 167).X
Tire-changing tool kit: check that the jack is
working and make sure you have the lug
wrench, a robust tow cable and a folding
spade in the vehicle. X
Wheels and tires: check the tire tread depth
and tire pressure. X
Check for damage and remove any foreign
objects, e.g. small stones, from the wheels/
tires. X
Replace any missing valve caps. X
Replace dented or damaged wheels. X
Rims: dented or bent rims can result in a loss
of tire pressure and damage the tire bead.
Before driving off-road, check the wheels and
replace them if necessary.
Checklist after driving off-road
! If you detect damage to the vehicle after
driving off-road, have the vehicle checked
immediately at a qualified specialist work-
shop.
Driving over rough terrain places greater
demands on your vehicle than driving on normal
roads. After driving off-road, check the vehicle.
This allows you to detect damage promptly and
reduce the risk of an accident to yourself and
other road users. X
If the Offroad or Offroad Plus drive program
is selected: select the Individual , Sport ,
Comfort or Slippery drive program
( Y
page 152). X
Deactivate the LOW RANGE off-road gear
( Y
page 239). X
Deactivate DSR ( Y
page 236).X
Lower the vehicle level again to a level suita-
ble to the road conditions, e.g. to the normal
level. X
Clean the headlamps and rear lights and
check for damage. X
Clean the front and rear license plates. X
Clean the wheels and tires with a water jet
and remove any foreign objects.188
Driving tips
Driving and parking
Page 215 of 450
Problems with PARKTRONIC Problem
Possible causes/consequences and �P Solutions
Only the red segments in
the PARKTRONIC warn-
ing displays are lit. You
also hear a warning tone
for approximately two
seconds.
PARKTRONIC is deacti-
vated after approx-
imately five seconds,
and the indicator lamp in
the PARKTRONIC button
lights up. PARKTRONIC has malfunctioned and has switched off. X
If problems persist, have PARKTRONIC checked at a qualified spe-
cialist workshop.
Only the red segments in
the PARKTRONIC warn-
ing displays are lit.
PARKTRONIC is deacti-
vated after approx-
imately five seconds. The PARKTRONIC sensors are dirty or there is interference. X
Clean the PARKTRONIC sensors ( Y
page 365).X
Switch the ignition back on.
The problem may be caused by an external source of radio or ultra-
sound waves. X
See if PARKTRONIC functions in a different location.
Active Parking Assist
General notes Active Parking Assist is an electronic parking aid
with ultrasound. It measures the road on both
sides of the vehicle. A parking symbol indicates
a suitable parking space. Active steering inter-
vention and brake application can assist you
during parking. You may also use PARKTRONIC
( Y
page 210).
Important safety notes Active Parking Assist is merely an aid. It is not a
replacement for your attention to your immedi-
ate surroundings. You are always responsible
for safe maneuvering, parking and exiting a
parking space. Make sure that no persons, ani-
mals or objects are in the maneuvering range.
When PARKTRONIC is switched off, Active Park-
ing Assist is also unavailable.
G WARNING
While parking or pulling out of a parking
space, the vehicle swings out and can drive
onto areas of the oncoming lane. This could result in a collision with another road user.
There is a risk of an accident.
Pay attention to other road users. Stop the
vehicle if necessary or cancel the Active Park-
ing Assist parking procedure.
! If unavoidable, you should drive over obsta-
cles such as curbs slowly and not at a sharp
angle. Otherwise, you may damage the
wheels or tires.
Active Parking Assist may possibly indicate
parking spaces which are not suitable for park-
ing, for example: R
where parking or stopping is prohibited R
in front of driveways or entrances and exits R
on unsuitable surfaces
Parking tips: R
On narrow roads, drive as close to the parking
space as possible. R
Parking spaces that are littered or overgrown
might be identified or measured incorrectly. R
Parking spaces that are partially occupied by
trailer drawbars might not be identified as
such or be measured incorrectly.Driving systems 213
Driving and parking Z
Page 230 of 450
cycle racks or overhanging loads. Following a
severe impact or in the event of damage to the
bumpers, have the function of the radar sensors
checked at a qualified specialist workshop.
Blind Spot Assist may no longer work properly.
Monitoring range of the sensors In particular, the detection of obstacles can be
impaired if: R
there is dirt on the sensors or anything else
covering the sensors R
there is poor visibility, e.g. due to fog, heavy
rain or snow R
narrow vehicles, e.g. motorcycles or bicycles
Vehicles in the monitoring range are then not
indicated.
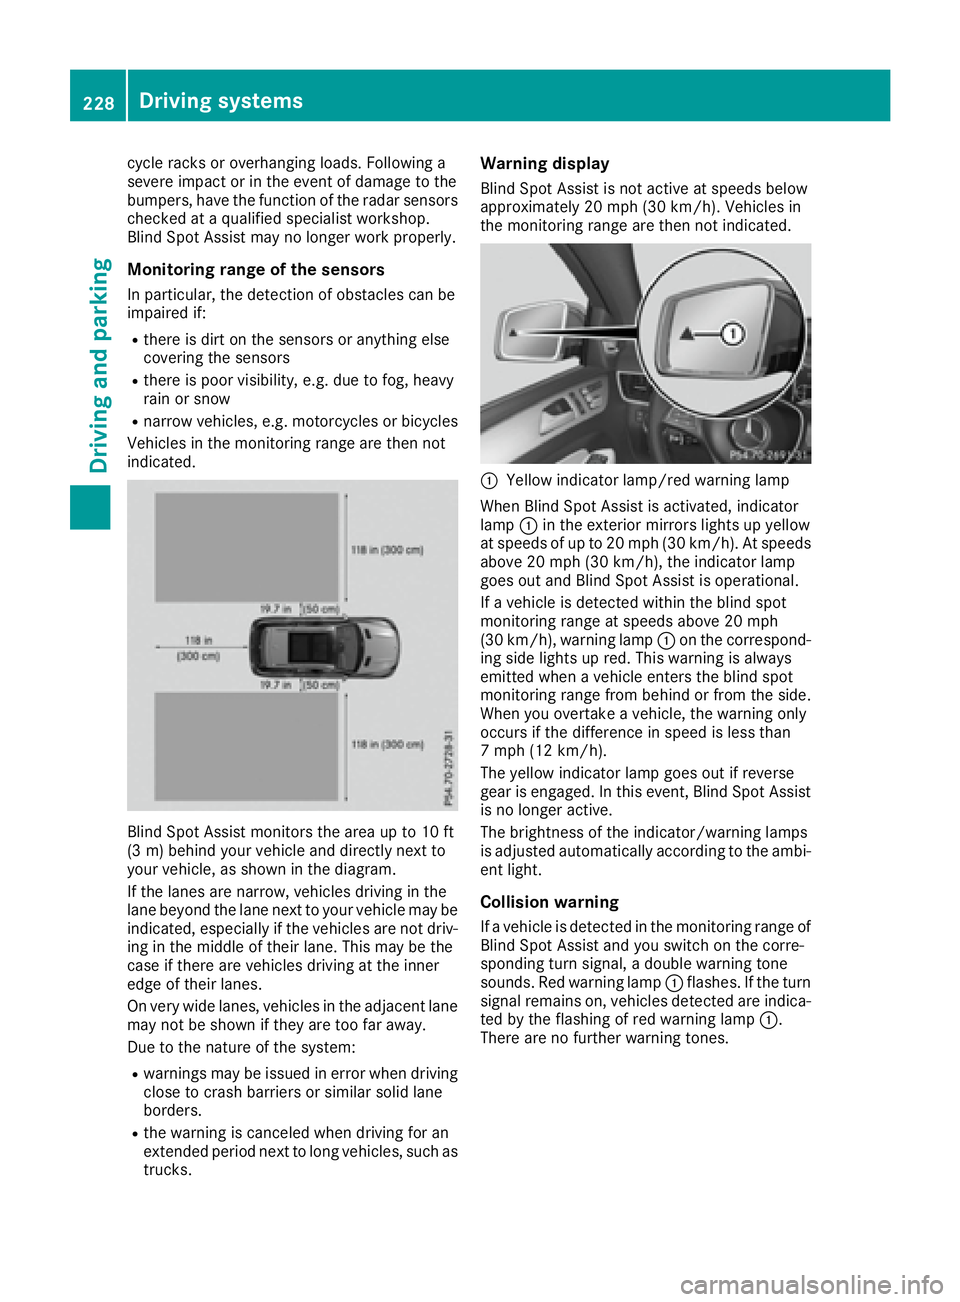
Blind Spot Assist monitors the area up to 10 ft
(3 m) behind your vehicle and directly next to
your vehicle, as shown in the diagram.
If the lanes are narrow, vehicles driving in the
lane beyond the lane next to your vehicle may be
indicated, especially if the vehicles are not driv-
ing in the middle of their lane. This may be the
case if there are vehicles driving at the inner
edge of their lanes.
On very wide lanes, vehicles in the adjacent lane
may not be shown if they are too far away.
Due to the nature of the system: R
warnings may be issued in error when driving
close to crash barriers or similar solid lane
borders. R
the warning is canceled when driving for an
extended period next to long vehicles, such as
trucks. Warning display Blind Spot Assist is not active at speeds below
approximately 20 mph (30 km/h). Vehicles in
the monitoring range are then not indicated.
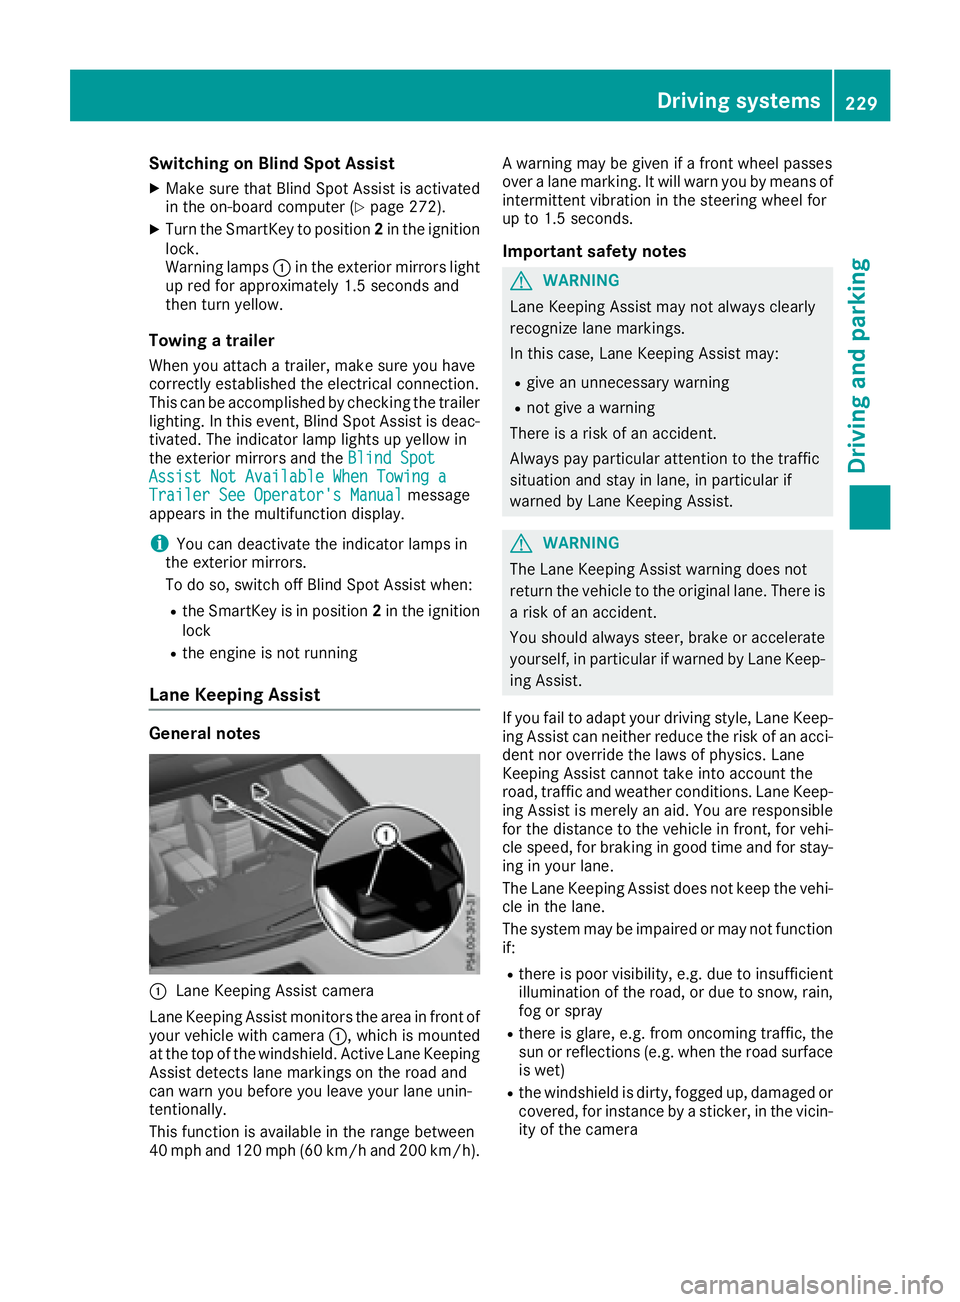
�C
Yellow indicator lamp/red warning lamp
When Blind Spot Assist is activated, indicator
lamp �C in the exterior mirrors lights up yellow
at speeds of up to 20 mph (30 km/h). At speeds
above 20 mph (30 km/h), the indicator lamp
goes out and Blind Spot Assist is operational.
If a vehicle is detected within the blind spot
monitoring range at speeds above 20 mph
(30 km/h), warning lamp �C on the correspond-
ing side lights up red. This warning is always
emitted when a vehicle enters the blind spot
monitoring range from behind or from the side.
When you overtake a vehicle, the warning only
occurs if the difference in speed is less than
7 mph (12 km/h).
The yellow indicator lamp goes out if reverse
gear is engaged. In this event, Blind Spot Assist
is no longer active.
The brightness of the indicator/warning lamps
is adjusted automatically according to the ambi-
ent light.
Collision warning
If a vehicle is detected in the monitoring range of
Blind Spot Assist and you switch on the corre-
sponding turn signal, a double warning tone
sounds. Red warning lamp �C flashes. If the turn
signal remains on, vehicles detected are indica-
ted by the flashing of red warning lamp �C .
There are no further warning tones.228
Driving systems
Driving and parking
Page 231 of 450
Switching on Blind Spot Assist X
Make sure that Blind Spot Assist is activated
in the on-board computer ( Y
page 272).X
Turn the SmartKey to position 2 in the ignition
lock.
Warning lamps �C in the exterior mirrors light
up red for approximately 1.5 seconds and
then turn yellow.
Towing a trailer When you attach a trailer, make sure you have
correctly established the electrical connection.
This can be accomplished by checking the trailer
lighting. In this event, Blind Spot Assist is deac-
tivated. The indicator lamp lights up yellow in
the exterior mirrors and the Blind Spot
Assist Not Available When Towing a
Trailer See Operator's Manual message
appears in the multifunction display.
i You can deactivate the indicator lamps in
the exterior mirrors.
To do so, switch off Blind Spot Assist when: R
the SmartKey is in position 2 in the ignition
lock R
the engine is not running
Lane Keeping Assist
General notes
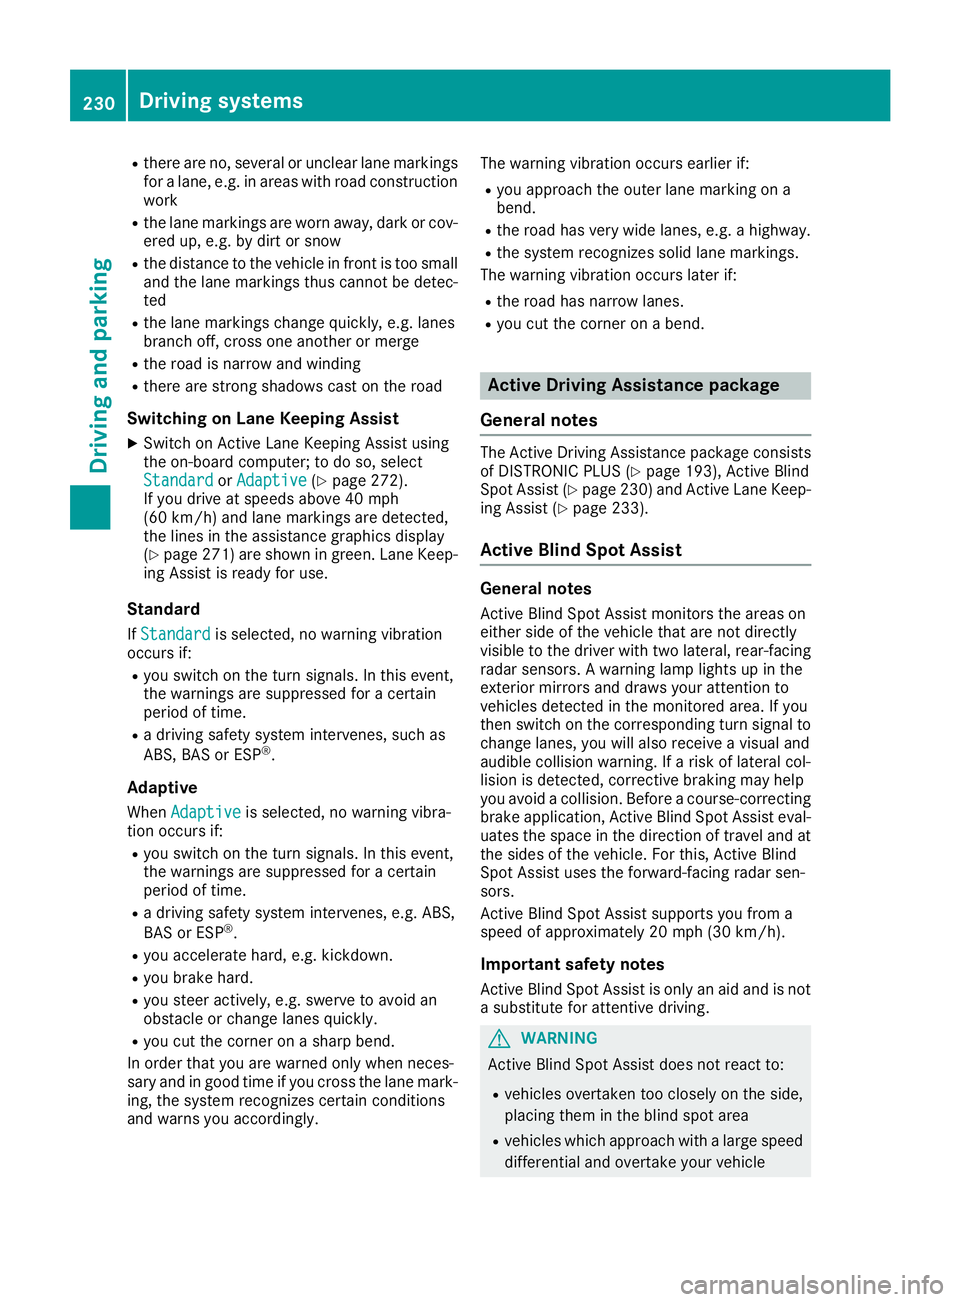
�C
Lane Keeping Assist camera
Lane Keeping Assist monitors the area in front of
your vehicle with camera �C , which is mounted
at the top of the windshield. Active Lane Keeping
Assist detects lane markings on the road and
can warn you before you leave your lane unin-
tentionally.
This function is available in the range between
40 mph and 120 mph (60 km/h and 200 km/h). A warning may be given if a front wheel passes
over a lane marking. It will warn you by means of
intermittent vibration in the steering wheel for
up to 1.5 seconds.
Important safety notes
G WARNING
Lane Keeping Assist may not always clearly
recognize lane markings.
In this case, Lane Keeping Assist may: R
give an unnecessary warning R
not give a warning
There is a risk of an accident.
Always pay particular attention to the traffic
situation and stay in lane, in particular if
warned by Lane Keeping Assist.
G WARNING
The Lane Keeping Assist warning does not
return the vehicle to the original lane. There is
a risk of an accident.
You should always steer, brake or accelerate
yourself, in particular if warned by Lane Keep-
ing Assist.
If you fail to adapt your driving style, Lane Keep-
ing Assist can neither reduce the risk of an acci-
dent nor override the laws of physics. Lane
Keeping Assist cannot take into account the
road, traffic and weather conditions. Lane Keep-
ing Assist is merely an aid. You are responsible
for the distance to the vehicle in front, for vehi-
cle speed, for braking in good time and for stay-
ing in your lane.
The Lane Keeping Assist does not keep the vehi-
cle in the lane.
The system may be impaired or may not function
if: R
there is poor visibility, e.g. due to insufficient
illumination of the road, or due to snow, rain,
fog or spray R
there is glare, e.g. from oncoming traffic, the
sun or reflections (e.g. when the road surface
is wet) R
the windshield is dirty, fogged up, damaged or
covered, for instance by a sticker, in the vicin-
ity of the cameraDriving systems 229
Driving and parking Z
Page 232 of 450
R
there are no, several or unclear lane markings
for a lane, e.g. in areas with road construction
work R
the lane markings are worn away, dark or cov-
ered up, e.g. by dirt or snow R
the distance to the vehicle in front is too small
and the lane markings thus cannot be detec-
ted R
the lane markings change quickly, e.g. lanes
branch off, cross one another or merge R
the road is narrow and winding R
there are strong shadows cast on the road
Switching on Lane Keeping Assist X
Switch on Active Lane Keeping Assist using
the on-board computer; to do so, select
Standard or Adaptive ( Y
page 272).
If you drive at speeds above 40 mph
(60 km/h) and lane markings are detected,
the lines in the assistance graphics display
( Y
page 271) are shown in green. Lane Keep-
ing Assist is ready for use.
Standard If Standard is selected, no warning vibration
occurs if: R
you switch on the turn signals. In this event,
the warnings are suppressed for a certain
period of time. R
a driving safety system intervenes, such as
ABS, BAS or ESP ®
.
Adaptive When Adaptive is selected, no warning vibra-
tion occurs if: R
you switch on the turn signals. In this event,
the warnings are suppressed for a certain
period of time. R
a driving safety system intervenes, e.g. ABS,
BAS or ESP ®
.R
you accelerate hard, e.g. kickdown. R
you brake hard. R
you steer actively, e.g. swerve to avoid an
obstacle or change lanes quickly. R
you cut the corner on a sharp bend.
In order that you are warned only when neces-
sary and in good time if you cross the lane mark-
ing, the system recognizes certain conditions
and warns you accordingly. The warning vibration occurs earlier if: R
you approach the outer lane marking on a
bend. R
the road has very wide lanes, e.g. a highway. R
the system recognizes solid lane markings.
The warning vibration occurs later if: R
the road has narrow lanes. R
you cut the corner on a bend.
Active Driving Assistance package
General notes The Active Driving Assistance package consists
of DISTRONIC PLUS ( Y
page 193), Active Blind
Spot Assist ( Y
page 230 )a nd Active Lane Keep-
ing Assist ( Y
page 233).
Active Blind Spot Assist
General notes Active Blind Spot Assist monitors the areas on
either side of the vehicle that are not directly
visible to the driver with two lateral, rear-facing
radar sensors. A warning lamp lights up in the
exterior mirrors and draws your attention to
vehicles detected in the monitored area. If you
then switch on the corresponding turn signal to
change lanes, you will also receive a visual and
audible collision warning. If a risk of lateral col-
lision is detected, corrective braking may help
you avoid a collision. Before a course-correcting
brake application, Active Blind Spot Assist eval-
uates the space in the direction of travel and at
the sides of the vehicle. For this, Active Blind
Spot Assist uses the forward-facing radar sen-
sors.
Active Blind Spot Assist supports you from a
speed of approximately 20 mph (30 km/h).
Important safety notes
Active Blind Spot Assist is only an aid and is not
a substitute for attentive driving.
G WARNING
Active Blind Spot Assist does not react to: R
vehicles overtaken too closely on the side,
placing them in the blind spot area R
vehicles which approach with a large speed
differential and overtake your vehicle230
Driving systems
Driving an d parking
Page 234 of 450
Indicator and warning display
�C
Yellow indicator lamp/red warning lamp
Active Blin d Spo t Assist is not active at spee ds
below appr oximately 20 mph (30 km/h). Veh i-
cles in the monitoring range are then not ind i-
cated.
When Active Blin d Spo t Assist is activated, ind i-
cator lamp �C in the exterior mirrors lights up
yellow at spee ds of up to 20 mph (30 km /h ). At
spee ds above 20 mph (30 km/h), the indicator
lamp goes out and Active Blin d Spo t Assist is
operational.
If a veh icle is detected wit hin the monitoring
range at spee ds above appr oximately 20 mph
(30 km/h), warning lamp �C on the correspond-
ing side lights up red. This warning lamp always
lights up when a veh icle enters the blin d spot
monitoring range from behind or from the side .
When you overtake a veh icle wit h a diff erence in
speed of less than 7 mph (12 km /h ), a delayed
warning occurs.
The yellow indicator lamp goes out if reverse
gear is engaged. Active Blin d Spo t Assist is not
operational.
The brig htness of the indicator/warning lamps
is adjusted automatical ly according to the
brig htness of the surroun din gs.
Visual and acoustic collision warning
If you swit ch on the turn signals to change lanes
and a veh icle is detected in the side monitoring
range, you receive a visual and acoust ic co llisio n
warning. You then hear a double war ning tone
an d red warning lamp �C flashes. If the turn sig-
nal remains on, detected veh icle s are indicated
by the flashing of red warning lamp �C . There are
no further warning tones. Course-correcting brake application If Active Blin d Spot Assist detects a risk of a lat-
eral collision in the monitoring range, a course-
correcting brake application is carried out. This
is meant to assist you in avoiding a collision.
G WARNING
A course-correcting brake application cannot
always prevent a collision. There is a risk of an
accident.
Always steer, brake or accelerate yourself,
especially if Active Blin d Spot Assist warns
you or makes a course-correcting brake appli-
cation. Always maintain a safe distance at the
sides.
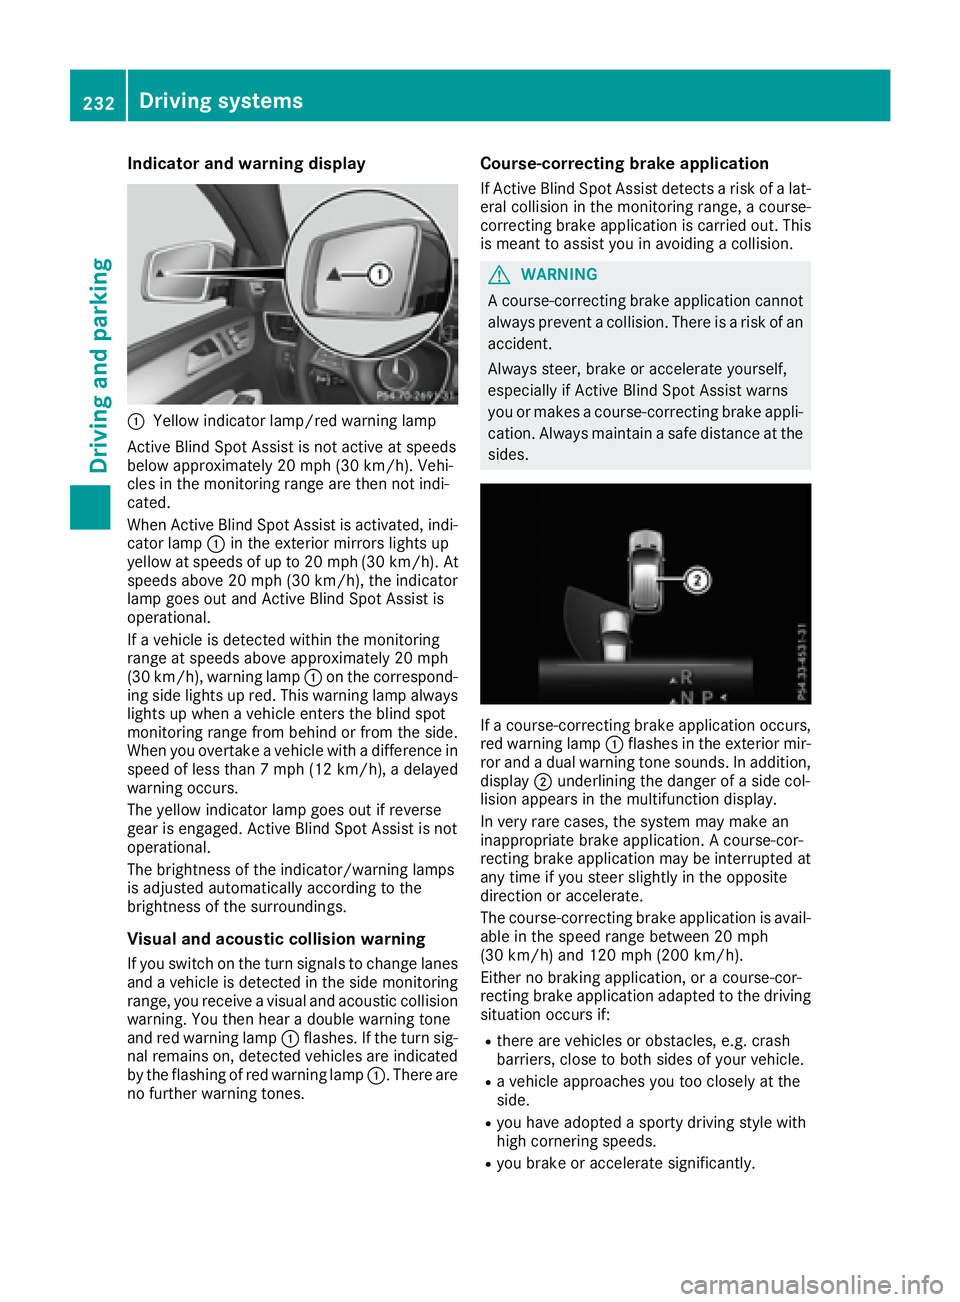
If a course-correcting brake application occurs,
red warning lamp �C flashes in the exterior mir-
ror and a dual warning tone sounds. In addition,
disp lay �D underlining the danger of a side col-
lisio n appears in the multifunction display.
In very rare cases, the system may make an
inappropriate brake application. A course-cor-
recting brake application may be interrupted at
any time if you steer slightly in the opposite
dire ction or accelerate.
The course-correcting brake application is avail-
able in the speed range between 20 mph
(30 km/h) and 120 mph (200 km/h).
Either no braking application, or a course-cor-
recting brake application adapted to the driving
situation occurs if: R
there are vehicles or obstacles, e.g. crash
barriers, close to both side s of your vehicle.R
a vehicle approaches you too closely at the
side . R
you have adopted a sporty driving style with
high cornering speeds. R
you brake or accelerate significantly.232
Driving systems
Driving and parking