2016 MERCEDES-BENZ GLE-CLASS SUV door lock
[x] Cancel search: door lockPage 98 of 450
!Only open the sliding sunroof if it is free of
snow and ice. Otherwise, malfunctions may
occur.
Do not allow anything to protrude from the
sliding sunroof. Otherwise, the seals could be
damaged.
!The weather can change abruptly. It could
start to rain or snow. Make sure that the slid-
ing sunroof is closed when you leave the vehi-
cle. The vehicle electronics can be damaged if
water enters the vehicle interior.
Resonance noises can occur in addition to the
usual airflow noises when the sliding sunroof is
open. They are caused by minor pressure fluc-
tuations in the vehicle interior. Change the posi-
tion of the sliding sunroof or open a side win-
dow. The noise will be reduced or eliminated.
Sliding sunroof reversing feature
Your vehicle may be equipped with a sliding
sunroof or a panorama roof with power tilt/slid-
ing panel. In the following section, the term
"sliding sunroof" refers to both sliding sunroof
variants.
The sliding sunroof is equipped with an auto-
matic reversing feature. If a solid object blocks
or restricts the sliding sunroof during the closing
process, the sliding sunroof opens again auto-
matically. However, the automatic reversing
feature is only an aid and does not relieve you of
the responsibility of paying attention when clos-
ing the sliding sunroof.
GWARNING
The reversing feature does not react:
Rto soft, light and thin objects, e.g. small fin-
gers
Rover the last 1/6 in (4 mm) of the closing
movement
Rduring resetting
Rwhen closing the sliding sunroof again man- ually immediately after automatic reversing
This means that the reversing feature cannot
prevent someone being trapped in these sit-
uations. There is a risk of injury.
Make sure that no body parts are in close
proximity during the closing procedure.
If somebody becomes trapped:
Rrelease the switch immediately, or
Rpress the switch in any direction during the
automatic closing process
The closing process is stopped.
Operating the sliding sunroof
Opening and closing
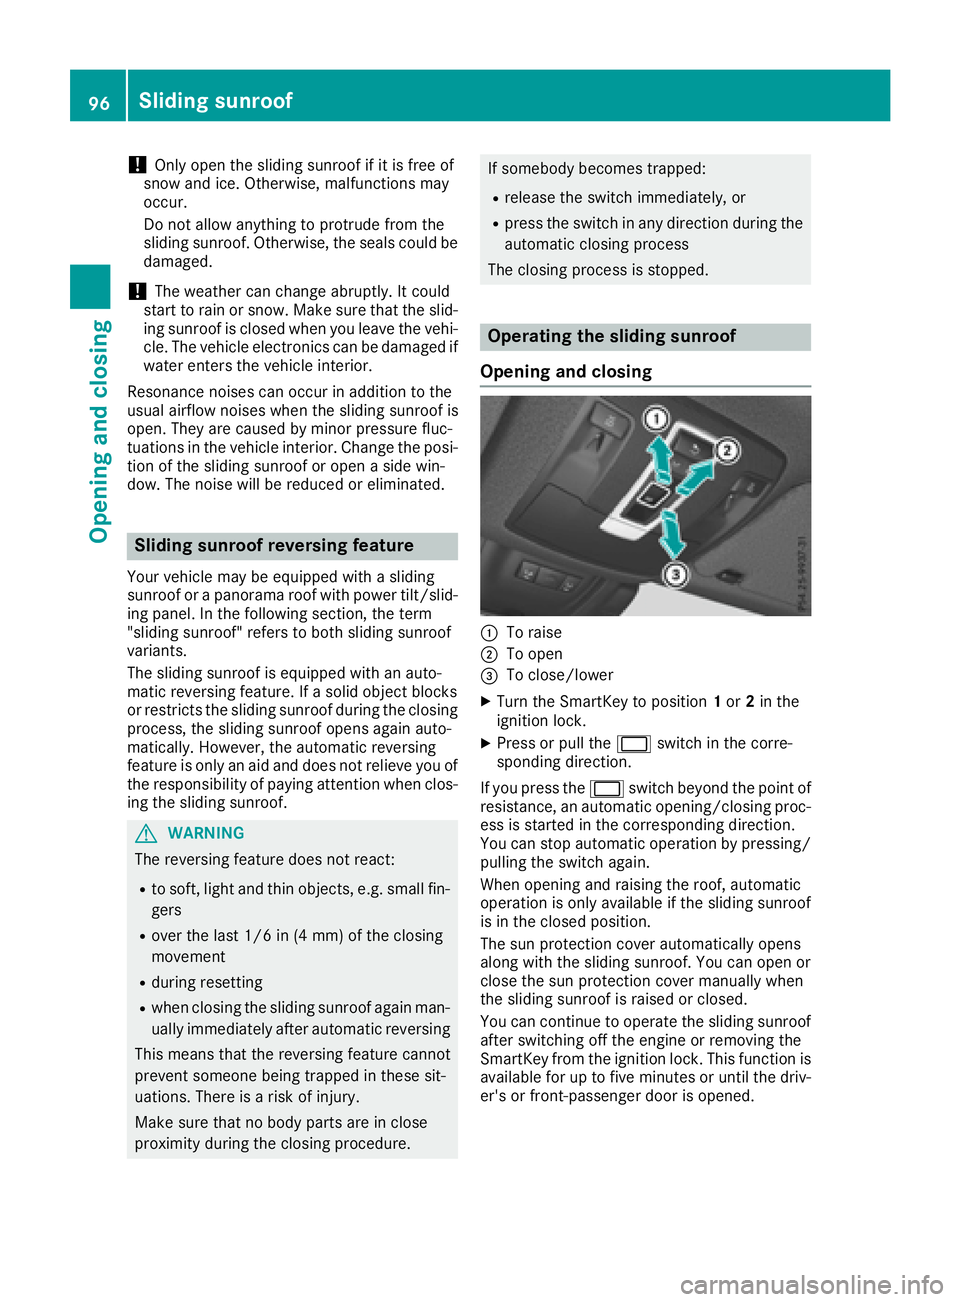
:To raise
;To open
=To close/lower
XTurn the SmartKey to position 1or 2in the
ignition lock.
XPress or pull the 2switch in the corre-
sponding direction.
If you press the 2switch beyond the point of
resistance, an automatic opening/closing proc-
ess is started in the corresponding direction.
You can stop automatic operation by pressing/
pulling the switch again.
When opening and raising the roof, automatic
operation is only available if the sliding sunroof
is in the closed position.
The sun protection cover automatically opens
along with the sliding sunroof. You can open or
close the sun protection cover manually when
the sliding sunroof is raised or closed.
You can continue to operate the sliding sunroof
after switching off the engine or removing the
SmartKey from the ignition lock. This function is
available for up to five minutes or until the driv- er's or front-passenger door is opened.
96Sliding sunroof
Opening and closing
Page 110 of 450

Adjusting the steering wheel electri-
cally
:Adjusts th esteering whee lheight
;Adjusts th esteering whee lposition (fore-
and-af tadjustment)
The steering whee lcan also be adjusted when
th eSmartKey is remove dfrom th eignition lock.
iFurther relate dsubjects :
REASY-ENTRY/EXIT feature (Ypage 109)
RStoring settings (Ypage 113)
Steering wheel heating
Switching on/off
XTurn th eSmartKey to position 2in th eignition
loc k (Ypage 145).
XTo switch on/off: turnth elever in th edirec -
tion of arrow :or;.
Indicato rlamp =lights up or goe sout .
Vehicles wit hKEYLESS-GO :when you switch off
th eignition and open th edriver's door ,th e
steering whee lheating is deactivated.
Vehicles without KEYLESS-GO :when you
remove th eSmartKey from th eignition lock, th e
steering whee lheating is deactivated.
108Steering wheel
Seats, steering wheel and mirrors
Page 111 of 450
Problems with the steering wheel heating
ProblemPossible causes/consequences andMSolutions
The steering wheel heat-
ing has switched off pre-
maturely or cannot be
switched on.The on-board voltage is too low because too many electrical consum-
ers are switched on.
XSwitch off electrical consumers that you do not need, such as the
rear window defroster or interior lighting.
EASY-ENTRY/EXIT feature
Important safety notes
GWARNING
When the EASY-ENTRY/EXIT feature adjusts
the steering wheel, you and other vehicle
occupants – particularly children – could
become trapped. There is a risk of injury.
While the EASY-ENTRY/EXIT feature is mak-
ing adjustments, make sure that no one has
any body parts in the sweep of the steering
wheel.
Move the steering wheel adjustment lever if
there is a risk of entrapment by the steering
wheel. The adjustment process is stopped.
Press one of the memory function position but-
tons. This function is only available on vehicles
with memory function.
GWARNING
If children activate the EASY-ENTRY/EXIT fea-
ture, they can become trapped, particularly
when unattended. There is a risk of injury.
When leaving the vehicle, always take the
SmartKey with you and lock the vehicle. Never
leave children unsupervised in the vehicle.
GWARNING
If you drive off while the EASY-ENTRY/EXIT
feature is making adjustments, you could lose
control of the vehicle. There is a risk of an
accident.
Always wait until the adjustment process is
complete before driving off.
The EASY-ENTRY/EXIT feature makes getting in
and out of your vehicle easier. You can activate and deactivate the EASY-
ENTRY/EXIT feature in the on-board computer
(
Ypage 275).
Position of the steering wheel when the
EASY-ENTRY/EXIT feature is active
The steering wheel swings upwards when you:
Rremove the SmartKey from the ignition lock
Ropen the driver's door with KEYLESS-GO in
position
1
Ropen the driver's door and the SmartKey is in
position0or 1in the ignition lock
iThe steering wheel only moves upwards if it
has not already reached the upper stop.
Position of the steering wheel for driv-
ing
The steering wheel is moved to the last selected
position when:
Rthe driver's door is closed
Ryou insert the SmartKey into the ignition lock
or
Ryou press the Start/Stop button once on vehi-
cles with KEYLESS-GO
When you close the driver's door with the igni-
tion switched on, the steering wheel is also
automatically moved to the previously set posi-
tion.
The last position of the steering column is stored
when you:
Rswitch the ignition off
Rsave the setting with the memory function
(Ypage 113).
Steering wheel109
Seats, steering wheel and mirrors
Z
Page 112 of 450
Crash-responsive EASY-EXIT feature
If the crash-responsive EASY-EXIT feature is trig-
gered in an accident, the steering column will
move upwards when the driver's door is opened.
This occurs irrespective of the position of the
SmartKey in the ignition lock. This makes it eas-ier to exit the vehicle and rescue the occupants.
The crash-responsive EASY-EXIT feature is only
operational if the EASY-EXIT/ENTRY feature is
activated in the on-board computer
(
Ypage 275).
Mirrors
Rear-view mirror
XAnti-glare mode: flick anti-glare lever :for-
wards or back.
Exterior mirrors
Adjusting the exterior mirrors
GWARNING
You could lose control of your vehicle if you do the following while driving:
Radjust the driver's seat, head restraint,
steering wheel or mirrors
Rfasten the seat belt
There is a risk of an accident.
Adjust the driver's seat, head restraint, steer-
ing wheel and mirror and fasten your seat belt before starting the engine.
GWARNING
The exterior mirror on the front-passenger
side reduces the size of the image. Visible
objects are actually closer than they appear.
This means that you could misjudge the dis-
tance from road users traveling behind, e.g.
when changing lane. There is a risk of an acci-
dent.
For this reason, always make sure of the
actual distance from the road users traveling
behind by glancing over your shoulder.
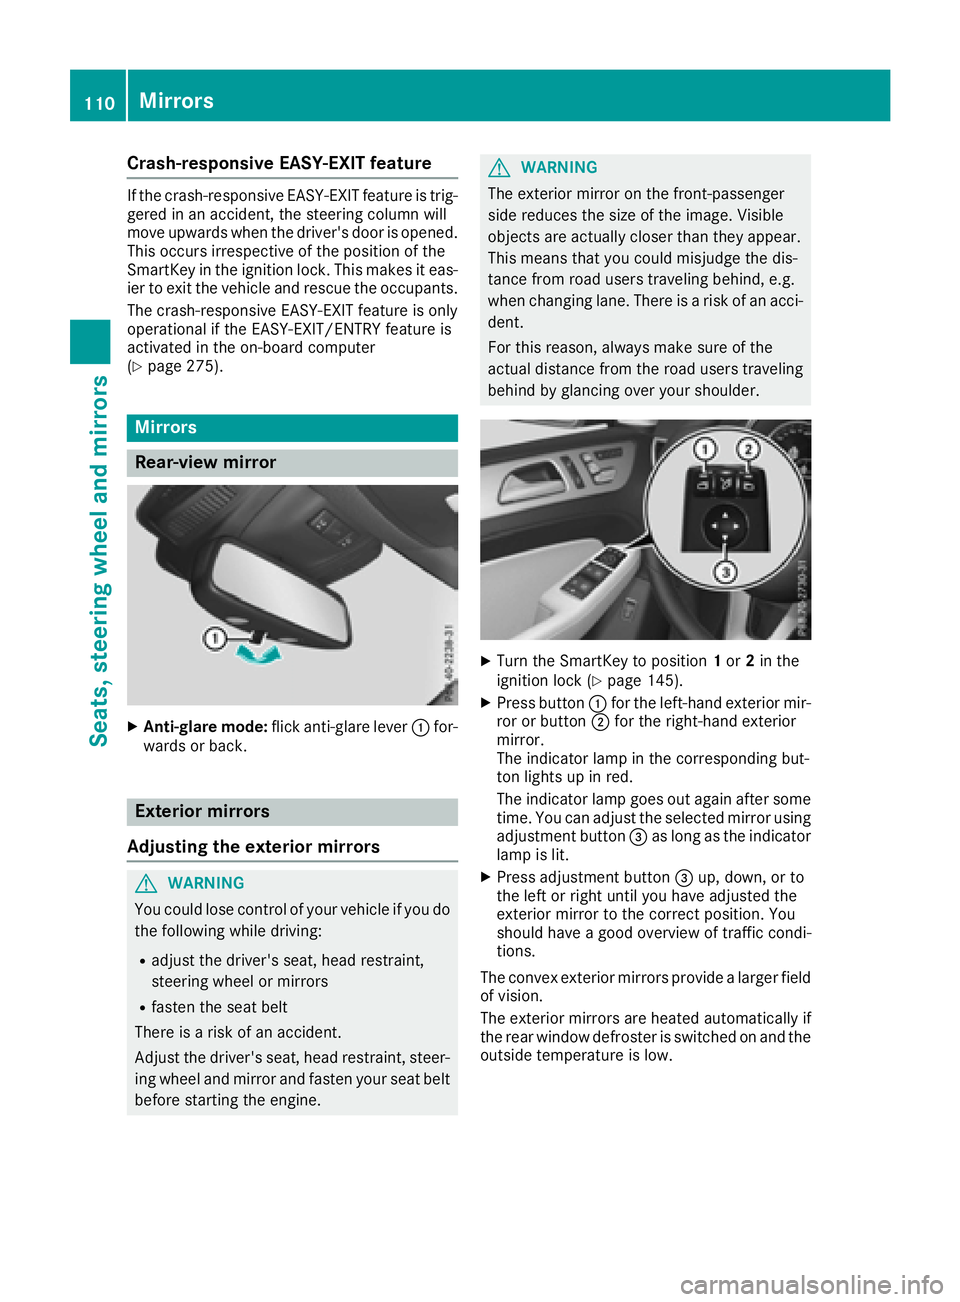
XTurn the SmartKey to position 1or 2in the
ignition lock (Ypage 145).
XPress button :for the left-hand exterior mir-
ror or button ;for the right-hand exterior
mirror.
The indicator lamp in the corresponding but-
ton lights up in red.
The indicator lamp goes out again after some
time. You can adjust the selected mirror using
adjustment button =as long as the indicator
lamp is lit.
XPress adjustment button =up, down, or to
the left or right until you have adjusted the
exterior mirror to the correct position. You
should have a good overview of traffic condi-
tions.
The convex exterior mirrors provide a larger field
of vision.
The exterior mirrors are heated automatically if
the rear window defroster is switched on and the
outside temperature is low.
110Mirrors
Seats, steering wheel and mirrors
Page 113 of 450
Folding the exterior mirrors in or out
electrically
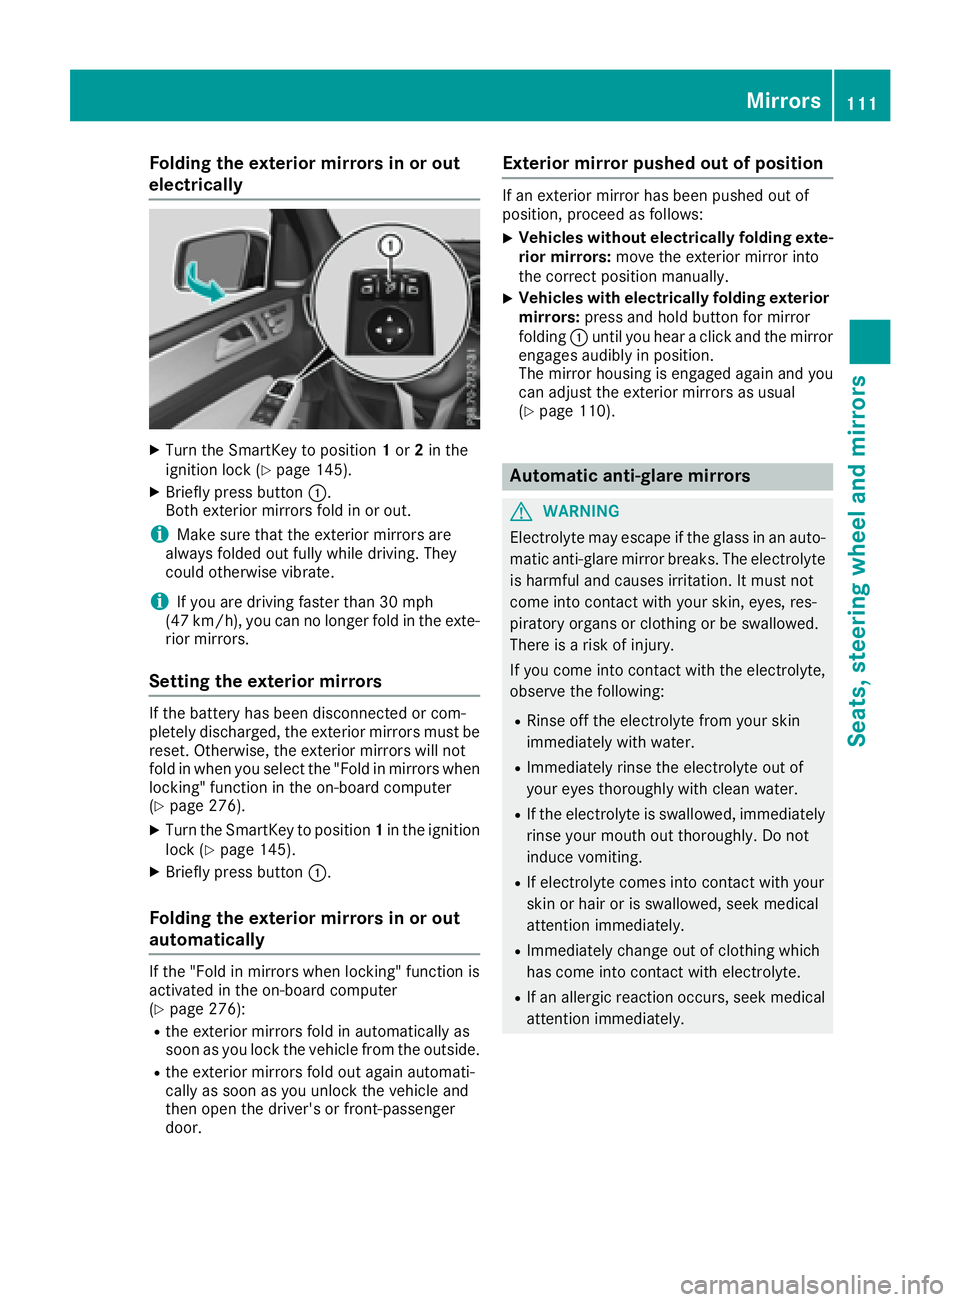
XTurn theSmartKey to position 1or 2in th e
ignition loc k (Ypage 145).
XBriefly press butto n:.
Both exterio rmirror sfol din or out .
iMakesure that th eexterio rmirror sare
always folded out fully while driving .They
could otherwise vibrate .
iIf you are driving fasterthan 30 mph
(47 km/h), you can no longer fol din th eexte -
rio rmirrors.
Setting the exterior mirrors
If th ebattery has been disconnected or com-
pletely discharged, th eexterio rmirror smust be
reset .Otherwise, th eexterio rmirror swill no t
fol din when you select th e"Fold in mirror swhen
locking" function in th eon-board computer
(
Ypage 276).
XTurn th eSmartKey to position 1in th eignition
loc k (Ypage 145).
XBriefly press butto n:.
Folding the exterior mirrors in or out
automatically
If th e"Fold in mirror swhen locking" function is
activated in th eon-board computer
(
Ypage 276):
Rth eexterio rmirror sfol din automatically as
soo nas you loc kth evehicl efrom th eoutside .
Rtheexterio rmirror sfol dout again automati-
call yas soo nas you unlock th evehicl eand
then open th edriver' sor front-passenger
door .
Exterior mirror pushed out of position
If an exterio rmirror has been pushed out of
position ,procee das follows :
XVehicles without electricall yfolding exte-
rior mirrors :mov eth eexterio rmirror int o
th ecorrect position manually.
XVehicles with electricall yfolding exterior
mirrors :press and hold butto nfor mirror
foldin g: until you hear aclick and th emirror
engage saudibly in position .
The mirror housing is engage dagain and you
can adjust th eexterio rmirror sas usual
(
Ypage 110).
Automatic anti-glare mirrors
GWARNIN G
Electrolyte may escape if th eglass in an auto -
matic anti-glare mirror breaks .The electrolyt e
is harmful and causes irritation .It must no t
come int ocontact wit hyour skin, eyes, res -
piratory organs or clothing or be swallowed.
Ther eis aris kof injury.
If you come int ocontact wit hth eelectrolyte,
observ eth efollowing:
RRins eoff th eelectrolyt efrom your skin
immediately wit hwater.
RImmediately rinse th eelectrolyt eout of
your eyes thoroughly wit hclean water.
RIf th eelectrolyt eis swallowed, immediately
rinse your mout hout thoroughly. Do no t
induce vomiting .
RIf electrolytecomes int ocontact wit hyour
skin or hair or is swallowed, seek medical
attention immediately.
RImmediately chang eout of clothing whic h
has come int ocontact wit helectrolyte.
RIf an allergic reaction occurs, seek medical
attention immediately.
Mirrors111
Seats, steering wheel and mirrors
Z
Page 116 of 450

Useful information
i
This Operator's Manual describes all models
and all standard and optional equipment of
your vehicle available at the time of publica-
tion of the Operator's Manual. Country-spe-
cific differences are possible. Please note
that your vehicle may not be equipped with all
features described. This also applies to
safety-related systems and functions.
iRead the information on qualified specialist
workshops (Ypage 29).
Exterior lighting
General notes
For reasons of safety, Mercedes-Benz recom-
mends that you drive with the lights switched on
even during the daytime. In some countries,
operation of the headlamps varies due to legal
requirements and self-imposed obligations.
Setting the exterior lighting
Setting options
Exterior lighting can be set using:
Rthe light switch
Rthe combination switch (Ypage 116)
Rthe on-board computer (Ypage 275)
Light switch
Operation
1 WLeft-hand standing lamps
2XRight-hand standing lamps
3TParking lamps, license plate and
instrument cluster lighting
4ÃAutomatic headlamp mode, controlled
by the light sensor
5 LLow-beam/high-beam headlamps
BRRear fog lamp
If you hear a warning tone when you leave the
vehicle, the lights may still be switched on.
XTurn the light switch to Ã.
The exterior lighting (except the parking/stand-
ing lamps) switches off automatically if you:
Rremove the SmartKey from the ignition lock
Ropen the driver's door with the SmartKey in
position 0in the ignition lock
Automatic headlamp mode
à is the favored light switch setting. The light
setting is automatically selected according to
the brightness of the ambient light (exception:
poor visibility due to weather conditions such as
fog, snow or spray):
RSmartKey in position 1in the ignition lock: the
parking lamps are switched on or off auto-
matically depending on the brightness of the
ambient light.
RWith the engine running (USA only): if you
have switched on the Daytime Running
Lightsfunction in the on-board computer,
the daytime running lamps or the parking
lamps and low-beam headlamps are switched
on or off automatically depending on the
brightness of the ambient light.
XTo switch on automatic headlamp mode:
turn the light switch to Ã.
GWARNING
When the light switch is set to Ã, the low-
beam headlamps may not be switched on
automatically if there is fog, snow or other
causes of poor visibility due to the weather
conditions such as spray. There is a risk of an
accident.
In such situations, turn the light switch to
L.
The automatic headlamp feature is only an aid.
The driver is responsible for the vehicle's light-
ing at all times.
Canada only:
114Exterior lighting
Lights and windshield wipers
Page 121 of 450

except when the SmartKey is in position2in the
ignition lock.
The color and brightness for the ambient lighting may be set via the multimedia system (see the
separate operating instructions).
Automatic interior lighting control
XTo switch on: set the switch to center posi-
tion B.
XTo switch off: set the switch to the |
position.
The interior lighting automatically switches on if
you:
Runlock the vehicle
Ropen a door
Rremove the SmartKey from the ignition lock
The interior light is activated for a short while
when the SmartKey is removed from the ignition
lock. This delayed switch-off can be adjusted via
the multimedia system (see the separate oper-
ating instructions).
Manual interior lighting control
XTo switch the front interior lighting on: set
the switch to the cposition.
XTo switch the front interior lighting off: set
the switch to the |position or (if the door
is closed) to the center position.
XTo switch the rear compartment interior
lighting on/off: press theubutton.
XTo switch the reading lamps on/off: press
the p button.
Crash-responsive emergency lighting
The interior lighting is activated automatically if
the vehicle is involved in an accident.
XTo switch off the crash-responsive emer-
gency lighting: press the hazard warning
lamp button.
or
XLock and then unlock the vehicle using the
SmartKey.
Replacing bulbs (vehicles with LED
headlamps)
The front and rear light clusters of your vehicle
are equipped with LED light bulbs. Do not
replace the bulbs yourself. Contact a qualified
specialist workshop which has the necessary
specialist knowledge and tools to carry out the
work required.
Lamps are an important aspect of vehicle safety.
You must therefore make sure that these func-
tion correctly at all times. Have the headlamp
setting checked regularly.
Changing bulbs (vehicles with halo-
gen headlamps)
Important safety notes
GWARNING
Bulbs, lamps and connectors can get very hot
when operating. If you change a bulb, you
could burn yourself on these components.
There is a risk of injury.
Allow these components to cool down before
changing a bulb.
Do not use a bulb that has been dropped or if its
glass tube has been scratched.
The bulb may explode if:
Ryou touch it
Rit is hot
Ryou drop it
Ryou scratch it
Only operate bulbs in enclosed lamps designed
for that purpose. Only install spare bulbs of the same type and the specified voltage.
Marks on the glass tube reduce the service life
of the bulbs. Do not touch the glass tube with
your bare hands. If necessary, clean the glass
tube when cold with alcohol or spirit and rub it
off with a lint-free cloth.
Protect bulbs from moisture during operation.
Do not allow bulbs to come into contact with
liquids.
Only replace the bulbs listed (
Ypage 120).
Have the bulbs that you cannot replace yourself
replaced at a qualified specialist workshop.
Changing bulbs (vehicles with halogen headlamps)119
Lights and windshield wipers
Z
Page 127 of 450

Problems with the windshield wipers
ProblemPossible causes/consequences andMSolutions
The windshield wipers
are jammed.Leaves or snow, for example, may be obstructing the windshield wiper
movement. The wiper motor has been deactivated.
XFor safety reasons, you should remove the SmartKey from the igni-
tion lock.
or
XSwitch off the engine using the Start/Stop button and open the
driver's door.
XRemove the cause of the obstruction.
XSwitch the windshield wipers back on.
The windshield wipers
fail completely.The windshield wiper drive is malfunctioning.
XSelect another wiper speed on the combination switch.
XHave the windshield wipers checked at a qualified specialist work-
shop.
Windshield wipers125
Lights and windshield wipers
Z