2016 MERCEDES-BENZ GLE-CLASS SUV wheels
[x] Cancel search: wheelsPage 78 of 450

Function
XTo activate/deactivate:activateor deacti -
vat ePRE-SAF E®Brake in th eon-board com-
puter (Ypage 272).
If th ePRE-SAF E®Brake is no tactivated, th e
æ symbol appear sin th emultifunction dis-
play.
If you have activated DS R (
Ypage 236), PRE-
SAFE®Brake is deactivated.
Starting at aspee dof aroun d 4mph (7 km/h),
this function warn syou if you rapidly approac h a
vehicl ein front. An intermittent warning tone
will then soun dand th e· distanc ewarning
lamp will ligh tup in th einstrumen tcluster.
XBrake immediately to defuse th esituation .
or
XTak eevasive action provide dit is saf eto do
so.
PRE-SAF E
®Brake can also brak eth evehicl e
automatically under th efollowin gconditions:
Rth edriver and front-passenger have their seat
belt sfastene d
and
Rth evehicl espee dis between approximately
4 mph (7 km/h) and 12 4mph (20 0km/h)
At speeds of up to approximately 44 mph
(70 km/h) PRE-SAF E
®Brake can also detect :
Rstationary objectsin th epat hof your vehicle,
e.g. stoppe dor parked vehicles
Rpedestrian sin th epat hof your vehicl e
iIf there is an increased ris kof acollision ,
preventive passenger protection measures
(PRE-SAF E
®)are triggered (Ypage 58).
If th eris kof collision wit hth evehicl ein fron t
remain sand you do no tbrake, tak eevasive
action or accelerate significantly, th evehicl e
may perfor mautomatic emergenc ybraking ,up
to th epoin tof full brak eapplication .Automatic
emergenc ybraking is no tperformed until imme-
diately prio rto an imminent accident.
You can preven tth eintervention of th ePRE -
SAFE
®Brake at any time by:
Rdepressing th eaccelerato rpedal further.
Ractivating kickdown .
Rreleasingth ebrak epedal. The braking action of PRE-SAF
E
®Brake is ended
automatically if:
Ryou maneuve rto avoi dth eobstacle .
Rthere is no longer any danger of acollision .
Rthere is no longer an obstacle detected in
frontof your vehicle.
STEER CONTROL
General information
STEE RCONTROL help syou by transmitting a
noticeable steering force to th esteering whee l
in th edirection require dfor vehicl estabilization .
This steering assistanc eis provide din particular
if:
Rbot hright wheels or bot hlef twheels are on a
wet or slippery road surface when you brake.
Rth evehicl estart sto skid.
Important safety notes
iObserv eth e"Importan tsafet ynotes" sec -
tion (Ypage 66) .
No steering support is provide dfrom STEE R
CONTROL, if:
RES P®is deactivated
RESP®is malfunctioning .
Rthelighting is faulty.
If ES P®is malfunctioning ,you will be assisted
further by th eelectrical power steering .
Protection against theft
Immobilizer
XTo activate with theSmartKey :remove th e
SmartKey from th eignition lock.
XTo activate with KEYLESS-GO: switch the
ignition off and open th edriver' sdoor .
XTo deactivate: switch on theignition .
The immobilize rprevents your vehicl efrom
bein gstarted without th ecorrect SmartKey.
When leaving th evehicle, always tak eth e
SmartKey wit hyou and loc kth evehicle. Anyon e
can start th eengin eif avalid SmartKey has been
lef tinside th evehicle.
76Protection against theft
Safety
Page 87 of 450
Unlocking and opening doors from
the inside
You can open a door from inside the vehicle
even if it has been locked. You can only open the
rear doors from inside the vehicle if they are notsecured by the child-proof locks (
Ypage 65).
If the vehicle has previously been locked from
the outside, opening a door from the inside will
trigger the anti-theft alarm system. Switch off
the alarm (
Ypage 77).
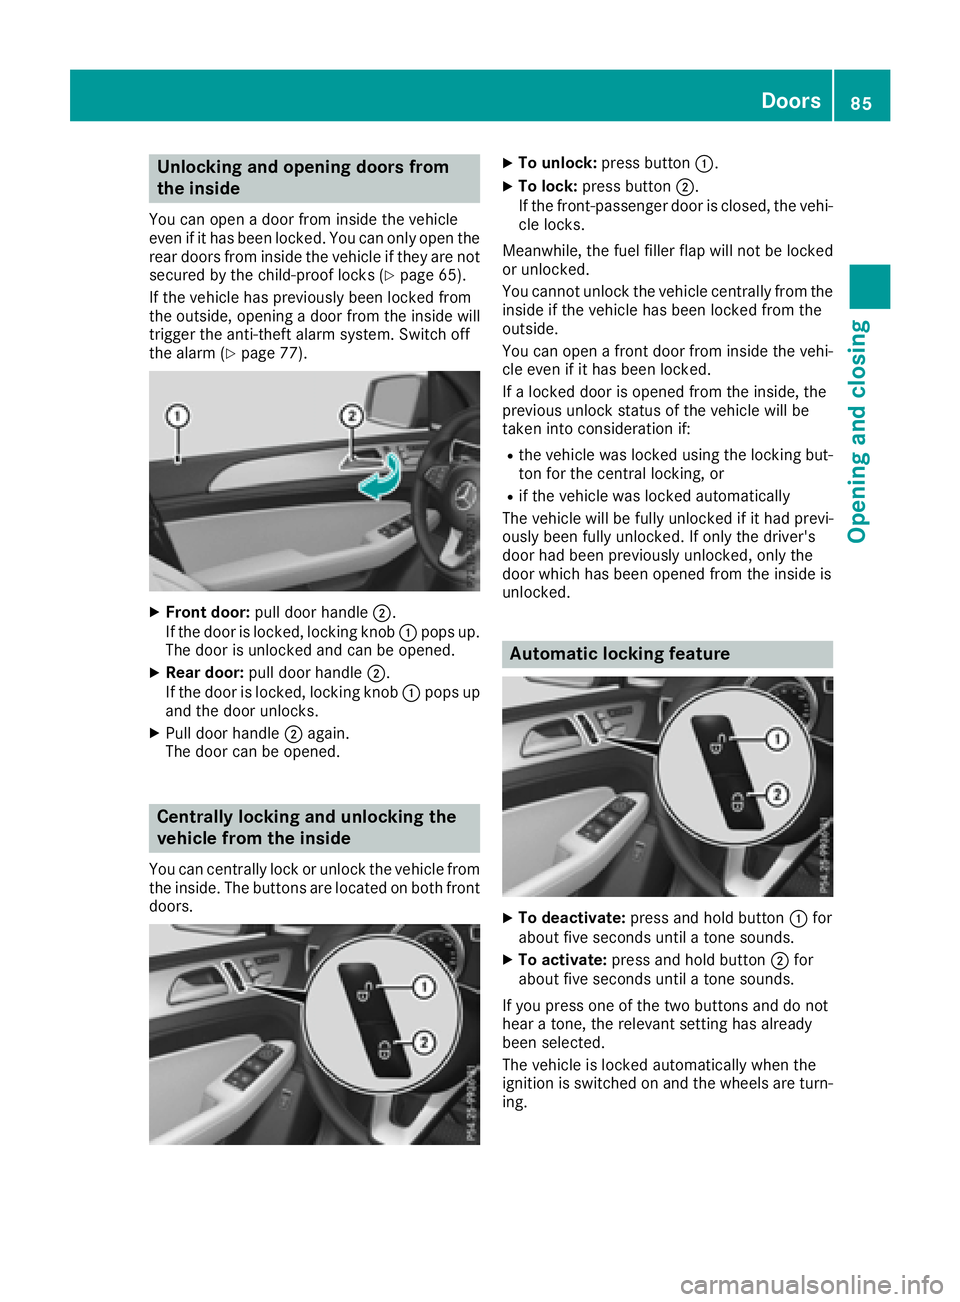
XFront door: pull door handle ;.
If the door is locked, locking knob :pops up.
The door is unlocked and can be opened.
XRear door: pull door handle ;.
If the door is locked, locking knob :pops up
and the door unlocks.
XPull door handle ;again.
The door can be opened.
Centrally locking and unlocking the
vehicle from the inside
You can centrally lock or unlock the vehicle from
the inside. The buttons are located on both front
doors.
XTo unlock: press button :.
XTo lock:press button ;.
If the front-passenger door is closed, the vehi-
cle locks.
Meanwhile, the fuel filler flap will not be locked
or unlocked.
You cannot unlock the vehicle centrally from the
inside if the vehicle has been locked from the
outside.
You can open a front door from inside the vehi-
cle even if it has been locked.
If a locked door is opened from the inside, the
previous unlock status of the vehicle will be
taken into consideration if:
Rthe vehicle was locked using the locking but-
ton for the central locking, or
Rif the vehicle was locked automatically
The vehicle will be fully unlocked if it had previ-
ously been fully unlocked. If only the driver's
door had been previously unlocked, only the
door which has been opened from the inside is
unlocked.
Automatic locking feature
XTo deactivate: press and hold button :for
about five seconds until a tone sounds.
XTo activate: press and hold button ;for
about five seconds until a tone sounds.
If you press one of the two buttons and do not
hear a tone, the relevant setting has already
been selected.
The vehicle is locked automatically when the
ignition is switched on and the wheels are turn-
ing.
Doors85
Opening and closing
Z
Page 122 of 450

If you require assistance replacing bulbs, con-
sult a qualified specialist workshop.
If the new bulb still does not light up, consult a
qualified specialist workshop.
Headlamps and lights are an important aspect of
vehicle safety. You must therefore make sure
that these function correctly at all times. Have
the headlamp setting checked regularly.
Overview: changing bulbs/bulb types
You can replace the following bulbs. The bulb
type can be found in the legend.
Halogen headlamps
:
Low-beam headlamp: H7 55 W
;High-beam headlamp: H7 55 W
=Turn signal: W 5 W BV
Removing and installing the cover in
the front wheel housing
You must remove the cover from the front wheel
housing before you can change the front bulbs.
XTo remove:switch off the lights.
XTurn the front wheels inwards.
XRemove securing pin ;using a suitable tool.
XSlide cover :up and remove it.
XTo install: insert cover :again and slide it
down until it engages.
XInsert securing pin ;.
Low-beam headlamps
XRemove the cover in the front wheel housing
(Ypage 120).
XTurn housing cover:counter-clockwise and
remove it.
XTurn bulb holder ;counter-clockwise and
pull out.
XPull the bulb out of bulb holder ;.
XInsert the new bulb into bulb holder ;.
XInsert bulb holder;and turn it clockwise.
XPress on housing cover :and turn it to the
right.
XReplace the cover in the front wheel housing
(Ypage 120).
High-beam headlamps
XSwitch off the lights.
XOpen the hood.
120Changing bulbs (vehicles with halogen headlamps)
Lights and windshield wipers
Page 144 of 450
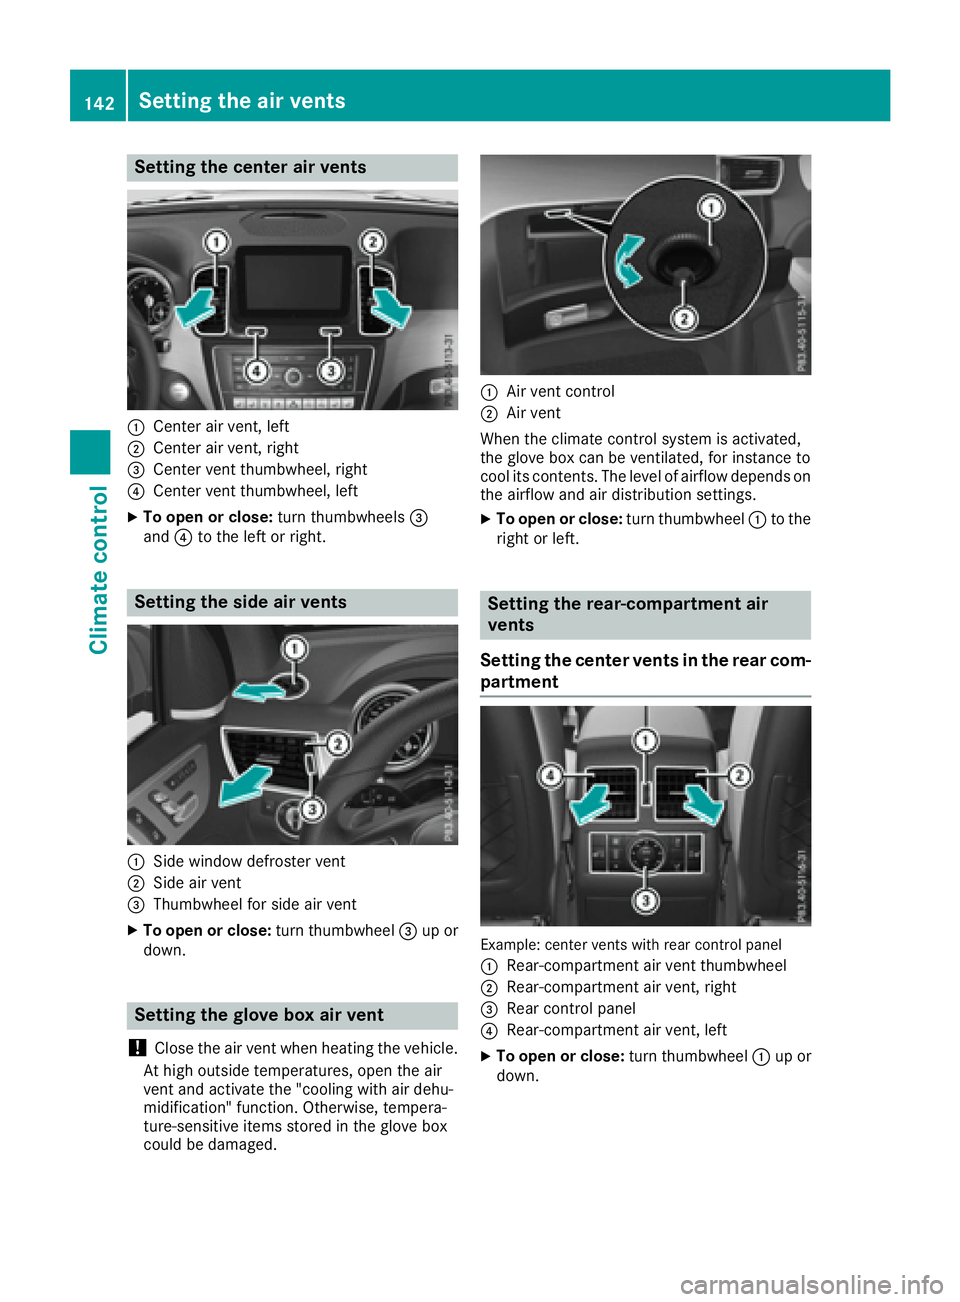
Setting the center air vents
:Center air vent, left
;Center air vent, right
=Center vent thumbwheel, right
?Center vent thumbwheel, left
XTo open or close:turn thumbwheels=
and ?to the left or right.
Setting the side air vents
:Side window defroster vent
;Side air vent
=Thumbwheel for side air vent
XTo open or close: turn thumbwheel=up or
down.
Setting the glove box air vent
!
Close the air vent when heating the vehicle.
At high outside temperatures, open the air
vent and activate the "cooling with air dehu-
midification" function. Otherwise, tempera-
ture-sensitive items stored in the glove box
could be damaged.
:Air vent control
;Air vent
When the climate control system is activated,
the glove box can be ventilated, for instance to
cool its contents. The level of airflow depends on the airflow and air distribution settings.
XTo open or close: turn thumbwheel:to the
right or left.
Setting the rear-compartment air
vents
Setting the center vents in the rear com-
partment
Example: center vents with rear control panel
:
Rear-compartment air vent thumbwheel
;Rear-compartment air vent, right
=Rear control panel
?Rear-compartment air vent, left
XTo open or close: turn thumbwheel:up or
down.
142Setting the air vents
Climate control
Page 147 of 450
GWARNING
If you switch off the ignition while driving,
safety-relevant functions are only available
with limitations, or not at all. This could affect, for example, the power steering and the brake
boosting effect. You will require considerably
more effort to steer and brake. There is a risk
of an accident.
Do not switch off the ignition while driving.
GWARNING
If the parking brake has not been fully
released when driving, the parking brake can:
Roverheat and cause a fire
Rlose its hold function.
There is a risk of fire and an accident. Release
the parking brake fully before driving off.
!Do not warm up the engine with the vehicle
stationary. Drive off immediately. Avoid high
engine speeds and driving at full throttle until
the engine has reached its operating temper-
ature.
Only shift the automatic transmission to the
desired drive position when the vehicle is sta-
tionary.
Where possible, avoid spinning the drive
wheels when pulling away on slippery roads.
You could otherwise damage the drive train.
!Mercedes-AMG vehicles: at low engine oil
temperatures below 68 ‡ (+20 †), the max-
imum engine speed is restricted in order to
protect the engine. To protect the engine and
maintain smooth engine operation, avoid driv-
ing at full throttle when the engine is cold.
Observe the important safety notes for PLUG-IN
HYBRID vehicles (
Ypage 42).
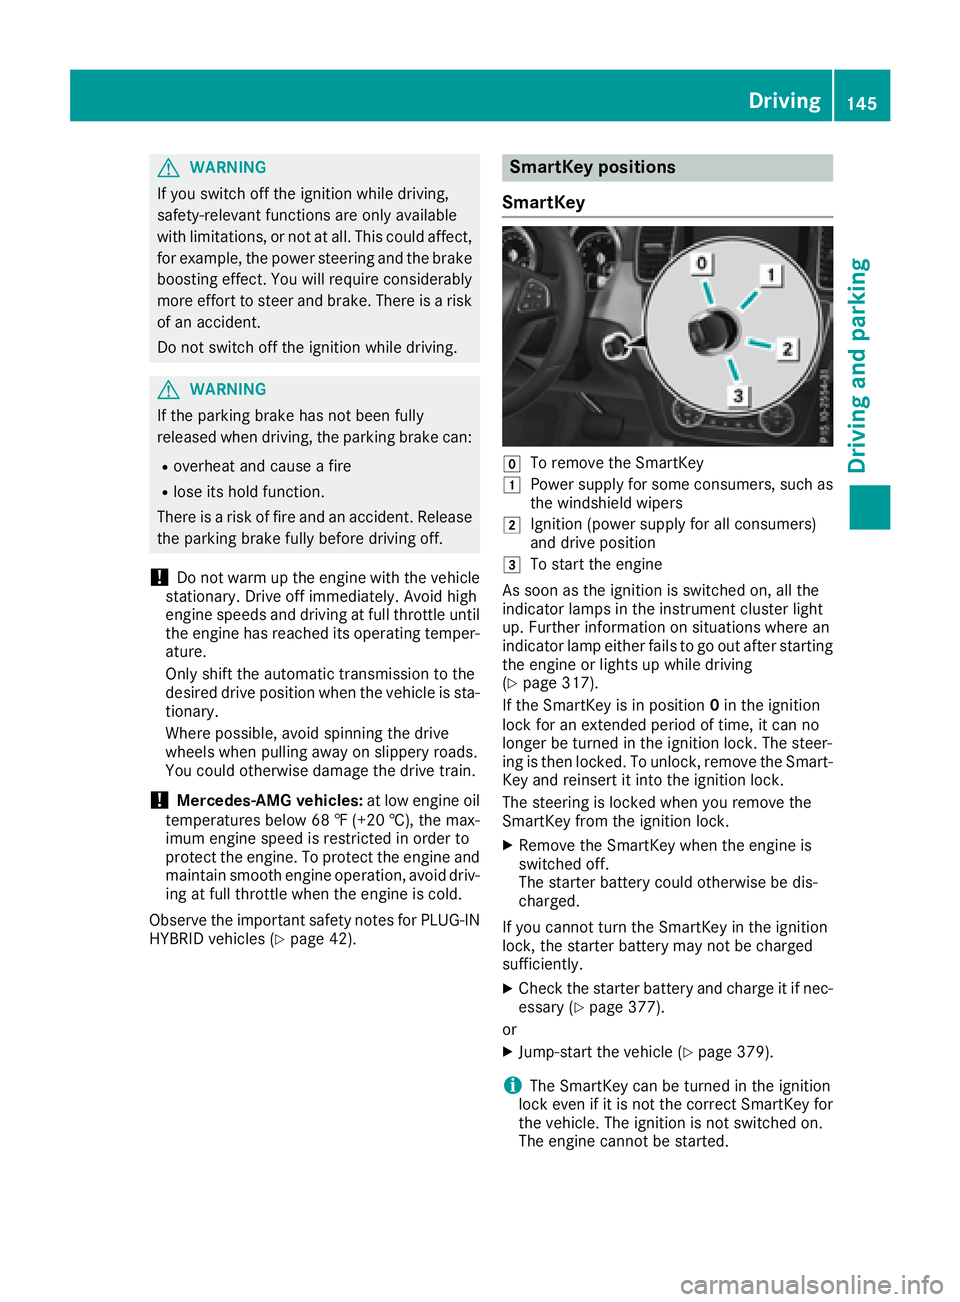
SmartKey positions
SmartKey
gTo remove the SmartKey
1Power supply for some consumers, such as
the windshield wipers
2Ignition (power supply for all consumers)
and drive position
3To start the engine
As soon as the ignition is switched on, all the
indicator lamps in the instrument cluster light
up. Further information on situations where an
indicator lamp either fails to go out after starting
the engine or lights up while driving
(
Ypage 317).
If the SmartKey is in position 0in the ignition
lock for an extended period of time, it can no
longer be turned in the ignition lock. The steer-
ing is then locked. To unlock, remove the Smart-
Key and reinsert it into the ignition lock.
The steering is locked when you remove the
SmartKey from the ignition lock.
XRemove the SmartKey when the engine is
switched off.
The starter battery could otherwise be dis-
charged.
If you cannot turn the SmartKey in the ignition
lock, the starter battery may not be charged
sufficiently.
XCheck the starter battery and charge it if nec-
essary (Ypage 377).
or
XJump-start the vehicle (Ypage 379).
iThe SmartKey can be turned in the ignition
lock even if it is not the correct SmartKey for
the vehicle. The ignition is not switched on.
The engine cannot be started.
Driving145
Driving and parking
Z
Page 159 of 450
ANeutral
Do not shift the transmission toN
while driving. Otherwise, the auto-
matic transmission could be dam-
aged.
No power is transmitted from the
engine to the drive wheels.
Releasing the brakes will allow you to
move the vehicle freely, e.g. to push
it or tow it.
If ESP
®is deactivated or faulty: shift
the transmission to position Nif the
vehicle is in danger of skidding, e.g.
on icy roads.
If you switch the engine off with the
transmission in position Ror D, the
automatic transmission shifts to N
automatically.
!Rolling in neutral Ncan damage
the drive train.
7Drive
The automatic transmission changes
gear automatically. All forward gears
are available.
Driving tips
Changing gear
The automatic transmission shifts to the indi-
vidual gears automatically when it is in trans-
mission position D. This automatic gear shifting
behavior is determined by:
Rthe selected drive program
Rthe position of the accelerator pedal
Rthe road speed
Accelerator pedal position
Your style of driving influences how the auto-
matic transmission shifts gear:
Rlittle throttle: early upshifts
Rmore throttle: late upshifts
Kickdown
Use kickdown for maximum acceleration.
XDepress the accelerator pedal beyond the
pressure point.
The automatic transmission shifts to a lower
gear depending on the engine speed.
XEase off the accelerator pedal once the
desired speed is reached.
The automatic transmission shifts back up.
Rocking the vehicle free
Shifting the transmission repeatedly between
gears Dand Rmay help to free the vehicle if it
has become stuck in slush or snow. The vehi-
cle's engine management system limits the
speed to a maximum of 5 mph (9 km/h) when
shifting back and forth. To shift back and forth
between transmission positions Dand R, move
the DIRECT SELECT lever up and down past the
point of resistance.
Gliding mode
All vehicles (except Mercedes-AMG vehi-
cles)
Gliding mode is characterized by the following:
Rthe combustion engine is disconnected from
the drive train.
Rthe engine speed corresponds to the idling
speed.
Rthe gear indicated after the transmission
position Ddisappears in the multifunction
display (
Ypage 154).
Gliding mode can be activated under the follow-
ing conditions:
Ryou select the "ECO" setting for the drive sys-
tem within the Individualdrive program. You
can find information about this in the Digital
Operator's Manual.
Rthe speed is within a suitable range.
Rthe course of the road is suitable, e.g. there
are no steep up or downhill gradients.
Ryou are no longer depressing the accelerator
pedal.
Gliding mode is deactivated under the following conditions:
Ryou depress the accelerator pedal.
Ryou depress the brake pedal.
Automatic transmission157
Driving an d parking
Z
Page 160 of 450
Ryou use theDIRECT SELECT lever to switch
th etransmission position (Ypage 154).
Ruse theDYNAMIC SELECT controller to
chang eth edrive progra m (Ypage 152).
Ryou activatemanual gearshiftin g
(Ypage 159).
Ryou leav eth esuitable speed range.
Mercedes-AMG vehicles
Glidin gmod eis characterized by th efollowing:
Rth ecombustion engin eis disconnected from
th edrive train .
Rtheengin espeed corresponds to th eidlin g
speed.
Rin th emultifunction display, th eglidin gsym -
bol appears in th edrive progra mdisplay.
Glidin gmod ecan be activated under th efollow-
in g conditions:
Rth eComfor tdrive progra mis activated or you
select th e"Comfort" setting for th edrive sys-
te m within th eIndividua ldrive program. You
can fin dinformation about this in th eDigital
Operator' sManual.
Rth eECO start/sto pfunction is activated.
Ryou are drivin gcarefully wit hlow acceleration
of th evehicle.
Rth eengin eis at normal operating tempera-
ture.
Rth espeed is within asuitable range.
Rth ecours eof th eroa dis suitable, e.g. there
are no steep up or downhill gradients .
Ryou are no longer depressingth eaccelerato r
pedal .
Glidin gmod eis d
eactivated under th
efollowin g
conditions:
Ryou hav edeactivated th eECO start/sto p
function .
Ryou depress th eaccelerato rpedal .
Ryou depress th ebrak epedal .
Ryou use th eDIRECT SELECT lever to switch
th etransmission position (Ypage 154).
Ruse theDYNAMIC SELECT controller to
chang eth edrive progra m (Ypage 152).
Ryou activatemanual gearshiftin g
(Ypage 159).
Ryou leav eth esuitable speed range.
Towing a trailer
XDrive in th emiddle of th eengin espeed range
on uphil lgradients .
XDependin gon th euphil lor downhill gradient,
use left-han dsteerin gwhee lpaddl eshifter
(
Ypage 159) to select alower gear ,eve nif
cruise control or DISTRONI CPLU Sare acti-
vated.
Drive programs
Slippery drive program
The Slipper ydrive progra mhas th efollowin g
characteristics :
Rreducedengin eand transmission setting sfor
optimum propulsion on slipper yor snow-cov-
ere droads.
Roptimized ES P®stabilitycontrol on slipper yor
snow-covered roads.
Rth evehicl ehas improved drivin gstabilit yon
slipper yor snow-covered roads, for example.
Comfort drive program
The Comfor tdrive progra mhas th efollowin g
characteristics :
Rcomfort-oriented engin eand transmission
settings.
Roptimal fuel consumption resultin gfrom th e
automati ctransmission shiftin gup sooner.
Rth evehicl epullin gaway mor egentl yin
forward and revers egears, unless th eaccel-
erator pedal is depressed fully.
Rth eautomati ctransmission shiftin gup
sooner. This result sin th evehicl ebein gdriven
at lower engin espeeds and th ewheels bein g
less likely to spin .
Sport drive program
TheSport drive progra mhas th efollowin gchar-
acteristics :
Rsportyengin eand transmission settings.
Rth eautomati ctransmission shiftin gup later.
th efuel consumption possibl ybein ghigher as
a result of th elater automati ctransmission
shift points .
Rthesuspension exhibits sport ydampin g(vehi-
cle swit hAIRMATIC) .
158Automatic transmission
Driving an d parking
Page 180 of 450
Every person who has access to the informa-
tion stated can use the functions of the online
access to the vehicle.
iInformation when selling a vehicle or
buying a used vehicle:
RIf you sell your vehicle, you are obliged to
delete the vehicle from your personal area
on the online access to the vehicle.
RIf you have bought a used vehicle, it is pos-
sible that the previous owner still has
access to the online access to the vehicle.
Calling up functions
The online access to the vehicle allows you
access to your vehicle's information and func-
tions using remote query and remote configu-
ration.
The following functions can be accessed:
Rrequest the current condition of charge of the
high-voltage battery
Rprogram the departure time (Ypage 274)
Rset or activate the "Pre-entry climate control
at departure time" function (see the separate
COMAND operating instructions)
Information on additional functions and operat- ing instructions can be found within the online
access to the vehicle.
Connecting the vehicle to the Internet
iThis function is not available in all countries
and requires activated access to the mbrace
emergency call system.
You can use the online access to the vehicle if
the vehicle has a connection to the Internet via a mobile phone network. The necessary data is
transmitted by radio. The vehicle automatically
recognizes whether a connection to the Internet
is possible or not. No presets are necessary.
iRestrictions in reception are possible if the
vehicle is in an underground car park, for
example. Restrictions may also occur in areas with poor mobile network coverage.
Parking
Important safety notes
GWARNING
Flammable material such as leaves, grass or
twigs may ignite if they come into contact with
hot parts of the exhaust system or exhaust
gas flow. There is a risk of fire.
Park the vehicle so that no flammable mate-
rials come into contact with parts of the vehi-
cle which are hot. Take particular care not to
park on dry grassland or harvested grain
fields.
GWARNING
If you leave children unsupervised in the vehi-
cle, they could set it in motion by, for example:
Rrelease the parking brake.
Rshift the automatic transmission out of the
parking position P.
Rstart the engine.
In addition, they may operate vehicle equip-
ment and become trapped. There is a risk of
an accident and injury.
When leaving the vehicle, always take the
SmartKey with you and lock the vehicle. Never
leave children unsupervised in the vehicle.
!Always secure the vehicle correctly against
rolling away. Otherwise, the vehicle or its driv-
etrain could be damaged.
To ensure that the vehicle is secured against
rolling away unintentionally:
Rthe electric parking brake must be applied.
Rthe transmission must be in position Pand the
SmartKey must be removed from the ignition
lock.
Rthe front wheels must be turned towards the
curb on steep uphill or downhill gradients.
Rthe empty vehicle must be secured at the
front axle with a wheel chock or similar, for
example, on uphill or downhill gradients.
Ra laden vehicle must also be secured at the
rear axle with a wheel chock or similar, for
example, on uphill or downhill gradients.
178Parking
Driving an d parking