2016 MERCEDES-BENZ GLE-Class change time
[x] Cancel search: change timePage 350 of 450

You can find more information in the separate
mbrace manual.
The system has not been able to initiate a Road-
side Assistance call, if:
Rthe indicator lamp for Roadside Assistance
call buttonFis flashing continuously.
Rno voice connection to the Mercedes-Benz
Customer Assistance Center was estab-
lished.
This can occur if the relevant mobile phone net-
work is not available, for example.
The Call Failed
message appears in the mul-
tifunction display.
XTo end a call: press the~button on the
multifunction steering wheel.
or
XPress the corresponding multimedia system
button for ending a phone call.
MB Info call button
XTo call MB Info: press MB Info call button :.
This initiates a call to the Mercedes-Benz Cus-
tomer Assistance Center.
The indicator lamp in MB Info call button :
flashes while the connection is being made.
The Connecting Call
message appears in
the multifunction display. The audio output is
muted.
If a connection can be made, the Call Con‐
nectedmessage appears in the multifunction
display.
If a mobile phone network and GPS reception
are available, the system transfers data to the
Mercedes-Benz Customer Assistance Center,
for example:
Rcurrent location of the vehicle
Rvehicle identification number The multimedia system display indicates that a
call is active. During the call, you can change to
the navigation menu by pressing the NAVI but-
ton on COMAND, for example.
Voice output is not available in this case.
A voice connection is established between the
Mercedes-Benz Customer Assistance Center
and the vehicle occupants.
You receive information about operating your
vehicle, about the nearest authorized
Mercedes-Benz Center and about other prod-
ucts and services from Mercedes-Benz.
You can find further information on the mbrace
system under "Owners Online" at http://
www.mbusa.com.
The system has not been able to initiate an MB
Info call, if:
Rthe indicator lamp in MB Info call button
ï
is flashing continuously.
Rno voice connection to the Mercedes-Benz
Customer Assistance Center was estab-
lished.
This can occur if the relevant mobile phone net-
work is not available, for example.
The Call Failed
message appears in the mul-
tifunction display.
XTo end a call: press the~button on the
multifunction steering wheel.
or
XPress the corresponding multimedia system
button for ending a phone call.
Call priority
When service calls are active, e.g. Roadside
Assistance or MB Info calls, an emergency call
can still be initiated. In this case, an emergency
call will take priority and override all other active
calls.
The indicator lamp of the respective button
flashes until the call is ended.
An emergency call can only be terminated by the
Mercedes-Benz Customer Assistance Center.
All other calls can be ended by pressing:
Rthe ~ button on the multifunction steering
wheel
Rthe corresponding button in the multimedia
system to end the voice call
When a call is initiated, the audio system is
muted.
348Features
Stowage and features
Page 371 of 450

Useful information
i
This Operator's Manual describes all models
and all standard and optional equipment of
your vehicle available at the time of publica-
tion of the Operator's Manual. Country-spe-
cific differences are possible. Please note
that your vehicle may not be equipped with all
features described. This also applies to
safety-related systems and functions.
iRead the information on qualified specialist
workshops (Ypage 29).
Where will I find...?
Vehicle tool kit
General notes
The vehicle tool kit can be found in the stowage
well under the cargo compartment floor.
Apart from certain country-specific variations,
the vehicles are not equipped with a tire-change
tool kit. Some tools for changing a wheel are
specific to the vehicle. For more information on which tools are required to perform a wheel
change on your vehicle, consult a qualified spe-
cialist workshop.
Tools required for changing a wheel may
include, for example:
RJack
RWheel chock
RLug wrench
RRatchet wrench
RAlignment bolt
Vehicles with a TIREFIT kit
:Jack
;Folding wheel chock
=Towing eye
?Alignment bolt
ATire inflation compressor
BLug wrench
CRatchet wrench
DTire sealant filler bottle
XOpen the tailgate.
XLift the cargo compartment floor upwards
(Ypage 337).
XUse the TIREFIT kit (Ypage 371).
Vehicles with a "Minispare" emergency
spare wheel
:Folding wheel chock
;Lug wrench
=Alignment bolt
?Towing eye
AJack
BRatchet wrench
Where will I find...?369
Breakdown assitance
Page 374 of 450
RImmediately change out of clothing which
has come into contact with tire sealant.
RIf an allergic reaction occurs, seek medical
attention immediately.
!Do not operate the tire inflation compressor
for longer than eight minutes at a time without
a break. It may otherwise overheat.
The tire inflation compressor can be operated
again once it has cooled down.
Comply with the manufacturer’s safety instruc-
tions on the sticker on the tire inflation com-
pressor.
Using the TIREFIT kit
XDo not remove any foreign objects which have
penetrated the tire, e.g. screws or nails.
XRemove the tire sealant bottle, the accompa-
nying TIREFIT sticker and the tire inflation
compressor from the stowage well under-
neath the cargo compartment floor
(
Ypage 369).
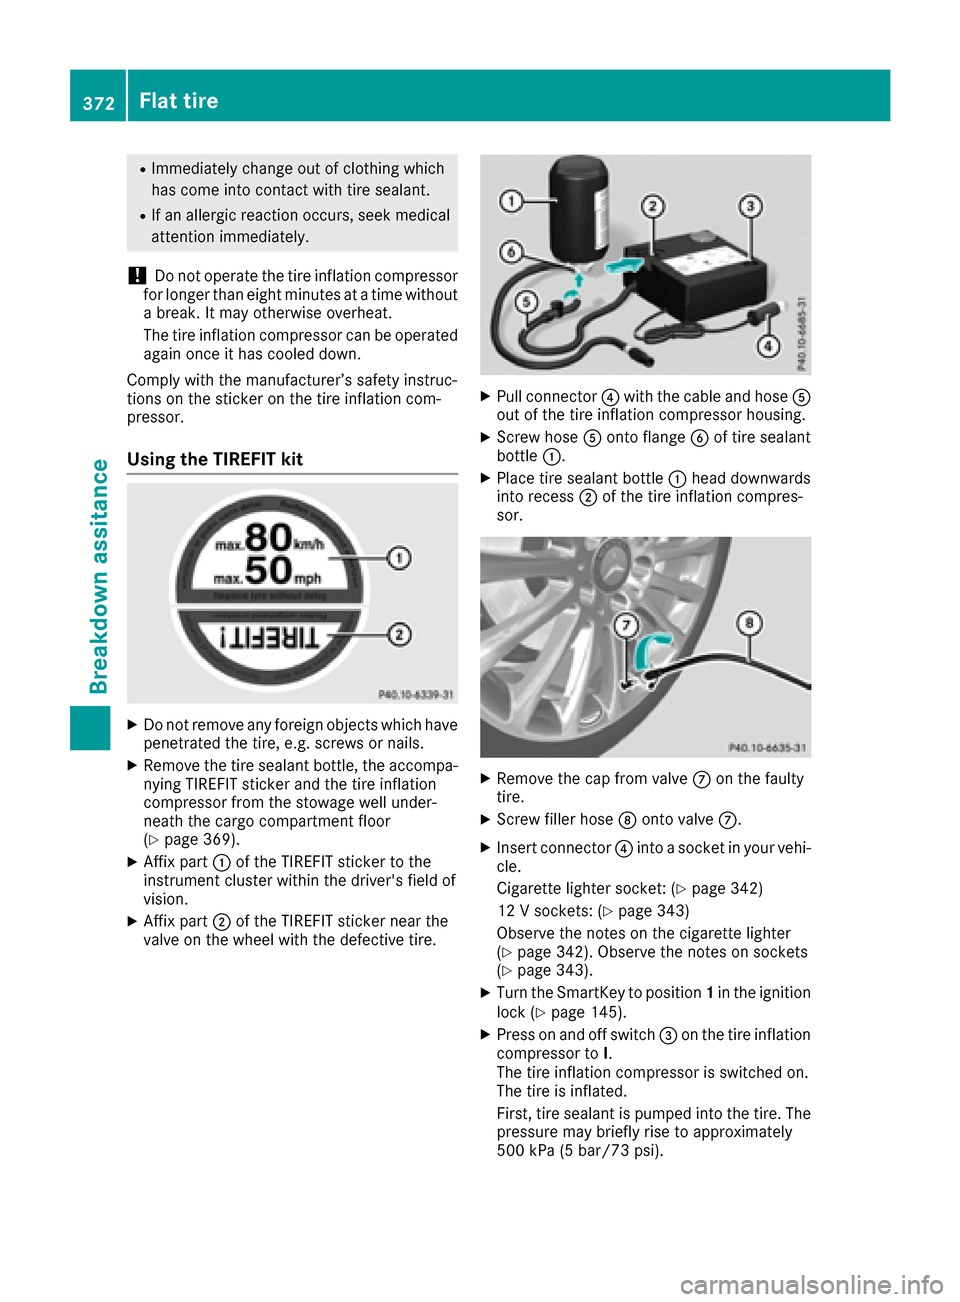
XAffix part :of the TIREFIT sticker to the
instrument cluster within the driver's field of
vision.
XAffix part ;of the TIREFIT sticker near the
valve on the wheel with the defective tire.
XPull connector ?with the cable and hose A
out of the tire inflation compressor housing.
XScrew hose Aonto flange Bof tire sealant
bottle :.
XPlace tire sealant bottle :head downwards
into recess ;of the tire inflation compres-
sor.
XRemove the cap from valve Con the faulty
tire.
XScrew filler hose Donto valve C.
XInsert connector ?into a socket in your vehi-
cle.
Cigarette lighter socket: (
Ypage 342)
12 V sockets: (
Ypage 343)
Observe the notes on the cigarette lighter
(
Ypage 342). Observe the notes on sockets
(Ypage 343).
XTurn the SmartKey to position 1in the ignition
lock (Ypage 145).
XPress on and off switch =on the tire inflation
compressor to I.
The tire inflation compressor is switched on.
The tire is inflated.
First, tire sealant is pumped into the tire. The
pressure may briefly rise to approximately
500 kPa (5 bar/73 psi).
372Flat tire
Breakdown assitance
Page 396 of 450

Information on the message display can be
found in the "Restarting the tire pressure loss
warning system" section (
Ypage 394).
Important safety notes
The tire pressure warning system does not warn
you of an incorrectly set tire pressure. Observe
the notes on the recommended tire pressure
(
Ypage 390).
The tire pressure loss warning does not replace
the need to regularly check the tire pressure. An
even loss of pressure on several tires at the
same time cannot be detected by the tire pres-
sure loss warning system.
The tire pressure monitor is not able to warn you
of a sudden loss of pressure, e.g. if the tire is
penetrated by a foreign object. In the event of a
sudden loss of pressure, bring the vehicle to a
halt by braking carefully. Avoid abrupt steering
movements.
The function of the tire pressure loss warning
system is limited or delayed if:
Rsnow chains are mounted on your vehicle's
tires.
Rroad conditions are wintry.
Ryou are driving on sand or gravel.
Ryou adopt a very sporty driving style (corner-
ing at high speeds or driving with high rates of acceleration).
Ryou are driving with a heavy load (in the vehi-
cle or on the roof).
Restarting the tire pressure loss warn-
ing system
Restart the tire pressure loss warning system if
you have:
Rchanged the tire pressure
Rchanged the wheels or tires
Rmounted new wheels or tires
XBefore restarting, make sure that the tire
pressures are set properly on all four tires for
the respective operating conditions.
The recommended tire pressure can be found
on the Tire and Loading Information placard
on the B-pillar. Additionally, a tire pressure
table is attached to the fuel filler flap. The tire pressure loss warning system can only give
reliable warnings if you have set the correct tire pressure. If an incorrect tire pressure is
set, these incorrect values will be monitored.
XAlso observe the notes in the section on tire
pressures (Ypage 390).
XMake sure that the SmartKey is in position
2
in the ignition lock (Ypage 145).
XPress the =or; button on the steering
wheel to select the Servicemenu.
XPress the9or: button to select
Tire Pressure.
XPress the abutton.
The Run Flat Indicator Active Press
'OK' to Restartmessage appears in the
multifunction display.
If you wish to confirm the restart:
XPress the abutton.
The Tire Pressure Now OK?message
appears in the multifunction display.
XPress the 9or: button to select Yes.
XPress theabutton.
The Run Flat Indicator Restartedmes-
sage appears in the multifunction display.
After a teach-in period, the tire pressure loss
warning system will monitor the set tire pres- sures of all four tires.
If you wish to cancel the restart:
XPress the %button.
or
XWhen the TirePressureNowOK?message
appears, press the 9or: button to
select Cancel
.
XPress the abutton.
The tire pressure values stored at the last
restart will continue to be monitored.
Tire pressure monitor
General notes
If a tire pressure monitor is installed, the vehi-
cle's wheels have sensors that monitor the tire
pressures in all four tires. The tire pressure mon-
itor warns you if the pressure drops in one or
more of the tires. The tire pressure monitor only
functions if the corresponding sensors are
installed in all wheels.
Information on tire pressures is displayed in the
multifunction display. After a few minutes of
driving, the current tire pressure of each tire is
394Tire pressure
Wheels and tires
Page 411 of 450

be required earlier. Do not change the direction
of wheel rotation.
Clean the contact surfaces of the wheel and the
brake disc thoroughly every time a wheel is rota-ted. Check the tire pressure and, if necessary,
restart the tire pressure loss warning system or
the tire pressure monitor.
Direction of rotation
Tires with a specified direction of rotation have
additional benefits, e.g. if there is a risk of hydro-
planing. These advantages can only be gained if
the tires are installed corresponding to the
direction of rotation.
An arrow on the sidewall of the tire indicates its
correct direction of rotation.
Storing wheels
Store wheels that are not being used in a cool,
dry and preferably dark place. Protect the tires
from oil, grease, gasoline and diesel.
Mounting a wheel
Preparing the vehicle
XVehicle with emergency spare wheel:
when mounting the emergency spare wheel in
the event of a flat tire, follow the additional
notes on vehicle preparation under "Flat tire"
(
Ypage 370).
XStop the vehicle on solid, non-slippery and
level ground.
XApply the electric parking brake manually.
XUnload heavy luggage.
XBring the front wheels into the straight-ahead position.
XShift the transmission to position P.
XVehicles with the AIRMATIC package:
make sure that the normal vehicle level is
selected (
Ypage 207).
XVehicles with the Off-Road Engineering
package:make sure that the normal vehicle
level is selected (
Ypage 201).
XSwitch off the engine.
XVehicles without KEYLESS-GO: remove the
SmartKey from the ignition lock.
XVehicles with KEYLESS-GO: open the driv-
er's door.
The on-board electronics now have status 0.
This is the same as the SmartKey having been
removed.
XVehicles with KEYLESS-GO: remove the
Start/Stop button from the ignition lock
(
Ypage 146).
XMake sure that the engine cannot be started
via your smartphone (Ypage 148).
XIf included in the vehicle equipment, remove
the tire-change tool kit from the vehicle.
XSafeguard the vehicle against rolling away.
iApart from certain country-specific varia-
tions, vehicles are not equipped with a tire-
change tool kit. For information on which
tools are required to perform a wheel change
on your vehicle, consult an authorized
Mercedes-Benz Center.
Necessary tire-changing tools can include, for example:
RJack
RWheel chock
RLug wrench
Securing the vehicle to prevent it from
rolling away
If your vehicle is equipped with a wheel chock, itcan be found in the tire-change tool kit
(
Ypage 369).
The folding wheel chock is an additional safety
measure to prevent the vehicle from rolling
away, for example when changing a wheel.
XFold both plates upwards :.
XFold out lower plate;.
XGuide the lugs on the lower plate fully into the
openings in base plate =.
Changing a wheel409
Wheels and tires
Z
Page 412 of 450
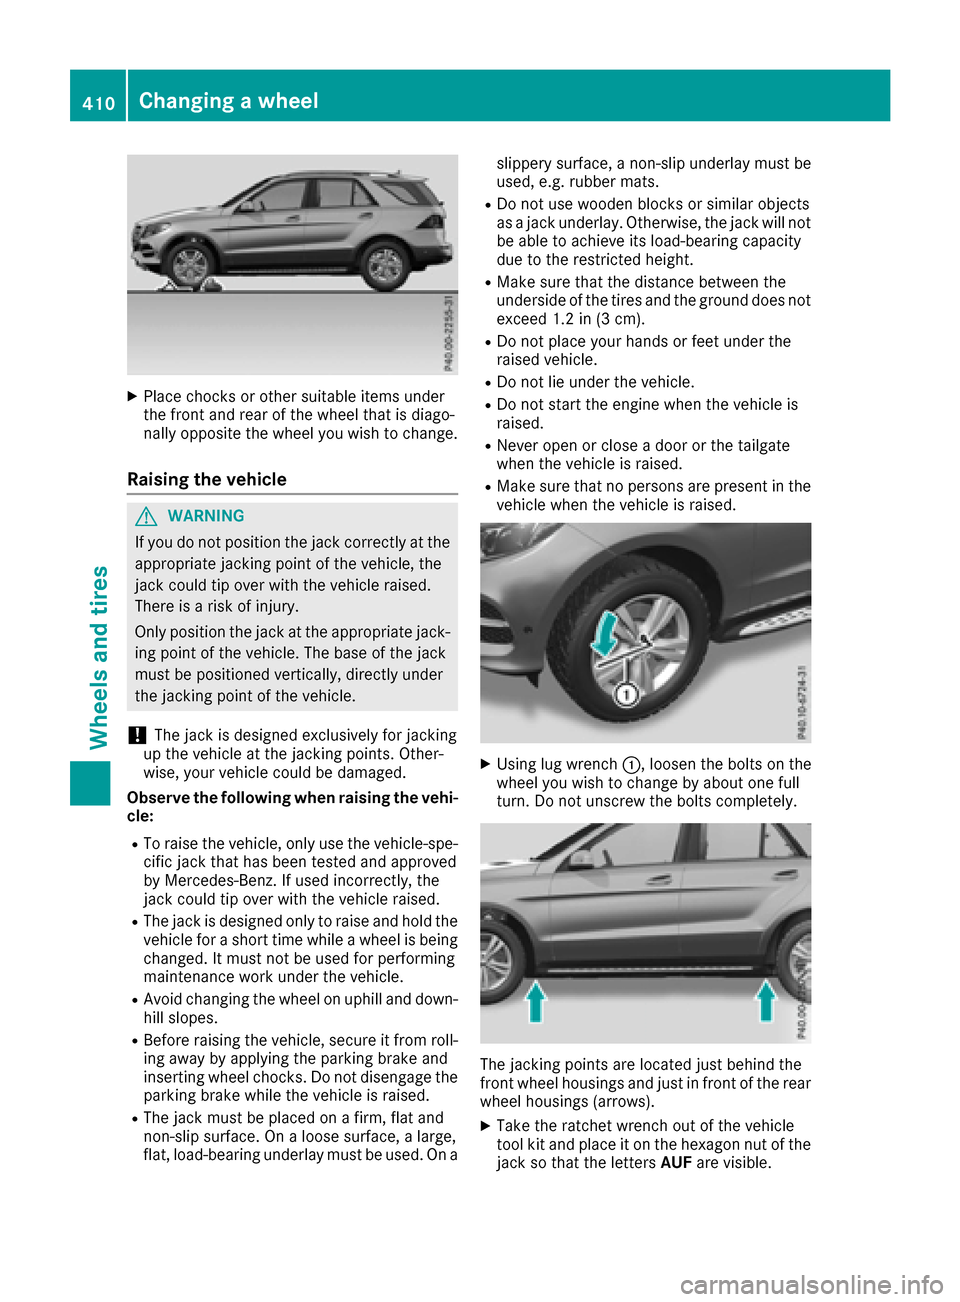
XPlace chocks or other suitable items under
the front and rear of the wheel that is diago-
nally opposite the wheel you wish to change.
Raising the vehicle
GWARNING
If you do not position the jack correctly at the
appropriate jacking point of the vehicle, the
jack could tip over with the vehicle raised.
There is a risk of injury.
Only position the jack at the appropriate jack-
ing point of the vehicle. The base of the jack
must be positioned vertically, directly under
the jacking point of the vehicle.
!The jack is designed exclusively for jacking
up the vehicle at the jacking points. Other-
wise, your vehicle could be damaged.
Observe the following when raising the vehi-
cle:
RTo raise the vehicle, only use the vehicle-spe-
cific jack that has been tested and approved
by Mercedes-Benz. If used incorrectly, the
jack could tip over with the vehicle raised.
RThe jack is designed only to raise and hold the
vehicle for a short time while a wheel is being
changed. It must not be used for performing
maintenance work under the vehicle.
RAvoid changing the wheel on uphill and down-
hill slopes.
RBefore raising the vehicle, secure it from roll-
ing away by applying the parking brake and
inserting wheel chocks. Do not disengage the
parking brake while the vehicle is raised.
RThe jack must be placed on a firm, flat and
non-slip surface. On a loose surface, a large,
flat, load-bearing underlay must be used. On a slippery surface, a non-slip underlay must be
used, e.g. rubber mats.
RDo not use wooden blocks or similar objects
as a jack underlay. Otherwise, the jack will not
be able to achieve its load-bearing capacity
due to the restricted height.
RMake sure that the distance between the
underside of the tires and the ground does not
exceed 1.2 in (3 cm).
RDo not place your hands or feet under the
raised vehicle.
RDo not lie under the vehicle.
RDo not start the engine when the vehicle is
raised.
RNever open or close a door or the tailgate
when the vehicle is raised.
RMake sure that no persons are present in the
vehicle when the vehicle is raised.
XUsing lug wrench :, loosen the bolts on the
wheel you wish to change by about one full
turn. Do not unscrew the bolts completely.
The jacking points are located just behind the
front wheel housings and just in front of the rear
wheel housings (arrows).
XTake the ratchet wrench out of the vehicle
tool kit and place it on the hexagon nut of the
jack so that the letters AUFare visible.
410Changing a wheel
Wheels and tires
Page 436 of 450

229.5). They have not necessarily been
approved by Mercedes-Benz.
Other identifications, for example:
R0 W-30
R5 W-30
R5 W-40
Fuel
Important safety notes
GWARNING
Fuel is highly flammable. If you handle fuel
incorrectly, there is a risk of fire and explo-
sion.
You must avoid fire, open flames, creating
sparks and smoking. Switch off the engine
and, if applicable, the auxiliary heating before refueling.
GWARNING
Fuel is poisonous and hazardous to health.
There is a risk of injury.
You must make sure that fuel does not come into contact with your skin, eyes or clothing
and that it is not swallowed. Do not inhale fuel
vapors. Keep fuel away from children.
If you or others come into contact with fuel,
observe the following:
RWash away fuel from skin immediately
using soap and water.
RIf fuel comes into contact with your eyes,
immediately rinse them thoroughly with
clean water. Seek medical assistance with-
out delay.
RIf fuel is swallowed, seek medical assis-
tance without delay. Do not induce vomit-
ing.
RImmediately change out of clothing which
has come into contact with fuel.
Tank capacity
Missing values were not available at time of
going to print.
ModelTotal capa- city
GLE 450 Sport AMG
4MATIC
GLE 550 4MATIC21.1 US gal (80.0 l)
Allot her models24.6 US gal
(93.0 l)
ModelOf which
reserve
GLE 450 Sport AMG
4MATIC
GLE 550 4MATICApprox.
2.6 US gal (10.0 l)
Mercedes‑AMG vehiclesApprox.
3.7 US gal (14.0 l)
Allot her modelsApprox.
3.2 US gal (12.0 l)
Gasoline
Fuel grade
!Do not use diesel to refuel vehicles with a
gasoline engine. Do not switch on the ignition
if you accidentally refuel with the wrong fuel.
Otherwise, the fuel will enter the fuel system.
Even small amounts of the wrong fuel could
result in damage to the fuel system and the
engine. Notify a qualified specialist workshop
and have the fuel tank and fuel lines drained
completely.
!Only refuel using unleaded premium grade
gasoline with at least 91 AKI/95 RON.
!Only use the fuel recommended. Operating
the vehicle with other fuels can lead to engine failure.
434Service products and filling capacities
Technical data
Page 440 of 450

Mercedes-AMG vehicles:only use SAE 0W-40
or SAE 5W-40 engine oils.
iMB approval is indicated on the oil contain-
ers.
Filling capacities
The following values refer to an oil change
including the oil filter.
Missing values were not available at time of
going to print.
ModelCapacity
GLE 250 d 4MATIC6.9 US qt (6.5 l)
GLE 350 d 4MATIC8.5 US qt (8.0l)
GLE 450 Sport AMG
4MATIC
GLE 550 4MATIC9.0 US qt (8.5l)
Mercedes‑AMG
vehicles
All other models7.4 US qt (7.0l)
Additives
!Do not use any additives in the engine oil.
This could damage the engine.
Engine oil viscosity
Viscosity describes the flow characteristics of a
fluid. If an engine oil has a high viscosity, this
means that it is thick; a low viscosity means that it is thin.
Select an engine oil with an SAE classification
(viscosity) suitable for the prevailing outside
temperatures. The table shows you which SAE
classifications are to be used. The low-temper- ature characteristics of engine oils can deterio-
rate significantly, e.g. as a result of aging, soot
and fuel deposits. It is therefore strongly rec-
ommended that you carry out regular oil
changes using an approved engine oil with the
appropriate SAE classification.
Brake fluid
GWARNING
The brake fluid constantly absorbs moisture
from the air. This lowers the boiling point of
the brake fluid. If the boiling point of the brake
fluid is too low, vapor pockets may form in the
brake system when the brakes are applied
hard. This would impair braking efficiency.
There is a risk of an accident.
You should have the brake fluid renewed at
the specified intervals.
Comply with the important safety notes for ser-
vice products when handling brake fluid
(
Ypage 433).
The brake fluid change intervals can be found in
the Maintenance Booklet.
Only use brake fluid approved by Mercedes-
Benz in accordance with MB-Freigabe or MB-
Approval 331.0.
Information about approved brake fluid can be
obtained at any qualified specialist workshop or on the Internet at
http://bevo.mercedes-benz.co m.
iHave the brake fluid regularly replaced at a
qualified specialist workshop and the replace-
ment confirmed in the Maintenance Booklet.
Coolant
Important safety notes
GWARNING
If antifreeze comes into contact with hot com- ponents in the engine compartment, it may
ignite. There is a risk of fire and injury.
Let the engine cool down before you add anti-
freeze. Make sure that antifreeze is not spilled
next to the filler neck. Thoroughly clean the
438Service products and filling capacities
Technical data