2016 MERCEDES-BENZ GLE-Class display
[x] Cancel search: displayPage 76 of 450

ESP®trailer stabilization does not work if ESP®
is deactivated or disabled because of a malfunc-
tion.
Crosswind Assist
General information
Strong crosswinds can cause your vehicle to
deviate from a straight course. The crosswind
driving assistance function integrated in ESP
®
noticeably reduces these impairments.
ESP®intervenes automatically according to the
direction and intensity of the crosswinds affect-
ing your vehicle.
ESP intervenes with stabilizing braking to assist
you in keeping the vehicle in the lane.
Crosswind Assist is active at vehicle speeds
above 50 mph (80 km/h) when driving straight
ahead or cornering gently.
Important safety notes
Crosswind Assist does not work if ESP®is deac-
tivated or disabled because of a malfunction.
EBD (electronic brake force distribu-
tion)
General information
EBD monitors and controls the brake pressure
on the rear wheels to improve driving stability
while braking.
Important safety notes
iObserve the "Important safety notes" sec-
tion for driving safety systems (Ypage 66).
GWARNING
If EBD is malfunctioning, the rear wheels can
lock, e.g. under full braking. This increases the
risk of skidding and an accident.
You should therefore adapt your driving style
to the different handling characteristics. Have
the brake system checked at a qualified spe-
cialist workshop.
Observe information regarding indicator and
warning lamps (
Ypage 319) as well as display
messages (Ypage 283).
ADAPTIVE BRAKE
ADAPTIVE BRAKE enhances braking safety and
offers increased braking comfort. In addition to the braking function, ADAPTIVE BRAKE also has
the HOLD function (
Ypage 204) and hill start
assist (Ypage 149).
PRE-SAFE®Brake
General information
PRE-SAFE®Brake can help you to minimize the
risk of a collision with a vehicle ahead or a
pedestrian, and reduce the effects of such a
collision. If PRE-SAFE
®Brake has detected a risk
of collision, you will be warned visually and
acoustically as well as by automatic braking.
iPay attention to the important safety notes
in the "Driving safety systems" section
(
Ypage 66).
PRE‑SAFE
®Brake is only available in vehicles
with the Driving Assistance Plus package.
For PRE-SAFE
®Brake to assist you when driving,
the radar sensor system and the camera system
must be switched on and be operational.
With the help of the radar sensor system and the
camera system, PRE-SAFE
®Brake can detect
obstacles that are in front of your vehicle for an
extended period of time.
In addition, pedestrians in the path of your vehi-
cle can be detected.
PRE-SAFE
®Brake detects pedestrians using
typical characteristics such as the body con-
tours and posture of a person standing upright.
iObserve the restrictions described in the
"Important safety notes" sec-
tion“ (
Ypage 74).
Important safety notes
GWARNING
PRE-SAFE
®Brake will initially brake your vehi-
cle by a partial application of the brakes if a
danger of collision is detected. There may be
a collision unless you brake yourself. Even
after subsequent full application of the brakes
a collision cannot always be avoided, partic-
74Driving safet ysystem s
Safety
Page 102 of 450

Useful information
i
This Operator's Manual describes all models
and all standard and optional equipment of
your vehicle available at the time of publica-
tion of the Operator's Manual. Country-spe-
cific differences are possible. Please note
that your vehicle may not be equipped with all
features described. This also applies to
safety-related systems and functions.
iRead the information on qualified specialist
workshops (Ypage 29).
Correct driver's seat position
GWARNING
You could lose control of your vehicle if you do the following while driving:
Radjust the driver's seat, head restraint,
steering wheel or mirrors
Rfasten the seat belt
There is a risk of an accident.
Adjust the driver's seat, head restraint, steer-
ing wheel and mirror and fasten your seat belt before starting the engine.
XObserve the safety guidelines on seat adjust-
ment (Ypage 101).
XCheck whether you have adjusted seat =
properly (Ypage 102). When adjusting the seat, make sure that:
Ryou are as far away from the driver's air bag as
possible
Ryou are sitting in a normal upright position
Ryou can fasten the seat belt properly
Ryou have moved the backrest to an almost
vertical position
Ryou have set the seat cushion angle so that
your thighs are gently supported
Ryou can depress the pedals properly
XCheck whether the head restraint is adjusted
properly (Ypage 102).
When doing so, make sure that you have
adjusted the head restraint so that the back of
your head is supported at eye level by the
center of the head restraint.
XObserve the safety notes on steering column
adjustment (Ypage 107).
XMake sure that steering wheel :is adjusted
properly.
Adjusting the steering wheel manually
(
Ypage 107)
Adjusting the steering wheel electrically
(
Ypage 108)
When adjusting the steering wheel column,
make sure that:
Ryou can hold the steering wheel with your
arms slightly bent
Ryou can move your legs freely
Ryou can see all the displays in the instrument cluster clearly
XObserve the safety guidelines for seat belts
(Ypage 46).
XCheck whether you have fastened seat
belt ;properly (Ypage 48).
The seat belt should:
Rfit snugly across your body
Rbe routed across the middle of your shoulder
Rbe routed in your pelvic area across the hip
joints
XBefore starting off, adjust the rear-view mirror
and the exterior mirrors in such a way that you
have a good view of road and traffic condi-
tions (
Ypage 110).
XVehicles with a memory function: save the
seat, steering wheel and exterior mirror set-
tings with the memory function (
Ypage 113).
100Correct driver's seat position
Seats, steering wheel and mirrors
Page 120 of 450

activated regardless. There is a risk of an acci-dent.
Always carefully observe the traffic conditions
and switch off the high-beam headlamps in
good time.
Adaptive Highbeam Assist cannot take into
account road, weather or traffic conditions.
Adaptive Highbeam Assist is only an aid. You are responsible for adjusting the vehicle's lighting
to the prevailing light, visibility and traffic con-
ditions.
In particular, the detection of obstacles can be
restricted if there is:
Rpoor visibility, e.g. due to fog, heavy rain or
snow
Rdirt on the sensors or the sensors are
obscured
Switching Adaptive Highbeam Assist
on/off
XTo switch on: turn the light switch to Ã.
XPress the combination switch beyond the
pressure point in the direction of arrow :.
The _ indicator lamp in the multifunction
display lights up when it is dark and the light
sensor activates the low-beam headlamps.
If you are driving at speeds above approx-
imately 16 mph (25 km/h):
The headlamp range is set automatically
depending on the distance between the vehi-
cle and other road users.
If you are driving at speeds above approx-
imately 19 mph (30 km/h) and no other road
users have been detected:
The high-beam headlamps are switched on
automatically. The Kindicator lamp in the
instrument cluster also lights up.
If you are driving at speeds below approx-
imately 16 mph (25 km/h) or other road users
have been detected or the roads are ade-
quately lit:
The high-beam headlamps are switched off
automatically. The Kindicator lamp in the
instrument cluster goes out. The _indi- cator lamp in the multifunction display
remains lit.
XTo switch off:
move the combination switch
back to its normal position or move the light
switch to another position.
The _ indicator lamp in the multifunction
display goes out.
Headlamps fogged up on the inside
Certain climatic and physical conditions may
cause moisture to form in the headlamp. This
moisture does not affect the functionality of the
headlamp.
Interior lighting
Overview of interior lighting
Overhead control panel
:
p Switches the left-hand front reading
lamp on/off
;c Switches the front interior lighting on
=vSwitches the rear interior lighting on/
off
?| Switches the front interior lighting/
automatic interior lighting control off
Ap Switches the right-hand front reading
lamp on/off
BSwitches the automatic interior lighting con-
trol on
Interior lighting control
General notes
In order to prevent the vehicle's battery from
discharging, the interior lighting functions are
automatically deactivated after some time
118Interior lighting
Lights and windshield wipers
Page 131 of 450

ADirects the airflow through the footwell vents
BSwitches the seat heating on the left-hand side on/off
Optimum use of dual-zone climate
control
The following contains notes and recommenda-
tions on optimum use of dual-zone climate con-
trol.
RYou can switch on climate control by using the
Ãand¿ orà andÁ buttons.
The indicator lamps in the Ãand
¿ buttons or the ÃandÁ buttons
light up.
RSet the temperature to 72 ‡ (22 †).
ROnly use the "Windshield defrosting" function
briefly until the windshield is clear again.
ROnly use air-recirculation mode briefly, e.g. if
there are unpleasant outside odors or when in
a tunnel. The windows could otherwise fog up,
since no fresh air is drawn into the vehicle in
air-recirculation mode.
RUse the ZONE function to adopt the temper-
ature settings on the driver's side for the
front-passenger side as well. The indicator
lamp above the ábutton goes out.
RIf you change the settings of the climate con-
trol system, the climate status display
appears for approximately three seconds at
the bottom of the screen in the multimedia
system display. You will see the current set-
tings of the various climate control functions.
During automatic engine switch-off, the climate
control system only operates at a reduced capa-
city. If you require the full cl
imate control output,
you can switch off the ECO start/stop function
by pressing the ECO button (
Ypage 151).
Overview of climatecont rol systems129
Climate control
Page 132 of 450

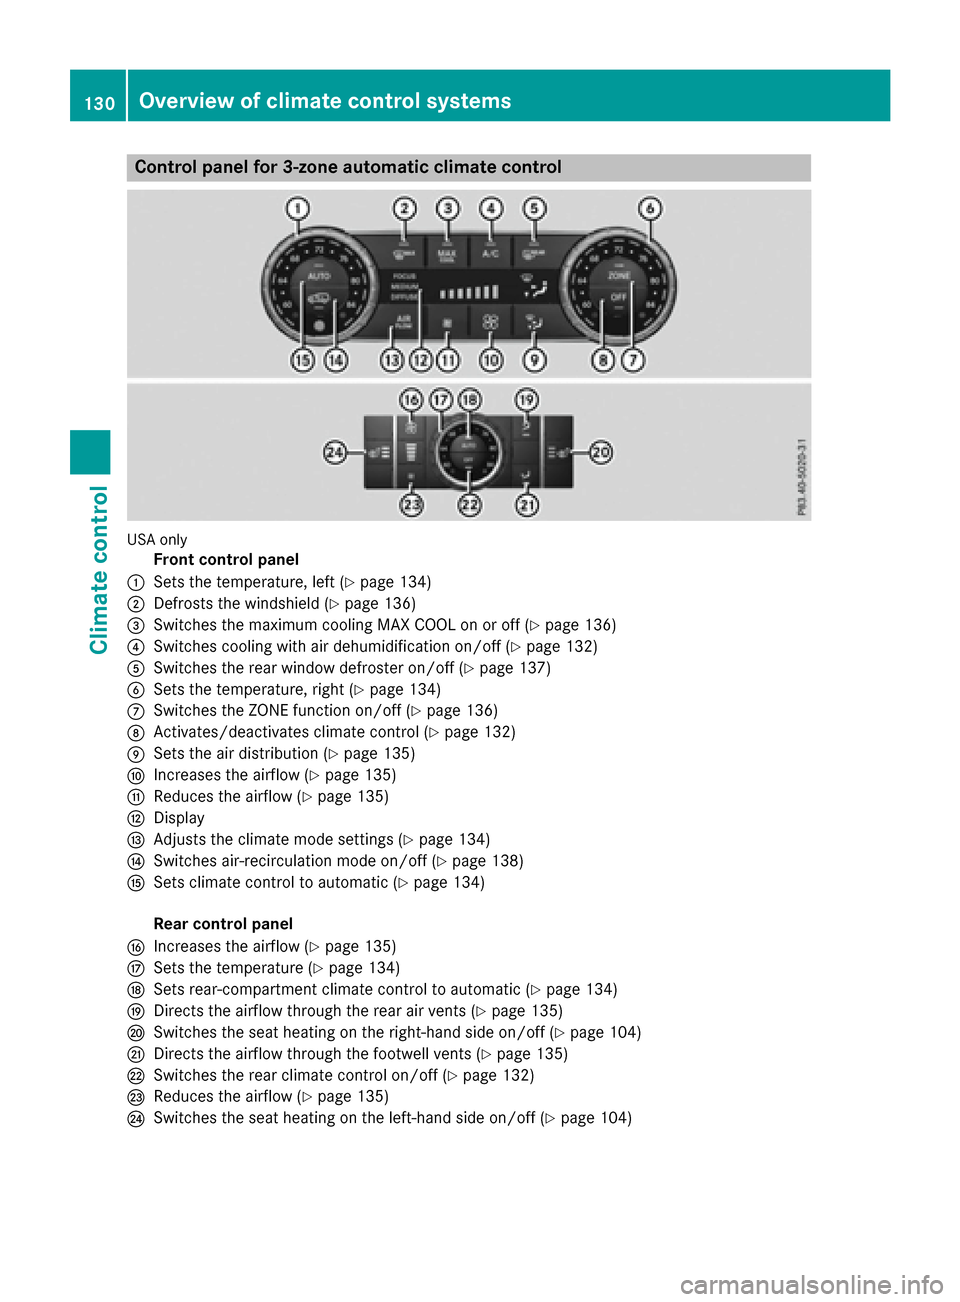
Control panel for 3-zone automatic climate control
USAonly
Front control panel
:Sets the temperature, left (Ypage 134)
;Defrosts the windshield (Ypage 136)
=Switches the maximum cooling MAX COOL on or off (Ypage 136)
?Switches cooling with air dehumidification on/off (Ypage 132)
ASwitches the rear window defroster on/off (Ypage 137)
BSets the temperature, right (Ypage 134)
CSwitches the ZONE function on/off (Ypage 136)
DActivates/deactivates climate control (Ypage 132)
ESets the air distribution (Ypage 135)
FIncreases the airflow (Ypage 135)
GReduces the airflow (Ypage 135)
HDisplay
IAdjusts the climate mode settings (Ypage 134)
JSwitches air-recirculation mode on/off (Ypage 138)
KSets climate control to automatic (Ypage 134)
Rear control panel
LIncreases the airflow (Ypage 135)
MSets the temperature (Ypage 134)
NSets rear-compartment climate control to automatic (Ypage 134)
ODirects the airflow through the rear air vents (Ypage 135)
PSwitches the seat heating on the right-hand side on/off (Ypage 104)
QDirects the airflow through the footwell vents (Ypage 135)
RSwitches the rear climate control on/off (Ypage 132)
SReduces the airflow (Ypage 135)
TSwitches the seat heating on the left-hand side on/off (Ypage 104)
130Overview of climate control systems
Climate control
Page 133 of 450

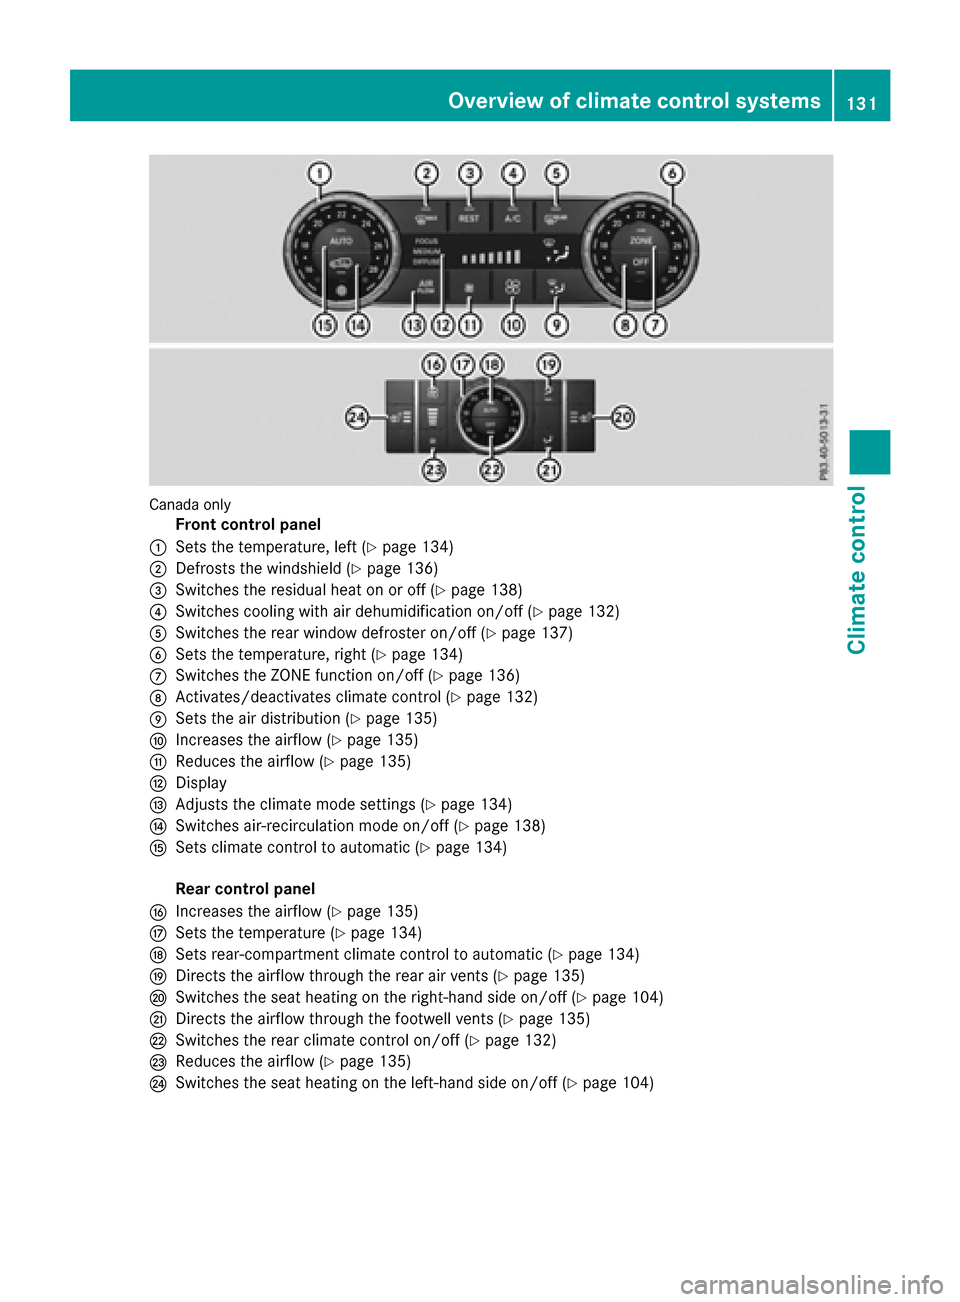
Canada only
Front control panel
:Sets the temperature, left (Ypage 134)
;Defrosts the windshield (Ypage 136)
=Switches the residual heat on or off (Ypage 138)
?Switches cooling with air dehumidification on/off (Ypage 132)
ASwitches the rear window defroster on/off (Ypage 137)
BSets the temperature, right (Ypage 134)
CSwitches the ZONE function on/off (Ypage 136)
DActivates/deactivates climate control (Ypage 132)
ESets the air distribution (Ypage 135)
FIncreases the airflow (Ypage 135)
GReduces the airflow (Ypage 135)
HDisplay
IAdjusts the climate mode settings (Ypage 134)
JSwitches air-recirculation mode on/off (Ypage 138)
KSets climate control to automatic (Ypage 134)
Rear control panel
LIncreases the airflow (Ypage 135)
MSets the temperature (Ypage 134)
NSets rear-compartment climate control to automatic (Ypage 134)
ODirects the airflow through the rear air vents (Ypage 135)
PSwitches the seat heating on the right-hand side on/off (Ypage 104)
QDirects the airflow through the footwell vents (Ypage 135)
RSwitches the rear climate control on/off (Ypage 132)
SReduces the airflow (Ypage 135)
TSwitches the seat heating on the left-hand side on/off (Ypage 104)
Overview of climate control systems131
Climate control
Page 134 of 450

Optimum use of 3-zone automatic cli-
mate control
The following contains instructions and recom-
mendations to enable you to get the most out of
your 3-zone automatic climate control.
RActivate climate control using theÃand
¿ buttons. The indicator lamps above the
à and¿ buttons light up.
RIn automatic mode, you can also use the ñ
button to set a climate mode (FOCUS/
MEDIUM/DIFFUSE). The MEDIUM level is
recommended.
RSet the temperature to 72 ‡ (22 †).
ROnly use the "Windshield defrosting" function
briefly until the windshield is clear again.
ROnly use air-recirculation mode briefly, e.g. if
there are unpleasant outside odors or when in
a tunnel. The windows could otherwise fog up, since no fresh air is drawn into the vehicle in
air-recirculation mode.
RUse the ZONE function to adopt the temper-
ature settings on the driver's side for the
front-passenger side and the rear compart-
ment as well. The indicator lamp above the
á button goes out.
RUse the residual heat function if you want to
heat or ventilate the vehicle interior when the
ignition is switched off. The residual heat
function can only be activated or deactivated with the ignition switched off.
RIf you change the settings of the climate con-
trol system, the climate status display
appears for approximately three seconds at
the bottom of the screen in the multimedia
system display. You will see the current set-
tings of the various climate control functions.
During automatic engine switch-off, the climate
control system only operates at a reduced capa-
city. If you require the full climate control output,
you can switch off the ECO start/stop function
by pressing the ECO button (
Ypage 151).
Operating the climate control sys-
tems
Activating/deactivating climate con-
trol
General notes
When the climate control is switched off, the air
supply and air circulation are also switched off.
The windows could fog up. Therefore, switch off
climate control only briefly
iSwitch on climate control primarily using
the à button (Ypage 134).
In the rear compartment, you can also switch
climate control on and off using the Ãand
^ buttons.
Activating or deactivating
XTurn the SmartKey to position 2in the ignition
lock (Ypage 145).
XTo activate: press theÃbutton.
The indicator lamp in the Ãbutton lights
up. Airflow and air distribution are set to auto-
matic mode.
or
XPress the ^button.
The indicator lamp in the ^button goes
out. The previously selected settings are
restored.
XTo deactivate: press the^button.
The indicator lamp in the ^button lights
up.
Switching cooling with air dehumidi-
fication on/off
General notes
If you deactivate the "Cooling with air-dehumid-
ification" function, the air inside the vehicle will
not be cooled. The air inside the vehicle will also
not be dehumidified. The windows can fog up
more quickly. Therefore, only deactivate the
"Cooling with air-dehumidification" function
briefly.
The "Cooling with air dehumidification" function is only available when the engine is running. The
air inside the vehicle is cooled and dehumidified
according to the temperature selected.
132Operating the climate control systems
Climate control
Page 136 of 450

Problems with the "Cooling with air dehumidification" function
ProblemPossible causes/consequences andMSolutions
The indicator lamp in the
¿orÁ button
flashes three times or
remains off. The "Cool-
ing with air dehumidifi-
cation" function cannot
be switched on.Cooling with air dehumidification has been deactivated due to a mal-
function.
XVisit a qualified specialist workshop.
Setting climate control to automatic
General notes
In automatic mode, the set temperature is main-
tained automatically at a constant level. The
system automatically regulates the temperature
of the dispensed air, the airflow and the air dis-
tribution.
The "Cooling with air dehumidification" function
is activated automatically in automatic mode.
In the rear compartment, you can also switch
climate control for the rear seats to automatic
mode using the Ãbutton.
Automatic control
XTurn the SmartKey to position 2in the ignition
lock (Ypage 145).
XSet the desired temperature.
XTo activate: press theÃbutton.
The indicator lamp in the Ãbutton lights
up. Automatic air distribution and airflow are
activated.
XTo switch to manual mode: press the_
button.
or
XPress the IorK button.
The indicator lamp in the Ãbutton goes
out.
3-zone automatic climate control: when auto-
matic mode is activated, you can select a cli-
mate mode (
Ypage 134).
Adjusting the climate mode settings
You can select the following climate mode set-
tings in automatic mode:
FOCUS high airflow, slightly cooler setting
MEDIUM medium airflow, standard setting
DIFFUSE low airflow, slightly warmer and draft- free setting
XTurn the SmartKey to position 2in the ignition
lock (Ypage 145).
XPress the Ãbutton.
XPress the ñbutton repeatedly until the
desired climate mode appears in the display.
Setting the temperature
Dual-zone automatic climate control
Different temperatures can be set for the driv-
er's and front-passenger sides.
XTurn the SmartKey to position 2in the ignition
lock (Ypage 145).
XTo increase or decrease: turn control:or
B counter-clockwise or clockwise
(
Ypage 127).
Only change the temperature setting in small
increments. Start at 72 ‡ (22 †).
134Operating the climate control systems
Climate control