2016 MERCEDES-BENZ GLE-Class ECO mode
[x] Cancel search: ECO modePage 185 of 450
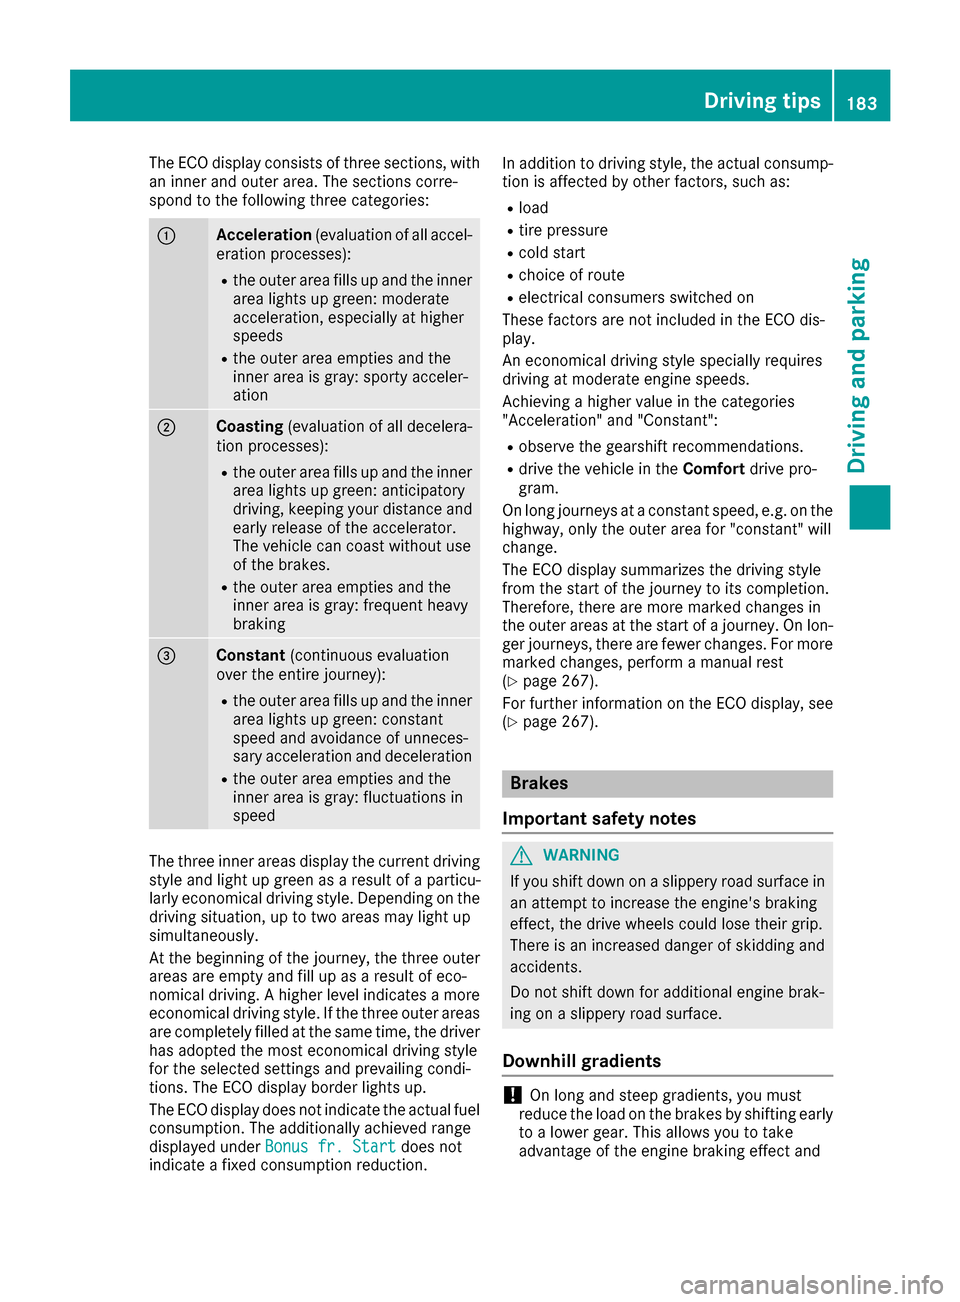
The ECO display consists of three sections, with
an inner and outer area. The sections corre-
spond to the following three categories:
:Acceleration(evaluation of all accel-
eration processes):
Rthe outer area fills up and the inner area lights up green: moderate
acceleration, especially at higher
speeds
Rthe outer area empties and the
inner area is gray: sporty acceler-
ation
;Coasting (evaluation of all decelera-
tion processes):
Rthe outer area fills up and the inner area lights up green: anticipatory
driving, keeping your distance and
early release of the accelerator.
The vehicle can coast without use
of the brakes.
Rthe outer area empties and the
inner area is gray: frequent heavy
braking
=Constant (continuous evaluation
over the entire journey):
Rthe outer area fills up and the inner area lights up green: constant
speed and avoidance of unneces-
sary acceleration and deceleration
Rthe outer area empties and the
inner area is gray: fluctuations in
speed
The three inner areas display the current driving
style and light up green as a result of a particu-
larly economical driving style. Depending on thedriving situation, up to two areas may light up
simultaneously.
At the beginning of the journey, the three outer
areas are empty and fill up as a result of eco-
nomical driving. A higher level indicates a more
economical driving style. If the three outer areas
are completely filled at the same time, the driver
has adopted the most economical driving style
for the selected settings and prevailing condi-
tions. The ECO display border lights up.
The ECO display does not indicate the actual fuel consumption. The additionally achieved range
displayed under Bonus fr. Start
does not
indicate a fixed consumption reduction. In addition to driving style, the actual consump-
tion is affected by other factors, such as:
Rload
Rtire pressure
Rcold start
Rchoice of route
Relectrical consumers switched on
These factors are not included in the ECO dis-
play.
An economical driving style specially requires
driving at moderate engine speeds.
Achieving a higher value in the categories
"Acceleration" and "Constant":
Robserve the gearshift recommendations.
Rdrive the vehicle in the Comfortdrive pro-
gram.
On long journeys at a constant speed, e.g. on the
highway, only the outer area for "constant" will
change.
The ECO display summarizes the driving style
from the start of the journey to its completion.
Therefore, there are more marked changes in
the outer areas at the start of a journey. On lon- ger journeys, there are fewer changes. For more
marked changes, perform a manual rest
(
Ypage 267).
For further information on the ECO display, see
(
Ypage 267).
Brakes
Important safety notes
GWARNING
If you shift down on a slippery road surface in an attempt to increase the engine's braking
effect, the drive wheels could lose their grip.
There is an increased danger of skidding and
accidents.
Do not shift down for additional engine brak-
ing on a slippery road surface.
Downhill gradients
!On long and steep gradients, you must
reduce the load on the brakes by shifting early
to a lower gear. This allows you to take
advantage of the engine braking effect and
Driving tips183
Driving and parking
Z
Page 186 of 450

helps avoid overheating and excessive wear
of the brakes.
When you take advantage of the engine brak-
ing effect, a drive wheel may not turn for some
time, e.g. on a slippery road surface. This
could cause damage to the drive train. This
type of damage is not covered by the
Mercedes-Benz warranty.
Do not depress the brake pedal continuously
while the vehicle is in motion, e.g. causing the
brakes to rub by constantly applying light pres-
sure to the pedal. This results in excessive and
premature wear to the brake pads.
Heavy and light loads
GWARNING
If you rest your foot on the brake pedal while
driving, the braking system can overheat. This increases the stopping distance and can even
cause the braking system to fail. There is a
risk of an accident.
Never use the brake pedal as a footrest. Never
depress the brake pedal and the accelerator
pedal at the same time.
!Depressing the brake pedal constantly
results in excessive and premature wear to
the brake pads.
If the brakes have been subjected to a heavy
load, do not stop the vehicle immediately. Drive
on for a short while. This allows the airflow to
cool the brakes more quickly.
Wet roads
If you have driven for a long time in heavy rain
without braking, there may be a delayed reac-
tion from the brakes when braking for the first
time. This may also occur after the vehicle has
been washed or driven through deep water.
You then have to depress the brake pedal more
firmly. Maintain a greater distance from the
vehicle in front.
After driving on a wet road or having the vehicle
washed, brake firmly while paying attention to
the traffic conditions. This will warm up the
brake discs, thereby drying them more quickly
and protecting them against corrosion.
Limited braking performance on salt-
treated roads
If you drive on salted roads, a layer of salt resi-
due may form on the brake discs and brake
pads. This can result in a significantly longer
braking distance.
RBrake occasionally to remove any possible
salt residue. Make sure that you do not
endanger other road users when doing so.
RCarefully depress the brake pedal and the
beginning and end of a journey.
RMaintain a greater distance to the vehicle
ahead.
Servicing the brakes
!The brake fluid level may be too low, if:
Rif the red brake warning lamp lights up in
the instrument cluster and
Ryou hear a warning tone while the engine is
running
Observe additional warning messages in the
multifunction display.
The brake fluid level may be too low due to
brake pad wear or leaking brake lines.
Have the brake system checked immediately.
Consult a qualified specialist workshop to
arrange this.
!A function or performance test should only
be carried out on a 2-axle dynamometer. If
you wish to operate the vehicle on such a
dynamometer, please consult a qualified spe-
cialist workshop in advance. You could oth-
erwise damage the drive train or the brake
system.
!Because ESP®is an automatic system, the
engine and ignition must be switched off
(SmartKey in position 0or 1or Start/Stop
button in position 0or 1) when the electric
parking brake is being tested on a brake dyna-
mometer (maximum 10 seconds).
Braking triggered automatically by ESP
®may
seriously damage the brake system.
All checks and maintenance work on the brake
system must be carried out at a qualified spe-
cialist workshop.
Have brake pads installed and brake fluid
replaced at a qualified specialist workshop.
If the brake system has only been subject to
moderate loads, you should test the functional-
184Driving tips
Driving and parking
Page 208 of 450
Make sure no one is underneath the vehicle or
in the immediate vicinity of the wheel arches
when the vehicle is being lowered.
If you unlock the vehicle or open a door, the
vehicle begins to compensate for load discrep-
ancies while still parked. However, for signifi-
cant level changes, such as after the vehicle has
been stationary for a long period, the engine
must be on. For safety reasons, the vehicle is
only lowered when the doors are closed. Low-
ering is interrupted if a door is opened, and it
continues once the door has been closed.
ADS and ADS PLUS (Adaptive Damping
System)
General notes
The Adaptive Damping System automatically
controls the calibration of the dampers. The
damping characteristics adapt to the current
operating and driving situation.
The damping is tuned individually to each wheel
and depends on:
Ryour driving style, e.g. sporty
Rthe road surface conditions
Rthe drive program selected
Rthe vehicle level setting
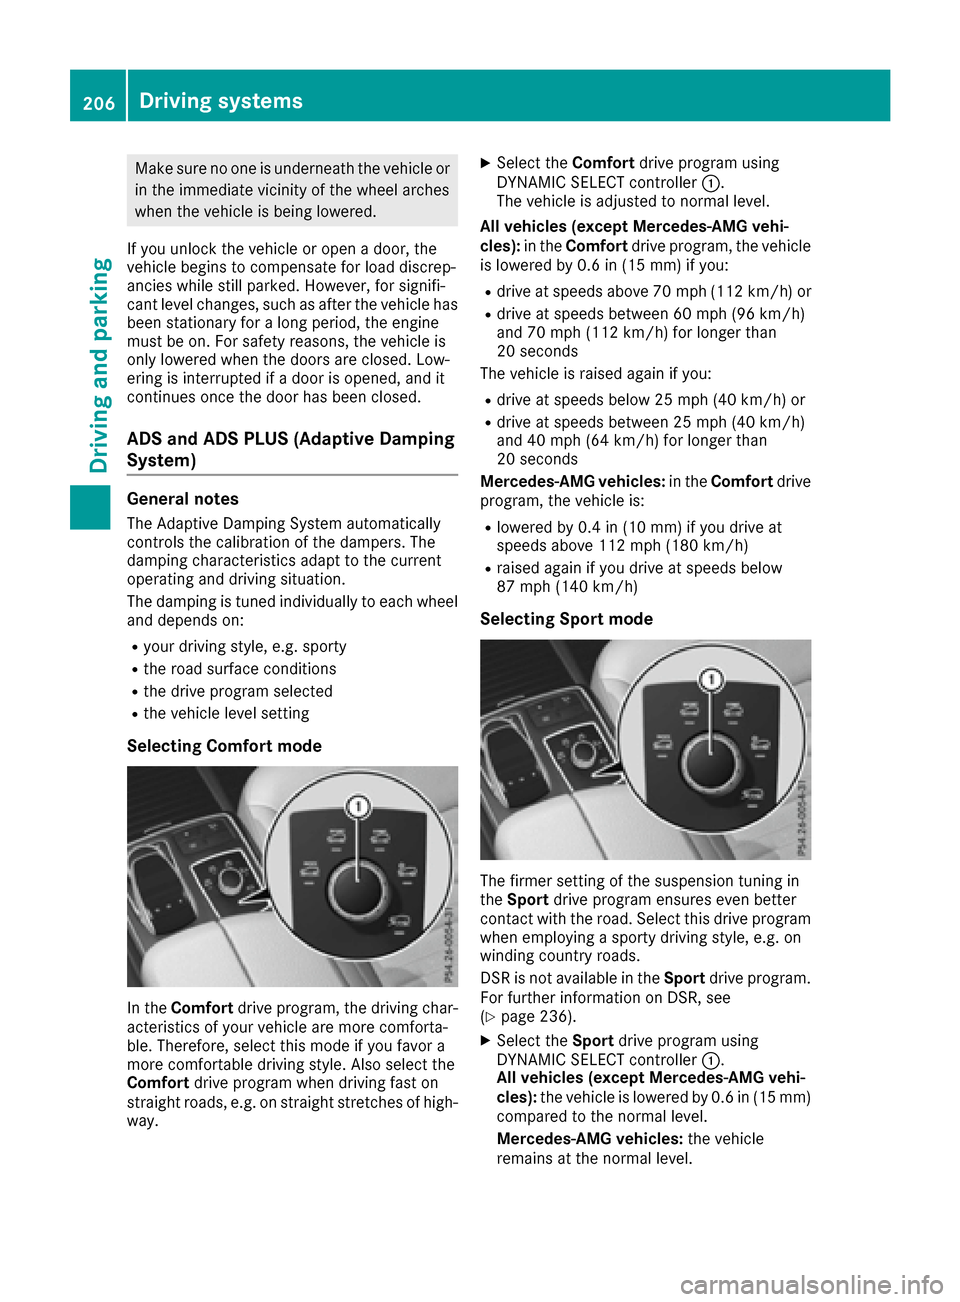
Selecting Comfort mode
In the Comfort drive program, the driving char-
acteristics of your vehicle are more comforta-
ble. Therefore, select this mode if you favor a
more comfortable driving style. Also select the
Comfort drive program when driving fast on
straight roads, e.g. on straight stretches of high-
way.
XSelect the Comfortdrive program using
DYNAMIC SELECT controller :.
The vehicle is adjusted to normal level.
All vehicles (except Mercedes-AMG vehi-
cles): in theComfort drive program, the vehicle
is lowered by 0.6 in (15 mm) if you:
Rdrive at speeds above 70 mph (112 km/h) or
Rdrive at speeds between 60 mph (96 km/h)
and 70 mph (112 km/h) for longer than
20 seconds
The vehicle is raised again if you:
Rdrive at speeds below 25 mph (40 km/h) or
Rdrive at speeds between 25 mph (40 km/h)
and 40 mph (64 km/h) for longer than
20 seconds
Mercedes-AMG vehicles: in theComfort drive
program, the vehicle is:
Rlowered by 0.4 in (10 mm) if you drive at
speeds above 112 mph (180 km/h)
Rraised again if you drive at speeds below
87 mph (140 km/h)
Selecting Sport mode
The firmer setting of the suspension tuning in
the Sport drive program ensures even better
contact with the road. Select this drive program
when employing a sporty driving style, e.g. on
winding country roads.
DSR is not available in the Sportdrive program.
For further information on DSR, see
(
Ypage 236).
XSelect the Sportdrive program using
DYNAMIC SELECT controller :.
All vehicles (except Mercedes-AMG vehi-
cles): the vehicle is lowered by 0.6 in (15 mm)
compared to the normal level.
Mercedes-AMG vehicles: the vehicle
remains at the normal level.
206Driving systems
Driving and parking
Page 224 of 450

Rif the camera lenses are dirty or covered
Rif the vehicle components in which the cam-
eras are installed are damaged. In this event,
have the camera position and setting checked
at a qualified specialist workshop
Do not use the 360° camera in this case. You
can otherwise injure others or cause damage to objects or the vehicle.
Guide lines are always shown at road level.
The field of vision and other functions of the
camera system may be restricted due to addi-
tional accessories on the rear of the vehicle (e.g.
license plate holder, bicycle rack).
On vehicles with height-adjustable chassis,
depending on technical conditions, leaving the
standard height can result in:
Rinaccuracies in the guide lines
Rinaccuracies in the display of generated
images (top view)
Activation conditions
The 360° camera image can be displayed if:
Ryour vehicle is equipped with a 360° camera
Rthe SmartKey is in position 2in the ignition
lock
Rthe multimedia system is switched on
Switching on the 360° camera
XPress the Øbutton in the center console
for longer than two seconds.
Depending on whether position Dor Ris
engaged, the following is shown:
Ra split screen with top view and the image
from the front camera or
Ra split screen with top view and the image
from the rear view camera
or
XPress the Øbutton in the center console.
The vehicle menu is displayed.
XSelect 360°Cameraand press 7to confirm.
Depending on whether position Dor Ris
engaged, the following is shown:
Ra split screen with top view and the image
from the front camera or
Ra split screen with top view and the image
from the rear view camera
Activating the 360° camera using
reverse gear
The 360° camera images can be automatically
displayed by engaging reverse gear.
XMake sure that the SmartKey is in position 2
in the ignition lock.
XMake sure that the Activation by R gearfunction is selected in the multimedia system
(see the separate operating instructions).
XTo show the 360° camera image: engage
reverse gear.
The multimedia system shows the area
behind the vehicle in split-screen mode. You
see the top view of the vehicle and the image
from the rear view camera.
Selecting the split-screens or 180° view
Selecting split-screen view
XTo switch to the line with the vehicle icons:
slide 5the controller.
XTo select one of the vehicle icons: turn 3
the controller.
XTo switch to 180° View:turn 3 the con-
troller to select 180° View
and press7to
confirm.
iThe 180°Viewoption is only available in the
following views:
RTop view with picture from the rear view
camera
RTop view with picture from the front camera
Displays in the multimedia system
Important safety notes
The camera system may show a distorted view
of obstacles, show them incorrectly or not at all.
Obstacles are not shown by the system in the
following locations:
Runder the front and rear bumpers
Rvery close to the front and rear bumpers
Rin the area immediately above the tailgate
handle
Rvery close to the exterior mirrors
Rin the transitional areas between the various
cameras in the virtual top view
222Driving systems
Driving and parking
Page 244 of 450

ELevel control
FCompass with angle scale
Activating the driving dynamics display
XSwitch on COMAND. You can find further
information in the separate COMAND operat-
ing instructions.
XPress button:.
The driving dynamics display appears in the
COMAND display.
PLUG-IN HYBRID operation
Points to remember
General notes
Hybrid technology combines a fuel efficient
internal combustion engine with a powerful
electric motor. In HYBRIDmode, the hybrid
drive system automatically selects the most effi-
cient operating mode for every driving situation. Drive the vehicle in the usual manner.
To save fuel in HYBRIDmode, the hybrid drive
system switches off the combustion engine as
often as possible during the journey when power
output requirements are low. When power out-
put requirements are low, the electric motor
powers the vehicle. The engine is switched on,
even while the vehicle is in motion, when a
higher power output is required. The engine is
usually switched off when the vehicle is station-
ary. Consequently, there is usually no engine
idling as with combustion engine vehicles.
For pulling away and accelerating, the electric
motor supports the internal combustion engine
using the power stored in the high-voltage bat-
tery. In addition, the power is used for electric
driving, operation of the electric refrigerant
compressor and to supply the 12 V on-board electrical system. In this way the hybrid drive
system helps to reduce your vehicle's fuel con-
sumption.
Observe the driving tips on plug-in hybrid oper-
ation (
Ypage 252).
Recuperative Brake System
If you release the accelerator pedal when the
vehicle is in motion, overrun recuperation is ini-
tiated. The electric motor is operated as a gen-
erator when in overrun mode and when you
brake. Hybrid technology converts the kinetic
energy of the vehicle into electricity and stores
it in the high-voltage battery.
Observe the important safety notes for the
Recuperative Brake System (
Ypage 44).
Important safety notes
If the engine is switched off by the ECO start/
stop function, you open the driver's door and
unfasten your seat belt:
Ra message appears in the multifunction dis-
play and
Ra warning tone sounds
Further information (
Ypage 299).
All of the vehicle's systems remain active, if:
Rthe vehicle is stationary
Rthe combustion engine is switched off and
Rthe READY indicator in the instrument cluster
lights up
If you remove your foot from the brake pedal
while in transmission position D or R, the vehicle
may pull away automatically.
Observe the notes on the READY display of the
ECO start/stop function (
Ypage 253).
Vehicles with an electric motor generate much
less driving noise than vehicles with internal
combustion engines. As a result, your vehicle
may not be heard by other road users in certain
situations. This is the case, for example, when
you are parking and your vehicle is not seen by
other road users.
This requires you to adopt a particularly antici-
patory driving style, as it is necessary to allow
for the possibility that other road users may
behave erratically.
Depending on the vehicle's equipment and
country-specific regulations, the vehicle can be
equipped with Acoustic Vehicle Indication.
242PLUG-IN HYBRID operation
Driving and parking
Page 247 of 450
Instrument cluster
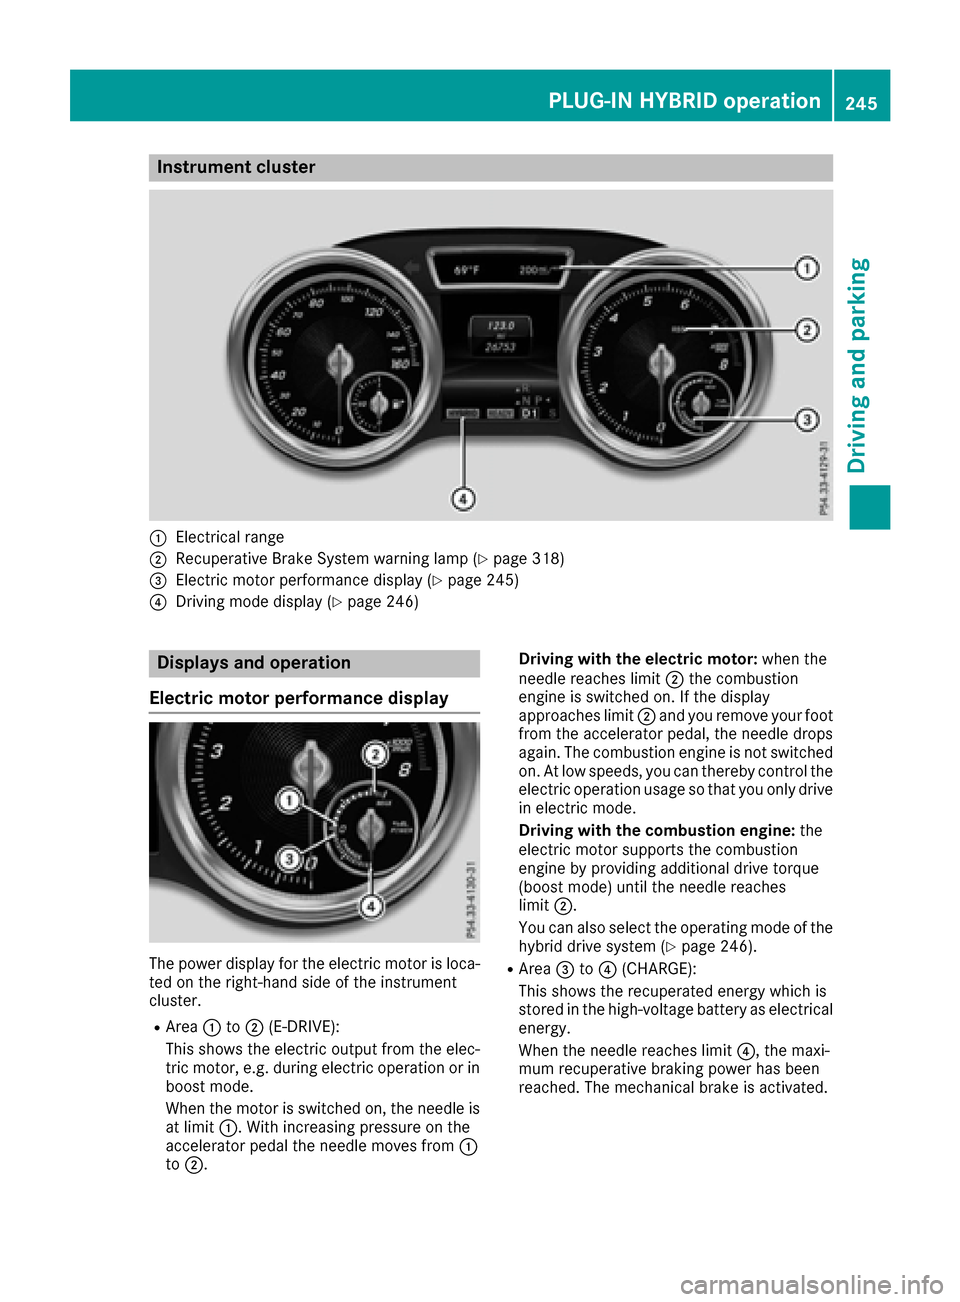
:Electrical range
;Recuperative Brake Systemwarning lamp (Ypage 318)
=Electric motor performance display (Ypage 245)
?Drivingmod edisplay (Ypage 246)
Displays and operation
Electric motor performance display
The power display for th eelectric motor is loca-
te don th eright-hand side of th einstrumen t
cluster.
RArea :to; (E-DRIVE):
This shows th eelectric output from th eelec -
tric motor, e.g. during electric operation or in
boos tmode.
When th emotor is switched on ,th eneedle is
at limi t:. Withincreasing pressur eon th e
accelerato rpedal th eneedle moves from :
to ;. Driving with th
eelectri cmotor: when th e
needle reaches limi t; thecombustion
engin eis switched on .If th edisplay
approaches limi t; and you remove your foo t
from th eaccelerato rpedal ,th eneedle drops
again .The combustion engin eis no tswitched
on .At low speeds, you can thereby control th e
electric operation usage so that you only driv e
in electric mode.
Driving with th ecombustion engine: the
electric motor support sth ecombustion
engin eby providing additional driv etorque
(boost mode) until th eneedle reaches
limi t;.
You can also select th eoperating mod eof th e
hybrid driv esystem (
Ypage 246).
RArea=to? (CHARGE) :
This shows th erecuperate denerg ywhic his
store din th ehigh-voltage battery as electrical
energy.
When th eneedle reaches limi t?, themaxi-
mum recuperative brak ing p
ower has been
reached. The mechanical brak eis activated.
PLUG-IN HYBRID operation245
Driving and parking
Z
Page 249 of 450
If manual gearshifting is deactivated, the auto-
matic transmission shifts:
Rinto the drive program that was last selected,
and
Rinto the driving mode that was last selected
If you change the drive program, the operating
mode that was last selected is stored for approx-
imately 60 seconds. After this time, the HYBRID
operating mode is automatically activated.
Operating the on-board computer
You can display the current operating condition
of the hybrid drive system in the multifunction
display and the multimedia system in the form of
an energy flow display (
Ypage 247).
In the multimedia system display, you can also
call up a graphic display of the fuel consumption
and generated electricity (
Ypage 250).
Menus and submenus
Selecting displays in the display of the
multimedia system
XPress the Øbutton on the multimedia sys-
tem.
The vehicle menu is displayed.
XTo select Energy flow: turn and press the
controller.
The energy flow is displayed.
or
XTo select Consumption: turn and press the
controller.
Fuel consumption and the generated electric
energy are displayed.
XTo exit the display: press the %button on
the controller.
Selecting the energy flow display in the
multifunction display
XPress the =or; button on the steering
wheel to select the Tripmenu.
XUse: or9 to select Energy flow.
XConfirm by pressing aon the steering
wheel.
The active components of the hybrid drive
system are highlighted in the energy flow dis- play.
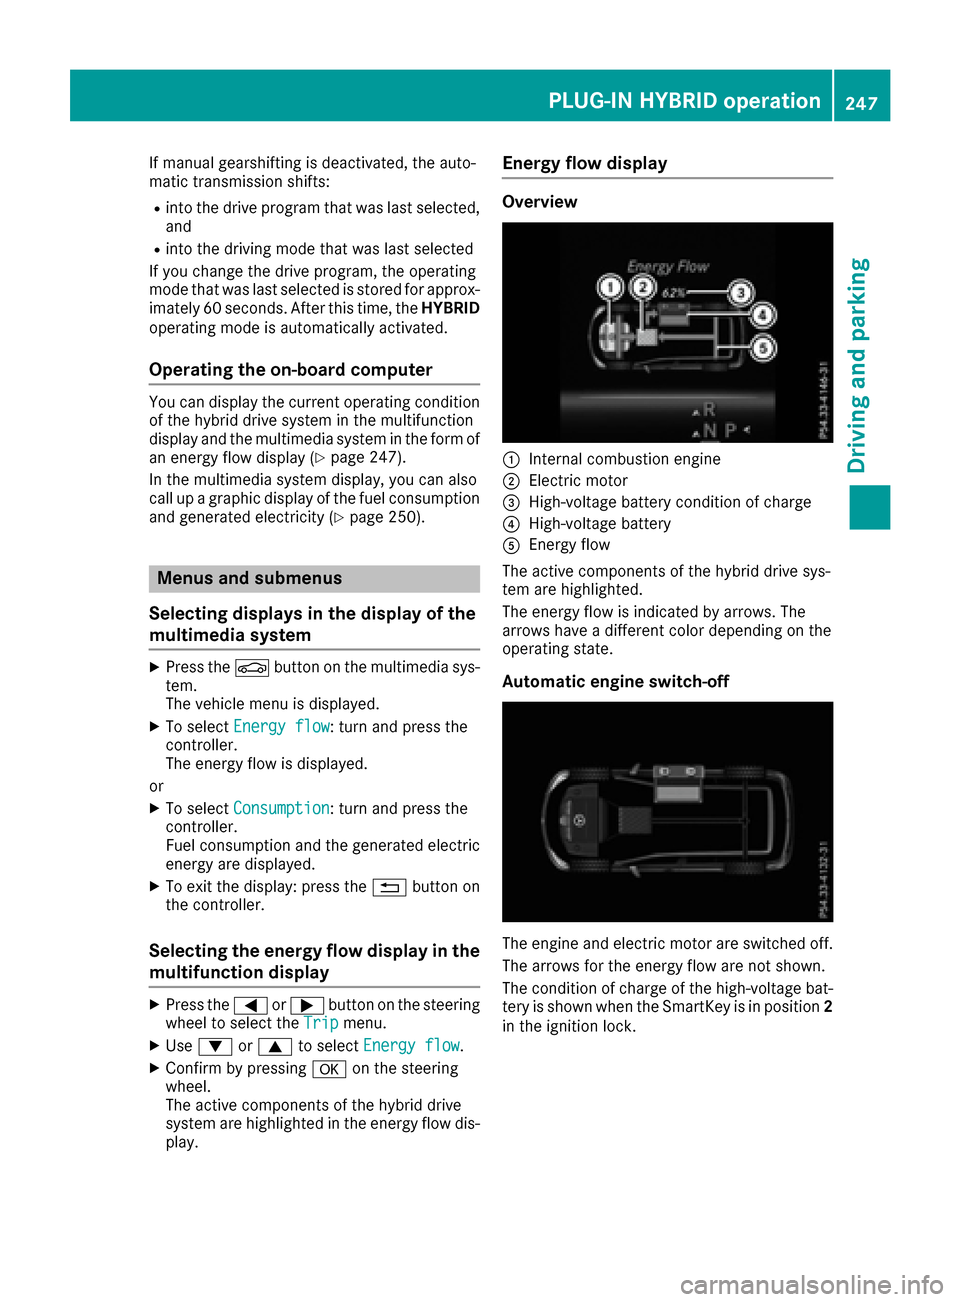
Energy flow display
Overview
:Internal combustion engine
;Electric motor
=High-voltage battery condition of charge
?High-voltage battery
AEnergy flow
The active components of the hybrid drive sys-
tem are highlighted.
The energy flow is indicated by arrows. The
arrows have a different color depending on the
operating state.
Automatic engine switch-off
The engine and electric motor are switched off.
The arrows for the energy flow are not shown.
The condition of charge of the high-voltage bat-
tery is shown when the SmartKey is in position 2
in the ignition lock.
PLUG-IN HYBRID operation247
Driving and parking
Z
Page 250 of 450
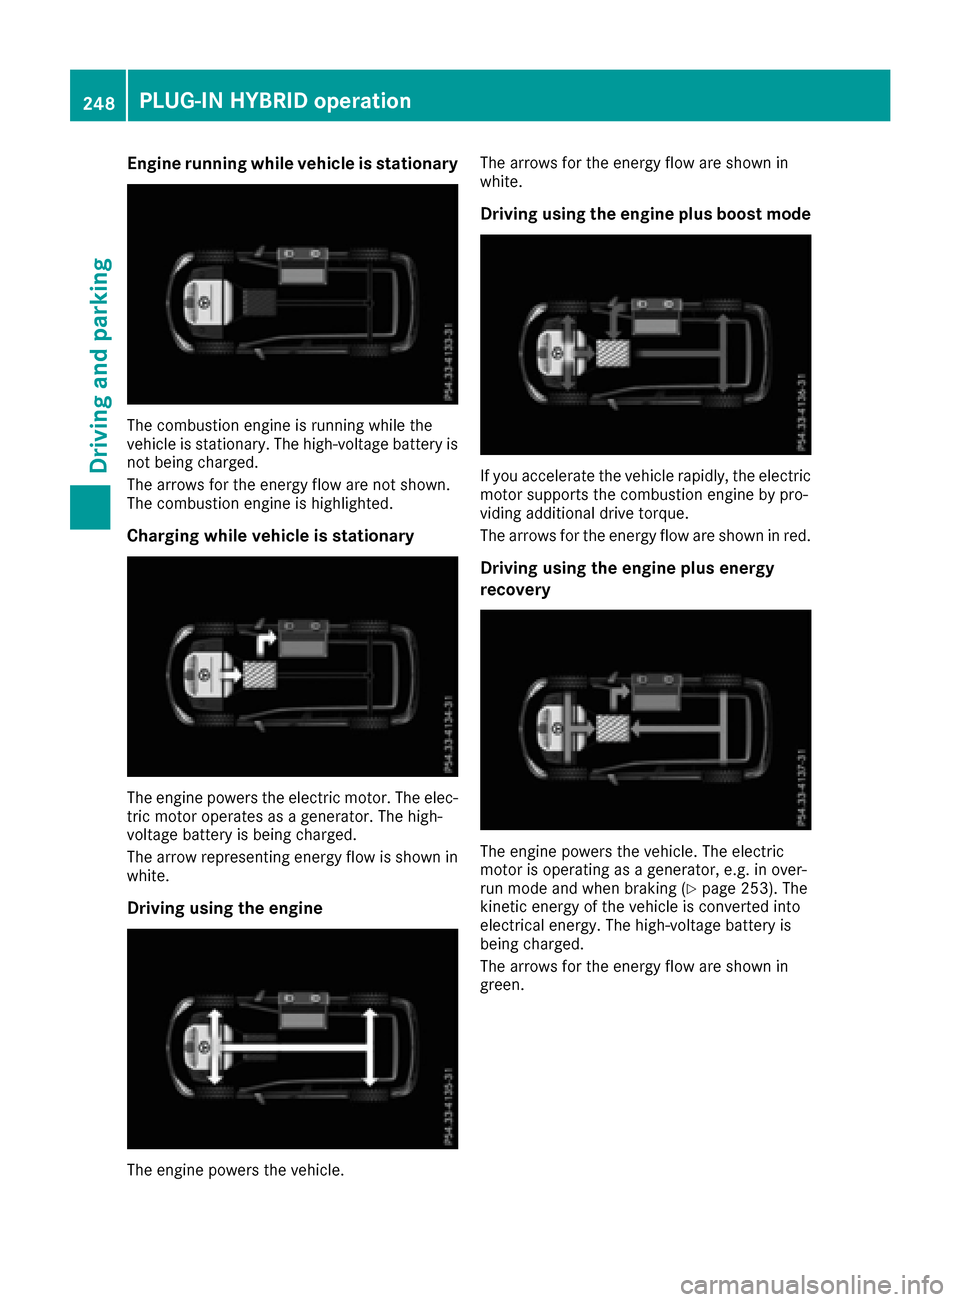
Engine running while vehicle is stationary
The combustion engine is running while the
vehicle is stationary. The high-voltage battery is
not being charged.
The arrows for the energy flow are not shown.
The combustion engine is highlighted.
Charging while vehicle is stationary
The engine powers the electric motor. The elec-
tric motor operates as a generator. The high-
voltage battery is being charged.
The arrow representing energy flow is shown in
white.
Driving using the engine
The engine powers the vehicle.The arrows for the energy flow are shown in
white.
Driving using the engine plus boost mode
If you accelerate the vehicle rapidly, the electric
motor supports the combustion engine by pro-
viding additional drive torque.
The arrows for the energy flow are shown in red.
Driving using the engine plus energy
recovery
The engine powers the vehicle. The electric
motor is operating as a generator, e.g. in over-
run mode and when braking (
Ypage 253). The
kinetic energy of the vehicle is converted into
electrical energy. The high-voltage battery is
being charged.
The arrows for the energy flow are shown in
green.
248PLUG-IN HYBRID operation
Driving and parking