2016 MERCEDES-BENZ GLE-Class parking brake
[x] Cancel search: parking brakePage 260 of 450
tem and prevents the brakes from overheating
and wearing too quickly. If you need additional
braking, depress the brake pedal repeatedly
rather than continuously.
Driving tips
If the trailer swings from side to side:
XDo not accelerate.
XDo not counter-steer.
XBrake if necessary.
RMaintain a greater distance from the vehicle
in front than when driving without a trailer.
RAvoid braking abruptly. If possible, brake gen-tly at first to allow the trailer to run on. Then,
increase the braking force rapidly.
RThe values given for gradient-climbing capa-
bilities from a standstill refer to sea level.
When driving in mountainous areas, note that
the power output of the engine and, conse-
quently, the vehicle's gradient-climbing capa-
bility, decreases with increasing altitude.
Installing the ball coupling
GWARNING
If the ball coupling is not correctly installed
and secured, it can come loose during the
journey and endanger other road users. There is a risk of an accident and injury.
Always install and secure the ball coupling as
described. Before every journey, ensure that
the ball coupling is secured with the bolt and
the corresponding spring cotter.
GWARNING
If the ball coupling is not installed correctly or not secured with the bolt provided and the
corresponding spring cotter, the trailer may
come loose. There is a risk of an accident.
Always install and secure the ball coupling as
described. Before every journey, ensure that
the ball coupling is secured with the bolt and
the corresponding spring cotter.
GWARNING
If the ball coupling is not installed and secured
correctly the trailer may come loose. There is
a risk of an accident.
Install and secure the ball coupling as descri-
bed in the ball coupling installation instruc-
tions. Make sure that the ball coupling is
installed and secured correctly before every
journey.
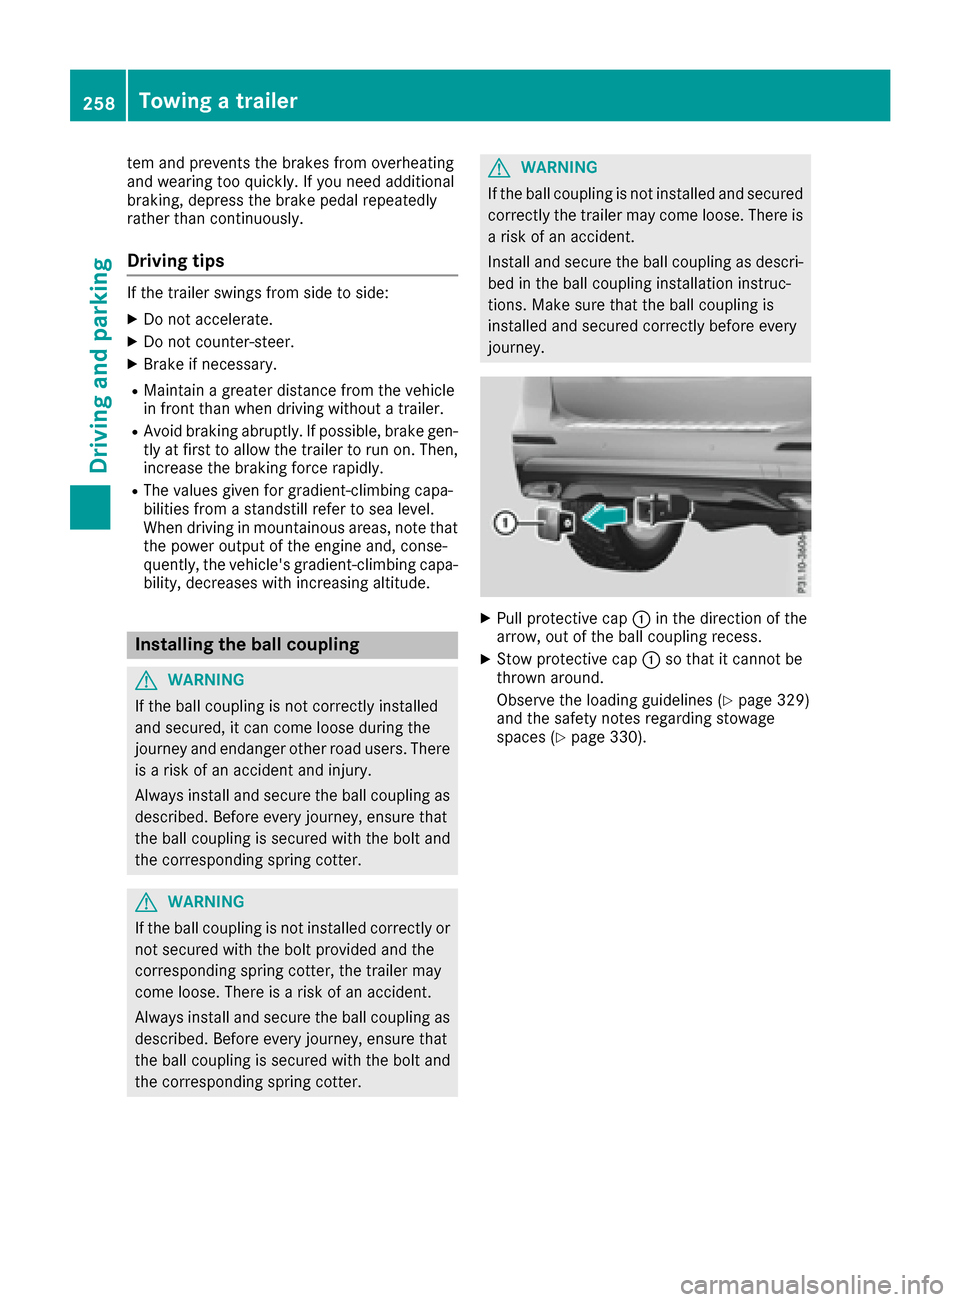
XPull protective cap :in the direction of the
arrow, out of the ball coupling recess.
XStow protective cap :so that it cannot be
thrown around.
Observe the loading guidelines (
Ypage 329)
and the safety notes regarding stowage
spaces (
Ypage 330).
258Towing a trailer
Driving an d parking
Page 261 of 450
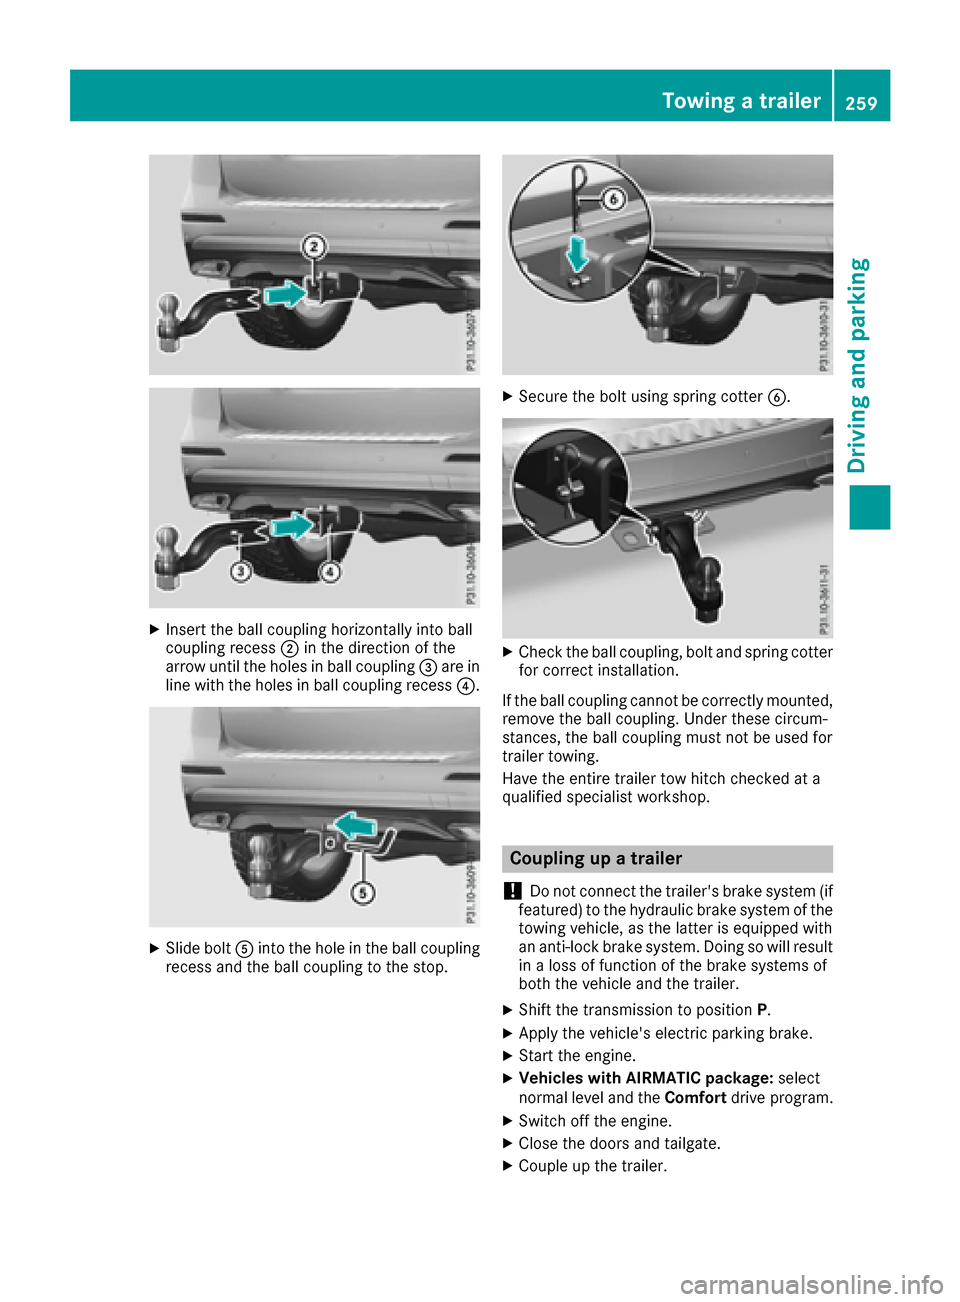
XInsert the ball coupling horizontally into ball
coupling recess;in the direction of the
arrow until the holes in ball coupling =are in
line with the holes in ball coupling recess ?.
XSlide boltAinto the hole in the ball coupling
recess and the ball coupling to the stop.
XSecure the bolt using spring cotter B.
XCheck the ball coupling, bolt and spring cotter
for correct installation.
If the ball coupling cannot be correctly mounted,
remove the ball coupling. Under these circum-
stances, the ball coupling must not be used for
trailer towing.
Have the entire trailer tow hitch checked at a
qualified specialist workshop.
Coupling up a trailer
!
Do not connect the trailer's brake system (if
featured) to the hydraulic brake system of the
towing vehicle, as the latter is equipped with
an anti-lock brake system. Doing so will result
in a loss of function of the brake systems of
both the vehicle and the trailer.
XShift the transmission to position P.
XApply the vehicle's electric parking brake.
XStart the engine.
XVehicles with AIRMATIC package: select
normal level and the Comfortdrive program.
XSwitch off the engine.
XClose the doors and tailgate.
XCouple up the trailer.
Towing a trailer259
Driving and parking
Z
Page 262 of 450
XEstablish the electrical connection between
the vehicle and the trailer.
XCheck that the trailer lighting system is work-
ing.
XPush the combination switch upwards/down-wards and check whether the corresponding
turn signal on the trailer flashes.
A trailer that is connected is recognized only
when the electrical connection is established
correctly and when the lighting system is work-
ing properly. The function of other systems also
depends on this, for example:
RESP®
RPARKTRONIC
RActive Parking Assist
RActive Blind Spot Assist
RActive Lane Keeping Assist
iVehicles with the AIRMATIC package: if you
couple up a trailer, the vehicle always remains
at normal level. When coupling up a trailer,
please observe the following:
RIf the normal level has not been set man-
ually, the vehicle is automatically lowered
to normal level. This is the case if a speed of
5 mph (8 km/h) is reached.
RThe Sport drive program is not available.
These restrictions apply to all accessories
powered through a connection to the trailer
power socket of your vehicle, e.g. a bicycle
carrier.
Observe the maximum permissible trailer
dimensions (width and leng
th).
Most U.S. states and all Canadian provinces
require by law:
RSafety chains between the towing vehicle and
the trailer. The chains should be cross-wound
under the trailer drawbar. They must be fas-
tened to the vehicle's trailer coupling, not to
the bumper or the axle.
Leave enough play in the chains to make tight
cornering possible.
RA separate brake system for certain types of
trailer.
RSafety switch for braked trailers. Check the
specific legal requirements applicable to your
state.
If the trailer becomes detached from the tow-
ing vehicle, the safety switch applies the
trailer brakes.
Towing a trailer
There are numerous legal requirements con-
cerning the towing of a trailer, e.g. speed restric- tions. Make sure that your car/trailer combina-
tion complies with the local regulations:
Rin your place of residence
Rin the location to which you are driving
The police and local authorities can provide reli- able information.
Observe the following when towing a trailer:
RTo gain driving experience and to become
accustomed to the new handling characteris-
tics, you should practice the following in a
traffic-free location:
-cornering
-stopping
-backing up
RBefore driving, check:
-trailer tow hitch
-safety switch for braked trailers
-safety chains
-electrical connections
-lights
-wheels
RAdjust the exterior mirrors to provide an
unobstructed view of the rear section of the
trailer.
RIf the trailer has electronically controlled
brakes, pull away carefully. Brake manually
using the brake controller and check whether
the brakes function correctly.
RSecure any objects on the trailer to prevent
the cargo from slipping when the vehicle is in
motion.
RWhen you couple up a trailer, check at regular
intervals that the load is firmly secured. If the
tra
iler is equipped with trailer lights and
brakes, check the trailer to ensure that these
are working.
RBear in mind that the handling will be less
stable when towing a trailer than when driving
without one. Avoid sudden steering move-
ments.
RThe vehicle/trailer combination is heavier,
accelerates more slowly, has a decreased
gradient climbing capability and a longer
braking distance.
It is more susceptible to side winds and
requires more careful steering.
260Towing a trailer
Driving an d parking
Page 263 of 450

RIf possible, do not brake suddenly, but insteaddepress the brake pedal moderately at first so
that the trailer can activate its brakes. Then
increase the pressure on the brake pedal.
RIf the automatic transmission repeatedly
shifts between gears on uphill or downhill gra-
dients, shift to a lower gear using the left-hand
steering wheel paddle shifter.
A lower gear and lower speed reduce the risk
of engine failure.
RWhen driving downhill, shift to a lower gear toutilize the engine's braking effect.
Avoid continuous brake application as this
may overheat the vehicle brakes and, if instal-
led, the trailer brakes.
RIf the coolant temperature increases dramat-
ically while the air-conditioning system is
switched on, switch off the air-conditioning
system.
Coolant heat can also be dissipated by open-
ing the windows and switching the ventilation blower and the interior temperature to the
highest level.
RWhen overtaking, pay particular attention to
the extended length of your vehicle/trailer
combination.
Due to the length of the vehicle/trailer com-
bination, you require additional road space in
relation to the vehicle you are overtaking
before you can change back to the original
lane.
Decoupling a trailer
GWARNING
If you uncouple a trailer with the overrun
brake engaged, you could trap your hand
between the vehicle and the trailer drawbar.
There is a risk of injury.
Do not uncouple a trailer if the overrun brake
is engaged.
GWARNING
Vehicles with level control:
The vehicle is lowered as soon as you discon-
nect the trailer cable. This could result in your
limbs or those of other people that are
between the vehicle body and tires or under-
neath the vehicle being trapped. There is a
risk of injury.
Make sure that nobody is in the immediate
vicinity of the wheel housings or under the
vehicle when you disconnect the trailer cable.
!Do not disconnect a trailer with an engaged
overrun brake. Otherwise, your vehicle could
be damaged by the rebounding of the overrun brake.
XShift the transmission to position P.
XApply the vehicle's electric parking brake.
XStart the engine.
XClose the doors and tailgate.
XApply the trailer's parking brake.
XDetach the trailer cable and decouple the
trailer.
XSwitch off the engine.
Permissible trailer loads and drawbar
loads
Weight specifications
Maximum allowable gross mass
The gross vehicle weight of the trailer is calcu-
lated by adding the weight of the trailer to the
weight of the load and equipment on the trailer. You will find installing dimensions and loads
under "Technical data" (
Ypage 444).
Permissible noseweight
You will find installing dimensions and loads
under "Technical data" (Ypage 444).
Loading a trailer
RWhen loading the trailer, make sure that nei-
ther the permissible gross weight of the trailer
nor the gross vehicle weight are exceeded.
The permissible gross vehicle weight is indi-
cated on the identification plate located on
the B-pillar on the driver's side of the vehicle.
You can find the maximum permissible values
on the type plates of your vehicle and the
trailer. When calculating how much weight
Towing a trailer261
Driving and parking
Z
Page 286 of 450
Display messagesPossible causes/consequences andMSolutions
F(USA
only)
!( Canada
only)
Tur nOn the Igni‐
tio ntoReleas etheParkingBrake
The red F(USAonly) or !(Canada only) indicator lamp lights
up.
You attempte dto release th eelectric parking brak ewhile th eignition
was switched off .
XSmartKey:tur nth eSmartKey to position 1in th eignition lock.
XKEYLESS-GO: switch on theignition .
F(USA
only)
!( Canada
only)
Please
Releas ePark‐ing Brake
The red F(USAonly) or !(Canada only) indicator lamp flashes
and awarning tone sounds. Acondition for automatic release of th e
electric parking brak eis no tfulfilled (
Ypage 179).
You are drivin gwit hth eelectric parking brak eapplied.
XReleas eth eelectric parking brak emanually.
The red F(USAonly) or !(Canada only) indicator lamp flashes
and awarning tone sounds.
You are usin gth eelectric parking brak efor emergenc ybraking
(
Ypage 179).
F(USA
only)
!( Canada
only)
Parkin gBrake See
Operator' sManual
The yellow !warning lamp lights up.
The electric parking brak eis malfunctioning .
To apply :
XSwitchth eignition off .
XPress theelectric parking brak ehandle for at least te nseconds.
XShift th etransmission to position P.
XConsultaqualified specialist workshop .
The yellow!warning lamp and th ered F (USAonly) or !
(Canada only) indicator lamp ligh tup.
The electric parking brak eis malfunctioning .
To release:
XSwitc hoff th eignition and tur nit bac kon .
XReleas eth eelectric parking brak emanually.
or
XReleas eth eelectric parking brak eautomatically (Ypage 179).
If th eelectric parking brak estill canno tbe released:
XDo no tdrive on .
XConsult aqualified specialist workshop .
284Display messages
On-board computer and displays
Page 287 of 450
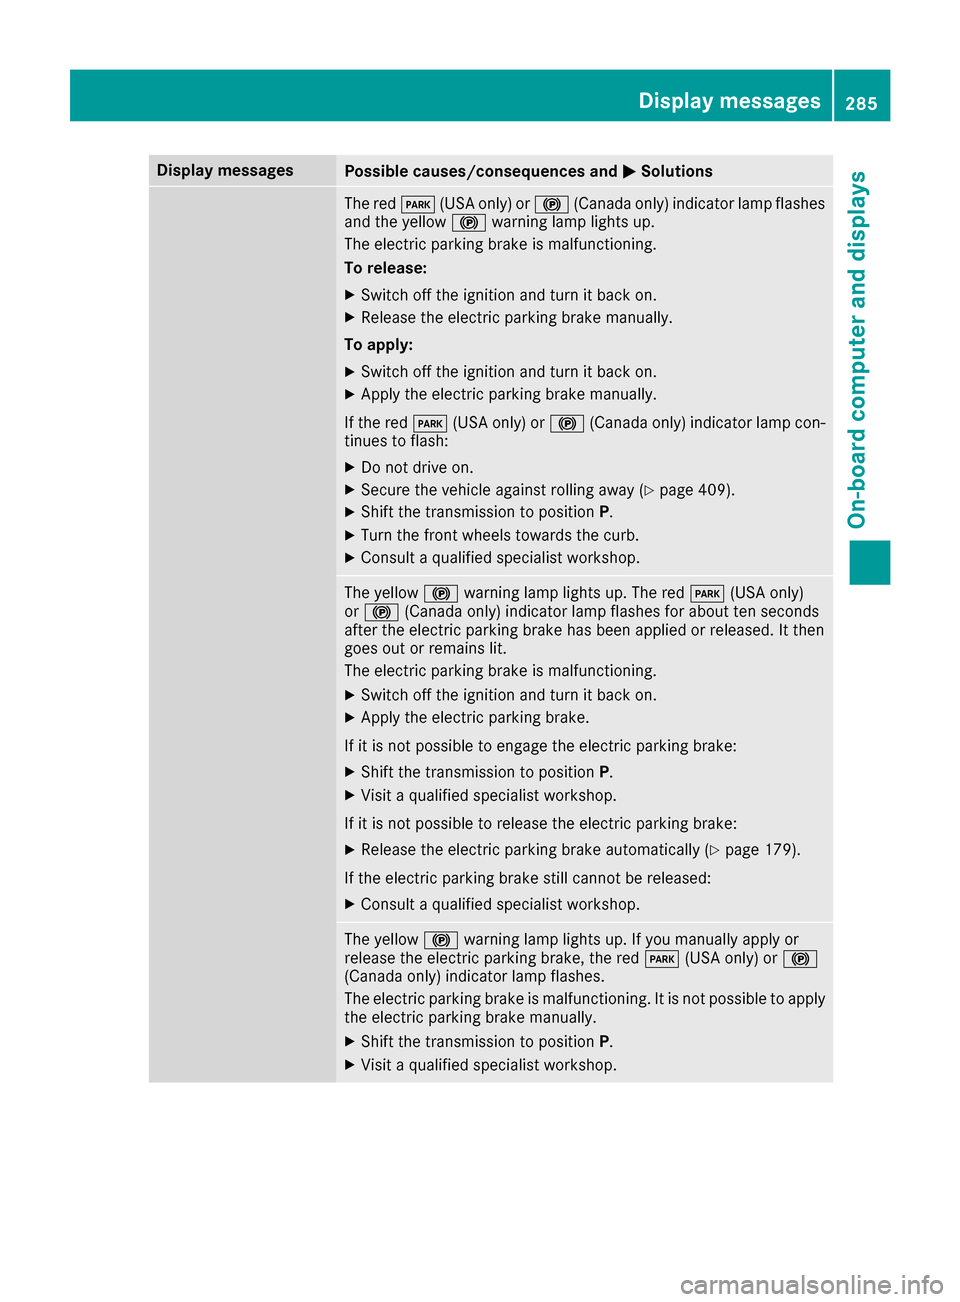
Display messagesPossible causes/consequences andMSolutions
The redF(USAonly) or !(Canada only) indicator lamp flashes
and th eyellow !warning lamp lights up.
The electric parking brak eis malfunctioning .
To release:
XSwitc hoff th eignition and tur nit bac kon .
XReleas eth eelectric parking brak emanually.
To apply :
XSwitchoff th eignition and tur nit bac kon .
XApply th eelectric parking brak emanually.
If th ered F (USAonly) or !(Canada only) indicator lamp con-
tinue sto flash:
XDo no tdrive on .
XSecureth evehicl eagainst rollin gaway (Ypage 409).
XShift th etransmission to position P.
XTurn thefron twheels toward sth ecurb.
XConsult aqualified specialist workshop .
The yellow!warning lamp lights up. The red F(USAonly)
or ! (Canada only) indicator lamp flashes for about te nseconds
after th eelectric parking brak ehas been applie dor released. It then
goe sout or remain slit .
The electric parking brak eis malfunctioning .
XSwitchoff th eignition and tur nit bac kon .
XApply th eelectric parking brake.
If it is no tpossibl eto engage th eelectric parking brake:
XShift th etransmission to position P.
XVisitaqualified specialist workshop .
If it is no tpossibl eto release th eelectric parking brake:
XReleas eth eelectric parking brak eautomatically (Ypage 179).
If th eelectric parking brak estill canno tbe released:
XConsult aqualified specialist workshop .
The yellow!warning lamp lights up. If you manually apply or
release th eelectric parking brake, th ered F (USAonly) or !
(Canada only) indicator lamp flashes .
The electric parking brak eis malfunctioning .It is no tpossibl eto apply
th eelectric parking brak emanually.
XShift th etransmission to position P.
XVisitaqualified specialist workshop .
Display messages285
On-board computer and displays
Z
Page 288 of 450

Display messagesPossible causes/consequences andMSolutions
F(USA
only)
!( Canada
only)
Parkin gBrake Inop‐
erativ e
The yellow !warning lamp lights up. The red F(USAonly)
or ! (Canada only) indicator lamp flashes for about te nseconds
after th eelectric parking brak ehas been applie dor released. It then
goe sout or remain slit .
The electric parking brak eis malfunctioning ,e.g. because of over-
voltag eor undervoltage.
XRemove th ecaus efor th eovervoltage or undervoltage, e.g. by
charging th ebattery or restarting th eengine.
XEngage or release th eelectric parking brake.
If it remain simpossible to apply or release th eelectric parking brake:
XSwitc hoff th eignition and tur nit bac kon .
XEngage or release th eelectric parking brake.
If th eelectric parking brak estill canno tbe released:
XConsult aqualified specialist workshop .
If th eelectric parking brak estill canno tbe applied:
XVisit aqualified specialist workshop .
The yellow!warning lamp lights up and th ered F (USAonly)
or ! (Canada only) indicator lamp flashes .
It is no tpossibl eto apply th eelectric parking brak emanually.
XShift th etransmission to position P.
XVisitaqualified specialist workshop .
$(USA
only)
J( Canada
only)
Check Brake Fluid
Level
There is no tenough brak eflui din th ebrak eflui dreservoir .In addition ,
th e$ (USAonly) or J(Canada only) warning lamp lights up in
th einstrumen tcluste rand awarning tone sounds.
GWARNIN G
The braking effec tmay be impaired.
There is aris kof an accident.
XPull ove rand stop th evehicl esafely as soo nas possible, payin g
attention to roa dand traffic conditions. Do no tcontinu edrivin g
under any circumstances.
XSecur eth evehicl eagainst rollin gaway (Ypage 178).
XConsult aqualified specialist workshop .
XDo notadd brak efluid .This does no tcorrec tth emalfunction .
#
CheckBrakePadWear
The brak epads/linings hav ereached their wear limit.
US Aonly: th e$ red brak esystem warning lamp is lit while th e
engin eis running.
XVisit aqualified specialist workshop .
G
Inoperative
Oneor mor emain features of th embrace system are malfunctioning .
XVisitaqualified specialist workshop .
286Display messages
On-board computer and displays
Page 295 of 450

Display messagesPossible causes/consequences andMSolutions
b
Check Front LeftTurnSignalor
Check Front Right
Tur nSignal
The fron tleft-han dor fron tright-hand tur nsignal is defective.
XHalogen headlamp :replace th ebulb (Ypage 119).
XLED headlamps: consultaqualified specialist workshop .
b
Check LeftMirrorTur nSignalor
Check Right Mirror
Tur nSignal
The tur nsignal in th eleft-han dor right-hand exterio rmirror is defec -
tive.
XVisit aqualified specialist workshop .
b
Check Center BrakeLamp
The high-mounte dbrak elamp is faulty.
XVisit aqualified specialist workshop .
b
Check LeftBrakeLam porCheck RightBrake Lam p
The leftor right-hand brak elamp is defective.
XVisit aqualified specialist workshop .
b
CheckLeftTailandBrake Lampsor
Check Right Tai l
and Brake Lamps
The leftor right-hand tai llamp/brake lamp is defective.
XVisit aqualified specialist workshop .
b
Check LeftHig hBeamorCheck RightHig hBea m
The lef tor right-hand high beam is defective.
XHalogen headlamp :replace th ebulb (Ypage 119).
XLED headlamps: consultaqualified specialist workshop .
b
LicensePlate Lam p
The leftor right-hand license plat elamp is faulty.
XVisit aqualified specialist workshop .
b
RearFog Lam p
The rear fog lamp is faulty.
XVisitaqualified specialist workshop .
b
Check Front LeftParkingLam por
Check Front Right
Parkin gLam p
The fron tlef tor fron tright parking or standing lamp is defective.
XVisit aqualified specialist workshop .
b
Backup Light
The backup lamp is defective.
XVisitaqualified specialist workshop .
Display messages293
On-board computer and displays
Z