2016 MERCEDES-BENZ GLC COUPE light
[x] Cancel search: lightPage 77 of 389

Drive on carefully. Have ESP
®
checked at a
qualified specialist workshop.
If the å ESP®
OFF warning lamp lights up
continuously, ESP ®
is deactivated.
If the ÷ ESP®
warning lamp lights up contin-
uously, ESP ®
is not available due to a malfunc-
tion.
Read the information on warning lamps
(Y page 283 )and display messages that may be
shown in the instrument cluster (Y page 250).
Only use wheels with the recommended tyre
sizes. Only then will ESP ®
function properly.
Characteristics of ESP ®General notes
If the ÷ ESP warning lamp goes out before
beginning the journey, ESP ®
is automatically
active.
If ESP ®
engages, the ÷ESP®
warning lamp
flashes in the instrument cluster.
If ESP ®
engages:
X Do not deactivate ESP ®
under any circum-
stances.
X When pulling away, only depress the acceler-
ator pedal as far as is necessary.
X Adapt your driving style to suit the prevailing
road and weather conditions.
ECO start/stop function
The ECO start/stop function switches the
engine off automatically if the vehicle stops
moving. When the vehicle pulls away again, the
engine starts automatically. ESP ®
remains in its
previously selected status, e.g. if ESP ®
was
deactivated before the engine was automati-
cally switched off.
Activating/deactivating ESP ®
(except
Mercedes‑AMG vehicles) Important safety notes
i Observe the "Important safety notes" sec-
tion (Y page 68). You can select between the following ESP
®
sta-
tuses:
R ESP ®
is activated
R ESP ®
is deactivated G
WARNING
If you deactivate ESP ®
, ESP ®
no longer sta-
bilises the vehicle. There is an increased risk
of skidding and an accident.
Only deactivate ESP ®
in the situations descri-
bed in the following.
It may be best to deactivate ESP ®
in the follow-
ing situations:
R when snow chains are used
R in deep snow
R on sand or gravel
Spinning the wheels results in a cutting action,
which enhances traction.
i Activate ESP ®
as soon as the situations
described above no longer apply. ESP ®
will
otherwise not be able to stabilise the vehicle
if the vehicle starts to skid or a wheel starts to
spin.
Activating/deactivating ESP ® X
To deactivate: press button:.
The å ESP®
OFF warning lamp on the
instrument cluster lights up.
X To activate: press button :.
The å ESP®
OFF warning lamp on the
instrument cluster goes out.
Characteristics when ESP ®
is deactivated
If ESP ®
is deactivated and one or more wheels
start to spin, the ÷ESP®
warning lamp on 74
Driving safety systemsSafety
Page 78 of 389

the instrument cluster flashes. In such situa-
tions, ESP ®
will not stabilise the vehicle.
If you deactivate ESP ®
:
R ESP ®
no longer improves driving stability
R engine torque is no longer limited and the
drive wheels may start to spin
R traction control is still activated
R COLLISION PREVENTION ASSIST is no longer
available; it is not activated even if you brake
firmly with assistance from ESP ®
R PRE-SAFE ®
is no longer available; it is not
activated even if you brake firmly with assis-
tance from ESP ®
R PRE-SAFE ®
Brake is no longer available; it is
not activated even if the brakes are firmly
applied with assistance from ESP ®
R ESP ®
still provides support when you brake
firmly.
Deactivating/activating ESP ®
(Mercedes‑AMG vehicles) Important safety notes
i Observe the "Important safety notes" sec-
tion (Y page 68).
You can select between the following ESP ®
sta-
tuses:
R ESP ®
is activated
R SPORT handling mode is activated
R ESP ®
is deactivated
ESP ®
is activated every time the engine is star-
ted, regardless of whether ESP ®
was deactiva-
ted before the engine was switched off. G
WARNING
When SPORT handling mode is activated,
there is a greater risk of skidding and acci-
dents.
Only activate SPORT handling mode in the sit- uations described in the following. G
WARNING
If you deactivate ESP ®
, ESP ®
no longer sta-
bilises the vehicle. There is an increased risk
of skidding and an accident.
Only deactivate ESP ®
in the situations descri-
bed in the following. In the following situations, it may be better to
activate SPORT handling mode or deactivate
ESP
®
:
R when snow chains are used
R in deep snow
R on sand or gravel
R on specially designated roads when the vehi-
cle's own oversteering and understeering
characteristics are desired
Spinning the wheels results in a cutting action,
which enhances traction.
Driving in SPORT handling mode or without
ESP ®
requires a highly qualified and experi-
enced driver.
i Activate ESP ®
as soon as the situations
described above no longer apply. ESP ®
will
otherwise not be able to stabilise the vehicle
if the vehicle starts to skid or a wheel starts to spin.
Activating/deactivating ESP ® X
To activate SPORT handling mode: briefly
press button :.
The M SPORT handling mode warning
lamp on the instrument cluster lights up. The
SPORT SPORT handling
handling mode
modemessage appears on
the multifunction display.
X To deactivate SPORT handling mode:
briefly press button
:.
The M SPORT handling mode warning
lamp on the instrument cluster goes out.
X To deactivate ESP ®
:press button :until
the å ESP®
OFF warning lamp lights up on
the instrument cluster.
The ÷ OFF
OFF message appears on the mul-
tifunction display. Driving safety systems
75Safety Z
Page 81 of 389
G
WARNING
PRE-SAFE ®
Brake cannot always clearly iden-
tify people, especially if they are moving. In
these cases, PRE-SAFE ®
Brake cannot inter-
vene. There is a risk of an accident.
Always pay particular attention to the traffic
situation and be ready to brake, especially if
PRE-SAFE ®
Brake warns you.
To maintain the appropriate distance to the
vehicle in front and thus prevent a collision, you
must apply the brakes yourself. G
WARNING
PRE-SAFE ®
Brake does not react:
R to small people, e.g. children
R to animals
R to oncoming vehicles
R to crossing traffic
R when cornering
As a result, PRE-SAFE ®
Brake may neither
give warnings nor intervene in all critical sit-
uations. There is a risk of an accident.
Always pay careful attention to the traffic sit- uation and be ready to brake.
In the event of snowfall or heavy rain, detection can be impaired.
Detection by the radar sensor system is also
impaired in the following situations:
R dirt on the sensors or obscured sensors
R interference by other radar sources
R strong radar reflections, for example, in multi-
storey car parks
R a narrow vehicle travelling in front, e.g. a
motorcycle
R a vehicle travelling in front on a different line
Detection by the camera system is also impaired
in the following situations:
R dirt on the camera or obscured camera
R glare on the camera system, e.g. from the sun
being low in the sky R
darkness
R if:
- pedestrians move quickly, e.g. into the path
of the vehicle
- the camera system no longer detects a
pedestrian as a person due to special cloth-
ing or other objects
- a pedestrian is concealed by other objects
- the typical outline of a pedestrian is not
distinguishable from the background
Following damage to the front end of the vehicle, have the radar sensor settings and operation
checked at a qualified specialist workshop. This
also applies to collisions at low speeds where
there is no visible damage to the front of the
vehicle.
Following damage to the windscreen, have the
configuration and operation of the camera sys-
tem checked at a qualified specialist workshop.
Function X
To activate/deactivate: activate or deacti-
vate PRE-SAFE ®
Brake in the on-board com-
puter (Y page 241).
If the PRE-SAFE ®
Brake is not activated, the
æ symbol appears on the multifunction
display.
This function will issue a warning if: R at a speed of around 30 km/h or more, the
distance maintained to the vehicle travelling
in front is insufficient for several seconds
The · distance warning lamp will then
light up on the instrument cluster.
R at a speed of around 7 km/h or more, you
rapidly approach a vehicle in front or a pedes-
trian
An intermittent warning tone will then sound
and the ·distance warning lamp will light
up on the instrument cluster.
X Brake immediately to rectify the situation.
or
X Take evasive action provided it is safe to do
so. 78
Driving safety systemsSafety
Page 86 of 389
Key functions
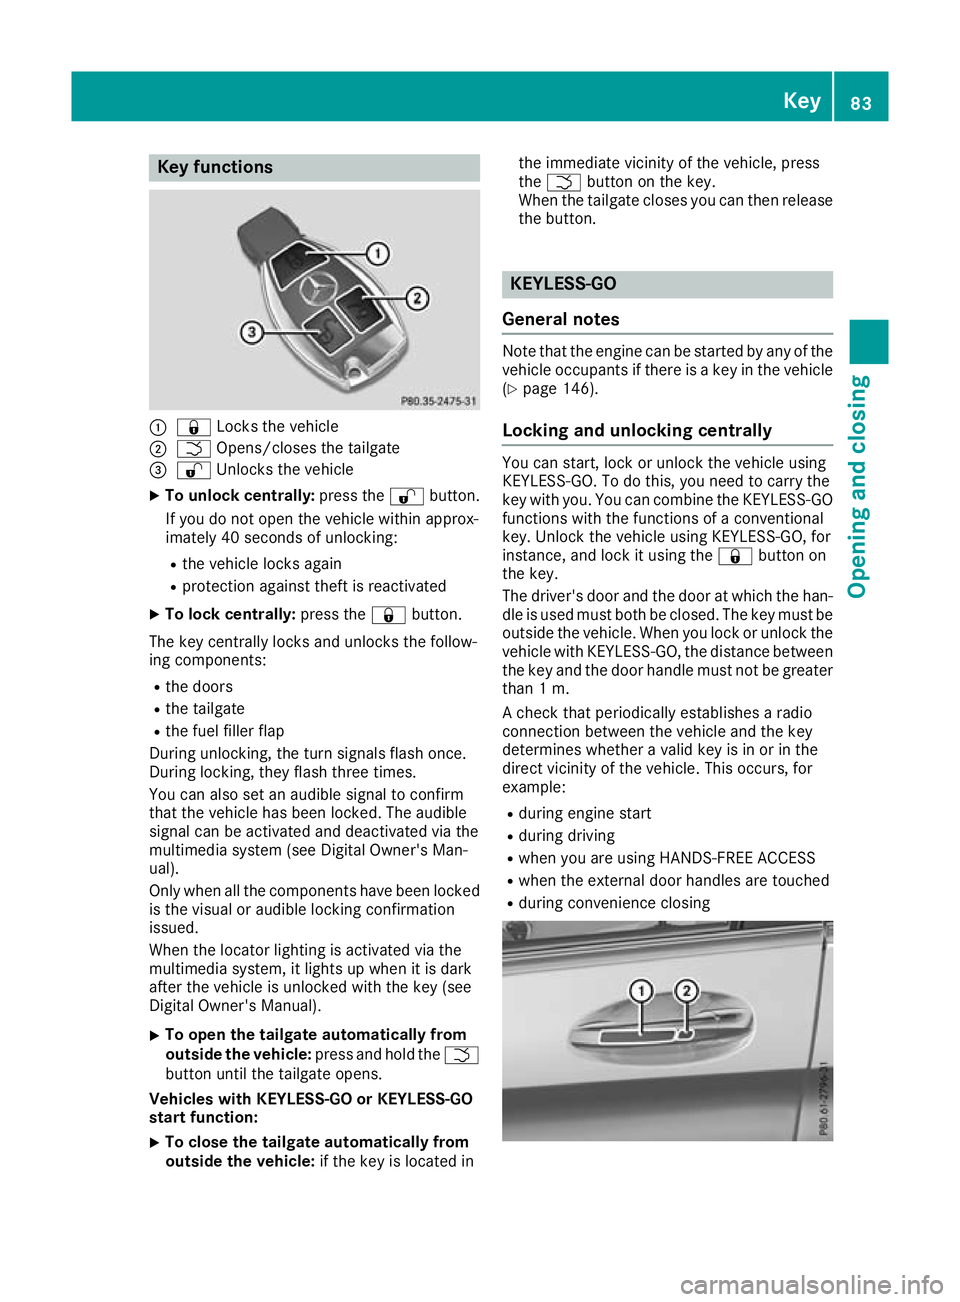
:
& Locks the vehicle
; F Opens/closes the tailgate
= % Unlocks the vehicle
X To unlock centrally: press the%button.
If you do not open the vehicle within approx-
imately 40 seconds of unlocking:
R the vehicle locks again
R protection against theft is reactivated
X To lock centrally: press the&button.
The key centrally locks and unlocks the follow-
ing components: R the doors
R the tailgate
R the fuel filler flap
During unlocking, the turn signals flash once.
During locking, they flash three times.
You can also set an audible signal to confirm
that the vehicle has been locked. The audible
signal can be activated and deactivated via the
multimedia system (see Digital Owner's Man-
ual).
Only when all the components have been locked
is the visual or audible locking confirmation
issued.
When the locator lighting is activated via the
multimedia system, it lights up when it is dark
after the vehicle is unlocked with the key (see
Digital Owner's Manual).
X To open the tailgate automatically from
outside the vehicle: press and hold theF
button until the tailgate opens.
Vehicles with KEYLESS-GO or KEYLESS-GO
start function:
X To close the tailgate automatically from
outside the vehicle: if the key is located in the immediate vicinity of the vehicle, press
the
F button on the key.
When the tailgate closes you can then release the button. KEYLESS-GO
General notes Note that the engine can be started by any of the
vehicle occupants if there is a key in the vehicle
(Y page 146).
Locking and unlocking centrally You can start, lock or unlock the vehicle using
KEYLESS-GO. To do this, you need to carry the
key with you. You can combine the KEYLESS-GO functions with the functions of a conventional
key. Unlock the vehicle using KEYLESS-GO, for
instance, and lock it using the &button on
the key.
The driver's door and the door at which the han- dle is used must both be closed. The key must beoutside the vehicle. When you lock or unlock the
vehicle with KEYLESS-GO, the distance between the key and the door handle must not be greater
than 1 m.
A check that periodically establishes a radio
connection between the vehicle and the key
determines whether a valid key is in or in the
direct vicinity of the vehicle. This occurs, for
example:
R during engine start
R during driving
R when you are using HANDS-FREE ACCESS
R when the external door handles are touched
R during convenience closing Key
83Opening and closing Z
Page 87 of 389
X
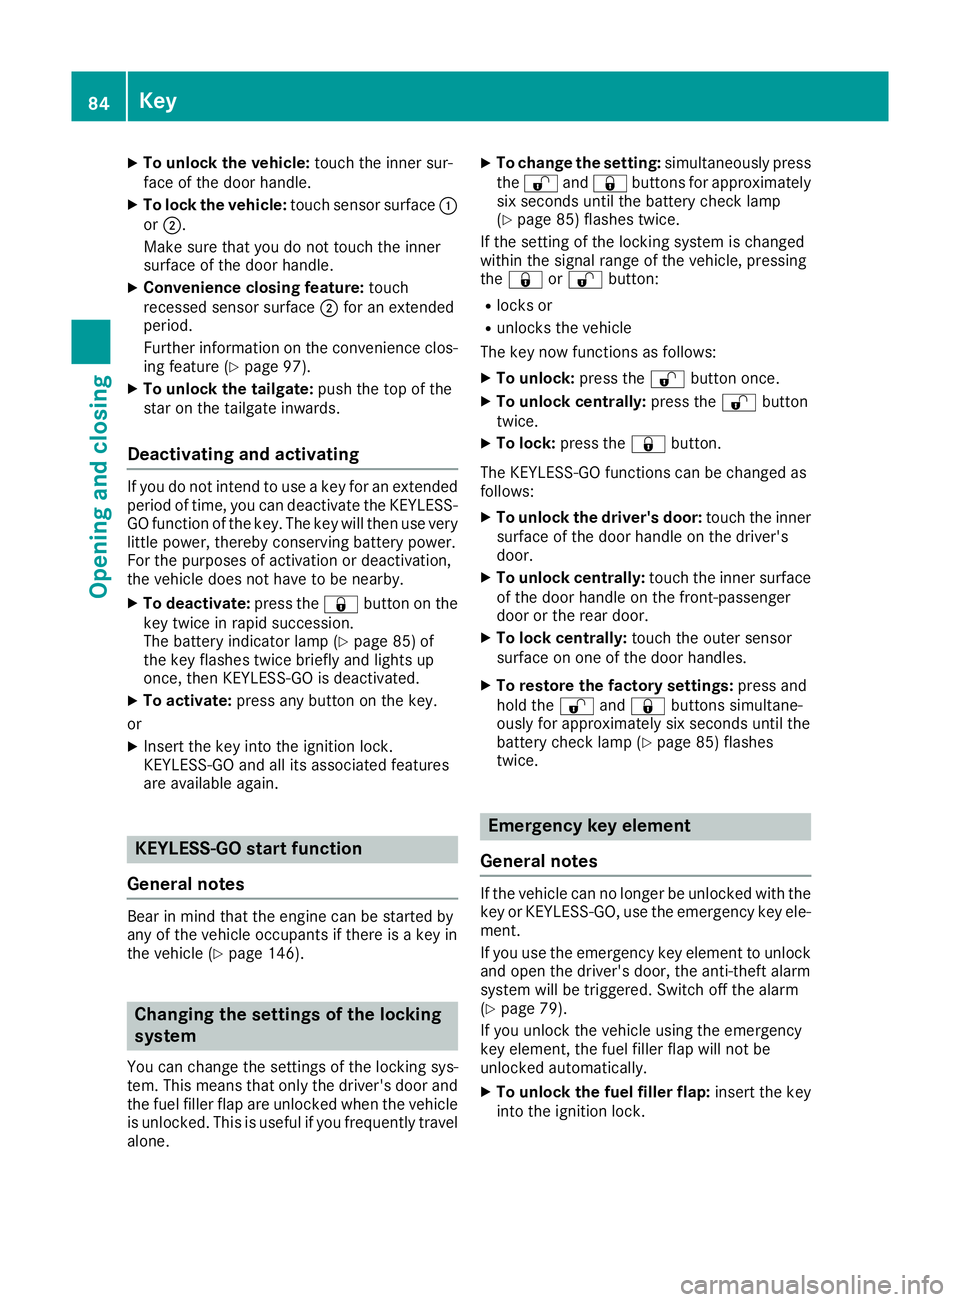
To unlock the vehicle: touch the inner sur-
face of the door handle.
X To lock the vehicle: touch sensor surface :
or ;.
Make sure that you do not touch the inner
surface of the door handle.
X Convenience closing feature: touch
recessed sensor surface ;for an extended
period.
Further information on the convenience clos-
ing feature (Y page 97).
X To unlock the tailgate: push the top of the
star on the tailgate inwards.
Deactivating and activating If you do not intend to use a key for an extended
period of time, you can deactivate the KEYLESS-
GO function of the key. The key will then use very
little power, thereby conserving battery power.
For the purposes of activation or deactivation,
the vehicle does not have to be nearby.
X To deactivate: press the&button on the
key twice in rapid succession.
The battery indicator lamp (Y page 85) of
the key flashes twice briefly and lights up
once, then KEYLESS-GO is deactivated.
X To activate: press any button on the key.
or X Insert the key into the ignition lock.
KEYLESS-GO and all its associated features
are available again. KEYLESS-GO start function
General notes Bear in mind that the engine can be started by
any of the vehicle occupants if there is a key in
the vehicle (Y page 146). Changing the settings of the locking
system
You can change the settings of the locking sys-
tem. This means that only the driver's door and
the fuel filler flap are unlocked when the vehicle is unlocked. This is useful if you frequently travel
alone. X
To change the setting: simultaneously press
the % and& buttons for approximately
six seconds until the battery check lamp
(Y page 85) flashes twice.
If the setting of the locking system is changed
within the signal range of the vehicle, pressing
the & or% button:
R locks or
R unlocks the vehicle
The key now functions as follows:
X To unlock: press the%button once.
X To unlock centrally: press the%button
twice.
X To lock: press the &button.
The KEYLESS-GO functions can be changed as
follows: X To unlock the driver's door: touch the inner
surface of the door handle on the driver's
door.
X To unlock centrally: touch the inner surface
of the door handle on the front-passenger
door or the rear door.
X To lock centrally: touch the outer sensor
surface on one of the door handles.
X To restore the factory settings: press and
hold the %and& buttons simultane-
ously for approximately six seconds until the
battery check lamp (Y page 85) flashes
twice. Emergency key element
General notes If the vehicle can no longer be unlocked with the
key or KEYLESS-GO, use the emergency key ele-
ment.
If you use the emergency key element to unlock
and open the driver's door, the anti-theft alarm
system will be triggered. Switch off the alarm
(Y page 79).
If you unlock the vehicle using the emergency
key element, the fuel filler flap will not be
unlocked automatically.
X To unlock the fuel filler flap: insert the key
into the ignition lock. 84
KeyOpening and closing
Page 88 of 389
Removing the emergency key element
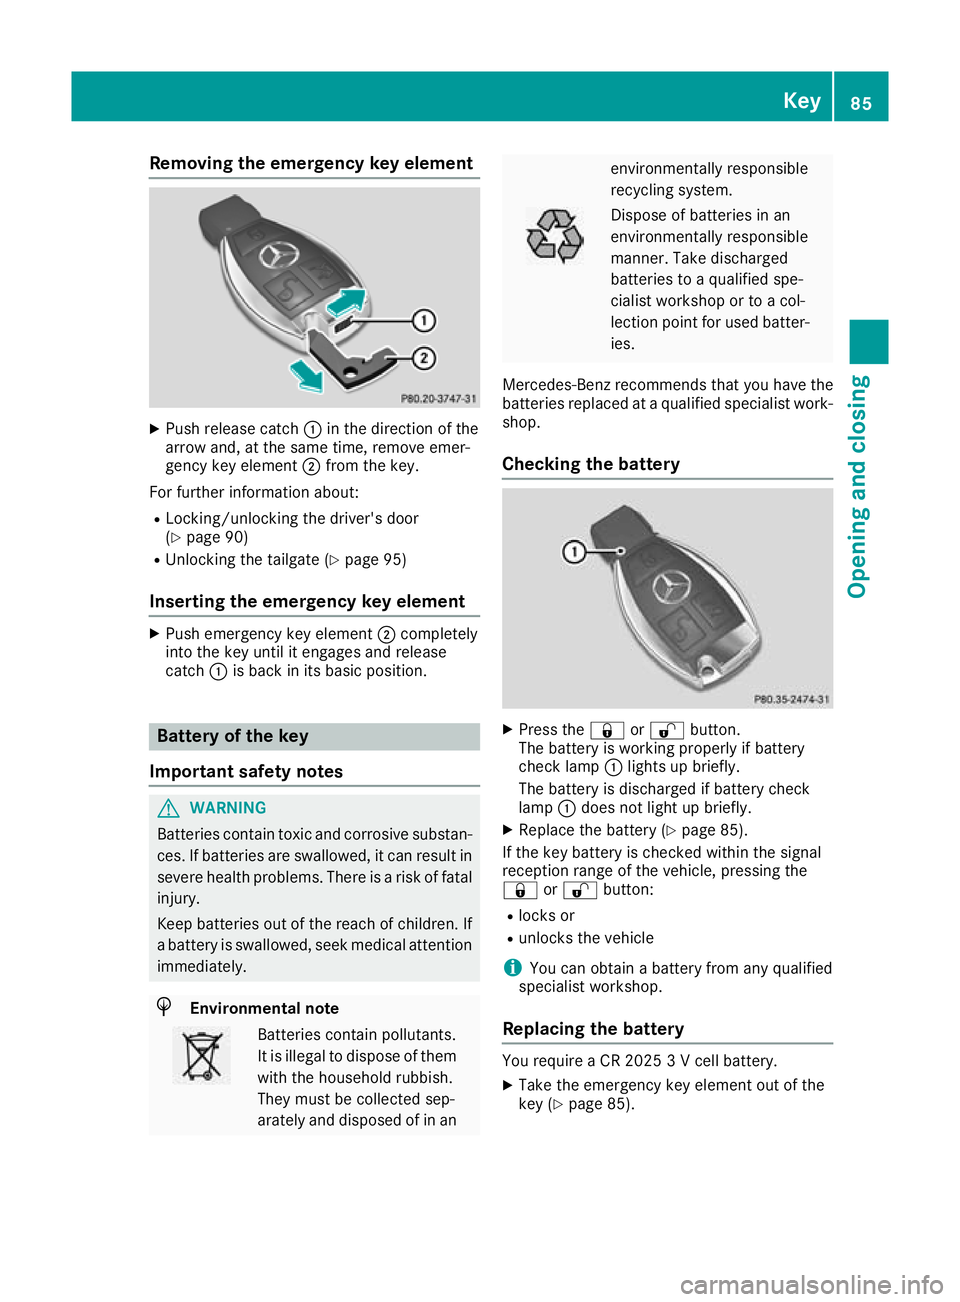
X
Push release catch :in the direction of the
arrow and, at the same time, remove emer-
gency key element ;from the key.
For further information about:
R Locking/unlocking the driver's door
(Y page 90)
R Unlocking the tailgate (Y page 95)
Inserting the emergency key element X
Push emergency key element ;completely
into the key until it engages and release
catch :is back in its basic position. Battery of the key
Important safety notes G
WARNING
Batteries contain toxic and corrosive substan- ces. If batteries are swallowed, it can result in
severe health problems. There is a risk of fatal injury.
Keep batteries out of the reach of children. If
a battery is swallowed, seek medical attention immediately. H
Environmental note Batteries contain pollutants.
It is illegal to dispose of them with the household rubbish.
They must be collected sep-
arately and disposed of in an environmentally responsible
recycling system.
Dispose of batteries in an
environmentally responsible
manner. Take discharged
batteries to a qualified spe-
cialist workshop or to a col-
lection point for used batter-
ies.
Mercedes-Benz recommends that you have the
batteries replaced at a qualified specialist work- shop.
Checking the battery X
Press the &or% button.
The battery is working properly if battery
check lamp :lights up briefly.
The battery is discharged if battery check
lamp :does not light up briefly.
X Replace the battery (Y page 85).
If the key battery is checked within the signal
reception range of the vehicle, pressing the
& or% button:
R locks or
R unlocks the vehicle
i You can obtain a battery from any qualified
specialist workshop.
Replacing the battery You require a CR 2025 3 V cell battery.
X Take the emergency key element out of the
key (Y page 85). Key
85Opening and closing Z
Page 90 of 389
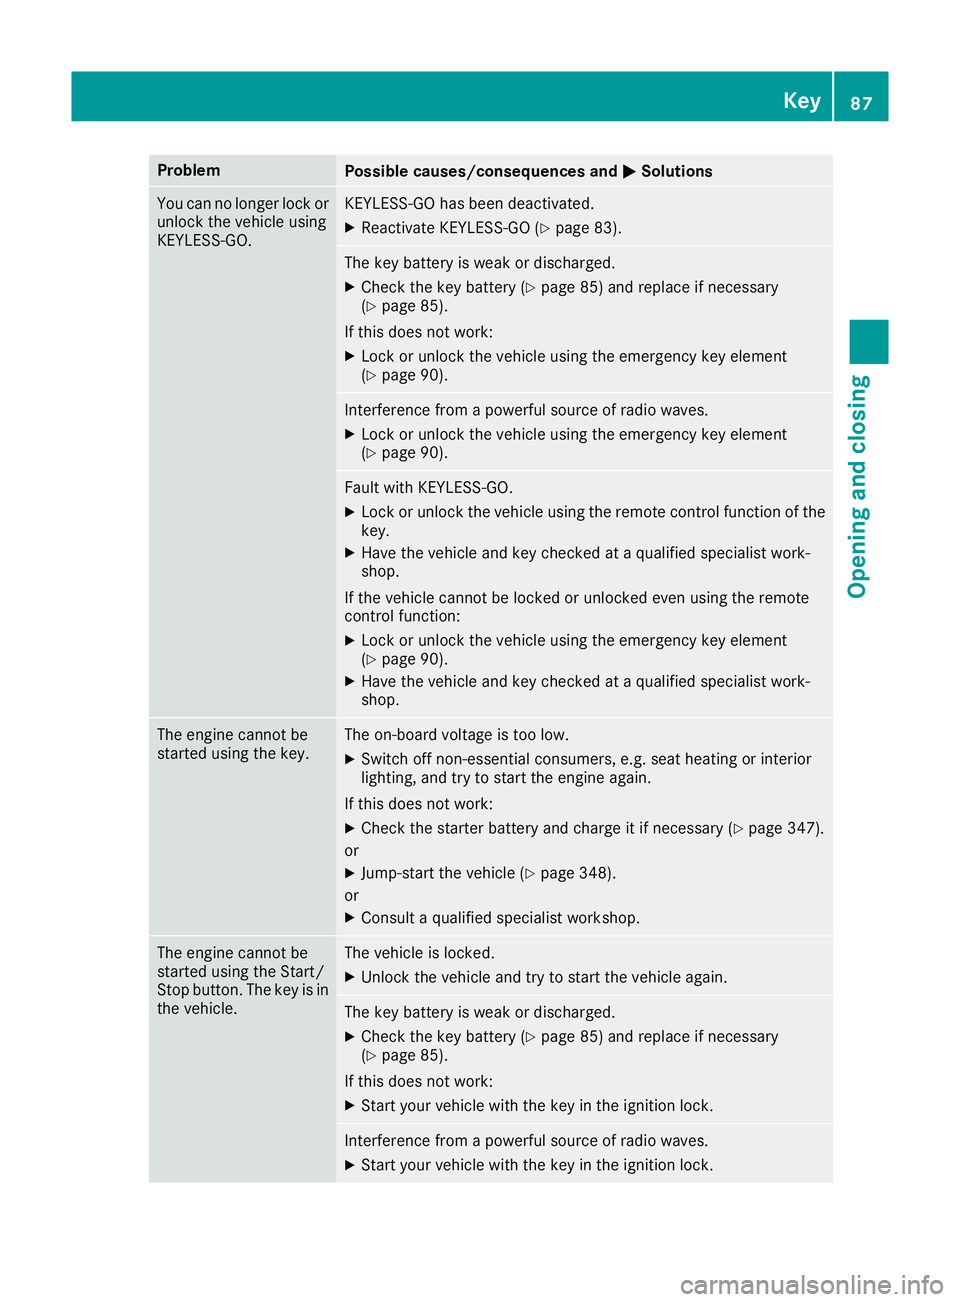
Problem
Possible causes/consequences and
M
MSolutions You can no longer lock or
unlock the vehicle using
KEYLESS-GO. KEYLESS-GO has been deactivated.
X Reactivate KEYLESS-GO (Y page 83). The key battery is weak or discharged.
X Check the key battery (Y page 85) and replace if necessary
(Y page 85).
If this does not work: X Lock or unlock the vehicle using the emergency key element
(Y page 90). Interference from a powerful source of radio waves.
X Lock or unlock the vehicle using the emergency key element
(Y page 90). Fault with KEYLESS-GO.
X Lock or unlock the vehicle using the remote control function of the
key.
X Have the vehicle and key checked at a qualified specialist work-
shop.
If the vehicle cannot be locked or unlocked even using the remote
control function:
X Lock or unlock the vehicle using the emergency key element
(Y page 90).
X Have the vehicle and key checked at a qualified specialist work-
shop. The engine cannot be
started using the key. The on-board voltage is too low.
X Switch off non-essential consumers, e.g. seat heating or interior
lighting, and try to start the engine again.
If this does not work:
X Check the starter battery and charge it if necessary (Y page 347).
or X Jump-start the vehicle (Y page 348).
or X Consult a qualified specialist workshop. The engine cannot be
started using the Start/
Stop button. The key is in
the vehicle. The vehicle is locked.
X Unlock the vehicle and try to start the vehicle again. The key battery is weak or discharged.
X Check the key battery (Y page 85) and replace if necessary
(Y page 85).
If this does not work: X Start your vehicle with the key in the ignition lock. Interference from a powerful source of radio waves.
X Start your vehicle with the key in the ignition lock. Key
87Opening and closing Z
Page 94 of 389
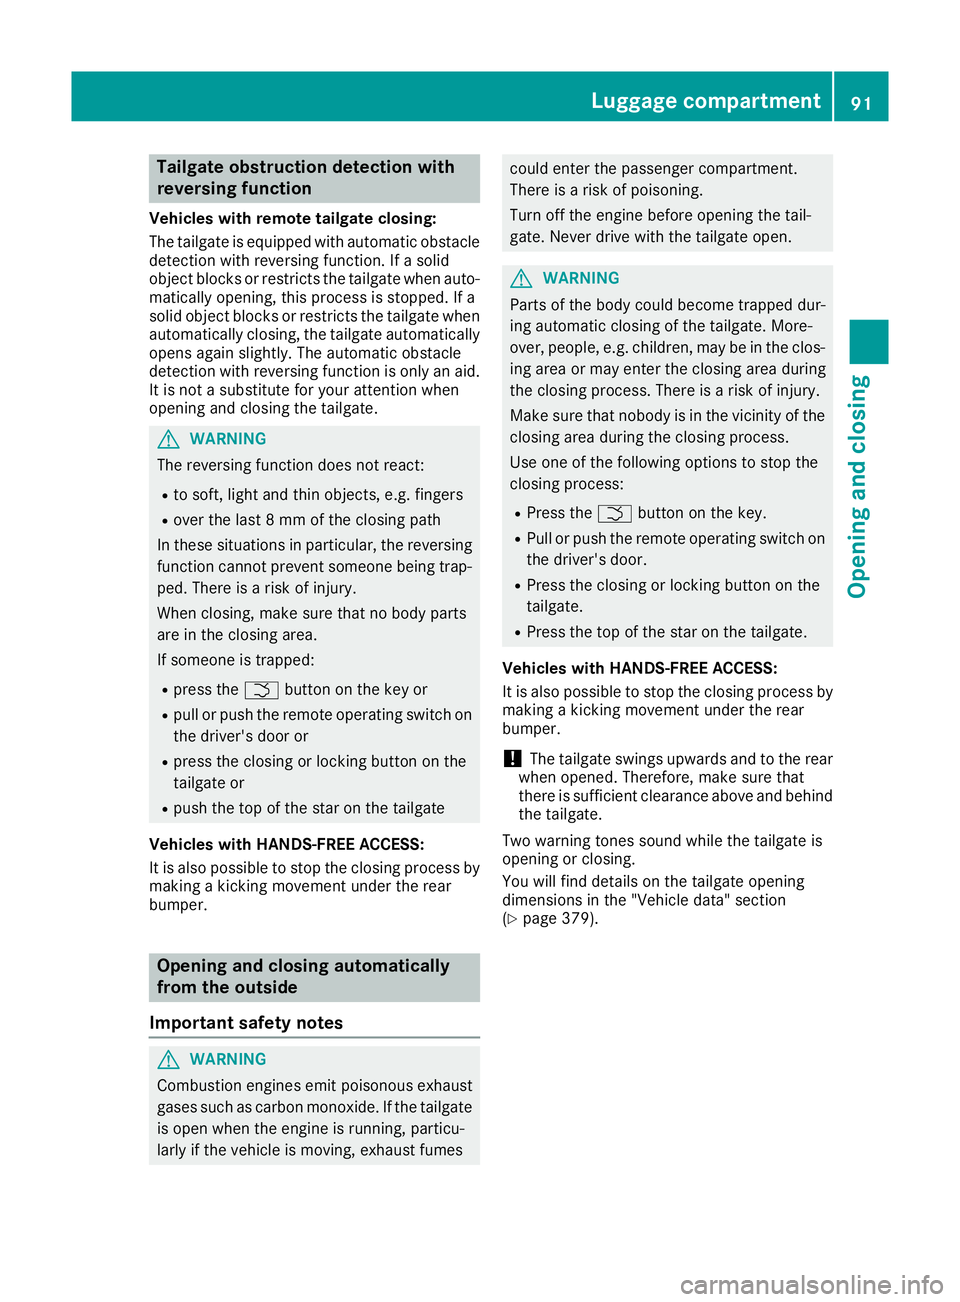
Tailgate obstruction detection with
reversing function
Vehicles with remote tailgate closing:
The tailgate is equipped with automatic obstacle detection with reversing function. If a solid
object blocks or restricts the tailgate when auto-
matically opening, this process is stopped. If a
solid object blocks or restricts the tailgate when
automatically closing, the tailgate automatically opens again slightly. The automatic obstacle
detection with reversing function is only an aid.
It is not a substitute for your attention when
opening and closing the tailgate. G
WARNING
The reversing function does not react:
R to soft, light and thin objects, e.g. fingers
R over the last 8 mm of the closing path
In these situations in particular, the reversing
function cannot prevent someone being trap-
ped. There is a risk of injury.
When closing, make sure that no body parts
are in the closing area.
If someone is trapped:
R press the Fbutton on the key or
R pull or push the remote operating switch on
the driver's door or
R press the closing or locking button on the
tailgate or
R push the top of the star on the tailgate
Vehicles with HANDS-FREE ACCESS:
It is also possible to stop the closing process by
making a kicking movement under the rear
bumper. Opening and closing automatically
from the outside
Important safety notes G
WARNING
Combustion engines emit poisonous exhaust
gases such as carbon monoxide. If the tailgate is open when the engine is running, particu-
larly if the vehicle is moving, exhaust fumes could enter the passenger compartment.
There is a risk of poisoning.
Turn off the engine before opening the tail-
gate. Never drive with the tailgate open.
G
WARNING
Parts of the body could become trapped dur-
ing automatic closing of the tailgate. More-
over, people, e.g. children, may be in the clos- ing area or may enter the closing area during
the closing process. There is a risk of injury.
Make sure that nobody is in the vicinity of theclosing area during the closing process.
Use one of the following options to stop the
closing process:
R Press the Fbutton on the key.
R Pull or push the remote operating switch on
the driver's door.
R Press the closing or locking button on the
tailgate.
R Press the top of the star on the tailgate.
Vehicles with HANDS-FREE ACCESS:
It is also possible to stop the closing process by making a kicking movement under the rear
bumper.
! The tailgate swings upwards and to the rear
when opened. Therefore, make sure that
there is sufficient clearance above and behind
the tailgate.
Two warning tones sound while the tailgate is
opening or closing.
You will find details on the tailgate opening
dimensions in the "Vehicle data" section
(Y page 379). Luggage compartment
91Opening and closing Z