2016 MERCEDES-BENZ GLC COUPE stop start
[x] Cancel search: stop startPage 95 of 389
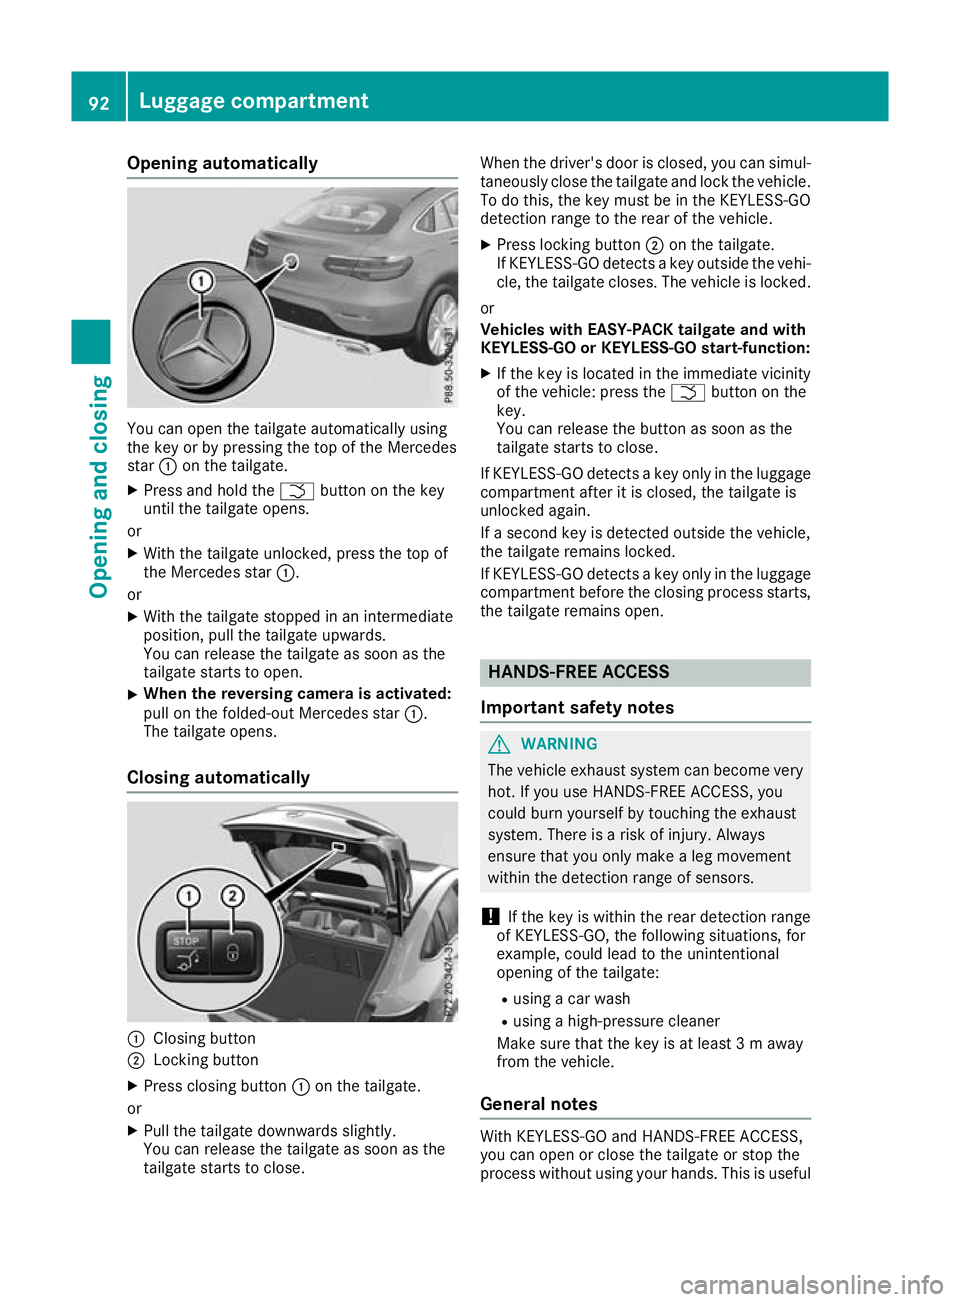
Opening automatically
You can open the tailgate automatically using
the key or by pressing the top of the Mercedes
star
:on the tailgate.
X Press and hold the Fbutton on the key
until the tailgate opens.
or X With the tailgate unlocked, press the top of
the Mercedes star :.
or X With the tailgate stopped in an intermediate
position, pull the tailgate upwards.
You can release the tailgate as soon as the
tailgate starts to open.
X When the reversing camera is activated:
pull on the folded-out Mercedes star
:.
The tailgate opens.
Closing automatically :
Closing button
; Locking button
X Press closing button :on the tailgate.
or
X Pull the tailgate downwards slightly.
You can release the tailgate as soon as the
tailgate starts to close. When the driver's door is closed, you can simul-
taneously close the tailgate and lock the vehicle.
To do this, the key must be in the KEYLESS-GO
detection range to the rear of the vehicle.
X Press locking button ;on the tailgate.
If KEYLESS-GO detects a key outside the vehi- cle, the tailgate closes. The vehicle is locked.
or
Vehicles with EASY-PACK tailgate and with
KEYLESS-GO or KEYLESS-GO start-function:
X If the key is located in the immediate vicinity
of the vehicle: press the Fbutton on the
key.
You can release the button as soon as the
tailgate starts to close.
If KEYLESS-GO detects a key only in the luggage
compartment after it is closed, the tailgate is
unlocked again.
If a second key is detected outside the vehicle,
the tailgate remains locked.
If KEYLESS-GO detects a key only in the luggage compartment before the closing process starts,
the tailgate remains open. HANDS-FREE ACCESS
Important safety notes G
WARNING
The vehicle exhaust system can become very
hot. If you use HANDS-FREE ACCESS, you
could burn yourself by touching the exhaust
system. There is a risk of injury. Always
ensure that you only make a leg movement
within the detection range of sensors.
! If the key is within the rear detection range
of KEYLESS-GO, the following situations, for
example, could lead to the unintentional
opening of the tailgate:
R using a car wash
R using a high-pressure cleaner
Make sure that the key is at least 3 m away
from the vehicle.
General notes With KEYLESS-GO and HANDS-FREE ACCESS,
you can open or close the tailgate or stop the
process without using your hands. This is useful92
Luggage compartmentOpening and closing
Page 96 of 389
if you have your hands full. To do this, make a
kicking movement under the bumper with your
foot.
Observe the following points:
R Carry your KEYLESS-GO key with you. The key
must be in the KEYLESS-GO detection range
to the rear of the vehicle.
R When making the kicking movement, make
sure that you are standing firmly on the
ground and that there is sufficient clearance
to the rear of the vehicle. You could otherwise lose your balance, e.g. on ice. R
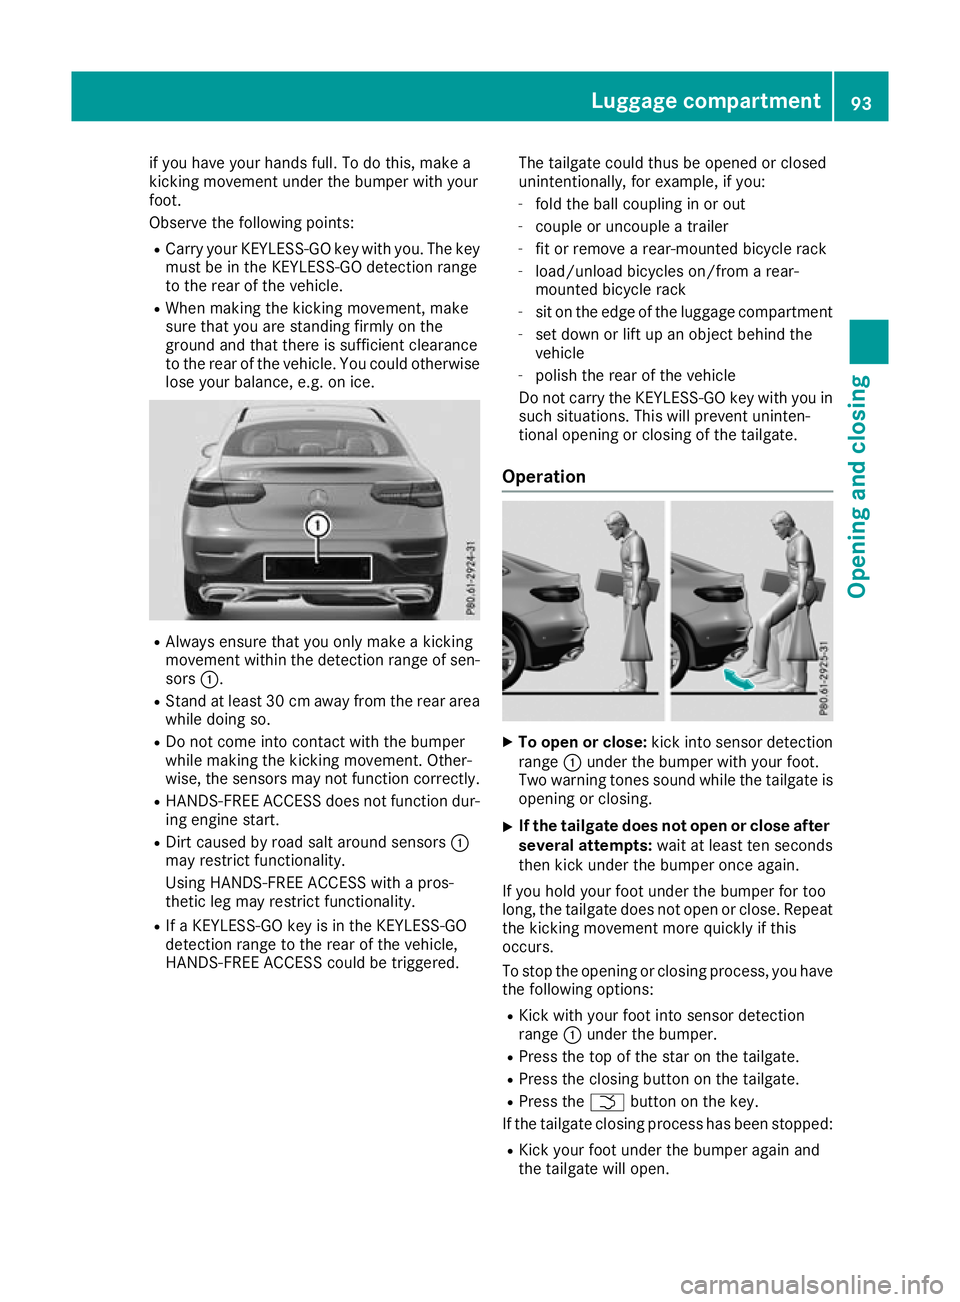
Always ensure that you only make a kicking
movement within the detection range of sen- sors :.
R Stand at least 30 cm away from the rear area
while doing so.
R Do not come into contact with the bumper
while making the kicking movement. Other-
wise, the sensors may not function correctly.
R HANDS-FREE ACCESS does not function dur-
ing engine start.
R Dirt caused by road salt around sensors :
may restrict functionality.
Using HANDS-FREE ACCESS with a pros-
thetic leg may restrict functionality.
R If a KEYLESS-GO key is in the KEYLESS-GO
detection range to the rear of the vehicle,
HANDS-FREE ACCESS could be triggered. The tailgate could thus be opened or closed
unintentionally, for example, if you:
- fold the ball coupling in or out
- couple or uncouple a trailer
- fit or remove a rear-mounted bicycle rack
- load/unload bicycles on/from a rear-
mounted bicycle rack
- sit on the edge of the luggage compartment
- set down or lift up an object behind the
vehicle
- polish the rear of the vehicle
Do not carry the KEYLESS-GO key with you in such situations. This will prevent uninten-
tional opening or closing of the tailgate.
Operation X
To open or close: kick into sensor detection
range :under the bumper with your foot.
Two warning tones sound while the tailgate is opening or closing.
X If the tailgate does not open or close after
several attempts: wait at least ten seconds
then kick under the bumper once again.
If you hold your foot under the bumper for too
long, the tailgate does not open or close. Repeat
the kicking movement more quickly if this
occurs.
To stop the opening or closing process, you have the following options:
R Kick with your foot into sensor detection
range :under the bumper.
R Press the top of the star on the tailgate.
R Press the closing button on the tailgate.
R Press the Fbutton on the key.
If the tailgate closing process has been stopped:
R Kick your foot under the bumper again and
the tailgate will open. Luggage compartment
93Opening and closing Z
Page 99 of 389
only opens again automatically after the corre-
sponding switch is released. The automatic
reversing feature is only an aid and is no substi-
tute for your attention when closing a side win-
dow. G
WARNING
The reversing function does not react:
R to soft, light and thin objects, e.g. small fin-
gers
R while resetting
This means that the reversing feature cannot
prevent someone being trapped in these sit-
uations. There is a risk of injury.
When closing, make sure that no parts of the
body are in the closing area. If someone
becomes trapped, press the switch to open
the side window again. Opening and closing the side win-
dows
The switches for all side windows are located on
the driver's door. There is also a switch on each door for the corresponding side window.
The switches on the driver's door take prece-
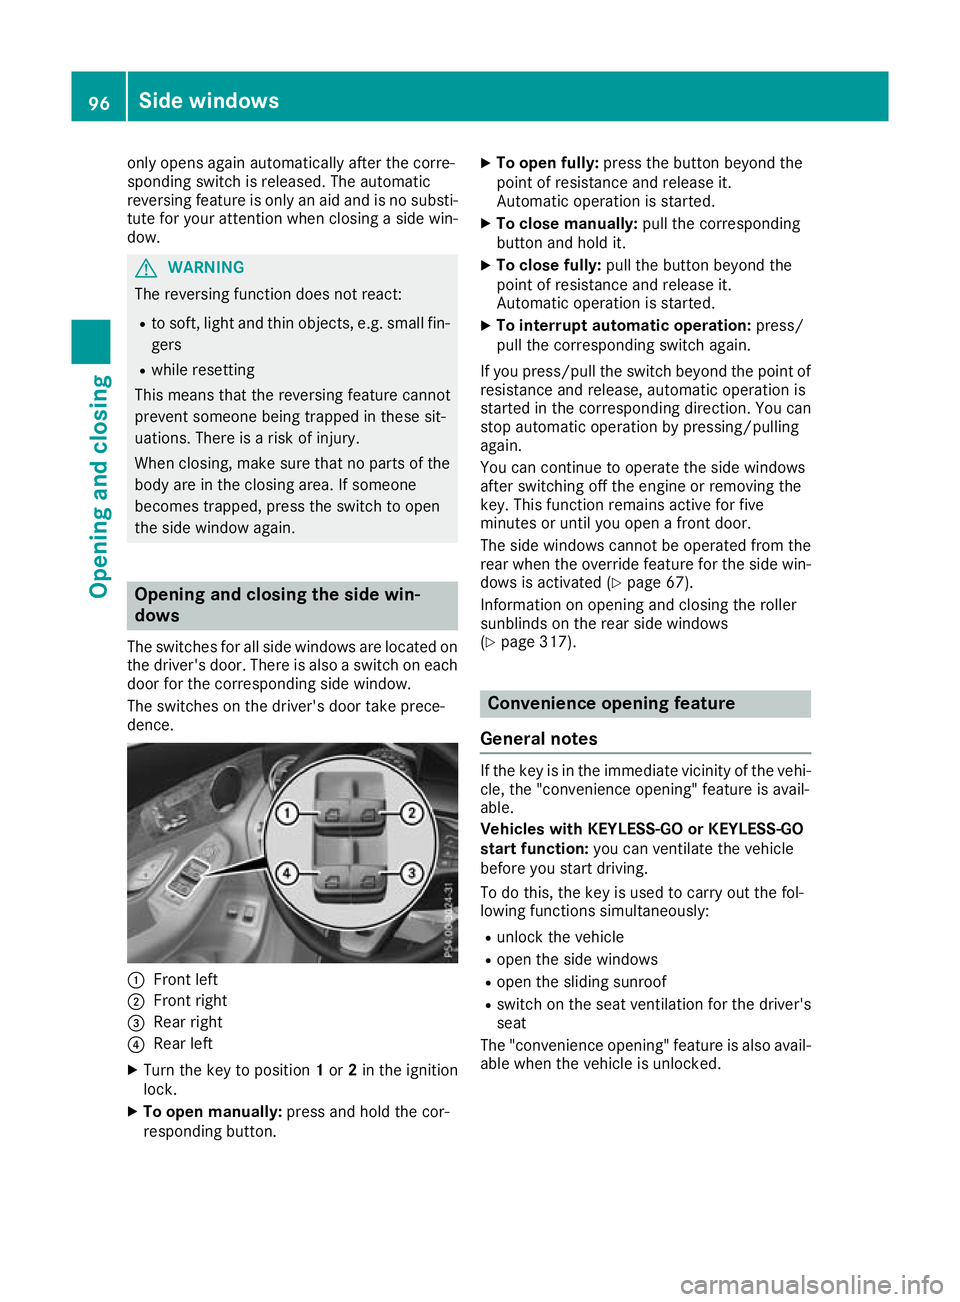
dence. :
Front left
; Front right
= Rear right
? Rear left
X Turn the key to position 1or 2in the ignition
lock.
X To open manually: press and hold the cor-
responding button. X
To open fully: press the button beyond the
point of resistance and release it.
Automatic operation is started.
X To close manually: pull the corresponding
button and hold it.
X To close fully: pull the button beyond the
point of resistance and release it.
Automatic operation is started.
X To interrupt automatic operation: press/
pull the corresponding switch again.
If you press/pull the switch beyond the point of resistance and release, automatic operation is
started in the corresponding direction. You can
stop automatic operation by pressing/pulling
again.
You can continue to operate the side windows
after switching off the engine or removing the
key. This function remains active for five
minutes or until you open a front door.
The side windows cannot be operated from the
rear when the override feature for the side win-
dows is activated (Y page 67).
Information on opening and closing the roller
sunblinds on the rear side windows
(Y page 317). Convenience opening feature
General notes If the key is in the immediate vicinity of the vehi-
cle, the "convenience opening" feature is avail-
able.
Vehicles with KEYLESS-GO or KEYLESS-GO
start function: you can ventilate the vehicle
before you start driving.
To do this, the key is used to carry out the fol-
lowing functions simultaneously:
R unlock the vehicle
R open the side windows
R open the sliding sunroof
R switch on the seat ventilation for the driver's
seat
The "convenience opening" feature is also avail-
able when the vehicle is unlocked. 96
Side windowsOpening and closing
Page 102 of 389
Sliding sunroof reversing feature
The sliding sunroof is equipped with an auto-
matic reversing function. If an solid object
blocks or restricts the sliding sunroof during the
closing process, the sliding sunroof opens again automatically. The automatic reversing function
is only an aid and is not a substitute for your
attention when closing the sliding roof. G
WARNING
The reversing feature does not react:
R to soft, light and thin objects, e.g. small fin-
gers
R over the last 4 mm of the closing movement
R during resetting
R when closing the sliding sunroof again man-
ually immediately after automatic reversing
This means that the reversing feature cannot
prevent someone being trapped in these sit-
uations. There is a risk of injury.
When closing make sure that no body parts
are in the closing area.
If someone is trapped:
R release the switch immediately or
R press the switch in any direction during the
automatic closing process
The closing process is stopped. Operating the sliding sunroof
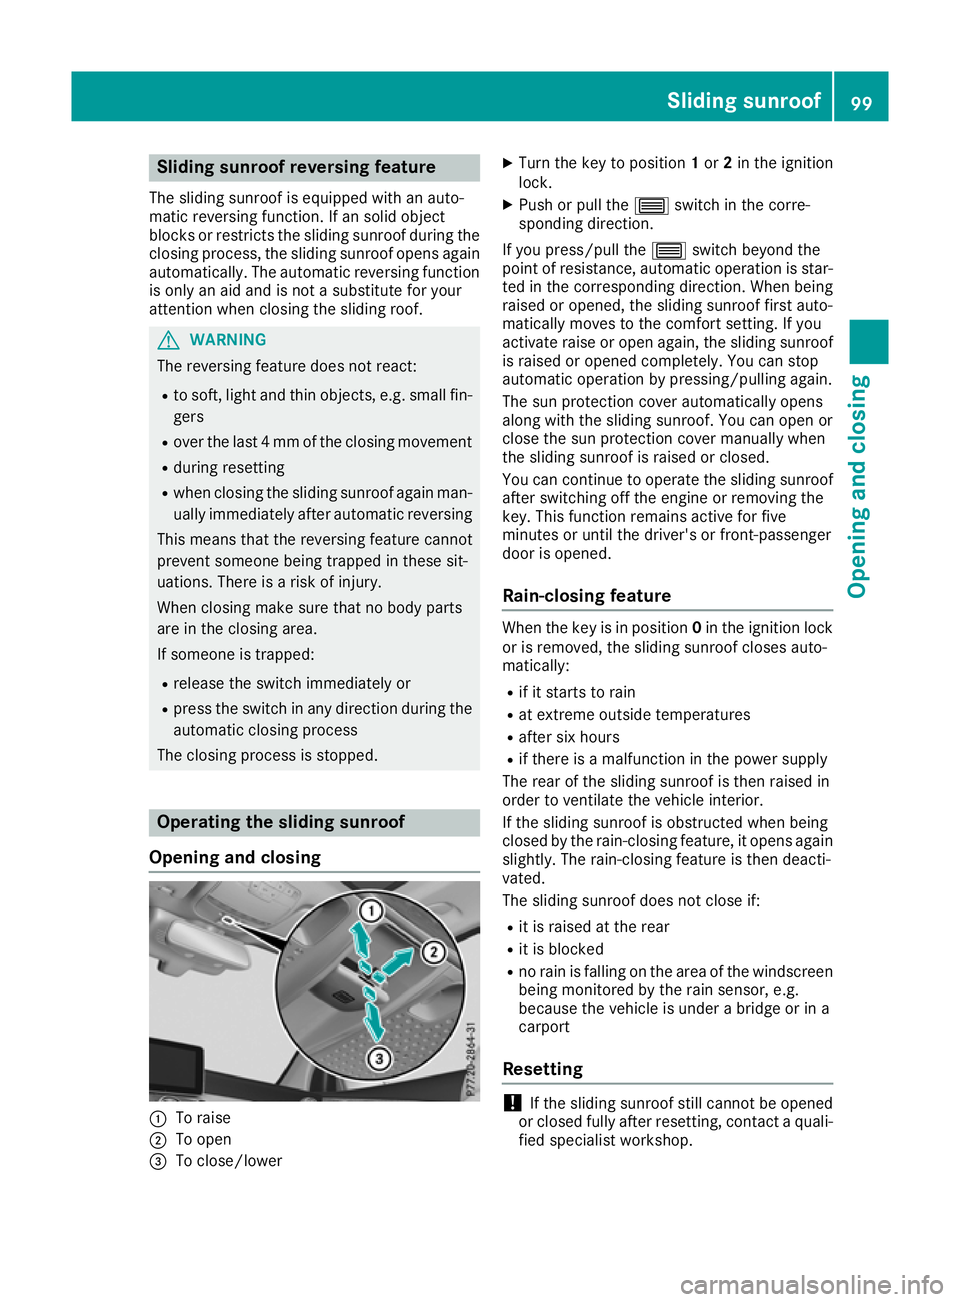
Opening and closing :
To raise
; To open
= To close/lower X
Turn the key to position 1or 2in the ignition
lock.
X Push or pull the 3switch in the corre-
sponding direction.
If you press/pull the 3switch beyond the
point of resistance, automatic operation is star- ted in the corresponding direction. When being
raised or opened, the sliding sunroof first auto-
matically moves to the comfort setting. If you
activate raise or open again, the sliding sunroof
is raised or opened completely. You can stop
automatic operation by pressing/pulling again.
The sun protection cover automatically opens
along with the sliding sunroof. You can open or
close the sun protection cover manually when
the sliding sunroof is raised or closed.
You can continue to operate the sliding sunroof
after switching off the engine or removing the
key. This function remains active for five
minutes or until the driver's or front-passenger
door is opened.
Rain-closing feature When the key is in position
0in the ignition lock
or is removed, the sliding sunroof closes auto-
matically:
R if it starts to rain
R at extreme outside temperatures
R after six hours
R if there is a malfunction in the power supply
The rear of the sliding sunroof is then raised in
order to ventilate the vehicle interior.
If the sliding sunroof is obstructed when being
closed by the rain-closing feature, it opens again
slightly. The rain-closing feature is then deacti-
vated.
The sliding sunroof does not close if:
R it is raised at the rear
R it is blocked
R no rain is falling on the area of the windscreen
being monitored by the rain sensor, e.g.
because the vehicle is under a bridge or in a
carport
Resetting !
If the sliding sunroof still cannot be opened
or closed fully after resetting, contact a quali- fied specialist workshop. Sliding sunroof
99Opening and closing Z
Page 113 of 389
control of the vehicle. There is a risk of an
accident.
Always wait until the adjustment process is
complete before driving off.
The EASY-ENTRY/EXIT feature makes getting in
and out of your vehicle easier.
You can activate and deactivate the EASY-
ENTRY/EXIT feature using the multimedia sys-
tem (see the Digital Operating Instructions).
Position of the steering wheel when the
EASY-ENTRY/EXIT feature is active The steering wheel tilts upwards if you:
R remove the key from the ignition lock
R with KEYLESS-GO or KEYLESS-GO start
function: open the driver's door; the voltage
supply must be switched on
R with the key: open the driver's door; the key
must be in position 0or 1in the ignition lock
(Y page 144)
R open the driver's door when the ignition is
switched off
i The steering wheel tilts upwards only if the
driving position is stored after the steering
column adjustment has been adjusted
(Y page 113).
The most recent driving position of the steering
wheel is stored if:
R the ignition is switched off
R the setting is stored using the memory func-
tion (Y page 113)
i The steering wheel moves upwards only if it
has not already reached the upper steering
limiter.
Position of the steering wheel for driv-
ing The steering wheel is moved to the previously
set position if:
R the driver's door is closed and you insert the
key into the ignition lock
R you close the driver's door when the ignition
is switched on
R you press the Start/Stop button once in vehi-
cles with KEYLESS-GO or the KEYLESS-GO
start function i
The steering wheel returns to the last set
position only if the driving position is stored
after the seat or steering column has been
adjusted (Y page 113).
The most recent driving position of the steering
wheel is stored if:
R the ignition is switched off
R the setting is stored using the memory func-
tion (Y page 113)
Crash-responsive EASY-EXIT feature If the crash-responsive EASY-EXIT feature is trig-
gered in an accident, the steering column will
move upwards when the driver's door is opened
or the key is removed from the ignition lock. This
makes it easier to exit the vehicle and rescue the
occupants.
The crash-responsive EASY-EXIT feature is
operational only if the EASY-EXIT/ENTRY fea-
ture is activated in the multimedia system (see
Digital Operating Instructions). Mirrors
Rear-view mirror
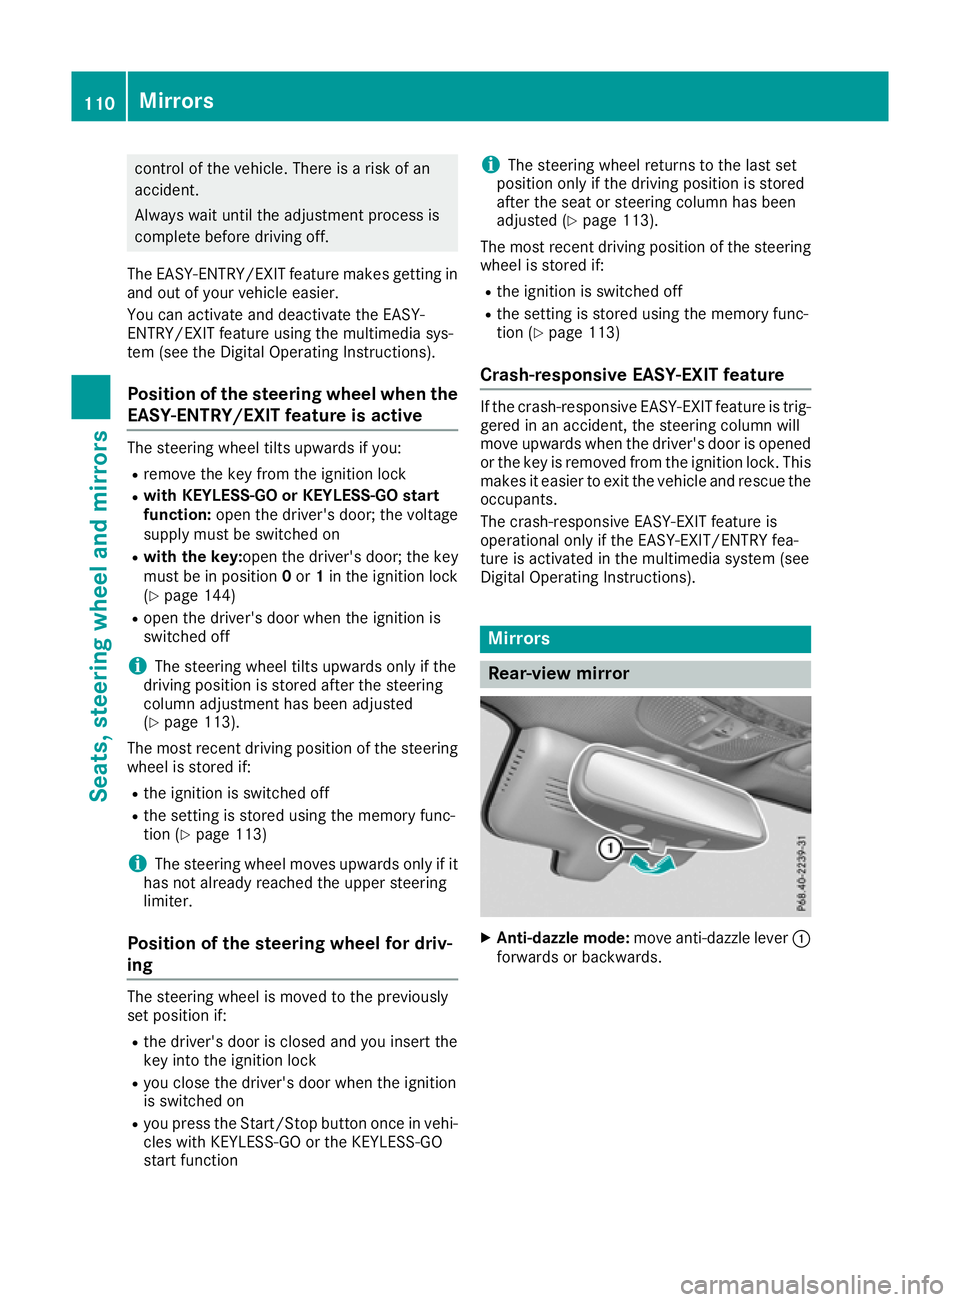
X
Anti-dazzle mode: move anti-dazzle lever :
forwards or backwards. 110
MirrorsSeats, steering wheel and mirrors
Page 127 of 389
For this reason, you should always switch off
the windscreen wipers in dry weather. 1
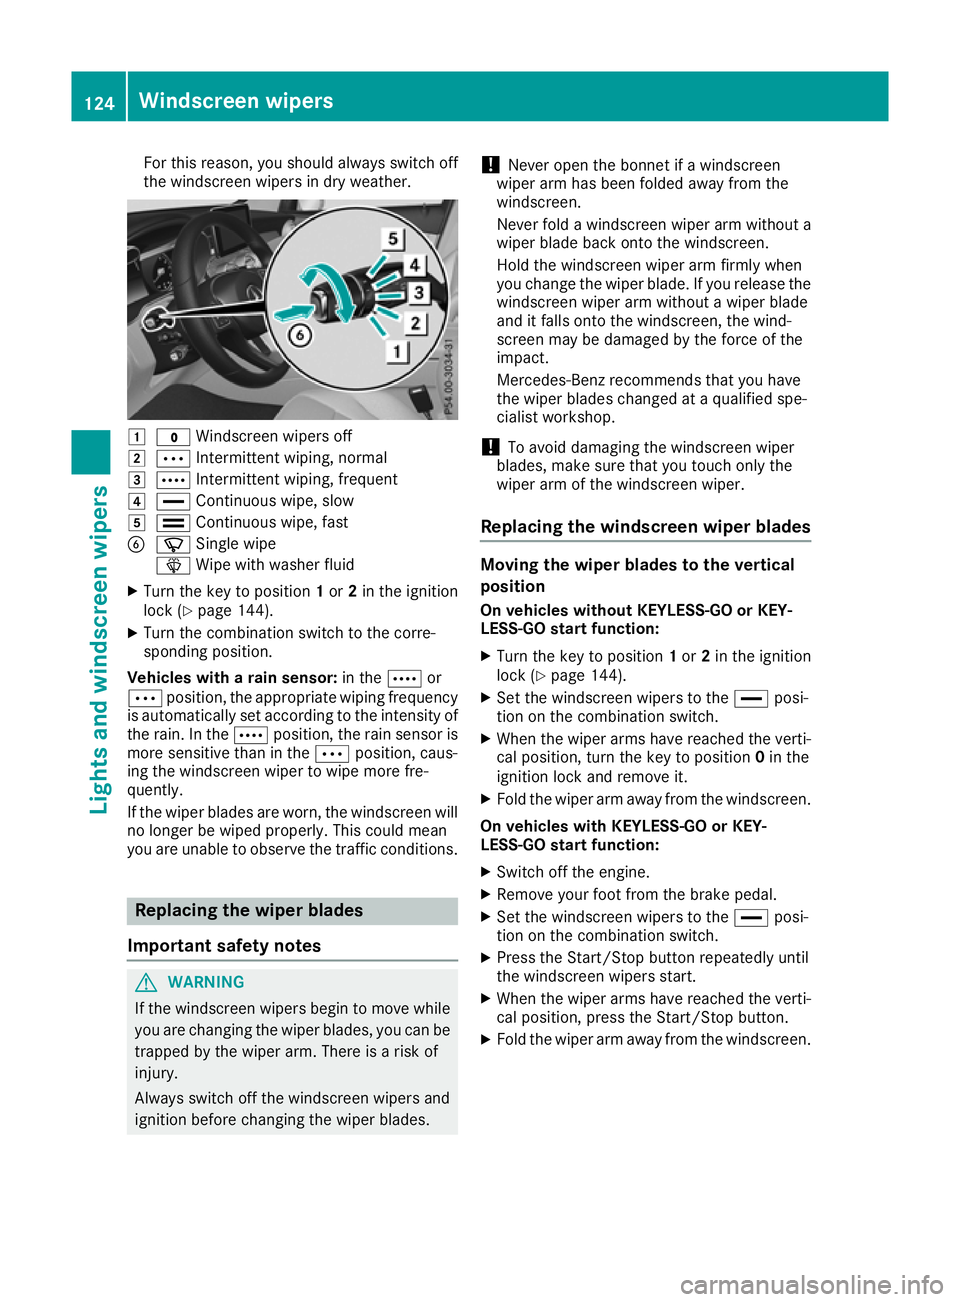
$ Windscreen wipers off
2 Ä Intermittent wiping, normal
3 Å Intermittent wiping, frequent
4 ° Continuous wipe, slow
5 ¯ Continuous wipe, fast
B í Single wipe
î Wipe with washer fluid
X Turn the key to position 1or 2in the ignition
lock (Y page 144).
X Turn the combination switch to the corre-
sponding position.
Vehicles with a rain sensor: in theÅor
Ä position, the appropriate wiping frequency
is automatically set according to the intensity of
the rain. In the Åposition, the rain sensor is
more sensitive than in the Äposition, caus-
ing the windscreen wiper to wipe more fre-
quently.
If the wiper blades are worn, the windscreen will no longer be wiped properly. This could mean
you are unable to observe the traffic conditions. Replacing the wiper blades
Important safety notes G
WARNING
If the windscreen wipers begin to move while
you are changing the wiper blades, you can be trapped by the wiper arm. There is a risk of
injury.
Always switch off the windscreen wipers and
ignition before changing the wiper blades. !
Never open the bonnet if a windscreen
wiper arm has been folded away from the
windscreen.
Never fold a windscreen wiper arm without a
wiper blade back onto the windscreen.
Hold the windscreen wiper arm firmly when
you change the wiper blade. If you release the
windscreen wiper arm without a wiper blade
and it falls onto the windscreen, the wind-
screen may be damaged by the force of the
impact.
Mercedes-Benz recommends that you have
the wiper blades changed at a qualified spe-
cialist workshop.
! To avoid damaging the windscreen wiper
blades, make sure that you touch only the
wiper arm of the windscreen wiper.
Replacing the windscreen wiper blades Moving the wiper blades to the vertical
position
On vehicles without KEYLESS-GO or KEY-
LESS‑GO start function:
X Turn the key to position 1or 2in the ignition
lock (Y page 144).
X Set the windscreen wipers to the °posi-
tion on the combination switch.
X When the wiper arms have reached the verti-
cal position, turn the key to position 0in the
ignition lock and remove it.
X Fold the wiper arm away from the windscreen.
On vehicles with KEYLESS-GO or KEY-
LESS‑GO start function:
X Switch off the engine.
X Remove your foot from the brake pedal.
X Set the windscreen wipers to the °posi-
tion on the combination switch.
X Press the Start/Stop button repeatedly until
the windscreen wipers start.
X When the wiper arms have reached the verti-
cal position, press the Start/Stop button.
X Fold the wiper arm away from the windscreen. 124
Windscreen wipersLights and windscreen wipers
Page 132 of 389
I
Display
J To set the airflow (Y page 132) Notes on using automatic climate
control
Optimum use of automatic climate con-
trol The following contains notes and recommenda-
tions on how best to use THERMATIC automatic
climate control or THERMOTRONIC.
R Activate climate control using the Ã
rocker switch. The indicator lamp above the
à rocker switch lights up. The "Cooling
with dehumidification" function is activated in
automatic mode.
R Set the temperature to 22 †.
R Use the "Windscreen demisting" function only
briefly until the windscreen is clear again.
R Use the "Air-recirculation mode" function only
briefly, e.g. if there are unpleasant outside
odours or when in a tunnel. The windows
could otherwise mist up as no fresh air is
drawn into the vehicle in air-recirculation
mode.
R Vehicles with THERMATIC with auxiliary heat-
ing or THERMOTRONIC: use the "Residual
heat" function if you want to heat or ventilate
the vehicle interior when the ignition is
switched off. The "Residual heat" function can
be switched on or off only with the ignition
switched off. The "Residual heat" function is
switched off when the ignition is switched on.
DYNAMIC SELECT switch (except
Mercedes-AMG vehicles) You can choose between various drive programs
with the DYNAMIC SELECT switch
(Y page 152).
If you have selected drive program E:
R during heating, the electrical heater booster
is deactivated and heat output is reduced as a
result
R the rear window heating running time is
reduced If you have selected drive program
C,Sor S+ ,
the current climate settings are maintained.
ECO start/stop function During automatic engine switch-off, the climate
control operates only at a reduced capacity. If
you require the full climate control output, you
can switch off the ECO start/stop function by
pressing the ECO button (Y page 149). Operating the climate control system
Switching the climate control on/off
General notes When climate control is switched off, the air
supply and air circulation are also switched off.
The windows could mist up. Therefore, switch
off climate control only briefly.
Switch on climate control primarily using the
à rocker switch (Y page 131).
Activating/deactivating X
Turn the key to position 2in the ignition lock
(Y page 144).
X To switch on: set the airflow to level 1 or
higher using the Hrocker switch.
X To switch off:set the airflow to level 0 using
the H rocker switch.
i THERMOTRONIC automatic climate control:
when climate control is switched off, "OFF"
appears in the rear-compartment display. Operating the climate control system
129Climate control
Page 137 of 389

Activating/deactivating air-recircula-
tion mode
General notes You can also temporarily deactivate the flow of
fresh air manually if unpleasant odours are
entering the vehicle from outside. The air
already inside the vehicle will then be recircula-
ted.
If you activate air-recirculation mode, the win-
dows can mist up more quickly, particularly at
low outside temperatures. Use air-recirculation
mode only briefly to prevent the windows from
misting up.
Activating/deactivating X
Turn the key to position 2in the ignition lock
(Y page 144).
X To activate: press thegrocker switch up
or down.
The indicator lamp above the grocker
switch lights up.
Air-recirculation mode is activated automati-
cally:
R at high outside temperatures
R at high levels of pollution (THERMOTRONIC
automatic climate control only)
R in tunnels (vehicles with a navigation system
only)
The indicator lamp above the grocker
switch is not lit when automatic air-recirculation
mode is activated. Outside air is added after
approximately 30 minutes.
X To deactivate: press thegrocker switch
up or down.
The indicator lamp above the grocker
switch goes out.
Air-recirculation mode is deactivated automati-
cally:
R after approximately five minutes at outside
temperatures below approximately 5 †
R after approximately five minutes if "Cooling
with air dehumidification" is deactivated
R after approximately 30 minutes at outside
temperatures above approximately 5 †if the
"Cooling with air dehumidification" function is
activated Convenience opening or closing using
the air-recirculation button G
WARNING
When the convenience closing feature is oper- ating, parts of the body could become trapped
in the closing area of the side window and the
sliding sunroof. There is a risk of injury.
Observe the complete closing procedure
when the convenience closing feature is oper-
ating. When closing make sure that no parts of the body are in the closing area. G
WARNING
During convenience opening parts of the body could be drawn in or become trapped
between the side window and window frame.
There is a risk of injury.
When opening, make sure that nobody is
touching the side window. If someone
becomes trapped, immediately press
the W switch in the door to stop the move-
ment of the side windows. To continue closing
the side window, pull on the Wswitch.
X Convenience closing feature: press and
hold the grocker switch up or down until
the side windows start to close automatically. Vehicles with sliding sunroof: the sliding
sunroof closes simultaneously.
The indicator lamp above the grocker
switch lights up. Air-recirculation mode is
activated.
If you open the side windows or the sliding
sunroof manually after closing with the con-
venience closing feature, they will remain in
this position when opened using the conve-
nience opening feature.
If parts of the body are in the closing area during convenience closing, proceed as follows:
X Press the Wbutton to stop the side win-
dows.
The side windows stop.
X To then open the side windows, press the
W button again. 134
Operating the climate control systemClimate control