2016 MERCEDES-BENZ GLC COUPE length
[x] Cancel search: lengthPage 172 of 389
X
If this is the case, park the vehicle only on
level ground and secure it to prevent it from
rolling away.
X Shift the automatic transmission to position
P.
It may not be possible to release an applied
parking brake if the on-board voltage is low or if there is a malfunction in the system. Contact a
qualified specialist workshop.
The electric parking brake carries out a function
check at regular intervals when the engine is
switched off. Noises that occur are normal.
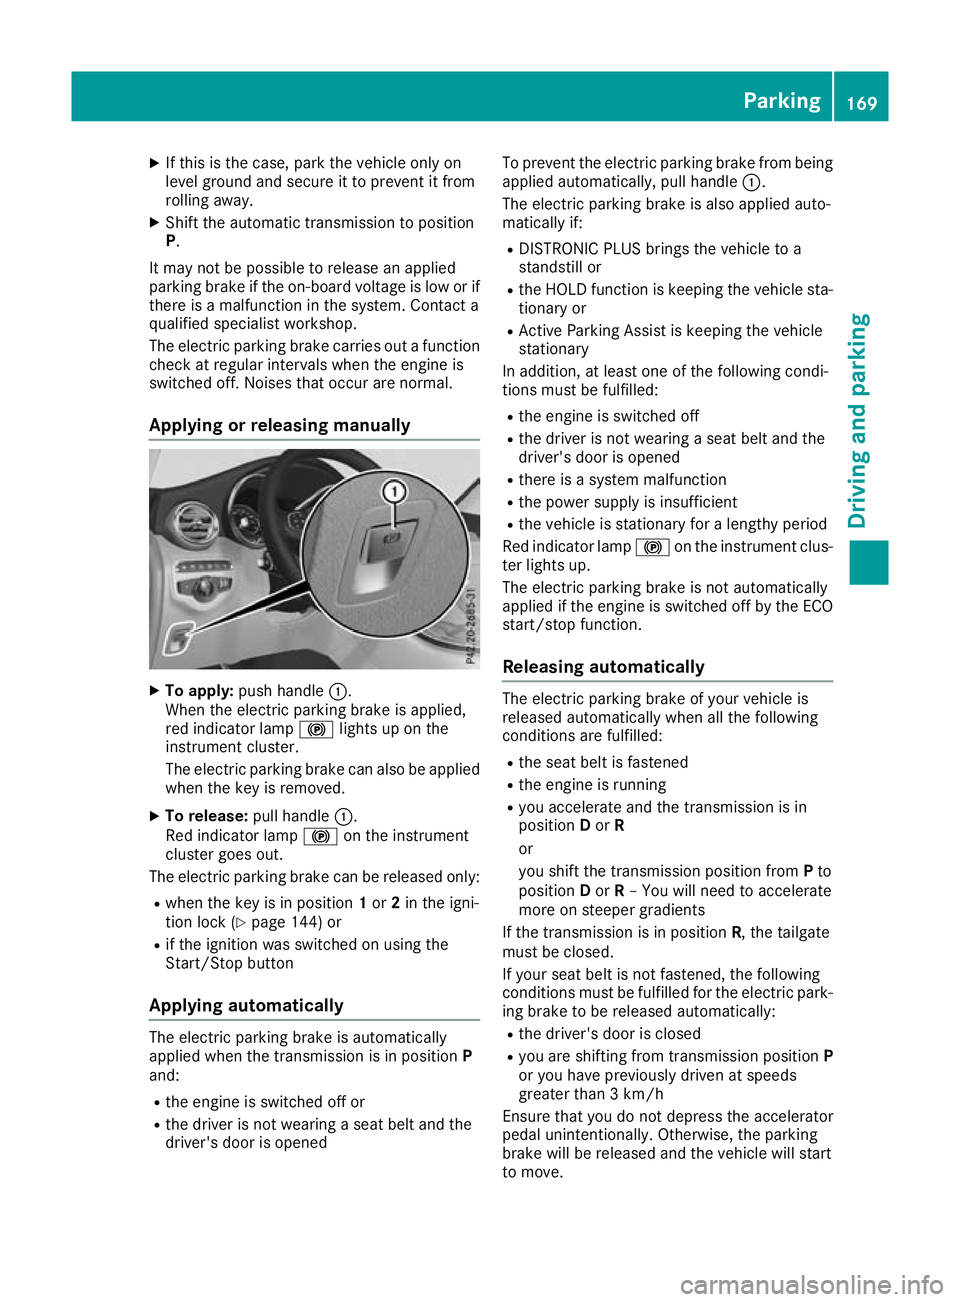
Applying or releasing manually X
To apply: push handle :.
When the electric parking brake is applied,
red indicator lamp !lights up on the
instrument cluster.
The electric parking brake can also be applied when the key is removed.
X To release: pull handle:.
Red indicator lamp !on the instrument
cluster goes out.
The electric parking brake can be released only:
R when the key is in position 1or 2in the igni-
tion lock (Y page 144) or
R if the ignition was switched on using the
Start/Stop button
Applying automatically The electric parking brake is automatically
applied when the transmission is in position P
and:
R the engine is switched off or
R the driver is not wearing a seat belt and the
driver's door is opened To prevent the electric parking brake from being
applied automatically, pull handle :.
The electric parking brake is also applied auto-
matically if:
R DISTRONIC PLUS brings the vehicle to a
standstill or
R the HOLD function is keeping the vehicle sta-
tionary or
R Active Parking Assist is keeping the vehicle
stationary
In addition, at least one of the following condi-
tions must be fulfilled:
R the engine is switched off
R the driver is not wearing a seat belt and the
driver's door is opened
R there is a system malfunction
R the power supply is insufficient
R the vehicle is stationary for a lengthy period
Red indicator lamp !on the instrument clus-
ter lights up.
The electric parking brake is not automatically
applied if the engine is switched off by the ECO
start/stop function.
Releasing automatically The electric parking brake of your vehicle is
released automatically when all the following
conditions are fulfilled:
R the seat belt is fastened
R the engine is running
R you accelerate and the transmission is in
position Dor R
or
you shift the transmission position from Pto
position Dor R– You will need to accelerate
more on steeper gradients
If the transmission is in position R, the tailgate
must be closed.
If your seat belt is not fastened, the following
conditions must be fulfilled for the electric park- ing brake to be released automatically:
R the driver's door is closed
R you are shifting from transmission position P
or you have previously driven at speeds
greater than 3 km/h
Ensure that you do not depress the accelerator
pedal unintentionally. Otherwise, the parking
brake will be released and the vehicle will start
to move. Parking
169Driving and parking Z
Page 197 of 389
Active Parking Assist
General notes Active Parking Assist is an electronic parking aid
with ultrasound. It measures the road on both
sides of the vehicle. A parking symbol indicates a suitable parking space. Active steering inter-
vention and brake application can assist you
during parking and when exiting a parking
space. You may also use PARKTRONIC
(Y page 191).
Important safety notes Active Parking Assist is only an aid. It is not a
substitute for your attention to the immediate
surroundings. The responsibility for safe
manoeuvring and parking remains with you.
Make sure that no persons, animals or objects
are in the manoeuvring range.
When PARKTRONIC is deactivated, Active Park-
ing Assist is also unavailable.
For vehicles with the trailer tow hitch folded out,
the minimum length for parking spaces is
slightly longer.
If you have attached a trailer to your vehicle, you
should not use Active Parking Assist. Once the
electrical connection is established between
your vehicle and the trailer, Active Parking
Assist is no longer available. PARKTRONIC is
deactivated for the rear area. G
WARNING
While parking or pulling out of a parking
space, the vehicle swings out and can drive
onto areas of the oncoming lane. This could
cause you to collide with other road users.
There is a risk of an accident.
Pay attention to other road users. Stop the
vehicle if necessary or cancel the Active Park- ing Assist parking procedure.
! If unavoidable, you should drive over obsta-
cles such as kerbs slowly and not at a sharp
angle. Otherwise, you may damage the
wheels or tyres. Active Parking Assist may also display spaces
not suitable for parking, e.g.:
R In a zone where parking or stopping is pro-
hibited
R In front of driveways or entrances and exits
R On unsuitable surfaces
Parking tips:
R On narrow roads, drive as closely as possible
past the parking space
R Parking spaces that are littered or overgrown
might be identified or measured incorrectly
R Parking spaces that are partially occupied by
trailer drawbars might not be identified as
such or be measured incorrectly
R Snowfall or heavy rain may lead to a parking
space being measured inaccurately
R Pay attention to the PARKTRONIC
(Y page 192) warning messages during the
parking procedure
R You can intervene in the steering procedure
to correct it at any time. Active Parking Assist is then deactivated
R When transporting a load that protrudes from
your vehicle, you should not use Active Park-
ing Assist
R Never use Active Parking Assist when snow
chains are fitted
R Always pay attention to the specified tyre
pressure for your vehicle. This has a direct
influence on the parking characteristics of the vehicle
Use Active Parking Assist for parking spaces
that are:
R parallel or at right angles to the direction of
travel
R on straight roads, not bends
R on the same level as the road, e.g. not on the
pavement
Detecting parking spaces Objects located above the height range of Active
Parking Assist will not be detected when the
parking space is measured. These are not taken into account when the parking procedure is cal-culated, e.g. overhanging loads, tail sections or
loading ramps of goods vehicles. 194
Driving systemsDriving and pa
rking
Page 210 of 389
ATTENTION ASSIST
General notes ATTENTION ASSIST helps you during long,
monotonous journeys such as on motorways
and trunk roads. It is active in the 60 km/h to
200 km/h speed range. If ATTENTION ASSIST
detects typical indicators of fatigue or increas-
ing lapses in concentration on the part of the
driver, it suggests taking a break.
Important safety notes ATTENTION ASSIST is only an aid. It may not
always detect fatigue or lapses in concentration
until too late, or may not detect them at all. The system is not a substitute for a well-rested and
attentive driver.
The functionality of ATTENTION ASSIST is
restricted, and warnings may be delayed or not
occur at all in the following situations:
R if the length of the journey is less than approx-
imately 30 minutes
R if the road condition is poor, e.g. if the surface
is uneven or contains potholes
R in case of strong side winds
R if you have adopted a sporty driving style with
high cornering speeds or high rates of accel-
eration
R if you are predominantly driving at a speed
below 60 km/h or above 200 km/h
R if you are driving with DISTRONIC PLUS Steer-
ing Assist activated
R if the time has been set incorrectly
R in active driving situations, such as when you
change lanes or change your speed
The ATTENTION ASSIST tiredness assessment
is deleted and restarted when you continue the
journey in the following situations:
R you switch off the engine
R you take off your seat belt and open the driv-
er's door, e.g. for a change of drivers or to
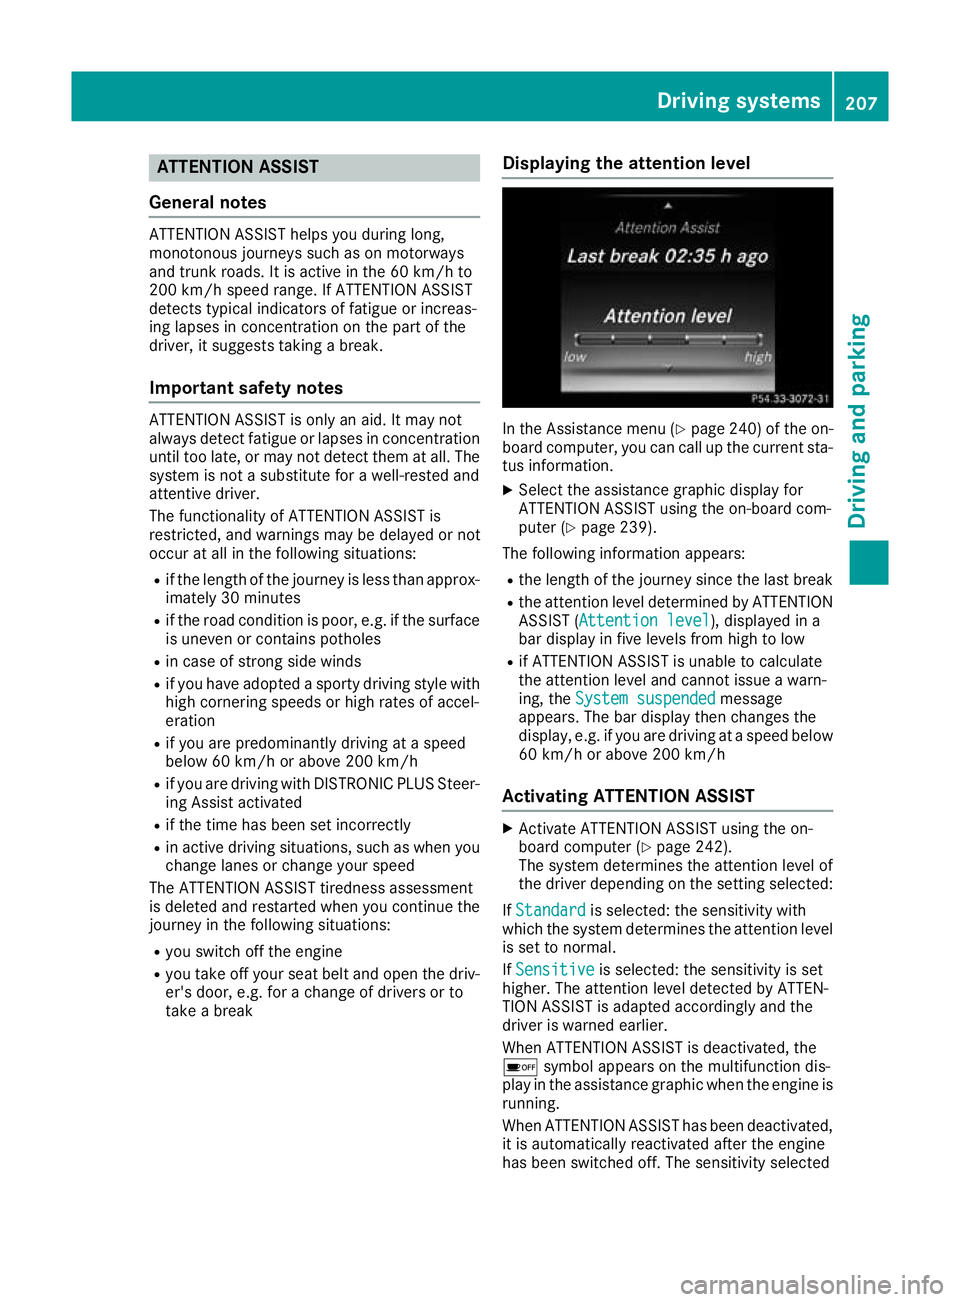
take a break Displaying the attention level In the Assistance menu (Y
page 240) of the on-
board computer, you can call up the current sta-
tus information.
X Select the assistance graphic display for
ATTENTION ASSIST using the on-board com-
puter (Y page 239).
The following information appears:
R the length of the journey since the last break
R the attention level determined by ATTENTION
ASSIST (Attention level Attention level), displayed in a
bar display in five levels from high to low
R if ATTENTION ASSIST is unable to calculate
the attention level and cannot issue a warn-
ing, the System suspended System suspended message
appears. The bar display then changes the
display, e.g. if you are driving at a speed below 60 km/h or above 200 km/h
Activating ATTENTION ASSIST X
Activate ATTENTION ASSIST using the on-
board computer (Y page 242).
The system determines the attention level of
the driver depending on the setting selected:
If Standard Standard is selected: the sensitivity with
which the system determines the attention level
is set to normal.
If Sensitive
Sensitive is selected: the sensitivity is set
higher. The attention level detected by ATTEN-
TION ASSIST is adapted accordingly and the
driver is warned earlier.
When ATTENTION ASSIST is deactivated, the
é symbol appears on the multifunction dis-
play in the assistance graphic when the engine is running.
When ATTENTION ASSIST has been deactivated,
it is automatically reactivated after the engine
has been switched off. The sensitivity selected Driving systems
207Driving and parking Z
Page 251 of 389
X
Press :or9 to select Stop Stop.
The RACETIMER is stopped.
X Press :or9 to select Reset Reset.
X Press ato confirm.
All laps are deleted.
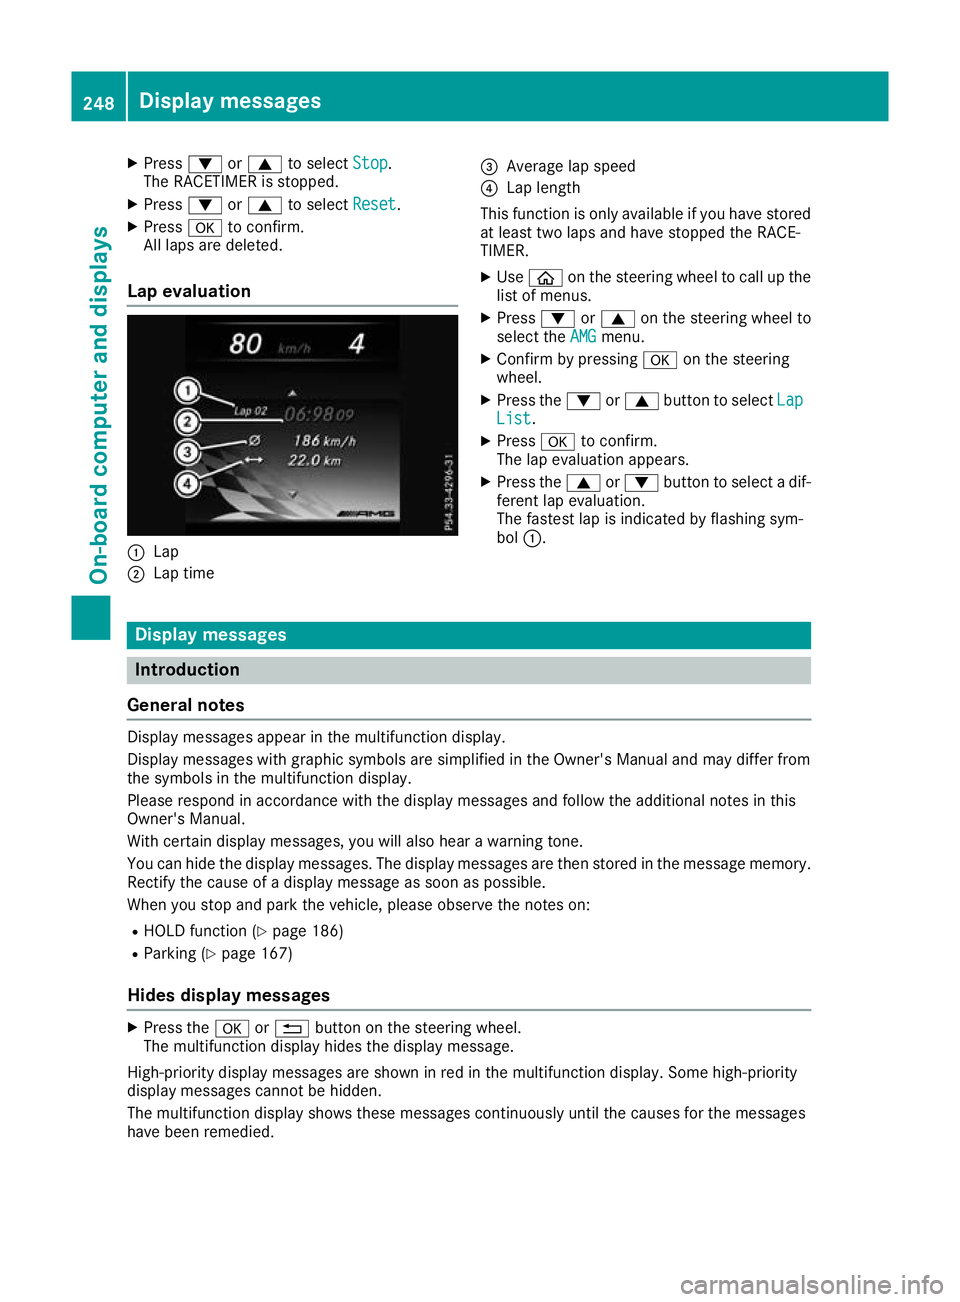
Lap evaluation :
Lap
; Lap time =
Average lap speed
? Lap length
This function is only available if you have stored
at least two laps and have stopped the RACE-
TIMER.
X Use ò on the steering wheel to call up the
list of menus.
X Press :or9 on the steering wheel to
select the AMG AMGmenu.
X Confirm by pressing aon the steering
wheel.
X Press the :or9 button to select Lap
Lap
List
List.
X Press ato confirm.
The lap evaluation appears.
X Press the 9or: button to select a dif-
ferent lap evaluation.
The fastest lap is indicated by flashing sym-
bol :. Display messages
Introduction
General notes Display messages appear in the multifunction display.
Display messages with graphic symbols are simplified in the Owner's Manual and may differ from
the symbols in the multifunction display.
Please respond in accordance with the display messages and follow the additional notes in this
Owner's Manual.
With certain display messages, you will also hear a warning tone.
You can hide the display messages. The display messages are then stored in the message memory.
Rectify the cause of a display message as soon as possible.
When you stop and park the vehicle, please observe the notes on:
R HOLD function (Y page 186)
R Parking (Y page 167)
Hides display messages X
Press the aor% button on the steering wheel.
The multifunction display hides the display message.
High-priority display messages are shown in red in the multifunction display. Some high-priority
display messages cannot be hidden.
The multifunction display shows these messages continuously until the causes for the messages
have been remedied. 248
Display messagesOn-board computer and displays
Page 352 of 389
R
It is particularly important to observe the described order when connecting and disconnecting
the jump leads.
R Never connect or disconnect the battery terminals while the engine is running. G
WARNING
A discharged battery can freeze at temperatures below freezing point. When jump-starting the
vehicle or charging the battery, gases can escape from the battery. There is a risk of an explosion.
Allow the frozen battery to thaw out before charging it or jump-starting.
If the warning and indicator lamps do not light up on the instrument cluster when temperatures are low, it is probably because the discharged battery has frozen. In this case, you may neither jump-
start the vehicle nor charge the battery. The service life of a battery that has been thawed may be
reduced. The starting characteristics may be impaired, especially at low temperatures. Have the
thawed battery checked at a qualified specialist workshop.
All vehicles:
! Vehicles with a petrol engine:
avoid repeated and lengthy starting attempts. Otherwise, the
non-combusted fuel may damage the catalytic converter.
Do not use a rapid charging device to start the vehicle. If your vehicle's battery is discharged, the
engine can be jump-started from another vehicle or from a second battery using jump leads.
Observe the following points:
R The battery is not accessible in all vehicles. If the other vehicle's battery is not accessible, jump-
start the vehicle using a second battery or a jump-starting device.
R Vehicles with a petrol engine: jump-start the vehicle only when the engine and exhaust system
are cold.
R All vehicles except vehicles with a lithium-ion battery: do not start the engine if the battery
is frozen. Let the battery thaw first.
R Jump-starting may be performed only using batteries with a nominal voltage of 12 V.
R Use only jump leads that have a sufficient cross-section and insulated terminal clamps.
R If the battery is fully discharged, leave the battery that is being used to jump-start connected for
a few minutes before attempting to start. This charges the empty battery a little.
R Make sure that the two vehicles do not touch.
Make sure that:
R The jump leads are not damaged.
R Non-insulated parts of the terminal clamps do not come into contact with other metal parts while
the jump leads are connected to the battery.
R The jump leads cannot come into contact with parts that can move when the engine is running,
such as the V-belt pulley or the fan.
X Secure the vehicle by applying the electric parking brake.
X Shift the transmission to position P.
X Make sure that the ignition is switched off . All indicator lamps on the instrument cluster must be
off. When using the key, turn the key to position 0in the ignition lock and remove it (Y page 144).
X Switch off all electrical consumers, e.g. rear window heating, lighting etc.
X Open the bonnet. Jump-starting
349Breakdown assistance Z
Page 382 of 389
Make sure the windscreen washer concen-
trate does not come into contact with the filler neck.
! Only use washer fluid that is suitable for
plastic lamp lenses, e.g. MB SummerFit or MB
WinterFit. Unsuitable washer fluid could dam-
age the plastic lenses of the headlamps.
! Only the washer fluids SummerFit and Win-
terFit can be mixed. Otherwise, the spraying
nozzles could become blocked.
Do not use distilled or de-ionised water, other-
wise the level sensor may give a false reading.
When handling washer fluid, observe the impor- tant safety notes on service products
(Y page 373).
At temperatures above freezing:
X Fill the washer fluid reservoir with a mixture of
water and washer fluid, e.g. MB SummerFit.
Mix 1 part MB SummerFit to 100 parts water.
At temperatures below freezing:
X Fill the washer fluid reservoir with a mixture of
water and washer fluid, e.g. MB WinterFit.
For the correct mixing ratio, refer to the infor- mation on the antifreeze reservoir.
i Add washer fluid concentrate, e.g. MB Sum-
merFit or MB WinterFit, to the washer fluid all
year round. Vehicle data
General notes
Please note that for the specified vehicle data:
R the heights specified may vary as a result of:
- tyres
- load
- condition of the suspension
- optional equipment
R items of optional equipment reduce the max-
imum payload
R vehicle-specific weight information can be
found on the vehicle identification plate
(Y page 372)
R for certain countries only: you can find vehi-
cle-specific vehicle data in the COC docu-
ments (CERTIFICATE OF CONFORMITY). These documents are delivered with your
vehicle
Observe the information relating to level con-
trol:
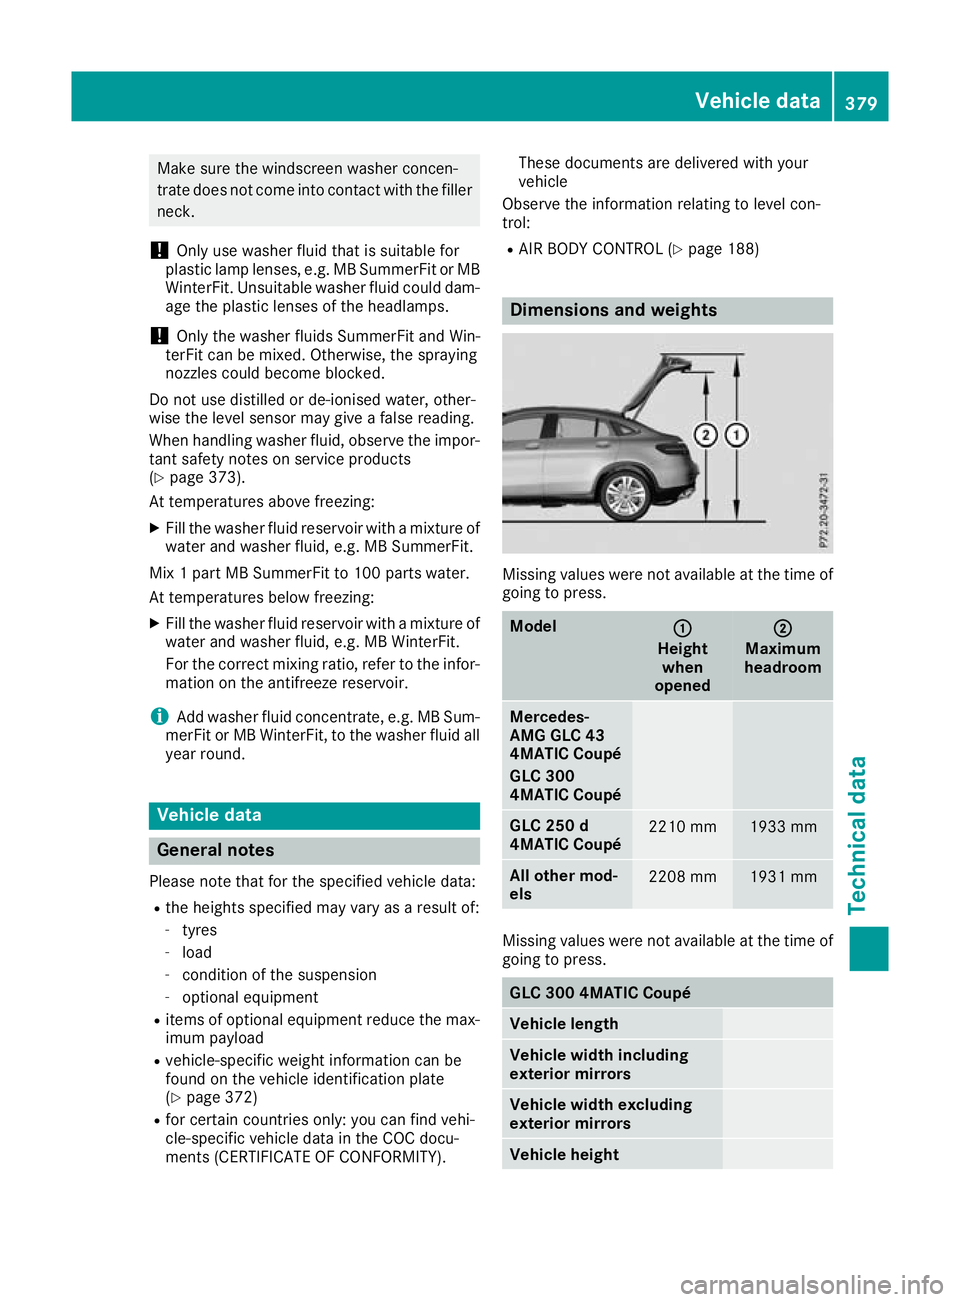
R AIR BODY CONTROL (Y page 188) Dimensions and weights
Missing values were not available at the time of
going to press. Model
: :
Height when
opened ;
;
Maximum
headroom Mercedes-
AMG GLC 43
4MATIC Coupé
GLC 300
4MATIC Coupé
GLC 250 d
4MATIC Coupé
2210 mm 1933 mm
All other mod-
els
2208 mm 1931 mm
Missing values were not available at the time of
going to press. GLC 300 4MATIC Coupé
Vehicle length
Vehicle width including
exterior mirrors
Vehicle width excluding
exterior mirrors
Vehicle height Vehicle data
379Technical data Z
Page 383 of 389
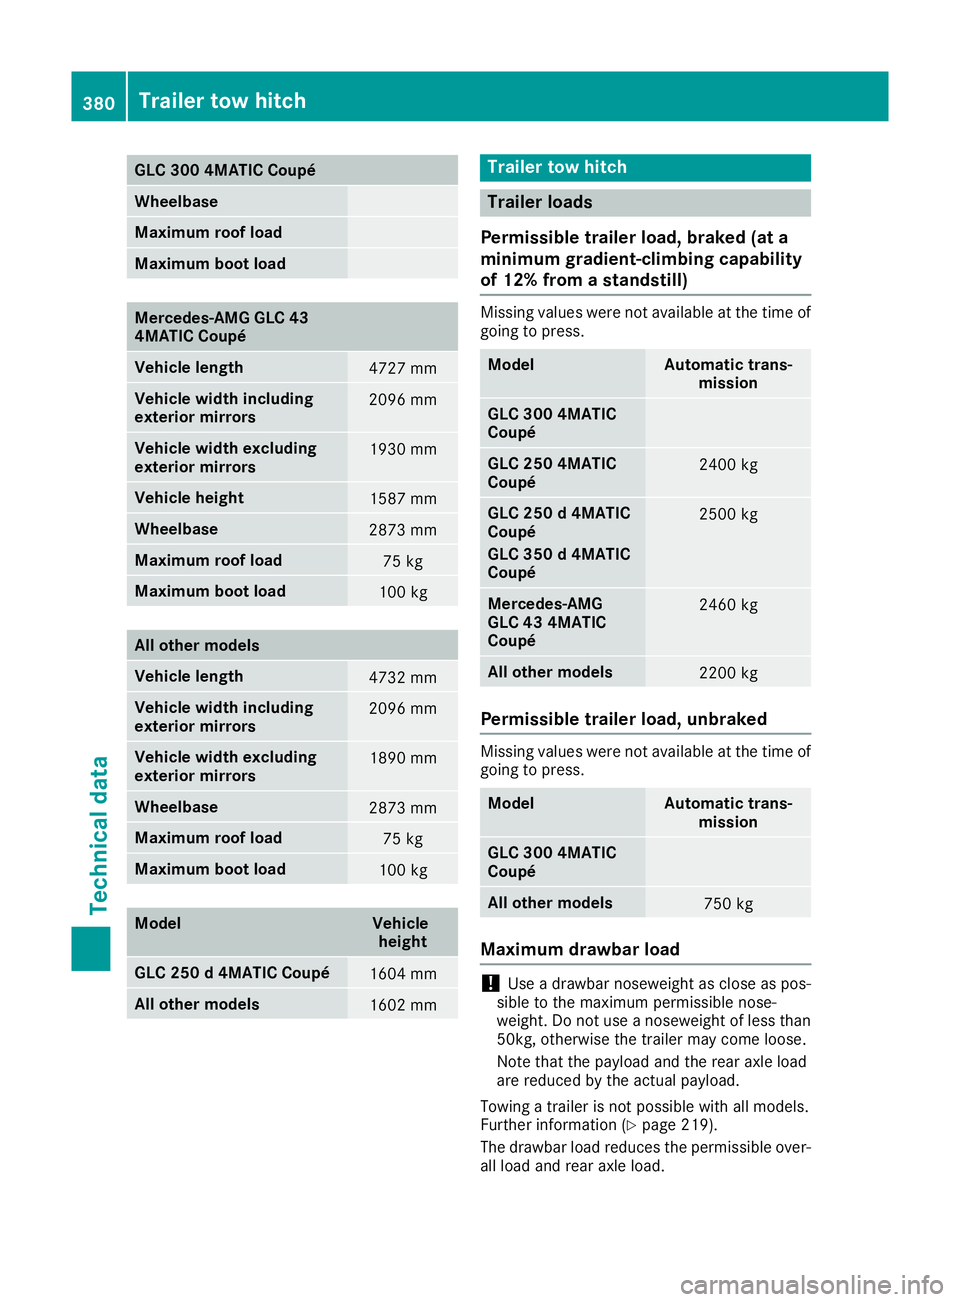
GLC 300 4MATIC Coupé
Wheelbase
Maximum roof load
Maximum boot load
Mercedes-AMG GLC 43
4MATIC Coupé
Vehicle length
4727 mm
Vehicle width including
exterior mirrors
2096 mm
Vehicle width excluding
exterior mirrors
1930 mm
Vehicle height
1587 mm
Wheelbase
2873 mm
Maximum roof load
75 kg
Maximum boot load
100 kg
All other models
Vehicle length
4732 mm
Vehicle width including
exterior mirrors
2096 mm
Vehicle width excluding
exterior mirrors
1890 mm
Wheelbase
2873 mm
Maximum roof load
75 kg
Maximum boot load
100 kg
Model Vehicle
height GLC 250 d 4MATIC Coupé
1604 mm
All other models
1602 mm Trailer tow hitch
Trailer loads
Permissible trailer load, braked (at a
minimum gradient-climbing capability
of 12% from a standstill) Missing values were not available at the time of
going to press. Model Automatic trans-
mission GLC 300 4MATIC
Coupé
GLC 250 4MATIC
Coupé
2400 kg
GLC 250 d 4MATIC
Coupé
GLC 350 d 4MATIC
Coupé
2500 kg
Mercedes-AMG
GLC 43 4MATIC
Coupé
2460 kg
All other models
2200 kg
Permissible trailer load, unbraked
Missing values were not available at the time of
going to press. Model Automatic trans-
mission GLC 300 4MATIC
Coupé
All other models
750 kg
Maximum drawbar load
!
Use a drawbar noseweight as close as pos-
sible to the maximum permissible nose-
weight. Do not use a noseweight of less than
50kg, otherwise the trailer may come loose.
Note that the payload and the rear axle load
are reduced by the actual payload.
Towing a trailer is not possible with all models.
Further information (Y page 219).
The drawbar load reduces the permissible over- all load and rear axle load. 380
Trailer tow hitchTechnical data