2016 MERCEDES-BENZ GLC COUPE clock
[x] Cancel search: clockPage 309 of 389
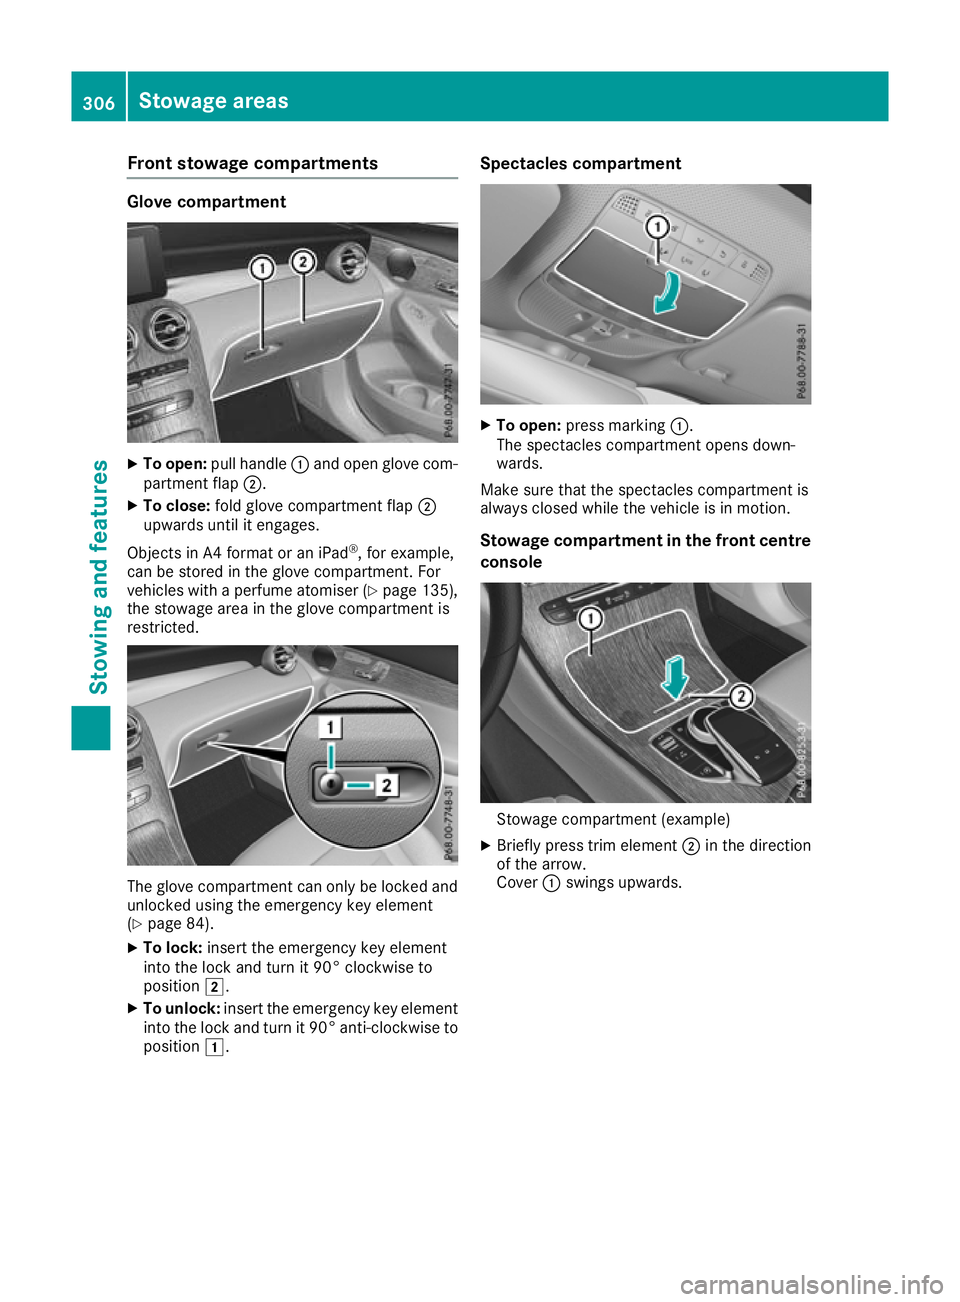
Front stowage compartments
Glove compartment
X
To open: pull handle :and open glove com-
partment flap ;.
X To close: fold glove compartment flap ;
upwards until it engages.
Objects in A4 format or an iPad ®
, for example,
can be stored in the glove compartment. For
vehicles with a perfume atomiser (Y page 135),
the stowage area in the glove compartment is
restricted. The glove compartment can only be locked and
unlocked using the emergency key element
(Y page 84).
X To lock: insert the emergency key element
into the lock and turn it 90° clockwise to
position 2.
X To unlock: insert the emergency key element
into the lock and turn it 90° anti-clockwise to
position 1. Spectacles compartment
X
To open: press marking :.
The spectacles compartment opens down-
wards.
Make sure that the spectacles compartment is
always closed while the vehicle is in motion.
Stowage compartment in the front centre
console Stowage compartment (example)
X Briefly press trim element ;in the direction
of the arrow.
Cover :swings upwards. 306
Stowage areasStowing and featu
res
Page 324 of 389
Problems with the 230 V power socket
Problem
Possible causes/consequences and
M
MSolutions The warning lamp on the
230 V power socket is
not lit. The on-board voltage is too low because the battery is too weak.
X Start the engine.
or X Charge the battery (Y page 347).
If the indicator lamp still does not light up: X Consult a qualified specialist workshop. The temperature of the DC/AC converter is temporarily too high.
X Remove the electronic device connector from the 230 V socket.
X Let the DC/AC converter cool down.
If the indicator lamp still does not light up after the converter cools
down:
X Consult a qualified specialist workshop. You have connected an electronic device that has a constant nominal
power of less than 150 watts, but has a very high switch-on current.
This device will not work. If you connect such a device, the 230 V
power socket will not supply it with power.
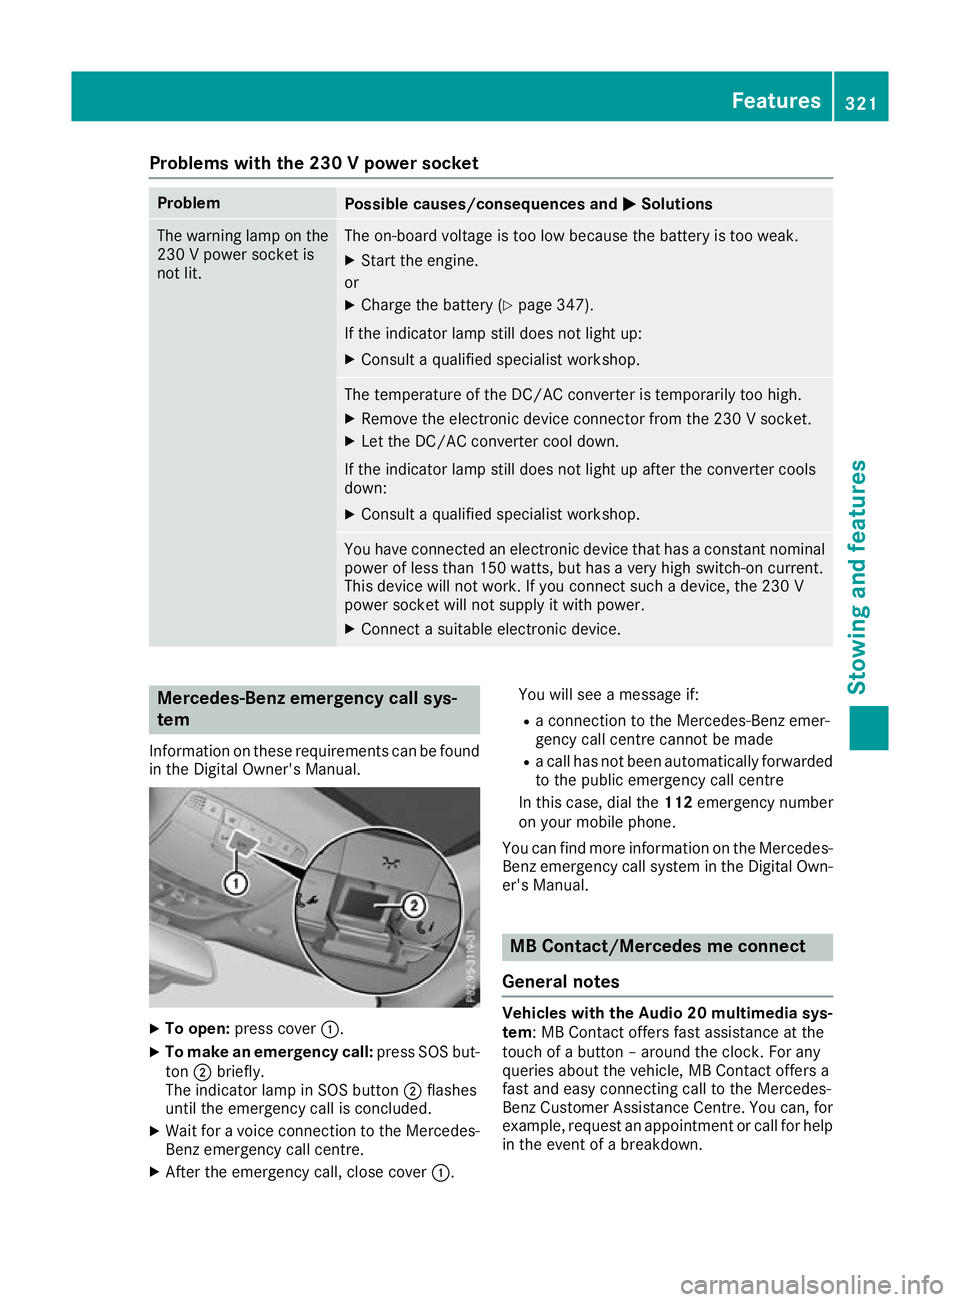
X Connect a suitable electronic device. Mercedes-Benz emergency call sys-
tem
Information on these requirements can be found in the Digital Owner's Manual. X
To open: press cover :.
X To make an emergency call: press SOS but-
ton ;briefly.
The indicator lamp in SOS button ;flashes
until the emergency call is concluded.
X Wait for a voice connection to the Mercedes-
Benz emergency call centre.
X After the emergency call, close cover :.You will see a message if:
R a connection to the Mercedes-Benz emer-
gency call centre cannot be made
R a call has not been automatically forwarded
to the public emergency call centre
In this case, dial the 112emergency number
on your mobile phone.
You can find more information on the Mercedes- Benz emergency call system in the Digital Own-
er's Manual. MB Contact/Mercedes me connect
General notes Vehicles with the Audio 20 multimedia sys-
tem: MB Contact offers fast assistance at the
touch of a button – around the clock. For any
queries about the vehicle, MB Contact offers a
fast and easy connecting call to the Mercedes-
Benz Customer Assistance Centre. You can, for
example, request an appointment or call for help in the event of a breakdown. Features
321Stowing and features Z
Page 325 of 389
Vehicles with the COMAND Online multime-
dia system: Mercedes me connect offers fast
assistance at the touch of a button – around the clock. For any queries about the vehicle,
Mercedes me connect offers a fast and easy
connecting call to the Mercedes-Benz CustomerAssistance Centre. You can, for example,
request an appointment or call for help in the
event of a breakdown.
The display of the multimedia system indicates
that a call is active. During the call, you can
change to the navigation menu by pressing the
Ø button on the multimedia system, for
example. Voice output is not available in this
case.
The Digital Owner's Manual contains further
information about:
R vehicles with the AUDIO 20 multimedia
system: MB Contact
R vehicles with the COMAND Online multi-
media system: Mercedes me connect
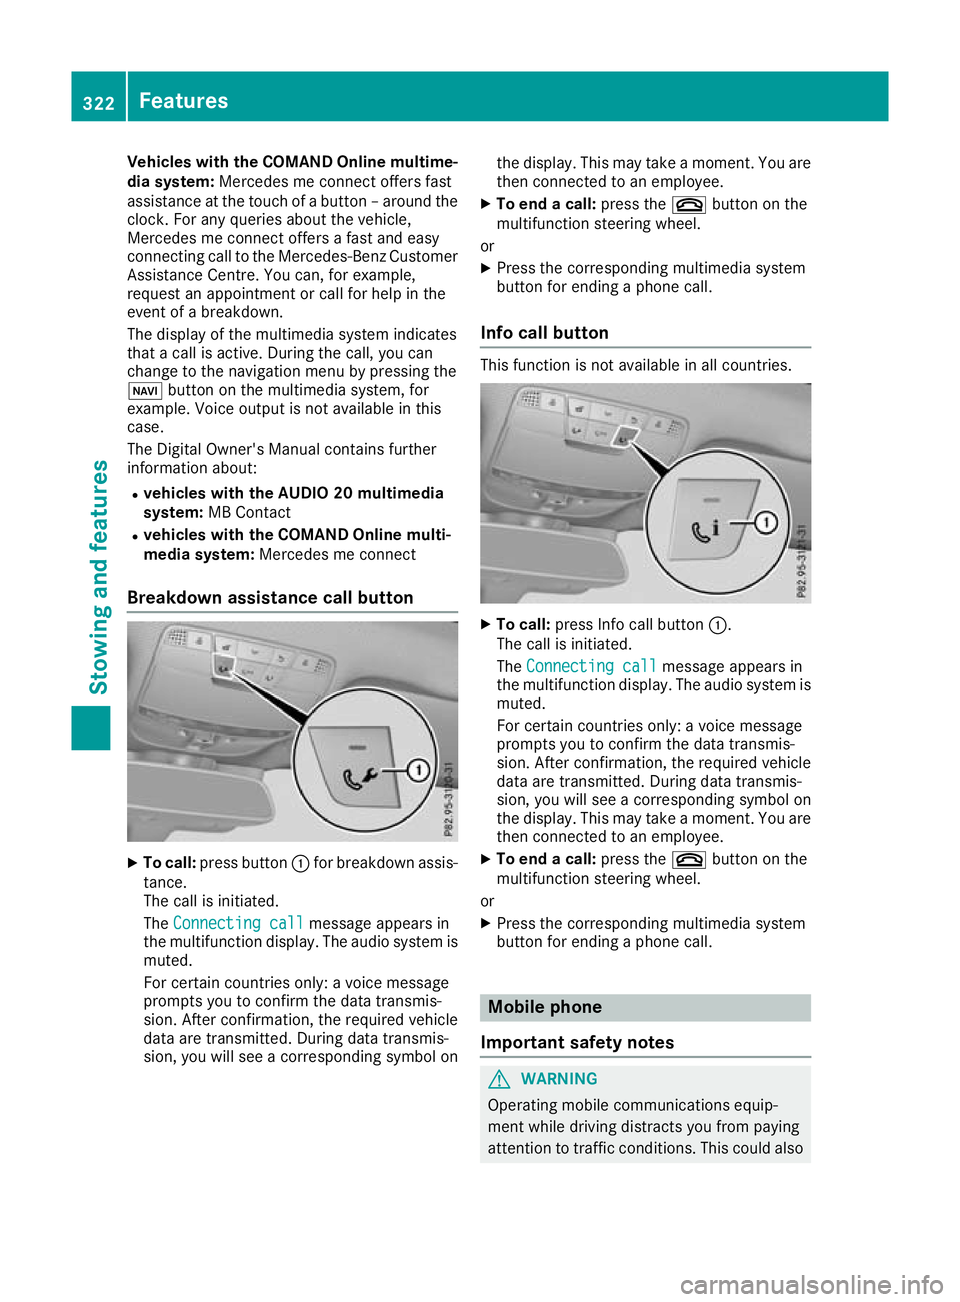
Breakdown assistance call button X
To call: press button :for breakdown assis-
tance.
The call is initiated.
The Connecting call
Connecting call message appears in
the multifunction display. The audio system is
muted.
For certain countries only: a voice message
prompts you to confirm the data transmis-
sion. After confirmation, the required vehicle
data are transmitted. During data transmis-
sion, you will see a corresponding symbol on the display. This may take a moment. You are
then connected to an employee.
X To end a call: press the~button on the
multifunction steering wheel.
or X Press the corresponding multimedia system
button for ending a phone call.
Info call button This function is not available in all countries.
X
To call: press Info call button :.
The call is initiated.
The Connecting call
Connecting call message appears in
the multifunction display. The audio system is muted.
For certain countries only: a voice message
prompts you to confirm the data transmis-
sion. After confirmation, the required vehicle
data are transmitted. During data transmis-
sion, you will see a corresponding symbol on
the display. This may take a moment. You are
then connected to an employee.
X To end a call: press the~button on the
multifunction steering wheel.
or
X Press the corresponding multimedia system
button for ending a phone call. Mobile phone
Important safety notes G
WARNING
Operating mobile communications equip-
ment while driving distracts you from paying
attention to traffic conditions. This could also 322
FeaturesStowing and features
Page 331 of 389
X
Slowly slide oil dipstick :into the guide tube
to the stop and take it out again after approx- imately three seconds.
If the level is between MIN mark =and MAX
mark ;, the oil level is correct.
X If the oil level has dropped to MIN mark =or
below, top up with 1.0 lof engine oil.
Topping up engine oil H
Environmental note
When topping up the oil, take care not to spill any. If oil enters the soil or waterways, it is
harmful to the environment.
! Use only engine oils and oil filters that are
approved for vehicles with a service system. A list of the engine oils and oil filters that have
been tested and approved in accordance with
Mercedes-Benz Specifications for Service
Products is available at any Mercedes-Benz
Service Centre.
The following cause engine failure or damage
to the exhaust system:
R Use of engine oils and oil filters that have
not been expressly approved for the service system
R Replacement of engine oil and oil filter after
the replacement interval specified by the
service system has expired
R Use of engine oil additives
! Do not add too much oil. Topping up with too
much engine oil can result in damage to the
engine or to the catalytic converter. Have
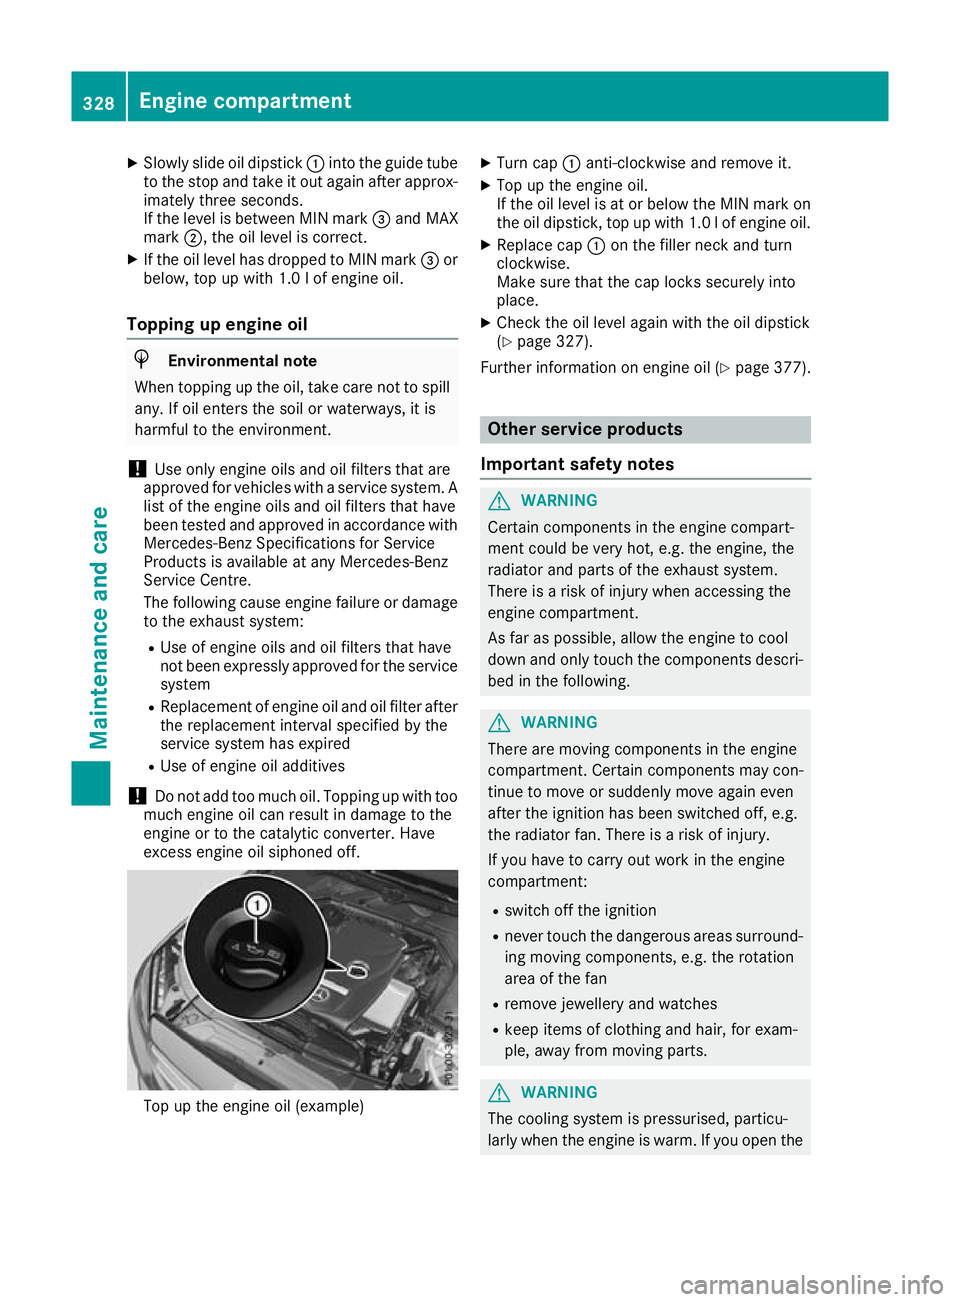
excess engine oil siphoned off. Top up the engine oil (example) X
Turn cap :anti-clockwise and remove it.
X Top up the engine oil.
If the oil level is at or below the MIN mark on
the oil dipstick, top up with 1.0 l of engine oil.
X Replace cap :on the filler neck and turn
clockwise.
Make sure that the cap locks securely into
place.
X Check the oil level again with the oil dipstick
(Y page 327).
Further information on engine oil (Y page 377). Other service products
Important safety notes G
WARNING
Certain components in the engine compart-
ment could be very hot, e.g. the engine, the
radiator and parts of the exhaust system.
There is a risk of injury when accessing the
engine compartment.
As far as possible, allow the engine to cool
down and only touch the components descri- bed in the following. G
WARNING
There are moving components in the engine
compartment. Certain components may con-
tinue to move or suddenly move again even
after the ignition has been switched off, e.g.
the radiator fan. There is a risk of injury.
If you have to carry out work in the engine
compartment:
R switch off the ignition
R never touch the dangerous areas surround-
ing moving components, e.g. the rotation
area of the fan
R remove jewellery and watches
R keep items of clothing and hair, for exam-
ple, away from moving parts. G
WARNING
The cooling system is pressurised, particu-
larly when the engine is warm. If you open the 328
Engine compartmentMaintenance and care
Page 332 of 389
cap, you could be scalded if hot coolant
sprays out. There is a risk of injury.
Let the engine cool down before you open the cap. Wear gloves and eye protection. Open
the cap slowly to release the pressure. G
WARNING
If you open the bonnet while the engine is
overheating or while there is a fire in the
engine compartment, you could come into
contact with hot gases or other leaking ser-
vice products. There is a danger of injury.
Allow an overheating engine to cool down
before opening the bonnet. If there is a fire in the engine compartment, leave the bonnet
closed and notify the fire brigade.
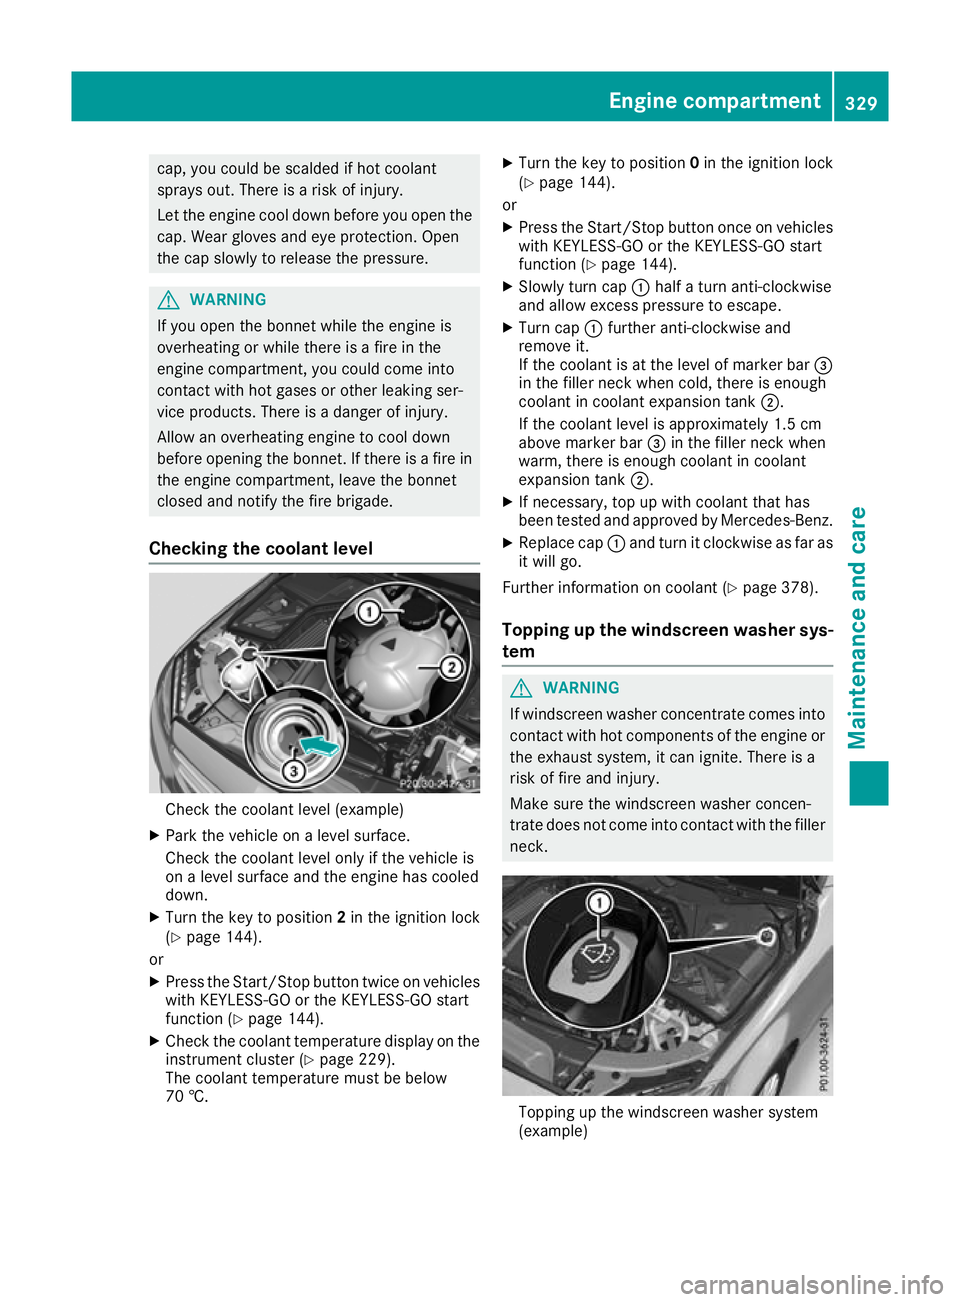
Checking the coolant level Check the coolant level (example)
X Park the vehicle on a level surface.
Check the coolant level only if the vehicle is
on a level surface and the engine has cooled
down.
X Turn the key to position 2in the ignition lock
(Y page 144).
or
X Press the Start/Stop button twice on vehicles
with KEYLESS-GO or the KEYLESS-GO start
function (Y page 144).
X Check the coolant temperature display on the
instrument cluster (Y page 229).
The coolant temperature must be below
70 †. X
Turn the key to position 0in the ignition lock
(Y page 144).
or X Press the Start/Stop button once on vehicles
with KEYLESS-GO or the KEYLESS-GO start
function (Y page 144).
X Slowly turn cap :half a turn anti-clockwise
and allow excess pressure to escape.
X Turn cap :further anti-clockwise and
remove it.
If the coolant is at the level of marker bar =
in the filler neck when cold, there is enough
coolant in coolant expansion tank ;.
If the coolant level is approximately 1.5 cm
above marker bar =in the filler neck when
warm, there is enough coolant in coolant
expansion tank ;.
X If necessary, top up with coolant that has
been tested and approved by Mercedes-Benz.
X Replace cap :and turn it clockwise as far as
it will go.
Further information on coolant (Y page 378).
Topping up the windscreen washer sys-
tem G
WARNING
If windscreen washer concentrate comes into contact with hot components of the engine or
the exhaust system, it can ignite. There is a
risk of fire and injury.
Make sure the windscreen washer concen-
trate does not come into contact with the filler neck. Topping up the windscreen washer system
(example) Engine compartment
329Maintenance and care Z
Page 355 of 389
The battery must be connected and charged.
Otherwise, you:
R cannot turn the key to position 2in the igni-
tion lock
R cannot release the electric parking brake
R cannot shift the automatic transmission to
position N
Deactivate the automatic locking feature before towing the vehicle (Y page 89). You could oth-
erwise be locked out when pushing or towing
the vehicle.
Deactivate tow-away protection before the vehi-
cle is towed away (Y page 80).Fitting/removing the towing eye
Fitting the towing eye G
WARNING
The exhaust tail pipe may be extremely hot.
There is a risk of burning when removing the
rear cover.
Do not touch the exhaust tail pipe. Use
extreme caution when removing the rear
cover. Mercedes-AMG vehicles All other vehicles
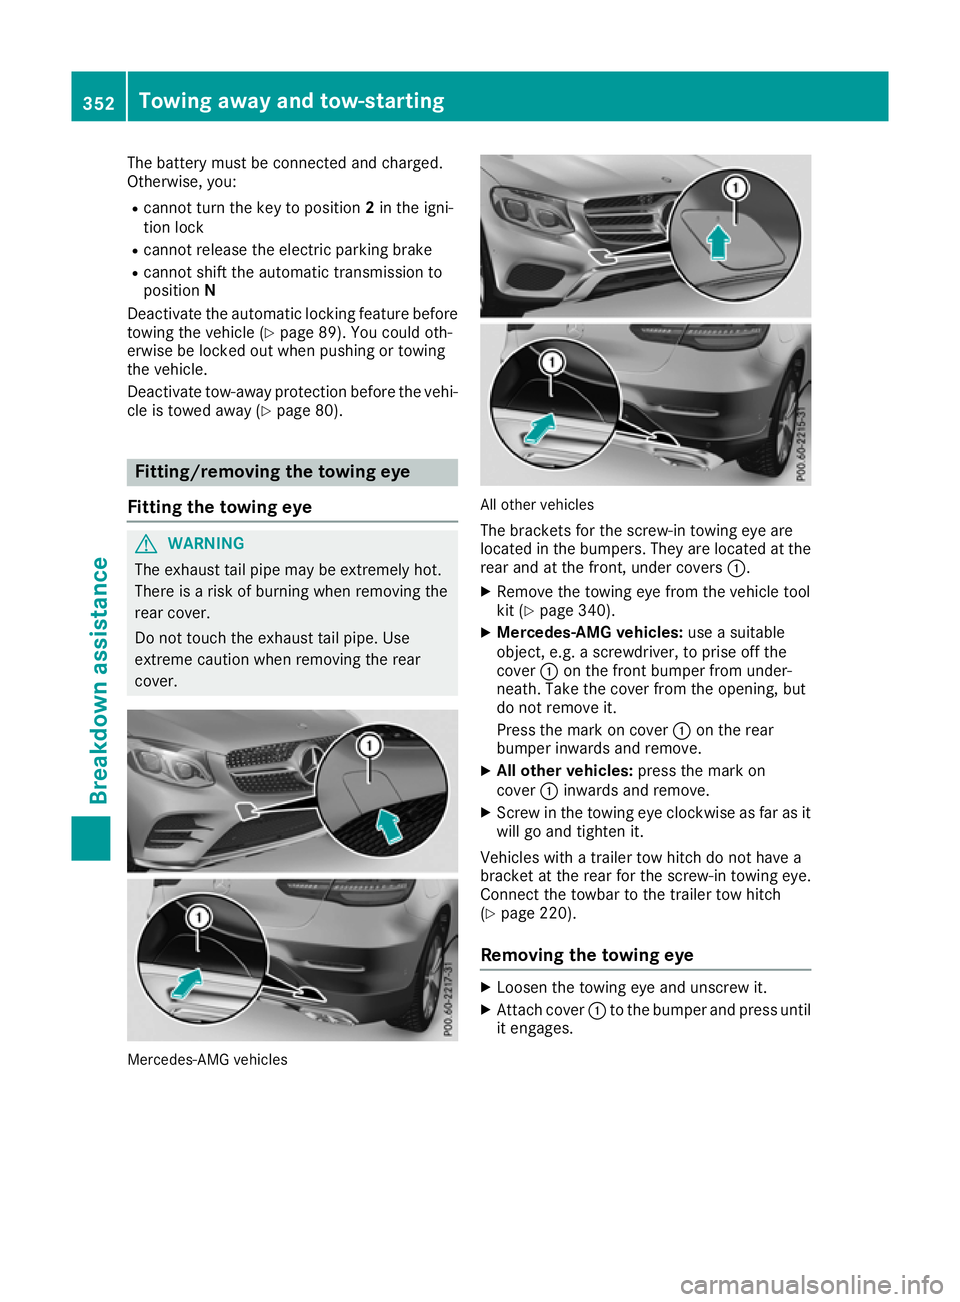
The brackets for the screw-in towing eye are
located in the bumpers. They are located at therear and at the front, under covers :.
X Remove the towing eye from the vehicle tool
kit (Y page 340).
X Mercedes-AMG vehicles: use a suitable
object, e.g. a screwdriver, to prise off the
cover :on the front bumper from under-
neath. Take the cover from the opening, but
do not remove it.
Press the mark on cover :on the rear
bumper inwards and remove.
X All other vehicles: press the mark on
cover :inwards and remove.
X Screw in the towing eye clockwise as far as it
will go and tighten it.
Vehicles with a trailer tow hitch do not have a
bracket at the rear for the screw-in towing eye.
Connect the towbar to the trailer tow hitch
(Y page 220).
Removing the towing eye X
Loosen the towing eye and unscrew it.
X Attach cover :to the bumper and press until
it engages. 352
Towing away and tow-startingBreakdown assistance
Page 358 of 389
Fuse box in the engine compartment
G
WARNING
When the bonnet is open, and the windscreen wipers are set in motion, you can be injured by
the wiper linkage. There is a risk of injury.
Always switch off the windscreen wipers and
the ignition before opening the bonnet. X
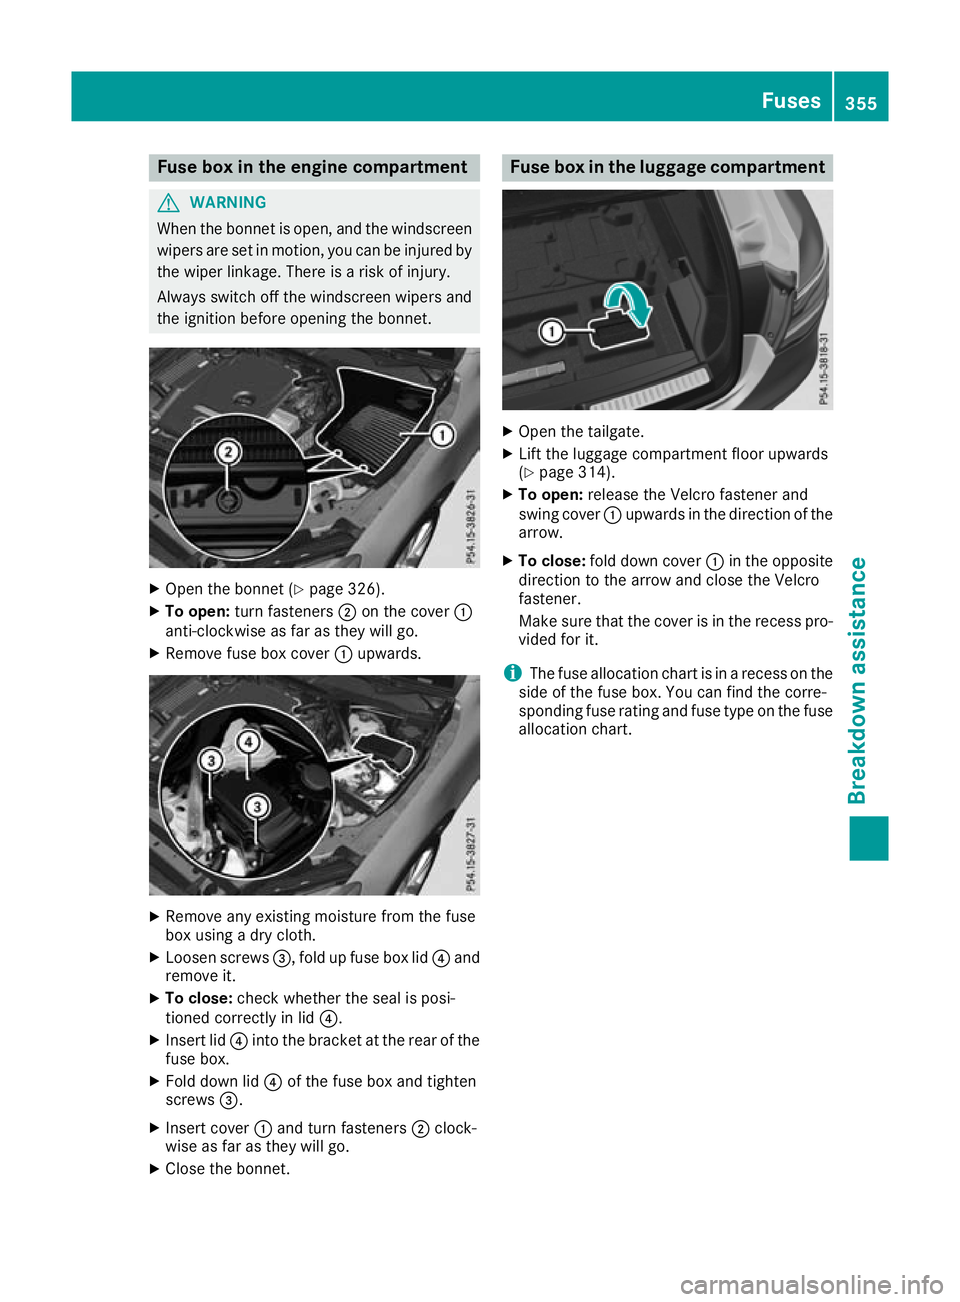
Open the bonnet (Y page 326).
X To open: turn fasteners ;on the cover :
anti-clockwise as far as they will go.
X Remove fuse box cover :upwards. X
Remove any existing moisture from the fuse
box using a dry cloth.
X Loosen screws =, fold up fuse box lid ?and
remove it.
X To close: check whether the seal is posi-
tioned correctly in lid ?.
X Insert lid ?into the bracket at the rear of the
fuse box.
X Fold down lid ?of the fuse box and tighten
screws =.
X Insert cover :and turn fasteners ;clock-
wise as far as they will go.
X Close the bonnet. Fuse box in the luggage compartment
X
Open the tailgate.
X Lift the luggage compartment floor upwards
(Y page 314).
X To open: release the Velcro fastener and
swing cover :upwards in the direction of the
arrow.
X To close: fold down cover :in the opposite
direction to the arrow and close the Velcro
fastener.
Make sure that the cover is in the recess pro-
vided for it.
i The fuse allocation chart is in a recess on the
side of the fuse box. You can find the corre-
sponding fuse rating and fuse type on the fuse
allocation chart. Fuses
355Breakdown assistance Z