2016 MERCEDES-BENZ GLC-Class steering wheel
[x] Cancel search: steering wheelPage 254 of 418

The assistance graphic displays the status
of and information from the following driv-
ing systems or driving safety systems:
RDISTRONIC PLUS (Ypage 183)
RTraffic Sign Assist (Ypage 216)
RDistance warning and the autonomous
braking function COLLISION PREVEN-
TION ASSIST PLUS (
Ypage 70)
RPRE-SAFE®Brake (Ypage 75)
RBlind Spot Assist (Ypage 217) or Active
Blind Spot Assist (
Ypage 222)
RATTENTION ASSIST (Ypage 214)
RLane Keeping Assist (Ypage 220) or
Active Lane Keeping Assist
(
Ypage 225)
RRear window wiper (Ypage 135)
XPress :to display the ATTEN-
TION ASSIST assessment.
Service menu
Introduction
Depending on the equipment installed in the
vehicle, you have the following options in the
Service
menu:
RCalling up display messages in message
memory (
Ypage 257)
RChecking the tire pressure electronically
(
Ypage 383)
RCalling up the service due date
(
Ypage 343)
Settings menu
Introduction
Depending on the equipment installed in the
vehicle, you have the following options in the
Settings
menu:
RChanging assistance settings
(
Ypage 252)
RChanging head-up display settings
(
Ypage 254)
RChanging the light settings (Ypage 255)
RChanging the instrument cluster settings
(
Ypage 255)
RRestoring the factory settings
(
Ypage 256)
Assistance submenu
Activating/deactivating COLLISION PRE-
VENTION ASSIST PLUS
XPress the òbutton on the steering
wheel to open the menu list.
XPress the :or9 button on the steer-
ing wheel to select the Settings
menu.
XConfirm by pressingaon the steering
wheel.
XUse : or9 to select the DriveAs‐
sistsubmenu.
XPressato confirm.
XPress 9or: to select Collision
Prevention.
252Menus and submenus
On-board computer and displays
Page 255 of 418

XPressato confirm.
The current selection appears.
XTo activate/deactivate: press thea
button again.
When COLLISION PREVENTION ASSIST
PLUS is deactivated, the æsymbol
appears in the multifunction display in the
Assistance Graphic
menu.
For further information about COLLISION
PREVENTION ASSIST PLUS, see (
Ypage 70).
Activating/deactivating PRE-SAFE
®
Brake
PRE ‑SAFE
®Brake is only available for vehi-
cles with the Driving Assistance package.
XPress the òbutton on the steering
wheel to open the menu list.
XPress the :or9 button on the steer-
ing wheel to select the Settings
menu.
XConfirm by pressingaon the steering
wheel.
XUse : or9 to select the DriveAs‐
sistsubmenu.
XPressato confirm.
XPress :or9 to select PRE-SAFE
Brake.
XPressato confirm.
The current selection appears.
XTo activate/deactivate: press thea
button again.
When PRE-SAFE
®Brake is deactivated, the
æ symbol appears in the multifunction
display in the Assistance
Graphicmenu.
For more information on PRE ‑SAFE
®Brake,
see (
Ypage 75).
Activating/deactivating Blind Spot Assist
XPress the òbutton on the steering
wheel to open the menu list.
XPress the :or9 button on the steer-
ing wheel to select the Settings
menu.
XConfirm by pressingaon the steering
wheel.
XUse : or9 to select the DriveAs‐
sistsubmenu.
XPressato confirm.
XPress :or9 to select BlindSpot
Assist.
XPressato confirm.
The current selection appears.
XTo activate/deactivate: press thea
button again.
For further information about Blind Spot
Assist, see (
Ypage 217).
For further information about Active Blind
Spot Assist, see (
Ypage 222).
Setting ATTENTION ASSIST
XPress the òbutton on the steering
wheel to open the menu list.
XPress the :or9 button on the steer-
ing wheel to select the Settings
menu.
XConfirm by pressingaon the steering
wheel.
XUse : or9 to select the DriveAs‐
sistsubmenu.
XPressato confirm.
XPress :or9 to select ATTENTION
ASSIST.
XPressato confirm.
XPress :or9 to select Off,Stand‐
ardor Sensitive.
XPress the abutton to confirm the selec-
tion.
When ATTENTION ASSIST is deactivated,
the é symbol appears in the Assis‐
tance Graphicmenu in the multifunction
display.
For further information about ATTENTION
ASSIST, see (
Ypage 214).
Setting Lane Keeping Assist
XPress the òbutton on the steering
wheel to open the menu list.
XPress the :or9 button on the steer-
ing wheel to select the Settings
menu.
Menus and submenus253
On-board computer and displays
Z
Page 256 of 418
XConfirmbypressing aon the steering
wheel.
XUse : or9 to select the DriveAs‐
sistsubmenu.
XPressato confirm.
XPress :or9 to select Lane Keep‐
ing Assist.
XPressato confirm.
The current selection, Standard
orAdap‐
tive, appears.
XTo change the setting: pressaagain.
For further information about Lane Keeping
Assist, see (
Ypage 220).
For further information about Active Lane
Keepin g Assist, see (
Ypage 225).
Head-up display submenu
Selecting other displays
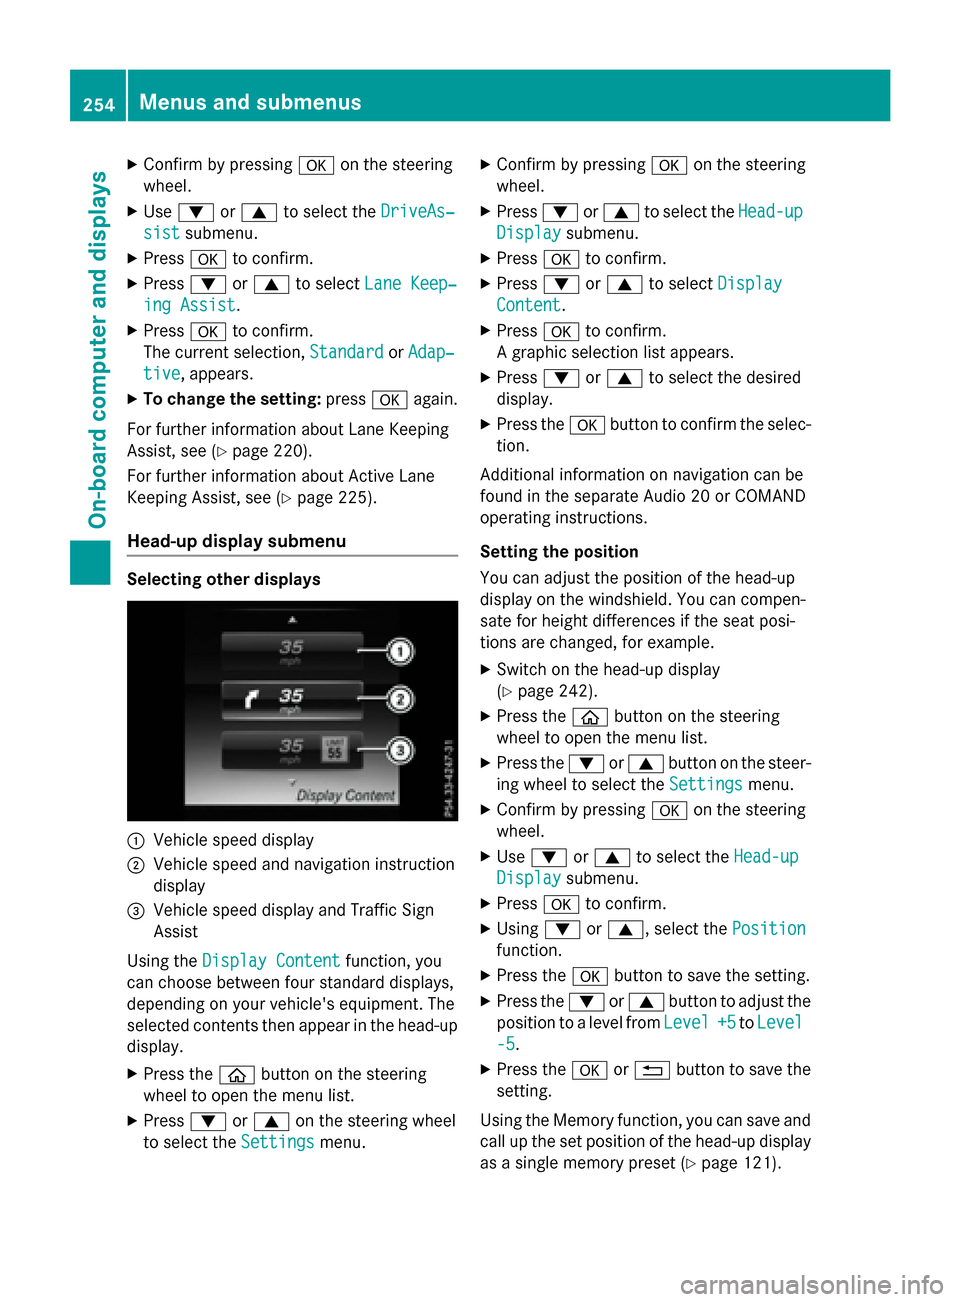
:Vehicle speed display
;Vehiclespeed and navigation instruction
disp lay
=Vehicle speed display and Traffic Sign
Assist
Using the Display Content
function, you
can choose between four standard displays,
depe nding on your vehicle's equipment. The
selected contents then appear inthe head-up
disp lay.
XPress the òbutton on the steering
wheel to open the menu list.
XPress :or9 on the steering wheel
to select the Settings
menu.
XConfirmbypressing aon the steering
wheel.
XPress :or9 to select the Head-up
Displaysubmenu.
XPressato confirm.
XPress :or9 to select Display
Content.
XPressato confirm.
A graphic selection listappears.
XPress :or9 to select the desired
display.
XPress the abutton to confirm the selec-
tion.
Ad ditional information on navigation can be
found inthe separate Aud io20 or COMAND
operating instructions.
Setting the positi on
You can adjust the position of the head-up
display on the windshield. You can compen-
sate for height differences ifthe seat posi-
tions are changed, for example.
XSwit ch on the head-up display
(
Ypage 242).
XPress the òbutton on the steering
wheel to open the menu list.
XPress the :or9 button on the steer-
ing wheel to select the Settings
menu.
XConfirmbypressing aon the steering
wheel.
XUse : or9 to select the Head-up
Displaysubmenu.
XPressato confirm.
XUsing :or9, select the Position
function.
XPress theabutton to save the setting.
XPress the :or9 button to adjust the
position to a level from Level
+5toLevel
-5.
XPress the aor% button to save the
setting.
Using the Memory function, you can save and
call up the set position of the head-up display
as a single memory preset (
Ypage 121).
254Menus and submenus
On-board computer and displays
Page 257 of 418
Setting the brightness
The brightness of the head-up display is auto-
matically adjusted to the surrounding ambi-
ent light. You can also individually adjust the
brightness of the head-up display.
XSwitch on the head-up display
(
Ypage 242).
XPress theòbutton on the steering
wheel to open the menu list.
XPress the :or9 button on the steer-
ing wheel to select the Settings
menu.
XConfirm by pressingaon the steering
wheel.
XUse : or9 to select the Head-up
Displaysubmenu.
XPressato confirm.
XUsing :or9, select the Bright‐
nessfunction.
XPress theabutton to save the setting.
XPress the :or9 button to adjust the
brightness to a level from Level
+5(bright)
to Level -5
(dark).
XPress the aor% button to save the
setting.
Light submenu
Switching the daytime running lamps on/
off
This function is not available in Canada.
XPress the òbutton on the steering
wheel to open the menu list.
XPress the :or9 button on the steer-
ing wheel to select the Settings
menu.
XConfirm by pressingaon the steering
wheel.
XUse : or9 to select the Lights
submenu.
XPressato confirm.
XPress the :or9 button to select the
Daytime Running Lights
function.
If the Daytime Running Lights
function
has been switched on, the cone of light and the
W symbol in the multifunction dis-
play are shown in white.
XPress the abutton to save the setting.
Further information on daytime running
lamps Daytime Running Lights
(Ypage 124).
Instrument cluster submenu
Selecting the distance unit
TheDisplay
UnitSpeed-/Odometerfunc-
tion allows you to choose whether certain
displays appear in kilometers or miles in the
multifunction display.
XPress the òbutton on the steering
wheel to open the menu list.
XPress the :or9 button on the steer-
ing wheel to select the Settings
menu.
XConfirm by pressingaon the steering
wheel.
XUse : or9 to select the Instru‐
ment Clustersubmenu.
XPressato confirm.
XPress :or9 to select the Display
Unit Speed-/Odometerfunction.
The current setting km
orMilesappears.
XPress the abutton to save the setting.
The selected unit of measurement for dis-
tance applies to:
RDigital speedometer in the Tripmenu
ROdometer and the trip odometer
RTrip computer
RCurrent consumption and the range
RNavigation instructions in the Navimenu
RCruise Control
RDISTRONIC PLUS with Steering Assist and
Stop&Go Pilot
RASSYST PLUS service interval display
Switching the additional speedometer
on/off
The Additional Speedometer [km/h]
function allows you to choose whether the
status area in the multifunction display shows
Menus and submenus255
On-board computer and displays
Z
Page 258 of 418

the speed digitally. The unit in the additional
speedometer is always inverse to the speed-
ometer unit.
XPress theòbutton on the steering
wheel to open the menu list.
XPress :or9 on the steering wheel
to select the Settings
menu.
XConfirm by pressing aon the steering
wheel.
XPress :or9 to select the Instru‐
ment Clustersubmenu.
XPressato confirm.
XUsing :or9, select the Addi‐
tional Speedometer [km/h]function.
The current selection appears.
XTo activate/deactivate: press thea
button again.
Restoring the factory settings
XPress the òbutton on the steering
wheel to open the menu list.
XPress the :or9 button on the steer-
ing wheel to select the Settings
menu.
XConfirm by pressingaon the steering
wheel.
XUse : or9 to select the Factory
Settingssubmenu.
XPressato confirm.
The Reset All Settings?
function
appears.
XPress :or9 to select NoorYes.
XPress ato confirm the selection.
If you have selected Yes
, the multifunction
display shows a confirmation message.
For safety reasons, the Daytime Running
Lightsfunction in theLightssubmenu is
only reset when the vehicle is stationary.
256Menus and submenus
On-board computer and displays
Page 260 of 418

Safety systems
Display messagesPossible causes/consequences andMSolutions
!÷
Currently Unavail‐
able See Opera‐
tor's Manual
ABS (Anti-lock Brake System), ESP®(Electronic Stability Program),
BAS (Brake Assist), PRE‑ SAFE®, HOLD function, Crosswind Assist,
hill start assist, STEER CONTROL, Active Lane Keeping Assist and
Active Blind Spot Assist are temporarily unavailable.
BAS PLUS with Cross-Traffic Assist, PRE‑SAFE
®Brake, PRE‑ SAFE®
PLUS and COLLISION PREVENTION ASSIST PLUS may also have
failed.
In addition, the ÷and! warning lamps light up in the
instrument cluster.
ATTENTION ASSIST is deactivated.
For example, the on-board voltage may be insufficient.
GWARNING
The brake system continues to function normally, but without the
functions listed above. The wheels could therefore lock if you
brake hard, for example.
The steerability and braking characteristics may be severely affec-
ted. The braking distance in an emergency braking situation can
increase.
If ESP
®is not operational, ESP®is unable to stabilize the vehicle.
There is an increased risk of skidding and an accident.
XDrive on carefully.
Carefully drive a suitable distance, making slight steering move-
ments at a speed above 12 mph (20 km/h).
If the display message disappears, the functions mentioned
above are available again.
If the multifunction display still shows the display message:
XDrive on carefully.
XVisit a qualified specialist workshop immediately.
!÷
Inoperative See
Operator's Manual
ABS, ESP®, BAS, PRE‑SAFE®, HOLD function, Crosswind Assist,
hill start assist, STEER CONTROL, Active Lane Keeping Assist and Active Blind Spot Assist are unavailable due to a malfunction.
BAS PLUS with Cross-Traffic Assist, PRE‑ SAFE
®Brake, PRE‑SAFE®
PLUS and COLLISION PREVENTION ASSIST PLUS may also have
failed.
The$ (USA only) or J(Canada only), ÷and! warn-
ing lamps in the instrument cluster may also light up.
ATTENTION ASSIST is deactivated.
GWARNING
258Display messages
On-board computer and displays
Page 287 of 418

Tires
Display messagesPossible causes/consequences andMSolutions
Please Correct
Tire Pressure
The tire pressure is too low in at least one of the tires, or the tire
pressure difference between the wheels is too great.
XCheck the tire pressures at the next opportunity (Ypage 381).
XIf necessary, correct the tire pressure.
XRestart the tire pressure monitor (Ypage 383).
Check TiresThe tire pressure in one or more tires has dropped significantly.
The wheel position is displayed in the multifunction display.
A warning tone also sounds.
GWARNING
Tire pressures that are too low pose the following hazards:
Rthey may burst, especially as the load and vehicle speed
increase.
Rthey may wear excessively and/or unevenly, which may greatly
impair tire traction.
Rthe driving characteristics, as well as steering and braking, may
be greatly impaired.
There is a risk of an accident.
XStop the vehicle without making any sudden steering or braking
maneuvers. Pay attention to the traffic conditions as you do so.
XSecure the vehicle against rolling away (Ypage 172).
XCheck the tires and, if necessary, follow the instructions for a
flat tire (
Ypage 356).
XCheck the tire pressure (Ypage 381).
XIf necessary, correct the tire pressure.
Displa y messages285
On-board computer and displays
Z
Page 292 of 418

SmartKey
Display messagesPossible causes/consequences andMSolutions
Â
Key Does Not
Belong to Vehicle
You have put the wrong SmartKey in the ignition lock.
XUse the correct SmartKey.
Â
TakeYourKeyfrom
Ignition
The SmartKey is in the ignition lock.
XRemove the SmartKey.
Â
Obtain a New Key
The SmartKey needs to be replaced.
XVisit a qualified specialist workshop.
Â
ReplaceKeyBattery
The SmartKey battery is discharged.
XChange the batteries (Ypage 86).
Â
Don't Forget Your
Key
The SmartKey is not in the ignition lock. You have opened the
driver's door with the engine switched off.
This display message is displayed for a maximum of 60 seconds
and is simply a reminder.
XTake the SmartKey with you when you leave the vehicle.
Â
Key Not Detected
(white display mes-
sage)
The SmartKey is currently undetected.
XChange the location of the SmartKey in the vehicle.
If the SmartKey still cannot be detected:
XInsert the SmartKey into the ignition lock and turn it to the
desired position.
Â
Key Not Detected
(red display message)
The SmartKey is not in the vehicle.
A warning tone also sounds.
If the engine is switched off, you can no longer lock the vehicle
centrally or start the engine.
XPull over and stop the vehicle safely as soon as possible, paying
attention to road and traffic conditions.
XSecure the vehicle against rolling away (Ypage 172).
XLocate the SmartKey.
XPress aon the steering wheel to confirm the display mes-
sage.
290Display messages
On-board computer and displays