2016 MERCEDES-BENZ GLC-Class height
[x] Cancel search: heightPage 113 of 418

=Seat cushion length
?Seat cushion angle
ASeat fore-and-aft adjustment
Adjusting the head restraints
Important safety notes
GWARNING
You could lose control of your vehicle if you do the following while driving:
Radjust the driver's seat, head restraint,
steering wheel or mirrors
Rfasten the seat belt
There is a risk of an accident.
Adjust the driver's seat, head restraint, steer-
ing wheel and mirror and fasten your seat belt before starting the engine.
GWARNING
If the head restraints are not installed or not
adjusted correctly, they cannot provide pro-
tection as intended. There is an increased risk
of injury in the head and neck area, e.g. in the event of an accident or when braking.
Always drive with the head restraints instal-
led. Before driving off, make sure for every
vehicle occupant that the center of the head
restraint supports the back of the head at
about eye level.
General notes
Pay attention to the important safety notes
(
Ypage 109).
Do not rotate the head restraints of the front
and rear seats. Otherwise, you cannot adjust
the height and angle of the head restraints to
the correct position.
Adjusting the head restraint height
manually
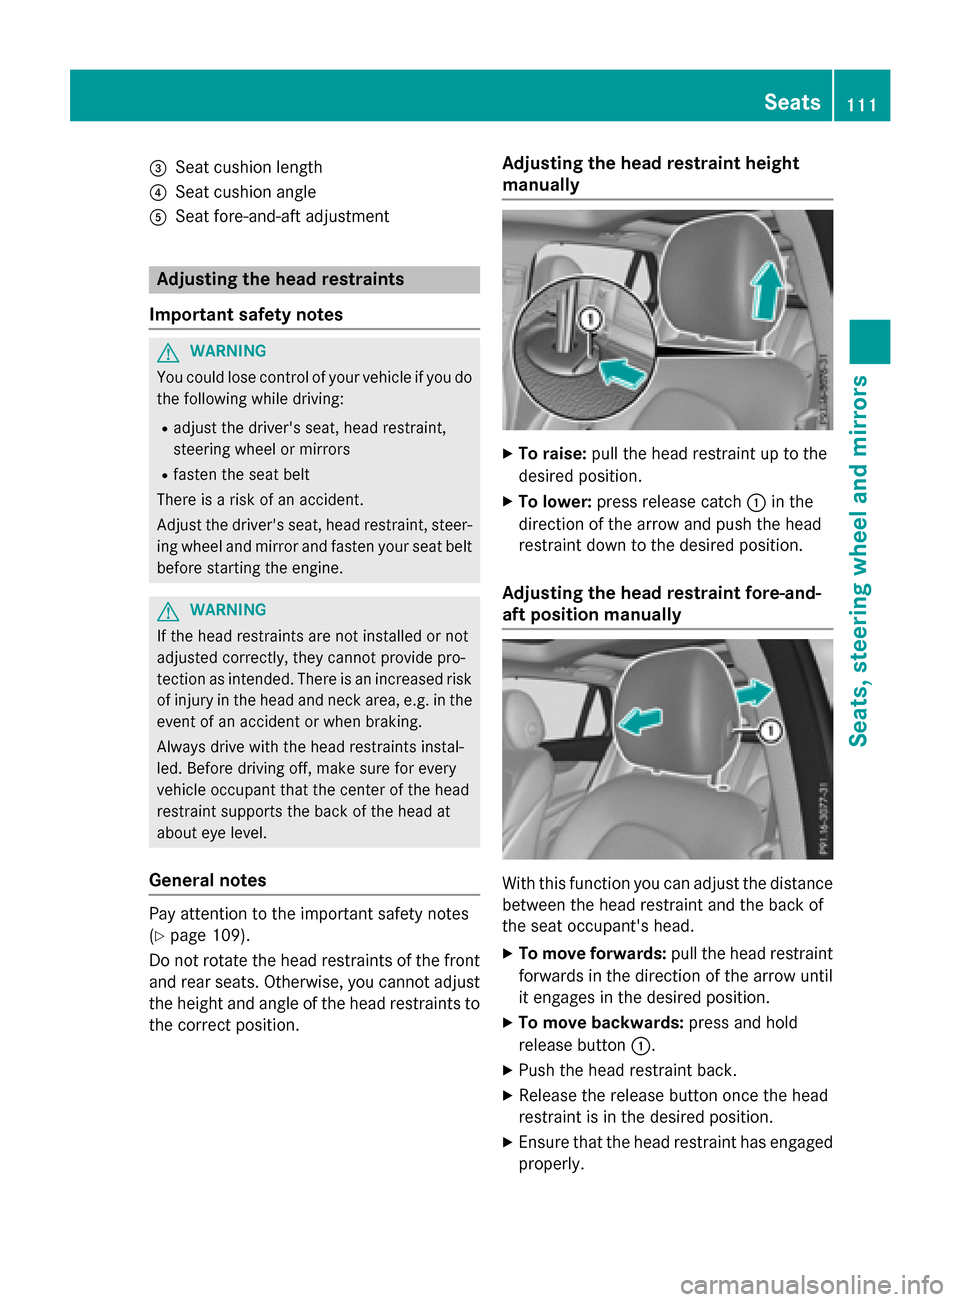
XTo raise: pull the head restraint up to the
desired position.
XTo lower: press release catch :in the
direction of the arrow and push the head
restraint down to the desired position.
Adjusting the head restraint fore-and-
aft position manually
With this function you can adjust the distance
between the head restraint and the back of
the seat occupant's head.
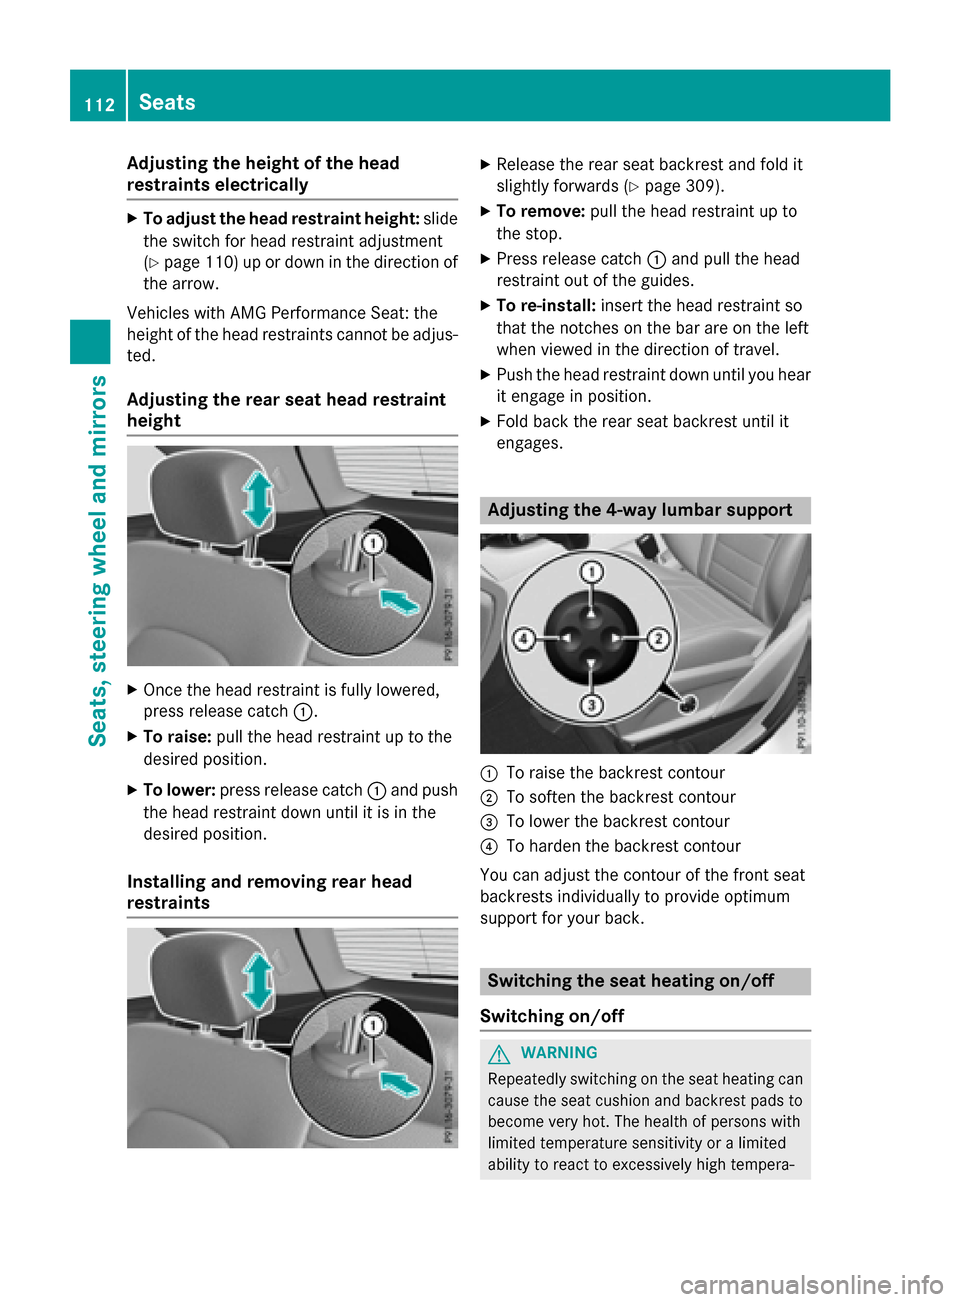
XTo move forwards: pull the head restraint
forwards in the direction of the arrow until
it engages in the desired position.
XTo move backwards: press and hold
release button :.
XPush the head restraint back.
XRelease the release button once the head
restraint is in the desired position.
XEnsure that the head restraint has engaged
properly.
Seats111
Seats, steering wheel and mirrors
Z
Page 114 of 418

Adjusting the heightofthe head
restraints electri cally
XTo adjust thehea drestrain theight :slide
th eswitch for head restrain tadjustmen t
(
Ypage 110) up or down in th edirection of
th earrow.
Vehicles wit hAM GPerformance Seat: th e
height of th ehead restraints canno tbe adjus-
ted.
Adjusting the rear seat head restraint
height
XOnce th ehead restrain tis fully lowered,
press release catch :.
XTo raise:pull thehead restrain tup to th e
desired position .
XTo lower:press release catch :and push
th ehead restrain tdown until it is in th e
desired position .
Installing and removing rear head
restraints
XReleaseth erear seat backr estand fol dit
slightly forwards (
Ypage 309).
XTo remove:pull thehead restrain tup to
th e stop.
XPress release catch :and pull th ehead
restrain tout of th eguide s.
XTo re-install :insert th ehead restrain t so
that th enotches on th ebar are on th elef t
when viewed in th edirection of travel .
XPush thehead restrain tdown until you hear
it engage in position .
XFold backth erear seat backr estuntil it
engage s.
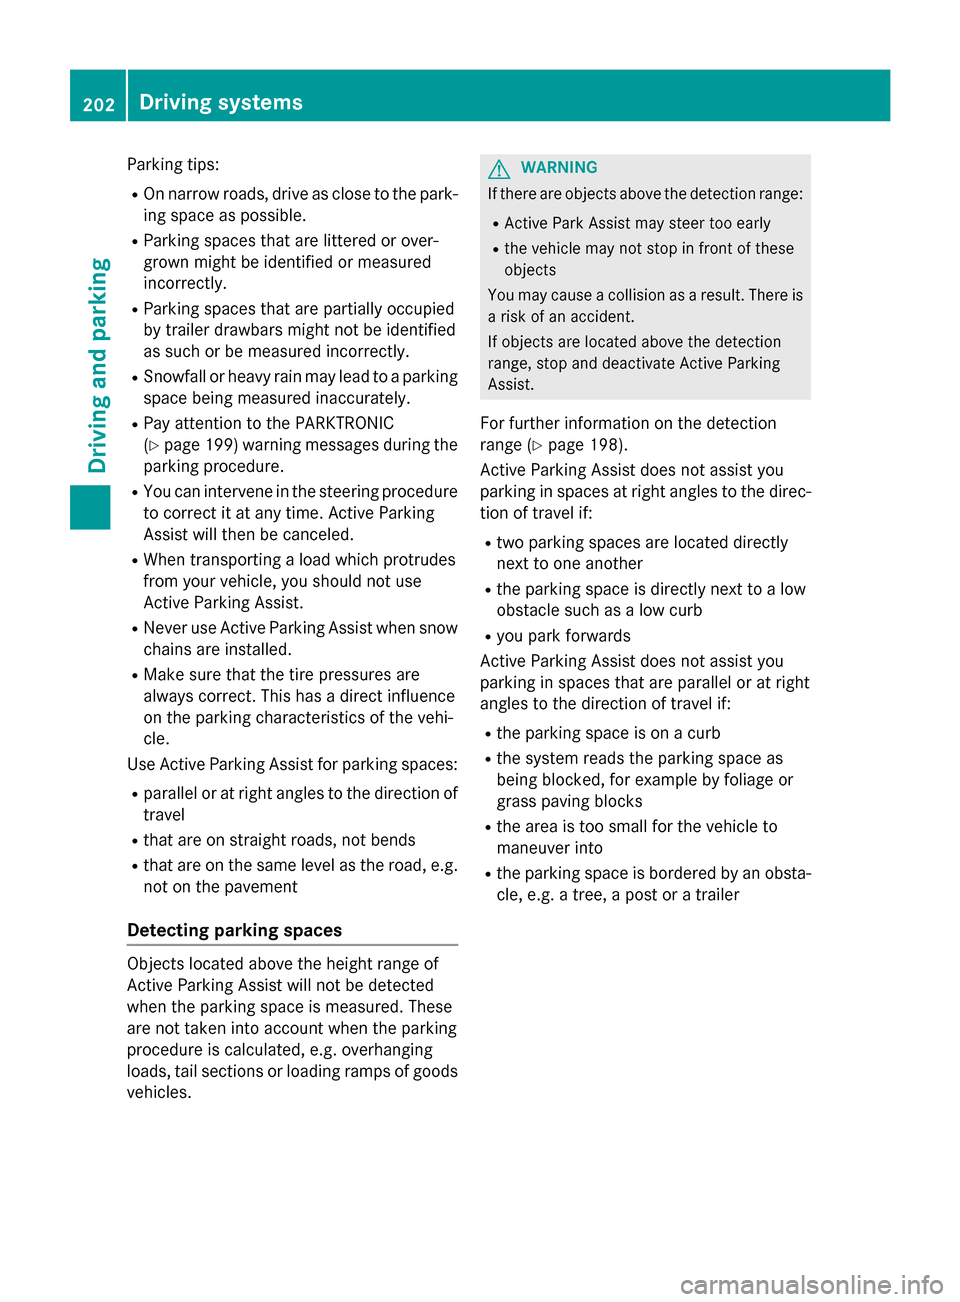
Adjusting the 4-way lumbar support
:To raiseth ebackr estcontour
;Tosofte nth ebackrest contour
=To lower th ebackr estcontour
?To harden th ebackrest contour
You can adj ustthecontour of th efron tseat
backrest sindividually to provide optimum
support for your back.
Switching the seat heating on/off
Switching on/off
GWARNIN G
Repeatedly switching on th eseat heating can
caus eth eseat cushion and backrest pads to
become ver yhot .The healt hof person swit h
limite dtemperature sensitivit yor alimite d
abilit yto reac tto excessivel yhigh tempera-
112Seats
Seats, steering wheel and mirrors
Page 117 of 418

Problems with the seat ventilation
ProblemPossible causes/consequences andMSolutions
The seat ventilation has
switched off prema-
turely or cannot be
switched on.The on-board voltage is too low because too many electrical con-
sumers are switched on.
XSwitch off electrical consumers that you do not need, such as
the rear window defroster or interior lighting.
Once the battery is sufficiently charged, the seat ventilation can
be switched back on.
Steering wheel
Important safety notes
GWARNING
You could lose control of your vehicle if you do the following while driving:
Radjust the driver's seat, head restraint,
steering wheel or mirrors
Rfasten the seat belt
There is a risk of an accident.
Adjust the driver's seat, head restraint, steer-
ing wheel and mirror and fasten your seat belt before starting the engine.
GWARNING
Children could injure themselves if they
adjust the steering wheel. There is a risk of
injury.
When leaving the vehicle, always take the
SmartKey with you and lock the vehicle. Never
leave children unsupervised in the vehicle.
The electrically adjustable steering wheel can
still be adjusted when there is no key in the
ignition lock.
Adjusting the steering wheel man-
ually
:Release lever
;To adjust the steering wheel height
=To adjust the steering wheel position
(fore-and-aft adjustment)
XPush release lever :down completely.
The steering column is unlocked.
XAdjust the steering wheel to the desired
position.
XPush release lever :up completely.
The steering column is locked.
XCheck if the steering column is locked.
When doing so, try to push the steering
wheel up or down or try to move it in the
fore-and-aft direction.
Steering wheel115
Seats, steering wheel and mirrors
Z
Page 118 of 418

Adjusting the steering wheel electri-
cally
:To adjust th esteering whee lheight
;To adjust th esteering whee lposition
(fore-and-af tadjustment)
iFurther relate dsubjects :
REASY-ENTRY/EXIT feature
(
Ypage 117)
RStoring setting s (Ypage 122)
ROperating theon-board computer
(
Ypage 239).
Steering wheel heating
Switching on/off
XTurn th eSmartKey to position 2in th eigni-
tion loc k (
Ypage 153).
XTo switch on/of f:tur nth elever in th e
direction of arrow :or;.
Indicato rlamp =lights up or goes out .Vehicles without KE
YLESS-GO:when you
remove th eSmartKey from th eignition lock,
th e steering whee lheating is deactivated.
Vehicles wit hKE YLESS-GO :when you switch
off th eignition and open th edriver' sdoor ,th e
steering whee lheating is deactivated.
116Steering wheel
Seats, steering wheel and mirrors
Page 198 of 418

Make sure no one is underneath the vehicle or
in the immediate vicinity of the wheel arches
when the vehicle is being lowered.
iIf one of the doors is open, the vehicle is
not lowered.
Vehicle level
Setting the raised vehicle level
It is possible to choose between the "Normal"
and "Raised" vehicle levels below a speed of
50 mph (80 km/h). Select the "Normal" set-
ting for normal road surfaces and "Raised" for
driving with snow chains or on particularly
poor road surfaces. Your selection remains
stored even if you remove the SmartKey from
the ignition lock.
XStart the engine.
If indicator lamp ;is not lit:
XPress button :.
Indicator lamp ;lights up. The vehicle is
raised by 0.6 in (15 mm) compared to the
normal level.
The Vehicle Rising
message appears in
the multifunction display.
iThe message disappears after ten sec-
onds, irrespective of the level reached. If
necessary, the vehicle is raised further.
The "Raised level" setting is canceled if you:
Rdrive faster than 75 mph (120 km/h)
Rdrive for approximately three minutes at a
speed above 50 mph (80 km/h) The "Raised level" remains active when you
are not driving within these speed ranges.
Setting the normal vehicle level
XStart the engine.
If indicator lamp ;is lit:
XPress button :.
Indicator lamp ;goes out. The vehicle is
adjusted to the height of the currently
selected drive program (
Ypage 161).
Suspension tuning
General notes
The Adaptive Damping System automatically
controls the calibration of the dampers.
The damping is tuned individually to each
wheel and depends on:
Ryour driving style, e.g. sporty
Rthe road surface condition, e.g. bumps
Ryour individual selection, i.e. sports or com-
fort
Your selection remains stored even if you
remove the SmartKey from the ignition lock.
Sports tuning
In the "Sport" and "Sport Plus" drive pro-
grams, the firmer suspension setting ensures
even better contact with the road. Select this
mode when employing a sporty driving style,
e.g. on winding country roads.
XSelect the Sor S+ drive program with the
DYNAMIC SELECT switch (
Ypage 161).
The vehicle is lowered by 0.6 in (15 mm)
compared to the normal level.
Comfort tuning
In the "Eco" and "Comfort" drive programs,
the driving characteristics of your vehicle are
more comfortable. Therefore, select this
mode if you favor a more comfortable driving
style. Select comfort mode also when driving
fast on straight roads, e.g. on straight
stretches of highway.
196Driving systems
Driving and parking
Page 204 of 418

Parking tips:
ROn narrow roads, drive as close to the park-
ing space as possible.
RParking spaces that are littered or over-
grown might be identified or measured
incorrectly.
RParking spaces that are partially occupied
by trailer drawbars might not be identified
as such or be measured incorrectly.
RSnowfall or heavy rain may lead to a parking
space being measured inaccurately.
RPay attention to the PARKTRONIC
(
Ypage 199) warning messages during the
parking procedure.
RYou can intervene in the steering procedure
to correct it at any time. Active Parking
Assist will then be canceled.
RWhen transporting a load which protrudes
from your vehicle, you should not use
Active Parking Assist.
RNever use Active Parking Assist when snow
chains are installed.
RMake sure that the tire pressures are
always correct. This has a direct influence
on the parking characteristics of the vehi-
cle.
Use Active Parking Assist for parking spaces:
Rparallel or at right angles to the direction of
travel
Rthat are on straight roads, not bends
Rthat are on the same level as the road, e.g.
not on the pavement
Detecting parking spaces
Objects located above the height range of
Active Parking Assist will not be detected
when the parking space is measured. These
are not taken into account when the parking
procedure is calculated, e.g. overhanging
loads, tail sections or loading ramps of goods vehicles.
GWARNING
If there are objects above the detection range:
RActive Park Assist may steer too early
Rthe vehicle may not stop in front of these
objects
You may cause a collision as a result. There is
a risk of an accident.
If objects are located above the detection
range, stop and deactivate Active Parking
Assist.
For further information on the detection
range (
Ypage 198).
Active Parking Assist does not assist you
parking in spaces at right angles to the direc-
tion of travel if:
Rtwo parking spaces are located directly
next to one another
Rthe parking space is directly next to a low
obstacle such as a low curb
Ryou park forwards
Active Parking Assist does not assist you
parking in spaces that are parallel or at right
angles to the direction of travel if:
Rthe parking space is on a curb
Rthe system reads the parking space as
being blocked, for example by foliage or
grass paving blocks
Rthe area is too small for the vehicle to
maneuver into
Rthe parking space is bordered by an obsta- cle, e.g. a tree, a post or a trailer
202Driving systems
Driving and parking
Page 213 of 418

The 360° camera will not function or will
function in a limited manner:
Rif the doors are open
Rif the exterior mirrors are folded in
Rif the trunk lid is open
Rin heavy rain, snow or fog
Rat night or in very dark places
Rif the cameras are exposed to very bright
light
Rif the area is lit by fluorescent bulbs or LED
lighting (the display may flicker)
Rif the camera lenses fog up, e.g. when driv-
ing into a heated garage in winter, causing
a rapid change in temperature
Rif the camera lenses are dirty or covered
Rif the vehicle components in which the
cameras are installed are damaged. In this
event, have the camera position and setting
checked at a qualified specialist workshop.
Do not use the 360° camera in this case. You
can otherwise injure others or cause damage to objects or the vehicle.
The guide lines in the COMAND display show
the distances to your vehicle. The distances
only apply to road level.
The camera in the rear area is protected by
means of a flap. This flap opens when the
360° camera is activated. Observe the notes
on cleaning (
Ypage 349). For technical rea-
sons, the flap may remain open briefly after
the 360° camera has been deactivated.
On vehicles with height-adjustable chassis,
depending on technical conditions, leaving
the standard height can result in:
Rinaccuracies in the guide lines
Rinaccuracies in the display of generated
images (top view)
Activation conditions
The 360° camera image can be displayed if:
RAudio 20 or COMAND is switched on (see
the Digital Operator's Manual)
Rthe 360° Camerafunction is switched on
iIf you are driving faster than at a moderate
speed and you turn on the 360° camera, a
warning message appears.
The warning message disappears if:
Ryou are again driving at a moderate
speed The 360° camera is then activa-
ted.
Rthe message is confirmed with the %
button.
Switching the 360° camera on and off
using the button
XTo switch on: press button:.
Depending on whether position Dor Ris
engaged, the following is shown:
Ra split screen with top view and the
image from the front camera or
Ra split screen with top view and the
image from the rear view camera
XTo switch off: press button:.
Switching on the 360° camera using
Audio 20 or COMAND
XTo select360° Camerain the vehicle car-
ousel: turn and press the controller.
Depending on whether position Dor Ris
engaged, the following is shown:
Ra split screen with top view and the
image from the front camera or
Ra split screen with top view and the
image from the rear view camera
Driving systems211
Driving and parking
Z
Page 231 of 418

speed and do not countersteer. Apply the
brake as necessary.
Please observe the manufacturer's operating
instructions for the trailer coupling if a
detachable trailer coupling is used.
Couple and uncouple the trailer carefully. If
you do not couple the trailer to the towing
vehicle correctly, the trailer could become
detached.
Make sure that the following values are not
exceeded:
Rthe permissible trailer drawbar noseweight
Rthe permissible trailer load
Rthe permissible rear axle load of the towing
vehicle
Rthe maximum permissible gross vehicle
weight of both the towing vehicle and the
trailer
The applicable permissible values, which
must not be exceeded, can be found:
Rin the vehicle documents
Ron the identification plates of the trailer tow hitch, the trailer and the vehicle
If the values differ, the lowest value applies.
You will find the values approved by the man-
ufacturer on the vehicle identification plates
and those for the towing vehicle under "Tech-
nical data" (
Ypage 416).
When towing a trailer, your vehicle's handling
characteristics will be different in comparison
with when driving without a trailer.
The vehicle/trailer combination:
Ris heavier
Ris restricted in its acceleration and gradi-
ent-climbing capability
Rhas an increased braking distance
Ris affected more by strong crosswinds
Rdemands more sensitive steering
Rhas a larger turning radius
This could impair the handling characteris-
tics. When towing a trailer, always adjust your
speed to the current road and weather con-
ditions. Do not exceed the maximum permis-
sible speed for your vehicle/trailer combina-
tion.
General notes
RDo not exceed the legally prescribed max-
imum speed for vehicle/trailer combina-
tions in the relevant country.
This lowers the risk of an accident.
ROnly install an approved trailer coupling on
your vehicle.
Further information on availability and on
installation is available from any authorized Mercedes-Benz Center.
RThe bumpers of your vehicle are not suita-
ble for installing detachable trailer cou-
plings.
RDo not install hired trailer couplings or
other detachable trailer couplings on the
bumpers of your vehicle.
RTo reduce the risk of damage to the ball
coupling, remove it from the ball coupling
recess when not in use.
iWhen towing a trailer, set the tire pres-
sure on the rear axle of the towing vehicle
for a maximum load; see the tire pressure
table in the fuel filler flap (
Ypage 393).
Please note that when towing a trailer,
PARKTRONIC (
Ypage 198) is only available
with limitations or not at all.
iOn vehicles without level control, the
height of the ball coupling will alter accord-
ing to the load placed on the vehicle. If nec-
essary, use a trailer with a height-adjusta-
ble drawbar.
You will find installing dimensions and loads
under "Technical data" (
Ypage 415).
Driving tips
iObserve the notes on ESP®trailer stabi-
lization (
Ypage 75).
Towing a trailer229
Driving and parking
Z