2016 MERCEDES-BENZ GLC-Class change language
[x] Cancel search: change languagePage 29 of 222

Handwriting recognition
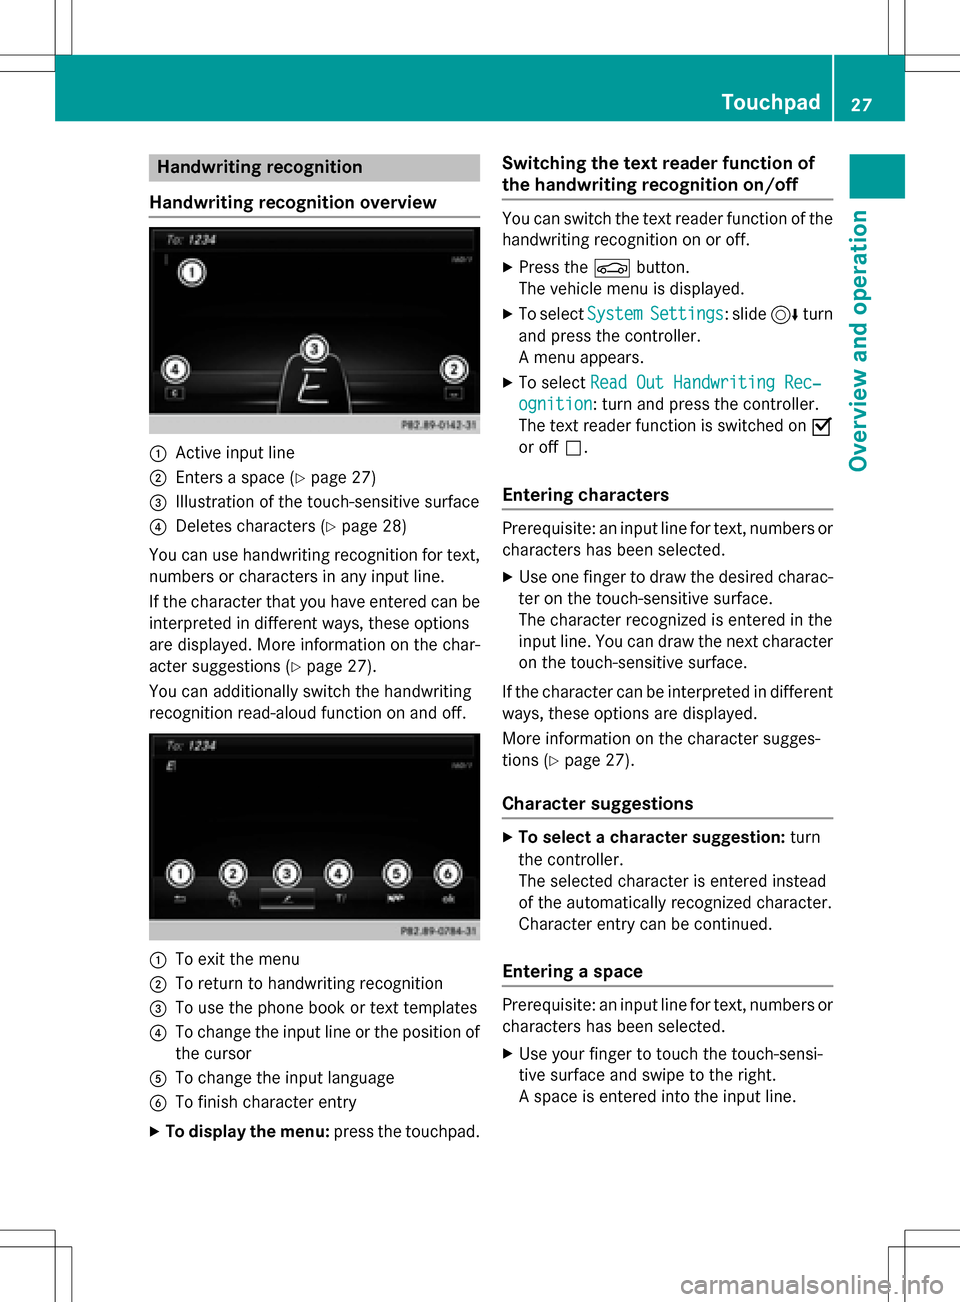
Handwriting recognition overview
:Active input line
;Enters a space (Ypage 27)
=Illustration of the touch-sensitive surface
?Deletes characters (Ypage 28)
You can use handwriting recognition for text,
numbers or characters in any input line.
If the character that you have entered can be
interpreted in different ways, these options
are displayed. More information on the char-
acter suggestions (
Ypage 27).
You can additionally switch the handwriting
recognition read-aloud function on and off.
:To exit the menu
;To return to handwriting recognition
=To use the phone book or text templates
?To change the input line or the position of
the cursor
ATo change the input language
BTo finish character entry
XTo display the menu: press the touchpad.
Switching the text reader function of
the handwriting recognition on/off
You can switch the text reader function of the
handwriting recognition on or off.
XPress theØbutton.
The vehicle menu is displayed.
XTo select SystemSettings: slide6turn
and press the controller.
A menu appears.
XTo select Read Out Handwriting Rec‐
ognition: turn and press the controller.
The text reader function is switched on O
or off ª.
Entering characters
Prerequisite: an input line for text, numbers or
characters has been selected.
XUse one finger to draw the desired charac-
ter on the touch-sensitive surface.
The character recognized is entered in the
input line. You can draw the next character
on the touch-sensitive surface.
If the character can be interpreted in different
ways, these options are displayed.
More information on the character sugges-
tions (
Ypage 27).
Character suggestions
XTo select a character suggestion: turn
the controller.
The selected character is entered instead
of the automatically recognized character.
Character entry can be continued.
Entering a space
Prerequisite: an input line for text, numbers or
characters has been selected.
XUse your finger to touch the touch-sensi-
tive surface and swipe to the right.
A space is entered into the input line.
Touchpad27
Overview and operation
Page 30 of 222

Deleting characters
Prerequisite: an input linefo rtext ,number sor
characters has been selected.
XUse your finger to touch th etouch-sensi-
tive surfac eand swip eto th eleft.
The characte rlast entered is deleted.
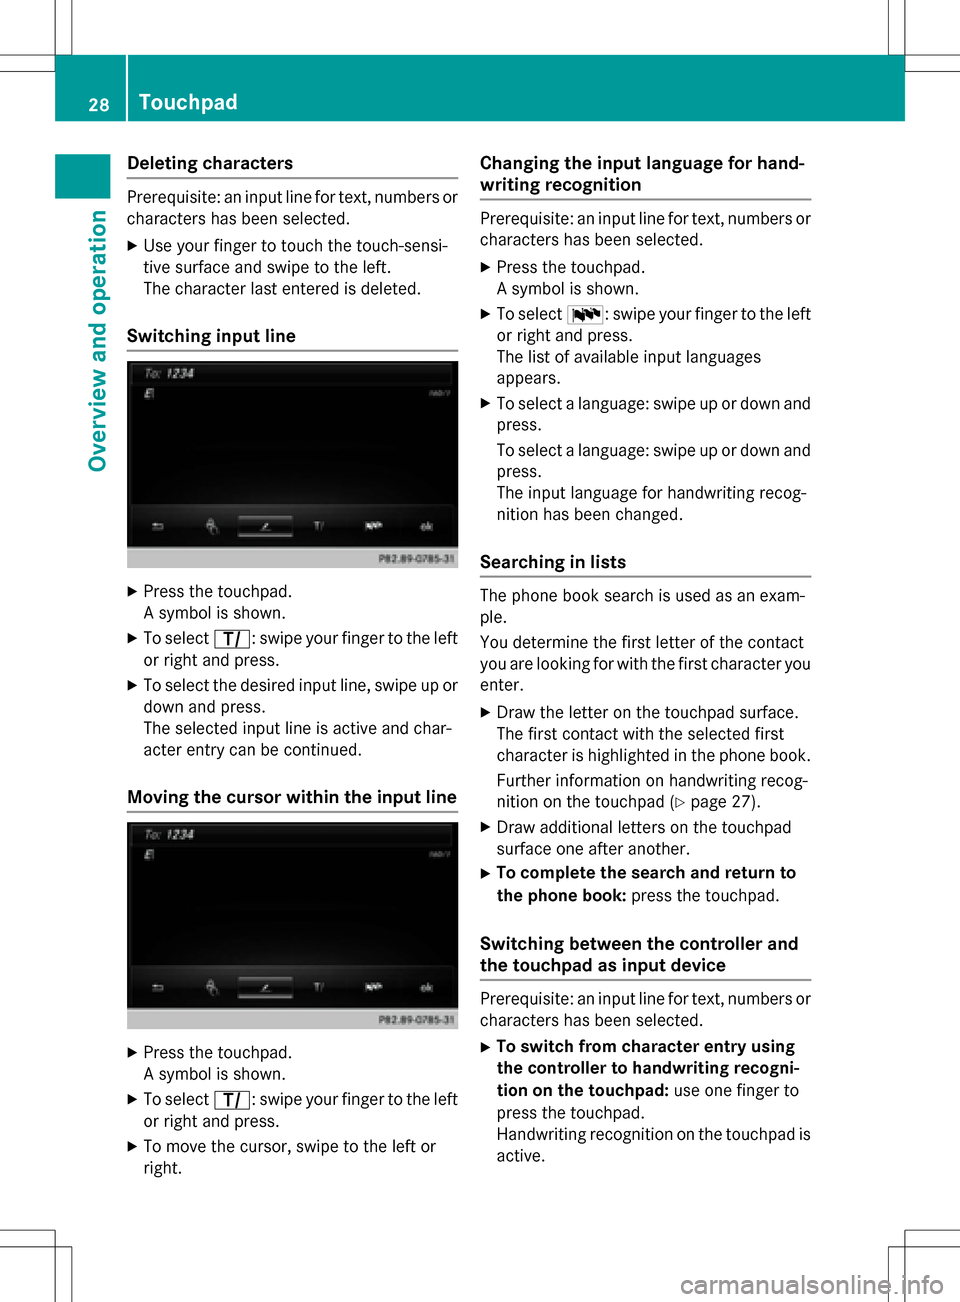
Switchin ginput line
XPress th etouchpad.
A symbol is shown .
XTo selectp: swipeyour finger to th elef t
or right and press.
XTo selec tth edesire dinput line, swip eup or
down and press.
The selecte dinput lin eis active and char-
acter entr ycan be continued.
Moving th ecursor within th einput line
XPress th etouchpad.
A symbol is shown .
XTo selectp: swipeyour finger to th elef t
or right and press.
XTo move th ecursor ,swip eto th elef tor
right .
Changin gth einput language for hand -
writing recognition
Prerequisite: an input lin efo rtext ,number sor
characters has been selected.
XPress th etouchpad.
A symbol is shown .
XTo selectB: swipeyour finger to th elef t
or right and press.
The list of available input language s
appears .
XTo selec t alanguage :swip eup or down and
press.
To selec t alanguage :swip eup or down and
press.
The input language fo rhandwritin grecog-
nition has been changed.
Searchin gin list s
The phone boo ksearch is used as an exam-
ple.
You determin eth efirst lette rof th econtact
you are looking fo rwit hth efirst characte ryou
enter.
XDraw th elette ron th etouchpad surface.
The first contact wit hth eselecte dfirst
characte ris highlighted in th ephone book.
Further information on handwritin grecog-
nition on th etouchpad (
Ypage 27).
XDraw additional letters on th etouchpad
surfac eon eafter another.
XTo complet eth esearc han dreturn to
th ephone book :press th etouchpad.
Switchin gbetween th econtroller an d
th etouchpa das input device
Prerequisite: an input lin efo rtext ,number sor
characters has been selected.
XTo switch from characte rentry using
th econtroller to handwriting recogni -
tion on th etouchpad: use onefinger to
press th etouchpad.
Handwritin grecognition on th etouchpad is
active .
28Touchpad
Overview and operation
Page 34 of 222

XTo select a character:turn and press the
controller.
The character selected in character bar ?
is entered into text message input line =.
XTo delete a character:switch to the bot-
tom line of the character bar by sliding 6
the controller.
XTo select F, turn and press the controller.
The character last entered is deleted.
XTo delete an entire entry: switch to the
bottom line of the character bar by sliding
6 the controller.
XTo select F, turn the controller.
XPress and hold the controller until the
entire entry is deleted.
XTo change the country setting of the
character bar: switch to the bottom line of
the character bar by sliding 6the con-
troller.
XTo select B, turn and press the control-
ler.
The available languages are displayed.
XTurn and press the controller.
Further functions available in the charac-
ter bar
SymbolFunction
ÄSwitches between digits and
symbols
*Switches the character bar to
uppercase/lowercase letters
BChanges the country setting for
the character bar
SymbolFunction
FDeletes a character/an entry
4, 5Selects the input line
2,3Moves the cursor within the
input line
¬Finishes an entry
&Cancels input
SInserts a paragraph
Character entry (navigation)
Character entry options
You can enter characters using the controller
or the touchpad. With the controller, you
enter characters using a character bar. To
enter using the touchpad, draw the character
in the entry field. COMAND supports this
using a handwriting recognition function.
Entering characters using the charac-
ter bar
:Characters STUTentered by the user
(orange)
;Characters EBÜLLautomatically added by
COMAND
=To switch to keyword search
?Characters not currently available
ACurrently selected character
BCharacters currently available
CCharacter bar
32Character entry (navigation)
Overview and operation
Page 35 of 222

The example shows the address entry
(
Ypage 67).
XTo enter a character:turn, slide6or
5 and press the controller.
Selected character :is entered in the
upper line. COMAND adds the missing
characters and shows the entry that best
matches the current input.
The characters are available Bor not ?,
depending on the characters already
entered and the data stored in the digital
map.
The Gsymbol indicates that an entry
exists more than once.
XTo delete a character: slide6and turn
the controller, then press it after selecting
F.
XTo delete an entire entry: slide6and
turn the controller; then after selecting F
press and hold down the controller until the
entire entry is deleted.
XTo switch to keyword search: slide6
and turn the controller, then press it after
selecting =(
Ypage 70).
XTo confirm an entry: slide6and turn
the controller, then press it after select-
ing¬.
or
XSlide 5the controller repeatedly until the
character bar disappears.
The location selection list appears. The
selected entry is highlighted.
:Cursor
;Entry line The example shows the character entry when
you save a destination as a navigable contact
in the address book (
Ypage 68).
XTo select an input line: slide6and turn
the controller, then press it after selecting
4 or5.
or
XSlide 5the controller repeatedly until the
character bar disappears.
XTurn and press the controller.
XTo move the cursor: select the input line.
XSlide6and turn the controller, then
press it after selecting 2or3.
XTo change the character bar language:
slide 6and turn the controller, then
press it after selecting B.
A menu appears.
XTo select the language: turn and press the
controller.
The character set for the selected language
is set.
The character bar entry functions are listed in
the table.
SymbolFunction
ÄSwitches between digits and
symbols
*Switches the character bar to
uppercase/lowercase letters
BChanges the character bar lan-
guage
FDeletes a character/an entry
Character entry (navigation)33
Overview and operation
Page 47 of 222

XTo selectSystem Settings: slide6,
turn and press the controller.
A menu appears.
XTo select Activate Bluetooth: turn and
press the controller.
This switches Bluetooth
®on O or off ª.
Automatic volume adjustment
General information
With the Automatic Volume Adjustment
function, the volumes of different audio sour-
ces are adjusted for each other, to compen-
sate for relative differences in volume.
For example: changing from a relatively
quiet to a relatively loud radio station. The
volume for both stations sounds the same.
Manual readjustment of the volume is not
required.
The Automatic Volume Adjustment
func-
tion is deactivated ªwhen the vehicle leaves
the factory. Using this function, the dynamic
range of the music is slightly reduced. To
make the most of the audiophile sound qual- ity, it is recommended to leave it off.
Switching the automatic volume
adjustment on/off
XPress the Øbutton.
or
XPress Vehiclein the main function bar.
The vehicle menu is displayed.
XTo select System Settings: slide6,
turn and press the controller.
A menu appears.
XTo select Automatic Volume Adjust‐
ment: turn and press the controller.
Switch the Automatic Volume Adjust‐
mentfunction on Oor off ª.
Setting the system language
This function allows you to determine the lan-
guage for the menu displays and the naviga-
tion messages. The selected language affects
the characters available for entry.
iThe navigation announcements are not
available in all languages. If a language is
not available, the navigation announce-
ments will be in English.
iWhen you set the system language, the
language of the Voice Control System will
change accordingly. If it is not supported by
the Voice Control System, English will be
selected.
XPress the Øbutton.
or
XPress Vehiclein the main function bar.
The vehicle menu is displayed.
XTo select System Settings: slide6,
turn and press the controller.
A menu appears.
XTo select Language: turn and press the
controller.
The list of languages appears. The #dot
indicates the current setting.
XSelect the desired language.
COMAND loads the selected language and
sets it.
Calling up and editing the Favorites
function
The Favorites function can, depending on the
vehicle equipment, be called up as follows:
Rvia the System Settingsmenu
Rvia the Favorites button on the controller
(
Ypage 23)
Rvia the Favorites button on the touchpad
(
Ypage 24)
Calling up and editing the Favorites function45
System settings
Z
Page 203 of 222

Bear in mind that at a speed of only 30 mph
(approximately 50 km/h) your vehicle covers
a distance of 44 feet (approximately 14m)
ever yse cond.
General notes
Notes on discs
!Do not affix stickers or labels to the discs.
They could peel off and damage COMAND.
Stickers can cause the disc to bend, which
can result in read errors and disc recogni-
tion problems.
!COMAND is designed to play discs that
comply with the EN 60908 standard. There- fore, you can only use discs with a maxi-
mum thickness of 1.3 mm.
If you insert thicker discs, e.g. those that
contain data on both sides (DVD on one
side and audio data on the other), they can-
not be ejected and can damage the device.
Only use round discs with a diameter of
12 cm. Do not use discs with a diameter of
8 cm, even with an adapter.
The variety of data media, burners and burn
software means there is no guarantee that
the system will be able to play discs that you
have copied yourself.
DVD playback conditions
If video DVDs do not conform to the NTSC or
PAL TV standards, they may create picture,
sound or other problems during playback.
COMAND is capable of playing back video
DVDs produced according to the following
standards:
RRegion code 1 or region code 0 (no region
code)
RPAL or NTSC standard
You will generally find the relevant details
either on the DVD itself or on the DVD case.
iIf you insert a video DVD with a different
region code, a message to this effect
appears.
iCOMAND is set to region code 1 at the
factory. This setting can be changed at an
authorized Mercedes-Benz Center. It is also
possible to play video DVDs with a different
region code, provided that they are pro-
duced in accordance with the PAL or NTSC
TV standard. The region code can be
changed up to five times.
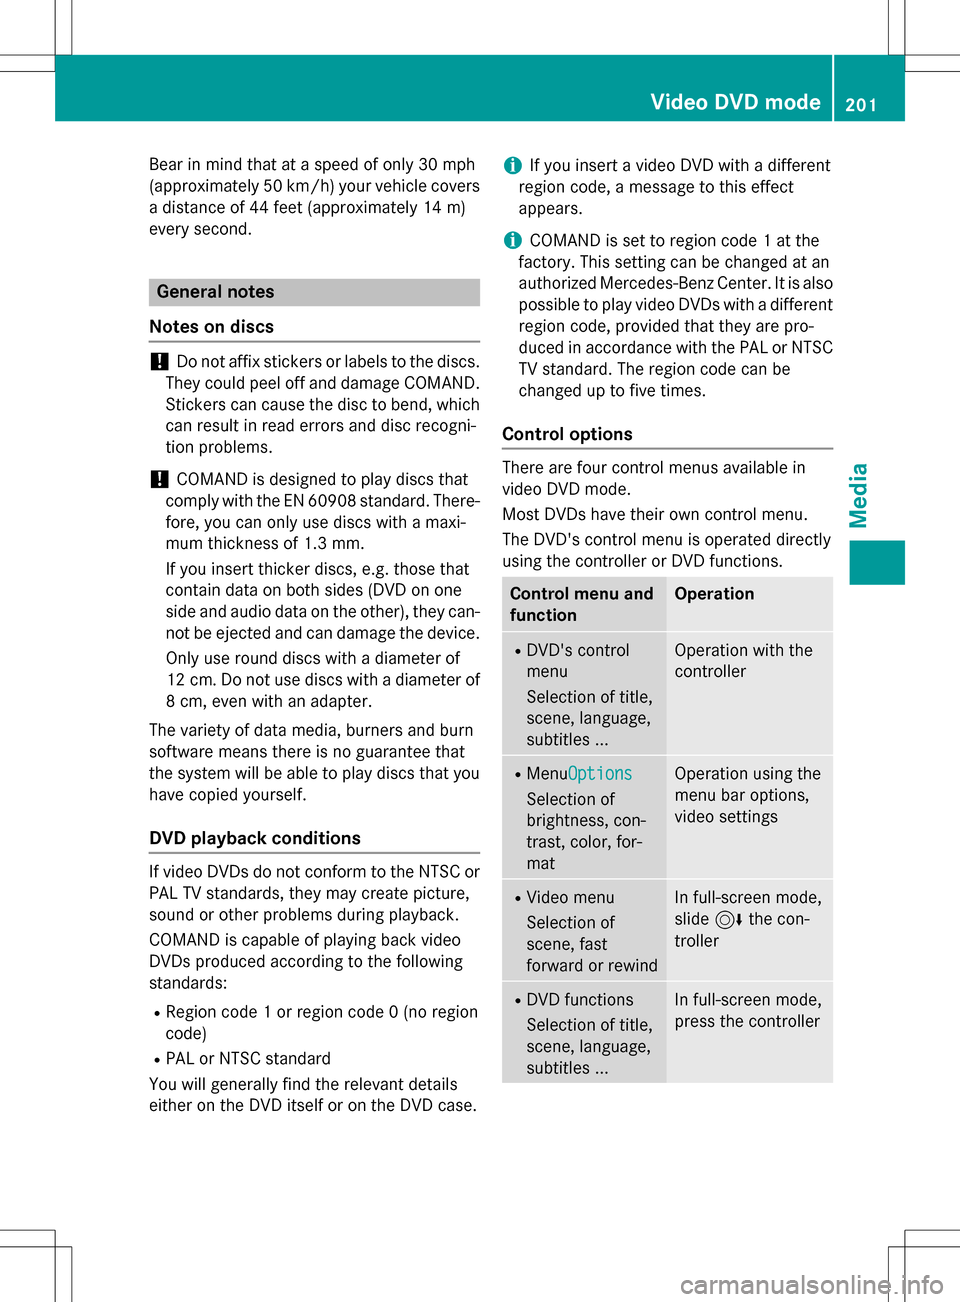
Control options
There are four control menus available in
video DVD mode.
Most DVDs have their own control menu.
The DVD's control menu is operated directly
using the controller or DVD functions.
Control menu and
functionOperation
RDVD's control
menu
Selection of title,
scene, language,
subtitles ...Operation with the
controller
RMenu Options
Selection of
brightness, con-
trast, color, for-
mat
Operation using the
menu bar options,
video settings
RVideo menu
Selection of
scene, fast
forward or rewindIn full-screen mode,
slide6the con-
troller
RDVD functions
Selection of title,
scene, language,
subtitles ...In full-screen mode,
press the controller
Video DVD mode201
Media
Z