2016 MERCEDES-BENZ GLA sunroof
[x] Cancel search: sunroofPage 16 of 390
Operation ......................................... 51
System self-test .............................. .5 3
Occupant safety
Automatic measures after an acci-
dent ................................................ .5 8
Childr en in the vehicle .................... .5 8
Important safety notes .................... 43
Introduction to the restraint sys-
tem .................................................. 42
Occupant Classification System
(OCS) ............................................... 51
PASSENGER AIR BAG indicator
lamps ............................................... 43
Pets in the vehicle ........................... 64
Restraint system warning lamp ........ 43
Seat belt .......................................... 44
OCS
Conditions ....................................... 51
Faults ............................................... 55
Operation ........................................ .5 1
System self-test ............................... 53
Odometer ........................................... 221
Off-road driving
Approach/departure angle ............ 384
Checklist after driving off-road ...... 182
Checklist before driving off-road .... 182
General information ....................... 181
Important safety notes .................. 180
Maximum gradient climbing abil-
ity .................................................. 384
Traveling uphill ............................... 183
Off-road program ............................... 199
Driving dynamics display ............... 200
Off-road system
DSR ............................................... 197
Off road drive program .................. 199
Off-road 4ETS .................................. 69
Off-road ABS .................................... 66
Off-road ESP ®
.................................. 72
On-board computer
AMG menu ..................................... 231
Assistance graphic menu ............... 227
Assistance menu ........................... 227
Audio menu ................................... 225
Convenience submenu .................. 231
Display messages .......................... 235
Displayi ng a se rvice message ........ 313
DISTRONIC
PLUS ........................... 191 Factory settings ............................. 231
Important safety notes .................. 218
Instrument cluster submenu .......... 229
Lighting submenu .......................... 230
Menu overview .............................. 221
Message memory .......................... 235
Navigation menu ............................ 223
Operation ....................................... 219
RACETIMER ................................... 232
Service menu ................................. 229
Settings menu ............................... 229
Standard display ............................ 221
Telephone menu ............................ 226
Trip menu ...................................... 221
Vehicle submenu ........................... 230
Video DVD operation ..................... 225
On-board diagnostic interface
see Diagnostics connection
Opening and closing the side trim
panels ................................................. 124
Operating safety
Declaration of conformity ................ 25
Operating system
see On-board computer
Operator's Manual
Vehicle equipment ........................... 24
Outside temperature display ........... 219
Overhead control panel ...................... 39
Override feature
Rear side windows ........................... 64
P
Paint code number ............................ 376
Paintwork (cleaning instructions) ... 315
Panic alarm .......................................... 42
Panorama roof with power tilt/
sliding panel
Important safety notes .................... 94
Operating ......................................... 95
Operating the roller sunblinds for
the sliding sunroof ........................... 96
Problem (malfunction) ..................... 99
Reversing feature ............................. 95
Parcel shelf ........................................ 286
Parking
Important safety notes .................. 171
Parking brake ................................ 17314
Index
Page 18 of 390

Rear-view mirror
Anti-glare (manual) ........................ 109
Dipping (automatic) ....................... 110
Recycling
see Protection of the environment
Refrigerant (air-conditioning sys-
tem)
Important safety notes .................. 382
Refueling
Fuel gauge ....................................... 31
Important safety notes .................. 169
Refueling process .......................... 170
see Fuel
Remote control
Garage door opener ....................... 300
Programming (garage door
opener) .......................................... 301
Replacing bulbs
Important safety notes .................. 121
Overview of bulb types .................. 122
Removing/replacing the cover
(front wheel arch) .......................... 122
Rescue card ......................................... 26
Reserve (fuel tank)
see Fuel
Reserve fuel
Display message ............................ 252
Warning lamp ................................. 275
see Fuel
Residual heat (climate control) ........ 143
Restraint system
Display message ............................ 243
Introduction ..................................... 42
Warning lamp ................................. 274
Warning lamp (function) ................... 43
Reverse gear (selector lever) ........... 161
Reversing feature
Panorama sliding sunroof ................ 95
Roller sunblind ................................. 97
Side windows ................................... 90
Tailgate ............................................ 86
Roadside Assistance (breakdown) .... 24
Roller sunblind
Panorama roof with power tilt/
sliding panel ..................................... 96
Roof carrier ........................................ 288 Roof lining and carpets (cleaning
guidelines) ......................................... 320
Roof load (maximum) ........................ 383
S Safety
Children in the vehicle ..................... 58
Safety system
see Driving safety systems
Seat belts
Adjusting the height ......................... 46
Cleaning ......................................... 320
Correct usage .................................. 46
Fastening ......................................... 46
Important safety guidelines ............. 44
Introduction ..................................... 44
Releasing ......................................... 47
Warning lamp ................................. 266
Warning lamp (function) ................... 47
Seats
Adjusting (electrically) ................... 105
Adjusting (manually) ...................... 104
Adjusting (Performance Seat) ........ 106
Adjusting the 4-way lumbar sup-
port ................................................ 106
Adjusting the head restraint .......... 105
Cleaning the cover ......................... 319
Correct driver's seat position ........ 102
Folding the backrest (rear com-
partment) forwards/back .............. 284
Important safety notes .................. 103
Seat heating problem .................... 108
Storing settings (memory func-
tion) ............................................... 112
Switching seat heating on/off ....... 107
Securing cargo .................................. 285
Selecting a gear
see Automatic transmission
Selector lever
Cleaning ......................................... 319
Sensors (cleaning instructions) ....... 317
Service menu (on-board com-
puter) .................................................. 229
Service message
see ASSYST PLUS
Service products
Brake fluid ..................................... 38016
Index
Page 19 of 390
Coolant (engine) ............................ 381
Engine oil ...................................... .3 79
Fuel ................................................ 377
Important safety notes .................. 377
Refrigerant (air-conditioning sys-
tem) ............................................... 382
Washer fluid ................................... 382
Setting a speed
see Cruise control
Setting the air distribution .............. .1 40
Setting the airflow ............................ 140
Settings
Factory (on-board computer) ......... 231
On-board computer ....................... 229
SETUP (on-board computer) ............. 232
Side impact air bag ............................ .5 0
Side marker lamp (display mes-
sage) ................................................... 250
Side windows
Cleaning ......................................... 316
Convenience closing feature ............ 92
Convenience opening feature ......... .9 1
Important safety information ........... 90
Opening/closing .............................. 91
Problem (malfunction) .................... .9 4
Resettin g ........................................ .9 3
Reversin g feature ............................ .9 0
Sliding sunroof
see Panorama roof with power
tilt/sliding panel
SmartKey
Changing the battery ....................... 80
Changing the programming ............ .7 8
Checking the battery ...................... .8 0
Convenience closing feature ............ 92
Convenience opening feature .......... 91
Dis play message ............................ 265
Door c entral locking/unlocking ...... .7 6
Importa nt safety notes .................... 76
KEYLESS-GO start function .............. 78
Loss ................................................ .8 1
Mechanical key ................................ 79
Positions (ignition lock) ................. 149
Problem (malfunction) ..................... 81
Starting the engine ........................ 151
SmartKey positions (ignition lock) .. 149
Snow chains ...................................... 343 Sockets
Center console .............................. 291
General notes ................................ 291
Luggage compartment .................. .2 92
Rear compartment ......................... 292
Special seat belt retractor .................. 59
Specialist workshop ............................ 25
Speed, controlling
see Cruise control
Speedometer
Activating/deactivating the addi-
tional speedometer ........................ 229
Digital ............................................ 223
In the Instrument cluster ................. 31
Segments ...................................... 218
Selecting the display unit .............. .2 29
SPORT handling mode
Deactivating/activating
(Mercedes-AMG vehicles) ................ 70
Warning lamp ................................. 272
Standing lamps
Display message ............................ 249
Switching on/off ........................... 118
Start-off assist
Activating ....................................... 194
Important safety notes .................. 194
Start/Stop button
Removing ....................................... 150
Starting the engine ........................ 152
Start/stop function
see ECO start/stop function
Starting (engine) ................................ 151
STEER CONTROL .................................. 73
Steering
Display message ............................ 264
Steering assistant STEER CON-
TROL
see STEER CONTROL
Steering wheel
Adjusting (manually) ...................... 108
Button overvi ew ............................... 33
Butto ns (on-board computer) ......... 219
Cleaning ......................................... 319
Important safety notes .................. 108
Paddle shifters ............................... 166
Steering wheel paddle shifters ........ 166
Stopwatch (RACETIMER) ................... 232Index 17
Page 94 of 390
Convenience closing feature
Important safety notes
G WARNING
When the convenience closing feature is oper-
ating, parts of the body could become trapped
in the closing area of the side window and the
sliding sunroof. There is a risk of injury.
Observe the complete closing procedure
when the convenience closing feature is oper-
ating. Make sure that no body parts are in
close proximity during the closing procedure.
Vehicles with KEYLESS-GO, the KEYLESS-
GO start function, Exclusive Package or
AMG Exclusive Package: at the same time
you can: R
lock the vehicle R
close the side windows R
close the panorama roof with power tilt/
sliding panel
On vehicles with a panorama roof with power
tilt/sliding panel, you can then close the
roller sunblind.
i Notes on the automatic reversing feature
for: R
the side window ( Y
page 90)R
the panorama roof with power tilt/slid-
ing panel ( Y
page 95)R
the roller sunblind ( Y
page 97)
Using the SmartKey X
Vehicles with Exclusive Package or
AMG Exclusive Package but without
KEYLESS-GO and the KEYLESS-GO start
function: for the following operations,
point the tip of the SmartKey at the door
handle on the driver's door. The SmartKey
must be close to the driver's door handle.
i Vehicles with KEYLESS-GO or the KEY-
LESS-GO start function: the SmartKey
must be in close proximity to the vehicle. X
Press and hold the �7 button until the
side windows and the panorama roof with
power tilt/sliding panel are fully closed. X
Make sure that all the side windows and the
panorama roof with power tilt/sliding
panel are closed.
On vehicles with a panorama roof with power
tilt/sliding panel: X
Press and hold the �7 button again until
the roller sunblind of the panorama roof
with power tilt/sliding panel closes. X
To interrupt convenience closing:
release the �7 button.
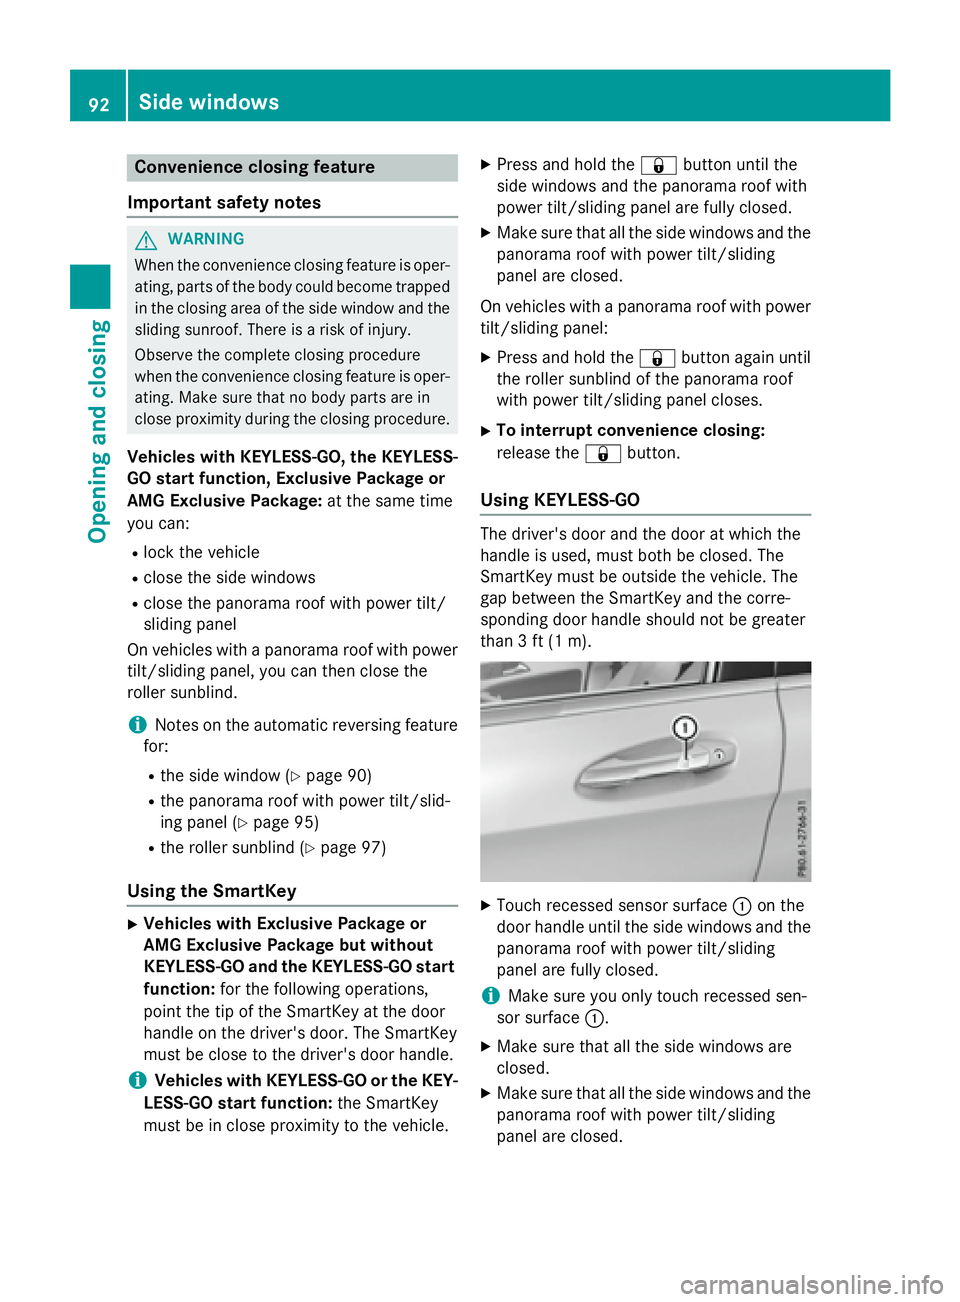
Using KEYLESS-GO The driver's door and the door at which the
handle is used, must both be closed. The
SmartKey must be outside the vehicle. The
gap between the SmartKey and the corre-
sponding door handle should not be greater
than 3 ft (1 m).
X
Touch recessed sensor surface �C on the
door handle until the side windows and the
panorama roof with power tilt/sliding
panel are fully closed.
i Make sure you only touch recessed sen-
sor surface �C . X
Make sure that all the side windows are
closed. X
Make sure that all the side windows and the
panorama roof with power tilt/sliding
panel are closed.92
Side windows
Opening and closing
Page 95 of 390
On vehicles with a panorama roof with power
tilt/sliding panel: X
Touch recessed sensor surface �C on the
door handle again until the roller sunblind
of the panorama sliding sunroof closes. X
To interrupt convenience closing:
release recessed sensor surface �C on the
door handle.
Resetting the side windows If a side window can no longer be closed fully,
you must reset it. X
Close all the doors. X
Turn the SmartKey to position 1 or 2 in the
ignition lock ( Y
page 149).X
Pull the corresponding switch on the door
control panel until the side window is com-
pletely closed ( Y
page 91).X
Hold the switch for an additional second.
If the side window opens again slightly: X
Immediately pull the corresponding switch
on the door control panel until the side win-
dow is completely closed ( Y
page 91).X
Hold the switch for an additional second. X
If the respective side window remains
closed after the button is released, then it
has been set correctly. If this is not the
case, repeat the steps above again. Side windows 93
Opening and closing Z
Page 96 of 390
Problems with the side windows
G WARNING
If you close a side window again immediately after it has been blocked or reset, the side window
closes with increased or maximum force. The reversing feature is then not active. Parts of the
body could be trapped in the closing area in the process. This poses an increased risk of injury or
even fatal injury.
Make sure that no parts of the body are in the closing area. To stop the closing process, release
the switch or push the switch again to reopen the side window.
Problem
Possible causes/consequences and �P Solutions
A side window cannot
be closed because it is
blocked by objects, e.g.
leaves in the window
guide. X
Remove the objects. X
Close the side window.
A side window cannot
be closed and you can-
not see the cause. If a side window is obstructed during closing and reopens again
slightly: X
Immediately after the window blocks, pull the corresponding
switch again until the side window has closed.
The side window is closed with increased force.
If a side window is obstructed again during closing and reopens
again slightly: X
Immediately after the window blocks, pull the corresponding
switch again until the side window has closed.
The side window is closed without the anti-entrapment feature.
Panorama roof with power tilt/sliding
panel
Important safety notes
In the following section, the term "sliding sun-
roof" refers to the panorama roof with power
tilt/sliding panel.
G WARNING
While opening and closing the sliding sunroof,
body parts in close proximity could become
trapped. There is a risk of injury.
Make sure that no body parts are in close
proximity during the opening and closing pro-
cedures. If somebody becomes trapped: R
release the switch immediately, or R
during automatic operation, push the
switch briefly in any direction
The opening or closing procedure will be stop-
ped.
G WARNING
If children operate the sliding sunroof they
could become trapped, particularly if they are
left unsupervised. There is a risk of injury.
When leaving the vehicle, always take the
SmartKey with you and lock the vehicle. Never
leave children unsupervised in the vehicle.94
Panorama roof with power tilt/sliding panel
Opening and closing
Page 97 of 390
G WARNING
At high speeds the raised sliding sunroof auto-
matically lowers slightly at the rear. This could
trap you or other persons. There is a risk of
injury. Make sure that nobody reaches into
the sweep of the sliding sunroof whilst the
vehicle is in motion.
If somebody becomes trapped, immediately
pull back the sliding sunroof switch. The slid-
ing sunroof lifts during opening.
! Only open the sliding sunroof if it is free of
snow and ice. Otherwise, malfunctions may
occur.
Do not allow anything to protrude from the
sliding sunroof. Otherwise, the seals could
be damaged.
! The weather can change abruptly. It could
start to rain or snow. Make sure that the
sliding sunroof is closed when you leave the
vehicle. The vehicle electronics can be
damaged if water enters the vehicle inte-
rior.
i Resonance noises can occur in addition to
the usual airflow noises when the sliding
sunroof is open. They are caused by minor
pressure fluctuations in the vehicle interior.
Change the position of the sliding sunroof
or open a side window slightly to reduce or
eliminate these noises.
Sliding sunroof reversing feature
In the following section, the term "sliding sun-
roof" refers to the panorama roof with power
tilt/sliding panel.
The sliding sunroof is equipped with an auto-
matic reversing feature. If a solid object
blocks or restricts the sliding sunroof during
the closing process, the sliding sunroof opens
again automatically. However, the automatic
reversing feature is only an aid and does not
relieve you of the responsibility of paying
attention when closing the sliding sunroof. G WARNING
The reversing feature does not react: R
to soft, light and thin objects, e.g. small fin-
gers R
over the last 1/6 in (4 mm) of the closing
movement R
during resetting R
when closing the sliding sunroof again man-
ually immediately after automatic reversing
This means that the reversing feature cannot
prevent someone being trapped in these sit-
uations. There is a risk of injury.
Make sure that no body parts are in close
proximity during the closing procedure.
If somebody becomes trapped: R
release the switch immediately, or R
press the switch in any direction during the
automatic closing process
The closing process is stopped.
Operating the panorama roof with
power tilt/sliding panel
Opening and closing
�C
To raise �D
To open �
Page 98 of 390
X
Turn the SmartKey to position 1 or 2 in the
ignition lock ( Y
page 149).X
Press or pull the �W switch in the corre-
sponding direction.
If you press/pull the �W switch beyond the
point of resistance, automatic operation is
started in the corresponding direction. You
can stop automatic operation by pressing/
pulling the switch again.
After opening the sliding sunroof, the roller
sunblind closes slightly automatically. This
reduces drafts in the vehicle interior.
If the sliding sunroof is raised at the rear, it
lowers slightly automatically at higher
speeds. The noise level in the vehicle interior
is reduced as a result.
At low speeds it raises again automatically.
You can also temporarily deactivate auto-
matic lowering. To do so, press the �W
switch. The sliding sunroof raises again auto-
matically.
You can continue to operate the sliding sun-
roof after switching off the engine or remov-
ing the SmartKey from the ignition lock. This
function remains active for five minutes or
until you open a front door.
The sliding sunroof cannot be opened if a roof
carrier is installed. In order to allow ventila-
tion of the vehicle interior, you can raise the
sliding sunroof.
If contact is made with a roof carrier approved
by Mercedes-Benz, the sliding sunroof lowers
slightly but remains raised at the rear.
Rain-closing feature
The rain-closing feature is only available for
vehicles with a rain sensor.
When the SmartKey is in position 0 in the
ignition lock or is removed, the sliding sunroof
closes automatically: R
if it starts to rain. R
at extreme outside temperatures. R
after six hours. R
if there is a malfunction in the power sup-
ply.
The panorama roof with power tilt/sliding
panel remains raised at the rear in order to
allow ventilation of the vehicle interior.
If the panorama roof with power tilt/sliding
panel is obstructed while being closed by the
rain-closing feature, it opens again slightly.
The rain-closing feature is then deactivated.
The panorama roof with power tilt/sliding
panel does not close if: R
it is raised at the rear. R
it is blocked. R
no rain is falling on the area of the wind-
shield being monitored by the rain sensor.
If the vehicle is under a bridge or in a car-
port, for example, the field of the sensor
may be covered.
Operating the roller sunblind for the
panorama roof with power tilt/sliding
panel
Important safety notes
G WARNING
Parts of the body could become trapped
between the roller sunblind and frame or slid-
ing sunroof during automatic opening or clos-
ing. There is a risk of injury.
When opening or closing, make sure that no
body parts are in the sweep of the roller sun-
blind.
If somebody becomes trapped: R
release the switch immediately, or R
during automatic operation, push the
switch briefly in any direction
The opening or closing procedure will be stop-
ped.
The roller sunblind shields the vehicle interior
from sunlight. The roller sunblind can only be
opened and closed when the panorama roof
with power tilt/sliding panel is closed.96
Panorama roof with power tilt/sliding panel
Opening and closing