2016 MERCEDES-BENZ GLA oil level
[x] Cancel search: oil levelPage 12 of 390
Emergency
Automatic measures after an acci-
dent ................................................ .5 8
Emergency braking
see BAS (Brake Assist System)
Emergency release
Driver's door .................................... 84
Vehicle ............................................ .8 4
Emergency Tensioning Devices
Activation ........................................ .5 6
Emergency unlocking
Tailgate ............................................ 89
Engine
Check Engine warning lamp .......... .2 75
Display message ............................ 251
ECO start/stop function ................ 153
Engine number ............................... 377
Irregular running ............................ 156
Jump-starting ................................. 331
Starting (important safety notes) ... 151
Starting problems .......................... 156
Starting the engine with the
SmartKey ....................................... 151
Starting with the Start/Stop but-
ton ................................................. 152
Switching off .................................. 172
Tow-starting (vehicle) ..................... 337
Engine electronics
Problem (malfunction) ................... 156
Engine oil
Adding .......................................... .3 10
Additives ........................................ 380
Checking the oil level ..................... 309
Checking the oil level using the
dipstick .......................................... 310
Display message ............................ 252
Filling capacity ............................... 380
Notes about oil grades ................... 379
Notes on oil level/consumption .... 309
Temperature (on-board computer,
Mercedes-AMG vehicles) .............. .2 31
Viscosity .............. .......................... 380
E ng
ine, starting
see Starting (engine)
ESC (Electronic Stability Control)
see ESP ®
(Electronic Stability Program) ESP ®
(Electronic Stability Pro-
gram)
AMG menu (on-board computer) ... 232
Characteristics ................................. 69
Deactivating/activating (button
in Mercedes-AMG vehicles) ............. 70
Deactivating/activating (except
Mercedes ‑ AMG vehicles) ................. 70
Deactivating/activating (on-
board computer, except
Mercedes-AMG vehicles) .............. .2 27
Display message ............................ 236
Function/notes ................................ 69
General notes .................................. 69
Important safety information ........... 69
Trailer stabilization ........................... 72
Warning lamp ................................. 271
ETS/4ETS (Electronic Traction Sys-
tem) ...................................................... 69
Exhaust
see Exhaust pipe
Exhaust check ................................... 175
Exhaust pipe
Cleaning ......................................... 318
Exterior lighting
Cleaning ......................................... 317
see Lights
Exterior mirrors
Adjusting ....................................... 109
Dipping (automatic) ....................... 110
Folding in when locking (on-board
computer) ...................................... 231
Folding in/out (automatically) ....... 110
Folding in/out (electrically) ........... 109
Out of position (troubleshooting) ... 110
Storing settings (memory func-
tion) ............................................... 112
Storing the parking position .......... 111
Eyeglasses compartment ................. 281
F
Filler cap
see Refueling
Flat tire
MOExtended tires .......................... 323
Preparing the vehicle ..................... 322
TIREFIT kit ...................................... 32410
Index
Page 184 of 390
function cannot hold the vehicle on such sur-
faces.
Checklist before driving off-road X
Engine oil level: check the engine oil level
and add oil if necessary.
When driving on steep gradients, the
engine oil level must be sufficiently high to
ensure a correct oil supply in the vehicle. X
Wheels and tires: check the tire tread
depth and tire pressure. X
Check for damage and remove any foreign
objects, e.g. small stones, from the
wheels/tires. X
Replace any missing valve caps. X
Replace dented or damaged wheels. X
Rims: dented or bent rims can result in a
loss of tire pressure and damage the tire
bead. Before driving off-road, check the
wheels and replace them if necessary.
Checklist after driving off-road
! If you detect damage to the vehicle after
driving off-road, have the vehicle checked
immediately at a qualified specialist work-
shop. X
Deactivate off-road program ( Y
page 157).X
Deactivate DSR ( Y
page 197).X
Clean the headlamps and rear lights and
check for damage. X
Clean the front and rear license plates. X
Clean the wheels and tires with a water jet
and remove any foreign objects. X
Clean the wheels, wheel housings and the
vehicle underside with a water jet; check
for any foreign objects and damage. X
Check whether twigs or other parts of
plants have become trapped. These
increase the risk of fire and can damage
fuel pipes, brake hoses or the rubber bel-
lows of the axle joints and propeller shafts. X
After the trip, examine without fail the
entire undercarriage, wheels, tires, brakes, bodywork structure, steering, chassis and
exhaust system for damage. X
After driving in sand, mud, gravel, water or
similar dirty conditions, have the following
checked and cleaned: R
brake discs R
wheels R
brake pads R
axle joints X
If you detect strong vibrations after off-road
travel, check for foreign objects in the
wheels and drive train and remove them if
necessary. Foreign objects can disturb the
balance and cause vibrations.
Driving over poor road surfaces places
greater demands on your vehicle than driving
on normal roads. After driving off-road, check
the vehicle. This allows you to detect damage
promptly and reduce the risk of an accident to
yourself and other road users.
Driving on sand
Observe the following rules when driving on
sand: R
Activate the off-road program
( Y
page 157). R
Avoid high engine speeds. R
Use the left-hand steering wheel paddle
shifter to shift to a lower gear appropriate
to the terrain. R
Drive quickly to overcome the rolling resist-
ance. Otherwise the vehicle's wheels could
become stuck in loose ground. R
Drive in the tracks of other vehicles if pos-
sible. Make sure that: -
the tire ruts are not too deep. -
the sand is sufficiently firm. -
the ground clearance of the vehicle is
sufficient.
Tire ruts and gravel roads
! Check that the ruts are not too deep and
that your vehicle has sufficient clearance.182
Driving tips
Driving and parking
Page 312 of 390
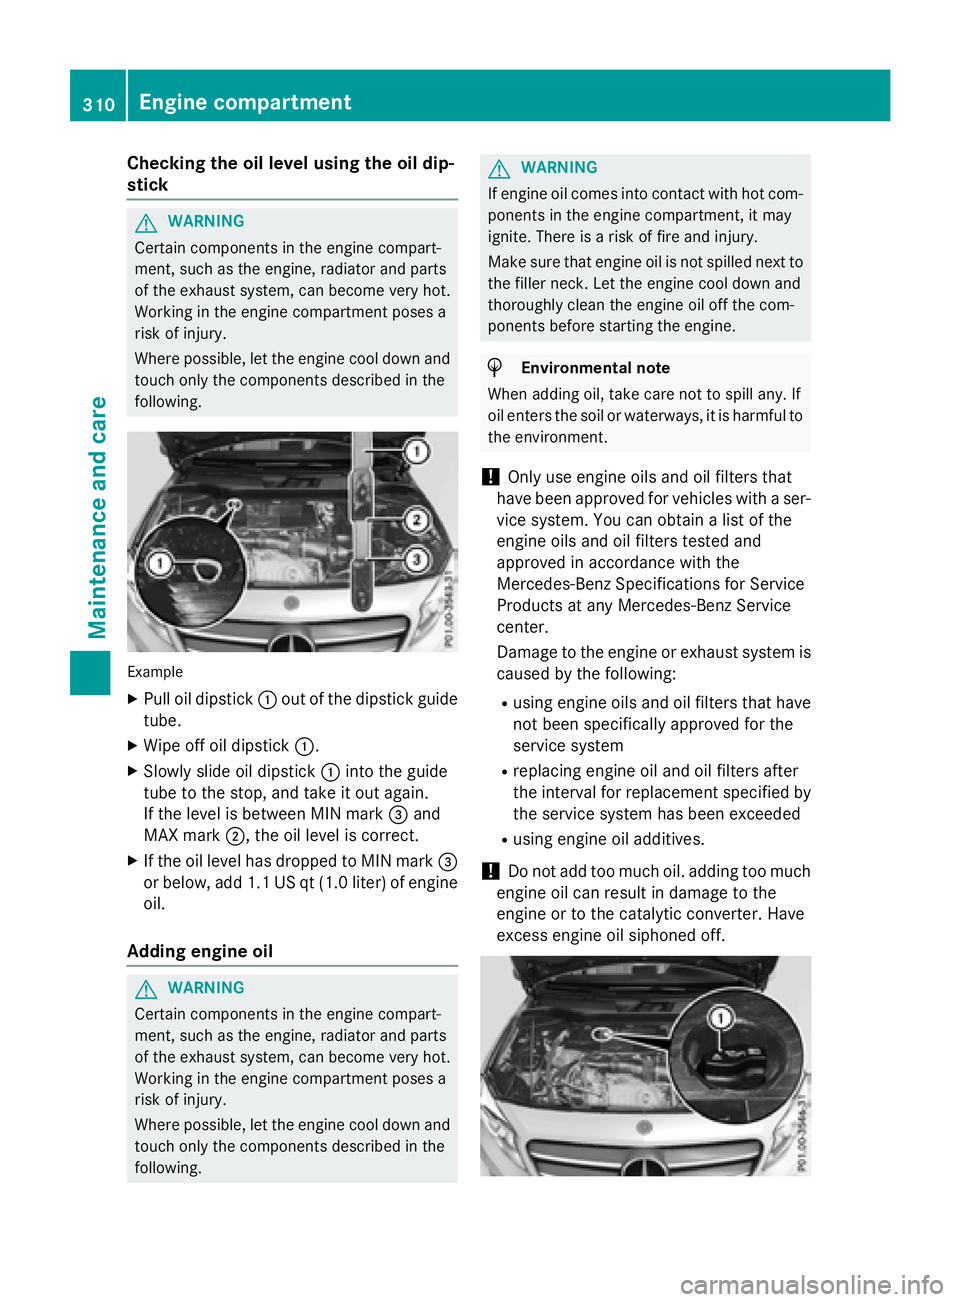
Checking the oil level using the oil dip-
stick
G WARNING
Certain components in the engine compart-
ment, such as the engine, radiator and parts
of the exhaust system, can become very hot.
Working in the engine compartment poses a
risk of injury.
Where possible, let the engine cool down and
touch only the components described in the
following.
Example X
Pull oil dipstick �C out of the dipstick guide
tube. X
Wipe off oil dipstick �C .X
Slowly slide oil dipstick �C into the guide
tube to the stop, and take it out again.
If the level is between MIN mark �
Page 313 of 390
Example: engine oil cap X
Turn cap �C counter-clockwise and remove
it. X
Add engine oil.
If the oil level is at or below the MIN mark on
the oil dipstick, add 1.1 US qt (1.0 l) of
engine oil. X
Replace cap �C on the filler neck and turn
clockwise.
Ensure that the cap locks into place
securely. X
Check the oil level again with the oil dip-
stick ( Y
page 310).
Further information on engine oil
( Y
page 379).
Checking and adding other service
products
Checking coolant level
G WARNING
The cooling system is pressurized, particularly
when the motor is warm. If you open the cap,
you could be scalded if hot coolant sprays out.
There is a risk of injury.
Let the engine cool down before you open the
cap. Wear gloves and eye protection. Slowly
open the cap to relieve pressure.
! The coolant may only be checked and cor-
rected when the engine is cool (coolant
temperature below 104 ‡ (40 †). Check-
ing the coolant when the coolant tempera-
ture is above 104 ‡ (40 †) may result in
damage to the engine or to the engine cool-
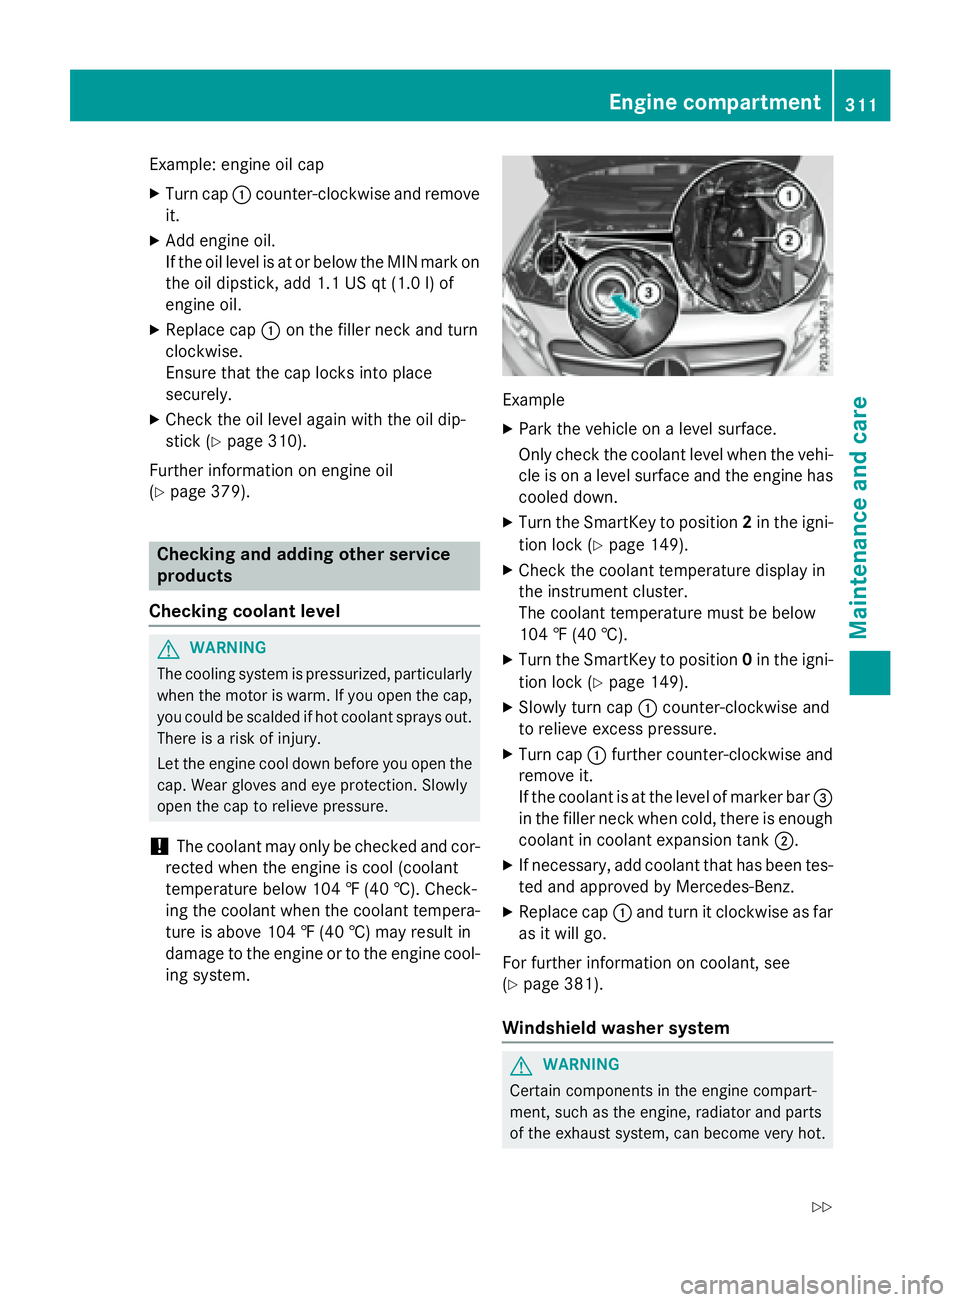
ing system. Example X
Park the vehicle on a level surface.
Only check the coolant level when the vehi-
cle is on a level surface and the engine has
cooled down. X
Turn the SmartKey to position 2 in the igni-
tion lock ( Y
page 149). X
Check the coolant temperature display in
the instrument cluster.
The coolant temperature must be below
104 ‡ (40 †). X
Turn the SmartKey to position 0 in the igni-
tion lock ( Y
page 149). X
Slowly turn cap �C counter-clockwise and
to relieve excess pressure. X
Turn cap �C further counter-clockwise and
remove it.
If the coolant is at the level of marker bar �
Page 314 of 390
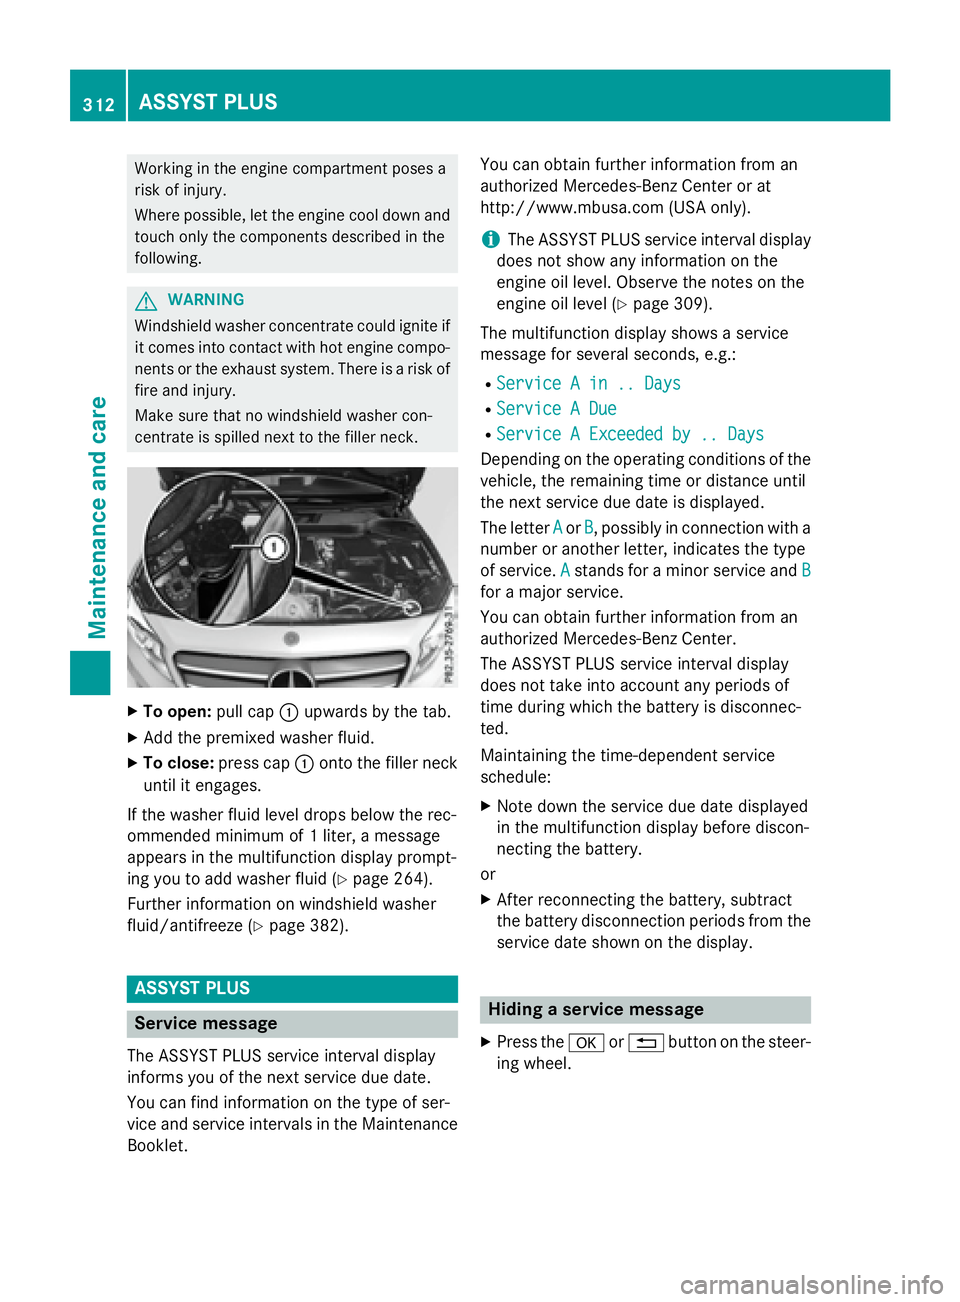
Working in the engine compartment poses a
risk of injury.
Where possible, let the engine cool down and
touch only the components described in the
following.
G WARNING
Windshield washer concentrate could ignite if
it comes into contact with hot engine compo-
nents or the exhaust system. There is a risk of
fire and injury.
Make sure that no windshield washer con-
centrate is spilled next to the filler neck.
X
To open: pull cap �C upwards by the tab.X
Add the premixed washer fluid. X
To close: press cap �C onto the filler neck
until it engages.
If the washer fluid level drops below the rec-
ommended minimum of 1 liter, a message
appears in the multifunction display prompt-
ing you to add washer fluid ( Y
page 264).
Further information on windshield washer
fluid/antifreeze ( Y
page 382).
ASSYST PLUS
Service message
The ASSYST PLUS service interval display
informs you of the next service due date.
You can find information on the type of ser-
vice and service intervals in the Maintenance
Booklet. You can obtain further information from an
authorized Mercedes-Benz Center or at
http://www.mbusa.com (USA only).
i The ASSYST PLUS service interval display
does not show any information on the
engine oil level. Observe the notes on the
engine oil level ( Y
page 309).
The multifunction display shows a service
message for several seconds, e.g.: R
Service A in .. Days R
Service A Due R
Service A Exceeded by .. Days
Depending on the operating conditions of the
vehicle, the remaining time or distance until
the next service due date is displayed.
The letter A or B , possibly in connection with a
number or another letter, indicates the type
of service. A
stands for a minor service and B
for a major service.
You can obtain further information from an
authorized Mercedes-Benz Center.
The ASSYST PLUS service interval display
does not take into account any periods of
time during which the battery is disconnec-
ted.
Maintaining the time-dependent service
schedule: X
Note down the service due date displayed
in the multifunction display before discon-
necting the battery.
or X
After reconnecting the battery, subtract
the battery disconnection periods from the
service date shown on the display.
Hiding a service message X
Press the �v or �8 button on the steer-
ing wheel.312
ASSYST PLUS
Maintenance and care
Page 364 of 390
Curb weight
The weight of a vehicle with standard equip-
ment including the maximum capacity of fuel,
oil and coolant. It also includes the air-condi-
tioning system and optional equipment if
these are installed in the vehicle, but does not
include passengers or luggage.
Maximum load rating
The maximum tire load is the maximum per-
missible weight in kilograms or lbs for which a
tire is approved.
Maximum permissible tire pressure
Maximum permissible tire pressure for one
tire.
Maximum load on one tire
Maximum load on one tire. This is calculated
by dividing the maximum axle load of one axle
by two.
PSI (pounds per square inch)
A standard unit of measure for tire pressure.
Aspect ratio
Relationship between tire height and tire
width in percent.
Tire pressure
This is pressure inside the tire applying an
outward force to each square inch of the tire's
surface. The tire pressure is specified in
pounds per square inch (psi), in kilopascal
(kPa) or in bar. The tire pressure should only
be corrected when the tires are cold.
Cold tire pressure
The tires are cold: R
if the vehicle has been parked with the tires
out of direct sunlight for at least three
hours and R
if the vehicle has not been driven further
than 1 mile (1.6 km) Tread
The part of the tire that comes into contact
with the road.
Bead
The tire bead ensures that the tire sits
securely on t h
e wheel. There are several steel
wires in the bead to prevent the tire from
coming loose from the wheel rim.
Sidewall
The part of the tire between the tread and the
bead.
Weight of optional extras
The combined weight of those optional extras
that weigh more than the replaced standard
parts and more than 2.3 kg (5 lbs). These
optional extras, such as high-performance
brakes, level control, a roof rack or a high-
performance battery, are not included in the
curb weight and the weight of the accesso-
ries.
TIN (Tire Identification Number)
This is a unique identifier which can be used
by a tire manufacturer to identify tires, for
example for a product recall, and thus identify
the purchasers. The TIN is made up of the
manufacturer's identity code, tire size, tire
type code and the manufacturing date.
Load bearing index
The load bearing index (also load index) is a
code that contains the maximum load bearing
capacity of a tire.
Traction
Traction is the result of friction between the
tires and the road surface.
Treadwear indicators
Narrow bars (tread wear bars) that are dis-
tributed over the tire tread. If the tire tread is
level with the bars, the wear limit of �
Page 365 of 390
Occupant distribution
The distribution of occupants in a vehicle at
their designated seating positions.
Total load limit
Nominal load and luggage load plus 68 kg
(150 lbs) multiplied by the number of seats in
the vehicle.
Changing a wheel
Flat tire The "Breakdown assistance" section
( Y
page 322) contains information and notes
on how to deal with a flat tire. Information on
driving with MOExtended tires in the event of
a flat tire can be found under "MOExtended
tires (tires with run-flat characteristics"
( Y
page 323).
Rotating the wheels
G WARNING
Interchanging the front and rear wheels may
severely impair the driving characteristics if
the wheels or tires have different dimensions.
The wheel brakes or suspension components
may also be damaged. There is a risk of acci-
dent.
Rotate front and rear wheels only if the wheels
and tires are of the same dimensions.
! On vehicles equipped with a tire pressure
monitor, electronic components are loca-
ted in the wheel.
Tire-mounting tools should not be used
near the valve. This could damage the elec-
tronic components.
Only have tires changed at a qualified spe-
cialist workshop.
Observe the instructions and safety notes in
the "Changing a wheel" section ( Y
page 363).
The wear patterns on the front and rear tires
differ, depending on the operating conditions.
Rotate the wheels before a clear wear pattern has formed on the tires. Front tires typically
wear more on the shoulders and the rear tires
in the center.
On vehicles that have the same size front and
rear wheels, you can rotate the wheels
according to the intervals in the tire manu-
facturer's warranty book in your vehicle docu-
ments. If no warranty book is available, the
tires should be rotated every 3,000 to
6,000 miles (5,000 to 10,000 km). Depending
on tire wear, this may be required earlier. Do
not change the direction of wheel rotation.
Clean the contact surfaces of the wheel and
the brake disc thoroughly every time a wheel
is rotated. Check the tire pressure and, if nec-
essary, restart the tire pressure loss warning
system or the tire pressure monitor.
Direction of rotation Tires with a specified direction of rotation
have additional benefits, e.g. if there is a risk
of hydroplaning. These advantages can only
be gained if the tires are installed correspond-
ing to the direction of rotation.
An arrow on the sidewall of the tire indicates
its correct direction of rotation.
Storing wheels
Store wheels that are not being used in a cool,
dry and preferably dark place. Protect the
tires from oil, grease, gasoline and diesel.
Mounting a wheel
Preparing the vehicle X
Stop the vehicle on solid, non-slippery and
level ground. X
Apply the electric parking brake manually. X
Bring the front wheels into the straight-
ahead position. X
Shift the transmission to position P .X
Switch off the engine.Changing a wheel 363
Wheels and tires Z
Page 384 of 390
Windshield washer system
Important safety notes
G WARNING
Windshield washer concentrate could ignite if
it comes into contact with hot engine compo-
nents or the exhaust system. There is a risk of
fire and injury.
Make sure that no windshield washer con-
centrate is spilled next to the filler neck.
! Do not add distilled or de-ionized water to
the washer fluid container. Otherwise, the
level sensor may be damaged.
! Only MB SummerFit and MB WinterFit
washer fluid should be mixed together. The
spray nozzles may otherwise become
blocked.
When handling washer fluid, observe the
important safety notes on service products
( Y
page 377).
At temperatures above freezing: X
Fill the washer fluid reservoir with a mixture
of water and windshield washer fluid, e.g.
MB SummerFit.
Add 1 part MB SummerFit to 100 parts water.
At temperatures below freezing: X
Fill the washer fluid reservoir with a mixture
of water and washer fluid, e.g. MB Winter-
Fit.
For the correct mixing ratio refer to the
information on the antifreeze reservoir.
i Add windshield washer fluid, e.g. MB
SummerFit or MB WinterFit, to the washer
fluid all year round.
Climate control system refrigerant
Important safety notes
The climate control system of your vehicle is
filled with refrigerant R ‑ 134a. The instruction label regarding the refrigerant
type used can be found on the left, on the
underside of the hood.
! Only the refrigerant R ‑ 134a and the PAG
oil approved by Mercedes-Benz may be
used. The approved PAG oil may not be
mixed with any other PAG oil that is not
approved for R-134a refrigerant. Other-
wise, the climate control system may be
damaged.
Service work, such as topping up refrigerant
or replacing components, may only be carried
out by a qualified specialist workshop. All
applicable regulations must be adhered to,
SAE standard J639 included.
Always have work on the climate control sys-
tem carried out at a qualified specialist work-
shop.
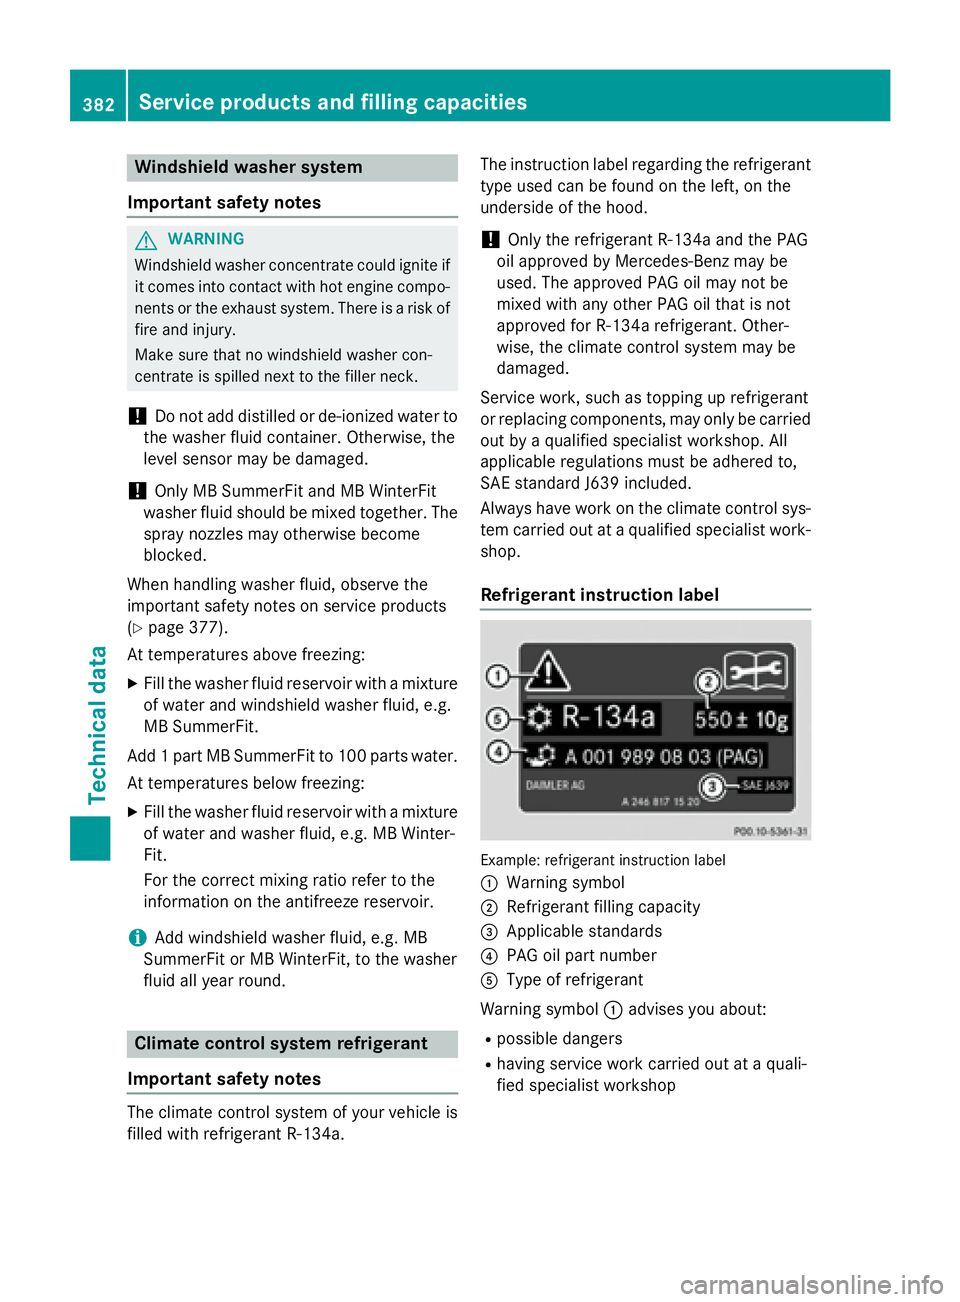
Refrigerant instruction label
Example: refrigerant instruction label
�C
Warning symbol �D
Refrigerant filling capacity �