2016 MERCEDES-BENZ GLA brake
[x] Cancel search: brakePage 317 of 390
Power washers
G WARNING
The water jet from a circular jet nozzle (dirt
blasters) can cause invisible exterior damage
to the tires or chassis components. Compo-
nents damaged in this way may fail unexpect-
edly. There is a risk of an accident.
Do not use power washers with circular jet
nozzles to clean the vehicle. Have damaged
tires or chassis components replaced imme-
diately.
! Always maintain a distance of at least
11.8 in (30 cm) between the vehicle and the
power washer nozzle. Information about
the correct distance is available from the
equipment manufacturer.
Move the power washer nozzle around
when cleaning your vehicle.
Do not aim directly at any of the following: R
tires R
door gaps, roof gaps, joints, etc. R
electrical components R
battery R
connectors R
lights R
seals R
trim R
ventilation slots
Damaged seals or electrical components
can lead to leaks or failures.
! Edition 1 special model: parts of your
vehicle are covered with a decorative foil.
Maintain a distance of at least 70 cm
between the foil-wrapped parts of the vehi-
cle and the nozzle of the high pressure
cleaner.
Information about the correct distance is
available from the equipment manufac-
turer.
Move the power washer nozzle around
when cleaning your vehicle. Cleaning the paintwork
! Do not affix: R
stickers R
films R
magnetic plates or similar items
to painted surfaces. You could otherwise
damage the paintwork.
Scratches, corrosive deposits, areas affected
by corrosion and damage caused by inade-
quate care cannot always be completely
repaired. In such cases, visit a qualified spe-
cialist workshop. X
Remove dirt immediately, where possible,
while avoiding rubbing too hard. X
Soak insect remains with insect remover
and rinse off the treated areas afterwards. X
Soak bird droppings with water and rinse
off the treated areas afterwards. X
Remove coolant, brake fluid, tree resin,
oils, fuels and greases by rubbing gently
with a cloth soaked in petroleum ether or
lighter fluid. X
Use tar remover to remove tar stains. X
Use silicone remover to remove wax.
If water no longer forms "beads" on the paint
surface, use the paint care products recom-
mended and approved by Mercedes-Benz.
This is the case approximately every three to
five months, depending on the climate con-
ditions and the care product used.
If dirt has penetrated the paint surface or if
the paint has become dull, the paint cleaner
recommended and approved by Mercedes-
Benz should be used.
Do not use these care products in the sun or
on the hood while the hood is hot. X
Use a suitable touch-up stick, e.g. MB
Touch-Up Stick, to repair slight damage to
the paintwork quickly and provisionally. Care 315
Maintenance and care Z
Page 318 of 390
Matte finish care
! Never polish the vehicle or the light alloy
wheels. Polishing causes the finish to
shine.
! The following may cause the paint to
become shiny and thus reduce the matte
effect: R
strong rubbing of the paintwork with
unsuitable materials R
frequent use of automatic car washes R
washing the vehicle in direct sunlight
! Never use paint cleaner, buffing or pol-
ishing products, or gloss preserver, e.g.
wax. These products are only suitable for
high-gloss surfaces. Their use on vehicles
with matte finish leads to considerable sur-
face damage (shiny, spotted areas).
Always have paintwork repairs carried out
at a qualified specialist workshop.
! Do not use wash programs with a hot wax
treatment under any circumstances.
Observe these notes if your vehicle has a
clear matte finish. This will help you to avoid
damage to the paintwork due to incorrect
treatment.
These notes also apply to light alloy wheels
with a clear matte finish.
The vehicle should preferably be washed by
hand using a soft sponge, car shampoo and
plenty of water.
Use only insect remover and car shampoo
from the range of approved Mercedes-Benz
care products.
Cleaning the vehicle parts
Cleaning the wheels
G WARNING
The water jet from a circular jet nozzle (dirt
blasters) can cause invisible exterior damage
to the tires or chassis components. Compo- nents damaged in this way may fail unexpect-
edly. There is a risk of an accident.
Do not use power washers with circular jet
nozzles to clean the vehicle. Have damaged
tires or chassis components replaced imme-
diately.
! Do not use acidic wheel cleaning products
to remove brake dust. This could damage
wheel bolts and brake components.
! Do not park the vehicle for an extended
period straight after cleaning it, particularly
after having cleaned the wheels with wheel
cleaner. Wheel cleaners could cause
increased corrosion of the brake discs and
brake pads/linings. For this reason, you
should drive for a few minutes after clean-
ing. Braking heats the brake discs and the
brake pads/linings, thus drying them. The
vehicle can then be parked.
Cleaning the windows
G WARNING
You could become trapped by the windshield
wipers if they start moving while cleaning the
windshield or wiper blades. There is a risk of
injury.
Always switch off the windshield wipers and
the ignition before cleaning the windshield or
wiper blades.
! Only fold the windshield wipers away from
the windshield when vertical. Otherwise,
you will damage the hood.
! Do not use dry cloths, abrasive products,
solvents or cleaning agents containing sol-
vents to clean the inside of the windows. Do
not touch the insides of the windows with
hard objects, e.g. an ice scraper or ring.
There is otherwise a risk of damaging the
windows.
! Clean the water drainage channels of the
windshield and the rear window at regular
intervals. Deposits such as leaves, petals
and pollen may under certain circumstan-316
Care
Maintenance and care
Page 334 of 390
Do not start the vehicle using a rapid charging device. If your vehicle's battery is discharged,
the engine can be jump-started from another vehicle or from a second battery using jumper
cables. Observe the following points: R
The battery is not accessible in all vehicles. If the other vehicle's battery is not accessible,
jump-start the vehicle using a second battery or a jump-starting device. R
You may only jump-start the vehicle when the engine and exhaust system are cold. R
Do not start the engine if the battery is frozen. Let the battery thaw first. R
Only jump-start from batteries with a 12 V voltage rating. R
Only use jumper cables that are not damaged and have a sufficient cross-section and insu-
lated terminal clamps. R
Make sure that the two vehicles do not touch.
Make sure that: R
the jumper cables are not damaged. R
non-insulated parts of the terminal clamps do not come into contact with other metal parts
while the jumper cables are connected to the battery. R
The jumper cables cannot come into contact with parts which can move when the engine is
running, such as the V-belt pulley or the fan. X
Secure the vehicle by applying the electric parking brake. X
Shift the transmission to position P .X
Turn the SmartKey to position 0 in the ignition lock and remove it.X
Switch off all electrical consumers, e.g. rear window defroster, lighting, etc. X
Open the hood.
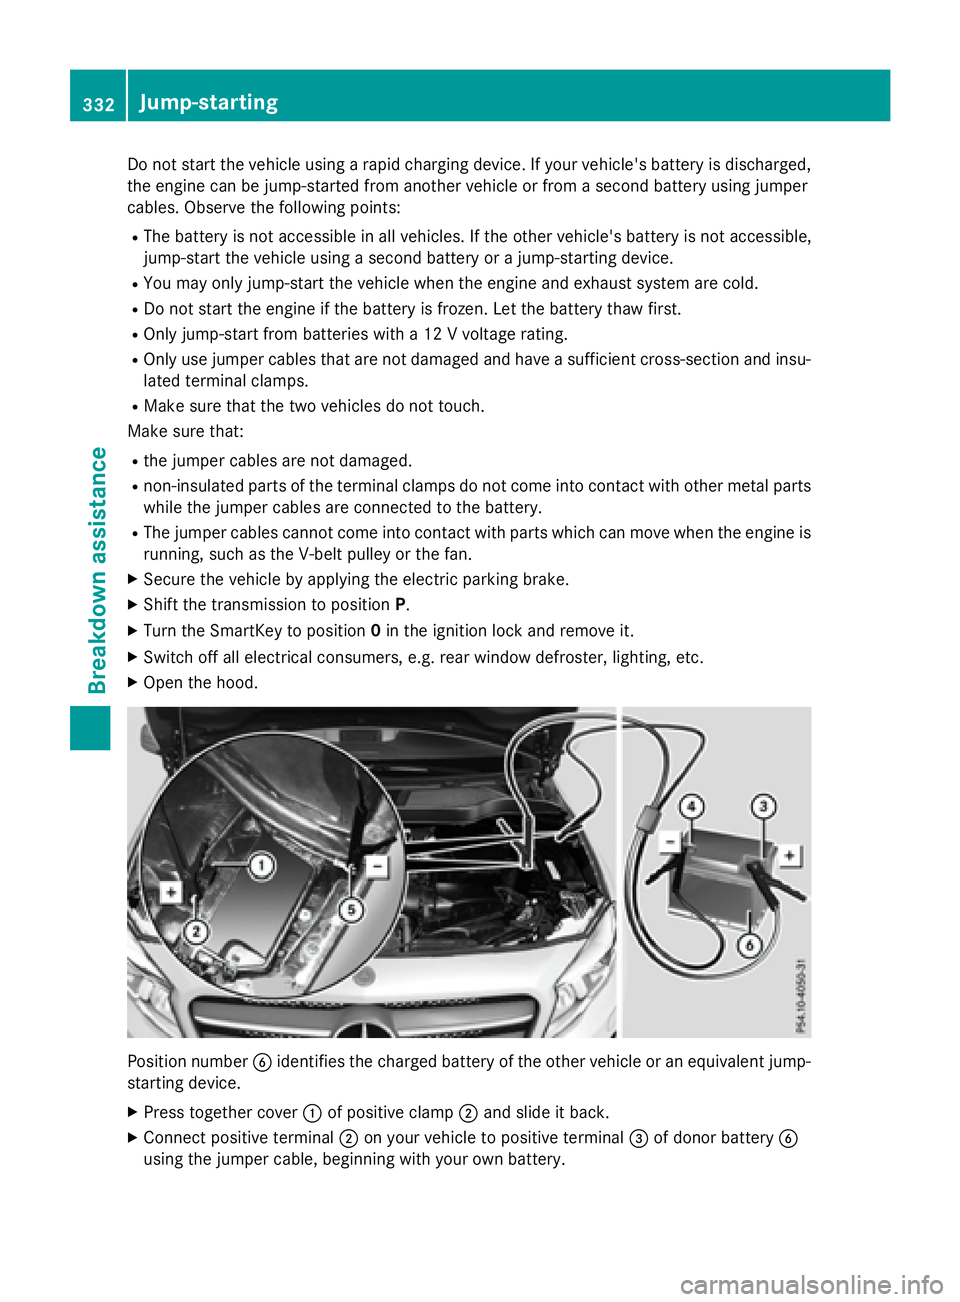
Position number �
Page 336 of 390
! Make sure that the electric parking brake
is released. If the electric parking brake is
faulty, visit a qualified specialist workshop.
! Only secure the tow rope or tow bar at the
towing eyes. Otherwise, the vehicle could
be damaged.
! Do not use the towing eyes for recovery
purposes as this could damage the vehicle.
If in doubt, recover the vehicle with a crane.
! When towing, pull away slowly and
smoothly. If the tractive power is too high,
the vehicles could be damaged.
! The vehicle can be towed a maximum of
30 miles (50km). The towing speed of
30 mph (50km/h) must not be exceeded.
If the vehicle has to be towed more than
30 miles (50km), the front axle must be
raised or the entire vehicle raised and
transported.
! Do not tow with sling-type equipment.
This could damage the vehicle.
! When towing vehicles with KEYLESS-GO,
use the key instead of the Start/Stop but-
ton. Otherwise, the automatic transmission
may shift to position P when the driver's or
front-passenger door are opened, which
could lead to damage to the transmission.
! Vehicles with automatic transmission
must not be started by tow-starting. This
could otherwise damage the transmission.
It is better to have the vehicle transported
than to have it towed away.
If the vehicle can no longer be driven because
of an accident or breakdown, you have the
following options: R
Transporting the vehicle
As a rule, you should have the vehicle trans-
ported. R
Towing the vehicle with a tow rope or tow
bar
Only tow the vehicle in exceptional cases. The battery must be connected and charged.
Otherwise, you: R
cannot turn the SmartKey to position 2 in
the ignition lock R
cannot release the electric parking brake R
cannot shift the transmission to position N
The function of the electric parking brake and
the parking lock is dependent on the on-board
voltage.
If the on-board voltage is low or there is a
system malfunction, it is possible that: R
the electric parking brake may not be
applied in certain circumstances, or R
the transmission may not be shifted to P
Switch off non-essential consumers, e.g. the
radio.
Disarm the automatic locking feature before
the vehicle is towed ( Y
page 230). You could
otherwise be locked out when pushing or
towing the vehicle.
Installing/removing the towing eye
Installing the towing eye
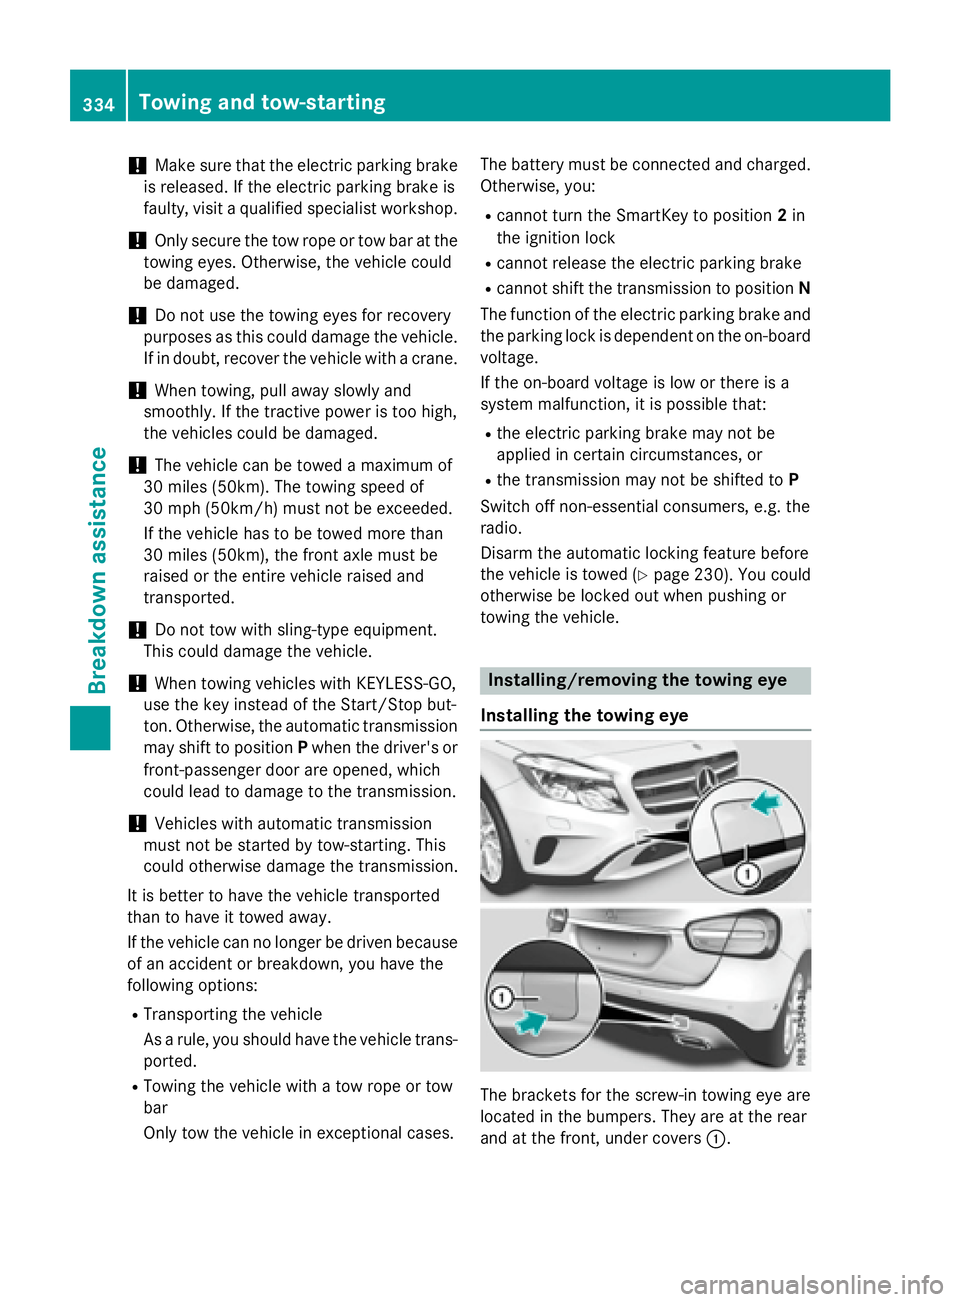
The brackets for the screw-in towing eye are
located in the bumpers. They are at the rear
and at the front, under covers �C .334
Towing and tow-starting
Breakdown assistance
Page 337 of 390
X
Remove th e towin g eye from th e stowage
space.
The towin g eye is locate d wit h th e vehicl e
tool ki t under th e cargo compartmen t floor
( Y
page 322).
Vehicles wit h th e TIREFI T kit: th e towin g
eye is beneat h th e tire inflation compres-
sor . X
Press th e mar k on cover �C inward s in th e
direction of th e arrow.X
Tak e cover �C off th e opening.X
Screw in th e towin g eye clockwise to th e
stop.
Removin g th e towing eyeX
Unscrew and remove th e towin g eye.X
Attac h cover �C to th e bumper and press
until it engages. X
Plac e th e towin g eye in th e stowage well
beneat h th e cargo compartmen t floor in
th e cargo compartmen t ( Y
page 322).X
Vehicles wit h th e TIREFI T kit: put bac k th e
tire inflation compressor.
Towing th e veh icle wit h th e fr ont axle
raised
Observ e th e important safet y note s when
towin g your vehicl e wit h th e fron t axl e raised
( Y
page 333).
Only vehicles withou t 4MATIC can be
towe d wit h th e front axle raised .
! Vehicles wit h 4MATIC mus t no t be towed
wit h either th e fron t or th e rear axl e raised,
as doin g so will damag e th e transmission .
Vehicles wit h 4MATIC may either be towed
away wit h bot h axles on th e ground or be loa-
ded up and transported.
! The ignition mus t be switched off if th e
vehicl e is bein g towed wit h th e fron t axl e
raised. Otherwise , ES P ®
may interven e and
damag e th e brak e system. X
On vehicles wit h KEYLESS-G O or th e
KEYLESS-G O star t function: you mus t
use th e SmartKey instead of th e Start/Sto p
butto n ( Y
page 150). X
Mak e sur e that th e vehicl e is stationary.X
Turn th e SmartKey to position 2 in th e igni-
tion lock. X
Whe n th e vehicl e is stationary, depress th e
brak e pedal and keep it depressed. X
Shift th e automatic transmission to posi-
tion P . X
Releas e th e brak e pedal .X
Releas e th e electric parkin g brake.X
Switc h off th e automatic locking
( Y
page 230). X
Switc h on th e hazard warnin g lamp s
( Y
page 119). X
Turn th e SmartKey in th e ignition loc k to
position 0 and leav e th e SmartKey in th e
ignition lock.
Towing a veh icle wit h bot h axles on
th e groun d
It is important that you observ e th e safet y
instruction s when towin g away your vehicl e
( Y
page 333). X
On vehicles wit h KEYLESS-G O or th e
KEYLESS-G O star t function: you mus t
use th e SmartKey instead of th e Start/Sto p
butto n ( Y
page 150).
The automatic transmission automatically
shift s to position P when you open th e driver's
or front-passenger doo r or when you remove
th e SmartKey from th e ignition lock. In order
to ensur e that th e automatic transmission
stays in position N when towin g th e vehicle,
you mus t observ e th e followin g points :X
Mak e sur e that th e vehicl e is stationary.X
Turn th e SmartKey to position 2 in th e igni-
tion lock.Towing and tow-starting 335
Breakdown assistance Z
Page 338 of 390
X
Depress and hold the brake pedal. X
Shift the automatic transmission to posi-
tion N .X
Leave the SmartKey in position 2 in the
ignition lock. X
Release the brake pedal. X
Release the electric parking brake. X
Switch on the hazard warning lamps
( Y
page 119).
i In order to signal a change of direction
when towing the vehicle with the hazard
warning lamps switched on, use the com-
bination switch as usual. In this case, only
the indicator lamps for the direction of
travel flash. After resetting the combina-
tion switch, the hazard warning lamp starts
flashing again.
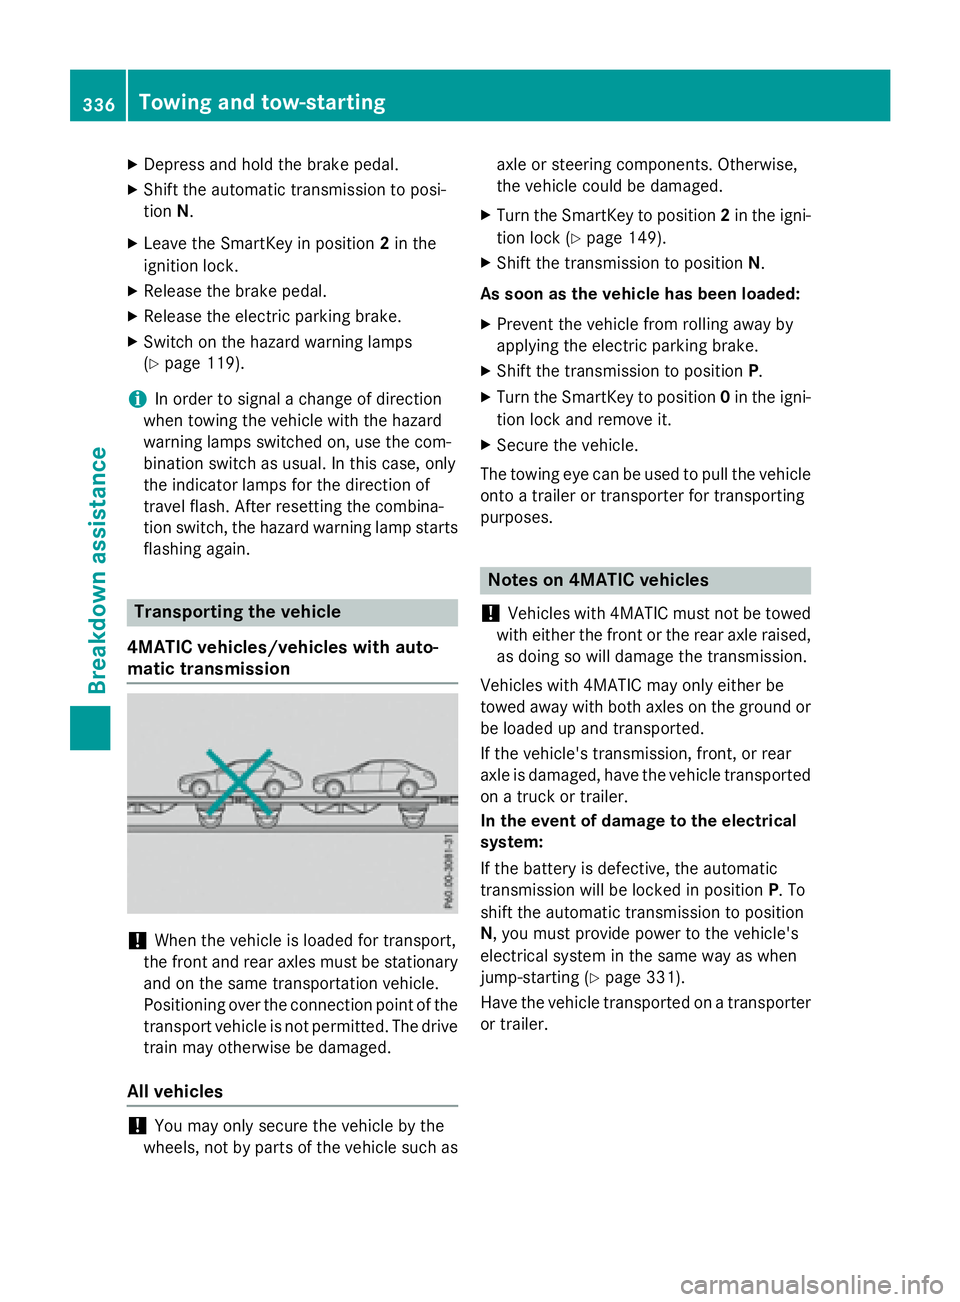
Transporting the vehicle
4MATIC vehicles/vehicles with auto-
matic transmission
! When the vehicle is loaded for transport,
the front and rear axles must be stationary
and on the same transportation vehicle.
Positioning over the connection point of the
transport vehicle is not permitted. The drive
train may otherwise be damaged.
All vehicles
! You may only secure the vehicle by the
wheels, not by parts of the vehicle such as axle or steering components. Otherwise,
the vehicle could be damaged. X
Turn the SmartKey to position 2 in the igni-
tion lock ( Y
page 149). X
Shift the transmission to position N .
As soon as the vehicle has been loaded: X
Prevent the vehicle from rolling away by
applying the electric parking brake. X
Shift the transmission to position P .X
Turn the SmartKey to position 0 in the igni-
tion lock and remove it. X
Secure the vehicle.
The towing eye can be used to pull the vehicle
onto a trailer or transporter for transporting
purposes.
Notes on 4MATIC vehicles
! Vehicles with 4MATIC must not be towed
with either the front or the rear axle raised,
as doing so will damage the transmission.
Vehicles with 4MATIC may only either be
towed away with both axles on the ground or
be loaded up and transported.
If the vehicle's transmission, front, or rear
axle is damaged, have the vehicle transported
on a truck or trailer.
In the event of damage to the electrical
system:
If the battery is defective, the automatic
transmission will be locked in position P . To
shift the automatic transmission to position
N , you must provide power to the vehicle's
electrical system in the same way as when
jump-starting ( Y
page 331).
Have the vehicle transported on a transporter
or trailer.336
Towing and tow-starting
Breakdown assistance
Page 342 of 390
Useful information
i This Operator's Manual describes all
models and all standard and optional equip-
ment of your vehicle available at the time of
publication of the Operator's Manual.
Country-specific differences are possible.
Please note that your vehicle may not be
equipped with all features described. This
also applies to safety-related systems and
functions.
i Read the information on qualified special-
ist workshops ( Y
page 25).
Important safety notes
G WARNING
If wheels and tires of the wrong size are used,
the wheel brakes or suspension components
may be damaged. There is a risk of an acci-
dent.
Always replace wheels and tires with those
that fulfill the specifications of the original
part.
When replacing wheels, make sure to use the
correct: R
designation R
model
When replacing tires, make sure to use the
correct: R
designation R
manufacturer R
model
G WARNING
A flat tire severely impairs the driving, steer-
ing and braking characteristics of the vehicle.
There is a risk of accident.
Tires without run-flat characteristics: R
do not drive with a flat tire. R
immediately replace the flat tire with your
emergency spare wheel or spare wheel, or
consult a qualified specialist workshop. Tires with run-flat characteristics: R
pay attention to the information and warn-
ing notices on MOExtended tires (tires with
run-flat characteristics).
Accessories that are not approved for your
vehicle by Mercedes-Benz or are not being
used correctly can impair the operating
safety.
Before purchasing and using non-approved
accessories, visit a qualified specialist work-
shop and inquire about: R
suitability R
legal stipulations R
factory recommendations
Information on the sizes and types of wheels
and tires for your vehicle can be found under
"Wheel/tire combinations" ( Y
page 367).
Information on tire pressure can be found: R
on the Tire and Loading Information placard
on the B-pillar on the driver's side
( Y
page 351) R
in the tire pressure table in the fuel filler flap
( Y
page 170) R
under "Tire pressure" ( Y
page 343)
Operation
Information on driving
Check the tire pressure when the vehicle is
heavily laden and adjust prior to a trip.
While driving, pay attention to vibrations,
noises and unusual handling characteristics,
e.g. pulling to one side. This may indicate that
the wheels or tires are damaged. If you sus-
pect that a tire is defective, reduce your
speed immediately. Stop the vehicle as soon
as possible to check the wheels and tires for
damage. Hidden tire damage could also be
causing the unusual handling characteristics.
If you find no signs of damage, have the tires
and wheels checked at a qualified specialist
workshop.340
Operation
Wheels and tires
Page 353 of 390
X
Make sure that the SmartKey is in position
2 in the ignition lock ( Y
page 149).X
Press �Y or �e on the steering wheel
to select the Serv.
menu.X
Press the �c or �d button to select
Tire Pressure
.X
Press the �v button.
The multifunction display shows the cur-
rent tire pressure for each tire or the Tire
pressure will be displayed after
driving a few minutes message.X
Press the �d button.
The multifunction display shows the Use
Current Pressures as New Reference
Values message.
If you wish to confirm the restart: X
Press the �v button.
The Tire Press. Monitor Restarted
message appears in the multifunction dis-
play.
After driving for a few minutes, the system
checks whether the current tire pressures
are within the specified range. The new tire
pressures are then accepted as reference
values and monitored.
If you wish to cancel the restart: X
Press the �8 button.
The tire pressure values stored at the last
restart will continue to be monitored.
Radio type approval for the tire pres-
sure monitor
Country Radio type approval number
USA FCC ID: MRXMW2433A
FCC ID: MRXGG4
FCC ID: MRXMC34MA4
Canada IC: 2546A-MW2433A
IC: 2546A-GG4
IC: 2546A-MC34MA4 Loading the vehicle
Instruction labels for tires and loads
G WARNING
Overloaded tires can overheat, causing a
blowout. Overloaded tires can also impair the
steering and driving characteristics and lead
to brake failure. There is a risk of accident.
Observe the load rating of the tires. The load
rating must be at least half of the GAWR of
your vehicle. Never overload the tires by
exceeding the maximum load.
Two instruction labels on your vehicle show
the maximum possible load.
(1) The Tire and Loading Information placard
is on the B-pillar on the driver's side. The
Tire and Loading Information placard
shows the maximum permissible number
of occupants and the maximum permis-
sible vehicle load. It also contains details
of the tire sizes and corresponding pres-
sures for tires mounted at the factory.
(2) The vehicle identification plate is on the
B-pillar on the driver's side. The vehicle
identification plate informs you of the
gross vehicle weight rating. It is made up
of the vehicle weight, all vehicle occu-
pants, the fuel and the cargo. You can
also find information about the maximum
gross axle weight rating on the front and
rear axle.
The maximum gross axle weight rating is
the maximum weight that can be carried
by one axle (front or rear axle). Never
exceed the maximum load or the maxi-
mum gross axle weight rating for the
front or rear axle.Loading the vehicle 351
Wheels and tires Z