2016 MERCEDES-BENZ GLA-Class rear view mirror
[x] Cancel search: rear view mirrorPage 113 of 390

The rear-view mirror and the exterior mirror
on the driver's side automatically go into anti-
glare mode if:
Rthe ignition is switched on and
Rincident light from headlamps strikes the
sensor in the rear-view mirror
The mirrors do not go into anti-glare mode if
reverse gear is engaged or the interior lighting
is switched on.
Parking position for the exterior mir-
ror on the front-passenger side
General notes
The "Parking position of the exterior mirror on
the front-passenger side" function is only
available if the vehicle is equipped with the
"Mirrors package".
Setting and storing the parking position
You can position the front-passenger side
exterior mirror in such a way that you can see
the rear wheel on that side as soon as you
engage reverse gear. You can store this posi-
tion.
Using reverse gear
:Button for the driver's side exterior mirror
;Button for the front-passenger side exte-
rior mirror
=Adjustment button
?Memory button M
XMake sure that the vehicle is stationary.
XTurn the SmartKey to position 2in the igni-
tion lock (
Ypage 149).
XPress button ;for the exterior mirror on
the front-passenger side.
XEngage reverse gear.
The exterior mirror on the front-passenger
side moves to the preset parking position.
XUse adjustment button =to adjust the
exterior mirror. You should see the rear
wheel and the curb in the exterior mirror.
The parking position is stored.
iIf you shift the transmission to another
position, the exterior mirror on the front-
passenger side returns to the driving posi-
tion.
Using the memory button
You can position the front-passenger side
exterior mirror in such a way that you can see
the rear wheel on that side as soon as you
engage reverse gear. This setting can be
stored using memory button M?.
XMake sure that the vehicle is stationary.
XTurn the SmartKey to position 2in the igni-
tion lock (
Ypage 149).
XPress button ;for the exterior mirror on
the front-passenger side.
XUse adjustment button =to adjust the
exterior mirror. You should see the rear
wheel and the curb in the exterior mirror.
XPress memory button M? and one of the
arrows on adjustment button =within
three seconds.
The parking position is stored if the exterior
mirror does not move.
XIf the mirror moves out of position, repeat
the steps.
Mirrors111
Seats, steering wheel and mirrors
Z
Page 210 of 390

Rear view camera
General notes
Rear view camera :is an optical parking and
maneuvering aid. It uses guide lines to show
the area behind your vehicle in the Audio/
COMAND display.
The area behind the vehicle is displayed as a
mirror image, as in the rear view mirror.
iThe text shown in the Audio/COMAND
display depends on the language setting.
The following are examples of rear view
camera messages in the Audio/COMAND
display.
Observe the notes on cleaning (
Ypage 318).
Important safety notes
The rear view camera is only an aid. It is not a
replacement for your attention to your imme-
diate surroundings. You are always responsi- ble for safe maneuvering and parking. When
maneuvering or parking, make sure that there
are no persons, animals or objects in the area
in which you are maneuvering.
Under the following circumstances, the rear
view camera will not function, or will function
in a limited manner:
Rif the tailgate is open
Rin heavy rain, snow or fog
Rat night or in very dark places
Rif the camera is exposed to very bright light
Rif the area is lit by fluorescent bulbs or LED
lighting (the display may flicker)
Rif there is a sudden change in temperature,
e.g. when driving into a heated garage in
winter
Rif the camera lens is dirty or obstructed
Observe the notes on cleaning
(
Ypage 318)
Rif the rear of your vehicle is damaged. In this
event, have the camera position and setting
checked at a qualified specialist workshop
The field of vision and other functions of the
rear view camera may be restricted due to
additional accessories on the rear of the vehi-
cle (e.g. license plate holder, bicycle rack).
Activating/deactivating the rear view
camera
XTo activate: make sure that the SmartKey
is in position 2in the ignition lock.
XMake sure that the Activation by R
gearfunction is selected in Audio 20/
COMAND; see the Digital Operator's Man-
ual.
XEngage reverse gear.
The area behind the vehicle is shown with
guide lines in the Audio 20/COMAND dis-
play.
The image from the rear view camera is
available throughout the maneuvering
process.
To deactivate: the rear view camera deacti-
vates if you shift the transmission to Por after
driving forwards a short distance.
Displays in the Audio 20/COMAND dis-
play
The rear view camera may show a distorted
view of obstacles, show them incorrectly or
not at all. The rear view camera does not show
objects in the following positions:
Rvery close to the rear bumper
Runder the rear bumper
Rin the area immediately above the tailgate
handle
208Driving systems
Driving and parking
Page 212 of 390

"Reverse parking" function
Backing up straight into a parking space
without turning the steering wheel
:White guide line without turning the steer-
ing wheel, vehicle width including the
exterior mirrors (static)
;Yellow guide line for the vehicle width
including the exterior mirrors, for current
steering wheel angle (dynamic)
=Yellow guide line at a distance of approx-
imately 3 ft (1.0 m) from the rear of the
vehicle
?Red guide line at a distance of approx-
imately 12 in (0.30 m) from the rear of the
vehicle
XMake sure that the rear view camera is
switched on (
Ypage 208).
The lane and the guide lines are shown.
XWith the help of white guide line :, check
whether the vehicle will fit into the parking
space.
XUsing white guide line :as a guide, care-
fully back up until you reach the end posi-
tion.
Red guide line ?is then at the end of the
parking space. The vehicle is almost paral-
lel in the parking space. Reverse perpendicular parking with the
steering wheel at an angle
:Parking space marking
;Yellow guide line for the vehicle width
including the exterior mirrors, for current
steering wheel angle (dynamic)
XDrive past the parking space and bring the
vehicle to a standstill.
XMake sure that the rear view camera is
switched on (
Ypage 208).
The lane and the guide lines are shown.
XWhile the vehicle is at a standstill, turn the
steering wheel in the direction of the park-
ing space until yellow guide line ;reaches
parking space marking :.
XKeep the steering wheel in that position
and back up carefully.
:Yellow guide line for the vehicle width
including the exterior mirrors, for current
steering wheel angle (dynamic)
210Driving systems
Driving and parking
Page 292 of 390
Sun visors
Overview
GWARNING
If the mirror cover of the vanity mirror is folded
up when the vehicle is in motion, you could be
blinded by incident light. There is a risk of an
accident.
Always keep the mirror cover folded down
while driving.
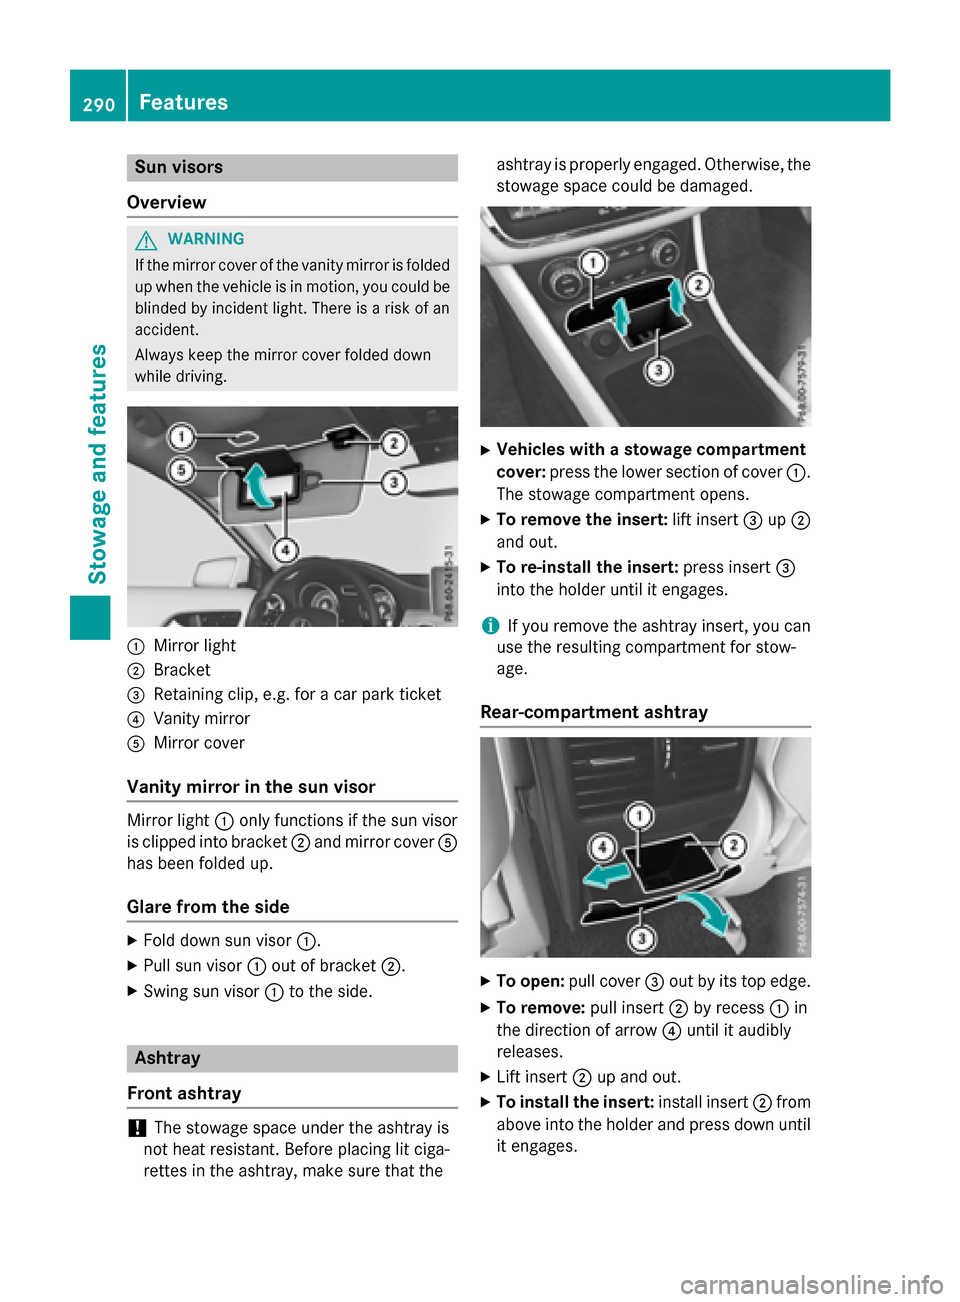
:Mirror light
;Bracket
=Retaining clip, e.g. for a car park ticket
?Vanity mirror
AMirror cover
Vanity mirror in the sun visor
Mirror light :only functions if the sun visor
is clipped into bracket ;and mirror cover A
has been folded up.
Glare from the side
XFold down sun visor :.
XPull sun visor:out of bracket ;.
XSwing sun visor :to the side.
Ashtray
Front ashtray
!The stowage space under the ashtray is
not heat resistant. Before placing lit ciga-
rettes in the ashtray, make sure that the ashtray is properly engaged. Otherwise, the
stowage space could be damaged.
XVehicles with a stowage compartment
cover:
press the lower section of cover :.
The stowage compartment opens.
XTo remove the insert: lift insert=up;
and out.
XTo re-install the insert: press insert=
into the holder until it engages.
iIf you remove the ashtray insert, you can
use the resulting compartment for stow-
age.
Rear-compartment ashtray
XTo open: pull cover =out by its top edge.
XTo remove: pull insert;by recess :in
the direction of arrow ?until it audibly
releases.
XLift insert ;up and out.
XTo install the insert: install insert;from
above into the holder and press down until
it engages.
290Features
Stowage and features
Page 302 of 390
Speed alert
You can define the upper speed limit, which
must not be exceeded by the vehicle.
If this selected speed is exceeded by the vehi-
cle, a message will be sent to the Customer
Assistance Center. The Customer Assistance Center then forwards this information to you.
You can select the way in which you receive
this information beforehand. Possible options
include text message, e-mail or an automated call.
The data you receive contains the following
information:
Rthe location where the speed limit was
exceeded
Rthe time at which the speed limit was
exceeded
Rthe selected speed limit which was excee-
ded
Geo fencing
Geo fencing allows you to select areas which
the vehicle should not enter or leave. You will
be informed if the vehicle crosses the boun-
daries of the selected areas. You can select
the way in which you receive this information beforehand. Possible options include text
message, e-mail or an automated call.
The area can be determined as either a circle
or a polygon with a maximum of ten corners.
You can specify up to ten areas simultane-
ously. Different settings are possible for each area.
USA only: these settings can be called up
under "Owners Online" at http://
www.mbusa.com.
Alternatively, you can trigger an MB Info call
and inform the customer service representa-
tive that you wish to activate geo fencing.
Currently inactive areas can be activated by
text message.
Triggering the vehicle alarm
With this function, you can trigger the vehi-
cle's panic alarm via text message. An alarm
sounds and the exterior lighting flashes.
Depending on the setting, the panic alarm
lasts five or ten seconds. Afterwards, the
alarm switches off.
Garage door opener
General notes
The HomeLink®garage door opener integra-
ted in the rear-view mirror allows you to oper-
ate up to three different door and gate sys-
tems.
Use the integrated garage door opener only
on garage doors that:
Rhave safety stop and reverse features and
Rmeet current U.S. federal safety standards
Once programed, the integrated garage door
opener in the rear-view mirror will assume the
function of the garage door system's remote
control. Please also read the operating
instructions for the garage door system.
When programming a garage door opener,
park the vehicle outside the garage. Do not
run the engine while programming.
Certain garage door drives are incompatible
with the integrated garage door opener. If you
have difficulty programing the integrated
garage door opener, contact an authorized
Mercedes-Benz Center.
Alternatively, you can call the following tele-
phone assistance services:
RUSA: Mercedes-Benz Customer Assistance
Center at 1-800-FOR-MERCedes
RCanada: Customer Service at
1-800-387-0100
RHomeLink®hotline 1-800-355-3515 (free
of charge)
More information on HomeLink
®and/or
compatible products is also available online
at http://www.homelink.com.
300Features
Stowage and features
Page 303 of 390
Notes on the declaration of conformity
(
Ypage 25).
USA: FCC ID: CB2HMIHL4
Canada: IC: 279B-HMIHL4
Important safety notes
GWARNING
When you operate or program the garage door
with the integrated garage door opener, per-
sons in the range of movement of the garage
door can become trapped or struck by the
garage door. There is a risk of injury.
When using the integrated garage door
opener, always make sure that nobody is
within the range of movement of the garage
door.
GWARNING
Combustion engines emit poisonous exhaust
gases such as carbon monoxide. Inhaling
these exhaust gases leads to poisoning. There
is a risk of fatal injury. Therefore never leave
the engine running in enclosed spaces with-
out sufficient ventilation.
Programming
Programing buttons
Pay attention to the "Important safety notes"
(
Ypage 301).
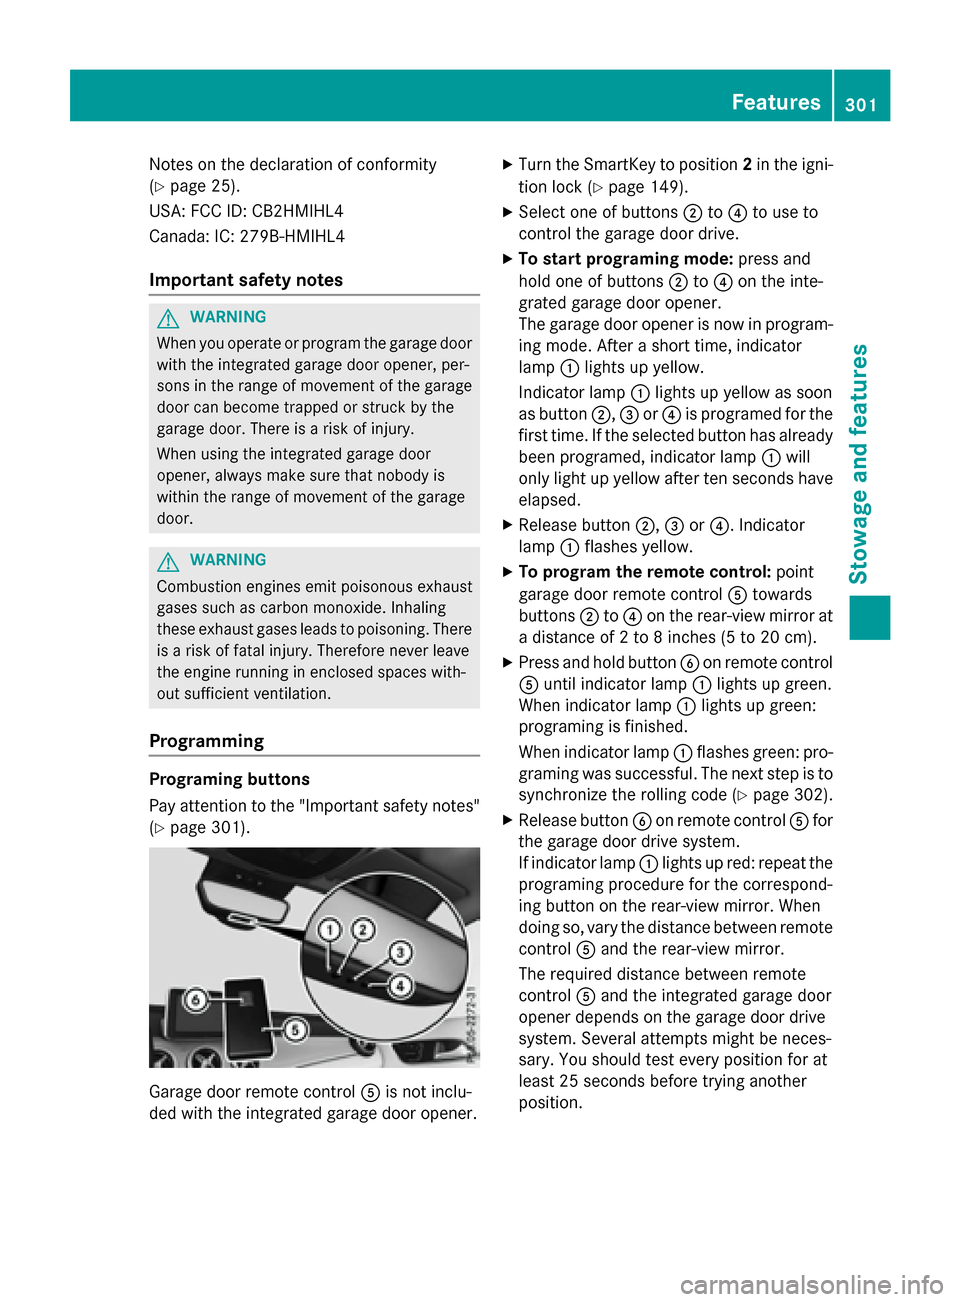
Garage door remote control Ais not inclu-
ded with the integrated garage door opener.
XTurn the SmartKey to position 2in the igni-
tion lock (
Ypage 149).
XSelect one of buttons ;to? to use to
control the garage door drive.
XTo start programing mode: press and
hold one of buttons ;to? on the inte-
grated garage door opener.
The garage door opener is now in program-
ing mode. After a short time, indicator
lamp :lights up yellow.
Indicator lamp :lights up yellow as soon
as button ;,=or? is programed for the
first time. If the selected button has already
been programed, indicator lamp :will
only light up yellow after ten seconds have
elapsed.
XRelease button ;,=or?. Indicator
lamp :flashes yellow.
XTo program the remote control: point
garage door remote control Atowards
buttons ;to? on the rear-view mirror at
a distance of 2 to 8 inches (5 to 20 cm).
XPress and hold button Bon remote control
A until indicator lamp :lights up green.
When indicator lamp :lights up green:
programing is finished.
When indicator lamp :flashes green: pro-
graming was successful. The next step is to
synchronize the rolling code (
Ypage 302).
XRelease button Bon remote control Afor
the garage door drive system.
If indicator lamp :lights up red: repeat the
programing procedure for the correspond-
ing button on the rear-view mirror. When
doing so, vary the distance between remote
control Aand the rear-view mirror.
The required distance between remote
control Aand the integrated garage door
opener depends on the garage door drive
system. Several attempts might be neces-
sary. You should test every position for at
least 25 seconds before trying another
position.
Features301
Stowage and features
Z
Page 304 of 390

Synchronizing the rolling code
Pay attention to the "Important safety notes"
(
Ypage 301).
If the garage door system uses a rolling code,
you will also have to synchronize the garage
door system with the integrated garage door
opener in the rear-view mirror. To do this you
will need to use the programing button on the
control panel of the door drive. The program-
ing button may be positioned in different pla-
ces depending on the manufacturer. It is usu-
ally located on the door drive unit on the
garage ceiling.
Familiarize yourself with the garage door
drive operating instructions, e.g. under "Pro-
graming of additional remote controls",
before carrying out the following steps.
Your vehicle must be within reach of the
garage door or gate opener drive. Make sure
that neither your vehicle nor any persons/
objects are present within the sweep of the
door or gate.
XTurn the SmartKey to position 2in the igni-
tion lock (
Ypage 149).
XGet out of the vehicle.
XPress the programing button on the door
drive unit.
Usually, you now have 30 seconds to ini-
tiate the next step.
XGet into the vehicle.
XPress previously programed button ;,=
or ? on the integrated garage door opener
repeatedly until the door closes.
The rolling code synchronization is then
complete.
Notes on programing the remote control
Canadian radio frequency laws require a
"break" (or interruption) of the transmission
signals after broadcasting for a few seconds.
Therefore, these signals may not last long
enough for the integrated garage door
opener. The signal is not recognized during
programing. Comparable with Canadian law,
some U.S. garage door openers also feature a
"break". Proceed as follows:
Rif you live in Canada
Rif you have difficulties programing the
garage door opener (regardless of where
you live) when using the programing steps.
XPress and hold one of buttons
;to? on
the integrated garage door opener.
After a short time, indicator lamp :lights
up yellow.
XRelease the button.
Indicator lamp :flashes yellow.
XPress button Bof garage door remote
control Afor two seconds, then release it
for two seconds.
XPress button Bagain for two seconds.
XRepeat this sequence on butt onB of
remote control Auntil indicator lamp :
lights up green.
When indicator lamp :lights up green:
programing is finished.
When indicator lamp :flashes green: pro-
graming was successful. The next step is to
synchronize the rolling code.
XRelease button Bof remote control Aof
the garage door drive.
If indicator lamp :lights up red: repeat the
programing process for the corresponding
button on the rear-view mirror. When doing so, vary the distance between remote con-
trol Aand the rear-view mirror.
The required distance between remote
control Aand the integrated garage door
opener depends on the garage door drive
system. Several attempts might be neces-
sary. You should test every position for at
least 25 seconds before trying another
position.
Problems when programing
If you experience problems programing the
integrated garage door opener on the rear-
view mirror, take note of the following instruc-
tions:
RCheck the transmitter frequency used by
garage door drive remote control Aand
302Features
Stowage and features
Page 305 of 390
whether it is supported. The transmitter
frequency can usually be found on the back
of the garage door drive remote control.
The integrated garage door opener is com-
patible with devices that have units which
operate in the frequency range of 280 to
433 MHz.
RReplace the batteries in garage door
remote controlA. This increases the like-
lihood that garage door remote control A
will transmit a strong and precise signal to the integrated garage door opener.
RWhen programing, hold remote control A
at varying distances and angles from the
button which you are programing. Try vari-
ous angles at a distance between 2and
12 inches (5to 30 cm )or at the same angle
but at varying distances.
RIf another remote control is available for the
same garage door drive, repeat the same
programing steps with this remote control. Before performing these steps, make sure
that new batteries have been installed in
garage door drive remote control A.
RNote that some remote controls only trans-
mit for a limited amount of time (the indi-
cator lamp on the remote control goes out).
Press buttonBon remote control Aagain
before transmission ends.
RAlign the antenna cable of the garage door
opener unit. This can improve signal recep-
tion/transmission.
Opening/closing the garage door
After it has been programmed, the integrated
garage door opener assumes the function of
the garage door system's remote control.
Please also read the operating instructions
for the garage door system.
XTurn the SmartKey to position 2in the igni-
tion lock (
Ypage 149).
XPress button ;,=or? that has been
programmed to operate the garage door.
Garage door system with a fixed code: indi-
cator lamp :lights up green. Garage door system with a rolling code:
indicator lamp
:flashes green.
The transmitter will transmit a signal as
long as the button is pressed. The trans-
mission is halted after a maximum of ten
seconds and indicator lamp :lights up
yellow.
XPress button ;,=or? again if neces-
sary.
Clearing the memory
Make sure that you clear the memory of the
integrated garage door opener before selling
the vehicle.
XTurn the SmartKey to position 2in the igni-
tion lock (
Ypage 149).
XPress and hold buttons ;and ?.
The indicator lamp initially lights up yellow
and then green.
XRelease buttons ;and ?.
The memory of the integrated garage door
opener in the rear-view mirror is cleared.
Compass
Calling up the compass
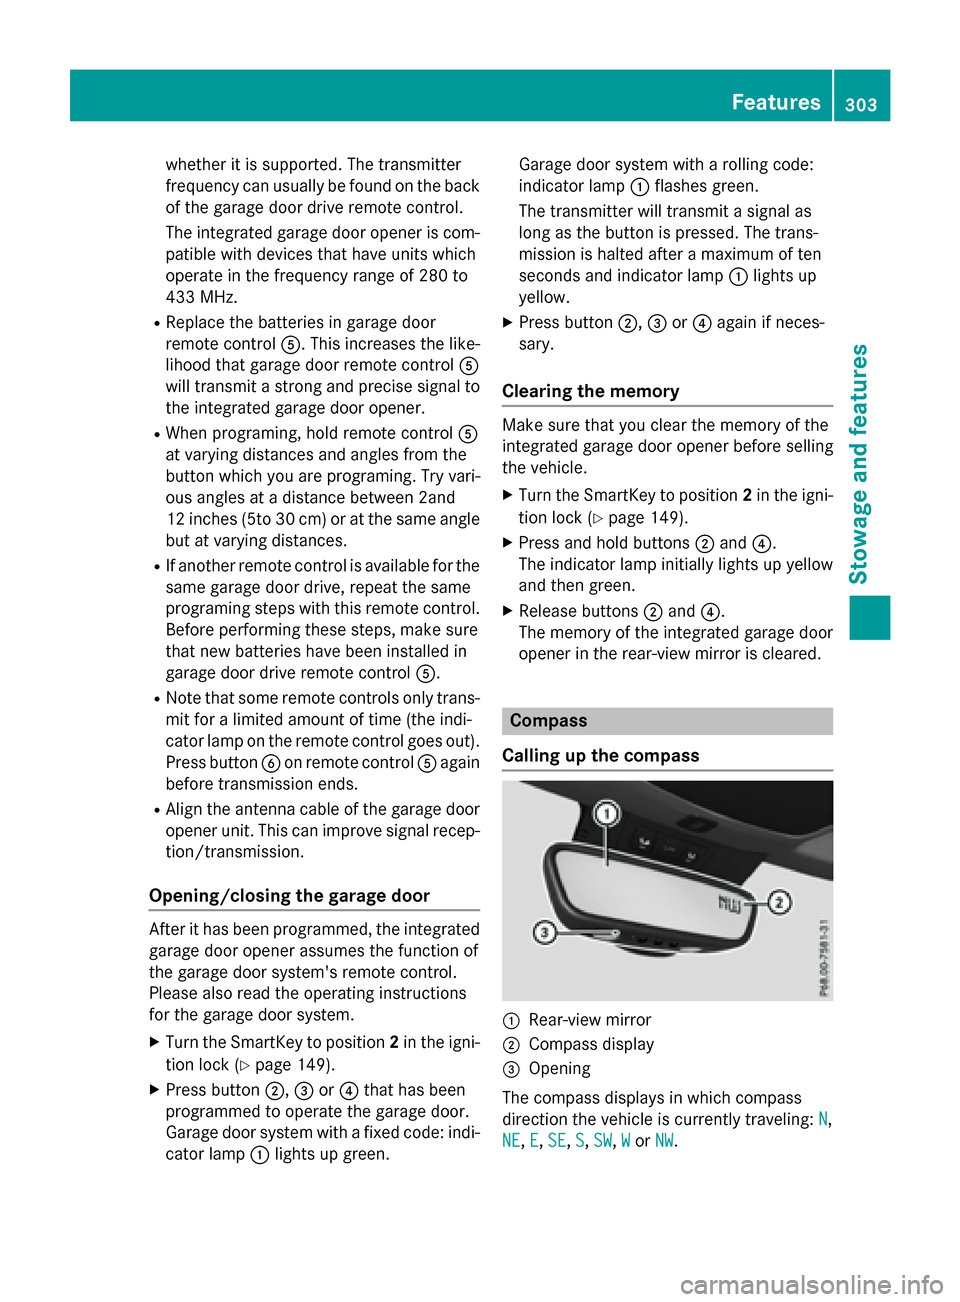
:Rear-view mirror
;Compass display
=Opening
The compass displays in which compass
direction the vehicle is currently traveling: N
,
NE
, E, SE,S, SW,Wor NW.
Features303
Stowage and features
Z