2016 MERCEDES-BENZ GLA-Class key
[x] Cancel search: keyPage 204 of 390

Warning displays
:Segments on the left-hand side of the
vehicle
;Segments on the right-hand side of the
vehicle
=Segments showing operational readiness
The warning displays show the distance
between the sensors and the obstacle. The
warning display for the front area is located
on the dashboard above the center air vents.
The warning display for the rear area is loca-
ted on the headliner in the rear compartment. The warning display for each side of the vehi-
cle is divided into five yellow and two red seg-
ments. PARKTRONIC is operational if yellow
segments showing operational readiness =
light up.
Transmission
positionWarning display
DFront area activated
R, Nor the vehicle
is rolling back-
wardsRear and front areas
activated
PNo areas activated
One or more segments light up as the vehicle
approaches an obstacle, depending on the
vehicle's distance from the obstacle. From the:
Rsixth segment onwards, you will hear an
intermittent warning tone for approx-
imately two seconds.
Rseventh segment onwards, you will hear a
warning tone for approximately two sec-
onds. This indicates that you have now
reached the minimum distance.
Deactivating/activating PARKTRONIC
:Indicator lamp
;Deactivating/activating PARKTRONIC
If indicator lamp :lights up, PARKTRONIC is
deactivated.
iPARKTRONIC is automatically activated
when you turn the SmartKey to position 2in
the ignition lock.
202Driving systems
Driving and parking
Page 210 of 390

Rear view camera
General notes
Rear view camera :is an optical parking and
maneuvering aid. It uses guide lines to show
the area behind your vehicle in the Audio/
COMAND display.
The area behind the vehicle is displayed as a
mirror image, as in the rear view mirror.
iThe text shown in the Audio/COMAND
display depends on the language setting.
The following are examples of rear view
camera messages in the Audio/COMAND
display.
Observe the notes on cleaning (
Ypage 318).
Important safety notes
The rear view camera is only an aid. It is not a
replacement for your attention to your imme-
diate surroundings. You are always responsi- ble for safe maneuvering and parking. When
maneuvering or parking, make sure that there
are no persons, animals or objects in the area
in which you are maneuvering.
Under the following circumstances, the rear
view camera will not function, or will function
in a limited manner:
Rif the tailgate is open
Rin heavy rain, snow or fog
Rat night or in very dark places
Rif the camera is exposed to very bright light
Rif the area is lit by fluorescent bulbs or LED
lighting (the display may flicker)
Rif there is a sudden change in temperature,
e.g. when driving into a heated garage in
winter
Rif the camera lens is dirty or obstructed
Observe the notes on cleaning
(
Ypage 318)
Rif the rear of your vehicle is damaged. In this
event, have the camera position and setting
checked at a qualified specialist workshop
The field of vision and other functions of the
rear view camera may be restricted due to
additional accessories on the rear of the vehi-
cle (e.g. license plate holder, bicycle rack).
Activating/deactivating the rear view
camera
XTo activate: make sure that the SmartKey
is in position 2in the ignition lock.
XMake sure that the Activation by R
gearfunction is selected in Audio 20/
COMAND; see the Digital Operator's Man-
ual.
XEngage reverse gear.
The area behind the vehicle is shown with
guide lines in the Audio 20/COMAND dis-
play.
The image from the rear view camera is
available throughout the maneuvering
process.
To deactivate: the rear view camera deacti-
vates if you shift the transmission to Por after
driving forwards a short distance.
Displays in the Audio 20/COMAND dis-
play
The rear view camera may show a distorted
view of obstacles, show them incorrectly or
not at all. The rear view camera does not show
objects in the following positions:
Rvery close to the rear bumper
Runder the rear bumper
Rin the area immediately above the tailgate
handle
208Driving systems
Driving and parking
Page 217 of 390

Collision warning
If a vehicle is detected in the monitoring range
of Blind Spot Assist and you switch on the
corresponding turn signal, a double warning
tone sounds. Red warning lamp :flashes. If
the turn signal remains on, vehicles detected
are indicated by the flashing of red warning
lamp :. There are no further warning tones.
Switching on Blind Spot Assist
XMake sure that Blind Spot Assist is activa-
ted in the on-board computer
(
Ypage 228).
XTurn the SmartKey to position 2in the igni-
tion lock.
Warning lamps :in the exterior mirrors
light up red for approximately 1.5 seconds
and then turn yellow.
Lane Keeping Assist
General notes
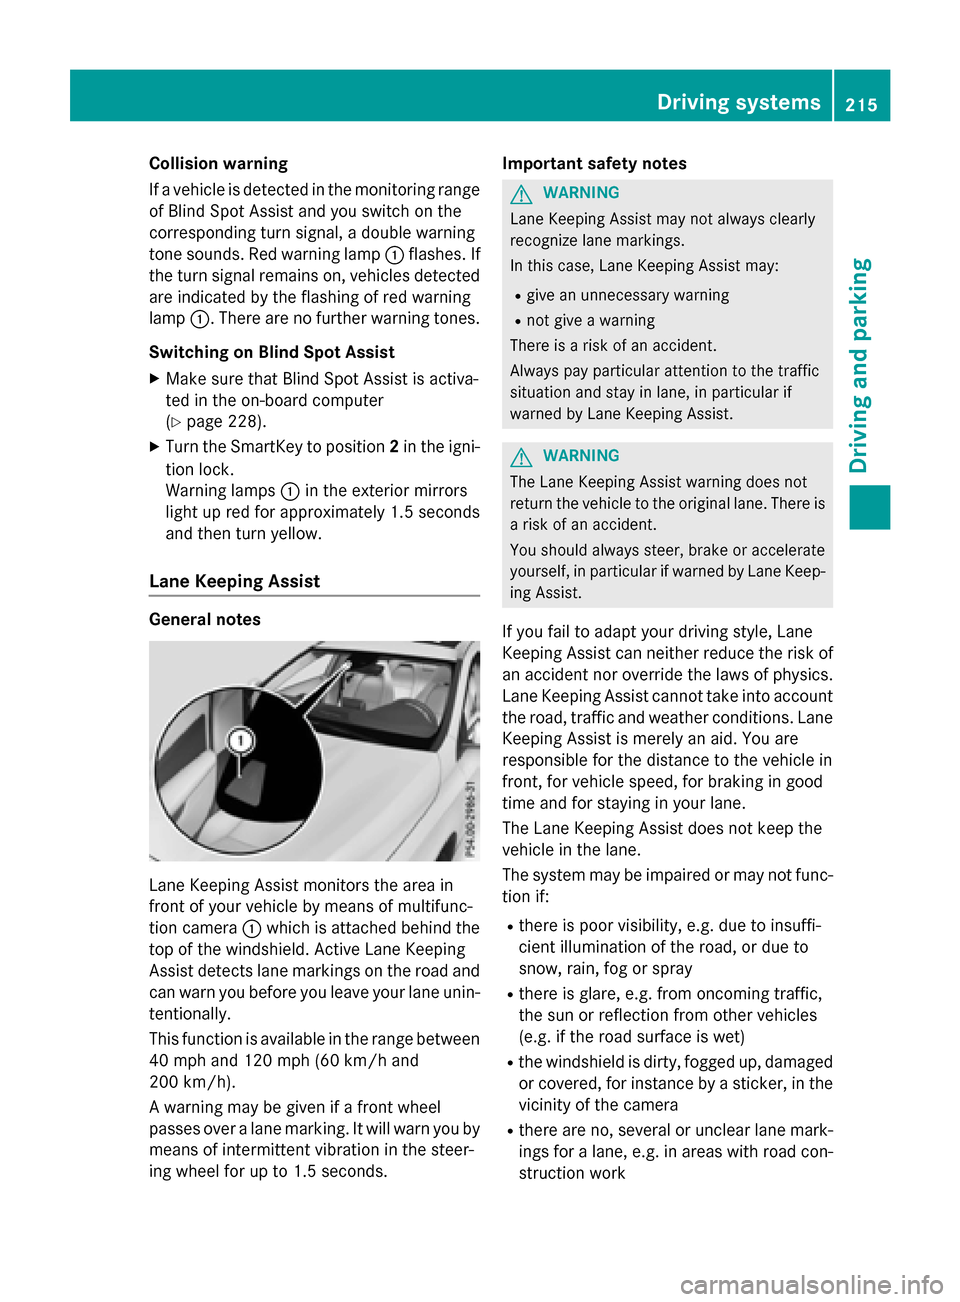
Lane Keeping Assist monitors the area in
front of your vehicle by means of multifunc-
tion camera :which is attached behind the
top of the windshield. Active Lane Keeping
Assist detects lane markings on the road and
can warn you before you leave your lane unin- tentionally.
This function is available in the range between
40 mph and 120 mph (60 km/h and
200 km/h).
A warning may be given if a front wheel
passes over a lane marking. It will warn you by
means of intermittent vibration in the steer-
ing wheel for up to 1.5 seconds. Important safety notes
GWARNING
Lane Keeping Assist may not always clearly
recognize lane markings.
In this case, Lane Keeping Assist may:
Rgive an unnecessary warning
Rnot give a warning
There is a risk of an accident.
Always pay particular attention to the traffic
situation and stay in lane, in particular if
warned by Lane Keeping Assist.
GWARNING
The Lane Keeping Assist warning does not
return the vehicle to the original lane. There is
a risk of an accident.
You should always steer, brake or accelerate
yourself, in particular if warned by Lane Keep-
ing Assist.
If you fail to adapt your driving style, Lane
Keeping Assist can neither reduce the risk of
an accident nor override the laws of physics.
Lane Keeping Assist cannot take into account
the road, traffic and weather conditions. Lane
Keeping Assist is merely an aid. You are
responsible for the distance to the vehicle in
front, for vehicle speed, for braking in good
time and for staying in your lane.
The Lane Keeping Assist does not keep the
vehicle in the lane.
The system may be impaired or may not func- tion if:
Rthere is poor visibility, e.g. due to insuffi-
cient illumination of the road, or due to
snow, rain, fog or spray
Rthere is glare, e.g. from oncoming traffic,
the sun or reflection from other vehicles
(e.g. if the road surface is wet)
Rthe windshield is dirty, fogged up, damagedor covered, for instance by a sticker, in the
vicinity of the camera
Rthere are no, several or unclear lane mark-
ings for a lane, e.g. in areas with road con-
struction work
Driving systems215
Driving and parking
Z
Page 221 of 390

Tachometer
!
Do not drive in the overrevving range, as
this could damage the engine.
The red band in the tachometer indicates the
engine's overrevving range.
The engine is limited within a range to protect
the engine when the red band is reached.
Outside temperature display
You should pay special attention to road con-
ditions when temperatures are around freez-
ing point.
Bear in mind that the outside temperature
display indicates the temperature measured
and does not record the road temperature.
The outside temperature display is in the mul-
tifunction display (
Ypage 221).
There is a short delay before a change in out-
side temperature appears in the multifunc-
tion display.
Coolant temperature display
GWARNING
Opening the hood when the engine is over-
heated or when there is a fire in the engine
compartment could expose you to hot gases
or other service products. There is a risk of
injury.
Let an overheated engine cool down before
opening the hood. If there is a fire in the
engine compartment, keep the hood closed
and contact the fire department.
!A display message is shown if the coolant
temperature is too high.
If the coolant temperature is over 248 ‡
(120 †), do not continue driving. The
engine will otherwise be damaged.
The coolant temperature gage is in the instru-
ment cluster on the right-hand side
(
Ypage 31). Under normal operating conditions and with
the specified coolant level, the coolant tem-
perature may rise to 248 ‡ (120 †).
Operating the on-board computer
Overview
:Multifunction display
;Right control panel
=Left control panel
XTo activate the on-board computer: turn
the SmartKey to position 1in the ignition
lock.
You can control the multifunction display and
the settings in the on-board computer using
the buttons on the multifunction steering
wheel.
Displays an doperation219
On-boa rd computer and displays
Z
Page 234 of 390

ing temperature. Avoid driving at full engine
output during this time.
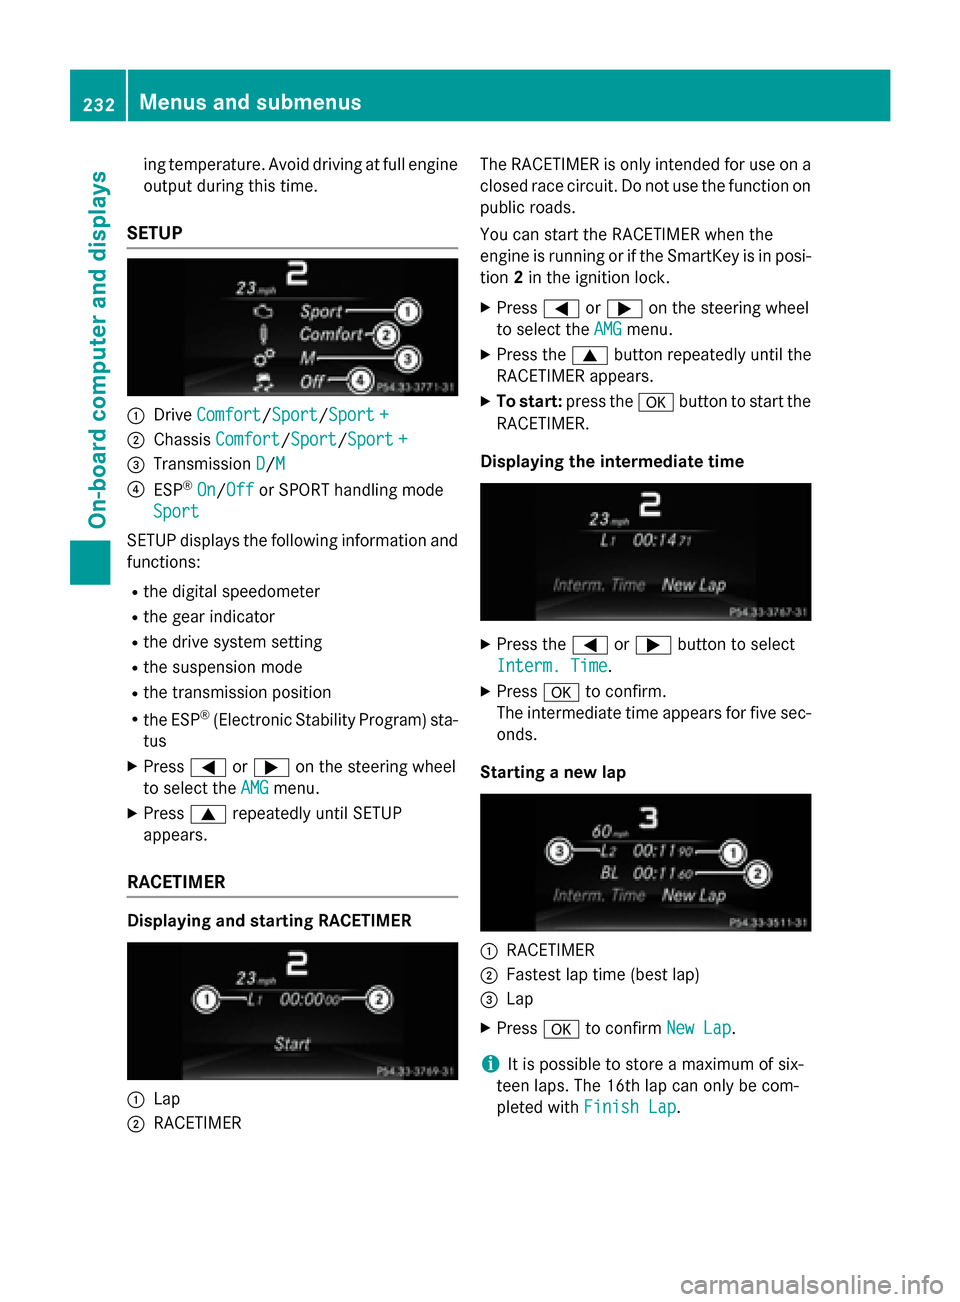
SETUP
:DriveComfort/Sport/Sport +
;Chassis Comfort/Sport/Sport +
=Transmission D/M
?ESP®On/Offor SPORT handling mode
Sport
SE TUP displays the following information and
functions:
Rthe digit al speedometer
Rthe gear indicator
Rthedrive system setting
Rthe suspension mode
Rthe transmission position
Rthe ESP®(Electronic Stability Program) sta-
tus
XPress =or; on the steering wheel
to select the AMG
menu.
XPress9repeatedly until SE TUP
appears.
RACETIMER
Displaying and starting RACETIMER
:Lap
;RACE TIMER The
RACE TIMER isonly intended for use on a
closed race circuit. Do not use the function on
public roads.
You can start the RACETIMER when the
engine isrunning or ifthe SmartKey is inposi-
tion 2in the ignit ion lock.
XPress=or; on the steering wheel
to select the AMG
menu.
XPress the9button repeatedly unt ilthe
RACE TIMER appears.
XTo star t:press the abutton to start the
RACETIMER.
Displaying the intermedia tetime
XPress the =or; button to select
Interm. Time
.
XPress ato confirm.
The intermediate time appears for five sec- onds.
Starting a new lap
:RACE TIMER
;Fastest lap time (best lap)
=Lap
XPress ato confirm New Lap.
iIt ispossible to store a maximum of six-
teen laps. The 16th lap can only be com-
pleted with Finish Lap
.
232Menus and submenus
On-board computer and displays
Page 235 of 390

Stopping the RACETIMER
XPress the%button on the steering
wheel.
XConfirm Yeswitha.
The RACETIMER interrupts timing if you stop
the vehicle and turn the SmartKey to position
1 in the ignition lock. If you turn the key to
position 3and then press ato confirm
Start
, timing is continued.
Resetting the current lap
XStop the RACETIMER.
XPress the =or; button to select
Reset Lap
.
XPress ato reset the lap time to "0".
Deleting all laps
If you switch off the engine, the RACETIMER is
reset to "0" after 30 seconds. All laps are
deleted.
You cannot delete individual stored laps. If
you have stopped 16 laps, the current lap
does not have to be reset.
XReset the current lap.
XPress ato confirm Reset.
Reset Race-Timer?
appears in the multi-
function display.
XPress the :button to select Yesand
press the abutton to confirm.
All laps are deleted.
Overall statistics
:RACETIMER overall evaluation
;Total time driven
=Average speed
?Distance covered
AMaximum speed
This function is shown if you have stored at
least one lap and stopped the RACETIMER.
XPress the =or; button on the steer-
ing wheel to select the AMG
menu.
XPress the9button repeatedly until the
overall evaluation appears.
Lap statistics
:Lap
;Lap time
=Average lap speed
?Lap length
ATop speed during lap
Menus and submenus233
On-board computer and displays
Z
Page 241 of 390

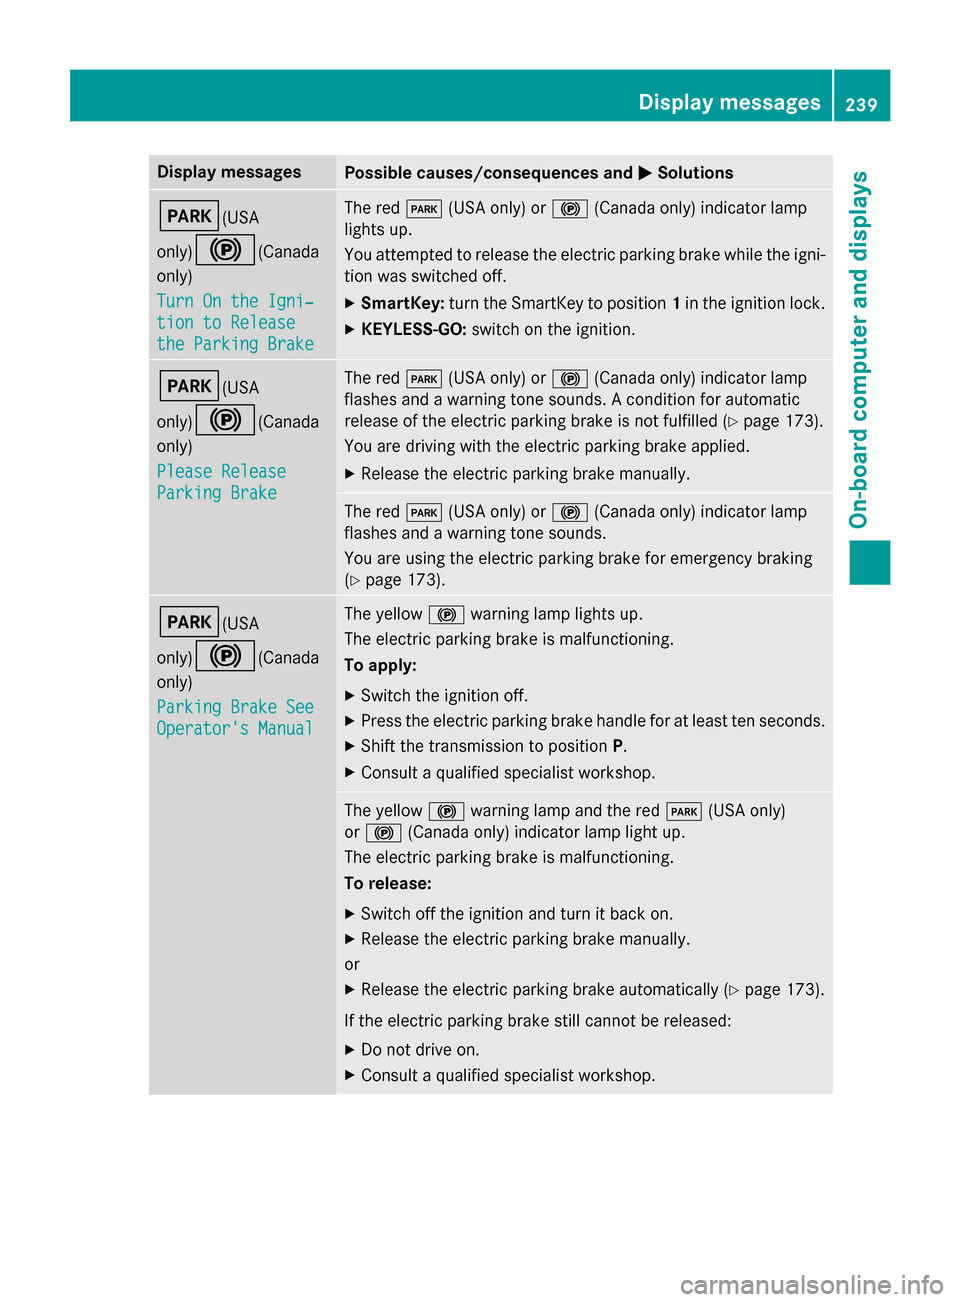
Display messagesPossible causes/consequences andMSolutions
F(USA
only)
!(Canada
only)
Tur nOn the Igni‐
tio nto Releas e
the Parkin gBrake
The red F(USAonly) or !(Canada only) indicato rlamp
lights up.
You attempte dto release th eelectric parkin gbrak ewhile th eigni-
tion was switched off.
XSmartKey: turnth eSmartKey to position 1in th eignition lock.
XKEYLESS-GO: switch on theignition .
F(USA
only)
!(Canada
only)
Please Releas e
ParkingBrake
The red F(USAonly) or !(Canada only) indicato rlamp
flashes and awarnin gtone sounds. Acondition fo rautomati c
release of th eelectric parkin gbrak eis no tfulfilled (
Ypage 173).
You are drivin gwit hth eelectric parkin gbrak eapplied.
XReleas eth eelectric parkin gbrak emanually.
The red F(USAonly) or !(Canada only) indicato rlamp
flashes and awarnin gtone sounds.
You are usin gth eelectric parkin gbrak efo remergenc ybrakin g
(
Ypage 173).
F(USA
only)
!(Canada
only)
Parkin gBrake See
Operator' sManual
The yello w! warnin glamp lights up.
The electric parkin gbrak eis malfunctioning.
To apply:
XSwitc hth eignition off.
XPress th eelectric parkin gbrak ehandle fo rat leas tte nseconds.
XShift th etransmissio nto position P.
XConsultaqualified specialist workshop .
The yellow! warnin glamp and th ered F (USAonly)
or ! (Canada only) indicato rlamp ligh tup.
The electric parkin gbrak eis malfunctioning.
To release:
XSwitc hof fth eignition and tur nit bac kon .
XReleas eth eelectric parkin gbrak emanually.
or
XReleas eth eelectric parkin gbrak eautomatically (Ypage 173).
If th eelectric parkin gbrak estill canno tbe released:
XDo no tdrive on .
XConsult aqualified specialist workshop .
Display messages239
On-board computer and displays
Z
Page 267 of 390

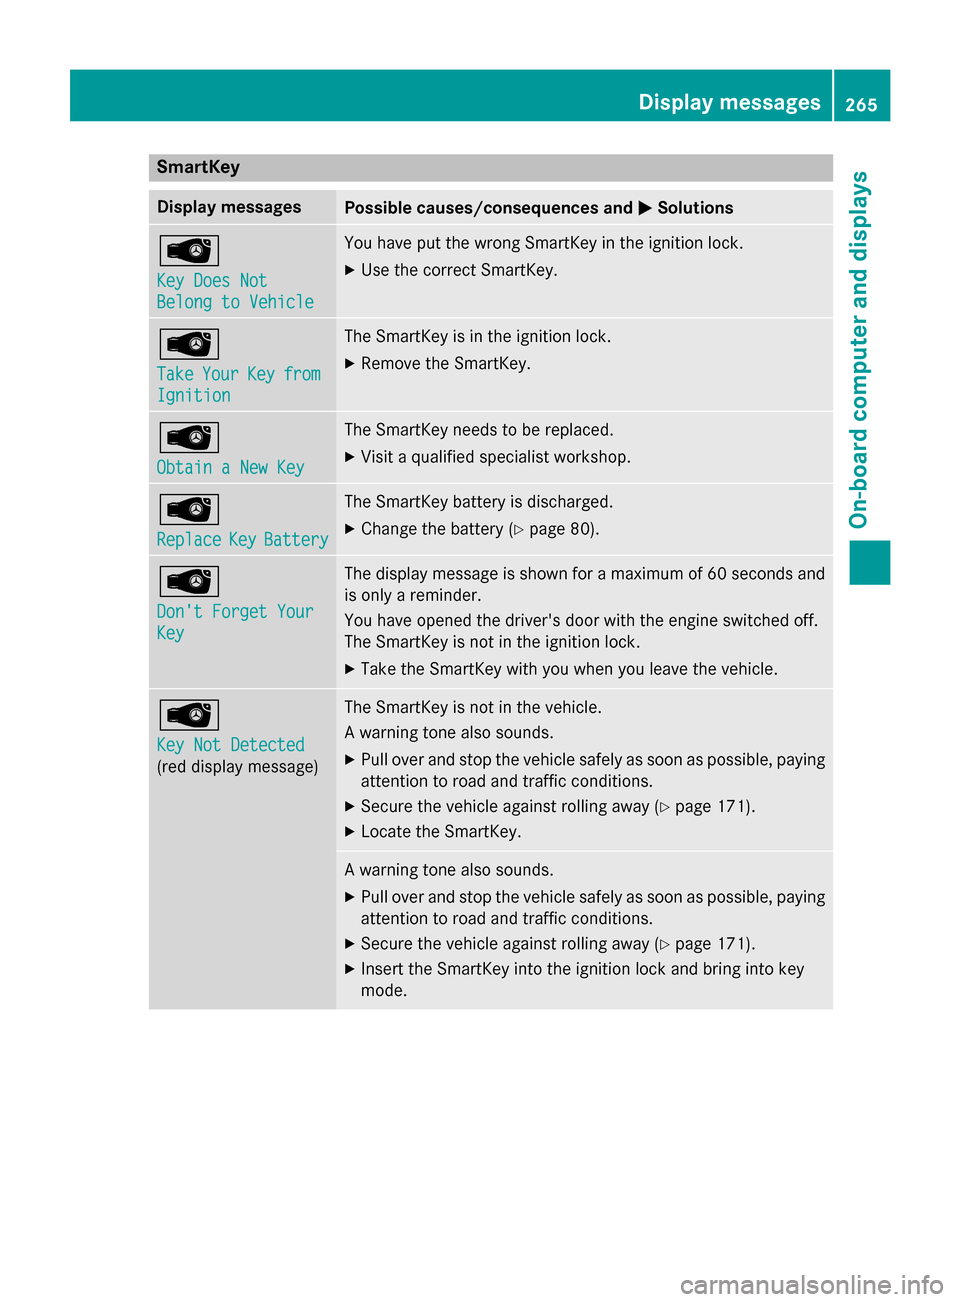
SmartKey
Display messagesPossible causes/consequences andMSolutions
Â
Key Does Not
Belong to Vehicle
You have put the wrong SmartKey in the ignition lock.
XUse the correct SmartKey.
Â
TakeYourKeyfrom
Ignition
The SmartKey is in the ignition lock.
XRemove the SmartKey.
Â
Obtain a New Key
The SmartKey needs to be replaced.
XVisit a qualified specialist workshop.
Â
ReplaceKeyBattery
The SmartKey battery is discharged.
XChange the battery (Ypage 80).
Â
Don't Forget Your
Key
The display message is shown for a maximum of 60 seconds and
is only a reminder.
You have opened the driver's door with the engine switched off.
The SmartKey is not in the ignition lock.
XTake the SmartKey with you when you leave the vehicle.
Â
Key Not Detected
(red display message)
The SmartKey is not in the vehicle.
A warning tone also sounds.
XPull over and stop the vehicle safely as soon as possible, paying
attention to road and traffic conditions.
XSecure the vehicle against rolling away (Ypage 171).
XLocate the SmartKey.
A warning tone also sounds.
XPull over and stop the vehicle safely as soon as possible, paying
attention to road and traffic conditions.
XSecure the vehicle against rolling away (Ypage 171).
XInsert the SmartKey into the ignition lock and bring into key
mode.
Display messages265
On-board computer and displays
Z