2016 MERCEDES-BENZ GL park assist
[x] Cancel search: park assistPage 397 of 462

Jump-starting For the jump-starting procedure, use only the jump-starting connection point, consisting of a
positive terminal and a ground point, in the engine compartment.
G WARNING
Battery acid is caustic. There is a risk of injury.
Avoid contact with skin, eyes or clothing. Do not inhale any battery gases. Do not lean over the
battery. Keep children away from batteries. Wash away battery acid immediately with plenty of
clean water and seek medical attention.
G WARNING
During charging and jump-starting, explosive gases can escape from the battery. There is a risk
of an explosion.
Particularly avoid fire, open flames, creating sparks and smoking. Ensure there is sufficient ven-
tilation while charging and jump-starting. Do not lean over a battery.
G WARNING
During the charging process, a battery produces hydrogen gas. If a short circuit occurs or sparks
are created, the hydrogen gas can ignite. There is a risk of an explosion. R
Make sure that the positive terminal of a connected battery does not come into contact with
vehicle parts. R
Never place metal objects or tools on a battery. R
It is important that you observe the described order of the battery terminals when connecting
and disconnecting a battery. R
When jump-starting, make sure that the battery poles with identical polarity are connected. R
It is particularly important to observe the described order when connecting and disconnecting
the jumper cables. R
Never connect or disconnect the battery terminals while the engine is running.
G WARNING
A discharged battery can freeze at temperatures below freezing point. When jump-starting the
vehicle or charging the battery, gases can escape from the battery. There is a risk of an explosion.
Allow the frozen battery to thaw out before charging it or jump-starting.
! Vehicles with a gasoline engine: avoid repeated and lengthy starting attempts. Other-
wise, the catalytic converter could be damaged by non-combusted fuel.
If the indicator/warning lamps do not light up at low temperatures, it is very likely that the
discharged battery has frozen. In this case you may neither jump-start the vehicle nor charge
the battery. The service life of a thawed-out battery may be shorter. The starting characteristics
can be impaired, particularly at low temperatures. Have the thawed-out battery checked at a
qualified specialist workshop. Jump-starting 395
Breakdown assistance Z
Page 398 of 462

Do not start the vehicle using a rapid charging device. If your vehicle's battery is discharged,
the engine can be jump-started from another vehicle or from a second battery using jumper
cables. Observe the following points: R
The battery is not accessible in all vehicles. If the other vehicle's battery is not accessible,
jump-start the vehicle using a second battery or a jump-starting device. R
Vehicles with a gasoline engine: only jump-start the vehicle when the engine and exhaust
system are cold. R
Do not start the engine if the battery is frozen. Let the battery thaw first. R
Only jump-start from batteries with a 12 V voltage rating. R
Only use jumper cables which have a sufficient cross-section and insulated terminal clamps. R
If the battery is fully discharged, leave the battery that is being used to jump-start connected
for a few minutes before attempting to start. This charges the battery slightly. R
Make sure that the two vehicles do not touch.
Make sure that: R
The jumper cables are not damaged. R
Bare parts of the terminal clamp do not come into contact with other metal parts while the
jumper cables are connected to the battery. R
The jumper cables cannot come into contact with parts which can move when the engine is
running, such as the V-belt pulley or the fan. X
Secure the vehicle by applying the electric parking brake. X
Shift the transmission to position P .X
Turn the SmartKey to position 0 in the ignition lock and remove it ( Y
page 165). On vehicles
with KEYLESS-GO, make sure the ignition is switched off ( Y
page 165). All indicator lamps
in the instrument cluster must be off. X
Switch off all electrical consumers, e.g. rear window defroster, lighting, etc. X
Open the hood.
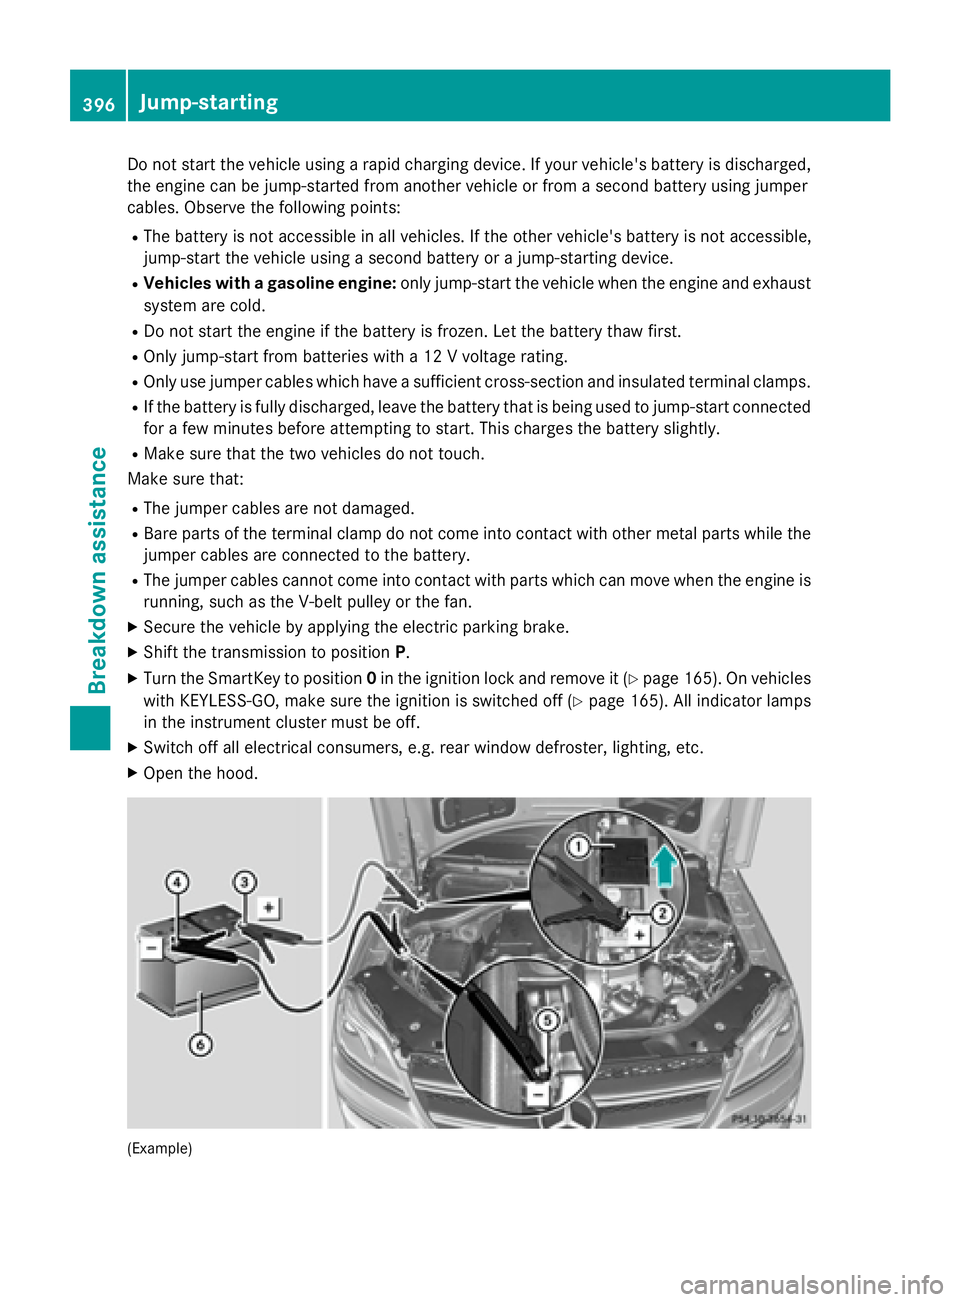
(Example)396
Jump-starting
Breakdown assistance
Page 400 of 462

To prevent damage to the vehicle, deacti-
vate DISTRONIC PLUS and the HOLD func-
tion in the following or other similar situa-
tions: R
when towing the vehicle R
in the car wash
! Make sure that the electric parking brake
is released. If the electric parking brake is
faulty, visit a qualified specialist workshop.
! Only secure the tow rope or tow bar at the
towing eyes. Otherwise, the vehicle could
be damaged.
! Do not use the trailer tow hitch for recov-
ery or towing. Do not use the towing eye for
recovery. this could damage the vehicle. If
in doubt, have the vehicle recovered using
a crane.
! When towing, pull away slowly and
smoothly. Pull the towed vehicle as straight
as possible and not at an acute angle.
Excessive tractive power could damage the
vehicles.
i When towing, it is preferable to use a rigid
towing bar as opposed to a tow rope. A rigid
towing bar helps to keep the tractive power
low.
! When towing vehicles with KEYLESS-GO,
use the key instead of the Start/Stop but-
ton. Otherwise, the automatic transmission
may shift to position P when the driver's or
front-passenger door are opened, which
could lead to damage to the transmission.
! Do not tow with sling-type equipment.
This could damage the vehicle.
! Vehicles with differential locks: make
sure the differential locks are in automatic
mode. When towing, the differential locks
must not be switched on. The transmission
may otherwise be damaged.
! The vehicle can be towed a maximum of
30 miles (50km). The towing speed of
30 mph (50 km/ h) must not be exceeded. If the vehicle has to be towed more than
30 miles (50km), the entire vehicle must be
raised and transported.
It is better to have the vehicle transported
than to have it towed away.
If the vehicle has suffered transmission dam-
age, have it transported on a transporter or
trailer.
The automatic transmission must be in posi-
tion N when the vehicle is being towed.
The battery must be connected and charged.
Otherwise, you: R
cannot turn the SmartKey to position 2 in
the ignition lock R
cannot release the electric parking brake R
cannot shift the automatic transmission to
position N
i Disarm the automatic locking feature
( Y
page 285). You could otherwise be
locked out when pushing or towing the
vehicle.
Installing/removing the towing eye
Installing the towing eye
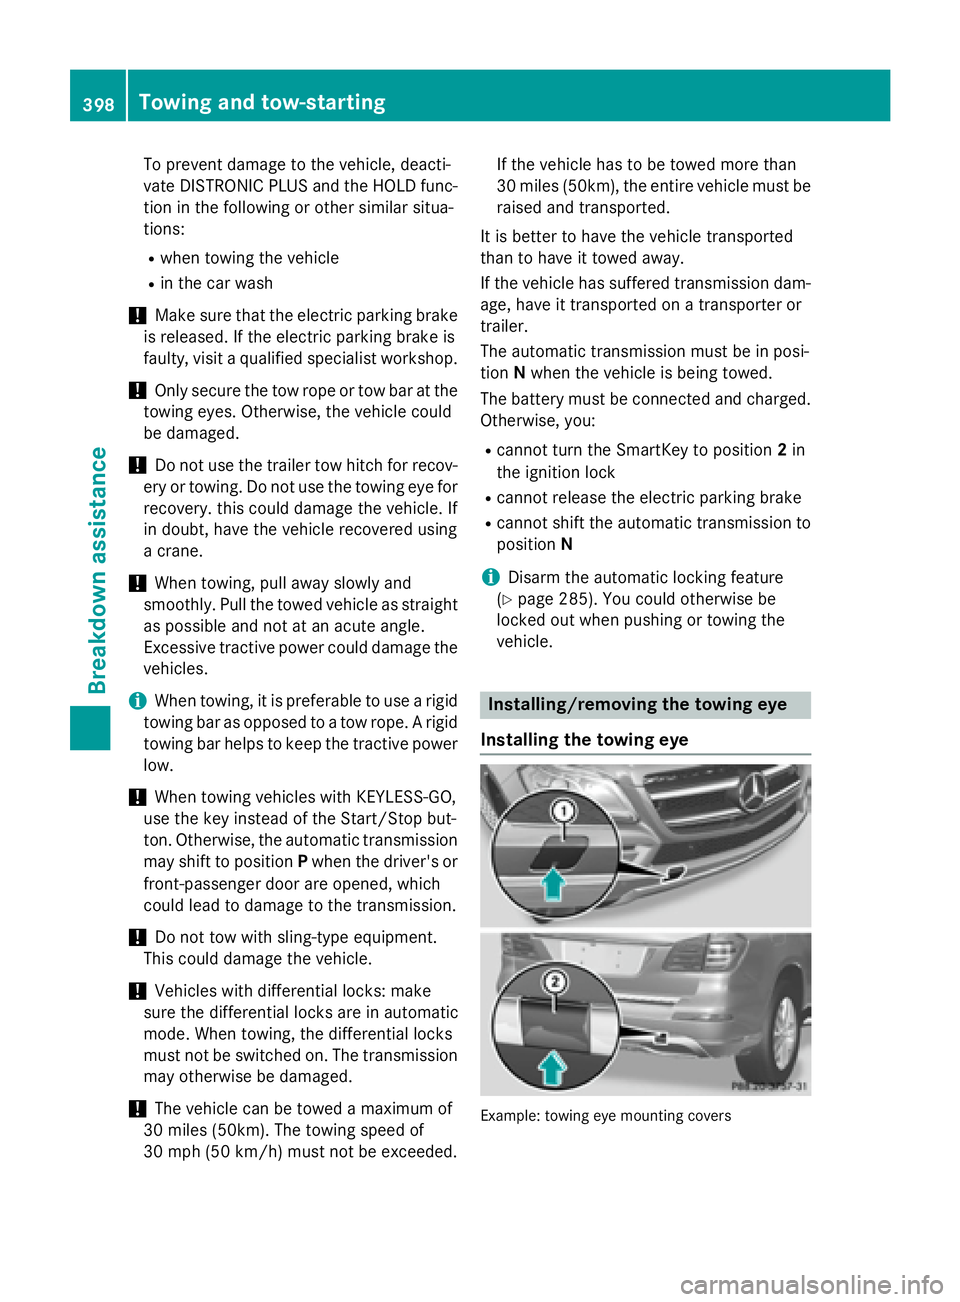
Example: towing eye mounting covers398
Towing and tow-starting
Breakdown assistance
Page 401 of 462

The brackets for the screw-in towing eyes are
located in the bumpers. They are at the front
and at the rear, behind the covers. X
Remove the towing eye from the vehicle
tool kit ( Y
page 386).X
To open the cover at the front: press the
mark on cover �C inwards in the direction
of the arrow. X
To open the cover at the rear: insert a
flat, blunt object into the cutout and lever
cover �D out of the bumper.X
Take cover �C or �D off the opening.X
Screw in the towing eye clockwise as far as
it will go and tighten it.
Removing the towing eye X
Unscrew and remove the towing eye. X
Attach cover �C or �D to the bumper and
press until it engages. X
Place the towing eye in the vehicle tool kit.
Towing a vehicle with both axles on
the ground
It is important that you observe the safety
instructions when towing away your vehicle
( Y
page 397).
The automatic transmission automatically
shifts to position P when you open the driver's
or front-passenger door or when you remove
the SmartKey from the ignition lock.
In order to ensure that the automatic trans-
mission stays in position N when towing the
vehicle, you must observe the following
points: X
Make sure that the vehicle is stationary and
the SmartKey in the ignition lock is in posi-
tion 0 .X
Turn the SmartKey to position 2 in the igni-
tion lock.
On vehicles with KEYLESS-GO, use the
SmartKey instead of the Start/Stop button
( Y
page 165). X
Depress and hold the brake pedal. X
Shift the automatic transmission to posi-
tion N . X
Release the brake pedal. X
Release the electric parking brake. X
Leave the SmartKey in position 2 in the
ignition lock. X
Switch on the hazard warning lamps
( Y
page 133).
i In order to signal a change of direction
when towing the vehicle with the hazard
warning lamps switched on, use the com-
bination switch as usual. In this case, only
the indicator lamps for the direction of
travel flash. After resetting the combina-
tion switch, the hazard warning lamp starts
flashing again.
Transporting the vehicle
! You may only secure the vehicle by the
wheels, not by parts of the vehicle such as
axle or steering components. Otherwise,
the vehicle could be damaged.
The towing eye can be used to pull the vehicle
onto a trailer or transporter for transporting
purposes. X
Turn the SmartKey to position 2 in the igni-
tion lock. X
Shift the automatic transmission to posi-
tion N .
As soon as the vehicle has been loaded: X
Prevent the vehicle from rolling away by
applying the electric parking brake. X
Shift the automatic transmission to posi-
tion P . X
Turn the SmartKey to position 0 in the igni-
tion lock and remove it. X
Secure the vehicle.Towing and tow-starting 399
Breakdown assistance Z