2016 MERCEDES-BENZ GL brakes
[x] Cancel search: brakesPage 231 of 462
arrow towards the right or the left also
appears. By default, Active Parking Assist
only displays parking spaces on the front-
passenger side. Parking spaces on the driv-
er's side are displayed as soon as the turn
signal on the driver's side is activated. When
parking on the driver's side, this must remain
switched on until you acknowledge the use of
Active Parking Assist by pressing the �v
button on the multifunction steering wheel.
A parking space is displayed while you are
driving past it, and until you are approx-
imately 50 ft (15 m) awa y from it .
Pa rking
G WARNING
Active Parking Assist merely aids you by inter-
vening actively in the steering. If you do not
brake there is a risk of an accident.
Always apply the brakes yourself when
maneuvering and parking. X
Stop the vehicle when the parking space
symbol shows the desired parking space in
the instrument cluster. X
Shift the transmission to position R .
The Start Park Assist? Yes: OK No:
�8 message appears in the multifunction
display. X
To cancel the procedure: press the �8
button on the multifunction steering wheel
or pull away.
or X
To park using Active Parking Assist:
press the �v button on the multifunction
steering wheel.
The Park Assist Active Accelerate
and Brake Observe Surroundings mes-
sage appears in the multifunction display. X
Let go of the multifunction steering wheel. X
Back up the vehicle, being ready to brake at
all times. When backing up, drive at a speed
below approximately 6 mph (10 km/h).
Otherwise Active Parking Assist will be can-
celed. i In tight parking spaces, you will achieve
the best parking results by backing up as
far as possible. When doing so, also
observe the PARKTRONIC messages. X
Stop as soon as PARKTRONIC sounds the
continuous warning tone, if not before.
Maneuvering may be required in tight park-
ing spaces.
The Park Assist active Select D
Observe surroundings message appears in
the multifunction display. X
Shift the transmission to position D while
the vehicle is stationary.
Active Parking Assist immediately steers in
the other direction.
The Park Assist active Accelerate
and brake Observe surroundings mes-
sage appears in the multifunction display.
i You will achieve the best results by wait-
ing for the steering procedure to complete
before pulling away. X
Drive forwards and be ready to brake at all
times. X
Stop as soon as PARKTRONIC sounds the
continuous warning tone, if not before.
The Park Assist active Select R
Observe surroundings message appears in
the multifunction display.
As soon as the parking procedure is com-
plete, the Park
Assist switched off mes-
sage appears and a warning tone sounds.
Active Parking Assist no longer supports you
with steering interventions. When Active
Parking Assist is finished, you must steer
again yourself. PARKTRONIC is still available.
Parking tips: R
The way your vehicle is positioned in the
parking space after parking is dependent
on various factors. These include the posi-
tion and shape of the vehicles parked in
front and behind it and the conditions of the
location. It may be the case that Active
Parking Assist guides you too far into a
parking space, or not far enough into it. In Driving system s 229
Dr ivi ng an d parking Z
Page 253 of 462
Either no braking application, or a course-
correcting brake application adapted to the
driving situation occurs if: R
there are vehicles or obstacles, e.g. crash
barriers, close to both sides of your vehicle. R
a vehicle approaches you too closely at the
side. R
you have adopted a sporty driving style with
high cornering speeds. R
you brake or accelerate significantly. R
a driving safety system intervenes, e.g.
ESP ®
or PRE-SAFE ®
Brake.R
ESP ®
is switched off.R
the off-road program is activated (vehicles
without the ON&OFFROAD package). R
off-road program 1 or 2 is activated (vehi-
cles with the ON&OFFROAD package). R
the LOW RANGE off-road gear is activated
(vehicles with the ON&OFFROAD package). R
a loss of tire pressure or a defective tire is
detected.
Switching on Active Blind Spot Assist X
Make sure that Active Blind Spot Assist is
activated in the on-board computer
( Y
page 282). X
Turn the SmartKey to position 2 in the igni-
tion lock.
Warning lamps �C in the exterior mirrors
light up red for approximately 1.5 seconds
and then turn yellow.
Towing a trailer
When you attach a trailer, make sure you have
co rr ectly established the electrical connec-
tion. This can be accomplished by checking
the trailer lighting. Active Blind Spot Assist is
then deactivated. The indicator lamp lights up
yellow in the exterior mirrors and the Active
Blind Spot Assist Currently Unavail‐
able See Operator's Manual message
appears in the multifunction display. Active Lane Keeping Assist General notes
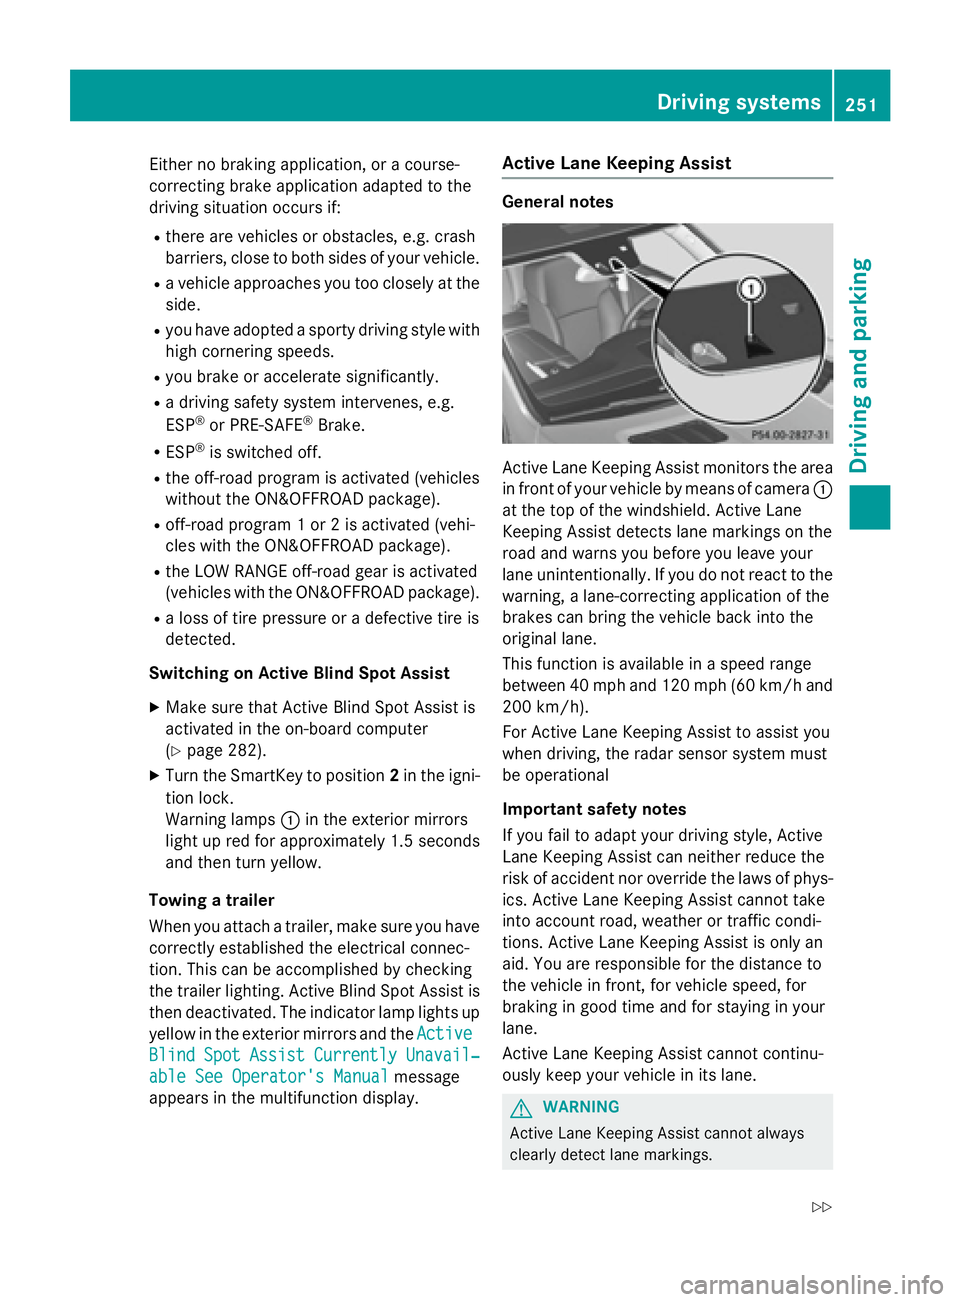
Active Lane Keeping Assist monitors the area
in front of your vehicle by means of camera �C
at the top of the windshield. Active Lane
Keeping Assist detects lane markings on the
road and warns you before you leave your
lane unintentionally. If you do not react to the
warning, a lane-correcting application of the
brakes can bring the vehicle back into the
original lane.
This function is available in a speed range
between 40 mph and 120 mph (60 km/h and
200 km/h).
For Active Lane Keeping Assist to assist you
when driving, the radar sensor system must
be operational
Important safety notes
If you fail to adapt your driving style, Active
Lane Keeping Assist can neither reduce the
risk of accident nor override the laws of phys-
ics. Active Lane Keeping Assist cannot take
into account road, weather or traffic condi-
tions. Active Lane Keeping Assist is only an
aid. You are responsible for the distance to
the vehicle in front, for vehicle speed, for
braking in good time and for staying in your
lane.
Active Lane Keeping Assist cannot continu-
ously keep your vehicle in its lane.
G WARNING
Active Lane Keeping Assist cannot always
clearly detect lane markings.Driving system s 251
Dr ivi ng an d parking Z
Page 259 of 462
! A function or performance test should
only be carried out on a two-axle dyna-
mometer. Before you operate the vehicle
on such a dynamometer, please consult a
qualified workshop. You could otherwise
damage the drive train or the brake system.
i In wintry driving conditions, the maximum
effect of 4MATIC can only be achieved if
you use winter tires (M +S tires), with snow
chains if necessary.
Further information about "Driving off-road"
( Y
page 198).
DSR (Downhill Speed Regulation) General notes
DSR is an aid to assist you when driving down-
hill. It keeps the speed of travel at the speed
selected on the on-board computer. The
steeper the downhill gradient, the greater the
DSR braking effect on the vehicle. When driv-
ing on flat stretches of road or on an uphill
gradient, the DSR braking effect is minimal or
nonexistent.
DSR controls the vehicle’s speed when it is
activated and the transmission is in position
D , R or N . You can drive at a higher or a lower
speed than that set on the on-board computer
at any time by accelerating or braking.
Important safety notes
G WARNING
If the speed driven and the set speed deviate
and you activate DSR on a slippery road sur-
face, the wheels may lose traction. There is an
increased danger of skidding and accidents.
Before switching DSR on, please take into
consideration the road surface and the differ-
ence between driving speed and the set
speed.
If you fail to adapt your driving style, DSR can
neither reduce the risk of accident nor over-
ride the laws of physics. DSR cannot take
account of road, weather and traffic condi-
tions. DSR is only an aid. You are responsible for the distance to the vehicle in front, for
vehicle speed, for braking in good time and for
staying in your lane.
You are always responsible for keeping con-
trol of the vehicle and for assessing whether
the downhill gradient can be managed. DSR
may not always be able to keep to the set
speed, depending on road surface and tire
conditions. Select a set speed suitable for the
prevailing conditions and when necessary,
apply the brakes manually.
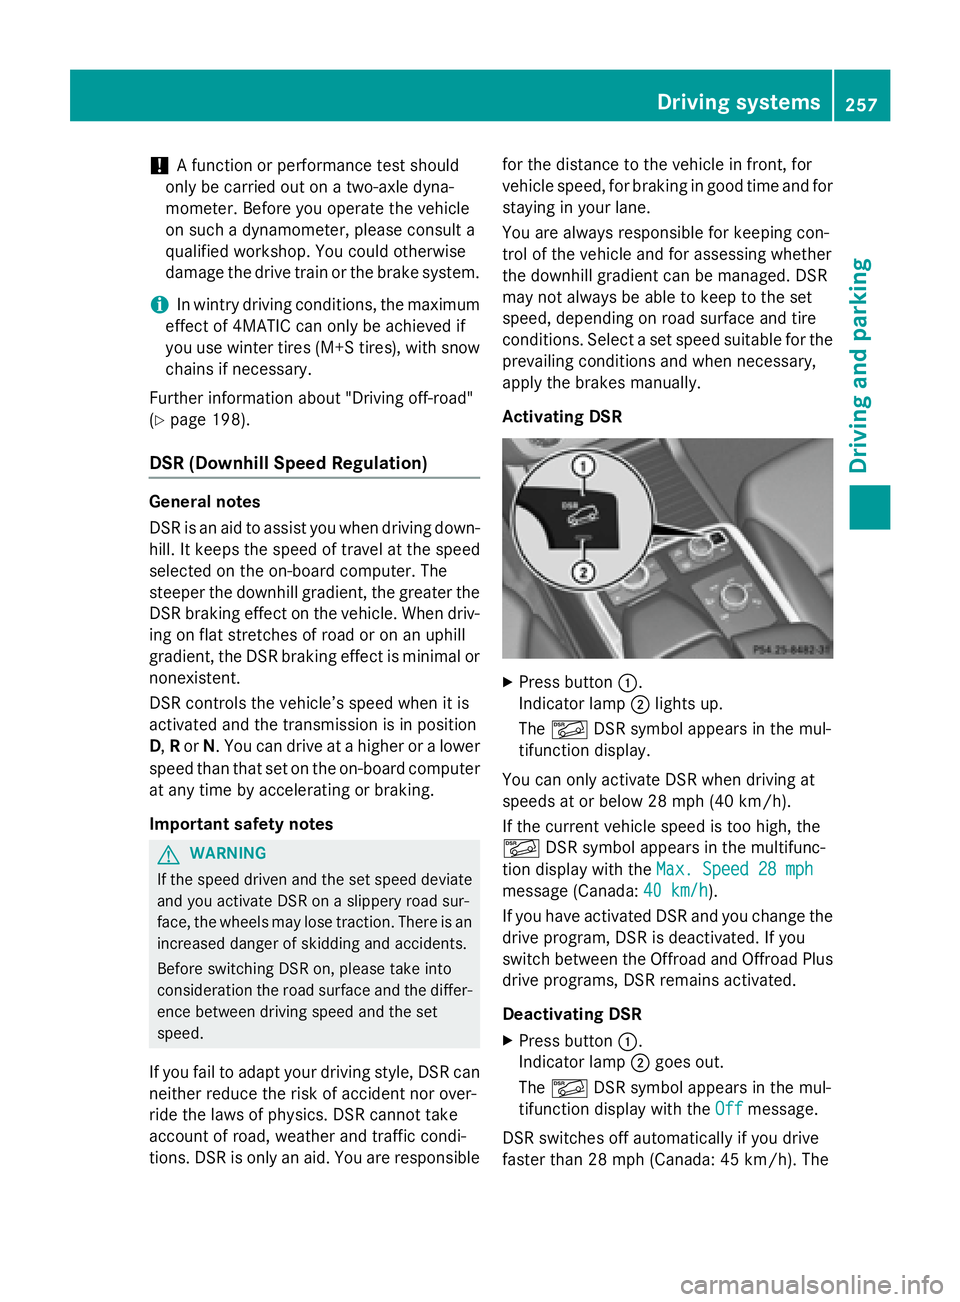
Activating DSR
X
Press button �C .
Indicator lamp �D lights up.
The �
Page 266 of 462
This could impair the handling characteris-
tics.
When towing a trailer, always adjust your
speed to the current road and weather con-
ditions. Do not exceed the maximum permis-
sible speed for your vehicle/trailer combina-
tion.
Notes on towing a trailer
General notes The following models cannot be used to tow a
trailer: R
GLE 550 e 4MATIC Sport Utility Vehicle R
Do not exceed the legally prescribed max-
imum speed for vehicle/trailer combina-
tions in the relevant country.
This lowers the risk of an accident. R
Only install an approved trailer coupling on
your vehicle.
Further information on availability and on
installation is available from any authorized
Mercedes-Benz Center. R
The bumpers of your vehicle are not suita-
ble for installing detachable trailer cou-
plings. R
Do not install hired trailer couplings or
other detachable trailer couplings on the
bumpers of your vehicle. R
If you no longer need the ball coupling,
remove it from the ball coupling recess.
This will reduce the risk of damage to the
ball coupling.
When towing a trailer, set the tire pressure on
the rear axle of the towing vehicle for the
maximum load. You will find the values in the
tire pressure table in the fuel filler flap of the
vehicle ( Y
page 425).
Please note that when towing a trailer, the
following driving systems have limited avail-
ability or are not available at all: R
PARKTRONIC ( Y
page 224)R
Blind Spot Assist ( Y
page 244)R
Active Lane Keeping Assist ( Y
page 251) You will find installing dimensions and loads
under "Technical data" ( Y
page 457).
Driving tips Observe the information on ESP ®
trailer sta-
bilization ( Y
page 75) and on pulling away with
a trailer ( Y
page 168).
The maximum permissible speed for vehicle/
trailer combinations depends on the type of
trailer. Before beginning the journey, check
the trailer's documents to see what the max-
imum permissible speed is. Observe the
legally prescribed maximum speed in the rel-
evant country.
For certain Mercedes-Benz vehicles, the max-
imum permissible rear axle load is increased
when towing a trailer. See "Technical data" to
find out whether this applies to your vehicle
( Y
page 458). If you utilize any of the added
maximum rear axle load when towing a trailer,
the vehicle/trailer combination may not
exceed a maximum speed of 60 mph
(100 km/h) for reasons concerning the oper-
ating permit. This also applies in countries in
which the permissible maximum speed for
vehicle/trailer combinations is above 60 mph
(100 km/ h) .
When towing a trailer, your vehicle's handling
characteristics will be different in comparison
with when driving without a trailer.
Use the left-hand steering wheel paddle
shifter to shift into a lower gear in good time
on long and steep downhill gradients.
This also applies if you have activated cruise
control or DISTRONIC PLUS.
This will use the braking effect of the engine,
so that less braking will be required to main-
tain the speed. This relieves the load on the
brake system and prevents the brakes from
overheating and wearing too quickly. If you
need additional braking, depress the brake
pedal repeatedly rather than continuously.264
Towing a trailer
Driving and parking
Page 269 of 462
so will result in a loss of function of the
brake systems of both the vehicle and the
trailer. X
Shift the transmission to position P .X
Apply the vehicle's electric parking brake. X
Start the engine. X
Vehicles with the AIRMATIC package:
select highway level. X
Vehicles with ADS: set ADS to AUTO or
COMF .X
Switch off the engine. X
Close the doors and tailgate. X
Couple up the trailer. X
Establish the electrical connection
between the vehicle and the trailer. X
Check that the trailer lighting system is
working.
i Vehicles with the AIRMATIC package:
with a trailer attached, the vehicle will
always remain at highway level. When cou-
pling up a trailer, please observe the fol-
lowing: R
Unless highway level has been set man-
ually, the vehicle is automatically low-
ered to highway level. This is the case if a
speed of 5 mph (8 km/h) is reached. R
High-speed level is not available.
These restrictions apply to all accessories
powered through a connection to the trailer
power socket of your vehicle, e.g. a bicycle
carrier.
Observe the maximum permissible trailer
dimensions (width and length).
Most U.S. states and all Canadian provinces
require by law: R
Safety chains between the towing vehicle
and the trailer. The chains should be cross-
wound under the trailer drawbar. They must
be fastened to the vehicle's trailer cou-
pling, not to the bumper or the axle. Leave enough play in the chains to make
tight cornering possible. R
A separate brake system for certain types
of trailer. R
Safety switch for braked trailers. Check the
specific legal requirements applicable to
your state.
If the trailer becomes detached from the
towing vehicle, the safety switch applies
the trailer brakes.
Towing a trailer There are numerous legal requirements con-
cerning the towing of a trailer, e.g. speed
restrictions. Make sure that your car/trailer
combination complies with the local regula-
tions: R
in your place of residence R
in the location to which you are driving
The police and local authorities can provide
reliable information.
Observe the following when towing a trailer: R
To gain driving experience and to become
accustomed to the new handling charac-
teristics, you should practice the following
in a traffic-free location: -
cornering -
stopping -
backing up R
Before driving, check: -
trailer tow hitch -
safety switch for braked trailers -
safety chains -
electrical connections -
lights -
wheels R
Adjust the exterior mirrors to provide an
unobstructed view of the rear section of the
trailer. R
If the trailer has electronically controlled
brakes, pull away carefully. Brake manually Towing a trailer 267
Driving and parking Z
Page 270 of 462
using the brake controller and check
whether the brakes function correctly. R
Se cure any objects on the trailer to prevent
the cargo from slipping when the vehicle is
in motion. R
When you couple up a trailer, check at reg-
ular intervals that the load is firmly secured.
If the trailer is equipped with trailer lights
and brakes, check the trailer to ensure that
these are working. R
Bear in mind that the han dlin g will be less
st able when towing a trailer than when driv-
ing wit hout one. Avoid sudden steering
movements. R
The vehicle/trailer combination is heavier,
accelerates more slowly, has a decreased
gradient cli mbin g capability and a longer
braking dist ance.
It is more susceptible to side winds and
requires more careful steering. R
If poss ible, do not brake suddenly, but
instead depr ess the brake pedal moder-
ate ly at first so that the trailer can activate
it s brakes. Then increase the pressure on
the brake pedal. R
If the automat ic transmission repeat edly
shifts between gears on uphill or down hill
gradients, shift to a lower gear using the
left-hand steering wheel paddle shifter.
A lower gear and lower speed reduce the
risk of engine failure. R
When driv ing down hill, shift to a lower gear
to uti liz e the engine's braking effect.
Avoid continuous brake application as this
m ay
overheat the vehicle brakes and, if
instal led, the trailer brakes.R
If the coolant temperature increases dra-
matical ly while the air-cond it ioning system
is swit ched on, switch off the air-condition-
ing system.
Coolant heat can also be dissipated by
opening the win dows and switching the ventilation blowe r and the interior temper-
ature to the highest leve l.R
When overtaking, pay particular attention
to the extended length of your vehicle/
trailer combination.
Due to the length of the vehicle/trailer
combination, you require additional road
space in relation to the vehicle you are
overtaking before you can change back to
the original lane.
Decoupling a trailer
G WARNIN G
If you uncouple a trailer wit h th e overrun
brak e engaged , you could trap your han d
between th e vehicl e and th e trailer drawbar.
Ther e is a ris k of injury.
Do no t uncouple a trailer if th e overrun brak e
is engaged .
G WARNIN G
Vehicles wit h leve l control :
The vehicl e is lowered as soo n as you discon -
nect th e trailer cable. This could result in your
limb s or those of other people that are
between th e vehicl e body and tires or under-
neath th e vehicl e bein g trapped . Ther e is a
ris k of injury.
Mak e sure that nobody is in th e immediat e
vicinity of th e whee l housing s or under th e
vehicl e when you disconnect th e trailer cable.
! Do not disc onnect a trailer wit h an
engaged overrun brake. Otherwise, your
vehicle could be damaged by the reboun d-
ing of the overrun brake. X
Sh ift the transmission to position P .X
Ap ply the vehicle's electr ic parking brake.X
St art the engine. X
Close the doors and tailgate. X
Apply the trailer's parking brake.268
Towing a trailer
Driving and parking
Page 378 of 462
R
solvents R
cleaning agents containing solvents
Do not scrub.
Do not touch the surfaces or protective
films with hard objects, e.g. a ring or ice
scraper. You could otherwise scratch or
damage the surfaces and protective film.
! Do not park the vehicle for an extended
period straight after cleaning it, particularly
after having cleaned the wheels with wheel
cleaner. Wheel cleaners could cause
increased corrosion of the brake discs and
brake pads/linings. For this reason, you
should drive for a few minutes after clean-
ing. Braking heats the brake discs and the
brake pads/linings, thus drying them. The
vehicle can then be parked.
Regular care of your vehicle is a condition for
retaining the quality in the long term.
Use care products and cleaning agents rec-
ommended and approved by Mercedes-Benz.
Washing the vehicle and cleaning the
paintwork
Automatic car wash
G WARNING
Braking efficiency is reduced after washing
the vehicle. There is a risk of an accident.
After the vehicle has been washed, brake
carefully while paying attention to the traffic
conditions until full braking power is restored. ! Before driving into an automatic car wash,
make sure that it is suitable for the dimen-
sions of the vehicle. In particular, make
sure that: R
there is enough ground clearance
between the vehicle underbody and the
guide rails of the automatic car wash. R
the clearance width of the automatic car
wash is sufficient, particularly the width
of the guide rails. R
you enter the automatic car wash
straight and in the center of the guide
rails in order to avoid damaging the tires
or wheel rims.
Fold in the exterior mirrors before the vehi-
cle is washed. The exterior mirrors could
otherwise be damaged.
! If DISTRONIC PLUS or the HOLD function
is activated, the vehicle brakes automati-
cally in certain situations.
To prevent damage to the vehicle, deacti-
vate DISTRONIC PLUS and the HOLD func-
tion in the following or other similar situa-
tions: R
when towing the vehicle R
in the car wash
! Never clean your vehicle in a Touchless
Automatic Car Wash as these use special
cleaning agents. These cleaning agents can
damage the paintwork or plastic parts.
! Make sure that: R
the side windows and the sliding sunroof
are fully closed. R
the ventilation/heating is switched off
(the OFF button has been pressed). R
the windshield wiper switch is in position
0 .
Otherwise, the vehicle might be damaged.
! In car washes with a towing mechanism,
make sure that the automatic transmission
is in transmission position N , otherwise the
vehicle could be damaged. R
Vehicles with a SmartKey:376
Care
Maintenance and care
Page 406 of 462
Useful information
i This Operator's Manual describes all
models and all standard and optional equip-
ment of your vehicle available at the time of
publication of the Operator's Manual.
Country-specific differences are possible.
Please note that your vehicle may not be
equipped with all features described. This
also applies to safety-related systems and
functions.
i Read the information on qualified special-
ist workshops ( Y
page 29).
Important safety notes
G WARNING
If wheels and tires of the wrong size are used,
the wheel brakes or suspension components
may be damaged. There is a risk of an acci-
dent.
Always replace wheels and tires with those
that fulfill the specifications of the original
part.
When replacing wheels, make sure to use the
correct: R
designation R
model
When replacing tires, make sure to use the
correct: R
designation R
manufacturer R
model
G WARNING
A flat tire severely impairs the driving, steer-
ing and braking characteristics of the vehicle.
There is a risk of accident.
Tires without run-flat characteristics: R
do not drive with a flat tire. R
immediately replace the flat tire with your
emergency spare wheel or spare wheel, or
consult a qualified specialist workshop. Tires with run-flat characteristics: R
pay attention to the information and warn-
ing notices on MOExtended tires (tires with
run-flat characteristics).
Accessories that are not approved for your
vehicle by Mercedes-Benz or that are not
being used correctly can impair operating
safety.
Before purchasing and using non-approved
accessories, visit a qualified specialist work-
shop and inquire about: R
suitability R
legal stipulations R
factory recommendations
Information on the sizes and types of wheels
and tires for your vehicle can be found under
"Wheel/tire combinations" ( Y
page 432).
Tire pressure information can be found: R
on the vehicle's Tire and Loading Informa-
tion placard on the B-pillar R
on the tire pressure label on the fuel filler
flap R
in the "Tire pressure" section
Operation
Information on driving
Check the tire pressure when the vehicle is
heavily laden and adjust prior to a trip.
While driving, pay attention to vibrations,
noises and unusual handling characteristics,
e.g. pulling to one side. This may indicate that
the wheels or tires are damaged. If you sus-
pect that a tire is defective, reduce your
speed immediately. Stop the vehicle as soon
as possible to check the wheels and tires for
damage. Hidden tire damage could also be
causing the unusual handling characteristics.
If you find no signs of damage, have the tires
and wheels checked at a qualified specialist
workshop.
When parking your vehicle, make sure that
the tires do not get deformed by the curb or404
Operation
Wheels and tires