2016 MERCEDES-BENZ G-CLASS SUV wheel
[x] Cancel search: wheelPage 55 of 261
Pets in the vehicle
G
WARNING
If you leave animals unsupervised or unse-
cured in the vehicle, they may push abutton
or as witch, for example.
They could:
R activate vehicl eequipment and become
trapped, for example
R switch vehicl esystems on or off, thus
endangering other road users
In the event of an accident, sudden braking or
abrupt changes of direction, unsecured ani-
mals coul dbeflung around the vehicle, injur-
ing the vehicl eoccupants. There is arisk of an
accident and injury.
Never leave animals unattended in the vehi-
cle. Always secure animals correctly during a
journey ,e.g. in an anima ltransport box. Driving safe
tysystems Drivin
gsafet ys ystems overview
In this section ,you will fin dinformati on about
th ef ollowin gdrivin gsafet ysystems:
R AB S(Anti-lock Braking System)
(Y page 52)
R BA S(Brake Assist System) (Y page 53)
R Adaptive brake lights (Y page 53)
R ESP ®
(Electronic Stability Program)
(Y page 53)
R EB D( electronic brak eforce distributi on)
(Y page 55)
R ADAPTIV EBRAKE (Y page 56) Important safety notes
If you fail to adapt your driving style or if you are
inattentive, th edriving safet ysystems can nei-
ther reduce th eriskofana ccidentnor override
th el aws of physics .Drivin gs afet ysystems are
merely aids designed to assist driving .You are
responsible for maintainin gthe distanc etothe
vehicl einfront,for vehicl espeed, for braking in
goo dtime, and for staying in lane. Always adapt
your driving style to suit th eprevailing road and weather conditions and maintain
asafe distance
fro mt hevehicle in front .Drive carefully.
The driving safet ysystems described work as
effectively as possible only when there is ade-
quate contac tbetween th etyres and th eroad
surface. Pay particular attention to th einforma-
tio nr egarding tyres, recommended minimum
tyr etread depths etc .inthe"Wheels and tyres"
sectio n(Ypage 235).
In wintry driving conditions ,always use winter
tyres (M+S tyres) and, if necessary, snow
chains. Only in this way will th edriving safety
systems described in this sectio nwork as effec-
tively as possible. ABS (Anti-lock Braking System)
Genera linformation AB
Sregulate sbrake pressure in such awaythat
the wheels do not lock when yo ubrake. This
allows yo utocontinue steering the vehicl ewhen
braking.
The yellow !ABS warning lamp in the instru-
ment cluster lights up when the ignition is
switched on. It goe soutwhen the engine is run-
ning.
ABS works from aspeed of abou t8km/h,
regardless of road-surface conditions. ABS
works on slippery surfaces ,evenw heny ou
brake onl ygently.
Important safety notes i
Observ
ethe "Important safety notes" sec-
tion (Y page 52). G
WARNING
If ABS is faulty, the wheels could lock when
braking. The steerability and braking charac-
teristics may be severely impaired.A ddition-
ally, further driving safety systems are deac-
tivated. There is an increased dange rofskid-
ding and accidents.
Drive on carefully.H ave ABS checked imme-
diately at aqualified specialist workshop.
If ABS is malfunctioning, other systems ,includ-
ing driving safety systems ,willa lsob ecome
inoperative. Observe the information on the ABS warning lamp (Y page158) and display mes- 52
Driving safety systemsSafety
Page 56 of 261
sages which may be shown in the instrument
cluster (Y page 142).
Braking X
If ABS intervenes: continue to depress the
bra kepedal with force until th ebraking sit-
uatio niso ver.
X To make afullb rake application: depress
th eb rak epedal with full force.
If AB Sintervene swhen braking ,you will fee la
pulsin ginthebrak epedal.
The pulsating brak epedal can be an indication
of hazardous road conditions; this serves as a
reminder to tak eextra car ewhile driving.
Off-road ABS An ESP
®
syste mspecifically suite dtooff-road
terrain is activated automaticall yonce the off-
roa dprogra misa ctivated.
At speed sbelow 60 km/h ,the front wheels lock
cyclically during braking .The digging-i neffect
achieved in the proces sreduce sthe stopping
distance during off-roa ddriving .Thisl im its
steering capability. BAS (Brak
eAssis tSystem)
General information BAS operate
sinemergency braking situations.
If yo udepress the brake pedal quickly ,BAS
automaticall yboosts the braking force ,thus
shortening the stopping distance.
Important safety notes i
Observe the "Important safety notes" sec-
tion (Y page 52). G
WARNING
If BAS is malfunctioning, the braking distance
in an emergency braking situation is
increased. There is arisk of accident.
In an emergency braking situation, depress
the brake peda lwith full force. ABS prevents
the wheels from locking. Braking X
Keep the brake pedald epressed firmly until
the emergency braking situation is over.
ABS prevents the wheels from locking.
The brakes willf unction as usual once you
release the brake pedal. BAS is deactivated. Adaptiv
ebrake lights
The adaptive brak elights warn followin gtraffic
in an emergenc ybraking situation by:
R flashin gbrak elamps
R activating th ehazard warning lamps
If you brak esharply from aspee dofm oret han
50 km/h or if braking is assisted by BAS, the
brak elamp sflas hrapidly. In this way, traffic
travellin gbehind you is warned in an eve nmore
noticeable manner.
If you brak esharply from aspee dofm oret han
70 km/h to astandstill, th ehazard warning
lamp sare activated automatically. If th ebrakes
are applie dagain ,the brak elamp sligh tupc on-
tinuously. The hazard warning lamp sswitch off
automatically if you travel faste rtha n1 0k m/ h.
You can also switch off th ehazard warning
lamp susingthe hazard warning button
(Y page 76). ESP
®
(Electronic Stability Program)
General notes i
Observ
ethe "Important safety notes" sec-
tion (Y page 52).
ESP ®
monitors driving stability and traction, i.e.
power transmission between the tyres and the
road surface.
If ESP ®
detects that the vehicle is deviating from
the direction desired by the driver, one or more
wheels are braked to stabilise the vehicle. The
engine output is also modified to keep the vehi- cle on the desired course within physical limits.
ESP ®
assists the driver when pulling awayon
wet or slippery roads. ESP ®
can also stabilise
the vehicle during braking. Driving safe
tysystems
53Safety Z
Page 57 of 261
4ETS (Electronic Traction System)
i
Observ
ethe "Important safety notes" sec-
tion (Y page 52).
4ETS traction control is part of ESP ®
.
4ETS traction control is no longer active above a
speed of approximately 60 km/h.
Traction control brakes the drive wheels indi-
vidually if they spin. This enables you to pull
awaya nd accelerate on slippery surfaces, e.g. if
the road surface is slippery on one side. In addi-
tion, more drive torque is transferred to the
wheel or wheels with traction.
Traction control remains active if you deactivate
ESP ®
.
Important safety notes i
Observe the "Important safety notes" sec-
tion (Y page 52). G
WARNING
If ESP ®
is malfunctioning, ESP ®
is unable to
stabilise the vehicle. In addition, other driving
safety systems are switched off. This increa-
ses the risk of skidding and an accident.
Drive on carefully.H ave ESP®
checked at a
qualified specialist workshop.
! Only operate the vehicl
efor am aximu mof
ten seconds on abrake dynamometer. Switch
off the ignition.
Application of the brakes by ESP ®
may oth-
erwise destroy the brake system.
! Af
unction or performance test should only
be carrie dout on atwin-axle dynamometer.
Before you operate the vehicl eonsuch a
dynamometer, please consult aqualified
workshop. You coul dotherwise damage the
drive train or the brake system.
If the å ESP®
OFF warning lamp lights up
continuously,E SP®
is deactivated.
If the ÷ ESP®
warning lamp lights up contin-
uously,E SP®
is not available due to amalfunc-
tion.
Observe the information on warning lamps
(Y page1 59) and display messages which may
be displayed in the instrument cluster
(Y page1 42). Use only wheels with the recommended tyre
sizes. Only then will ESP ®
functio nproperly.
If differential locks are switched on, ABS,B AS
and ESP ®
switch off automatically.
Characteristics of ESP ® General information
If the ÷ ESP warning lamp goes out before
you begin the journey, ESP ®
is automatically
active.
If ESP ®
intervenes,t he÷ ESP®
warning lamp
flashes on the instrument cluster.
If ESP ®
intervenes:
X Do not deactivate ESP ®
under any circum-
stances.
X When pulling away, depress the accelerator
pedalo nly as far as is necessary.
X Adapt yourd riving style to suit the prevailing
road and weather conditions.
ECO start/stop function
The ECO start/stop function switches the
engine off automaticall yifthe vehicle stops
moving. When the vehicle pulls awaya gain, the
engine starts automatically. ESP ®
remains in its
previously selected status, e.g. if ESP ®
was
deactivated before the engine was automati-
callys witched off.
Deactivating/activating ESP ® Im
portant safety notes
i Observ
ethe "Importan tsafety notes" sec-
tio n(Ypage 52).
You can select between th efollowin gESP®
sta-
tuses:
R ESP ®
is activated
R ESP ®
is deactivated G
WARNING
If yo udeactivate ESP ®
,E SP ®
no longer sta-
bilises the vehicle. There is an increased risk
of skidding and an accident.
Only deactivate ESP ®
in the situations descri-
bed in the following. 54
Driving safety systemsSafety
Page 58 of 261
It may be best to deactivate ESP
®
in the follow-
ing situations:
R when snow chains are used
R in deep snow
R on sand or gravel
R off-road
Spinning the wheelsr esults inacutting action,
which enhances traction.
Activate ESP ®
as soon as the situations descri-
bed above no longer apply. ESP ®
willo therwise
not be abletos tabilise the vehicle if the vehicle
starts to skid or awheel starts to spin.
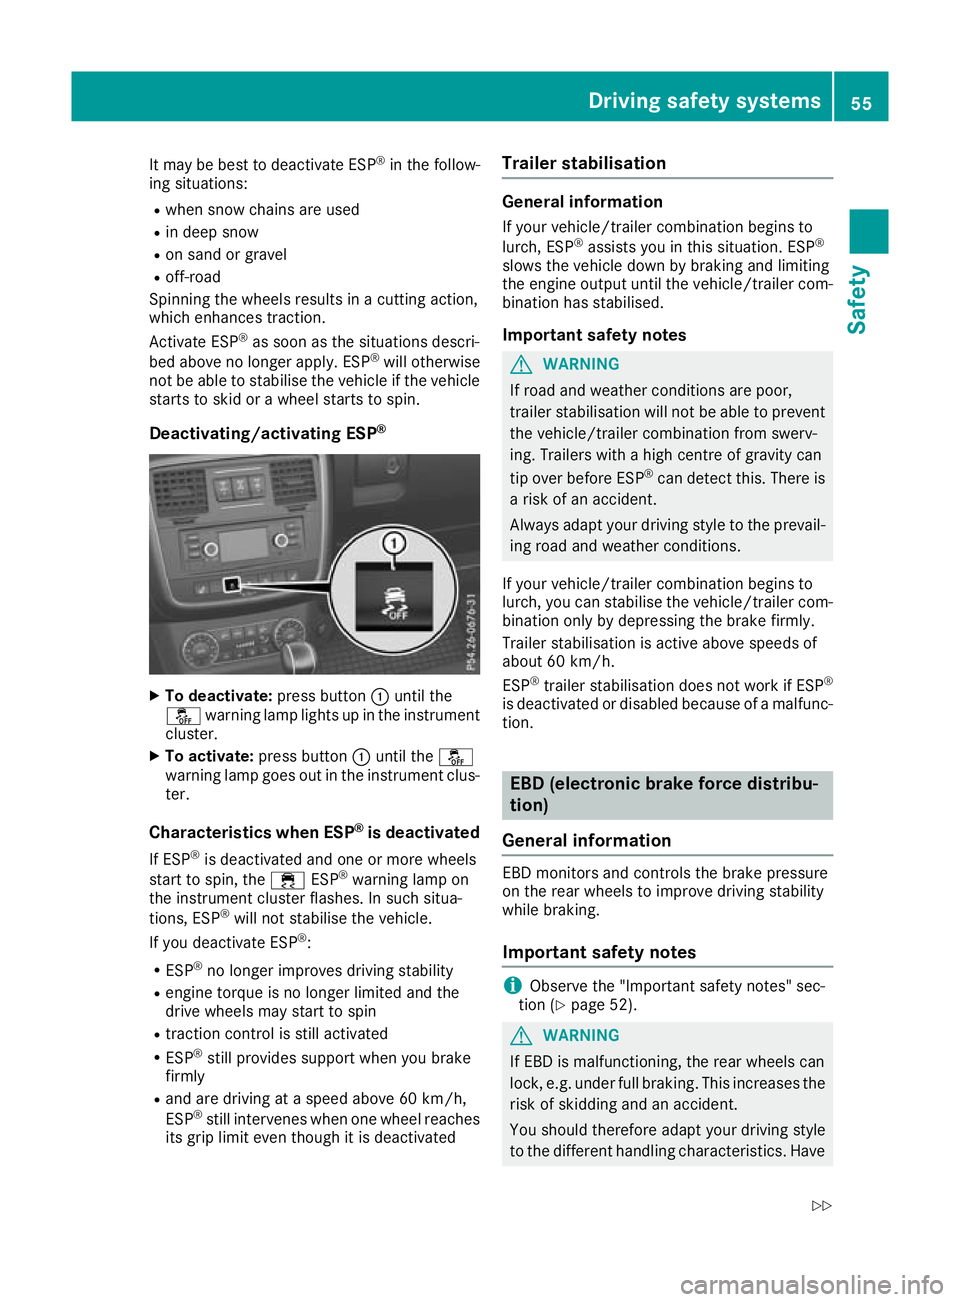
Deactivating/activating ESP ®X
To deactivate: press button:until the
å warning lamp lights up in the instrument
cluster.
X To activate: press button :until the å
warning lamp goes out in the instrument clus-
ter.
Characteristic swhenE SP®
is deactivated
If ESP ®
is deactivate dand one or more wheels
start to spin, the ÷ESP®
warning lamp on
the instrument cluster flashes. In such situa-
tions, ESP ®
will not stabilise the vehicle.
If yo udeactivate ESP ®
:
R ESP ®
no longer improve sdriving stability
R engine torque is no longer limite dand the
drive wheels may start to spin
R tractio ncontro lisstilla ctivated
R ESP ®
stil lprovides support when yo ubrake
firmly
R and are driving at aspeed above 60 km/h,
ESP ®
stil lintervene swheno ne whee lreaches
its gri plim it eve nthough it is deactivated Trailer stabilisation General information
If you rvehicle/trailer combinatio nbegins to
lurch, ESP ®
assists you in this situation. ESP ®
slowst he vehicle down by braking and limiting
the engine outpu tuntil the vehicle/trailer com-
binatio nhas stabilised.
Important safety notes G
WARNING
If road and weather conditions are poor,
trailer stabilisation willn ot be abletoprevent
the vehicle/trailer combination from swerv-
ing. Trailers with ahigh centre of gravity can
tip over before ESP ®
can detect this. There is
ar isk of an accident.
Always adapt yourd riving style to the prevail-
ing road and weather conditions.
If yourv ehicle/trailer combination begins to
lurch ,you can stabilise the vehicle/trailer com-
bination only by depressing the brake firmly.
Trailer stabilisation is active above speeds of
about 60 km/h.
ESP ®
trailer stabilisation does not work if ESP ®
is deactivated or disabledb ecause ofamalfunc-
tion. EB
D( electronic brak eforce distribu-
tion)
General information EB
Dm onitors and controls the brake pressure
on the rea rwheel stoi mprov edrivin gstability
whil ebraking.
Important safety notes i
Observ
ethe "Important safety notes" sec-
tion (Y page 52). G
WARNING
If EBD is malfunctioning, the rear wheels can
lock, e.g. under full braking. This increases the risk of skidding and an accident.
You should therefore adapt your driving style
to the different handling characteristics. Have Driving safe
tysystems
55Safety
Z
Page 65 of 261

Centrally lockin
gand unlocking the
vehicle from th einside
You can centrally loc korunlock th evehicle from
th ei nside.
The butto nfor th ecentral lockin gdoes no tlock
or unlock th efuel fille rflap.
The switch for th ecentral lockin gisonthelower
sectio nofthecentr econsole. X
To unlock: press button :.
X To lock: press button ;.
United Kingdom only: if thevehicl ehasbeen
locked with the key ,the double lock functio nis
activate dasstandard. It is then not possibl eto
open the doors from insid ethe vehicle. Yo ucan
deactivate the double lock functio nbydeacti-
vating the interio rmotion sensor (se eDigital
Owner' sManual) .Opening/closing doors is
then possibl easfollows :the doors can be
opene dfrom inside. Yo ucan onl yopent he rear
side doors from insid ethe vehicl eifthey are not
secured by the child-proof locks (Y page 51).
i It is onl
ypossibl etol ockt he vehicl ecen-
trally if the driver's door is closed.
i The doors unlock automaticall
yinthe event
of an accident if the force of the impact
exceed sapredetermined level. Automatic locking feature
X
To deactivate: press and holdbutton :for
approximatel yfives econds unti latone
sounds.
X To activate: press and hol dbutton ;for
approximatel yfives econds unti latone
sounds.
If yo upress one of the two buttons and do not
hea rat one, the relevant setting ha salready
been selected.
The vehicl eislocked automaticall ywhent he
ignition is switched on and the wheels are turn-
ing.
Therefore, yo ucould be locked ou tif:
R the vehicl eisbeing pushed
R the vehicl eisbeing towed
R the vehicl eisbeing teste donadynamometer
Yo uc an also activate and deactivate the auto-
matic locking functio nusing the on-board com-
puter (Y page 139). Locking/unlocking the driver's door
with the emergenc
ykey 62
DoorsOpening and closing
Page 69 of 261
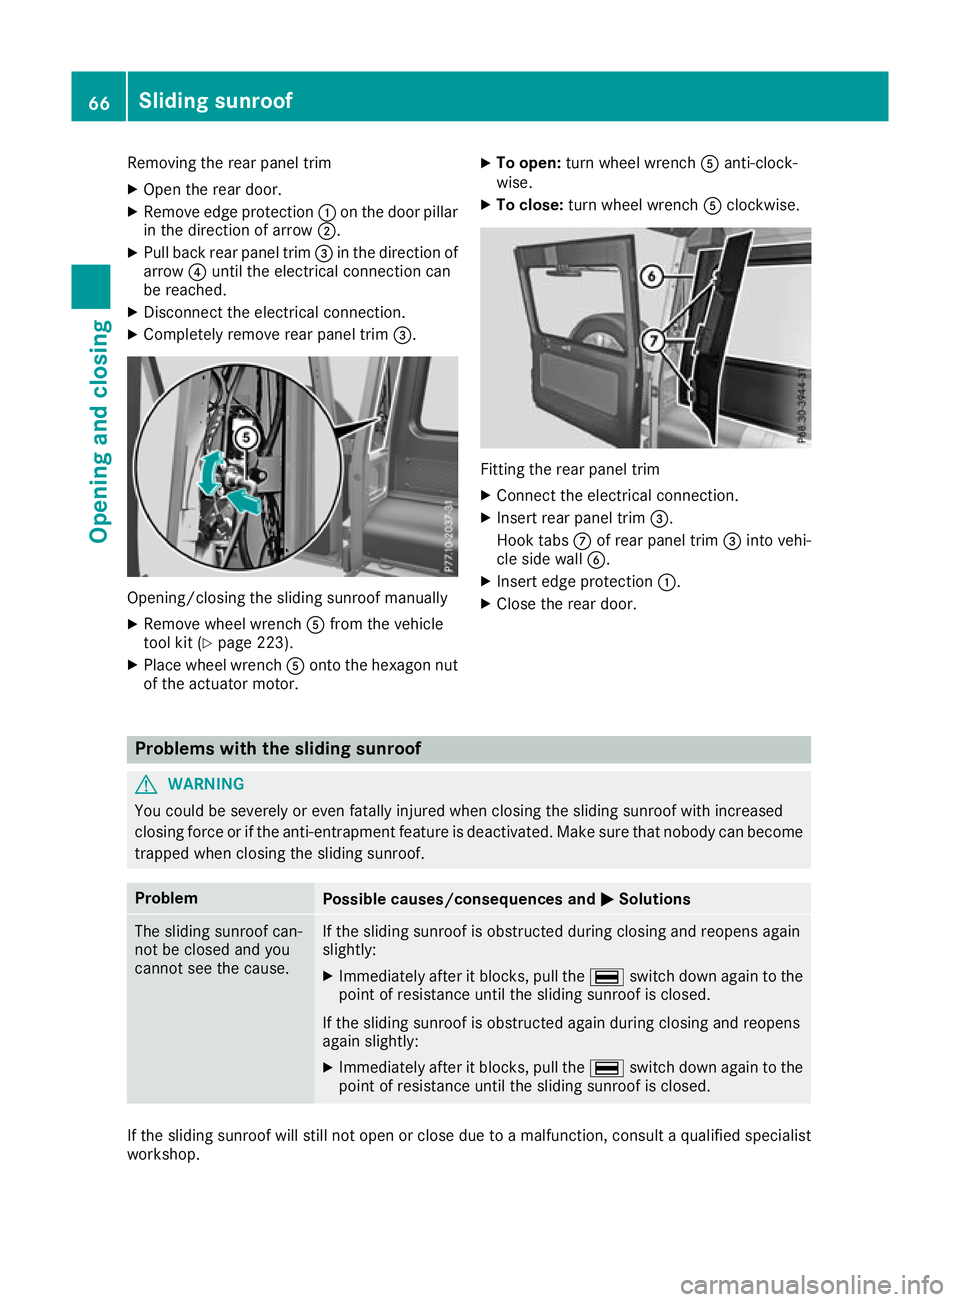
Removin
gthe rear panel trim
X Open th erear door.
X Remove edge protection :on th edoor pillar
in th edirection of arrow ;.
X Pull bac krear panel trim =in th edirection of
arrow ?until th eelectrical connection can
be reached.
X Disconnect th eelectrical connection.
X Completely remove rear panel trim =.Opening/closing the slidin
gsunroof manually
X Remove wheel wrench Afrom the vehicle
tool kit (Y page 223).
X Place wheel wrench Aonto the hexagon nut
of the actuator motor. X
To open: turnw heel wrench Aanti-clock-
wise.
X To close: turn wheelwrench Aclockwise. Fitting the rea
rpanel trim
X Connect the electrica lconnection.
X Insert rea rpanel trim =.
Hook tabs Cof rea rpanel trim =into vehi-
cle sid ewallB.
X Insert edg eprotection :.
X Close the rea rdoor. Problems wit
hthe sliding sunroof G
WARNING
You could be severely or even fatally injured when closing the sliding sunroof with increased
closing force or if the anti-entrapment feature is deactivated .Make sure that nobody can become
trappe dwhen closing the sliding sunroof. Problem
Possible causes/consequences and
M
MSolutions The sliding sunroof can-
not be close
dand you
cannot see the cause. If the sliding sunroo
fisobstructed during closing and reopens again
slightly:
X Immediately after it blocks, pullt he¡ switch down again to the
point of resistance until the sliding sunroof is closed.
If the sliding sunroof is obstructed again during closing and reopens
again slightly: X Immediately after it blocks, pullt he¡ switch down again to the
point of resistance until the sliding sunroof is closed. If the sliding sunroof wills
till not open or close due to amalfunction, consult aqualifieds pecialist
workshop. 66
Sliding sunroofOpening and closing
Page 70 of 261
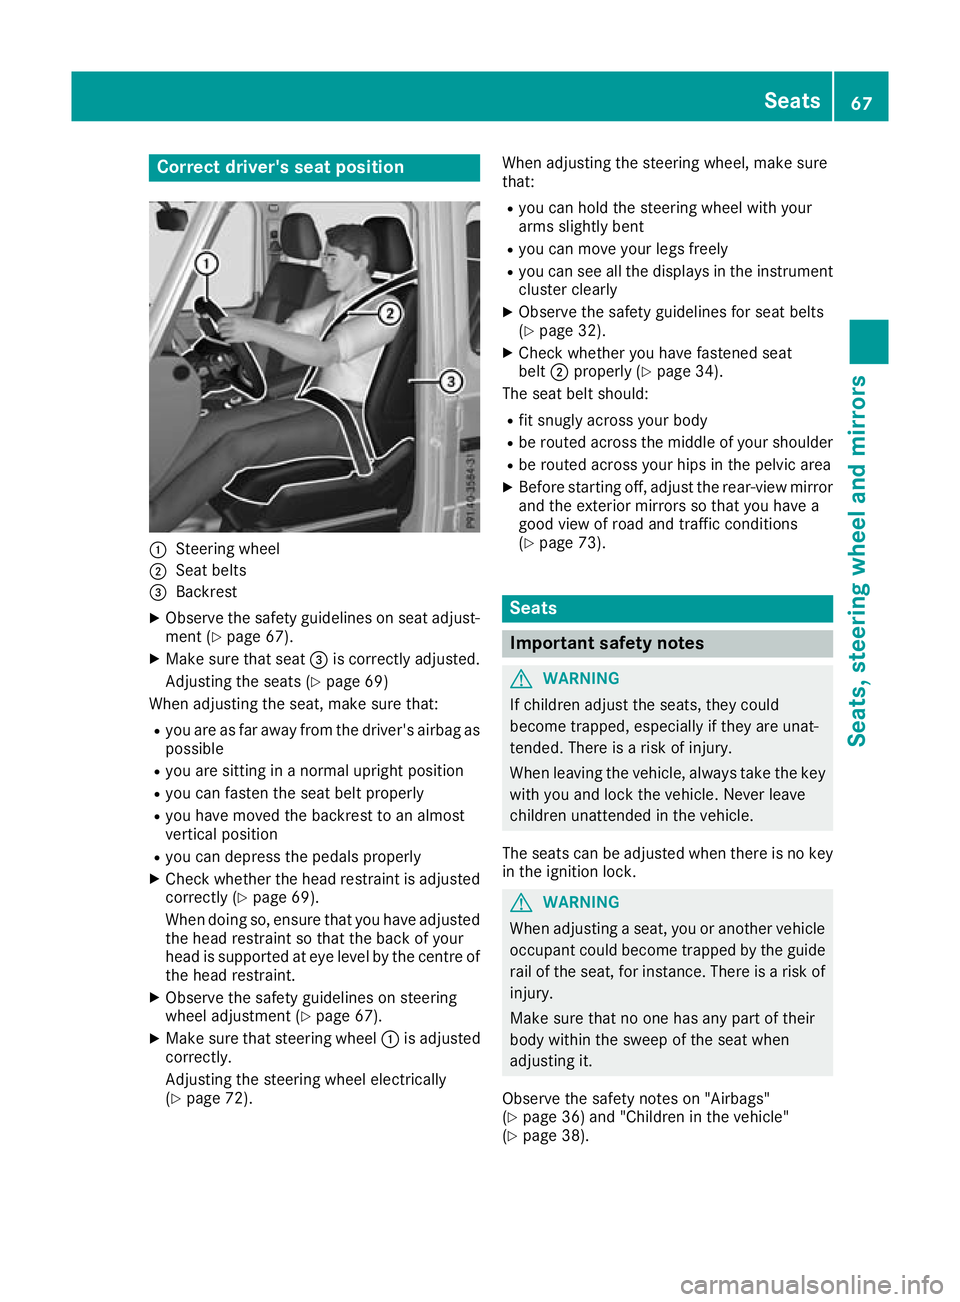
Correct driver's seat position
:
Steerin gwheel
; Seatbelts
= Backrest
X Observe the safety guideline sonseata djust-
ment (Y page 67).
X Make sure that seat =is correctly adjusted.
Adjusting the seats (Y page 69)
Whe nadjusting the seat, make sure that:
R youa re as far away from the driver' sairba gas
possible
R youa re sitting in anorma lupright position
R youc an fasten the sea tbeltp roperly
R youh avem ovedthe backrest to an almost
vertical position
R youc an depress the pedal sproperly
X Check whethe rthe hea drestraint is adjusted
correctly (Y page 69).
Whe ndoing so, ensure that yo uhavea djusted
the hea drestraint so that the back of your
hea diss upported at ey elev el by the centre of
the hea drestraint.
X Observe the safety guideline sonsteering
wheel adjustment (Y page 67).
X Make sure that steering wheel :is adjusted
correctly.
Adjusting the steering wheel electrically
(Y page 72). Whe
nadjustin gthe steerin gwheel, make sure
that:
R you can hold the steerin gwheel with your
arms slightly bent
R you can move your legs freely
R you can see all the displays in the instrument
cluster clearly
X Observe the safety guidelines for seat belts
(Y page 32).
X Check whether you have fastened seat
belt ;properly (Y page 34).
The seat belt should:
R fit snugly across your body
R be routed across the middle of your shoulder
R be routed across your hips in the pelvic area
X Befor estarting off, adjust the rear-view mirror
and the exterior mirrors so that you have a
good view of road and traffic conditions
(Y page 73). Seats
Important safety notes
G
WARNING
If children adjust the seats, they could
become trapped, especially if they are unat-
tended. Ther eisarisk of injury.
When leaving the vehicle, alwayst ake the key
with you and lock the vehicle. Never leave
children unattended in the vehicle.
The seats can be adjusted when there is no key
in the ignitio nlock. G
WARNING
When adjusting aseat, you or another vehicle
occupant coul dbecome trappe dbythe guide
rail of the seat, for instance. There is arisk of
injury.
Make sure that no one has any part of their
body withi nthe swee pofthe seat when
adjusting it.
Observe the safety notes on "Airbags"
(Y page3 6) and "Children in the vehicle"
(Y page3 8). Seats
67Seats,steering wheela nd mirrors Z
Page 71 of 261
G
WARNING
You coul dlose control of the vehicl ewhile
driving if you:
R adjust the driver's seat, steering whee lor
mirrors
R fasten the seat belt
There is arisk of an accident.
Adjust the driver's seat, headr estraint, steer-
ing whee land mirrors and fasten yours eat
beltb efore starting the engine. G
WARNING
The headr estraints cannot provid ethe inten-
ded protection unless they are fitted and
adjusted correctly. There is an increased risk of injury to the heada nd neck in the event of
an accident or sudden braking, for example.
Always drive with the headr estraints fitted.
Ensure that the centre of the headr estraints
support the back of each vehicl eoccupant's
headate ye levelbefore driving off.
Make sure that you do not interchange the head restraints of the front and rear seats when
adjusting the headr estraints. Otherwise, you
cannot adjust the height and angle of the head
restraints correctly.
Adjust the headr estraint so that it is as close as
possible to yourh ead. G
WARNING
If the driver's seat is not correctly engaged, it coul dunexpectedly move while driving. This
coul dcausey ou to lose control of the vehicle.
There is arisk of an accident.
Always ensure that the driver's seat is
engaged before starting the vehicle. G
WARNING
If you adjust the seat height carelessly, you or other vehicl eoccupants coul dbetrappe dand
thereby injured .Childre ninparticular could
accidentally press the electrica lseat adjust-
ment buttons and become trapped. There is a
risk of injury.
Whil emoving the seats, make sure that your
hands or other body parts do not get under the lever assembly of the sea
tadjustmen tsys-
tem. G
WARNING
Whe nadjusting aseat, you or another vehicle
occupant coul dbecome trappe dbythe guide
rail of the seat, for instance. There is arisk of
injury.
Make sure that no one has any part of their
body withi nthe swee pofthe seat when
adjusting it. G
WARNING
If the seat beltisn ot in the seat beltg uide, it
no longer offers the intended leve lofprotec-
tion. An incorrectly fastened seat beltc an also
caus eadditiona linjuries. This poses an
increased risk of injury or even fatal injury.
Before starting ajourney ,alwaysm ake sure
that the seat beltisint he seat beltguide and
all vehicl eoccupants have fastened their seat
belts properly.
! To avoi
ddamage to the seats and the seat
heating, observe the following information:
R do not spil lany liquidsont he seats. If liquid
is spilled on the seats, dry them as soon as possible.
R if the seat covers are damp or wet, do not
switch on the seat heating. The seat heat-
ing should alson ot be used to dry the seats.
R clea nthe seat covers as recommended;
see "Interio rcare".
R do not transport heav yloads on the seats.
Do not place sharp objects on the seat
cushions, e.g. knives, nail sortools. The
seats should only be occupied by passen-
gers, if possible.
R when the seat heating is in operation, do
not cover the seats with insulating materi-
als,e .g. blankets, coats, bags, seat covers,
child seats or booster seats.
! Make sure that there are no objects in the
footwel lunder or behind the seats when mov-
ing the seats back. There is arisk that the
seats and/or the objects coul dbedamaged.
! When the rear bench seat is folde
dfor-
wards, the front seats cannot be moved to 68
SeatsSeats
,steering wheela nd mirrors