2016 MERCEDES-BENZ G-CLASS SUV trailer
[x] Cancel search: trailerPage 132 of 261

also applies in countries in whic
hthe maximum
permissible spee dfor car/trailer combinations
is greate rtha n1 00 km/h.
When towing atrailer, your vehicle's handling
characteristics will be differen ttowhen driving
without atrailer and th evehicle will consume
mor efuel.
Driving tips R
Maintain agreater distance to the vehicle in
front than when driving without atrailer.
R Avoid braking abruptly. If possible, brake gen-
tly at first to allow the trailer to run on. Then,
increase the braking force rapidly.
R The values given for gradient-climbing capa-
bilities from astandstill refer to sea level.
When driving in mountainous areas, note that
the power output of the engine, and conse-
quently the vehicle's gradient-climbing capa-
bility from astandstill, decrease with increas-
ing altitude.
If the trailer swings from side to side:
X Do not accelerate under any circumstances.
X Do not countersteer.
X Brake, if necessary. Coupling up
atrailer
! Do no
tconnect th etrailer brak esystem (if
th et railer is fitte dwitho ne)d irectly to the
towing vehicle's hydraulic brak esystem,
since this is equipped wit hananti-lock brak-
ing system. Otherwise, neither th ebrakes on
th et ow ing vehicle no rthe brakes on the
trailer will work.
Observ ethe maximum permissible trailer
dimension s(widt hand length).
X Apply th evehicle's parking brake.
X Mak esure that th eautomatic transmission is
in transmission position P.
X Positio nthe trailer on aleve lsurface behind
th ev ehicle.
X Couple up th etrailer.
X Establish th eelectrical connection between
th ev ehicle and th etrailer.
X Chec kthatthe trailer lighting system is work-
ing.
X Push th ecombinatio nswitch upward sand
downwards and check whether th ecorre- sponding tur
nsignal indicator on the trailer is
flashing.
Ac onnected trailer is only detected when the
electrical connection is established correctly
and when the lighting system is working prop-
erly. The function of other systems, such as
ESP ®
also depends on this. Uncoupling
atrailer G
WARNING
If you uncouple atrailer with an engaged over-
run brake, you coul dtrap yourh and between
the vehicl eand the trailer drawbar. This poses
ar isk of injury.
Do not uncouple atrailer with an engaged
overru nbrake.
! Do not disconnect
atrailer with an engaged
overru nbrake. Otherwise, yourv ehiclecould
be damaged by the rebounding of the overrun brake.
X Apply the parking brake.
X Make sure that the automatic transmission is
in transmission position P.
X Secure the vehicl eand trailer against rolling
away.
X Close all doors, including the rear door.
X Remove the trailer cable.
X Uncoupl ethe trailer. Traile
rpower supply
! Yo
uc an connect accessories with amaxi-
mu mp ower consumption of 180 Wtothe
permanent powe rsupply.
Yo um ustn ot charge atrailer battery using the
powe rsupply.
The trailer socket of your vehicl eisequippe dat
the factory with apermanent powe rsupply.
The permanent powe rsuppl yiss upplie dvia
trailer socket pi n9.
Yo uc an find mor einformatio nabout installing
the trailer electrics at aquali fied specialis twork-
shop. Towin
gatrailer
129Driving an dparking Z
Page 133 of 261
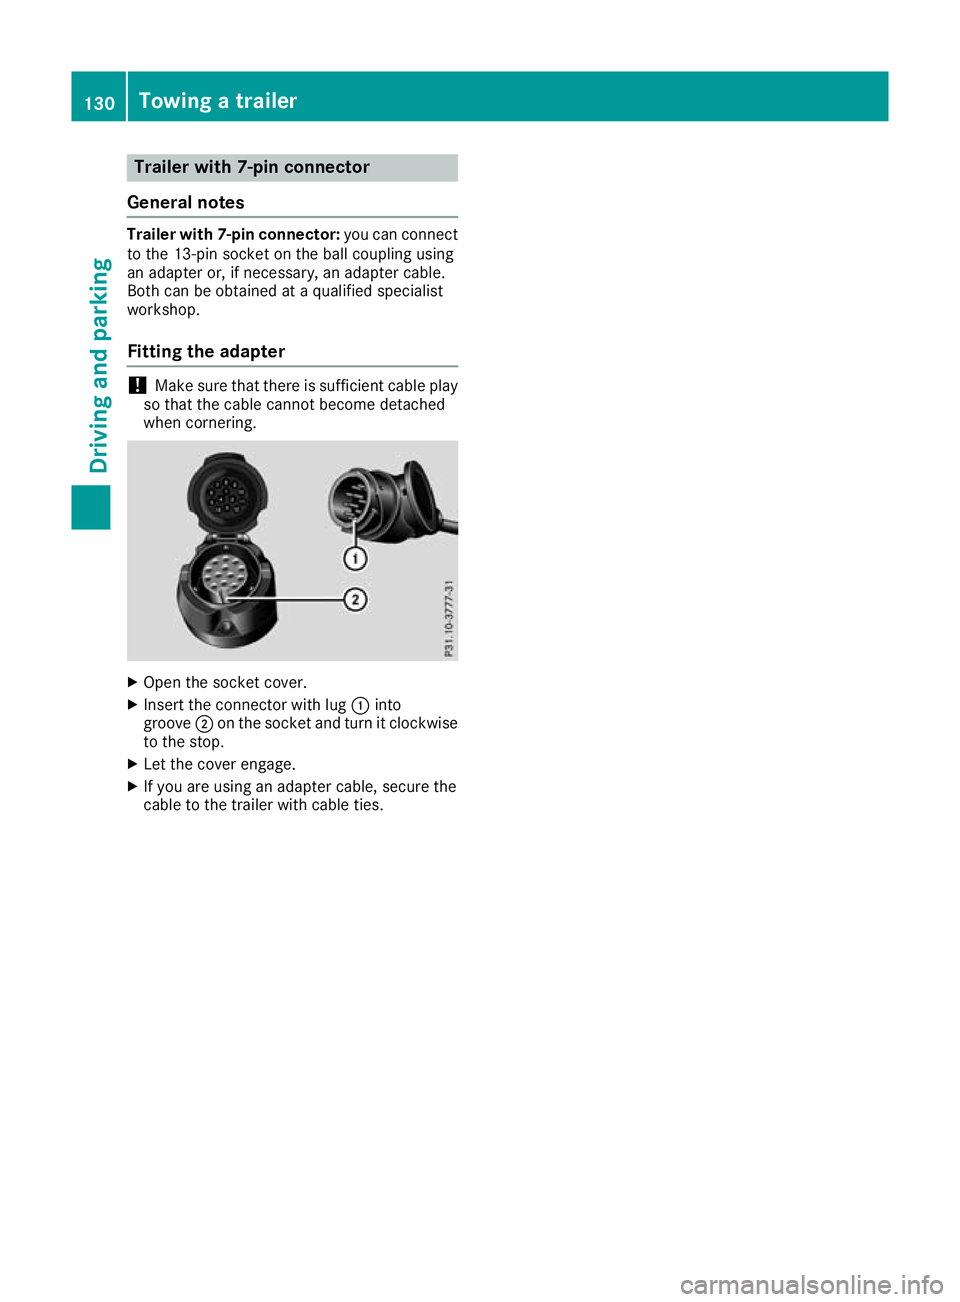
Trailer with 7-pi
nconnect or
General notes Trailer with 7-pi
nconnect or:youc an connect
to the 13-pi nsocke tont he ball coupling using
an adapter or, if necessary ,anadapter cable.
Both can be obtained at aquali fied specialist
workshop.
Fittin gthe adapter !
Mak
esure that there is sufficient cable play
so that the cable cannot become detached
when cornering. X
Open the socket cover.
X Insert the connector with lug :into
groove ;on the socket and turn it clockwise
to the stop.
X Let the cover engage.
X If you are using an adapter cable, secure the
cable to the trailer with cable ties. 130
Towing
atrailerDriving and parking
Page 223 of 261
Cleaning th
etrailer tow hitch !
Do not clean the bal
lcoupling with ahigh-
pressure cleaner. Do not use solvents.
! Please note the care instructionsint
he
trailer coupling manufacturer's operating
instructions. H
Environmental note
Dispose of oilya nd greasycloths in an envi-
ronmentally-responsible manner.
The ball coupling must be cleaned if it becomes dirt yorc orroded.
X Remov erust ,e.g.w ith aw ire brush.
X After cleaning ,lightly oil or greas ethe ball
coupling.
X Chec kthatthe vehicle' strailer to whitch is
working properly.
You can also have th emaintenanc ework on the
ball coupling and th etrailer to whitch carried out
by aq ualifie dspecialist workshop. Interior care
Cleaning th edisplay !
For cleaning, do not use any of the following:
R alcohol-based thinne rorpetrol
R abrasive cleaning agents
R commercially-available householdc leaning
agents
These may damage the displays urface. Do
not put pressure on the displays urface when
cleaning. This could lead to irreparable dam-
age to the display.
X Before cleaning the display, make sure that it
is switched off and has cooled down.
X Cleant he displays urface using acommer-
cially available microfibre cloth and TFT/LCD
displayc leaner.
X Dry the displays urface usingadry microfibre
cloth.
Cleaning the plastic trim G
WARNING
Care products and cleaning agents containing solvents can cause surfaces in the cockpit to become porous.T
his could result in plastic
parts breakin gaway when the airbags are
deployed. There is adanger of injury.
Do not use care product sand cleanin gagents
containin gsolvents to clean the cockpit.
! Never attac
hthe following to plastic surfa-
ces:
R stickers
R films
R perfume oil container or similar
You could otherwise damage the plastic.
! Do not allow cosmetics
,insec trepellent or
sunscreen to come in contact with the plastic trim .This maintains the high-quality look of
the surfaces.
X Wipe the plastic trim with adamp, lint-free
cloth, e.g. amicrofibre cloth.
X Heavy soiling: use care and cleanin gprod-
ucts recommended and approved by
Mercedes-Benz.
The surface may chang ecolour temporarily.
Wait until the surface is dry again.
Cleaning the steering wheel and selec-
tor lever X
Thoroughly wipe with adamp cloth or use
leather care agents that have been recom-
mended and approved by Mercedes-Benz.
Cleaning wood trim and trim elements !
Do not use solvent-based cleaning agents
such as tar remover, wheel cleaners, polishes
or waxes. There is otherwise arisk of damag-
ing the surface.
X Wipe the wood trim and trim elements with a
damp, lint-free cloth, e.g. amicrofibre cloth.
X Heavy soiling: use care and cleaning prod-
ucts recommended and approved by
Mercedes-Benz.
Cleaning the seat covers General notes
! Clean cloth covers with
amicrofibre cloth
moistened with asolution containing 1%
detergent (e.g. washing-up liquid). Rubc are-220
CareMaintenanc
eand care
Page 232 of 261

X
Lift up cover :of positive terminal ;in the direction of the arrow.
X Connect positive terminal ;on yourv ehicle to positive terminal ?of donor battery Busing the
jump lead, Alwaysb eginw ith positive terminal ;on youro wn vehicle first.
X Start the engine of the donor vehicle and run it at idling speed.
X Connect negative terminal Aof donor battery Bto earth point =of yourv ehicle using the jump
lead, connecting the jump leadtod onor batteryBfirst.
X Start the engine.
X Before disconnecting the jump leads, let the engines run for several minutes.
X First, remove the jump leads from earth point =and negative terminal A,then from positive
terminal ;and positive terminal ?.Each time, beginatt he contacts on youro wn vehicle.
X Close cover :of positive terminal ;after removing the jump leads.
X Have the battery checked at aqualifieds pecialist workshop.
Jump-starting is not considered to be anormal operating condition.
i Jump-starting cablesa
nd further information regarding jump-starting can be obtained at any
qualifieds pecialist workshop. Towinga
wayand tow-starting Importan
tsafety notes G
WARNING
Safety-relevant function sare restricted or not
available if:
R the engine is not running.
R the brake system or the power steering is
malfunctioning
R the voltag esupply or the vehicle's electrical
system is malfunctioning.
If yourv ehicleist owed,s ignificantly greater
force may be required to steer the vehicl eor
to brake. There is arisk of an accident.
In such circumstances, use atowing bar.
Make sure that the steering is moving freely
before towing. G
WARNING
If the steering whee llock is engaged, the vehi-
cle can no longer be steered .There is arisk of
an accident.
Always switch on the ignitio nwhen towing
with atow rope or atowing bar. G
WARNING
When towing or tow-starting another vehicle
and its weight is greater than the permissible gross weight of yourv ehicle, the:
R towing eye may be torn off
R car/trailer combination may swerve or
even overturn
There is arisk of an accident.
When towing or tow-starting another vehicle,
its weight should not be greater than the per- missible gross weight of yourv ehicle.
Detail sonthe permissible gross vehicl eweight
of yourv ehiclecan be found on the vehicl eiden-
tification plate (Y page249).
! You may tow the vehicl
efor am aximu mof
50km. Atowing spee dof50km/h must not
be exceeded.
For towing distances over 50 km, the entire
vehicl emust be lifted up and transported.
! Only secure the tow cabl
eortowing bar to
the towing eyes. You coul dotherwise damage
the vehicle.
! Observe the following points when towing
with atow rope:
R Secure the tow rope on the same side on
both vehicles.
R Make sure that the tow rope is not longer
than legally permitted. Mark the tow rope in the middle, e.g. with awhite cloth Towin
gawayand tow-starting
229Breakdown assis tance Z
Page 233 of 261
(30
x30c m). This will make othe rroad
users aware that avehicle is being towed.
R Only secure the tow cable to the towing
eyes or, if available, to the trailer tow hitch.
R Observ ethe brake lamps of the towing
vehicle while driving. Always maintain adis-
tance adistance so that the tow rope does
not sag.
R Do not use steel cables or chain stotow
your vehicle. You could otherwise damage
the vehicle.
! Do not use the trailer tow hitc
hfor recovery
or towing. Do not use the towin geye for
recovery. This could damage the vehicle. If in
doubt, have the vehicle recovered using a
crane.
! When towing, pull away slowly and
smoothly. If the tractive power is too high, the
vehicles could be damaged.
! Your vehicles is equipped with an automatic
transmission .Therefore, you must not have
the vehicle tow-started. The transmission
may otherwise be damaged.
Observ ethe legal requirementsine ach individ-
ual country when towing.
It is better to have the vehicle transported than
to have it towed.
If the transfer case can be shifted int othe Neu-
tral position, you can tow away the vehicle.
If the transfer case cannot be shifted int othe
Neutral position, you can tow away the vehicle
with one axle raised. Please bear the following in
mind:
R remov ethe propeller shaft from between the
transfer case and the rolling axle.
R turn the key to position 1in the ignition lock.
The battery must be connected and charged.
Otherwise, you:
R cannot turn the key to position 2in the igni-
tion lock
R cannot shift the automatic transmission to
position i To
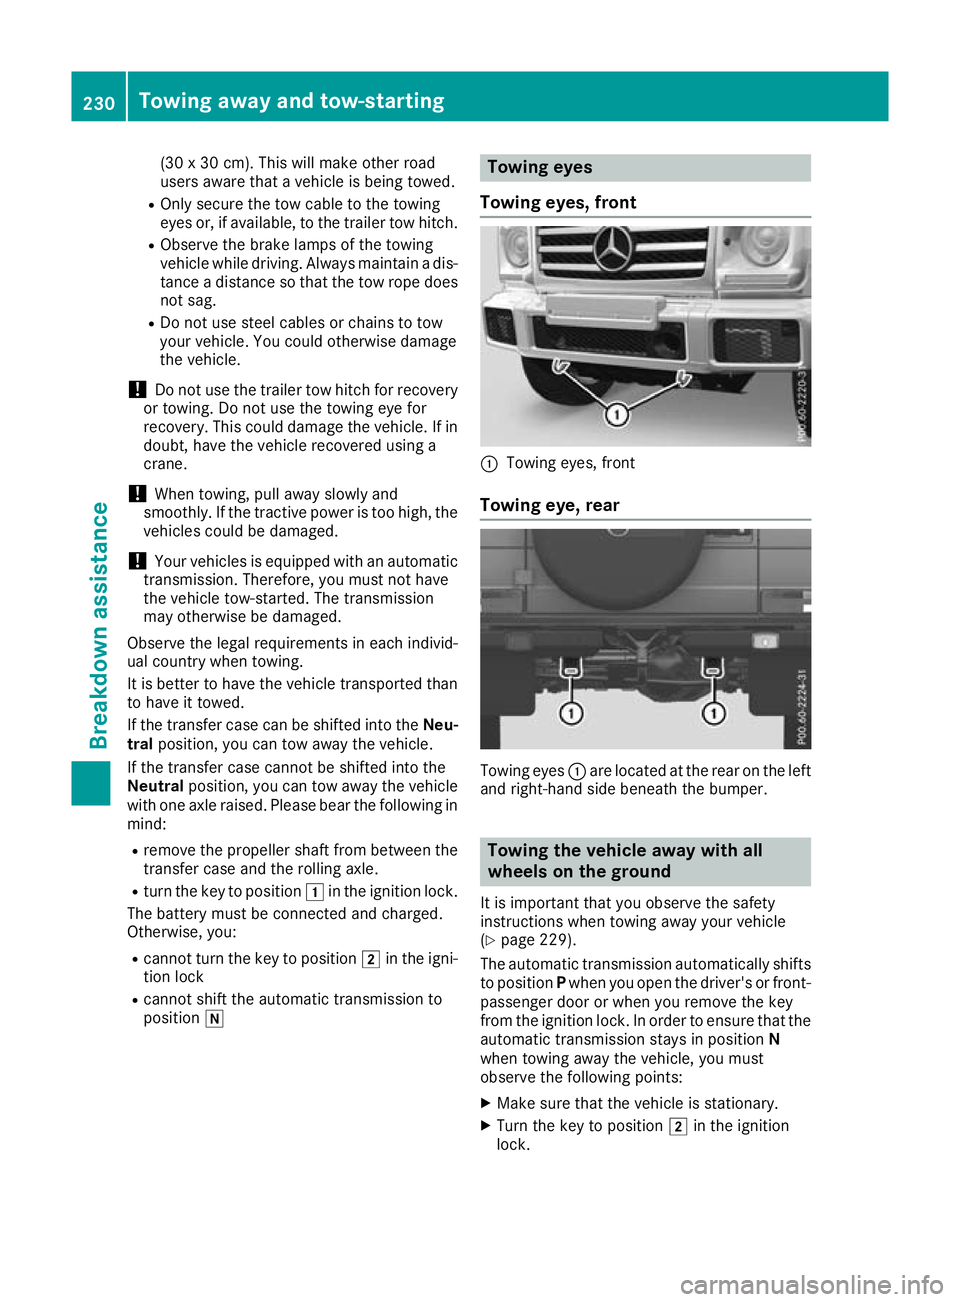
wing eyes
Towin geyes, front :
Towing eyes ,front
Towing eye, rear Towing eyes
:are located at the rear on the left
and right-hand side beneath the bumper. To
wing the vehicle away with all
wheels on the ground
It is important tha tyou observe the safety
instructions when towing away your vehicle
(Y page 229).
The automatic transmission automaticall yshifts
to position Pwhen yo uopenthe driver's or front-
passenge rdoororw heny ou remove the key
fro mt he ignition lock. In order to ensur etha tthe
automatic transmission stays in position N
when towing away the vehicle, yo umust
observe the following points:
X Make sure tha tthe vehicl eisstationary.
X Turn the key to position 2in the ignition
lock. 230
Towing away an
dtow-startingBreakdowna ssistan ce
Page 234 of 261
X
When the vehicle is stationary, depress the
brake pedal and keep it depressed.
X Shift the transfer case to position Neutral
(Y page 125).
X Shift the automatic transmission to position
N.
X Leave the key in position 2in the ignition
lock.
X Release the brake pedal.
X Release the parking brake.
X Switc hont he hazard warning lamps
(Y page 76).
In order to signal achange of direction when
towing the vehicle with the hazard warning
lamps switched on, use the combination switch
as usual. In this case, only the turn signals for
the desired direction flash. When you reset the
combination switch, the hazard warning lamps
start flashing again.
i The automatic transmission can only
change gear when the batter yhas sufficient
charge.
If you cannot shift the automatic transmission
to position N,the propeller shafts to the
driven axles must be removed. Transporting thev
ehicle !
Whe
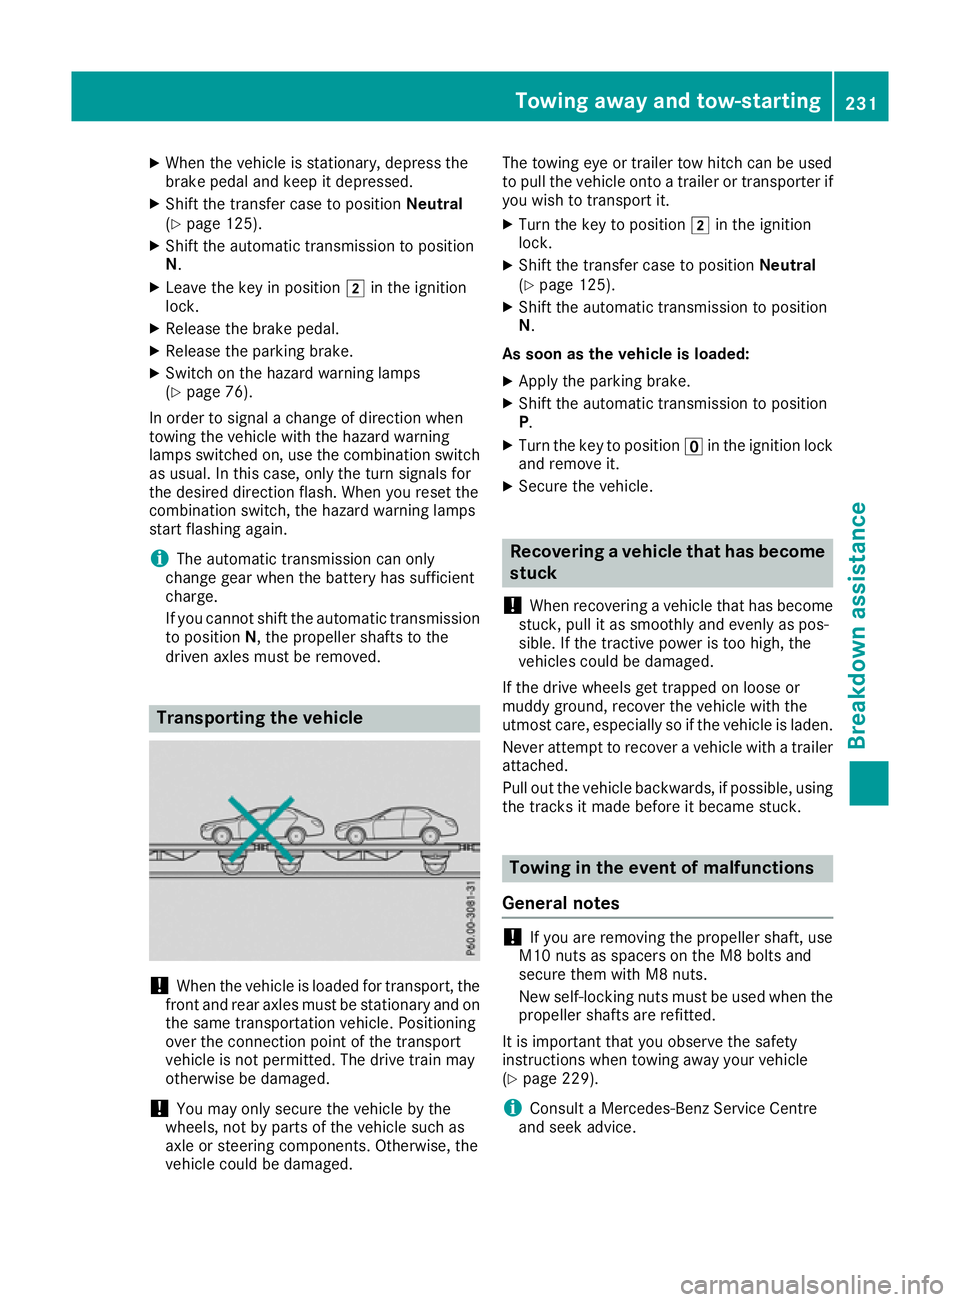
nthe vehicle is loadedf or transport, the
front and rear axles must be stationary and on the same transportation vehicle. Positioning
over the connection point of the transport
vehicle is not permitted. The drive train may
otherwise be damaged.
! You may only secure the vehicle by the
wheels, not by parts of the vehicle such as
axle or steering components. Otherwise, the
vehicle could be damaged. The towing eye or trailer tow hitch can be used
to pull the vehicle onto
atrailer or transporter if
you wish to transport it.
X Turn the key to position 2in the ignition
lock.
X Shift the transfer case to position Neutral
(Y page 125).
X Shift the automatic transmission to position
N.
As soon as the vehicle is loaded:
X Apply the parking brake.
X Shift the automatic transmission to position
P.
X Turn the key to position uin the ignition lock
and remove it.
X Secure the vehicle. Recovering
avehicle that has become
stuck
! Whe
nrecovering avehicl ethat ha sbecome
stuck, pull it as smoothly and evenly as pos-
sible .Ifthe tractive power is too high, the
vehicles could be damaged.
If the drive wheel sget trapped on loose or
muddy ground ,recover the vehicl ewitht he
utmost care ,especially so if the vehicl eisladen.
Neve rattempt to recover avehicl ewithat railer
attached.
Pull ou tthe vehicl ebackwards ,ifpossible ,using
the tracks it mad ebefore it became stuck. Towin
ginthe even tofm alfunctions
General notes !
If you are removing the propelle
rshaft, use
M10 nuts as spacers on the M8 bolts and
secure them with M8 nuts.
New self-locking nuts must be used when the propellers hafts are refitted.
It is important that you observe the safety
instructionsw hen towing awayy our vehicle
(Y page 229).
i Consult
aMercedes-Benz Service Centre
and seek advice. To
wing away and tow-starting
231Breakdown assis tance Z
Page 242 of 261

R
Chec kthe tyrefor foreign objects.
R Chec kwhether th ewheel is losin gair or the
valv eisl eaking.
If you are unable to rectif ythe damage, con-
tac taq ualified specialist workshop. H
Environmenta
lnote
Chec kthe tyrep ressure regularly, at least
ever y14d ays.
The recommended tyr epressures for various
operatin gcondition scan be foun donthetyre
pressure table on th efuel filler flap
(Y page 109).
Operation with atrailer: thea pplicable value
for th erear axle is th emaximum value stated in
th et yrep ressure table.
The tyr epressure table may also state tyr epres-
sures for differen tload conditions. Thes eare
defined in th etable as differen tnumbers of pas-
sengers and amounts of luggage. The actual
number of seat smay differ fro mthis.
If tyr esizes are not specified ,the tyrep ressures
stated on th etyrep ressure informatio nlabel
apply for all tyres approved for this vehicle. If one or mor
etyre sizes precedes atyre pres-
sure, the following tyre pressure information is
valido nly for that tyre size.
Use asuitable pressure gauge to check the tyre
pressure. The outer appearance of atyre does
not give any reliable indicatio nofthe tyre pres-
sure.
You can also check the tyre pressure using the
on-board computer.
If possible, correct tyre pressures only when the
tyres are cold. The tyres are cold:
R if the vehicl ehas been parked with the tyres
out of direct sunlight for at least three hours
and
R if the vehicle has not been driven further than
1.6 km
Dependin gonthe outside temperature, the
vehicle speed and the load on the tyres, the tyre temperature and thus the tyre pressure changes by approximately 10 kPa (0.1 bar/1.5 psi )per
10 †. Take this into account when checking the
pressure of warm tyres. Correct the tyre pres-
sure only if it is too low for the current operating
condition.
Drivin gwithatyre pressure that is too high or
too low can:
R shorten the service life of the tyres
R cause increased tyre damage
R have anegative effect on handling character-
istics and thus driving safety (e.g. aquaplan-
ing)
The tyre pressure values given for low loads are minimum values that offer you good driving
comfor tcharacteristics.
However, you can also use the values given for
higher loads. These are permissible and will not
adversely affect the runnin gofthe vehicle. Tyre pressur
emonitor
General notes If
at yre pressure monitor is fitted, the vehicle's
wheelsh ave sensors fitted that monitor the tyre
pressures in all four tyres. The tyre pressure
monitor warns you if the pressure drops in one
or more of the tyres. The tyre pressure monitor
functions only if the corresponding sensors are
fitted to all wheels.
Information on tyre pressures is shown on the
multifunction display. After afew minutes of
driving, the current tyre pressure of each wheel
is shown in the Serv.
Serv. menu. Tyrep
ressure
239Wheels and tyres Z
Page 252 of 261
nections intende
dfor us ewitht he basi cfittings.
Be sure to observe the manufacturer' saddi-
tional instructions when installing.
Deviations in respect of wavebands, maximum
transmission outputs or aeria lpositions must be
approved by Mercedes-Benz.
The maximu mtransmission outpu t(PE AK) at the
base of the aeria lmustn ot exceed the following
values: Waveband Maximum
transmissi on
output Short wave
3-54M
Hz 100 W
4mw
aveband
68 -87.5 MHz 30 W
2mw
aveband
144 -174 MHz 50 W
Trunked radio/Tetra
380
-460 MHz 10 W
70 cm waveband
400
-460 MHz 35 W
Mobilec
ommunications
(2G/3G/4G) 10 W
The following can be used in the vehicle without
restrictions:
R RF transmitters with amaximum transmis-
sion output of up to 100 mW
R RF transmitters with transmitter frequencies
in the 380 –410 MHz waveband and amaxi-
mum transmission output of up to 2W
(trunked radio/Tetra)
R Mobile phones (2G/3G/4G)
There are no restriction swhen positionin gthe
aerial on the outside of the vehicle for the fol-
lowing wavebands:
R Trunked radio/Tetra
R 70 cm waveband
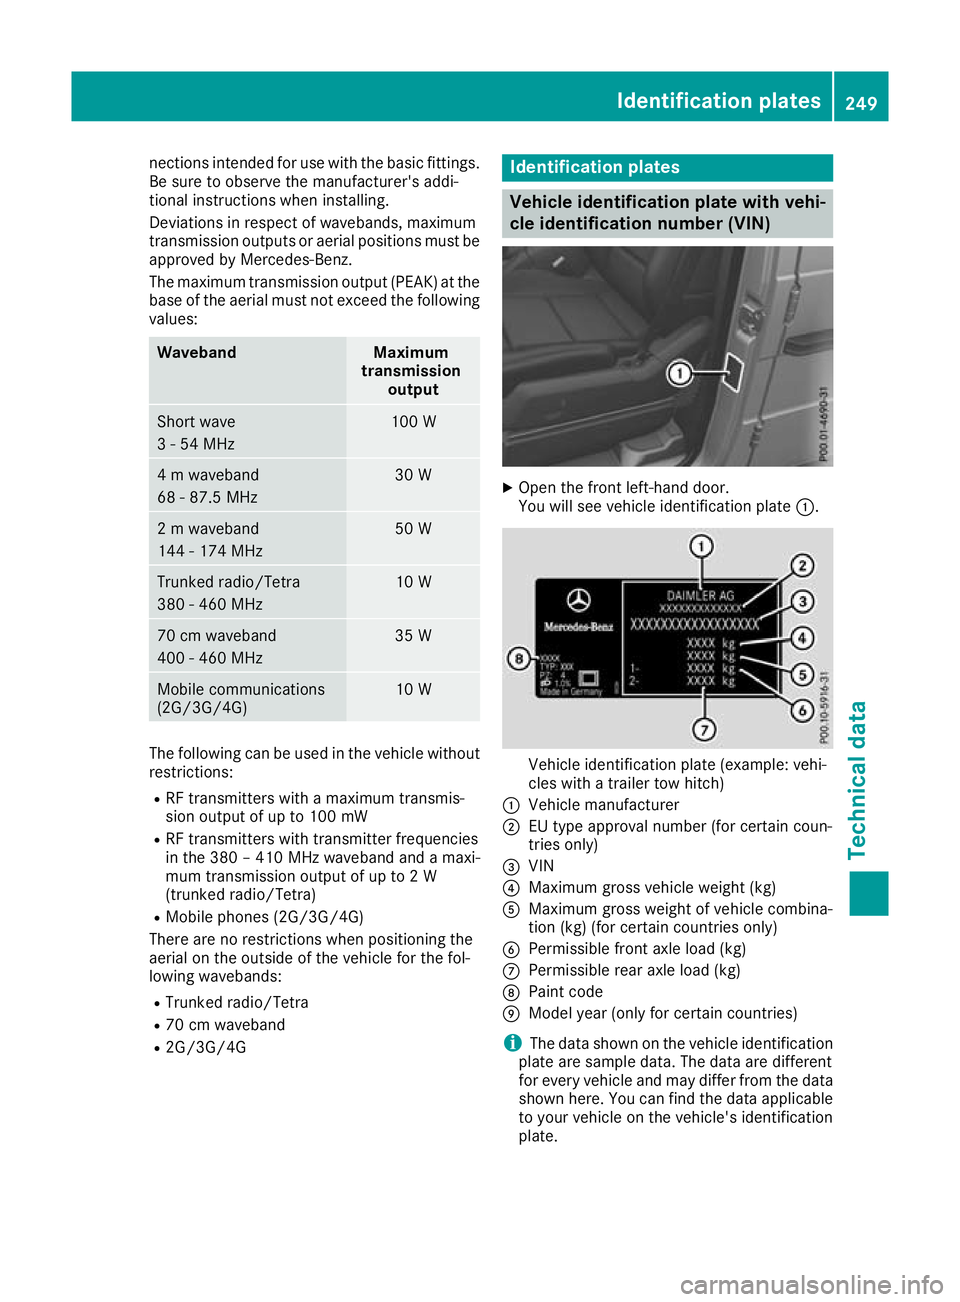
R 2G/3G/4G Identification plates
Veh
icle identificatio nplate with vehi-
cl ei dentificatio nnumber (VIN) X
Ope nthe front left-hand door.
You will see vehicle identification plate :. Vehicle identification plate (example: vehi-
cles with
atrailer tow hitch)
: Vehicle manufacturer
; EU type approvaln umber (for certain coun-
tries only)
= VIN
? Maximum gross vehicle weight( kg)
A Maximum gross weightofv ehicle combina-
tion (kg) (for certain countries only)
B Permissiblef ront axle load (kg)
C Permissibler ear axle load (kg)
D Paint code
E Model year( only for certain countries)
i The data shown on the vehicle identification
plate are sample data. The data are different
for every vehicle and may differ from the data shown here. You can find the data applicable
to yourv ehicle on the vehicle's identification
plate. Identification plates
249Technical data Z