2016 MERCEDES-BENZ G-CLASS SUV parking brake
[x] Cancel search: parking brakePage 105 of 261
Shifting to parkp
osition PX
Make sure that the vehicle is stationary.
X Depress the brake pedal and keep it
depressed.
X Press the Pbutton in the centre console.
If you depress the brake pedal and push the
selector lever forwards or back to the first point of resistance, park position Pis disengaged. The
transmission shifts to neutral N.
Shifting to reverse gear R !
Only move the automatic transmission to
k when the vehicle is stationary.
X Make sure that the vehicle is stationary.
X Depress the brake pedal and keep it
depressed.
X Push the selector lever forwards past the first
point of resistance.
The transmission position Ris engaged.
If you engage reverse gear and the ECO start/
stop function is activated, the engine starts
automatically (Y page 97).
Shifting to neutral N G
WARNING
If children are left unsupervised in the vehicle, they can:
R open doors and endanger other persons or
road users
R climb out and be injured by the traffic
R operate vehicle equipment and, for exam-
ple, trap themselves.
Children could also set the vehicle in motion, for examp leby:
R releasing the parking brake
R shifting the automatic transmission out of
park position P
R starting the engine.
There is arisk of an accident and injury.
When leaving the vehicle, alwayst ake the key
with you and lock the vehicle. Never leave
children unattended in the vehicle. Always
keep the key out of reach of children. X
Make sure that the vehicl eisstationary.
X Depress the brake pedal and keep it
depressed.
X Push the selector lever forwards or pull it back
to the first point of resistance, depending on
the current transmission position.
The automatic transmission shifts into N.
When the engine is switched off, the automatic
transmission shifts to Nautomatically.
If the vehicle is braked to astandstill in neutral
N,t he ECO start/stop function switches off the
engine automatically (Y page 97).
Staying in neutral( N) G
WARNING
If children are left unsupervised in the vehicle, they can:
R open doors and endanger other persons or
road users
R climb out and be injure dbythe traffic
R operate vehicl eequipment and, for exam-
ple,t rap themselves.
Childre ncoulda lsos et the vehicl einmotion,
for exampl eby:
R releasing the parking brake
R shifting the automatic transmission out of
park position P
R starting the engine.
There is arisk of an accident and injury.
When leaving the vehicle, alwayst ake the key
with you and lock the vehicle. Never leave
children unattended in the vehicle. Always
keep the key out of reach of children.
X Make sure that the vehicl eisstationary.
X Make sure that the ignitio nisswitched on.
X Depress the brake peda land keep it
depressed.
X Shift neutral N.
X Release the brake pedal.
X Make sure that the parking brake is released.
X Switch off the ignitio nand leave the key in the
ignitio nlock. 102
Automatic transmissionDrivinga
nd parking
Page 106 of 261
Shifting to drive position D
X
Make sure that the vehicle is stationary.
X Depress the brake pedal and keep it
depressed.
X Push the selector lever back past the first
point of resistance.
The automatic transmission shifts into D.
If the vehicle is braked to astandstill in trans-
mission position D,the ECO start/stop function
switches off the engine automatically
(Y page 97). Transmission positions
B Park
This safeguards the vehicle against
rolling away when stopped.
Only shift the transmission into posi-
tion Pwhen the vehicle is stationary
(Y page 101). The parking lock
should not be used as abrake when
parking. Always apply the parking
brake in addition to the parking lock
in order to secure the vehicle.
The key can only be removed if the
transmission is in position P.When
there is no key in the ignition lock, the selector lever is locked in position P.C Rev
erse gear
Only shift the transmission into posi- tion Rwhe nthe vehicle is stationary. A
!
Coasting in neutral
imay
caus edamage to the drive train.
Neutral
Do not shift the transmission to N
while driving. Otherwise, the auto-
matic transmission could be dam-
aged.
No power is transmitted from the
engine to the drive wheels.
Releasing the brakes will allow you to
move the vehicle freely, e.g. to push
it or tow it.
If ESP ®
is deactivated or faulty and
the vehicle is in danger of skidding
e.g. on icy roads: shift the transmis-
sion to position N.
If you engage the transfer case, shift briefly into N(Ypage 124). 7 Drive
The automatic transmission changes
gea rautomatically. Al lforward gears
are available. Changing gear
The automatic transmission shifts throug hthe
individua lgear sautomaticall ywhen it is in trans-
mission position D.Gearshiftin gisdetermined
by:
R as hiftrange restriction ,ifselected
R thep ositio nofthetransfer cas e(HIGH
RANGE orLOW RANGE)
R thep ositio noftheaccelerato rpedal
R ther oad speed Drivin
gtips
Accelerator pedal position Your drivi
ngstyle influences how the automatic
transmission shift sgear:
R little throttle: early upshifts
R more throttle: late upshifts Automatic transmission
103Driving and parking Z
Page 113 of 261
Fuel filler fla
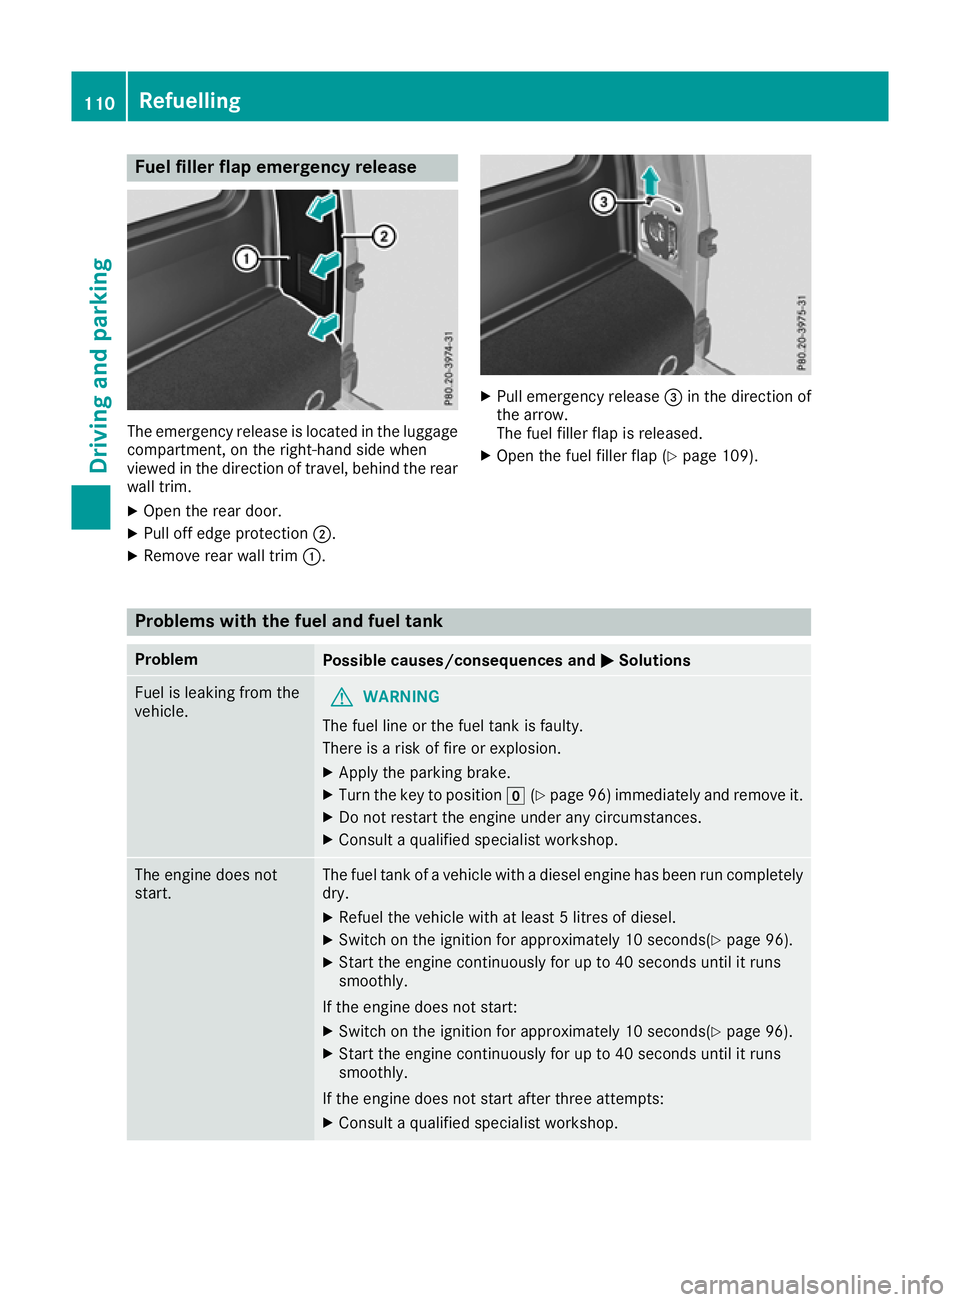
pemergency release The emergenc
yrelease is located in the luggage
compartment,ont he right-hand side when
viewed in the direction of travel, behind the rear
wall trim.
X Open the rear door.
X Pull off edge protection ;.
X Remove rear wall trim :. X
Pull emergenc yrelease =in the direction of
the arrow.
The fuel filler flap is released.
X Open the fuel filler flap (Y page 109).Problems with the fuel and fuel tank
Problem
Possible causes/consequences and
M MSolutions Fuel is leaking fro
mthe
vehicle. G
WARNING
The fuel line or the fuel tank is faulty.
There is arisk of fire or explosion.
X Apply the parking brake.
X Turn the key to position g(Ypage9 6) immediatel yand remove it.
X Do not restart the engine under any circumstances.
X Consult aqualified specialist workshop. The engin
edoes not
start. The fuel tank of
avehicle with adiesel engine has been run completely
dry.
X Refuel the vehicle with at least 5litres of diesel.
X Switch on the ignition for approximately 10 seconds(Y page 96).
X Start the engine continuously for up to 40 seconds until it runs
smoothly.
If the engine does not start:
X Switch on the ignition for approximately 10 seconds(Y page 96).
X Start the engine continuously for up to 40 seconds until it runs
smoothly.
If the engine does not start after three attempts: X Consult aqualified specialist workshop. 110
RefuellingDriving and parking
Page 116 of 261
removed when it has been only partially emp-
tied.
X Turn disposable hose ;on the filler neck of
the vehicl eanti-clockwise and remove it.
X Turn disposable hose ;on the opening of
AdBlue ®
refil lcanister :anti-clockwise and
remove it.
X Reseal AdBlue ®
refil lcanister :with the cap.
AdBlue ®
refil lcanisters are available at many
filling stations or at aqualified specialist work-
shop. AdBlue ®
refil lcanisters are often sold with
af iller hose. Afiller hose that does not exactly fit
the vehicle's AdBlue ®
tank offers no overfil lpro-
tection. AdBlue ®
may leako ut asaresul tof
overfilling. Mercedes-Benz offers aspecia ldis-
posable hose with overfil lprotection. You can
obtai nthis from any Mercedes-Benz Service
Centre. AdBlue ®
is available in avariety of con-
tainers and receptacles. Use the disposable
hose only with the Mercedes-Benz AdBlue ®
refill
canisters.
AdBlue ®
refill bottle !
Only screw on the AdBlue ®
refill bottle so
that it is hand-tight. Otherwise, the thread of
the AdBlue ®
refill bottle could be damaged
and AdBlue ®
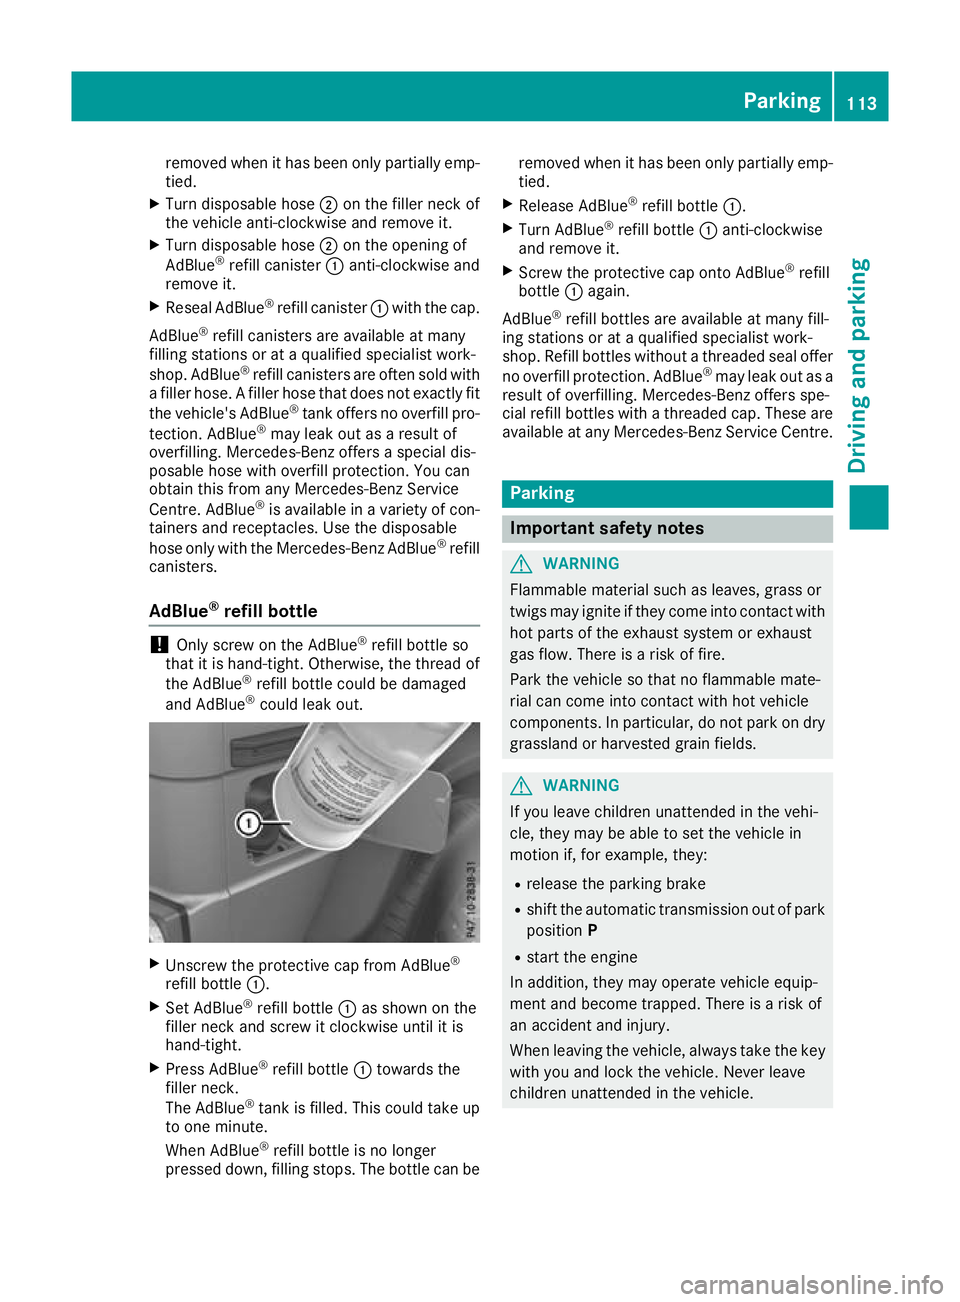
could leak out. X
Unscrew the protective cap from AdBlue ®
refill bottle :.
X Set AdBlue ®
refill bottle :as shown on the
filler neck and screw it clockwis euntil it is
hand-tight.
X Press AdBlue ®
refill bottle :towards the
filler neck.
The AdBlue ®
tank is filled. This could take up
to one minute.
When AdBlue ®
refill bottle is no longer
pressed down, filling stops. The bottle can be removed when it has been only partially emp-
tied.
X Release AdBlue ®
refill bottle :.
X Turn AdBlue ®
refill bottle :anti-clockwise
and remove it.
X Screw the protective cap onto AdBlue ®
refill
bottle :again.
AdBlue ®
refill bottles are available at many fill-
ing stations or at aqualified specialist work-
shop. Refill bottles withou tathreade dseal offer
no overfil lprotection. AdBlue ®
may leako ut as a
resul tofo verfilling. Mercedes-Benz offers spe-
cial refil lbottles with athreade dcap. These are
available at any Mercedes-Benz Service Centre. Parking
Im
portant safety notes G
WARNING
Flammable material such as leaves ,grass or
twigs may ignite if they come into contact with hot parts of the exhaust system or exhaust
gas flow .There is arisk of fire.
Park the vehicl esothat no flammable mate-
rial can come into contact with hot vehicle
components. In particular, do not park on dry grassland or harvested grai nfields. G
WARNING
If you leave children unattended in the vehi-
cle, they may be abletos et the vehiclein
motion if, for example, they:
R release the parking brake
R shift the automatic transmission out of park
position P
R start the engine
In addition, they may operate vehicl eequip-
ment and become trapped. There is arisk of
an accident and injury.
When leaving the vehicle, alwayst ake the key
with you and lock the vehicle. Never leave
children unattended in the vehicle. Parking
113Drivingand parking Z
Page 117 of 261
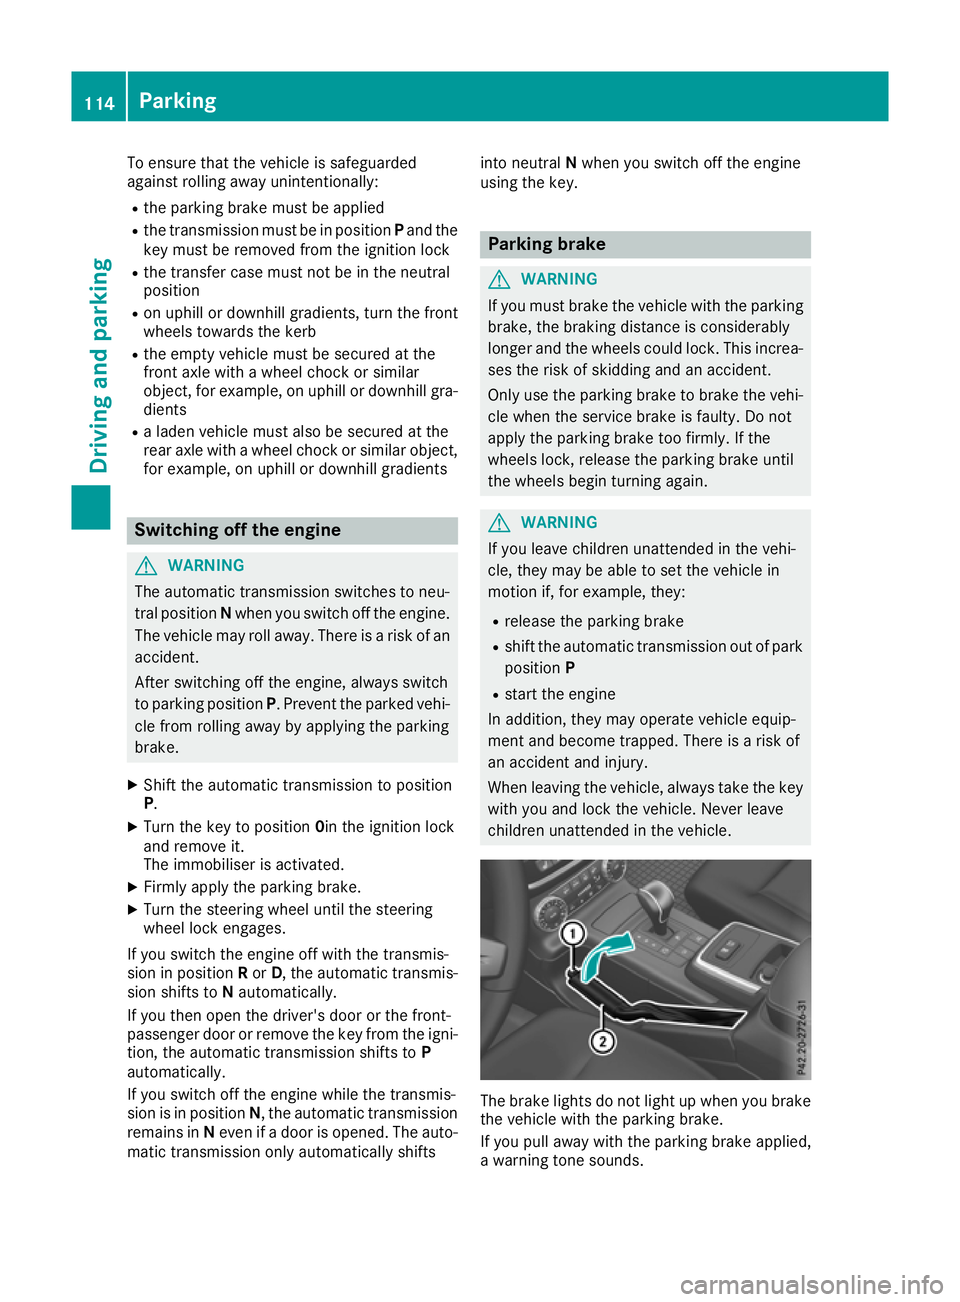
To ensure that the vehicle is safeguarded
against rolling away unintentionally:
R the parking brake must be applied
R the transmission must be in position Pand the
key must be removed from the ignition lock
R the transfer case must not be in the neutral
position
R on uphill or downhill gradients, turn the front
wheels towards the kerb
R the empty vehicle must be secured at the
front axle with awheel chock or similar
object ,for example, on uphill or downhill gra-
dients
R al aden vehicle must also be secured at the
rear axle with awheel chock or similar object,
for example, on uphill or downhill gradients Switching off the engine
G
WARNING
The automatic transmission switches to neu-
tral position Nwhen you switch off the engine.
The vehicle may roll away. There is arisk of an
accident.
After switching off the engine, alwayss witch
to parking position P.Prevent the parked vehi-
cle from rolling awaybya pplying the parking
brake.
X Shift the automatic transmission to position
P.
X Turn the key to position 0in the ignitionlock
and remove it.
The immobiliser is activated.
X Firmly apply the parking brake.
X Turn the steering whee luntil the steering
whee llock engages.
If you switch the engine off with the transmis-
sion in position Ror D,t he automatic transmis-
sion shifts to Nautomatically.
If you then open the driver's door or the front-
passenger door or remove the key from the igni- tion, the automatic transmission shifts to P
automatically.
If you switch off the engine while the transmis-
sion is in position N,the automatic transmission
remains in Neven if adoor is opened .The auto-
matic transmission only automatically shifts into neutral
Nwhe nyou switc hoff the engine
using the key. Parking brake
G
WARNING
If you mus tbrake the vehicl ewith the parking
brake, the braking distance is considerably
longer and the wheels coul dlock. This increa-
ses the risk of skidding and an accident.
Only use the parking brake to brake the vehi- cle when the service brake is faulty. Do not
apply the parking brake too firmly .Ifthe
wheels lock, release the parking brake until
the wheels begi nturning again. G
WARNING
If you leave children unattended in the vehi-
cle, they may be abletos et the vehiclein
motion if, for example, they:
R release the parking brake
R shift the automatic transmission out of park
position P
R start the engine
In addition, they may operate vehicl eequip-
ment and become trapped. There is arisk of
an accident and injury.
When leaving the vehicle, alwayst ake the key
with you and lock the vehicle. Never leave
children unattended in the vehicle. The brake light
sdonot light up when you brake
the vehicle with the parking brake.
If you pull away with the parking brake applied,
aw arning tones ounds.114
ParkingDriving and parking
Page 118 of 261

X
To apply: pull parking brake lever ;up
firmly.
Whe nthe ignition is switched on, the red J
indicator lamp in the instrument cluster lights up.
X To release: pull parking brake lever ;
slightly.
X Press release button :and guid eparking
brake ;down to the stop.
The J indicator lamp in the instrument
cluster goe sout.
The vehicl ecan also be braked during an emer-
genc ybyu sing the parking brake.
X To brake in an emergency: press and hold
release button :and carefull ypullp arking
brake lever ;upwards.
If yo udrive on we troads or dirt-covered surfa-
ces, roa dsalta nd/or dirt could get into the
parking brake.
In order to prevent corrosion and areduction in
the braking powe rofthe parking brake, observe
the following:
R pull the parking brake upwards with release
button :depresse dfrom time to time before
beginning ajourney
R drive for approximatel y100 ma tamaximum
speed of 20 km/h Parkin
gupthe vehicle
If you leave the vehicle parked up for longer than
four weeks, the battery may be damaged by
exhaustive discharging.
If you leave the vehicle parked up for longer than
six weeks, it may suffer from lack of use.
X Contact aqualified specialist workshop and
seek advice.
i You can obtain information on trickle charg-
ers from aqualified specialist workshop. Driving tips
General drivin
gtips
Important safety notes G
WARNING
If you switch off the ignition while driving,
safety-relevant functions are only available wit
hlimitations, or not at all. This could affect,
for example, th epower steerin gand th ebrake
boosting effect .You will requir econsiderably
mor eeffort to steer and brake. Ther eisarisk
of an accident.
Do not switch off th eignitio nwhile driving.
Drive sensibly –savef uel Observe the following tips to save fuel:
X The tyre sshould always be inflated to the rec-
ommended tyre pressure.
X Remove unnecessary loads.
X Remove roof carriers when they are not nee-
ded.
X Warm up the engine at low engine speeds.
X Avoid frequent acceleration or braking.
X Have all service and maintenance work car-
ried out at the specified intervals.
Fuel consumption also increases when driving in
cold weather, in stop-start traffic, on short jour- neys and in hilly terrain. Short journeys
! Vehicles with
adiesel particle filter: if the
vehicle is mostly driven for short distances, it
is possible that malfunction smay occur dur-
ing the automatic cleaning of the diesel par-
ticle filter. This may lead to fuel collecting in
the engine oil and cause engine failure. There- fore, if you frequently drive short distances,
you should take a20minute trip on amotor-
way or rural road at least every 500km. Brakes
Imp ortant safety notes G
WARNING
If you shift dow nonaslippery road surface in
an attempt to increas ethe engine's braking
effect, the drive wheels coul dlose their grip.
This increases the risk of skidding and having
an accident.
Do not shift downf or additionalengine brak-
ing on aslippery road surface. Drivingt
ips
115Driving an dparking Z
Page 119 of 261
G
WARNING
If you select the LOW RANGE off-road gearon as lippery road surface, the wheels coul dlose
traction:
R if you release the accelerator peda lwhen
the vehicl eisinmotion
R if Off-road ABS intervenes when braking
If the wheels lose traction, it willnol onger be
possible to steer the vehicle. This increases
the risk of skidding and having an accident.
Never select the LOW RANGE off-road gear
when driving on slippery road surfaces.
Information on the parking brake (Y page114).
Downhill gradients Shift to
alower gearing oodt ime on long and
stee pdownhil lgradients.
Take particula rnote of this when driving alad en
vehicl eand when towing atrailer.
Thi sw illu se the braking effect of the engine, so
less braking will be required to maintai nthe
vehicl espeed. Thi srelieves the load on the
brake system and prevents the brakes from
overheating and wearing too quickly.
Heav yand light loads G
WARNING
The braking system can overheat if you leave you rfoot on the brake peda lwhile driving.
This increases the braking distance and could
even caus ethe braking system to fail .There is
ar isk of an accident.
Never use the brake peda lasafootrest. Do
not simultaneously depress both the brake
peda land the accelerator peda lwhile driving.
! Depressing the brake peda
lconstantly
results in excessive and premature wearto
the brake pads.
If heavy demands are made on the brakes ,do
not park the vehicl eimmediately. Drive on for a
short while. This allows the airflow to cool the
brakes more quickly.
If the brakes have been used only moderately,
you should occasionall ytest their effectiveness.
To do this, brake more firmly from ahigher speed while paying attention to the traffic con-
ditions .This improves the grip of the brakes.
Wet road surfaces If driving in heavy rain for
aprolonge dperiod of
time withou tbraking, there may be adelayed
reaction from the brakes when braking for the
first time. This may also occur after the vehicle
has been washed.
You have to depres sthe brake pedalm ore
firmly .Maintai nagreater distance from the
vehicle in front.
After driving on awet road or having the vehicle
washed, brake firmly whilep aying attention to
the traffic conditions. This willw arm up the
brake discs, thereby drying them more quickly
and protecting them against corrosion.
Limited braking performance on salt-
treated roads If you drive on salt-treated roads,
alayer of salt
may form on the brake discs and pads.T his can
increase the braking distance considerably.
R In order to prevent any salt build-up,a pplythe
brakes occasionally whilep aying attention to
the traffic conditions.
R Carefullyd epressthe brake pedalatt he end
of the journey and when starting the next
journey.
R Maintai namuch greater distance to the vehi-
cle in front.
New brake discs and brake pads/
linings Brake pads/linings and discs that either are new
or have been replaced achieve optimum braking
effect only after several hundred kilometres of
driving. Compensate for the reduced braking
effect by applying greater force to the brake
pedal.
For safety reasons, Mercedes-Benz recom-
mends only fittingt he following brake discs and
brake pads/linings:
R brake discs that hav ebeena pproved by
Mercedes-Benz
R brake pads/linings that hav ebeena pproved
by Mercedes-Benz or that are of an equivalent
standard of quality
Other brake discs or brake pads/linings can
compromise the safety of your vehicle. 116
Drivin
gtipsDriving and parking
Page 120 of 261
Alway
sreplace al lbrake discs and brake pads/
lining sonana xleatt he same time .Alway sfit
new brake pads/lining swhenr eplacing brake
discs.
The vehicl eisequippe dwithl ightweight brake
discs to which the whee lassembl ywithr im and
threaded connectio nism atched.
The us eofbrake discs othe rtha nt hose
approved by Mercedes-Benz ma yalter track
width and is subject to approval, if applicable.
Whe nhandling the brake discs, shock-type
load ssuchast hoseexperience dwhenc hanging
wheels ,can lead to areduction in comfort when
driving with lightweight brake discs. Avoid
shock-typ eloads on the lightweight brake discs,
particularly on the brake plate. Driving on slippe
rysurfaces
! Where possible, avoid spinnin
gthe drive
wheels when pulling away on slipper yroads.
You could otherwise damage th edrive train.
Thi stypeofd amage is no tcovered by the
term soft heMercedes-Ben zwarranty.
X Engage th edifferential locks if necessary
(Y page 126). Drivin
gonw et roads
Aquaplaning If wate
rhas accumulated to acertain depth on
the road surface, there is adanger of aquaplan-
ing occurring, even if:
R you are driving at low speeds
R the tyres have adequate tread depth
For this reason, drive in the following manner in the event of heavy rain or in conditions in which
aquaplaning can occur:
R lowery ours peed
R avoid tyre ruts
R avoid sudden steering movements
R brake carefully
Drivin gonflooded roads !
Bear in mind that vehicles travelling in front
or in the opposite direction create waves. This may cause the maximum permissibl ewater
depth to be exceeded. These notes must be observed under all cir-
cumstances. You could otherwise damage
the engine, the electronics or the transmis-
sion.
If you must drive on stretches of road on which
water has collected, please bear in mind that:
R in the case of standing water, the water level
must be no higher than the lower edge of the
vehicle body
R you should drive no faster than walking pace
Off-road fording !
Under no circumstances should you accel-
erate before entering the water. The bow
wave could cause water to enter and damage
the engine and neighbouring assemblies.
! Do not open any of the vehicle's doors while
fording. Otherwise, water could get into the
vehicle interior and damage the vehicle's
electronics and interior equipment.
i You may only drive through fresh water.
R Observe the safety notes (Y page 119) and
general notes (Y page 119) on driving off-
road
R Establish how deep the water is and the char-
acteristics of the body of water before fording
R Switch off automatic climate control
R Vehicles with auxiliary heating/ventila-
tion: switch the auxiliary heating/ventilation
off
R Shift the transfer case to the LOW RANGE
off-road driving position (Y page 124)
R Engage the differential locks if necessary
(Y page 119)
R Avoid high engine speeds
R Enter and exit the water at aflat place and at
as teady walking pace
R Drive slowly and at aconstant speed through
the water
R Ensure that abow wave does not form as you
drive
R Do not stop and do not switch off the engine.
Water offers ahigh degree of resistance, the
ground is slippery and, in some cases, unsta- ble. Therefore, it is difficult and dangerous to pull awayinw ater
R Cleana ny mud from the tyre tread after ford-
ing
R Apply the brakes to dry them after fording Driving tips
117Driving and parking Z