2016 MERCEDES-BENZ G-Class ECU
[x] Cancel search: ECUPage 168 of 302
The vehicle's ability to steer is severely restric-
ted. Drive carefully and accelerate gently for
optimum traction.
iYou can now engage the differential lock for
rear axle ?and the differential lock for front
axle ;as required.
Differential lock for the rear axle
XTo engage: press switch ?.
Yellow activation indicator lamp Alights up
first, followed by red function indicator
lamp :of switch ?.
The differential lock for the rear axle is
engaged.
Differential lock for the front axle
XTo engage: press switch ;.
First, the yellow activation indicator lamp
lights up, followed by the red function indica-
tor lamp.
The differential lock for the front axle is
engaged.
Disengaging the differential locks
You can disengage the differential locks in the
following order: ;,?,=.
XTo simultaneously disengage all differen-
tial locks: press switch =.
Yellow activation indicator lamps Aand red
function indicator lamps :go out.
After approximately three seconds of normal
driving, ABS, 4ETS, ESP
®and BAS are activa-
ted.
The ABS not available differential
lockedmessage disappears in the multifunc-
tion display and the å,!and÷
warning lamps in the instrument cluster go
out.
XShift the transfer case to the HIGH RANGE
on-road position (Ypage 162).
iIf red function indicator lamps :do not go
out when disengaging the differential locks,
stop the vehicle safely as soon as possible, in
accordance with the traffic conditions. Then,
continue driving and the load change can
release the differential lock.
Towing a trailer
Notes on towing a trailer
Important safety notes
GWARNING
If you rest your foot on the brake pedal while
driving, the braking system can overheat. This increases the stopping distance and can even
cause the braking system to fail. There is a
risk of an accident.
Never use the brake pedal as a footrest. Never
depress the brake pedal and the accelerator
pedal at the same time.
GWARNING
When the vehicle/trailer combination begins
to lurch, you could lose control of it. The vehi- cle/trailer combination could even rollover.
There is a risk of an accident.
On no account should you attempt to
straighten up the vehicle/trailer combination
by increasing the speed. Reduce vehicle
speed and do not countersteer. Apply the
brake as necessary.
GWARNING
If you install a ball coupling other than the one
delivered with the vehicle, the trailer tow hitch
and the rear axle may be overloaded. This
applies especially if the ball coupling in ques-
tion is longer or angled differently. This could
seriously impair the driving characteristics
and the trailer can come loose. There is a risk
of an accident.
Only install the ball coupling delivered with
the vehicle or a ball coupling that is designed
to meet your trailer towing requirements. Do
not modify the ball coupling or the trailer tow
hitch.
GWARNING
If the ball coupling is not installed correctly or not secured with the bolt provided and the
corresponding spring cotter, the trailer may
come loose. There is a risk of an accident.
166Towing a trailer
Driving and parking
Page 169 of 302

Always install and secure the ball coupling asdescribed. Before every journey, ensure that
the ball coupling is secured with the bolt and
the corresponding spring cotter.
Please observe the manufacturer's operating
instructions for the trailer coupling if a detach-
able trailer coupling is used.
Exceeding the maximum permissible nose-
weight may cause damage to the following:
Ryour vehicle
Rthe trailer
Rthe ball coupling
Rtrailer tow hitch
The vehicle/trailer combination could become
unstable.
If the noseweight used is lower than the mini-
mum permissible noseweight, the vehicle/
trailer combination could also become unstable.
To avoid hazardous situations:
Rmake sure to check the noseweight before
each journey
Ruse a drawbar noseweight as close as possi-
ble to the maximum noseweight
Rdo not exceed the maximum permissible
noseweight
Rdo not use a noseweight lower than the min-
imum permissible trailer drawbar noseweight
When backing up the vehicle towards the trailer,
make sure there is nobody between the trailer
and the vehicle.
The applicable permissible values, which must
not be exceeded, can be fou nd:
Rin your vehicle documents
Ron the type plate of the trailer tow hitch and
trailer
Ron the vehicle identification plate
Couple and uncouple the trailer carefully. If you
do not couple the trailer to the towing vehicle
correctly, the trailer could become detached.
Make sure that the following values are not
exceeded:
Rthe permissible trailer drawbar noseweight
Rthe permissible trailer load
Rthe permissible rear axle load of the towing
vehicle
Rthe maximum permissible gross vehicle
weight of both the towing vehicle and the
trailer When towing a trailer, your vehicle's handling
characteristics will be different in comparison
with when driving without a trailer.
The vehicle/trailer combination:
Ris heavier
Ris restricted in its acceleration and gradient-
climbing capability
Rhas an increased braking distance
Ris affected more by strong crosswinds
Rdemands more sensitive steering
Rhas a larger turning radius
This could impair the handling characteristics.
Adapt your driving style accordingly. Maintain a
safe distance. Drive carefully.
When towing a trailer, always adjust your speed
to the current road and weather conditions. Do
not excee
d the maximum permissible speed for
your vehicle/trailer combination.
You will find the values approved by the manu-
facturer on the vehicle identification plates and
those for the towing vehicle in the "Technical
data" section (
Ypage 297).
General notes
RDo not exceed the legally prescribed maxi-
mum speed for vehicle/trailer combinations
in the relevant country.
This lowers the risk of an accident.
ROnly install an approved trailer coupling on
your vehicle.
Further information on availability and on
installation is available from any authorized
Mercedes-Benz Center.
RThe bumpers of your vehicle are not suitable
for installing detachable trailer couplings.
RDo not install hired trailer couplings or other
detachable trailer couplings on the bumpers
of your vehicle.
RIf you do not need the ball coupling, remove
the ball coupling from the ball coupling
recess. This reduces the risk of damage to the
ball coupling.
iCheck the tire pressures when towing a
trailer. You will find the values in the tire pres-
sure table in the fuel filler flap of the vehicle
(
Ypage 266).
You will find installation dimensions and loads
under "Technical data" (
Ypage 297).
Towing a trailer167
Driving an d parking
Z
Page 171 of 302
Trailer with 7-pin connector
General notes
You can make a connection to the 13-pin socket
on the ball coupling using an adapter or, if nec-
essary, an adapter cable. Both can be obtained
in a qualified specialist workshop.
Installing the adapter
!Make sure that there is enough slack in the
cable for cornering so that the cable cannot
become detached.
XOpen the socket cover.
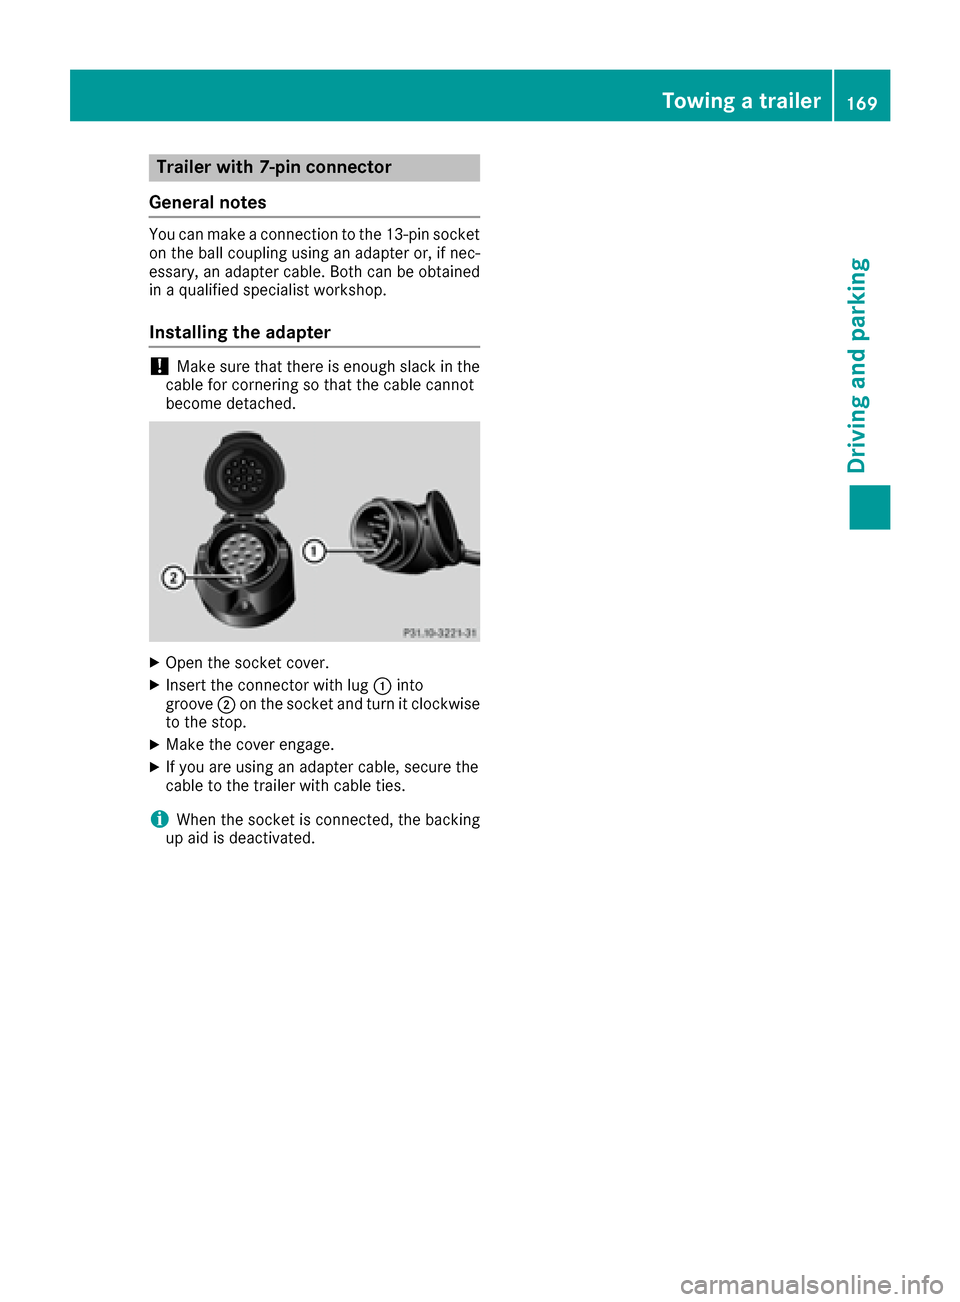
XInsert the connector with lug :into
groove ;on the socket and turn it clockwise
to the stop.
XMake the cover engage.
XIf you are using an adapter cable, secure the
cable to the trailer with cable ties.
iWhen the socket is connected, the backing
up aid is deactivated.
Towing a trailer169
Driving an d parking
Z
Page 189 of 302
Display messagesPossible causes/consequences andMSolutions
$(USA
only)
J( Canada
only)
Check Brake Fluid
Level
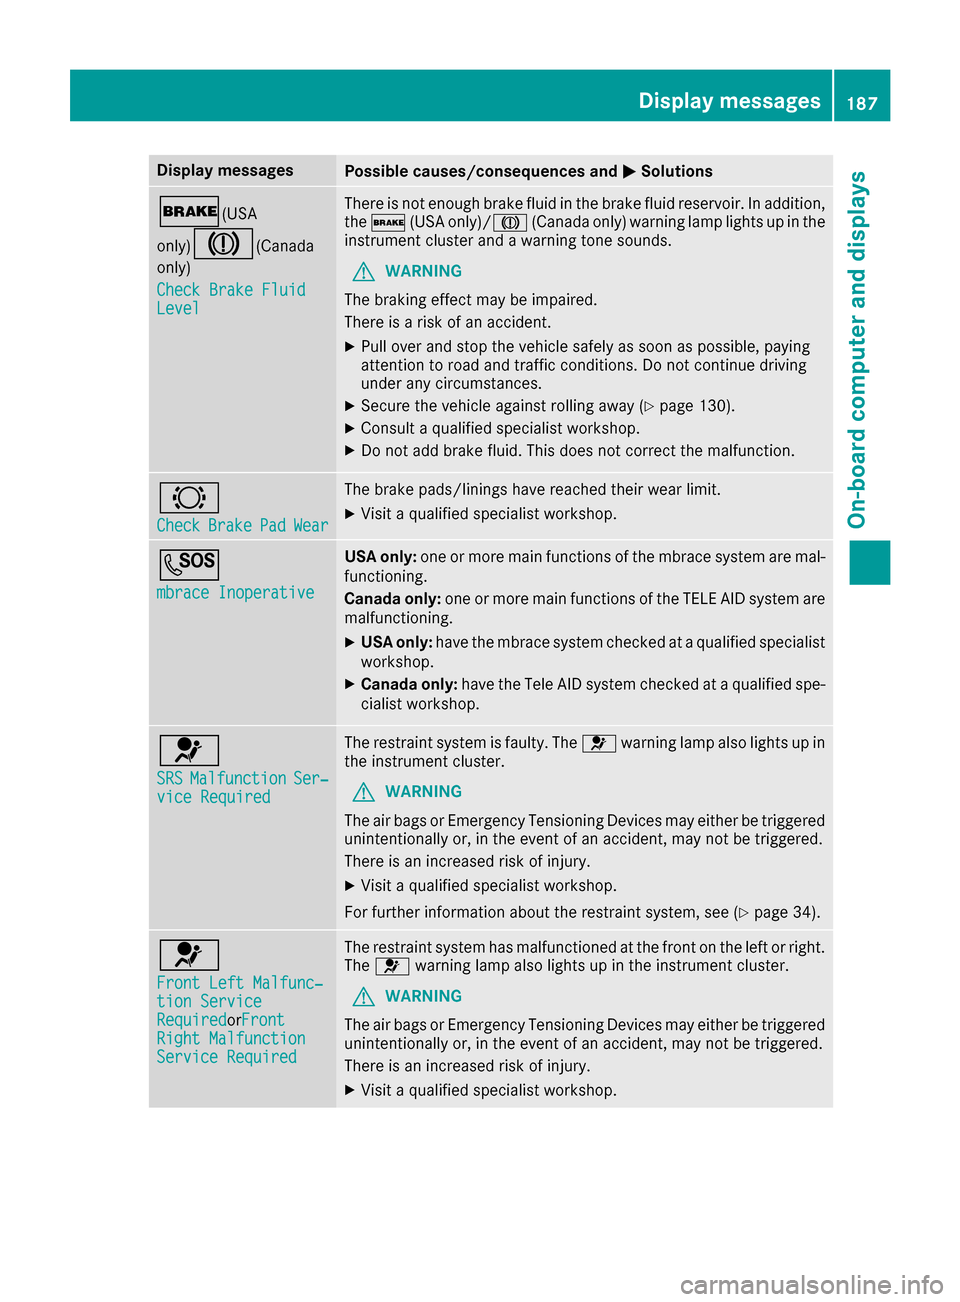
There is no tenough brak efluid in th ebrak efluid reservoir .In addition ,
th e$ (USAonly)/J (Canada only) warning lamp lights up in th e
instrumen tcluste rand awarning tone sounds.
GWARNIN G
The braking effec tmay be impaired.
There is aris kof an accident.
XPull ove rand stop th evehicl esafely as soo nas possible, payin g
attention to roa dand traffic conditions. Do no tcontinu edrivin g
under any circumstances.
XSecur eth evehicl eagainst rollin gaway (Ypage 130).
XConsult aqualified specialist workshop .
XDo notadd brak efluid .This does no tcorrec tth emalfunction .
#
CheckBrakePadWear
The brak epads/linings hav ereached their wear limit.
XVisit aqualified specialist workshop .
G
mbrace Inoperative
USA only:on eor mor emain function sof th embrace system are mal-
functioning .
Canad aonly :on eor mor emain function sof th eTELE AI Dsystem are
malfunctioning .
XUSA only:hav eth embrace system checke dat aqualified specialist
workshop .
XCanadaonly :hav eth eTele AI Dsystem checke dat aqualified spe -
cialist workshop .
6
SRSMalfunctionSer‐viceRequired
The restrain tsystem is faulty. The 6warning lamp also lights up in
th einstrumen tcluster.
GWARNIN G
The air bags or Emergency Tensioning Devices may either be triggered
unintentionally or, in th eevent of an accident, may no tbe triggered .
There is an increased ris kof injury.
XVisit aqualified specialist workshop .
Fo rfurther information about th erestrain tsystem, see (
Ypage 34).
6
Front Lef tMalfunc‐tio nServic eRequiredorFron tRight MalfunctionServic eRequired
The restrain tsystem has malfunctioned at th efron ton th elef tor right .
The 6 warning lamp also lights up in th einstrumen tcluster.
GWARNIN G
The air bags or Emergency Tensioning Devices may either be triggered
unintentionally or, in th eevent of an accident, may no tbe triggered .
There is an increased ris kof injury.
XVisit aqualified specialist workshop .
Display messages187
On-board computer and displays
Z
Page 190 of 302
Display messagesPossible causes/consequences andMSolutions
6
RearLef tMalfunc‐tio nServic eRequiredorRea rRight MalfunctionServic eRequired
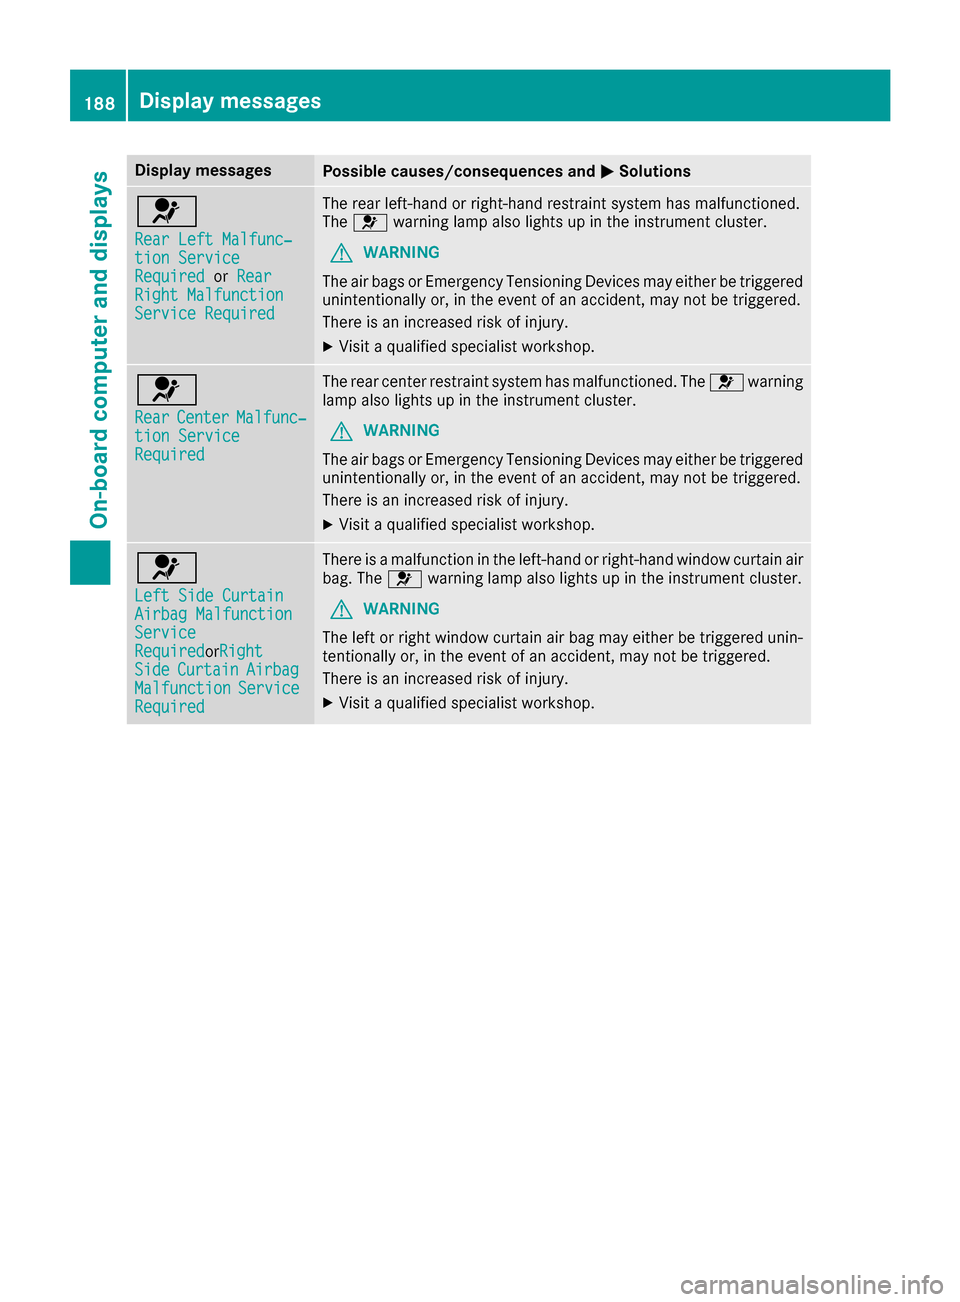
The rear left-han dor right-hand restrain tsystem has malfunctioned.
The 6 warning lamp also lights up in th einstrumen tcluster.
GWARNIN G
The air bags or Emergency Tensioning Devices may either be triggered
unintentionally or, in th eevent of an accident, may no tbe triggered .
There is an increased ris kof injury.
XVisit aqualified specialist workshop .
6
RearCenterMalfunc‐tionServic eRequired
The rear center restrain tsystem has malfunctioned. The 6warning
lamp also lights up in th einstrumen tcluster.
GWARNIN G
The air bags or Emergency Tensioning Devices may either be triggered
unintentionally or, in th eevent of an accident, may no tbe triggered .
There is an increased ris kof injury.
XVisit aqualified specialist workshop .
6
LeftSid eCurtai nAirbag MalfunctionServiceRequiredorRigh tSideCurtai nAirbagMalfunctionServiceRequired
There is amalfunction in th eleft-han dor right-hand window curtai nair
bag. The 6warning lamp also lights up in th einstrumen tcluster.
GWARNIN G
The lef tor right window curtai nair bag may either be triggered unin-
tentionally or, in th eevent of an accident, may no tbe triggered .
There is an increased ris kof injury.
XVisit aqualified specialist workshop .
188Display messages
On-board computer and displays
Page 194 of 302

Engine
Display messagesPossible causes/consequences andMSolutions
+
Check CoolantLevel. See Opera‐tor's Manual
The coolant level is too low.
XAdd coolant, observing the warning notes before doing so
(Ypage 238).
XHave the coolant system checked at a qualified specialist workshop
if the coolant needs topping up more often than usual.
?The fan motor is faulty.
XAt coolant temperatures below 248 ‡(120 †), drive to the nearest
qualified specialist workshop.
XAvoid heavy loads on the engine as you do so, e.g. driving in moun-
tainous terrain and stop-start traffic.
?
Coolant Too HotStopVehicleSwitchEngine Off
The coolant is too hot.
A warning tone also sounds.
GWARNING
Do not drive when your engine is overheated. This can cause some
fluids which may have leaked into the engine compartment to catch
fire.
Steam from the overheated engine can also cause serious burns which
can occur just by opening the hood.
There is a risk of injury.
XPull over and stop the vehicle safely and switch off the engine, pay- ing attention to road and traffic conditions.
XSecure the vehicle against rolling away (Ypage 130).
XLeave the vehicle and keep a safe distance from the vehicle until the
engine has cooled down.
XMake sure that the air supply to the engine radiator is not blocked,
e.g. by snow, slush or ice.
XDo not start the engine again until the display message goes out and
the coolant temperature is below 248 ‡ (120 †). Otherwise, the
engine could be damaged.
XPay attention to the coolant temperature display.
XIf the temperature increases again, visit a qualified specialist work-
shop immediately.
Under normal operating conditions and with the specified coolant
level, the coolant temperature may rise to 248 ‡ (120 †).
192Display messages
On-board computer and displays
Page 197 of 302
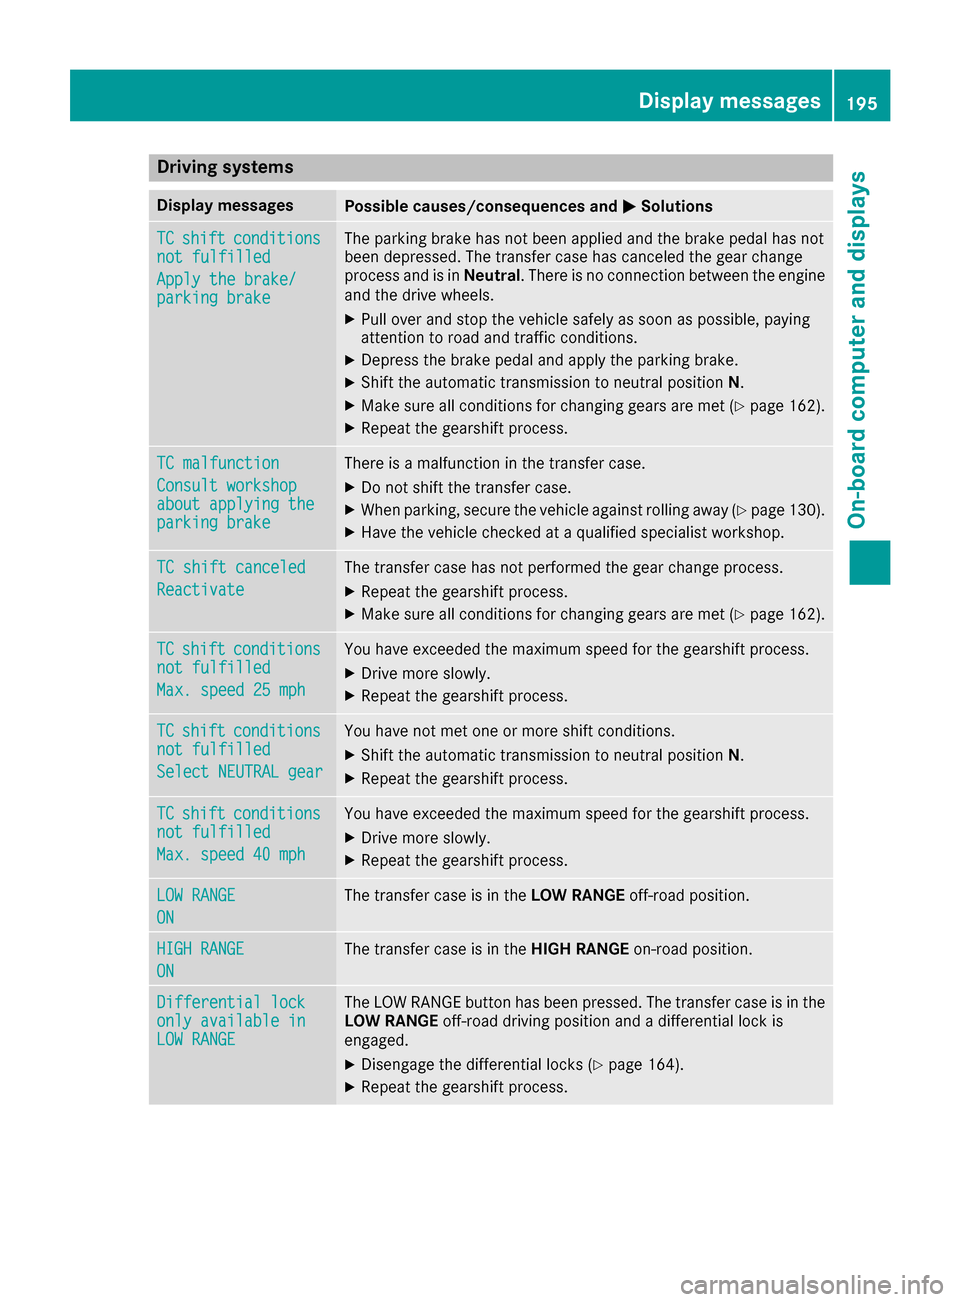
Drivingsystems
Display messagesPossible causes/consequences an dMSolutions
TCshiftcondition snot fulfilled
Apply the brake/parkingbrake
The parking brake has no tbee napplied and th ebrake peda lhas no t
bee ndepressed. The transfe rcas ehas canceled th egear chang e
process and is in Neutral.There is no connection between th eengin e
and th edrive wheels.
XPull over and stop th evehicle safely as soo nas possible, payin g
attention to road and traffic conditions.
XDepress th ebrake peda land apply th eparking brake .
XShift theautomatic transmissio nto neutral position N.
XMak esur eall condition sfo rchangin ggear sare met (Ypage 162).
XRepeat th egearshift process.
TC malfunction
Consul tworkshopabout applying theparkin gbrake
There is amalfunction in th etransfe rcase.
XDo no tshift th etransfe rcase.
XWhe nparking ,secure th evehicle against rollin gaway (Ypage 130).
XHaveth evehicle checke dat aqualified specialis tworkshop .
TC shift canceled
Reactivat e
The transfe rcas ehas no tperformed th egear chang eprocess.
XRepeat th egearshift process.
XMak esur eall condition sfo rchangin ggear sare met (Ypage 162).
TCshiftcondition snot fulfilled
Max.speed 25 mph
You hav eexceede dth emaximum speed fo rth egearshift process.
XDrive more slowly.
XRepeat th egearshift process.
TCshiftcondition snot fulfilled
Select NEUTRA Lgea r
You hav eno tmet on eor more shift conditions.
XShift th eautomatic transmissio nto neutral position N.
XRepeat th egearshift process.
TCshiftcondition snot fulfilled
Max.speed 40 mph
You hav eexceede dth emaximum speed fo rth egearshift process.
XDrive more slowly.
XRepeat th egearshift process.
LOW RANGE
ON
The transfe rcas eis in th eLOW RANGE off-road position .
HIGHRANGE
ON
The transfe rcas eis in th eHIG HRANGE on-road position .
Differential loc konlyavailable inLOW RANGE
The LO WRANGE butto nhas bee npressed. The transfe rcas eis in th e
LOW RANGE off-road drivin gposition and adifferential loc kis
engaged.
XDisengage th edifferential locks (Ypage 164).
XRepeat thegearshift process.
Display messages19 5
On-board computer and displays
Z
Page 198 of 302

Display messagesPossible causes/consequences andMSolutions
TC NEUTRAL
ON
The transfer cas eis in th eNeutral neutral position .
A warning tone will also soun dwhen th edriver's door is opened and
th ebrak epedal is no tdepressed.
XClos eth edriver's door .
XSecureth evehicl eagainst rollin gaway (Ypage 130).
XShift th etransfer cas eaccording to drivin gcondition s
(Ypage 162).
Preselected differ ‐ential lock
ESP unavailable
Adifferential loc khas been engaged. The differential gear has no tyet
locke dth erespective differential. The activation indicator lamp (yel-
low) (
Ypage 164) of th eswitch lights up.
ES Pis unavailable .
AB Sis still available.
Differential loc kactive
ABSandESPunavail‐able
Adifferential loc kwas engage dand th edifferential gear has locke d
th erespective differential. The activation indicator lamp (yellow) and
function indicator lamp (red) (
Ypage 164) on theswitch ligh tup.
AB Sand ES Pare unavailable .
Blind SpotAssistcurrently unavaila‐ble
See Operator' sMan ‐ual
Blind Spot Assis tis temporarily inoperative. Possibl ecauses are:
Ryou hav eestablished th eelectrical connection between th etrailer
and your vehicle.
Rth esensor sare dirty.
Rfunction is impaire ddue to heav yrain or snow.
Rth eradar sensor system is outside th eoperating temperature
range.
Rth eradar sensor system is temporarily inoperative, e.g. due to elec -
tromagneti cradiation emitted by nearby TV or radi ostation sor
other source sof electromagneti cradiation .
The yellow 9indicator lamp salso ligh tup in th eexterio rmirrors.
XWhe ntowin g atrailer ,confirm th edisplay message wit ha.
If you are drivin gwithout atrailer and th edisplay message does no t
disappear :
XPull overand stop th evehicl esafely as soo nas possible, payin g
attention to roa dand traffic conditions.
XApply th eparking brake.
XClean th esensor s (Ypage 244).
XRestart th eengine.
If th esystem detects that th esensor sare fully operational, th edisplay
message disappears.
Blind Spot Assis tis operational again .
Blind SpotAssistor
InoperativeBlind Spot Assis tis defective.
The yellow 9indicator lamp salso ligh tup in th eexterio rmirrors.
XVisit aqualified specialist workshop .
196Display messages
On-board computer and displays