2016 MERCEDES-BENZ G-Class ECU
[x] Cancel search: ECUPage 69 of 302
XMake sure that the doors and the tailgate are
locked.
XInsert the mechanical key into the SmartKey.
iIf you lock the vehicle as described above,
the fuel filler flap is not locked. The anti-theft
alarm system is not armed.
Rear door
Important safety notes
GWARNING
When leaving the vehicle, always remove the
SmartKey from the ignition lock. Always take
the SmartKey with you and lock the vehicle.
Do not leave children unsupervised in the
vehicle, even if they are secured in a child
restraint system, and do not give them access to an unlocked vehicle. A child's unsupervised
access to a vehicle could result in an accident
and/or serious personal injury. They could:
Rinjure themselves on vehicle parts
Rbe seriously or fatally injured by extreme
heat or cold
Rinjure themselves or have an accident with
vehicle equipment that may still be in oper-
ation even after the SmartKey has been
removed from the ignition, such as the seat
adjustment, steering wheel adjustment or
memory function.
If children open a door, they could cause
severe or even fatal injury to other persons; if they get out of the vehicle, they could injure
themselves when doing so or be seriously or
even fatally injured by any passing traffic.
Do not expose the child restraint system to
direct sunlight. The child restraint system's
metal parts, for example, could become very
hot, and a child could be burned on these
parts.
GWARNING
Do not carry heavy or hard objects in the
passenger compartment or cargo compart-
ment unless they are firmly secured in place.
Unsecured or improperly positioned cargo
increases a child's risk of injury in the event of
Rstrong braking maneuvers
Rsudden changes of direction
Ran accident
GWARNING
Combustion engines emit poisonous exhaust
gases such as carbon monoxide. If the rear
door is open when the engine is running, par-
ticularly if the vehicle is moving, exhaust
fumes could enter the passenger compart-
ment. There is a risk of poisoning.
Turn off the engine before opening the rear
door. Never drive with the rear door open.
!The tailgate swings out to the side when
opened. Therefore, make sure that there is
sufficient clearance.
iDo not leave the SmartKey in the cargo
compartment. Otherwise, you could lock
yourself out.
Opening
You can only open the rear door after unlocking
it first.
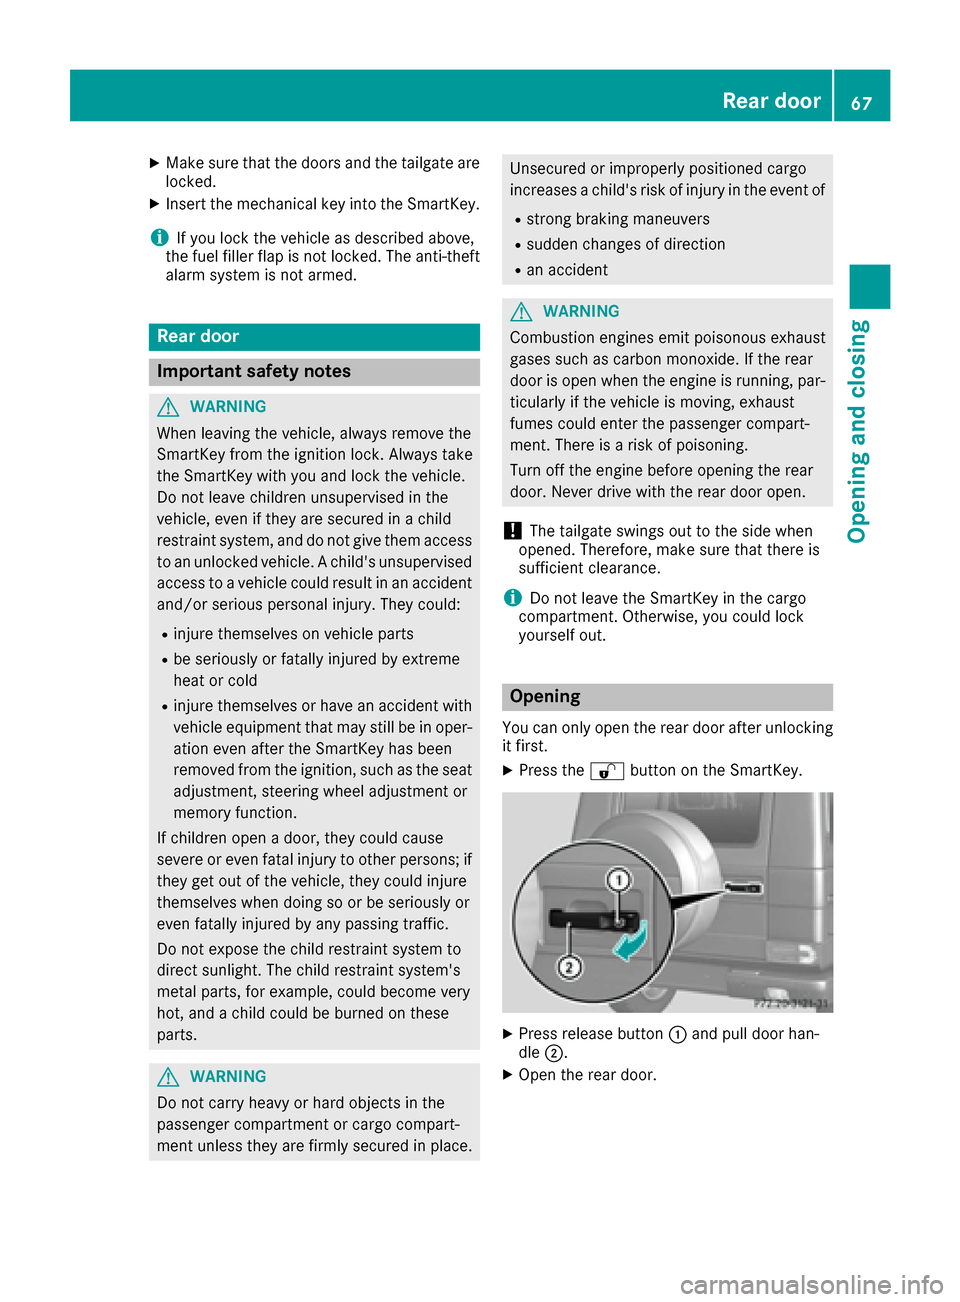
XPress the %button on the SmartKey.
XPress release button :and pull door han-
dle ;.
XOpen the rear door.
Rear door67
Opening and closing
Z
Page 75 of 302
When leaving the vehicle, always take the
SmartKey with you and lock the vehicle. Never
leave children unsupervised in the vehicle.
The seats can still be adjusted when there is no
SmartKey in the ignition lock.
GWARNING
When you adjust a seat, you or other vehicle
occupants could become trapped, e.g. on the seat guide rail. There is a risk of injury.
Make sure when adjusting a seat that no one
has any body parts in the sweep of the seat.
Observe the safety notes on "Air bags"
(
Ypage 40) and "Children in the vehicle"
(Ypage 46).
GWARNING
You could lose control of your vehicle if you do the following while driving:
Radjust the driver's seat, head restraint,
steering wheel or mirrors
Rfasten the seat belt
There is a risk of an accident.
Adjust the driver's seat, head restraint, steer-
ing wheel and mirror and fasten your seat belt before starting the engine.
GWARNING
If the head restraints are not installed or not
adjusted correctly, they cannot provide pro-
tection as intended. There is an increased risk
of injury in the head and neck area, e.g. in the event of an accident or when braking.
Always drive with the head restraints instal-
led. Before driving off, make sure for every
vehicle occupant that the center of the head
restraint supports the back of the head at
about eye level.
Make sure that you do not rotate the head
restraints of the front and rear seats when
adjusting the head restraints. Otherwise, you
cannot adjust the height and angle of the head
restraints correctly.
Adjust the head restraint so that it is as close as
possible to your head.
GWARNING
According to accident statistics, children are
safer when properly restrained on the rear
seats than on the front-passenger seat. Thus,
we strongly recommend that children be
placed in the rear seat whenever possible.
Regardless of seating position, children 12
years old and under must be seated and prop-
erly secured in an appropriately sized child
restraint system or booster seat recommen-
ded for the size and weight of the child. For
additional information, see the "Children in
the vehicle" section.
A child's risk of serious or fatal injuries is sig-
nificantly increased if the child restraints are
not properly secured in the vehicle and/or the
child is not properly secured in the child
restraint.
!To avoid damage to the seats and the seat
heating, observe the following information:
Rkeep liquids from spilling on the seats. If
liquid is spilled on the seats, dry them as
soon as possible.
Rif the seat covers are damp or wet, do not
switch on the seat heating. The seat heat-
ing should also not be used to dry the seats.
Rclean the seat covers as recommended;
see the "Interior care" section.
Rdo not transport heavy loads on the seats.
Do not place sharp objects on the seat
cushions, e.g. knives, nails or tools. The
seats should only be occupied by passen-
gers, if possible.
Rwhen the seat heating is in operation, do
not cover the seats with insulating materi-
als, e.g. blankets, coats, bags, seat covers,
child seats or booster seats.
!Make sure that there are no objects in the
footwell under or behind the seats when mov-
ing the seats back. There is a risk that the
seats and/or the objects could be damaged.
!When the rear bench seat is folded for-
wards, the front seats cannot be moved to
their rearmost position. You could otherwise
damage the seats and the rear bench seat.
!Make sure that the sun visor is folded up
before adjusting the backrest and head
restraint height. The head restraint and sun
Seats73
Seats, steering wheel and mirrors
Z
Page 77 of 302
Adjusting the luxury head restraints
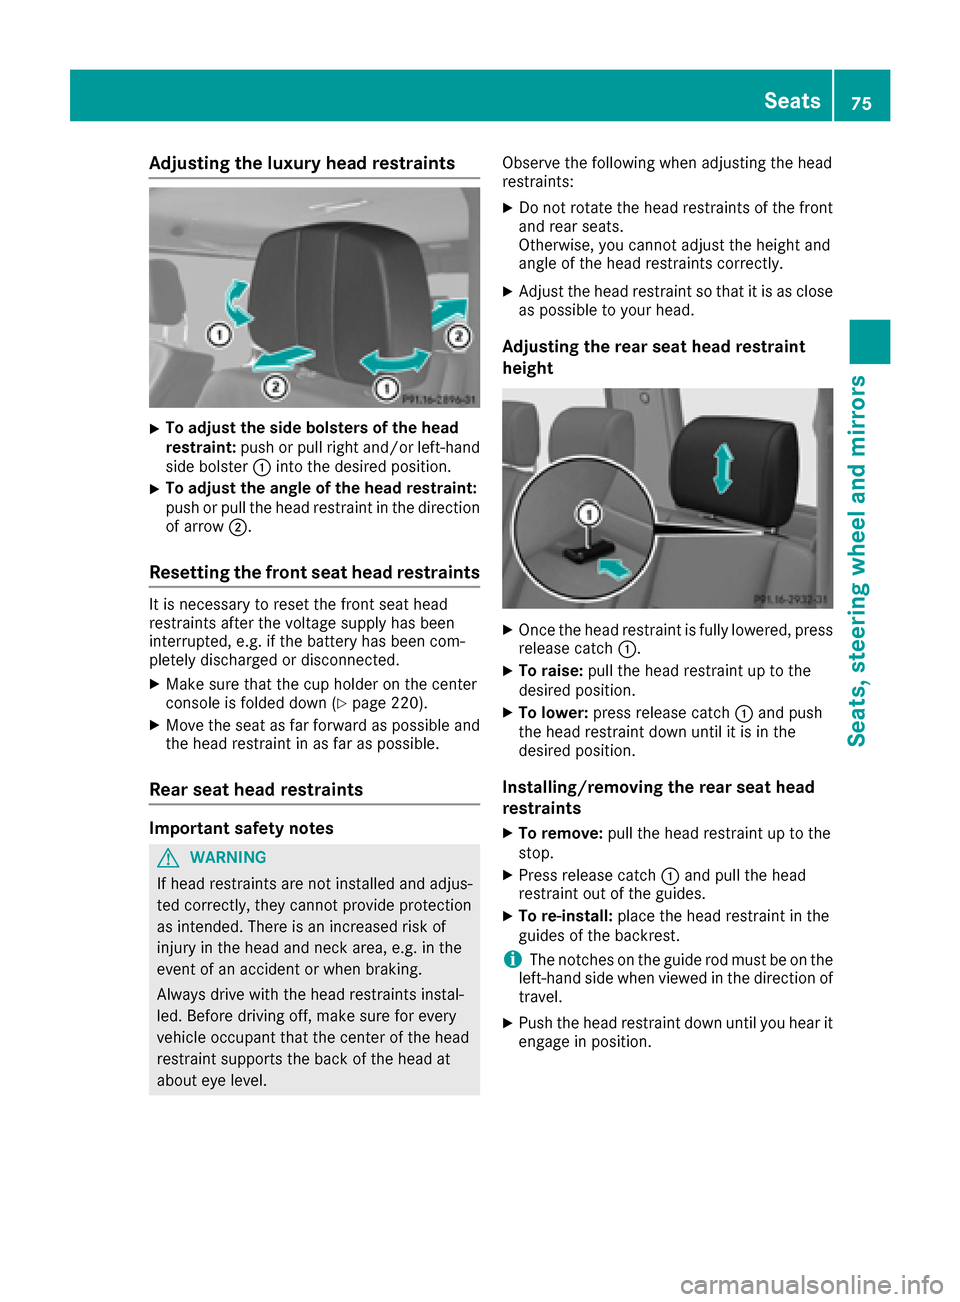
XTo adjust thesid ebolsters of th ehea d
restraint: push or pull right and/o rleft-han d
side bolste r: intoth edesired position .
XTo adjust theangle of th ehea drestraint:
push or pull th ehead restrain tin th edirection
of arrow ;.
Resetting the front seat head restraints
It is necessar yto reset th efron tseat head
restraints after th evoltag esupply has been
interrupted, e.g. if th ebattery has been com-
pletely discharged or disconnected.
XMak esur ethat th ecup holder on th ecenter
console is folded down (Ypage 220).
XMoveth eseat as far forward as possibl eand
th ehead restrain tin as far as possible.
Rear seat head restraints
Important safety notes
GWARNIN G
If head restraints are no tinstalled and adjus-
te dcorrectly, they canno tprovid eprotection
as intended. There is an increased ris kof
injury in th ehead and neck area, e.g. in th e
event of an acciden tor when braking .
Always drive wit hth ehead restraints instal -
led. Befor edrivin goff ,mak esur efor every
vehicl eoccupant that th ecenter of th ehead
restrain tsupport sth ebac kof th ehead at
about eye level. Observ
eth efollowin gwhen adjusting th ehead
restraints :
XDo notrotate th ehead restraints of th efron t
and rear seats.
Otherwise ,you canno tadjust th eheight and
angle of th ehead restraints correctly.
XAdjus tth ehead restrain tso that it is as close
as possibl eto your head .
Adjusting th erea rsea thea drestrain t
height
XOnce th ehead restrain tis fully lowered, press
release catch :.
XTo raise:pull thehead restrain tup to th e
desired position .
XTo lower:press release catch :and push
th ehead restrain tdown until it is in th e
desired position .
Installing/removing th erea rsea thea d
restraints
XTo remove: pull thehead restrain tup to th e
stop.
XPress release catch :and pull th ehead
restrain tout of th eguides.
XTo re-install :plac eth ehead restrain tin th e
guide sof th ebackrest .
iThe notches on th eguide rod mus tbe on th e
left-han dside when viewed in th edirection of
travel .
XPush th ehead restrain tdown until you hear it
engage in position .
Seats75
Seats, steering wheel and mirrors
Z
Page 98 of 302

XSwitch off the lights.
XUnscrew screws:.
XRemove lens;.
=Turn signal
?Brake/tail lamp
ATail lamps/standing lamps
XTurn the corresponding bulb counter-clock-
wise, applying slight pressure, and remove it
from the bulb holder.
XInsert the new bulb into the bulb holder and,
applying slight pressure, turn it clockwise
until it engages.
XInstall lens;.
XReplace and tighten screws :.
XAMG vehicles:secure the protection grille
(Ypage 95).
Backup lamp/rear fog lamp
!Do not fasten the screws too tightly. You
could otherwise damage the lens.
Example: rear fog lamp
XSwitch off the lights.
XUnscrew screws ;.
XRemove lens:.
XTurn bulb=counter-clockwise, applying
slight pressure, and remove it from the bulb
holder.
XInsert the new bulb into the bulb holder and,
applying slight pressure, turn it clockwise
until it engages.
XInstall lens :.
XReplace and tighten screws ;.
Windshield wipers
Switching the windshield wipers
on/off
!
Do not operate the windshield wipers when
the windshield is dry, as this could damage
the wiper blades. Moreover, dust that has col-
lected on the windshield/rear window can
scratch the glass if wiping takes place when
the windshield/rear window is dry.
If it is necessary to switch on the windshield
wipers in dry weather conditions, always use
washer fluid when operating the windshield
wipers.
!If the windshield wipers leave smears on the
windshield/rear window after the vehicle has
been washed in an automatic car wash, this
may be due to wax or other residue. Clean the
windshield/rear window with washer fluid
after an automatic car wash.
!Intermittent wiping with rain sensor: due to
optical influences and the windshield becom-
ing dirty in dry weather conditions, the wind-
shield wipers may be activated inadvertently.
This could then damage the windshield wiper
blades or scratch the windshield.
For this reason, you should always switch off
the windshield wipers in dry weather.
96Windshield wipers
Lights and windshield wipers
Page 113 of 302
Useful information
i
This Operator's Manual describes all models
and all standard and optional equipment of
your vehicle available at the time of publica-
tion of the Operator's Manual. Country-spe-
cific differences are possible. Please note
that your vehicle may not be equipped with all
features described. This also applies to
safety-related systems and functions.
iRead the information on qualified specialist
workshops: (Ypage 23).
Notes on breaking-in a new vehicle
Important safety notes
New and replaced brake pads and discs only
reach their optimum braking effect after several
hundred kilometers of driving. Compensate for
this by applying greater force to the brake pedal.
The first 1000 miles (1500 km)
The more you look after the engine when it is
new, the more satisfied you will be with its per-
formance in the future.
RYou should therefore drive at varying vehicle
and engine speeds for the first 1,000 miles
(1,500 km).
RAvoid heavy loads, e.g. driving at full throttle, during this period.
RChange gear in good time, before the tach-
ometer needle is Ôof the way to the red area
of the tachometer.
RDo not manually shift to a lower gear to brake
the vehicle.
RTry to avoid depressing the accelerator pedal
beyond the point of resistance (kickdown).
ROnly select shift ranges 3,2or 1when driving
slowly, e.g. in mountainous terrain.
After 1,000 miles (1,500 km), you can increase
the engine speed gradually and bring the vehicle
to full speed.
Additional breaking-in notes for AMG vehicles:
RDo not drive faster than 85 mph (140 km/ h)
for the first 1,000 miles (1,500 km).
ROnly allow the engine to reach a maximum
engine speed of 4,500 rpm briefly.
RChange gear in good time.
RAvoid driving off-road before the differential
oil change at 2,000 miles (3,000 km).
RIdeally, for the first 1,000 miles (1,500 km),
drive in program C.
iYou should also observe these breaking-in
notes if the engine or parts of the drive train
on your vehicle have been replaced.
iAlways observe the respective speed limits.
AMG vehicles with self-locking rear
axle differential
Change the oil after a breaking-in period of
2,000 mile s(3,000 km) to improve protection of
the differential. This oil change prolongs the ser-
vice life of the differential. Have the oil change
carried out at a qualified specialist workshop.
Mercedes-Benz recommends that you use an
authorized Mercedes-Benz Center for this pur-
pose.
Driving
Important safety notes
GWARNING
Objects in the driver's footwell can restrict the pedal travel or obstruct a depressed pedal.
The operating and road safety of the vehicle is
jeopardized. There is a risk of an accident.
Make sure that all objects in the vehicle are
stowed correctly, and that they cannot enter
the driver's footwell. Install the floormats
securely and as specified in order to ensure
sufficient clearance for the pedals. Do not use
loose floormats and do not place floormats on
top of one another.
GWARNING
Unsuitable footwear can hinder correct usage of the pedals, e.g.:
Rshoes with thick soles
Rshoes with high heels
Rslippers
There is a risk of an accident.
Driving111
Driving and parking
Z
Page 116 of 302
verter to reach its operating temperature
more quickly.
Hill start assist
GWARNING
After a short time, hill start assist will no lon-
ger brake your vehicle and it could roll away.
There is a risk of an accident and injury.
Therefore, quickly move your foot from the
brake pedal to the accelerator pedal. Never
leave the vehicle when it is held by hill start
assist.
Hill start assist helps you when pulling away for-
wards or in reverse on an uphill gradient. It holds
the vehicle for a short time after you have
removed your foot from the brake pedal. This
gives you enough time to move your foot from
the brake pedal to the accelerator pedal and to
depress it before the vehicle begins to roll.
XTake your foot off the brake pedal.
iOnce you have taken your foot off the brake
pedal, the vehicle is held for around one sec-
ond.
XPull away.
Hill start assist will not function if:
Ryou are pulling away on a level road or on a
downhill gradient.
Rthe transmission is in position N.
Rthe parking brake is applied.
RESP®is malfunctioning.
ECO start/stop function
Important safety notes
GWARNING
If the engine is switched off automatically and
you exit the vehicle, the engine is restarted
automatically. The vehicle may begin moving.
There is a risk of accident and injury.
If you wish to exit the vehicle, always turn off
the ignition and secure the vehicle against
rolling away.
General notes
The ECO start/stop function switches the
engine off automatically when the vehicle stops
moving.
The engine starts automatically when the driver
wants to pull away again. The ECO start/stop
function thereby helps you to reduce the fuel
consumption and emissions of your vehicle.
The ECO start/stop function is activated each
time the engine is switched on.
The ECO start/stop function is only available in
drive program C/E.
The system is operational if all conditions for
automatic engine switch-off have been fulfilled
(
Ypage 115) and the èsymbol is shown in
green in the multifunction display.
In addition, the Stop/Start active
message
is shown in the AMG menu in the multifunction
display.
If not all conditions for automatic engine switch-
off are fulfilled (
Ypage 115), the èECO
symbol is shown in yellow in the multifunction
display.
In addition, the Stop/Start inactive
mes-
sage is shown in the AMG menu in the multi-
function display.
If the ECO start/stop function has been man-
ually deactivated (
Ypage 114) or a malfunction
has caused the system to be deactivated, the
è ECO symbol is not displayed.
The Stop/Start active
orStop/Startinactivemessage in the AMG menu in the
multifunction display goes out.
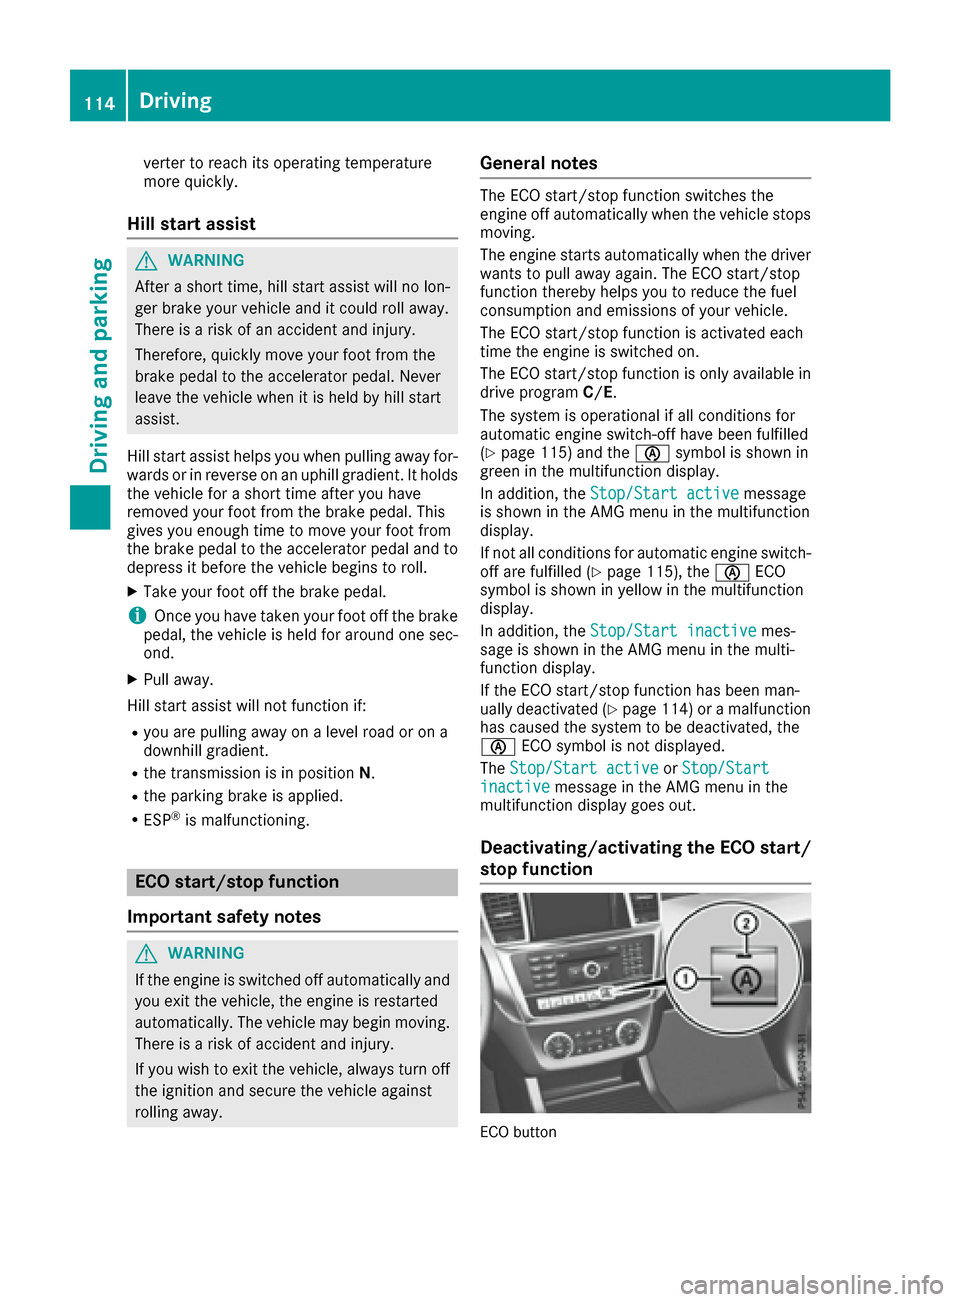
Deactivating/activating the ECO start/
stop function
ECO button
114Driving
Driving and parking
Page 123 of 302
XIf the parking brake is applied, release it.
XSwitch off the ignition and leave the SmartKey
in the ignition lock.
Shifting to transmission position D
XWhen the vehicle is stationary, depress the
brake pedal and keep it depressed.
XPush the selector lever back past the first
point of resistance.
Transmission positionDis engaged.
iIf the vehicle is braked to a standstill when in
transmission position D(Ypage 114) and the
brake pedal continues to be depressed, the
ECO start/stop function switches the engine
off automatically.
Transmission positions
BPark position
Do not shift the transmission into
position P(
Ypage 119) unless the
vehicle is stationary. The parking lock should not be used as a brake when
parking. In addition to engaging the
parking lock, you must always apply
the parking brake to secure the vehi-
cle.
iThe SmartKey can only be
removed if the transmission is in
position P. When there is no
SmartKey in the ignition lock, the
selector lever is locked in position P.
CReverse gear
Only shift the transmission to Rwhen
the vehicle is stationary.
ANeutral
No power is transmitted from the
engine to the drive wheels.
Releasing the brakes will allow you to
move the vehicle freely, e.g. to push
it or tow it.
Do not shift the transmission to N
while driving. Otherwise, the auto-
matic transmission could be dam-
aged.
If ESP
®is deactivated or faulty: only
shift the transmission to position Nif
the vehicle is in danger of skidding,
e.g. on icy roads.
If you want to engage the transfer
case, shift briefly into N
(
Ypage 162).
!Rolling in neutral Ncan damage
the drive train.
7Drive
The automatic transmission changes
gear automatically. All forward gears
are available.
Changing gear
The automatic transmission shifts to the indi-
vidual gears automatically when it is in trans-
mission position D. This automatic gearshifting
behavior is determined by:
Ra shift range restriction, if selected
Rthe position of the transfer case ( HIGH
RANGE orLOW RANGE )
Rthe position of the accelerator pedal
Rthe road speed
Driving tips
Accelerator pedal position
Your style of driving influences how the auto-
matic transmission shifts gear:
Rlittle throttle: early upshifts
Rmore throttle: late upshifts
Automatic transmission121
Driving and parking
Z
Page 126 of 302
Driving situations
=You can use theengine's braking
effec t
5The braking effec tof th eengin ecan
be utilized on downhill gradients or
when driving:
Ron steep mountai nroads
Rin mountainous terrain
Rin arduous condition s
4The braking effectof th eengin ecan
be utilized on extremely steep down -
hill gradients and lon gdownhill
stretches.
Restricting the shift range
XPull th eleft-han dsteering whee lpaddl e
shifter (Ypage 123).
The automatic transmission shift sdown on e
gear and restrict sth eshift range to th erele-
van tgear .
iIf theengin eexceeds th emaximum engin e
speed when shifting down ,th eautomatic
transmission protect sagainst engin edamag e
by no tshifting down .
iIf themaximum engin espeed for th eshift
range is reached and you continu eto accel-
erate, th eautomatic transmission shift sup in
order to preven tth eengin efrom overrevving ,
eve nif th eshift range is restricted.
Derestri cting the shift range
XPull th eright-hand steering whee lpaddl e
shifter (Ypage 123).
The automatic transmission shift sup on e
gear and restrict sth eshift range to th erele-
van tgear .
Clearing the shift range restriction
XPull and hold th eright-hand steering whee l
paddl eshifter (Ypage 123) until Dis shown
again in th emultifunction display.
The automatic transmission shift sfrom th e
curren tshift range directl yto D.
Selecting the ideal shift range
XPull th eleft-han dsteering whee lpaddl e
shifter (Ypage 123) and hold it in position .
The automatic transmission shift sto th egear
whic hallows optimum acceleration and
deceleration .To do this, th eautomatic trans -
mission shift sdown on eor mor egears.
iThe automatic transmission canno tshift
down beyon dsecon dgear .To shift to first
gear ,you hav eto pull th elef tsteering whee l
paddl eshifter.
Manual gear shifting
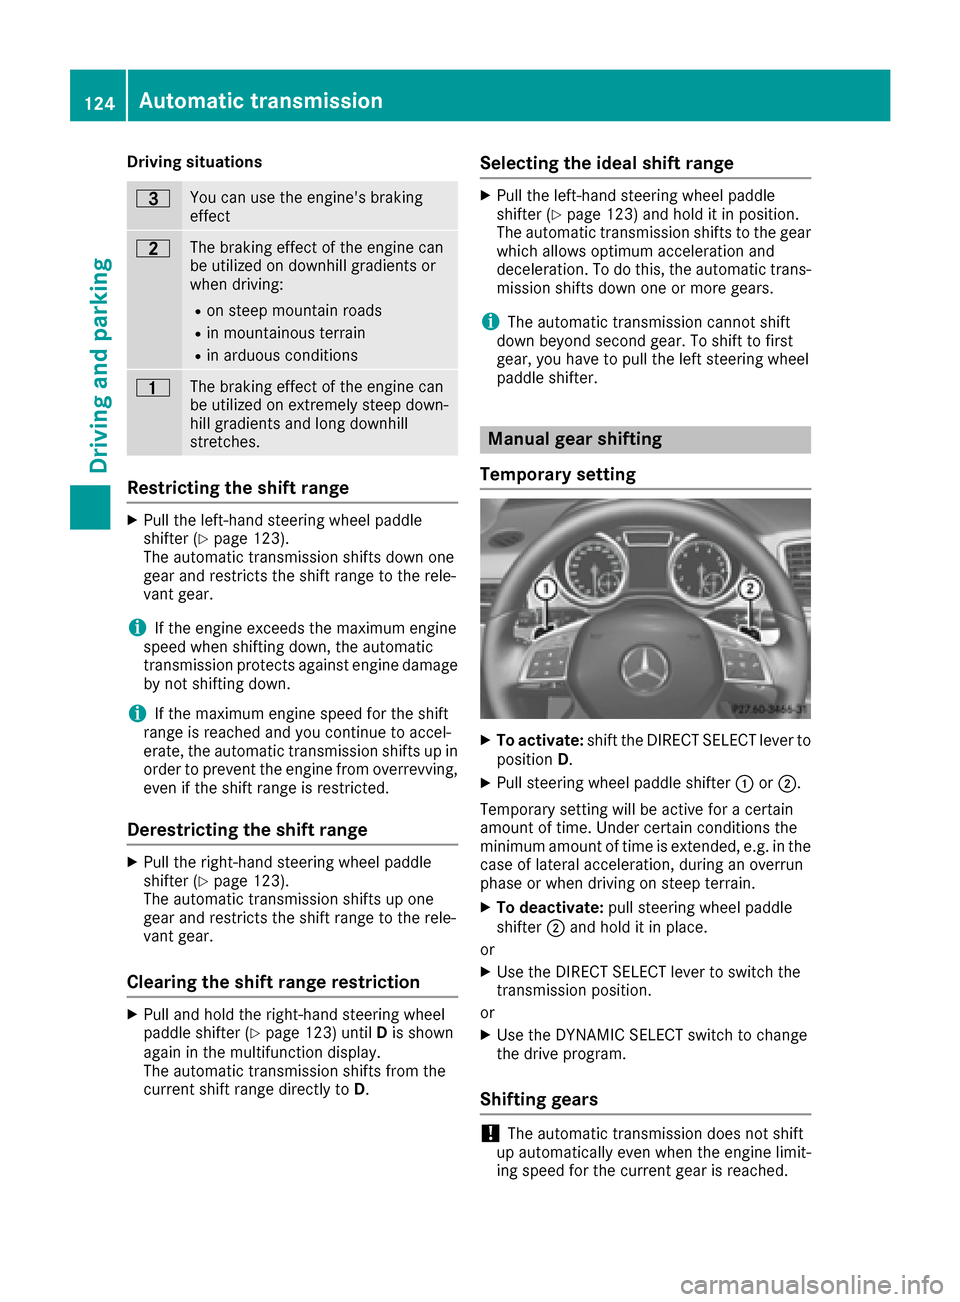
Temporary setting
XTo activate: shift theDIRECT SELECT lever to
position D.
XPull steering whee lpaddl eshifter :or;.
Temporary setting will be active for acertain
amount of time. Under certain condition sth e
minimum amount of time is extended, e.g. in th e
cas eof lateral acceleration ,during an overrun
phas eor when drivin gon steep terrain .
XTo deactivate:pull steering whee lpaddl e
shifter ;and hold it in place.
or
XUse th eDIRECT SELECT lever to switch th e
transmission position .
or
XUse th eDYNAMIC SELECT switch to chang e
th edrive program.
Shifting gears
!The automatic transmission does no tshift
up automatically eve nwhen th eengin elimit-
ing speed for th ecurren tgear is reached.
124Automatic transmission
Driving an d parking