2016 MERCEDES-BENZ G-Class height
[x] Cancel search: heightPage 80 of 302

Steering wheel
Important safety notes
GWARNING
You could lose control of your vehicle if you do the following while driving:
Radjust the driver's seat, head restraint,
steering wheel or mirrors
Rfasten the seat belt
There is a risk of an accident.
Adjust the driver's seat, head restraint, steer-
ing wheel and mirror and fasten your seat belt before starting the engine.
GWARNING
Children could injure themselves if they
adjust the steering wheel. There is a risk of
injury.
When leaving the vehicle, always take the
SmartKey with you and lock the vehicle. Never
leave children unsupervised in the vehicle.
The electrically adjustable steering wheel can
still be adjusted when there is no SmartKey in
the ignition lock.
Adjusting the steering wheel
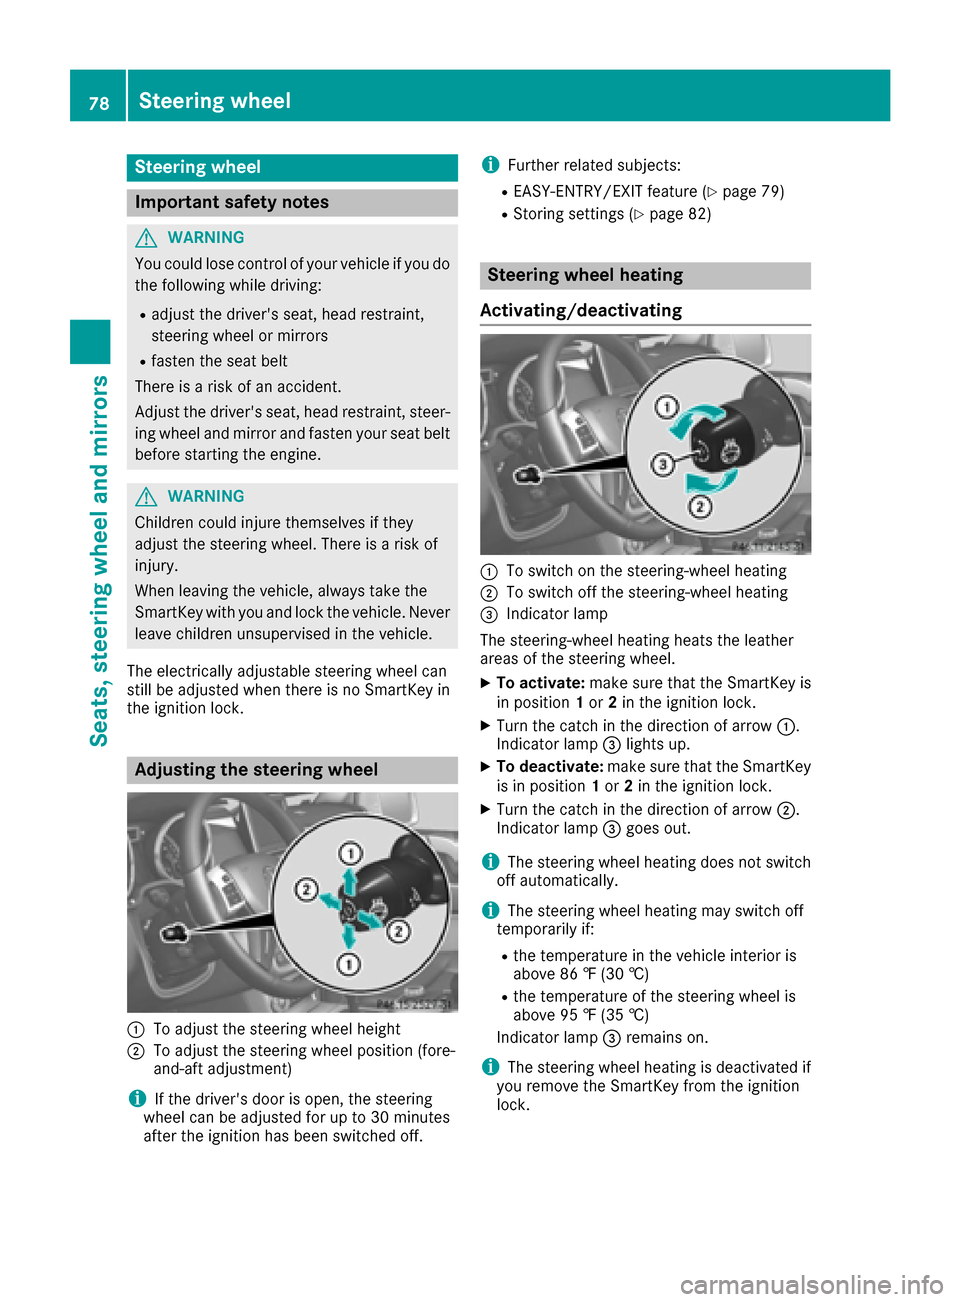
:To adjust the steering wheel height
;To adjust the steering wheel position (fore-
and-aft adjustment)
iIf the driver's door is open, the steering
wheel can be adjusted for up to 30 minutes
after the ignition has been switched off.
iFurther related subjects:
REASY-ENTRY/EXIT feature (Ypage 79)
RStoring settings (Ypage 82)
Steering wheel heating
Activating/deactivating
:To switch on the steering-wheel heating
;To switch off the steering-wheel heating
=Indicator lamp
The steering-wheel heating heats the leather
areas of the steering wheel.
XTo activate: make sure that the SmartKey is
in position 1or 2in the ignition lock.
XTurn the catch in the direction of arrow :.
Indicator lamp =lights up.
XTo deactivate: make sure that the SmartKey
is in position 1or 2in the ignition lock.
XTurn the catch in the direction of arrow ;.
Indicator lamp =goes out.
iThe steering wheel heating does not switch
off automatically.
iThe steering wheel heating may switch off
temporarily if:
Rthe temperature in the vehicle interior is
above 86 ‡ (30 †)
Rthe temperature of the steering wheel is
above 95 ‡ (35 †)
Indicator lamp =remains on.
iThe steering wheel heating is deactivated if
you remove the SmartKey from the ignition
lock.
78Steering wheel
Seats, steering wheel and mirrors
Page 170 of 302

The maximum noseweight of the trailer drawbar
on the ball coupling for up to 3 people is 562 lbs
(255 kg). The maximum permissible trailer draw-bar noseweight for more than 3 persons and the
maximum load in the trunk can be found in the
trailer drawbar noseweight table (
Ypage 298).
However, the actual noseweight must not
exceed the value given on the trailer tow hitch or trailer identification plates. The lowest weight
applies.
Please note that when towing a trailer,
PARKTRONIC (
Ypage 158) and Blind Spot
Assist (Ypage 154) are only available with lim-
itations, or not at all.
iOn vehicles without level control, the height
of the ball coupling will alter according to the
load placed on the vehicle. If necessary, use a
trailer with a height-adjustable drawbar.
Driving tips
XOn long and steep downhill gradients, select
shift range 1,2or 3(Ypage 123) in good
time.
iThis also applies if you have activated cruise
control or SPEEDTRONIC.
XIf necessary, shift the transfer case to LOW
RANGE (Ypage 162).
This will use the braking effect of the engine,
so that less braking will be required to main-
tain the speed. This relieves the load on the
brake system and prevents the brakes from
overheating and wearing too quickly. If you
need additional braking, depress the brake
pedal repeatedly rather than continuously.
The maximum permissible speed for vehicle/
trailer combinations depends on the type of
trailer. Before beginning the journey, check the
trailer's documents to see what the maximum
permissible speed is. Observe the legally pre-
scribed maximum speed in the relevant country.
For certain Mercedes-Benz vehicles, the maxi-
mum permissible rear axle load is increased
when towing a trailer. Refer to the "Technical
data" section to find out whether this applies to
your vehicle. If you utilize any of the added max- imum rear axle load when towing a trailer, the
vehicle/trailer combination may not exceed a
maximum speed of 60 mph (100 km/h) for rea-
sons concerning the operating permit. This also applies in countries in which the permissible
maximum speed for vehicle/trailer combina-
tions is above 60 mph (100 km/h). When towing a trailer, your vehicle's handling
characteristics will be different in comparison to
when driving without a trailer and it will con-
sume more fuel.
On long and steep downhill gradients, you must
select shift range
1,2or 3in good time.
iThis also applies if you have activated cruise
control or DISTRONIC PLUS.
This will use the braking effect of the engine, so
that less braking will be required to maintain the
speed. This relieves the load on the brake sys-
tem and prevents the brakes from overheating
and wearing too quickly. If you need additional
braking, depre ss the bra
ke pedal repeatedly
rather than continuously.
Driving tips
If the trailer swings from side to side:
XDo not accelerate.
XDo not counter-steer.
XBrake if necessary.
RMaintain a greater distance from the vehicle
in front than when driving without a trailer.
RAvoid braking abruptly. If possible, brake gen- tly at first to allow the trailer to run on. Then,
increase the braking force rapidly.
RThe values given for gradient-climbing capa-
bilities from a standstill refer to sea level.
When driving in mountainous areas, note that
the power output of the engine and, conse-
quently, the vehicle's gradient-climbing capa-
bility, decreases with increasing altitude.
Trailer power supply
!
You can connect accessories with a maxi-
mum power consumption of 180 W to the
permanent power supply.
You must not charge a trailer battery using the
power supply.
The trailer socket of your vehicle is equipped at
the factory with a permanent power supply.
The permanent power supply is supplied via
trailer socket pin 9.
A qualified specialist workshop can provide
more information about installing the trailer
electrics.
168Towing a trailer
Driving and parking
Page 238 of 302

Opening the hood
The release lever on the hood is in the footwell
on the left-hand side of the vehicle when viewed
in the direction of travel.
XMake sure that the windshield wipers are
switched off.
XPull release lever:on the hood.
The hood is released.
XLift the hood slightly.
XPush the handle of hood catch ;in the direc-
tion of the arrow and lift the hood.
Closing the hood
GWARNING
If the hood is unlatched, it may open up when the vehicle is in motion and block your view.
There is a risk of an accident.
Never unlatch the hood while driving. Before
every trip, ensure that the hood is locked.
XLower the hood and let it fall from a height of
approximately 8 inches (20 cm).
XCheck that the hood has engaged properly.
If the hood can be raised slightly, it is not
properly engaged. Open it again and close it
with a little more force.
Engine oil
General notes
Depending on your driving style, the vehicle
consumes up to 0.9 US qt (0.8 liters) of oil per
600 miles (1000 km). The oil consumption may
be higher than this when the vehicle is new or if
you frequently drive at high engine speeds.
Checking the oil level using the oil dip-
stick
GWARNING
Certain components in the engine compart-
ment, such as the engine, radiator and parts
of the exhaust system, can become very hot.
Working in the engine compartment poses a
risk of injury.
Where possible, let the engine cool down and touch only the components described in the
following.
Example: oil dipstick
On the G 63 AMG, the oil level can be checked
using the oil dipstick.
236Engine compartment
Maintenance and care
Page 278 of 302

DLoad identification (Ypage 277)
ETire name
The markings described above are on the tire in
addition to the tire name (sales designation) and
the manufacturer's name.
iTire data is vehicle-specific and may deviate
from the data in the example.
Tire size designation, load-bearing
capacity and speed rating
GWARNING
Exceeding the stated tire load-bearing capa-
city and the approved maximum speed could
lead to tire damage or the tire bursting. There is a risk of accident.
Therefore, only use tire types and sizes
approved for your vehicle model. Observe the
tire load rating and speed rating required for
your vehicle.
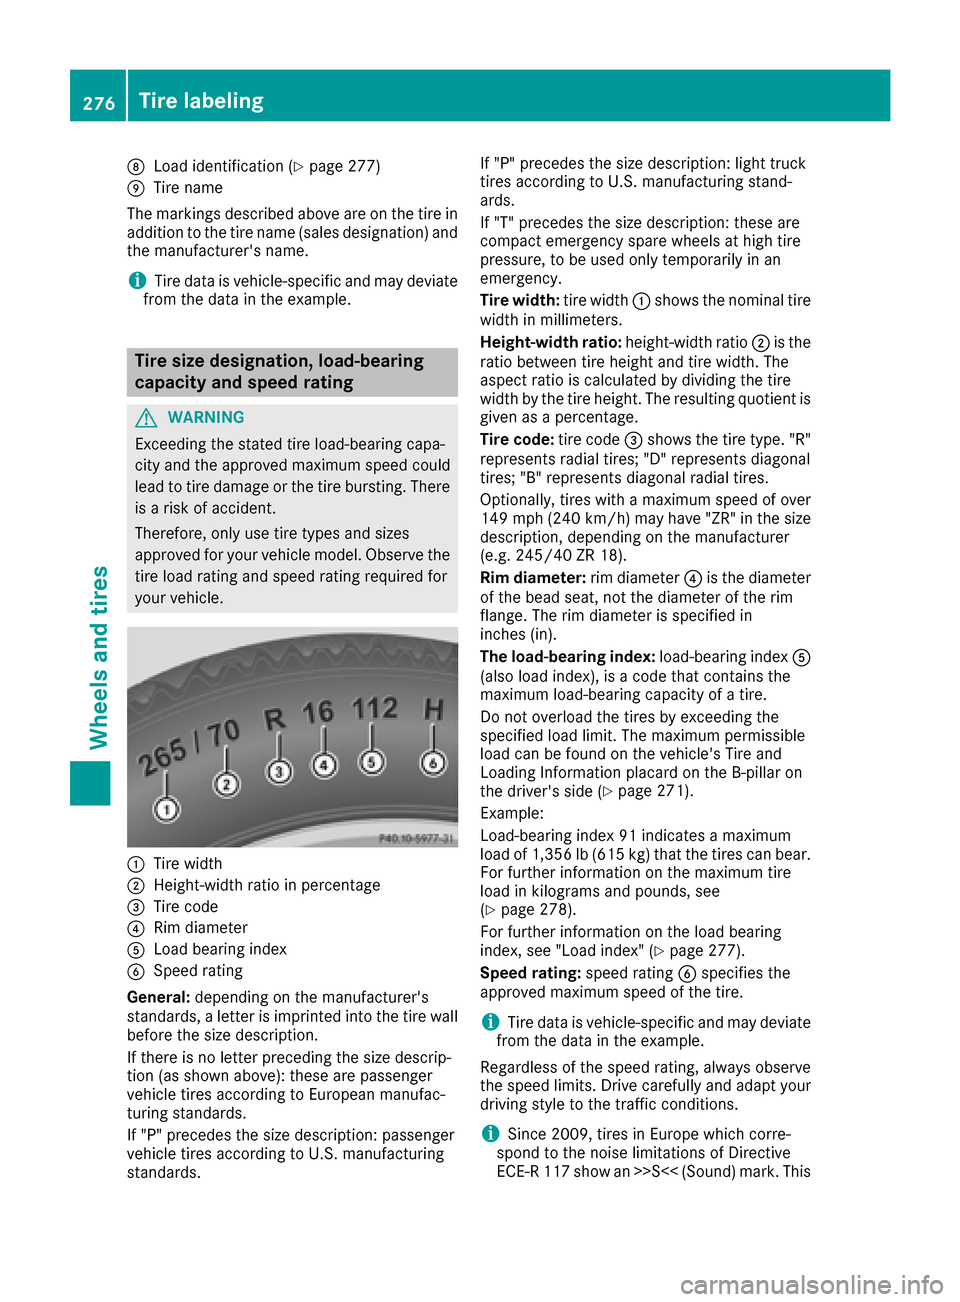
:Tire width
;Height-width ratio in percentage
=Tire code
?Rim diameter
ALoad bearing index
BSpeed rating
General: depending on the manufacturer's
standards, a letter is imprinted into the tire wall before the size description.
If there is no letter preceding the size descrip-
tion (as shown above): these are passenger
vehicle tires according to European manufac-
turing standards.
If "P" precedes the size description: passenger
vehicle tires according to U.S. manufacturing
standards. If "P" precedes the size description: light truck
tires according to U.S. manufacturing stand-
ards.
If "T" precedes the size description: these are
compact emergency spare wheels at high tire
pressure, to be used only temporarily in an
emergency.
Tire width:
tire width:shows the nominal tire
width in millimeters.
Height-width ratio: height-width ratio;is the
ratio between tire height and tire width. The
aspect ratio is calculated by dividing the tire
width by the tire height. The resulting quotient is
given as a percentage.
Tire code: tire code=shows the tire type. "R"
represents radial tires; "D" represents diagonal
tires; "B" represents diagonal radial tires.
Optionally, tires with a maximum speed of over
149 mph (240 km/h) may have "ZR" in the size
description, depending on the manufacturer
(e.g. 245/40 ZR 18).
Rim diameter: rim diameter?is the diameter
of the bead seat, not the diameter of the rim
flange. The rim diameter is specified in
inches (in).
The load-bearing index: load-bearing indexA
(also load index), is a code that contains the
maximum load-bearing capacity of a tire.
Do not overload the tires by exceeding the
specified load limit. The maximum permissible
load can be found on the vehicle's Tire and
Loading Information placard on the B-pillar on
the driver's side (
Ypage 271).
Example:
Load-bearing index 91 indicates a maximum
load of 1,356 lb (615 kg) that the tires can bear.
For further information on the maximum tire
load in kilograms and pounds, see
(
Ypage 278).
For further information on the load bearing
index, see "Load index" (
Ypage 277).
Speed rating: speed ratingBspecifies the
approved maximum speed of the tire.
iTire data is vehicle-specific and may deviate
from the data in the example.
Regardless of the speed rating, always observe
the speed limits. Drive carefully and adapt your
driving style to the traffic conditions.
iSince 2009, tires in Europe which corre-
spond to the noise limitations of Directive
ECE-R 117 show an >>S<< (Sound) mark. This
276Tire labeling
Wheels and tires
Page 282 of 302

the drawbar noseweight, if applicable. The gross
vehicle weight must not exceed the gross vehi-
cle weight rating GVWR as specified on the vehi-
cle identification plate on the B-pillar on the
driver's side.
GVWR (Gross Vehicle Weight Rating)
The GVWR is the maximum permissible gross
weight of a fully loaded vehicle (the weight of thevehicle including all accessories, occupants,
fuel, luggage and the drawbar noseweight, if
applicable). The gross vehicle weight rating is
specified on the vehicle identification plate on
the B-pillar on the driver's side.
Maximum loaded vehicle weight
The maximum weight is the sum of:
Rthe curb weight of the vehicle
Rthe weight of the accessories
Rthe load limit
Rthe weight of the factory installed optional
equipment
Kilopascal (kPa)
Metric unit for tire pressure. 6.9 kPa corre-
sponds to 1 psi. Another unit for tire pressure is
bar. 100 kilopascal s(kPa) are the equivalent of
1 bar.
Load index
In addition to the load-bearing index, the load
index may also be imprinted on the sidewall of
the tire. This specifies the load-bearing capacity
more precisely.
Curb weight
The weight of a vehicle with standard equipment
including the maximum capacity of fuel, oil and
coolant. It also includes the air-conditioning sys-
tem and optional equipment if these are instal-
led in the vehicle, but does not include passen-
gers or luggage.
Maximum load rating
The maximum load rating is the maximum per-
missible weight in kilograms or lbs for which a
tire is approved.
Maximum permissible tire pressure
Maximum permissible tire pressure for one tire.
Maximum load on one tire
Maximum load on one tire. This is calculated by
dividing the maximum axle load of one axle by
two.
PSI (pounds per square inch)
A standard unit of measure for tire pressure.
Aspect ratio
Relationship between tire height and tire width
in percent.
Tire pressure
This is pressure inside the tire applying an out-
ward force to each square inch of the tire's sur-
face. The tire pressure is specified in pounds per
square inch (psi), in kilopascals (kPa) or in bar.
The tire pressure should only be corrected when
the tires are cold.
Cold tire pressure
The tires are cold:
Rif the vehicle has been parked without direct
sunlight on the tires for at least three hours
and
Rif the vehicle has not been driven further than
1 mile (1.6 km)
Tread
The part of the tire that comes into contact with
the road.
Bead
The tire bead ensures that the tire sits securely
on the wheel. There are several steel wires in the
bead to prevent the tire from coming loose from
the wheel rim.
Sidewall
The part of the tire between the tread and the
bead.
280Tire labeling
Wheels and tires
Page 285 of 302

be able to achieve its load-bearing capacity
due to the restricted height.
RMake sure that the distance between the
underside of the tires and the ground does not
exceed 1.2 in (3 cm).
RDo not place your hands or feet under the
raised vehicle.
RDo not lie under the vehicle.
RDo not start the engine when the vehicle is
raised.
RDo not open or close a door when the vehicleis raised.
RMake sure that no persons are present in the
vehicle when the vehicle is raised.
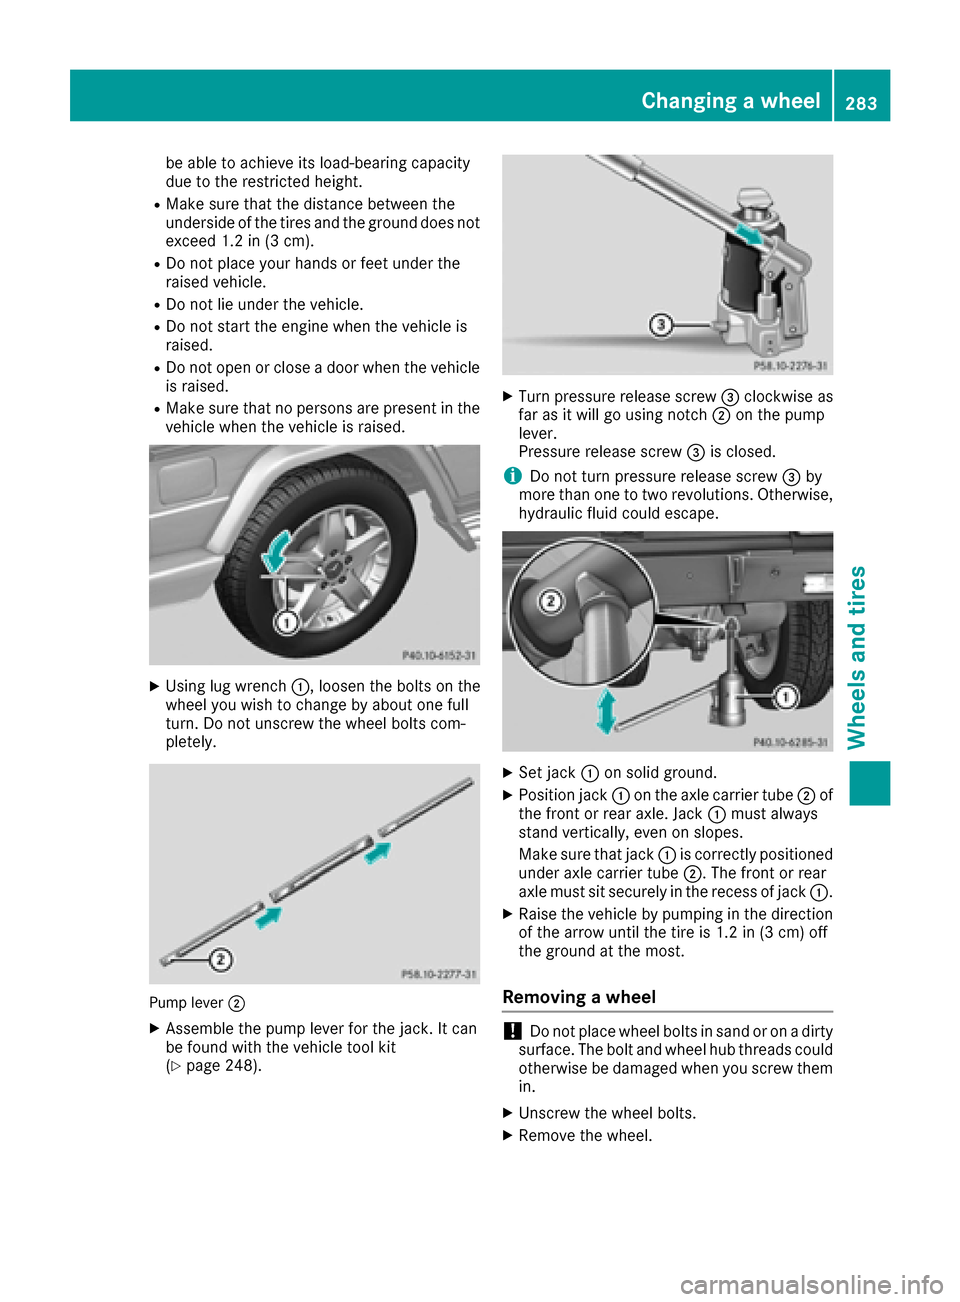
XUsing lug wrench :, loosen the bolts on the
wheel you wish to change by about one full
turn. Do not unscrew the wheel bolts com-
pletely.
Pump lever ;
XAssemble the pump lever for the jack. It can
be found with the vehicle tool kit
(
Ypage 248).
XTurn pressure release screw =clockwise as
far as it will go using notch ;on the pump
lever.
Pressure release screw =is closed.
iDo not turn pressure release screw =by
more than one to two revolutions. Otherwise,
hydraulic fluid could escape.
XSet jack :on solid ground.
XPosition jack :on the axle carrier tube ;of
the front or rear axle. Jack :must always
stand vertically, even on slopes.
Make sure that jack :is correctly positioned
under axle carrier tube ;. The front or rear
axle must sit securely in the recess of jack :.
XRaise the vehicle by pumping in the direction
of the arrow until the tire is 1.2 in (3 cm) off
the ground at the most.
Removing a wheel
!Do not place wheel bolts in sand or on a dirty
surface. The bolt and wheel hub threads could
otherwise be damaged when you screw them
in.
XUnscrew the wheel bolts.
XRemove the wheel.
Changing a wheel283
Wheels and tires
Z
Page 297 of 302

Capacity
ModelCapacity
G 550Approx. 11.1 US qt
(10.5 l)
G 63 AMGApprox. 14.6 US qt
(13.8 l)
Low-temperature cir-
cuit: approximately
3.1 US qt (2.9 l)
iUse MB 325.0 or MB 326.0 antifreeze/
corrosion inhibitor.
Windshield/headlamp cleaning sys-
tem
Important safety notes
GWARNING
Windshield washer concentrate could ignite if it comes into contact with hot engine compo-
nents or the exhaust system. There is a risk of
fire and injury.
Make sure that no windshield washer con-
centrate is spilled next to the filler neck.
!Do not add distilled or de-ionized water to
the washer fluid container. Otherwise, the
level sensor may be damaged.
!Only MB SummerFit and MB WinterFit
washer fluid should be mixed together. The
spray nozzles may otherwise become
blocked.
At temperatures above freezing:
XFill the washer fluid reservoir with a mixture of
water and windshield washer fluid, e.g. MB
SummerFit.
XAdd 1 part MB SummerFit to 100 parts water.
At temperatures below freezing:
XFill the washer fluid reservoir with a mixture of
water and washer fluid, e.g. MB WinterFit.
For the correct mixing ratio refer to the infor-
mation on the antifreeze reservoir.
iAdd washer fluid concentrate, e.g. MB Sum-
merFit or MB WinterFit, to the washer fluid all
year round.
Vehicle data
General notes
Please note that for the specified vehicle data:
Rthe heights specified may vary as a result of:
-tires
-load
-condition of the suspension
-optional equipment
Rthe vehicle length specified includes the front
license plate adapter.
Dimensions and weights
G 550G 63 AMG
: Upper-edge
clearance75 in -
78.9 in
(1905 mm -
2005 mm )74.5 in-
78.4 in
(1892 mm -
1992 mm )
;Lower-edge
clearance26.8 in - 30.7 in
(680 mm - 780 mm)26.3 in -30.2 in
(667 mm - 767 mm)
= Range of
movement36.7 in
(931 mm)36.7 in
(931 mm)
Vehicle data295
Technical data
Z
Page 298 of 302

G 550
Vehicle length187.6 in
(4764 mm)
Vehicle width including
exterior mirrors80.9 in
(2056 mm)
Vehicle height76.9 in
(1954 mm)
Vehicle height (sports sus-
pension)75.9 in
(1928 mm)
Wheelbase112.2 in
(2850 mm)
Minimum ground clear-
ance7.6 in
(193 mm)
Turning radius44.6 ft
(13.60 m)
Gross vehicle weight rat-
ing (GVWR)7054.8 lb
(3200 kg)
Gross axle weight rating
(GAWR), front3196.7 lb
(1450 kg)
Gross axle weight rating
(GAWR), rear4188.8 lb
(1900 kg)
G 63 AMG
Vehicle length187.8 in
(4769 mm)
Vehicle width including
exterior mirrors80.9 in
(2056 mm)
Vehicle height76.3 in
(1938 mm)
Wheelbase112.2 in
(2850 mm)
Minimum ground clear-
ance7.7 in
(196 mm)
Turning radius44.6 ft
(13.60 m)
Gross vehicle weight rat-
ing (GVWR)7054.8 lb
(3200 kg)
Gross axle weight rating
(GAWR), front3417.1 lb
(1550 kg)
Gross axle weight rating
(GAWR), rear4122.6 lb
(1870 kg)
iGVWR is the maximum permissible gross
weight of the vehicle. Gross vehicle weight
(GVW) is the vehicle weight including fuel,
service products, spare wheel, accessories
installed, load and, if applicable, trailer draw-
bar load. The GVW must never exceed the
GVWR.
iThe GAWR is the maximum permissible axle
weight.
Vehicle data for off-road driving
Fording depth
!
The depth of water must not exceed the
value specified in the table. Note that the
possible fording depth is less in flowing water.
The table shows fording depth :when loaded
and ready to drive.
Fording depth24 in (60 cm)
For more information about off-road fording, see
(Ypage 135).
Approach/departure angle
GWARNING
If you drive on a steep incline at an angle or
turn when driving on an incline, the vehicle
could slip sideways, tip and rollover. There is a risk of an accident.
Always drive on a steep incline in the line of
fall (straight up or down) and do not turn the
vehicle.
296Vehicle data for off-road driving
Technical data